When Rachel sent us her recently DIYed kitchen makeover we had to share the goods. Here’s her letter:
To say that there are touches of YHL in our newly renovated kitchen/dining room would be an understatement. I “borrowed” many of your ideas! First we removed the upper half of the wall separating the kitchen from the dining room. And after the dated wallpaper came down we painted both rooms with a 5 gallon bucket of Valspar paint to cut costs. We removed the upper kitchen cabinet doors to create an “open” look while the lower doors are original (we sanded, primed, & repainted them). We also added new hinges & hardware. Then we installed a beadboard backspash to take attention away from the original formica counters that we couldn’t yet upgrade. We also got a cast iron sink from Craigslist for $30 which included a faucet. The dining room light as well as the shelves on the wall are both YHL steals (the light is a direct CB2 light copy of the one in your dining area and the Ikea shelves are like the ones you have next to your table). All in all, our project cost was under $1000 and we did it ALL ourselves with the help of my handy carpenter dad and amazing husband. I relied heavily on your advice & before/after pictures during the renovation and I couldn’t have done it without you! Thanks for such a great site, and congrats on the little one!! There are more photos on my blog along with some pics of my two little helpers (we did this all with an almost 3 year old and an 8 month old!). – Rachel
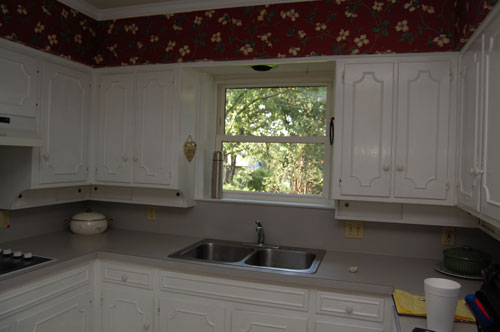
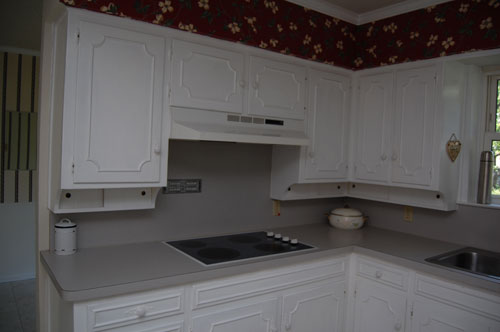
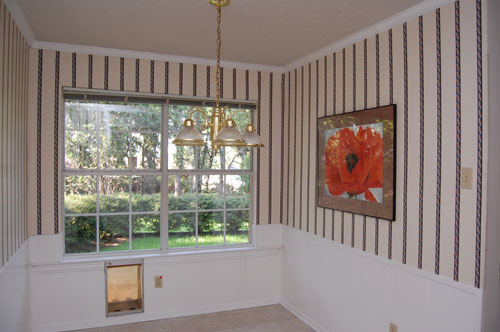
Here are the before photos of Rachel’s closed in kitchen and dining room:
And here are the after photos of her amazingly open and updated kitchen and dining area:
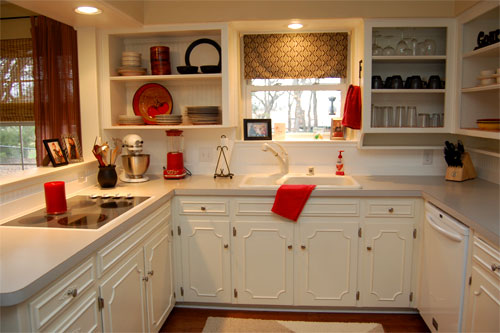
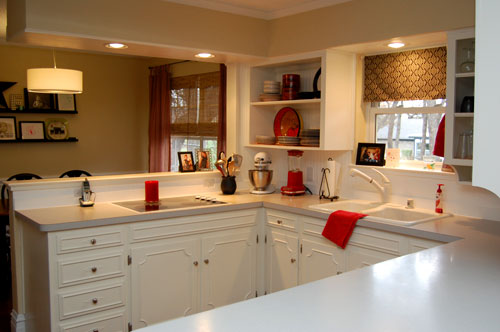
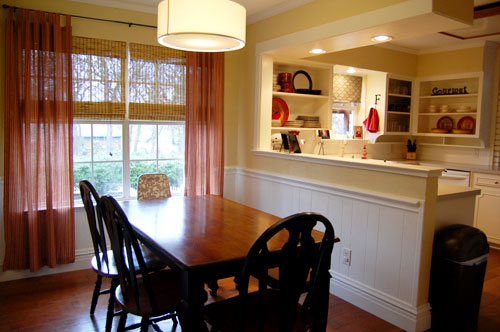
Isn’t that fantastic? We love how Rachel wasn’t afraid to knock out that wall for a much more airy and expansive feeling, and the fact that she was able to add a new backsplash, hinges, hardware, and even a new cast iron sink for under 1K is pretty amazing (thanks to budget saving methods like repainting her existing cabinets and removing the doors on the uppers). Plus we can’t forget that figure also includes the work they did in the dining area (from creating the pass through and bringing in that new pendant light to the floating shelves and the window treatments). Isn’t that a gorgeous two room makeover on the cheap? We love inspiring overhauls like this where it’s all about creativity, elbow grease, and a bit of Craigslist and Ikea deal hunting.
What do you guys think? Didn’t Rachel do an amazing job stretching her moolah and gaining an entirely new area in her home without doling out the big bucks? What’s your favorite part? We’re thinking we most adore the open feeling they created between both rooms, but all those fun red accents in the kitchen (along with those breezy red curtains in the dining room) are quite charming as well.

Shelley @ Green Eggs & Hamlet says
Holy moley, this is amazing! I love that they knocked out the wall between the kitchen and dining area and that everything is SO much brighter. Great job, Rachel!
Emily says
I LOVE this! We have a similar setup in our kitchen,except ours is only separated from the dining room with a set of cabinets, no wall. We have been planning to take down the cabinets to open it up more and this might have solidified those plans!
Jen says
This looks excellent!! It’s amazing what can be done if you are brave enough to knock out a wall (or part wall)! Thanks for sharing! I love these stories!
jbhat says
It’s truly beautiful. Love the open shelving and the view of the dining area. You must love it in there!
jbhat
Laura @ youngDCliving says
Wow, that’s such an awesome update! It’s so warm and inviting. Love how you opened up the cabinets and incorporated pops of color :)
Shereen says
Very cool!
I see a cook top, but where’s the oven?
Ruth says
Great job! Inspires me some!
Teresa says
awesome transformation! love the color scheme.
Caroline @ The Feminist Housewife says
Wow, That’s such an awesome re-do, especially considering the budget! Awesome job Rachel! (And thanks for sharing Sherry!) Hope the little one is doing well! = )
kathy t says
Your kitchen is amazing -Wow what a warm and inviting space
sarah says
Great job!!
looks wonderful!!
Tiffannie says
That is phenomenal!
Cate says
WOW–I LOVE this room! I admit, I even saved the pictures to my desktop to keep in my “decorating” folder!
And even more impressive? That you did it with a 3-year-old and an 8-month-old underfoot. Sheesh! I have a 1-year-old and can’t imagine.
Sarah says
Love it – and now I hate my kitchen even more!
kate says
AWESOME!!!! We will be doing the same in our kitchen this weekend!!! Great job!!!
crissy sanders says
Wowzers! I love the open top cabinets…makes the space look so much more modern.
Tiffany says
Wow! What a transformation for less than 1K.
joely says
wow, that is a really, really amazing makeover. they did such a great job, an inspiration!
maryann says
I love the open cabinets. Keep the doors, though, you might want to put some back up once you have kids & need to store thier bottles & sippy cups & plastic bowls. Not such a decorative look, lol.
Heather says
What a great kitchen! I’m so glad you shared this-it gives me some great input for my kitchen. We are, in the very near future, planning to do a beadboard backsplash. We too have white cabinets and ugly formica we can’t afford to upgrade yet. I LOVE how you removed the doors from your upper cabinets and placed beadboard in the back. And I never thought to look on craigslist for a sink! Love it!
Ann says
It doesn’t even look like the same place! Very nice!
Kimberly says
I was wondering what was wrong with the cabinets before the remodel but the after pictures are amazing! I love the idea of the 1/2 wall taken out. I wonder if that would work in our kitchen? We just bought a house built in the 60’s and are on a budget as well. This is truly inspirational!
Bethany says
Wow! This is truly inspiring! Thanks for sharing!
Carrie says
WOW! They did an amazing job within in a tight budget! Very impressive. I love how the kitchen went from being completely claustrophobic to open and inviting! Love it!
There is only one thing that I’m not so sure about – there’s no vent/hood above the stove top. Not trying to be a party-pooper, but I just wanted to point that out just in case they hadn’t noticed or thought about it. It will make a difference when trying to sell their house, especially if it’s not up to code. I just hate to see creativity and hard work not pay off.
k&b renovations says
I love the splashes of red in the design! The wall was begggggging to be torn down. Nice work!
Mandy Ford says
Great makeover! I love how they opened up the space between the two rooms and I’m a big fan of the open cabinets.
Catherine Kerton-Johnson says
I am a sucker for make overs. I look at each one with relish and desire. Unfortunately I can’t remake my rooms too often. I don’t think my family would appreciate it. I do like to do Kate and Aggie makeovers though – a good tidy-up and clean, and some fresh flowers and a miracle is worked!
Tiffany T. says
That is fire!
Tiffany T. says
I love how YHL shares their blog love! Before YHL in Do it Yourself Magazine, I had never read one. I have now added YHL and a few of their friends to my “must see frequently” list. I just popped over to Rachel’s blog, and read everything her little Eva says and I was laughing out loud. Thanks YHL, and thanks Rachel!!
Julie says
Oh my…amazing! I would love to hear more about where they saved $$$. I know labor is the huge part. Did they install the can lighting in the opening themselves too? We are about to do a major reno and the budget is scaring me.
I am MEGA impressed they were able to do all this with two little ones. Our youngins are our biggest hurdle. They want to ‘help’ do everything. Did you do it all after bedtime or something?
As for a hood…we don’t have one now and do fine. It would be nice to have one, but there is no place so we just deal. No codes issue in our area with that either. I have heard downdrafts are as good as nothing at all, so might want to research before you waste your money….
Jamie says
I was really skeptical about how the makeover was going to look while reading her description and looking at the before pictures..but then OMG I absolutely love the results. What a great job for a fabulous price!
Pam says
What a great transformation! Sometimes low-budget makeovers just don’t seem to look like the money and effort were worth it. This one is outstanding – it’s beautiful! I love the opened up all and the cabinet makeovers. Congratulations on a job well done.
Jessica says
I love the new look, especially the dining room light and the paint instead of wallpaper.
The one thing I would change is I would lower the curtains in the dining room so that they touch the floor. Right now, to me they look a little too short, kinda the highwater pants look.
Meghan says
I love this kind of project because it is so much more realistic. Attainable. It is just about the only kind we do. We rarely can afford the time or money to gut a room and start from scratch, replacing everything. Little things can completely change the feeling of a room.
alison (semi-fab lane) says
wow…what a transformation! i’m glad they didn’t replace the cabinets because i like them with a fresh coat of paint. opening the wall makes that space!
Karen O says
Nicely done – a low budget job that doesn’t look low budget! I’m a big fan of white kitchens and using the same wall color in both areas just keeps the space flowing. Yes, VERY nicely done!
Two thoughts to consider: One is a white trash can to blend in with the white cabinets and the other is to lower the drapery rods in the dining room so the draperies just skim the floor. (Back in my youth, I sold draperies for the local department store so I’m extra aware of the length . . . . )
Enjoy your lovely space (I know you do!) and thanks for sharing.
Leigh Anne says
I love this website! However, I don’t have an IKEA in my town and was wondering if you could tell me exactly which floating shelves were used in the dining room. This will make it much easier for me to buy the right ones online! Thanks!
YoungHouseLove says
Hey Leigh Anne,
Here’s hoping Rachel stops in with that info for you soon!
xo,
s
Emily says
I love, love, LOVE this redesign! That kitchen is totally gorgeous, and I adore the layout.
Rachel says
The wall directly opposite the sink houses our refrigerator, in wall oven, and another complete set of cabinets- with the doors on! I keep the kids’ plates, bowls, and cups, as well as tupperware, spices, and other things that aren’t “pretty.”
My handy husband hard wired the CB2 light instead of using it as a plug in, and he also installed the can lights. He’s very talented, but quite honestly, Google was our friend during this project!
As far as remodeling with kids…whew!..it is WORK!! I had great success keeping our (at the time) 8 month old happy by wearing her in a sling/wrap while I did various projects. Our 3 year old loved helping “sand” using an old worn out piece of sandpaper, or “paint” using a paint brush that was either dry or dipped in water. Mostly though, most of our days were spent planning and our nights were crammed with projects after our girls went to bed. A white noise machine is a necessity when trying to get projects done at night!
Thanks for the love, kind words, and good advice.
Rachel says
Leigh Anne- I’m having a hard time locating the exact shelves on the IKEA website. They’re the middle of 3 sizes offered, and if I remember correctly, they were $14.99 each and offered in both white and black. But, judging from pictures on the IKEA website, I’m not seeing any that look exactly like what we have. I know they still carry them, so if you’re able to make it out to an IKEA in the future, they’re in the frame section. Sorry I couldn’t be more help.
The Virginia House says
Wow!! That is one of the best remodels I’ve seen in a while. I love it because they really didn’t do THAT much but what they did do made a Huge impact! Great job!
Leigh Anne says
I certainly appreciate it – thanks Rachel!!
Kim says
Its amazing what great lighting can do! Looks fantastic :)