When Rachel sent us her recently DIYed kitchen makeover we had to share the goods. Here’s her letter:
To say that there are touches of YHL in our newly renovated kitchen/dining room would be an understatement. I “borrowed” many of your ideas! First we removed the upper half of the wall separating the kitchen from the dining room. And after the dated wallpaper came down we painted both rooms with a 5 gallon bucket of Valspar paint to cut costs. We removed the upper kitchen cabinet doors to create an “open” look while the lower doors are original (we sanded, primed, & repainted them). We also added new hinges & hardware. Then we installed a beadboard backspash to take attention away from the original formica counters that we couldn’t yet upgrade. We also got a cast iron sink from Craigslist for $30 which included a faucet. The dining room light as well as the shelves on the wall are both YHL steals (the light is a direct CB2 light copy of the one in your dining area and the Ikea shelves are like the ones you have next to your table). All in all, our project cost was under $1000 and we did it ALL ourselves with the help of my handy carpenter dad and amazing husband. I relied heavily on your advice & before/after pictures during the renovation and I couldn’t have done it without you! Thanks for such a great site, and congrats on the little one!! There are more photos on my blog along with some pics of my two little helpers (we did this all with an almost 3 year old and an 8 month old!). – Rachel
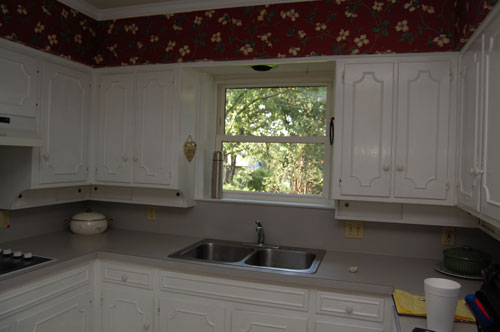
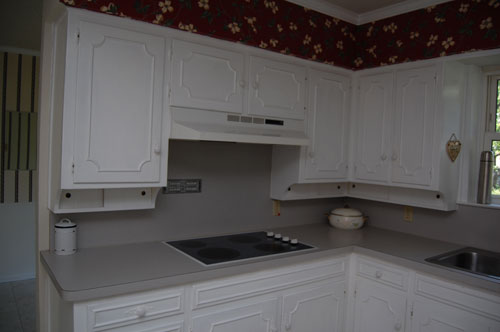
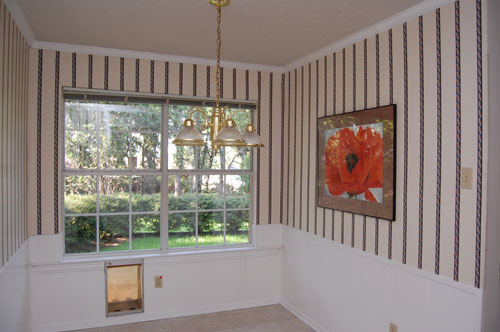
Here are the before photos of Rachel’s closed in kitchen and dining room:
And here are the after photos of her amazingly open and updated kitchen and dining area:
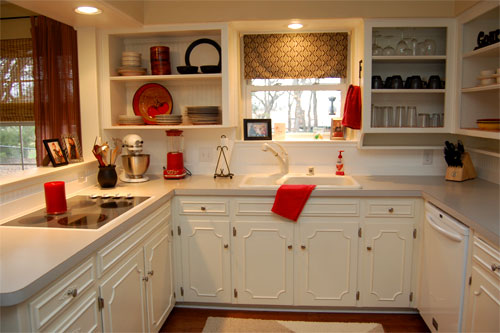
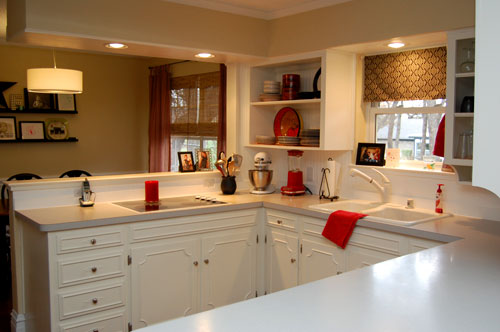
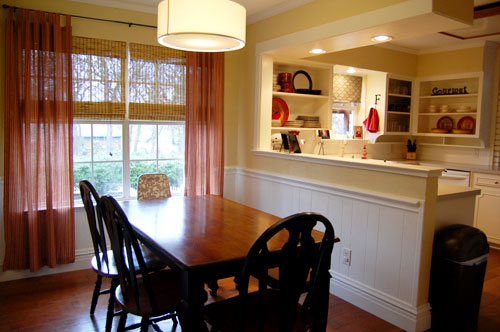
Isn’t that fantastic? We love how Rachel wasn’t afraid to knock out that wall for a much more airy and expansive feeling, and the fact that she was able to add a new backsplash, hinges, hardware, and even a new cast iron sink for under 1K is pretty amazing (thanks to budget saving methods like repainting her existing cabinets and removing the doors on the uppers). Plus we can’t forget that figure also includes the work they did in the dining area (from creating the pass through and bringing in that new pendant light to the floating shelves and the window treatments). Isn’t that a gorgeous two room makeover on the cheap? We love inspiring overhauls like this where it’s all about creativity, elbow grease, and a bit of Craigslist and Ikea deal hunting.
What do you guys think? Didn’t Rachel do an amazing job stretching her moolah and gaining an entirely new area in her home without doling out the big bucks? What’s your favorite part? We’re thinking we most adore the open feeling they created between both rooms, but all those fun red accents in the kitchen (along with those breezy red curtains in the dining room) are quite charming as well.

Laney says
Oh wow! That looks so amazing!!
:)
Great work!
Becky says
Wow – this is amazing!!! I love the whole look – especially the open cabinets! I can’t believe how different it looks for $1000. Great job!
Erika says
Wow! That looks amazing for just $1,000! My favorite part is the missing wall – so much more open. I’m also loving the new sink.
kristy says
Holy cow – that’s amazing! Nice work!
Ann Marie says
That looks so different & wonderful! Great job! I love it.
Samantha D says
Removing the upper-cabinet doors really did wonders to open up the space in addition to knocking out that wall. Great job!!
Laura B. says
What a great transformation! Would Rachel be able to post where she got those dreamy dining room curtains and blinds from? Thanks!
Cara @ Live the Home Life says
Very nice! I love the open shelves, neutral wall color and red accents.
-Cara
Sophie says
Wow! I’m speechless! This kitchen is absolutely beautiful (:
They did an amazing job.
TG says
Her kitchen is wonderful. I totally could do that to mine.I love the idea of the beadboard back splash. Her blog is blocked for me. What did she paint the beadboard with so it is washable (food splatters)? Would trim paint work well here?
YoungHouseLove says
Good question TG! Here’s hoping Rachel stops in with that info soon. Our best suggestion would be semi-gloss or high-gloss paint (we painted our just-plain-drywall backsplash with semi-gloss paint and years later it’s in mint condition- so easy to wipe down!
xo,
s
Meghan says
Rachel –
Your overhaul is amazing and beautiful. Want to come do my kitchen? :)
Stephanie says
It is beautiful and very inspiring! Congratulations!
Kayakgirl73 says
What are they doing about venting cooking fumes since there is no range hood now? Is opening the windo enough?
YoungHouseLove says
Here’s hoping Rachel drops in to answer everyone’s questions! Stay tuned…
xo,
s
Hannah @ The Nanner Republic says
Looks great!! I admire anyone brave enough to take doors off cabinets. I’m not willing/able to show off my cabinets.
It looks very bright and crisp! Love it.
{The Classy Woman} says
They did an amazing job! I love the idea of beadboard. We have formica right now and then the backsplash piece is the same pattern-ugly. LOL. Since we have enough of a lip before the backsplash, that would be an awesome solution and easy to cut. I just may have to do the same!
BTW-I did a post on bathroom inspiration and linked to both of your recent bathroom updates. I LOVE them and wanted to share them with all of my readers. Here is the link:
http://theclassywoman.blogspot.com/2010/05/my-inspiration-room-bathroom-eye-candy.html
~Karla
Tracey says
Gorgeous! I’d give my right arm for a kitchen like that. I think the countertops and the cabinets are actually pretty decent. I really like that molding (sp?) on the cabinets. It’s much nicer than a plain front with nothing.
Lindsay says
Way to go, Rachel! Very impressive! Looks amazing! That’s so much work and what a pay-off!!
xoxo,
Lindsay
Katie @ The NOC says
This looks great, Rachel – thanks for sharing YHL!
We are getting ready to re-do our kitchen, and I love the idea of leaving some cabinets doorless, and now might give it a try! Thanks for the inspiration!
Loren says
I had to scroll between the two pictures about 6 times before I’d convinced myself those were the same cabinets. Amazing how much a few coats of paint, losing some doors and half a wall can update a room. Looks amazing.
Lisa in Seattle says
My favorite part is also the removal of half the wall. I also like the recessed lighting and the beadboard. But honestly, her whole house is super cute – just checked out the blog!
Rachel, do you recall what color of paint you used to for your big brick fireplace?
Jessica @ How Sweet says
Absolutely beautiful!!
Lisa says
I love this! Makes me tempted to remove my cabinet doors, but I think it would look weird in my kitchen since I have a soffit that goes up to the ceiling.
Is a range hood always necessary? Ours just vents right back into the room, it seems pretty useless. I’m assuming it filters the air somehow, but it still doesn’t seem like it actually does much.
Katie says
I really love this! And the red accents are awesome (that is my favorite color!) I love how brave Rachel was in knocking out that wall. Rachel – did you find that you miss the cabinet space that was taken away after you knocked down the wall? It is funny because this looks JUST like my kitchen, except the dining room is not right next to the kitchen like that – although the living room is to the right of my kitchen. I don’t know if I could make some sort of pass-through with mine but I will be looking into it now!
lindsey kaye says
Love it!
You know I noticed that they didn’t have a hood anymore too – and then I thought about it for a minute and realized that I never use mine unless something burns!
I wouldn’t miss mine if it weren’t there. Good job having the guts to go for it!
Ashley @ The Design Thief says
Rachel did an awesome job! That was $1000 well spent :)
Beth says
Holy macaroni it’s amazing what a grand well spent can do! Really lovely!
Randa says
Wow, totally beautiful! Great job Rachel!! When I saw the before pictures, I couldn’t imagine what the afters would look like… very very impressive!!
As for favorite points, I love the red touches too, with all the white.
Courtney says
Gorgeous job! Love the after. I have to ask – what’s going on with the dog-door-looking thing in the before pics of the dining room wall, under the window?
Amy says
Uh, the knocked out wall looks great…but now they don’t have a vent for their cooktop! Can we say not up to code?
JULIE says
I was wondering the same thing about the vent hood…since that is the one thing that has kept me from knocking down some cabinets over and around my stove.
Kevin M says
I’d love to know where she picked up the light fixture over the dining table.
Kristin ~ Bien Living Design says
Great job, Rachel! I love to see transformations like this :)
Rachel says
Hi guys, thanks for all the kind words! The ventilation issue is a bit of a pain, but opening the window over the sink has been an effective method thus far. We hope to add a vent hood in the future.
The dining room curtains are from Target and the swatch over the sink is homemade.
Sherry is right, we used high gloss paint on the backsplash and it has worked perfectly for food/water splatters.
Thanks again!
lauren says
It looks great and really opens up the room!
However, as a real estate person, please don’t pitch those cabinet doors! This is really style specific and the next person may want them back up (and they are hard to replace).
Jill Stigs says
Looks fabulous……..what a great transformation. Thanks for sending in the pics Rachel!!
Lyndsey says
I’ve actually seen Rachel’s home and it is beautiful!!! Great job on your kitchen, Reachel!
Heather says
Love it! My husband and I just bought our first home together and know what it is like trying to add “our touch” on the cheap and have it look AwEsOmE! Our kitchen was redone right before we bought the house so I have been afraid to touch anything there…though it needs some brightening up… I think I could definitely get inspired by this post!!! Thanks!
Young and in Love too – Heather
Misty says
WOW! Looks fab! Is that a valance or fabric roman blind in the window over the sink? Either way, it’s cute! Our kitchen is currently under “mini-construction” and the afters of this keep my flame burning for my own to get done! Maybe I will have to send my pics to YHL as well.
Marian says
Another quick question for Rachel or anyone else “in the know” on this one, how much can you expect to pay to remove and finish a wall like was done in this project? Assuming that the wall is not structural does anyone have an estimate? Thank you!
Lauren says
The rooms look beautiful! I really like the recessed lighting you added and the open cabinets.
Tovah says
Wow it all looks amazing! Rachel the pops of red are great and I love how open and airy your kitchen feels now. The cabinets look wonderful and you’ve arranged things so beautifully in the open ones. Not sure I would have enough pretty/matching dishware to pull it off but it looks great in your kitchen!:)
Mel says
Very nice! If Rachel really wants to do something about the countertops, it’s possible to paint them. There’s a step-by-step here: http://oursuburbancottage.blogspot.com/2009/04/yes-you-can-paint-those-ugly-laminate.html I don’t think they look bad as they are, though, they fade into the background pretty well.
My favorite detail is the full length red curtains in the dining area. Somehow that one detail gives the illusion that they have french doors there, and draws the eye outside instead of stopping at an oddly proportioned window. Very, very nice update!
rachel says
Code regarding vent hoods is specific to the area, but we have every intention of installing a downdraft vent hood in the near future.
I’ve actually loved having the cabinets open. It’s forced me to keep my dishes nice and tidy. We gained quite a bit of cabinet space when we purchased our house (compared to the house we lived in prior), so I wasn’t upset about the loss of cabinet space by removing the half wall. We did lose 4 full cabinets and 2 half cabinets though.
As you noticed, there was a full sized doggy door right in the middle of the dining room!! We removed the door, put up new insulation and sheetrock, and then replaced the paneling on that portion of wall. We had extra brick that the previous owners had saved so repairing the outside of the wall wasn’t an issue. But seriously, a doggy door in the dining room?!
I’ll have to see if I can find the paint color of the brick. Per Sherry and John’s suggestion, we used brick primer and paint and it worked beautifully. I’ll search the garage for the color and get back on that one.
Emily says
Wow! Such a huge impact on so little money! I love it!
carole says
lovely! the open cabinets look great–nice job arranging your things to make them look like decor instead of just storage! I also like the window treatment and the new light in the dining room, good choices for your space.
Christy says
Wow, it looks amazing!! I think this is my favorite reader redesign yet!! What a difference, they did a fantastic job! Can’t believe how far they stretched $1K! KUDOS!!!!!!!
Trista says
The kitchen/dining rooms look fantastic.
Was there a doggie door in the dining room before picture? I’ve never seen anything like that.
rachel says
Trista- Yes! There was! Wasn’t it awful? As fellow dog lovers, we appreciated the sentiment, but a doggy door in the dining room was one of the worst things I had ever seen!
Katie says
This is one of the best budget kitchen redos I’ve seen! It truly looks like a brand new place!!
Kasey at Thrifty Little Blog says
I love how she was able to create a totally different look while keeping the cabinets and counters. It looks great!