You may have spotted our little DIY cork vases back in the big office reveal (and the follow up guest bedroom/playroom post). And now we’re back to share our two-different-looks tutorial. Yup, you can keep them au naturale…
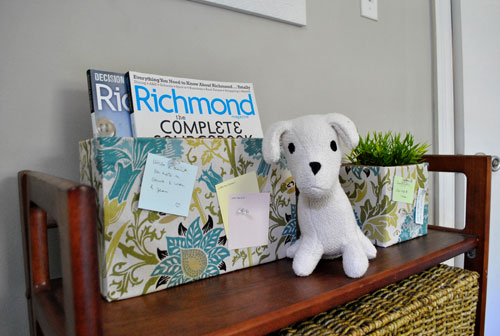
… or cover the cork with fabric for a playful printed look:
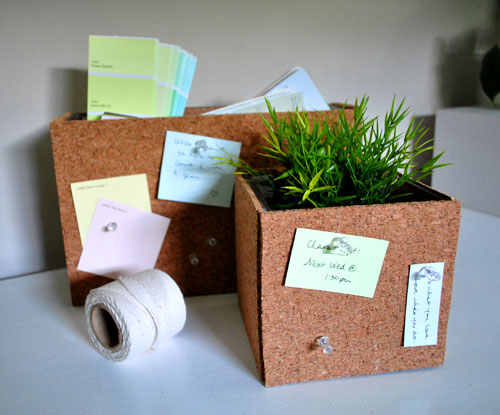
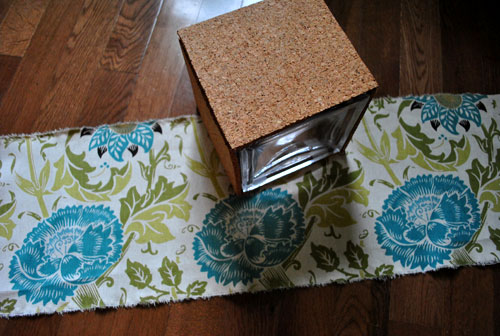
We first got the idea to create cork vases for pinning up little reminders and paint swatches that we loved from seeing an expensive designer cork lamp a while back. It seemed like such a smart way to keep from forgetting Clara’s checkups along with our dental appointments- and to add some aesthetically pleasing function to the room as well. But we didn’t need a lamp, and we just happened to have two glass vases lying around (one from Ikea and one from a bouquet of flowers that we received a while back). And so the cork vase idea was born. All we picked up was a pack of cork from Target for around $5 and we were ready to go.
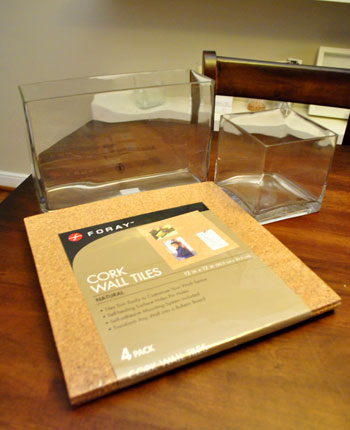
The four squares of cork in the pack provided more than enough material to cover both vases. And they even came with self adhesive squares that we used to stick our cut-to-size rectangles on each side of each vase. We just laid the vase on the cork, and traced an exacto knife along the edge of the vase to create our rectangles for each of the four sides for each vase. Then with a sticky square on each of the four corners for each plane we stuck them carefully to the vase (going slowly enough to ensure that they were straight and lined up with each other before firmly sticking them on).
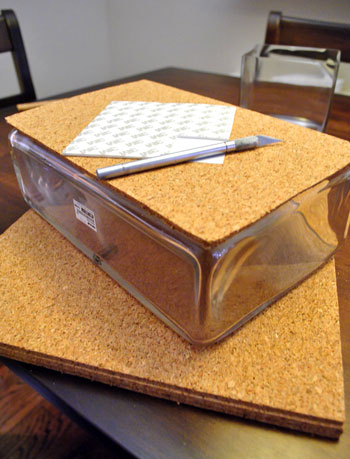
Before we knew it we had two cork vases. Easy, peasy. Oh and here’s a tip. Since we used the white adhesive squares to secure the cork, if you look on the inside of the vases you can see them (since they’re clear vases and the squares are white). So it helps to consider what you’ll be filling your vases with to hide those white squares (a plant and some paint decks did the job for us). You could also use dabs of clear glue from a hot glue gun in each corner to adhere the cork if you plan to leave the vases less full and don’t want to worry about the white squares being seen if anyone peers down into each vase.
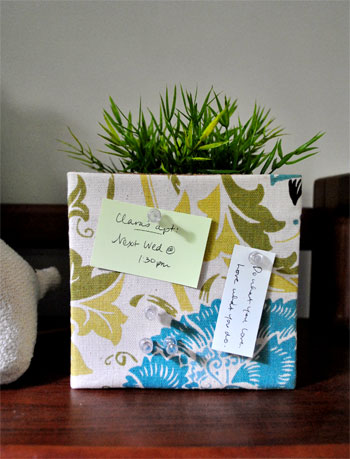
Although we loved the rough natural texture of the cork, we actually decided it would be fun to take things one step further with some printed fabric. The pins would still stick through the textile and grab the cork (so none of the function would be lost) and we really liked the idea of gaining some pattern and fun since we knew these babies would sit on Clara’s bookcase in our office/guest room/playroom. First we roughly cut out a strip of fabric that could easily wrap around the entire circumference of each vase (with extra fabric on the top and bottom to allow for a “hem” to create a more polished and finished look).
Then we whipped out some iron-on heavy duty hem tape…
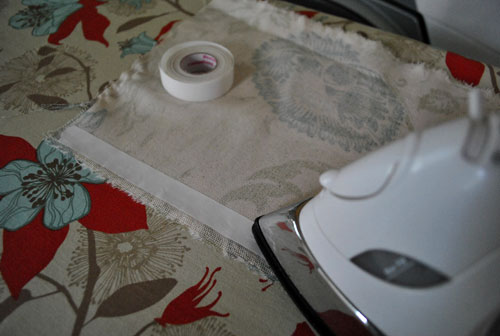
… which instantly added those polished looking hems that we were going for.

When it came time to apply the fabric around the vase to cleanly cover the cork we knew that a tight fit was the only way to go (something loose or baggy would have looked messy and weird). So we used duct tape to hold the soon-to-be-hidden edge of the fabric in place so we could pull the other side around for a nice and tight look. We hemmed the other side of the fabric so it would have a finished edge when it overlapped the duct tape (completely hiding it for a snug fit and a professional looking result).
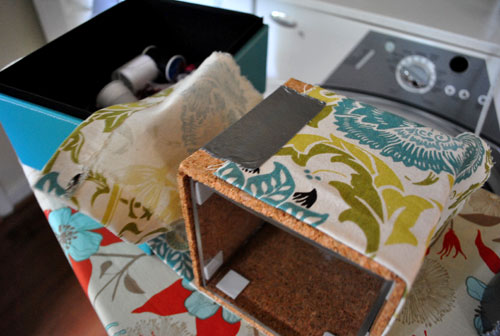
We debated using a glue gun to adhere the hemmed side of the fabric (the one that hides the duct tape) but couldn’t find any glue sticks so I quickly stitched the hemmed flap over the other side of fabric to create a tight fit that would really hold up over time. The seam landed right in the middle of the back of the vase, and thanks to some white heavy duty thread it looked nice and clean back there:
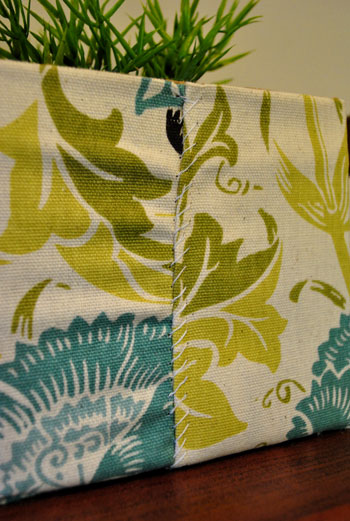
And of course the front looked even more seamless:
Fun right? The whole project only ran us around $5 for the cork since we already had the vases and the fabric (scored for cheap at U-Fab here in Richmond for Clara’s weekly photo project).
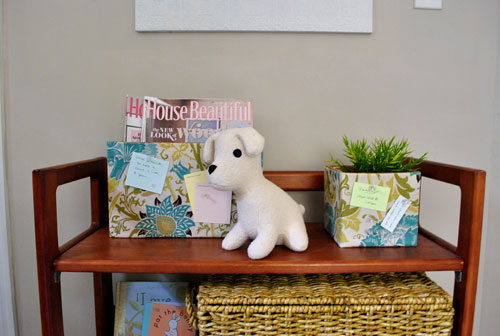
We love that we can use our DIY cork vases to house everything from magazines and paint decks to plants and pens in our multifunctional home office/guest bedroom/playroom.
And the fact that they help us remember all of our appointments is the icing on the cake.
Have any of you guys worked with a roll of cork or the same pre-cut cork squares to DIY something fun in your house? Do tell. And do you have any quotes that keep you going or make you smile? We pinned one of our favorites up: “Do what you love. Love what you do.” So share those cork projects and inspirational quotes!
Psst- Looking for another fun cork project? Check this out.

Blair says
Thanks for the quick response! Sorry to bother, but this is a project I am interested in trying! How exactly did you sew the cover with it already duct-taped to the cork? Did you just sew through the cork or carefully sew through the fabric without hitting the cork?
YoungHouseLove says
Yup, we just sewed through the fabric – the needle didn’t really seem to mess with the cork. We just pierced the fabric part and pushed it back through to secure everything. Hope it helps!
xo,
s
vika says
I have a couple of these and they don’t seem to be thick enough for the tacs. Do the cork boards come in different thickness or should I look for different type of tacs?
YoungHouseLove says
They definitely work for tacks, you just can’t sink the tacks all the way in (but even with most bulletin boards we’ve noticed they don’t usually sink all the way to the pin head). I guess you could look for more shallow pins but standard ones will work just fine. Hope it helps!
xo,
s
Sarah says
Hi John and Sherry,
I love the cork vases, but even more, I love the little green plant that you put into one of them. Do you happen to know what type of plant this is? I’ve been looking for some nice, small houseplants to spruce up my desk!
YoungHouseLove says
Hey Sarah,
So sorry! We have no idea. We got it as a gift and it doesn’t even have lighting or watering instructions on it. Thankfully we haven’t killed it yet!
xo,
s
Kaitlyn says
John and Sherry —
I love the cork vases AND the fabric covered ones! I would like to say, though, that the fabric ones pain me a bit.
Cork trees are becoming endangered and to create something from cork and cover it in fabric seems like a waste! You could just as easily make them out of cardboard and cover in fabric — plus you’d be recycling!
Just a thought from an earth-conscious reader!
YoungHouseLove says
Great tip Kaitlyn! We had no idea about the plight of the cork tree! We always thought it was an eco conscious material like bamboo!
xo,
s
Suzanne says
That is an unfortunate MYTH about cork … in fact it’s hurting the cork industry. Cork is a great eco-friendly choice.
http://www.greenlivingonline.com/article/green-myth-buster-1-cork-endangered
YoungHouseLove says
Hey Suzanne,
Good to know! Thanks for the link!
xo,
s
Unplanned Cooking says
I could totally see myself making cork bins for our toy room. Then again, the thought of our boys with pins…
Mizden says
Thanks for that quick response Sherry!
Wow I learned a lot with that post, love to learn new things every day (that’s how we realize we never stop learning) and sorry to bother with something that it’s clear you have cover.
Must share some of them with the parents.
Have a great day!
Area Rugs Gal says
This idea is so cute and original. Love adding colorful fabrics and accents to a room, plus this one is also so useful, and you can change it up when you get tired ;) thanks for sharing!
liz @ bon tmeps beignet says
Amanda & Alison, thanks for the tips girls!
Cait @ Hernando House says
I’ve seen a lamp like that, but never a vase. Those are cool :)
The quote “Do what you love. Love what you do.” always reminds me of Starbucks, since they have used that on their “now hiring” ads before.
Amanda @ longroadset says
I actually have something similar. But it’s an old picture frame with a cork board covered in fabric. I like the idea of doing that for something more functional in your home.
Oh the possibilities. You guys are oh so crafty!
beth austin says
Dear John and Sherry, I have enjoyed your blog for a while now and just wanted to share how much I love (and love to steal) your ideas as I redo my house. Also, I just finished re-doing my pantry and laundry room and used cork liner on all my shelves.It is great sound absorber and easy to put down. Maybe we could use that for the covered boxes? Anyway, just a thought, I got it at Lowes or Home Depot.
YoungHouseLove says
Oh yeah that would definitely work! And we love the idea for lining your shelves with it too!
xo,
s
Ashley says
Love it! How did you stitch up the seam to make it tight enough? Did you just take the fabric off the vase and measure carefully? I can see myself doing it and ending up with a loose cover, not perfectly fitted like yours.
I made a fabric covered wall hanging using a square canvas from Michaels (about 12×12). I hot glued the fabric all around it and push pins work perfectly w/o any cork just going through the canvas behind the fabric. But I have to try this vase idea!
YoungHouseLove says
Hey Ashley,
We just wrapped the strip of fabric around the vase and slipped it one way or the other way until we knew where to tape the first end down so that the second hemmed end would wrap around and be in the middle of the back. Then once we had the one end taped in place we tugged the other side around as tightly as possible and stitched it together right there on the vase (we didn’t stitch it while it was off and slide it on because we wanted the most accurate fit possible). The needle was easily guided through the fabric and back out to create the seam that you see in that photo. Hope it helps!
xo,
s
Jen {Savvy Homegirl} says
I can’t say how much you impress me.
You are a nonstop source of ideas and inspiration. You truly amaze me.
AND you respond to so many comments. I don’t think I read another blog that gets 75-150 comments per post on average. I can’t imagine. Then to think how much value and great ideas and advice are in the comments… wow.
You truly the deserve all the success this blog has brought you. I think it’s incredible and so awesome. Keep up the FABULOUS work!!
YoungHouseLove says
Aw shucks Jen- you’re making us blush. Thanks so much for the kind words! You really made our day!
xo,
s (& j)
Carolyn says
I love the fabric you used in this project! Here are a couple of quotes I really love:
“If life gives you lemons, make lemonade”
“Be good. And if you can’t be good, be careful.”
The second one applies to my husband :)
Susan says
Love, love, love this idea, and how simple it is.
You guys are so handy, and it has me wondering: have you ever refinished something and thought ‘wow! That’s not at all what I pictured!”? Or maybe brought home a piece of furniture and discovered the shape wasn’t quite right for your space? I’ve definitely had these kinds of mishaps, so I’d be curious if you have, too, and how you handled them. MIght be an amusing post. Or maybe you’ve already covered this and I just didn’t see it?
YoungHouseLove says
Oh yeah, we’ve made quite a few mistakes. Big ones. We painted all the trim in our house with flat paint (we’re talking about at least 30+ hours of painting) only to learn that we needed to use semi-gloss so it all had to be redone. Yikes! We also tried our hand at a DIY string lantern project that tanked (we were only allowed to use materials from Home Depot so we substituted poly for liquid starch from a craft store and it didn’t hold up). And of course our entire house was a work in progress for years (with the wrong sized furnishings and awkward arrangements that we remedied as we lived and learned). You can definitely count us as people who have made our fair share of mistakes, but that’s what makes us grow so we appreciate them all as learning experiences!
xo,
s
the cape on the corner says
now THIS i can do! i am super excited to try this, and even look at thrift stores for the containers to use since i think mine are all round!
Anna Seek says
You two must read minds! My project for this weekend to clean out the remaining linen closet in my daughter’s bathroom (the one with the hodge-podge of stuff). I know the top shelf is full of vases that aren’t being used. And I know that I can always, always, use extra storage in our office! Wonderful idea, and wonder timing!!!!!
Life in Rehab says
Great idea, guys! I love this idea; I’m going to give it a try later. We could use a few of these! I’ll link back if I blog it on the off chance there’s someone on the planet who HASN’T heard of the Petersiks. Because if they haven’t, they need to get over here and get inspired.
Angela says
Hi Sherry – first let me say that I LOVE your blog. And Clara is adorable. My question is, where do you find the corkboard in Target? What section or department? I couldn’t find it there last night. Thanks!
YoungHouseLove says
It’s right next to the cork boards and the bulletin boards in the office aisle (sort of near binders and mailing envelopes and notebooks and pushpins). Hope it helps!
xo,
s
Ashley says
Thanks Sherry, that does help! I’m impressed you stitched it on right on the vase just because it sounds hard, but with your skills, I’m not surprised. :)
YoungHouseLove says
Hey Ashley,
I just did a few loop stitches (instead of over under stitching) so it was pretty simple. Hope it helps!
xo,
s
Amanda says
I have been looking EVERYWHERE for the cork wall tiles. I went to Lowe’s, Home Depot, and Target, but I still can’t find them. Where in target did you find them?
Thanks!
amanda says
woops- I just realized that you’ve already answered this question!
Jen says
This is such a great idea. I have a cork bulletin board at home sitting around waiting for me to find fabric to cover it. but i actually like the ideas of covering 4 independent tiles and putting them together on the wall!
GREAT JOB!
Lana says
Quick question: What kind/ brand of hem tape did you use? I am looking for some to use to quick make some curtains for our toyroom…don’t have a sewing machine. Do you recommend something different for a project like that? LOVE your blog, by the way!
YoungHouseLove says
Hey Lana,
Here’s a post with that info for ya: https://www.younghouselove.com/2010/02/nursery-progress-getting-the-hang-of-it/
Hope it helps!
xo,
s
Dina @ Honey + Fitz says
Thanks so much for introducing me to Tonic Living. What a fabulous fabric resource! I love everything they have!
Candy says
Ah. mazing.
Ashley says
What a CUTE idea!!!…and totally doable. : ) Love it!
Melissa says
What a simple, creative and useful project. A great way to have a small memo center and hold your favorite plant or magazines.
Lisa says
How creative! Keep them coming YHL!
Lauren says
What a fantastic idea! And, a great fabric choice! :)
City Chic - Jamie says
I was just reviewing your posts on your office/guestroom makeover because I’m putting together ideas for my office/guest/sewing room (talk about needing to be multifunctional)! You guys are such a great resource when ever I start a project!
To answer Bethany S, the fabric is Columbine in Azure by Joel Dewberry. We sent the cover to the youngsters as a thank you gift awhile back, hope that helps!
celine says
this is so cool..you can now use the cork board for design as well as with it’s original purpose…
Rachel says
That’s way cute you two! Thanks for the great idea, I’ll be linking to this.
YoungHouseLove says
Thanks Rachel! So glad you like it!
xo,
s
Jessica says
AH! You’ve got the Joel Dewberry Columbine fabric. I love it! I purchased some recently for a runner for a chest with some damage on the top and I can’t stop swooning over it every time I walk past it. It’s just lovely.
Amanda says
Hi Sherry. I’m the home & garden editor over at Craft Gossip. This morning I featured this cork vase, but was unaware that it was actually yours as it was plagiarized on another site. A couple of your readers pointed it out to me and I have corrected the link to come to your blog. YOu can see the feature here http://homeandgarden.craftgossip.com/cork-vase/
If you would like a “featured by” button, you can grab one here!
http://homeandgarden.craftgossip.com/grab-a-craft-gossip-button/
Amanda says
My apologies, it wasn’t actually plagiarized, but rather they linked to your post and used your photo showing it as inspiration for theirs. Sorry to cause a panic!
YoungHouseLove says
No worries! A few readers alerted us to the whole thing as well, and we’re so glad to hear that you fixed that link. No harm done!
xo,
s
michmashed says
I love love love it! It looks great on its own but with the gorgeous fabric it is awesome! Thanks for posting!
Jennifer says
I love this idea! I recently noticed one of my glasses had developed a crack near the rim. Not wanting to throw it away, it’s been sitting on my sink for about a week. This evening, I suddenly remembered this project, I decided to wrap it with the cork contact paper I bought at Target for my tile coaster project. This worked out great and is now serving as my desk pencil cup. I may be buying different sizes at the thrift shop soon! Thanks!!
YoungHouseLove says
Cute idea! Love it.
xo,
s
Maria says
Pottery Barn Teen sells similar cork vases form $29.00-$39.00 a piece! I’m certainly going to try making these for my dorm room instead! Thanks for sharing this wonderful idea.
-Maria