I know, I know. The idea of puffy paint in most craft projects makes you skeptical. Me too. But a few weeks ago John and I were brainstorming about what we should do to our pumpkins this year, after painting them last year:
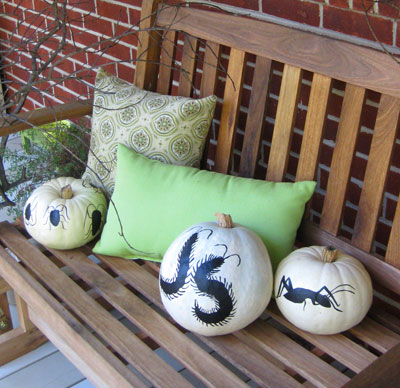
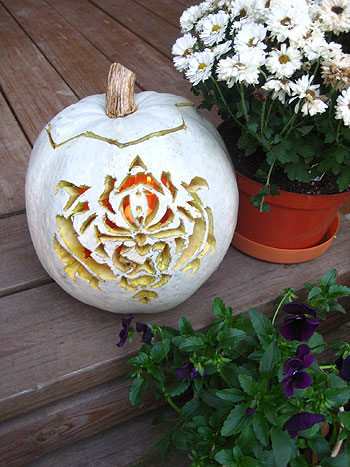
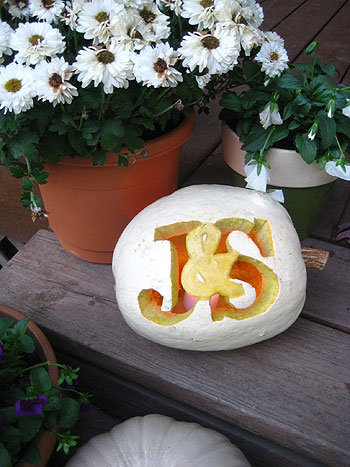
… and carving intricate designs into them the year before:
Anyway, so somewhere along the line John said “too bad we can’t use nail polish or something to build up shapes on the pumpkins.” I sort of looked at him sideways at the nail polish suggestion, but I liked the idea of somehow creating raised designs on them… and so the idea of puffy paint was born. We figured it was made for puffing (aka, building things up) and it’s super cheap so why the heck not. We even hoped that if we spray painted them after puffing them they might look sleek as opposed to cringeworthy and bad crafty. You know how there’s good crafty and bad crafty? We wanted to stay on the good crafty side of things.
In full disclosure, this was one of those projects where we had full expectations of failure. We could just picture the puffy paint sliding right off the pumpkins and creating a drippy mess (since pumpkins don’t exactly lay flat like paper or fabric). But we figured it was worth a try- and lo and behold it actually worked! Oh happy day.
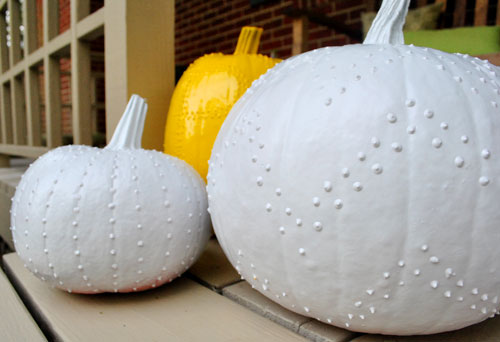
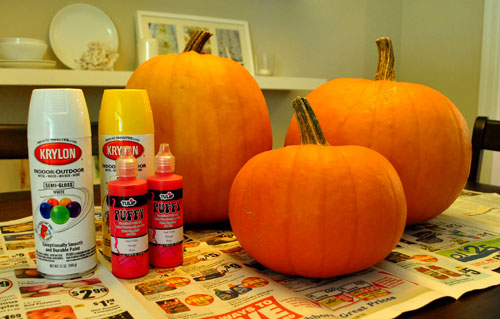
Here’s how it all went down. First we started with three pumpkins along with some puffy paint and some spray paint from Michael’s:
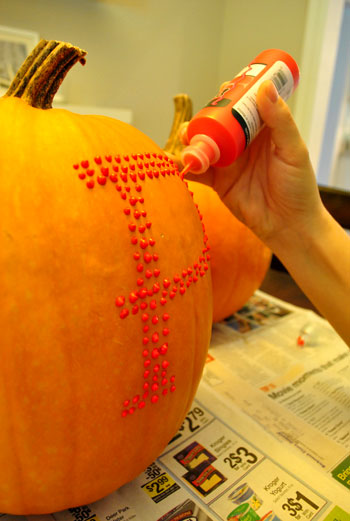
Then we just went to town on them with puffy paint. Here’s what things looked like in progress:
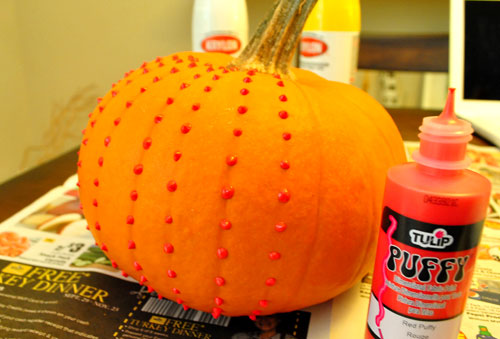
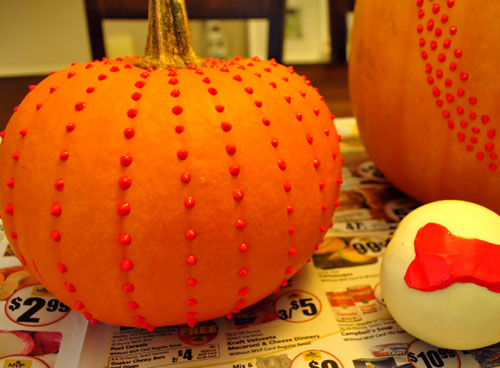
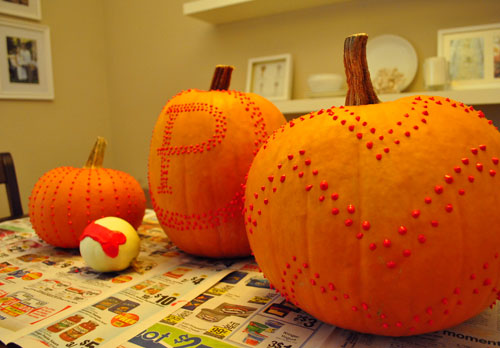
When we finally proclaimed them done (after about twenty minutes or so) here’s what we ended up with:
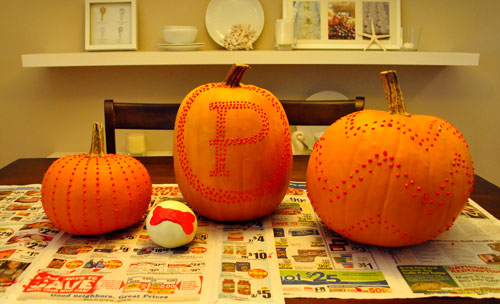
We decided to do a fun studded vertical stripe effect on one of them, a P monogram on the big tall guy, a chevron-inspired zig-zag pattern on the fat one, and a small bone on the tiny backyard pumpkin that we accidentally grew (you know, in Burger’s honor). We liked how everyone in our family of four was semi-represented thanks to ending up with four pumpkins- although I’ll be mad if you assume I’m the round one (even though John’s obviously the tall one).
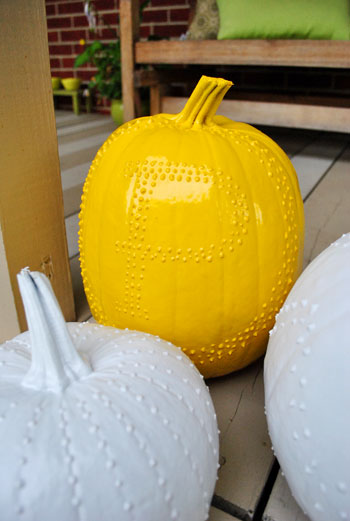
Oh and I chose that reddish-orange puffy paint color because I thought it would most closely resemble the color of the pumpkins, so when we sprayed them they would hopefully end up with even coverage and a uniform look (which did seem to work for us). Here they are with a few thin and even coats of marigoldy-yellow and pure-white spray paint:
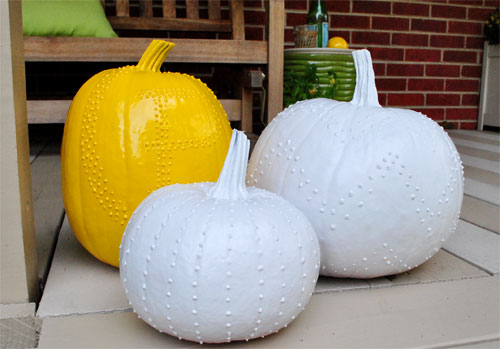
We went with those spray paint colors since we thought they’d work with the yellow mums and the light cream accents on our front porch.
Thankfully they fit right in.
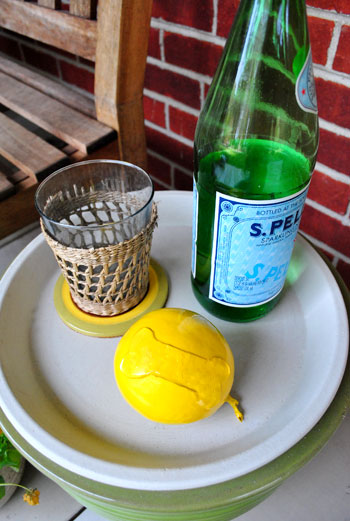
Burger’s wee pumpkin is back behind them on the planter side table that we made a while back. I can’t believe John “farmed” that. It’s so round and perfect that it looks more like a superball than a pumpkin.
Oh and here’s a spray painting tip for ya: we balanced each pumpkin on an old quart-sized paint can before spraying them so we could get all angles of ’em except for the unseen bottom portion without having to touch them and ruin the finish. We used white semi-gloss and marigold yellow high gloss paint and we actually preferred how the semi-gloss looked a bit more. The more matte texture made the studs look cool – like hammered metal – as opposed to the slicker and harder to see high gloss monogrammed P. In fact if we were to do it all over again we’d suggest using semi-gloss or even satin paint for all of them instead of dealing with the super shiny stuff. Surprising, because going into it we thought high gloss would look better. Live puffy paint and learn I guess.
But we’re happy with how they came out for sure. And it was a really easy and fun project. Although we must admit that we’re craving pumpkin seeds so much that we might grab one more small pumpkin and get all traditional on it- you know, so we can scoop out the goop and enjoy the seeds for Clara’s first Halloween. What about you guys? Do you have any pumpkin carving or Halloween decorating plans? Were you totally cringing when we said we used puffy paint on our pumpkins? Admit it, you were.

Brianna Wills says
I love these! They are kind of the reverse design the filigree pumpkins Martha Stewart did a few years ago. Plus a ton easier since you don’t have to go buy a bunch of punches. I’m probably going to have to copy this idea!
Beckie says
I just stumbled onto your site a few days ago and I love it! You guys are so creative and I’m so inspired by your posts. I’m going to try this with my kids when they’re a wee bit older since my “painting pumpkins with water based paint then putting them outside” was a not so great idea! I don’t know what I was thinking!
Mustard says
This is amazing. Love it! No carving required. Maybe I’ll use contrasting paint color and leave them as is.
susan says
I have been wanting to buy some white pumkins but they are expensive here. Thanks for the great idea. I will spray paint my orange ones……………
heather s. says
We used puffy paint on pumpkins in high school so I guess we were way ahead of the times since I graduated in high school 14 years ago. :) They look great!
Kate (Southern-Belle-Simple) says
I didn’t want to cut into my pumpkins, er I mean squash because I want to eat them in a bit….so instead, decided to do an easy craft to give them faces… http://www.southernbellesimple.com/2010/10/funny-face.html
Kelley says
Totally. Rad. Idea.
Kari says
I might try this!! I’m highly allergic to pumpkins (learned this by eating the seeds and wondering why I couldn’t breath so well) and my arms break out in hives when I scoop the goop out, so alternatives are always good!!! Looks like I have some shopping to do…
For the 3 pumpkins did you use all of that puffy paint or would one tube get the job done?
YoungHouseLove says
One tube totally would have done it, we just wanted to “puff” at the same time so I got two.
xo,
s
Carmen says
They look awesome! Where did you get the puffy paint? Thanks.
YoungHouseLove says
Michael’s!
xo,
s
Krista says
Best Idea Ever.
Christin says
Very cute. I love the link that someone shared with the puffy paint, spray paint, and vases, bottles or cans. So creative! I may steal that idea for some stocking stuffers this year. :)
Jessica says
How clever. I love the final result. However, the “good crafty v. bad crafty” portion of this blog post really provided my morning with the chuckle I needed to start the day! Thanks.
Rosi T says
I believed the puffy paint would work :).
I would use it on anything I could because I thought it was so cool when I was younger. :)
Dayna says
All I can say is…You all can rock a spray can! Beautiful!
Melissa G says
We always used puffy paint as kids – but made silly faces instead :)
I’m curious, how long did the puffy paint take to dry before spray painting them? (sorry if I missed that detail somewhere!?) They look great!
YoungHouseLove says
The puffy paint was dry within a few hours, but just to be sure we waited about 5 before spraying. Hope it helps!
xo,
s
Jen says
Wow, who knew puffy paint could make something so cool?!
Adore this!
xoxo,
Jen
Kelly says
Oooh, I was thinking of doing these Pottery Barn Kids knock-off pumpkins (http://livingwithlindsay.com/2009/10/pottery-barn-style-on-a-budget-halloween-edition.html), but I’m really digging your puff paint ones! Also, I’ll have to carve one to get the yummy seeds – I found a recipe for pumpkin seed pesto that I’m dying to try, too. Better make that 2 carved pumpkins…
Can’t wait to see what Clara will be for Halloween!
laurajane says
All-time best line ever written, “although I’ll be mad if you assume I’m the round one (even though John’s obviously the tall one)”. I literally laughed out loud- too cute.
Pumpkins look great- who knew puffy paint could be cool again?
Rachel @ The Avid Appetite says
This is such a fun idea! Once again, you’ve given me the spray painting itch!
marisa @ vinyasa mama says
Nice! I actually kind of like the puffy paint on the pumpkins before you spray painted. Maybe it didn’t look as cool in person, though…
YoungHouseLove says
Hey Marisa,
We also thought they looked cool even before spray paint. We kind of wished that we had picked up a white pumpkin and some black puffy paint- just to see how that would look without the spray painting step.
xo,
s
Jen @ The Decor Scene says
Love them. They came out really really great. I would have never thought about puffy paint, but now I would. ;)
I did these faux pumpkins last year for indoor decor. White faux pumpkin, faux leaves, some ribbon & hot glue.
Scroll down to see the faux pumpkins. http://thedecorscene.blogspot.com/2010/10/fall-redesign-living-room.html
katie @ k+b says
I love it!!! I never realized until this year how creative you can get with pumpkins so they can be stylish and fun..and still go with decor. I actually did something similar on my blog recently — http://www.kt-brian.blogspot.com Thanks for the idea!
mike @ the lil house that could says
You guys love painting things white :)
YoungHouseLove says
Guilty as charged.
xo,
s
candace @ thecandace.com says
WOW – your pumpkins are AWESOME!! I loved the way they turned out – so creative and classy! You two always seem to outdo yourselves!
mike @ the lil house that could says
Did you guys do the P with the puffy paint by free-hand? Looks flawless!
YoungHouseLove says
Aw thanks Mike! It was a freehand endeavor, but the few rows of dots technique was pretty forgiving.
xo,
s
Karla @ {TheClassyWoman} says
You guys are just so creative! I’m always amazed at what you come up with. Your whole home has so much inspiration, including your festive porch! I like that the decor is not spooky or creepy. It’s timeless and perfect while selling your home.
karen says
I am doing a series of postings of fun ideas for carving pumpkins. I want to use some of your images, would you mind? I would of course link to you.
Thanks,
KAren
YoungHouseLove says
Sure! We love a shout out.
xo,
s
UpcycledHome says
Great, great idea! I have two GIANT white pumpkins that were gifted to me by my MIL (she’s awesome like that) and the black puffy monogram on them is giving me a super-sized crafty itch! Thanks for [coming up with and] sharing this!
Carol N. says
Love the pumpkins! Does Clara have a Halloween costume yet? It would be cute if she went as a hamburger (reference to Burger) and he went as a hot dog.
YoungHouseLove says
Hey Carol,
Wow. She does have a costume- and we think you’ll love it! Stay tuned…
xo,
s
alison@semi-fab lane says
love how they turned out! you guys are so darn creative!!
Emily says
I think they look incredible.
I still use puffy paint regularly at work (as a teacher) because I find that it really benefits a lot of my more tactile students. They love to touch the paint!
I do, however, agree with the other reader. It makes me sad, the thought of painting some fresh from nature.
Keri says
I love the pumpkins! I’m from the South, so they kind of remind me of those studded jean jackets from the 80’s. You know, the kind people would wear to go line-dancing? I think I might try this with black puff paint on white pumpkins, like you mentioned in the comments. Thanks for the inspiration!!
Melody says
I love the puffy paint idea. I’ve used puffy paints in my paintings before to add some texture to landscapes.
I also liked how your pumpkins looked before spray painting them. They’re really cool either way.
Elisa says
Heeey! They look like more white ceramic things! I like it.
Krithiga says
I would have liked to spray paint before you did the puffy, the contrast orangish puffy on the yellow paint would have made the letters and design stand out ?
am i the only one who thinks so ?
Loved the idea!
Robyn in Chicago says
Yes, I was totally cringing when I read “puffy paint and pumpkins”. I should have known you guys wouldn’t let me down. Awesome project!
mike @HA says
Would you recommend spray priming them or did the paint hold fine on its own?
YoungHouseLove says
Hey Mike,
It definitely couldn’t hurt but a few coats of paint went on just fine.
xo,
s
Christina says
Those pumpkins look great! I need to get a bite from the creative bug lol
Vonda says
What an original idea. I really like it. I painted my pumpkins white, black and gray and used glitter. You can see them here: http://newlywedsandtheoldhouse.blogspot.com/2010/10/halloween-decor-my-own-hizzie.html
Also, I just have to add this to my ongoing favorite Halloween ideas post w/full street cred of course. Hope that’s ok! http://newlywedsandtheoldhouse.blogspot.com/2010/10/top-ten-favorite-halloween-decorating.html
Monique says
Did you see this?
http://www.realsimple.com/holidays-entertaining/holidays/halloween/easy-no-carve-pumpkins-00000000043701/index.html?xid=weeklynews-10-20-2010
YoungHouseLove says
We hadn’t seen that yet- so fun! Thanks for the link!
xo,
s
Sarah B says
Love someone else’s suggestion of white pumpkin with black puffy paint! You could even add the texture to one of the pumpkins you have already spray-painted.
And I think you should definitely get a pumpkin to carve for some cute pics of Miss Clara – hello Anne Geddes like photo! If nothing else – letting her put her fingers in the pumpkin goo will be a priceless pic!
Erin says
I am just a traditional kind of girl when it comes to pumpkins, so for me free style carving is the only way to go! Lots of wonderful memories carving pumpkins with my dad :) I love thinking outside of the box, which yall always do so well. Its a great decorating idea for little kids too little to be playing with knives. As always, thanks for the fun ideas!
Rachel P. says
The pumpkins look fantastic. It’s just always funny to me that people still do this, pumpkin-carving that is. Or I guess it would be pumpkin-decorating in your case. Pumpkins are food! I bring home several from our local farm and process them for the muffins, bread, donuts, soup and pies we all love during fall. We also dry out the seeds and add them to our homemade granola. I guess that is my celebrating of fall, putting up food.
Kristen says
The puffy pumpkins turned out awesome! What a great idea!
MelissaOklahoma says
Great job guys! Looks amazing!!!
Sarah says
Loved the pumpkins! I watched the video, and dang Sherry, you move a lot! John would just sit there so still, and you were really getting into it. I love seeing your personalities in your posts. You’re definately keeping it real:)
CJ says
I love the puffy paint idea! They look great, very ceramic-like! I also really like the idea of black puffy paint over white too. What a unique idea!
Alycia says
Puffy Paint! I so didn’t think of that and it totally brings me back to my youth of puffy paint went on everything. Everything old is new again. Heck, I thought bedazzling of things would never come back and here it is cool as ever. Thanks for the tip and triggering my mental stroll down memory lane.
stacia says
Always love a new pumpkin idea. But I’m having a hard time with the headed for the trash instead of the compost. This might be a place to use those hideous fake pumpkins from the craft store so it can be reused.
Nadia says
We just carved our pumpkins this weekend and actually used the shillohette of my daughter’s head as a template and carved out the shillohette on the pumpkin…. It came out way cool! Do I get bonus points for combining two of this week’s posts?!?!
YoungHouseLove says
Yes! 500 bonus points to be exact.
xo,
s