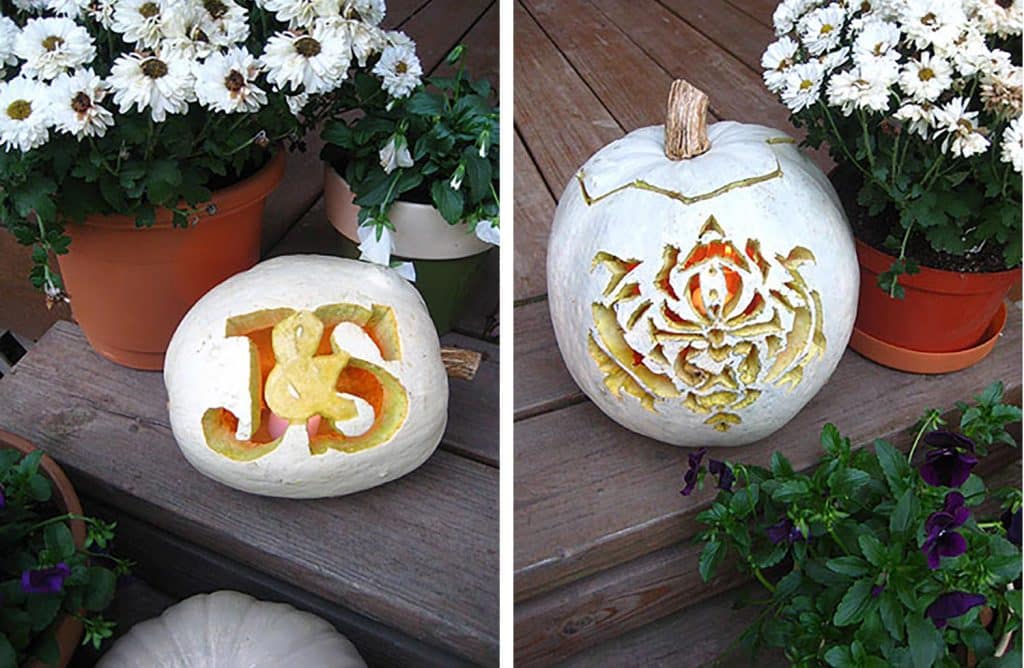
Looking for a unique and chic design to carve into your pumpkin this year? Try these two patterns we made with homemade stencils – a couples’ monogram jack-o-lantern and an intricate damask design.
Choosing The Right Pumpkin
Rather than grab the traditional orange variety, we picked up (this should not surprise you) white pumpkins instead. They lent themselves to some more modern, unexpected designs versus your traditional orange jack-o-lanters. And these non-traditional pumpkins called for non-traditional designs courtesy of some homemade stencils.
Creating A Homemade Pumpkin Stencil
I wanted to flex my pumpkin carving muscles so I located an intricate damask pattern online and used Photoshop to turn it into a black & white line drawing that we could use as a stencil. After sizing it to fit my pumpkin, I simply printed it out on regular office paper.

Transferring Your Stencil To The Pumpkin
To transfer the stencil onto the pumpkin, we used a trick Sherry picked up in art school. We flipped the paper over and rubbed graphite all over the back of it using a regular pencil. It’s like makeshift carbon paper.

Then we taped the design in place on the pumpkin (graphite side down) and used the pencil (and some decent pressure) to trace over the damask outline. This transferred a faint outline onto the pumpkin, which we then went over with a thin Sharpie to make sure that the design didn’t smudge away during the carving process:

Carefully Carve Your Damask Pattern
From there we got down to slicing and dicing, using a $2 four-in-one pumpkin carving tool we picked up from Michael’s. I’ll spare you from most of the photos of this process, since everything after the initial pumpkin gutting involved a lot of strained grimaces and “man, this thing is thick!” faces. White pumpkins are a rare (and pretty thick-skinned) bunch.

But in the end, I was pleasantly surprised with the final result… since there were multiple moments in the process when I was sure it was ruined. Not the easiest design to read from the road (but I do like getting guesses as to what it is – a butterfly? a monster?). And I lived to tell the tale. With all ten fingers intact no less.

Carving A Couples’ Monogram
We took things a little bit easier with the pumpkin Sherry carved. We used the same homemade pattern process, this time to transfer a J&S monogram onto her pumpkin. This pumpkin had some balance issues so we decided to try carving it on its side (cutting out the back, instead of the top). It’s actually a lot more interesting that way. Gotta love a happy accident. Here it is before the carve job:

We designed the ampersand to overlap our initials knowing that it wouldn’t be possible to completely cut it out. Instead, we just scraped off a couple of layers to expose the orange rind inside. It’s a good ol’ trick sure to give your pumpkin a bit of the layered look. Here’s the final result of Sherry’s handiwork:

We loved how this one turned out, which gave us the idea of carving out our house numbers – one digit per pumpkin. Maybe we’ll tackle that another weekend once my hands have recovered…
Got any unexpected pumpkin carving tricks or designs up your sleeves? We wanna hear ’em so spill the beans- er, pumpkin seeds.

Rhonda says
Cute! One of my favorite pumpkin tricks is to pin a piece of waxed paper inside the pumpkin behind the carved out design. It diffuses the light from the candle into a soft glow and you can’t see the scraggly insides.
Lisa says
A tip I got online a few years ago was to tape the stencil to the pumpkin and use a push pin to punch holes along the lines. The pumpkin “bleeds” a little liquid but the end result is similar to a connect the dots image.
Take care,
Lisa
Jenn says
I’d love to see what these look like glowing at night!
Julie says
You’re the masters of all things hip & cool. Including pumpkin carving. Who knew?!
Jeni from Kansas says
What a fun spin on pumpkin carving!!
half of vamh says
Eddie Ross just did a blog with some seriously cute pumpkins — simple too! http://www.eddieross.com/eddie_ross/2008/10/pumpkins.html
I love the monogram you did! Especially with the white pumpkin (I had no idea they had orange guts!).
Corinna says
I’ve not commented before, so I want to be sure to thank you for all of the great design ideas!
Just wanted to mention that if you do use sharpie to draw on your pumpkin, and you don’t cut all of the outline off, you can use a little rubbing alcohol to remove the excess sharpie marks.
Melissa Wellington says
Impressive! I must say, as I was reading, I was expecting to get to the blooper photo after seeing that intricate design John picked out… but you pulled it off! Why am I surprised?! :)
freckles chick says
I knew any ol’ pumpkin face wouldn’t do for you hip Youngsters =)
My two fave things: damask and monograms! Gorgeous results.
Cara says
c.u.t.e. !!!
how did you guys get to be so crafty??
sara says
My hubby and I just got bit by the pumpkin carving bug, too. He did serious justice to Obama’s image. You can check it out here if you’re interested: http://2000dollarwedding.com/2008/10/date-night-1-pumpkin-carving.html
Cindy says
Very cute. Are white pumpkins more expensive than a regular orange one? I haven’t seen them actually in the grocery store we go to…
Great job doing turning something so traditional into something that fits your personalities!!
Swestie says
Awesome pumpkin!
Carrie says
These are amazing! Although, I’m having flash backs to why John always made me feel like an inadequate pumpkin carver when we were growing up…
YoungHouseLove says
Glad you all are picking up what we’re putting down here (sorry to sister Carrie if it’s bringing back bad memories).
Rhonda and Lisa, great pumpkin tricks! We actually saw a carving tool kit that came with a little rolling-perforator so you could create the effect Lisa described. It was twice the price of the $2 kit we bought (I know, gasp) so I guess I was just being a cheapskate.
Jenn, we’ll try to snag some shots of these glowing for you at night. I’ll admit we had trouble getting them to come out nicely. And half of vamh, thanks for the link to Eddie’s blog. Little did he know that could just buy white pumpkins (Cindy, they were the same price as the orange ones). And I do love Eddie’s idea of using a drill. I was this close to breaking my out for some of the smaller parts.
Bravo to Sara’s husband for the stellar Obama pumpkin. If you guys are looking for more Barack carvings, check out Yes We Carve. It’s pretty fun to see how politics can fuel people’s creative juices.
In case I forget later, Happy Halloween everyone!
-John
Karolynah says
Hey guys, just wanted to share a photo of the pumpkin my husband and I carved this weekend. I was so inspired by your initialed one and since this is our first Halloween as husband and wife, it seemed just perfect. Please take a look at it! http://www.flickr.com/photos/karolynah/4071576443/
YoungHouseLove says
So cute Karolynah! We did a great job. Thanks so much for the link!
xo,
s
Becky says
Such a creative idea! A friend of mine has a ton of overgrown cords and different colored pumpkins. This is going to be fun:)