And now, for the dang paneling update. Hold on to your hats ladies and gents. This post = wild ride.
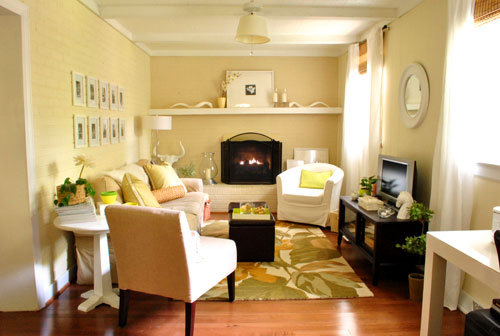
As you probably know, we’re no strangers to priming and painting paneling. Sure we could remove the paneling, but it would mean removing and rehanging all the cabinets since they’re hung in front of it – and revealing goodness knows how many scary issues behind it (they’re old plaster walls so that just felt like a big ol’ can o’ worms). And we could attempt to drywall over it (but it would mean drywalling around the existing cabinets and a lot more expense/trouble than just painting it). So we decided early on that we’d once again say yes to painted paneling – just like we did in our former den (which ended up being our favorite room in the house) when it (slowly over the course of 4.5 years) went from this…
… to this:
We never regretted the whole painted paneling choice – I guess it’s just like painted brick to us (we don’t mind the grooves that remain after it’s painted since they just add charming and subtle texture). But folks have caulked or puttied those grooves to hide ’em, so you can always do that (or rip it the heck out) if it’s not your thing.
But this time there was a slight variation to the painted paneling process since the last time we tackled it. That variation: the time that it took to get ‘er done. Last time it took us an afternoon (more on that here). So we went into this whole priming and painting thing with high hopes that it would be a quick little project. Yessiree, an afternoon spent completing the paneling would have been awesome (as would seeing a unicorn on our front lawn or finding out that Burger laid golden eggs). Spoiler alert: that didn’t happen.
The time difference was all because we decided to attempt to prime and paint our paneling the no slash low VOC way this time. Just because we like the idea of avoiding as many harmful fumes as we can since we work so regularly with paint and caulk and primer (especially now that we have a baby around). We knew this choice wasn’t a short cut. Heck, it would crack our margin for error right open (since oil-based stainblocking primer is the only professionally recommended way to guard against nasty yellow-orange wood-bleed, which can ooze through as you prime and paint). But we thought it was a risk worth taking in the name of family health. And it was in the end… it just took a while to get there. So here’s how it all went down.
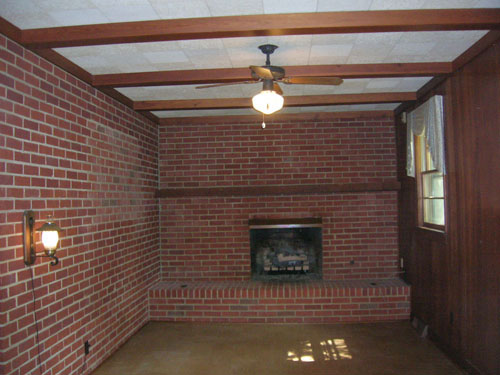
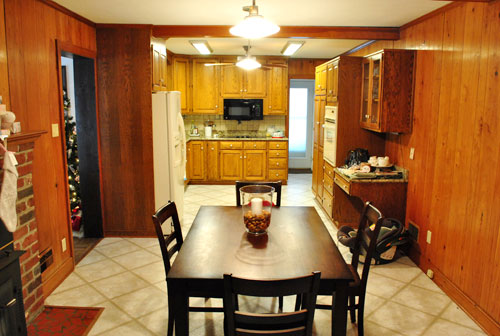
First, here’s what our kitchen looked like before we embarked on our little priming adventure:
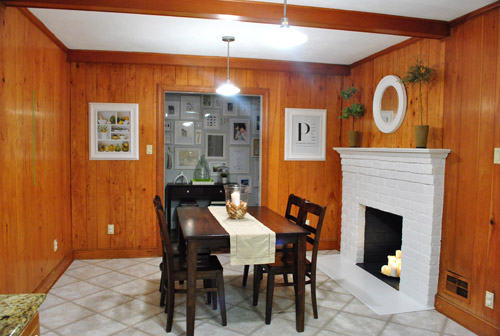
And here’s an old shot of the kitchen from the other direction just for reference (it was actually taken a while back, before we removed the wood stove and painted the fireplace):
Step 1: We wiped down the paneling, beams, and trim with a moist cloth. Some people use TSP for their wipe-down, but we didn’t (didn’t use it last time we painted the den paneling either – but it’s not a bad idea, especially if your paneling feels especially greasy). We also didn’t sand at all (didn’t last time either) but you can if your paneling is especially tough, splintery, or super glossy & shellacked.
Step 2: We removed the vent covers and outlet covers since we decided that we’d be replacing them all (they were bisque and we wanted fresh white).
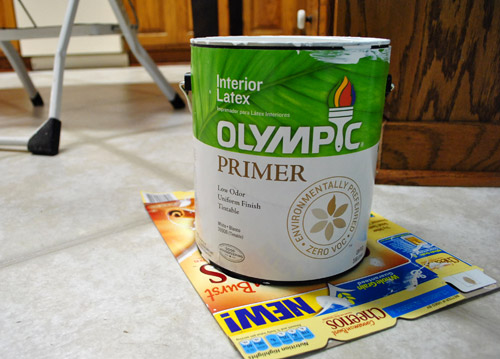
Step 3: We spent about three hours applying a coat of primer to the trim, beams, and paneled walls with Olympic No-VOC primer.
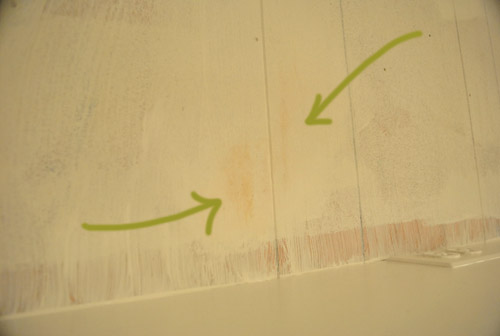
After our first coat it looked like this (about fifteen minutes in we knew we were in trouble):

Primer never needs to be super consistent and perfect looking (it often looks uneven and rough but still totally does the job) but we experienced almost immediate bleed-through in a number of spots (when the orangey-brown stain of the wood seeps through the primer and threatens to ruin your paint job). Not good.
Step 4: We waited for that to dry a bit and tried a second coat of the same primer in certain obviously-bleeding spots, hoping it would block more nasty orange seepage. Nope. It did not.

Step 5: We noticed that we had a can of Behr Primer + Paint (in white semi-gloss) in the basement from a previous project (which is low-VOC and nice and thick) so everything got a coat of that (yup, the trim, beams, and paneling got another full coat).
We still had bleed through. Not much, but in certain places it was definitely still there. And it was maddening.
Step 6: We went to Home Depot and found Kilz Clean Start No-VOC primer. It said “stainblocker” right on the label so we gave it a shot on everything (yup, another full coat of a third type of primer went up on the trim, beams, and walls).
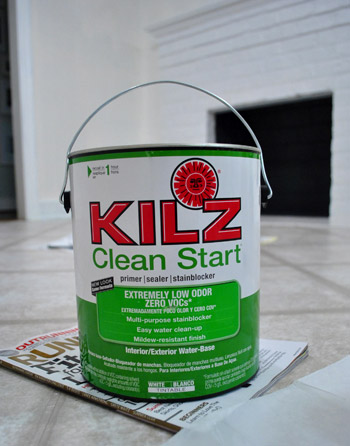
It worked. Angels sang and two white-haired Petersiks rejoiced in the privacy of their freshly primed (finally) kitchen.
Step 7: We painted just the trim and beams with our Behr Primer + Paint (in white semi-gloss) since leaving things primed but not painted for the long term can lead to a nasty and grungy hard-to-wipe-down mess (it’s a dust and dirt magnet since primer is intentionally sticky for paint adhesion). Happily the Behr stuff had great coverage over that last coat of Kilz and looked glossy and amazing. A sight for sore eyes (and arms).

Step 8: We removed all the painter’s tape while the last coat of paint was still fresh for the cleanest lines possible (waiting for everything to dry can cause the paint to peel when you remove the tape). In cases when it was stuck to the primer/paint, we used an exacto knife to carefully slice it along the line of the tape so the primer/paint wouldn’t get pulled off with it.
We’re usually happy to avoid painters tape when we can (I rely a lot on this little miracle short handled brush instead) but since I’m short and I’m the resident cutter-inner/edger, I don’t have as much control up on a stool. So taping around the ceiling trim (and in this case tossing down a quick frame of tape around the baseboards) helped me go faster while I was happy to freehand around the door frames and fireplace.
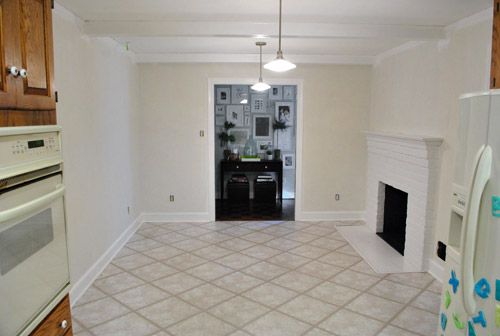
About 48 hours after the beginning of our priming adventure, it finally looked like this. The trim looks whiter because it’s topped with that semi-gloss Behr paint and not just a flat finish white primer (which was more creamy and less snow-white-ish in color). Now we just have to paint those walls.
We’re not sure if the Kilz No-VOC primer worked because it was the best choice for the job or because it was layered with the other methods beneath it (perhaps on its own you’d need two or even three coats of it to get full bleed-blockage) but we definitely would recommend 2-3 coats of Kilz Clean Start No-VOC primer followed by two thin and even coats of latex paint if you’re planning to paint your paneling without messing with fumey VOCs. Fingers crossed that’ll work for ya. Otherwise one coat of oil-based stainblocking primer followed by two thin and even coats of latex paint should do the trick (find more step by step instructions on that method here).
It probably won’t take you an afternoon if you go low/no VOC (it took us two days with some babysitting help from John’s parents just to complete the priming stage). And we’re not gonna lie. It was not fun. But it was worth it as soon as we got through to the other side. You know, when we finally crossed that rainbow bridge from bleed-ville to clean-white-walls… hallelujah. It should be mentioned that in very rare cases bleed can come through weeks or even months later (which would make us want to stick paintbrushes in our eyes). Thankfully we painted the wood trim in the living room using the same no-VOC method (four coats of Olympic Premium Paint instead of with an oil-based stainblocking primer) five months ago and nothing has since seeped through. And because the baseboard and trim in the kitchen is the same exact wood, all signs point to: this should work. Of course we’ll tell you if something supremely annoying happens though.
So if somebody would be so kind as to do a nap-time dance for Clara, we’d really appreciate it. So far swinging her stuffed giraffe back and forth and saying “you are getting sleeeepy” isn’t quite doing the trick. Well it’s making us sleepy, but we’re not the target. Has anyone else tried to paint paneling without VOCs? Or been forced to apply four coats of paint or primer for any reason at all? Sucks right? Let’s commiserate.
Psst- Read more about the whole Phase 1 kitchen plan here.

Edie says
To paint or to gut, that is the question. I still can’t decide it I want to tackle painting my awful wood paneled kitchen or not. It’s like your old one, but bigger. And it’s gonna require sanding because the walls and cabinets are nice and shiny. But I don’t think we are prepared to shell out 20k to gut the thing, especially since I recently quit my job to stay at home with our little one. Sigh…
Heather @ REOlisticRenovation says
Can you convince my Hubs to paint our kitchen grellow? That would be great. :) LOVE IT!
YoungHouseLove says
My best “ammunition” to get John on board with something is to show him photos (like the one in this post) as inspiration to help him picture it. Maybe that’ll work?
xo,
s
Christine B says
When we first move in our house we instanting jumped into painting with primer. We were very successful except in our guest bedroom. We had to coat the back wall two times with primer and over and over again with paint, the reason being the former owners children had attacked the wal with crayon! Argh!
As for the new kitchen color you are going for, we had that as our guestroom color for awhile and LOVED it. It was called burned ginger I believe by behr. . .
form2form.wordpress.com
Aimee says
My kitchen walls and ceiling were covered in grease spots near the stove. It was almost as if the previous owners had flung a vat of oil onto the ceiling. I foolishly tried to just paint the ceiling, but no dice. It took that first coat of paint plus TWO coats of heavy-duty Kilz to get rid of the grease spots.
Lauren says
We primed and painted our nursery with low VOC and it was a huge headache. I love the idea of low VOC, but we were trying to cover blue walls (and not that dark of a blue either) and my poor husband had to do several coats of primer and several coats of paint! Next time I’ll just move out for a few days and use the oil-based primer. It wasn’t worth the extra time!! But yours looks great and I can’t wait to see the finished product!
maribel says
WOW!!!!
Lisa says
Love. Love. LOVE your blog! Thirteen years ago, my hubs and I bought a house that had been foreclosed on and we had to do some major repairs before the bank would even allow the closing to take place. One item on the list was to paint everything. Easy peasy, right? WRONG! The bedrooms were painted very odd colors…one in particular was eggplant purple with bright turquoise trim. While I love all shades of purple, this was grotesque. It took 6 coats of primer before we were satisfied that there was no bleed through. Now it’s a pretty sunny yellow!
Carol N. says
Love the inspiration photo, and when I get home I’ll be repinning that one. We do have black granite countertops and I’m trying to confince my husband that painting the cabinets white (they are oak now) will really lighten up the room. Can’t wait to see how yours turns out!
Meghan Reed says
So fantastic looking! I love how bright/airy it looks now, and I’m sure the room feels so much bigger. I just applied Kilz over the weekend on our side porch – 4 coats! I actually posted it today on my blog – http://www.cheekychicstudio.com
Did you have any issues getting Kilz paint splatter off your skin? Any special tricks? I was finally able to get it all off yesterday and I painted on Saturday. Yes, I did take a couple of showers ;)
YoungHouseLove says
Since ours was the no-VOC kind it was water based so it came right off with water and a good scrub with a wet cloth. But maybe try mineral spirits with the oil-based stuff? We’ve used that in the past. Hope it helps!
xo,
s
Kathi says
Vegetable oil works wonders if you want to avoid the harsh mineral spirits on your skin.
Jennifer says
It already looks heaps better. Kudos to you for sticking it out. I have zero patience and would have thrown myself on the floor and kicked and screamed once I saw the bleed through.
Sarah says
In case you haven’t already picked a wall color, Ben Moore’s “chic lime” is a great green. I have it in my kitchen and it’s the perfect apple/lime green without being obnoxious. Happy painting!
YoungHouseLove says
Thanks for the recommendation!
xo
s
Val says
I used Kilz in my living room on these 2 really random spots–one is pink and one is blue–no clue as to their origin. They eventually bled through, and luckily they are in a place I can ignore them.
Congrats! I am sure that kitchen is already a more joyous place to walk into. Love the yellow-green–that’s the color I am considering for my white kitchen too, probably Benjamin Moore Grassy Green (since the husband won’t go for “American Cheese”). They have great greens and the Aura line is fantastic!
Hillary says
Last summer I painted a pine entertainment armoire — turned it into a computer cabinet. I used three coats of Kilz Clean Start followed by two coats of Sherwin-Williams furniture/trim enamel and everything seemed fine until about a month ago. Now the knots are bleeding through. It’s not terrible, but I can see it.
And, last fall I painted my daughter’s pine bed. I used Sherwin-Williams oil-based primer and the same furniture trim/enamel from the armoire and that is bleeding through at the knots, too. It started within a few weeks of finishing the paint job and it looks awful. Luckily (I guess) my daughter has put dirty footprints all over the white paint and so the knots kind of blend in. :)
Beth says
ok so now I am sitting on the edge of my seat, holding my breath!!! hurry up!!! i cant wait to see it!!!! Its looking a may zing so far!!!
JR says
Looks fab already! Can’t wait to see it painted.
Liz loves Cam says
What a perfect post! I just decided to paint our master bedroom white with a grellow accent wall, but haven’t decided a swatch yet (or convinced the hubby). What color are you thinking of using for the paint? (I’m a shameless YHL copier. I used the same deep teal in my bathroom that you used in your guest bedroom. Gotta love the tried and true colors!)
YoungHouseLove says
We’re be sharing all those paint decision details asap!
xo,
s
Carley says
Your kitchen looks so much bigger and more open! Amazing how lightening the paneling made such a difference.
We painted my grandmother’s paneling many years ago and yikes, it took us forever! Amazing how when we sold her house this year, it still looked great!
Julie says
Looks awesome!! I’m so jealous of your smooth panelling as opposed to my rough and knotty wood panelling I had to paint over. Mine looks beachy and kind of cool, but you can’t even tell there used to be panelling in your kitchen!
Steph says
It looks like a complete different room! I just painted our bedroom “grellow” and everyone thought I was so weird for my “greenish yellow” search (wish I had heard of grellow then!) but I was determined to find a perfect color. I ended up using Benjamin Moore’s Castleton Mist, and I did wide, subtle, vertical stripes using flat and semi gloss both in that shade. I am just so in love with that room and color! I can’t wait to see what color you guys choose!
rachael says
Yesssssssss!! I was so dissapointed yesterday when we didn’t get to see it right away, but this was worth the wait, even though its just primer, its B-E-A-U-T-I-F-U-L!! And again, yes, we have had problems with bleed through. We had dark trim and doors in our whole house and we painted them, and everything was fine except our hallway and bedroom doors. For some reason, they were the only ones to bleed through, and it was maddening. I’m talking like 6 coats of primer and paint before it finally stopped showing through, and now 1 year later there a little streaks showing through again. Grr! At least the primer was guarenteed to cover in 1 or 2 coats, so we got our money back for it from the hardware store.
kelsey says
it looks so great! i am with you about painting brick and paneling. i hate it when people take it down or cover it up with dry wall (most of the time) i love walls with texture, it adds so much more texture. it seems like you really had to work like dogs to get that pine underneath to go bye bye! it looks great and i love love love the new color that you are going to do, it will be such a sunny place.
Emily says
Kitchen is looking great! I know you guys are busy, but I’m wondering if you can tell me if the topiary on the mantel is real or artificial? If real, what kind of plant is it? I’m getting ready to shop for one, but I don’t want it to die right away.
Thanks for your time.
YoungHouseLove says
That’s a faux topiary (I call them fauxpiaries, har-har) from Crate & Barrel a while back. Hope it helps!
xo,
s
Torey says
Did you paint the small parts of paneling on the other side of the kitchen (above the doorway and such?)
YoungHouseLove says
Yup, all the paneling and beams and trim got primed and painted.
xo,
s
Wrenaria says
Fantastic improvement already! (“Already”, I say – pshh – probably felt like a forever process to you.) I have that same kitchen pinned on Pinterest, haha. Great inspiration choice. Also: so much <3 for Pinterest!
Stephanie says
We painted our wood paneling this spring with no-VOC paint, and had the same troubles that you had. Coat after coat after coat. Serious grumpiness.
And then, yes, the KILZ finally helped us out. I wish you had done your project before we did ours; I could have learned from you! ;)
Anna says
I love it – big change – the kitchen looks so much better already. I look forward to see the final product :) Good Luck guys.
MelissaOklahoma says
Three times? Ooooooooh…that’s maddening. We recently painted 98% of our new home and I am in no hurry to pick up a paint brush or can of paint.
But I’m so excited to see what’s next for your dining room/kitchen. I’m sure it will be gorgeous! :)
Erika says
This post brought a little tear to my eye remembering the process I went through to remove the wallpaper in our dining room. It was nightmarish (if that’s a word), to make it right. I posted about it here on my blog so my family might read it and feel bad for me. no luck. http://kitschdesigns.com/post/In-Case-You-Are-Wondering-Why-I-Have-Been-MIAhellip3b.aspx
Once I worked through the massive areas where the drywall came down with the wallpaper I had to patch and prime like crazy! No fun, so I feel ya! Here is the outcome so far. I still need to add a few finishing touches (when I decide what those are.) http://kitschdesigns.com/post/DIY-ndash3b-The-Dining-Room–Finally-Some-Progress-To-Share!.aspx#comment
What you guys have done so far looks really good. Just be glad the paneling didn’t get all oozy and rippled. That happened to a friend of mine and they were forced to rip it all down before they really had the budget for that kind of fix. ugh!
It’s all in the name of style, right?
Can’t wait to see the final color.
YoungHouseLove says
Wow what an ordeal! So glad you cane out alive!
xo,
s
Martina says
1. Our nursery/kids room has painted wood paneling (done before we moved in, thankfully) and I love the striped texture and the character it gives. Plus it’s so much easier to hang art in wood walls. Oh, and it’s more sound proof. 2. You can spray paint your vent covers much cheaper than replacing them. We did that and ours have held up wonderfully for a year now. 3. We recently painted our living room Greek White over the previous Quietude (soft greenish blue) and it took 3 full coats plus some touch up. Why oh why didn’t we buy primer? I had no idea it would be so hard to put white over a (light) color. And this was excellent quality Cashmere paint from Sherwin Williams. So yeah, I can commiserate a little bit. Painting a room in 1 or 2 coats is fun. Anything more that feels cruel.
Martina says
By the way, the room does look much better already! You can hardly even tell it’s paneling in the photos.
meghan says
So….If you’re wanting to repaint trim…what’s the best primer and paint? Do you recommend sanding first? And how do you paint it all without getting it on the floor? I guess my concern is some of our rooms are carpeted :(
Suggestions???
Kitchen looks SO different already! Love it.
YoungHouseLove says
The same recommendations that we made towards the bottom of this post for paneling work for wood trim as well! You can also use drop cloths or large pieces of cardboard to protect the floor. Good luck!
xo,
s
Heather Andrews says
Wow guys! That’s going to look awesome when it’s all said and done!
I can feel your pain. I haven’t painted any paneling, but I painted my living room red. Not just red, either. RED. It looks better than it sounds. It took one coat of gray tinted primer (we were painting over this weird green color), and three coats of RED in most of the room, four in some places. However, I was expecting this going in, because everyone warned me that RED is like that.
Do you guys find that the low VOC stuff doesn’t cover as well? The last room I painted was my husband’s office, in a grassy green. We used the same Olympic, low VOC paint you guys use. It took almost 3 coats of green in some places to get it all even, and we were painting over white primer. I was surprised.
I have another question too… What do you guys do with all your paint samples? I’m painting my nursery, and I ended up with 5 samples of paint before I got the color I wanted. They’re not low VOC, and they’re satin finish, which I’m not crazy about. When I go buy the gallons, it will be low VOC for sure, and in a different finish, but this means I can’t even keep the sample of the color I’m using. Do you (or can you) take them back to Lowes to go in the “oops” rack? Do you keep them? Can you recycle used paint in Richmond? We can, but only once a year on Earth Day, so I usually end up with stockpiles of used paint until April. I don’t mind that, but I was wondering what you guys did with all those little half pint paint jars. :)
YoungHouseLove says
We find that whether we use Benjamin Moore or Olympic No-VOC paint, our plaster walls need two coats. So for budget reasons we go with Olympic No-VOC. It’s definitely not as thick (Ben Moore might get by with a coat and a half while Olympuc needs two thorough coats) but it would be a $50 gallon or a $20 gallon and it only takes a wee bit longer to do a full second coat so it’s worth it for us. If we had to do three coats or buy a second gallon or something we’d rethink it, but so far it’s always two coats on regular walls in this house and our last one. As for paint samples I keep them for smaller projects like DIY art or furniture projects. Then about once every two years I bring the stuff we won’t use to the paint recycling center at our local dump.
xo,
s
Ashley @ Simply Creative Things says
What an amazing difference that made already! Sorry to hear it was such a process to get it there….but just think how happy the finished product will make you compared to those dark paneled walls :)
Azure says
Did you get your idea for the green chairs from that kitchen picture as well? Your room has lot more wall than that kitchen. I hope that’s not too much color for you!
(Not too much for me though; the outside of our house is actually blue and grellow! :) )
YoungHouseLove says
We actually found that pic after the green dining chair idea (we wanted apple green leather for a while but that shot made us reconsider slipcovers though). As for the big wall across from the fireplace, it’ll be gone when we add the wide doorway, so we think it’ll be a nice open room with a dash of color around the perimeter.
xo,
s
Sarah says
I love the white…ahhh so fresh! Makes everything look better. I know you are replacing the electrical covers in a fresh white (relatively inexpensive) but does that mean that you are replacing all the switches and outlets too? (A little pricier) so they match? Or do you have some trick I can borrow? I have a whole house full of bisque/almond/dirty looking outlets and switches i want to be white. I know it is probably crazy, but any thoughts on the possibility of spray painting them?
YoungHouseLove says
We’re planning to buck up and replace both parts. It should be around $40 but it’ll look so fresh and new that we think it’s worth it (I’ve tried spray painting them but when you plug in the vacuum it scrapes off over time and looks cheap). Hope it helps!
xo,
s
Kari says
I CAN’T wait to see what you do with your cabinets. My cabinets and counters are the exact (or appear to be) same as yours. I was really considering trying the Rustoleum product to pain/stain cabinets but wanted to do a little more looking around. I’m thinking an espresso color. Eventually I would like to replace them for taller ones, but for now, painting saves about 10K…(gulp). Our kitchen started off powder blue (i know, horrible), and I painted it Sharkey Gray by MS and it looks great. We also have bead board in our kitchen, so it has some white in it already, which looks good with the warm gray.
i’m rambling (ha!), but long story short, I can’t wait to see how you update your cabinets, and the tips you have to offer.
Kami says
Question: I have the same paneling in the man cave and the office that was painted a horrible mauve color by the previous owners. Do I still have to use an oilbased primer before painting the walls?
YoungHouseLove says
For the best durability and finish I would use some sort of primer (either the No-VOC Kilz or something oil-based).
xo,
s
Lisa Nairn says
We painted the soffit in our kitchen recently and it was a nightmare. It had that really thick vinyl wallpaper on it and when we tried to take it down the wall came with it. We decided to just paint over it. 11 coats later… It had blue stenciled flowers on it and they wouldn’t cover. 6 coats of primer/paint and then 3 coats of Kilz followed b 2 more coats of primer/paint. It’s now probably 25 lbs heavier up there and I think we lost some square footage in the kitchen from it.
elle C. says
Oh man, I totally feel your pain. You two are very determined, but honestly, it’s a bit of a relief to hear that you get really frustrated sometimes. It was actually inspiring enough to get me to write this post that I hadn’t had the motivation for previously. Our entryway seemed like it would never come together. After painting 3 different colors before realizing that it was the TEXTURE that was the problem, we retextured, sanded, kilzed, primed, did an all-over stencil that I am now in the midst of giving a second coat. So thanks for keepin’ it real J & S!
If you ever find time to read my misadventure, I’d be honored to commiserate with you! http://memoirsofawannabegypsy.com/2011/06/before-almost-after-entryway-how-this-room-fought-to-get-noticed/
YoungHouseLove says
What a long journey you’ve had with that entryway but it’s amazing now! Congrats on living to tell the tale!
xo,
s
Lindsey says
I’m really feeling the grellow..:) Great info here, thanks guys!
Mindy@FSL says
I can commiserate. Our bathroom was painted a very intense yellow. We wanted it white. Three coats later & sometimes I can still see yellow peeking through. Here’s a link to the bathroom’s before & afters so you can peek if you want.
http://fisilis.wordpress.com/2011/06/09/small-bath-makeover/
It is a very small room. I can’t imagine how crazy I’d get if the room was bigger. I feel your pain guys…
xo
Mindy
Amanda B. says
Is anyone else grossed out by the term “grellow?” The concept is fine, and the color in the inspiration photo is really pretty, but for some reason the word itself is weirding me out. Language is crazy sometimes.
And speaking of crazy, I painted over WALLPAPER in my kitchen/dining room. Two coats of oil-based Kilz and two coats of latex paint. It was a four-day fume-fest, but it was easier than removing the wallpaper and the drywall repair that was sure to ensue! I didn’t really know about low-VOC paint back then, but thanks to you guys I will go the healthier route next time!
Megan Sanders says
First off, you do realize your orgiinal tutorial about painting panelling is labeled: Painting Wood Paneling (It’s Easy), right? Tee-hee!
Second, about this oil-based primer. So, I’m usually a laytex kinda gal (that’s what she said) but I’ve painted a few pieces of wood furniture in the past and haven’t been thrilled with the results. The paint often chips or peels pretty quickly so I recently used your tip about using an oil-based primer. Turned out great BUT, how the heck do you clean the brushes? I tried Klean Strip Brush Cleaner (recomended by a guy in orange) but the primer just gummed up and wouldn’t come clean. I ruined a $12 brush and that’s a lot for me, Miss Cheapee-McCheapskate! So how about a clean-up tutorial?
Thanks for your blog-I’ve ripped off lots of ideas from you. Please house crash me if you are ever in the midwest!
YoungHouseLove says
Oh the irony of that initial panel-painting post. Haha. As for your brush cleaning question: mineral spirits were our go-to oil-brush-cleaning trick! Hope it helps.
xo,
s
Laura says
Looks great! I wouldn’t be so sure it was the voc-free paint that required the multiple layers. I primed the interior of a walk in closet recently, that was all dark stained/varnished hard wood, and even though I used the stinky traditional primer, it still bleed through and needed 3 coats. Can wait to see how you guys handle the cabinets. :)
Leslie says
All I can say is, “lightweights!” My hubby and I have painted paneling BEFORE Kilz was invented using breathing apparatus and disgusting oil-based primers. It took us 2 weeks because we had to let the paint dry and cure between coats – otherwise, bleed-through. We also had to move out because of the fumes. So, dry your tears and give credit to the painting pioneers who came before and blazed a trail!!!!
YoungHouseLove says
Mad props to you. You’re definitely hardcore!
xo,
s
ashe says
Oh Petersiks! This just happened to me! Going against your advice from your first panel painting experience, I attempted to paint my paneled office with a low VOC Valspar primer (left over from a friend’s redo). But three coats in, the walls were still turning yellow! So I went back to your blog and then to Sherwin Williams and bought the oil primer. So the office got two coats of that and then two coats of the color and sigh… Four days and SEVEN coats later, I am finally enjoying my paneling.
Glad you guys made it through! Looks great!
Ashley @ DesignBuildLove.co says
already looks better! Can’t wait to see the end result!!!
LJ says
We primed our whole house with Valspar’s primer and ended up having to paint 3 coats throughout the whole house! For the forth coat we decided to just pony up and head out to Benjamin Moore. More expensive but it would have saved us a TON of time.
The same was true with our cabinets.
GregC says
I used Kilz no-VOC on some wood bathroom cabinets that I cleaned w/TSP. It still took 3 coats in spots to cover up the bleedthrough.
Mary says
It already looks SO much better! I have a paneled family room and foyer that are my next projects. Luckily the family room was already painted so that shouldn’t be as much work. My son calls the side foyer “the lodge” because of the dark paneling. Gotta love Richmond houses! Everywhere I’ve lived here has had paneling in some portion of it.
mribaro says
Are you going to paint all of the kitchen cabinets white? White top cabinets with black bottom cabinets might look nice and modern too. And the granite counter would tie in well with both. And the cheery green would look nice with both too.
YoungHouseLove says
I think we’re 99.9% sold on white cabinets all around (we love that look from our first kitchen). Also since the cabinets on the right side as you face the microwave aren’t uppers and lowers (they’re just large pieces from the floor to the almost-ceiling) we thought it would look unbalanced to have dark lowers on one side since there aren’t lowers and uppers on the other side.
xo,
s
mribaro says
Yeah, that makes sense. It’ll look great all in white too!