And now, for the dang paneling update. Hold on to your hats ladies and gents. This post = wild ride.
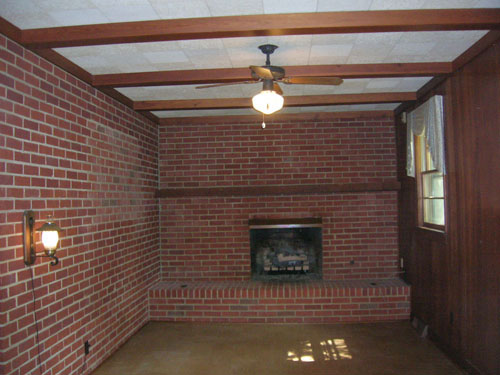
As you probably know, we’re no strangers to priming and painting paneling. Sure we could remove the paneling, but it would mean removing and rehanging all the cabinets since they’re hung in front of it – and revealing goodness knows how many scary issues behind it (they’re old plaster walls so that just felt like a big ol’ can o’ worms). And we could attempt to drywall over it (but it would mean drywalling around the existing cabinets and a lot more expense/trouble than just painting it). So we decided early on that we’d once again say yes to painted paneling – just like we did in our former den (which ended up being our favorite room in the house) when it (slowly over the course of 4.5 years) went from this…
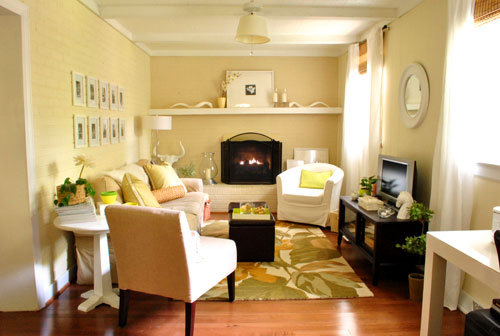
… to this:
We never regretted the whole painted paneling choice – I guess it’s just like painted brick to us (we don’t mind the grooves that remain after it’s painted since they just add charming and subtle texture). But folks have caulked or puttied those grooves to hide ’em, so you can always do that (or rip it the heck out) if it’s not your thing.
But this time there was a slight variation to the painted paneling process since the last time we tackled it. That variation: the time that it took to get ‘er done. Last time it took us an afternoon (more on that here). So we went into this whole priming and painting thing with high hopes that it would be a quick little project. Yessiree, an afternoon spent completing the paneling would have been awesome (as would seeing a unicorn on our front lawn or finding out that Burger laid golden eggs). Spoiler alert: that didn’t happen.
The time difference was all because we decided to attempt to prime and paint our paneling the no slash low VOC way this time. Just because we like the idea of avoiding as many harmful fumes as we can since we work so regularly with paint and caulk and primer (especially now that we have a baby around). We knew this choice wasn’t a short cut. Heck, it would crack our margin for error right open (since oil-based stainblocking primer is the only professionally recommended way to guard against nasty yellow-orange wood-bleed, which can ooze through as you prime and paint). But we thought it was a risk worth taking in the name of family health. And it was in the end… it just took a while to get there. So here’s how it all went down.
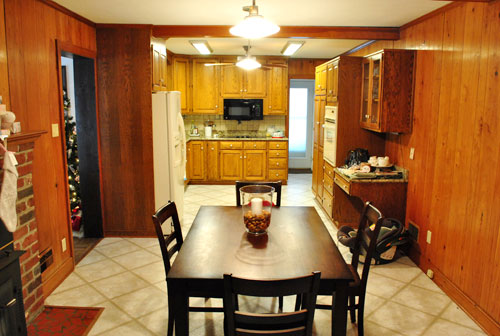
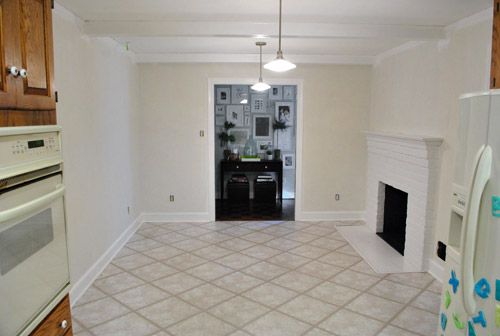
First, here’s what our kitchen looked like before we embarked on our little priming adventure:
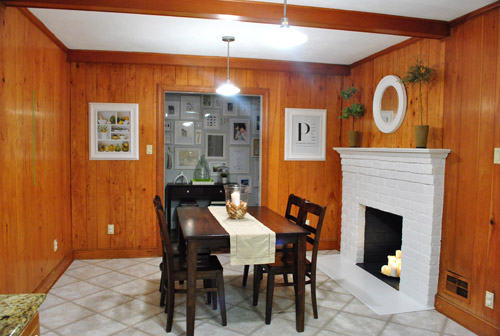
And here’s an old shot of the kitchen from the other direction just for reference (it was actually taken a while back, before we removed the wood stove and painted the fireplace):
Step 1: We wiped down the paneling, beams, and trim with a moist cloth. Some people use TSP for their wipe-down, but we didn’t (didn’t use it last time we painted the den paneling either – but it’s not a bad idea, especially if your paneling feels especially greasy). We also didn’t sand at all (didn’t last time either) but you can if your paneling is especially tough, splintery, or super glossy & shellacked.
Step 2: We removed the vent covers and outlet covers since we decided that we’d be replacing them all (they were bisque and we wanted fresh white).
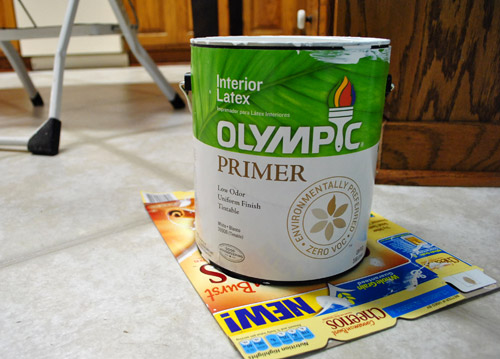
Step 3: We spent about three hours applying a coat of primer to the trim, beams, and paneled walls with Olympic No-VOC primer.
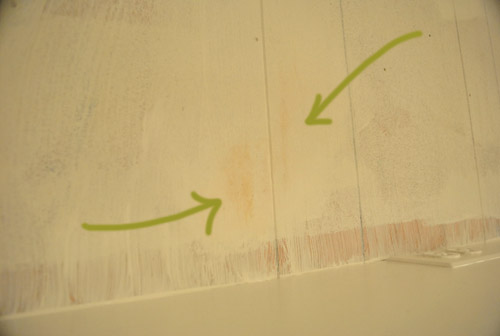
After our first coat it looked like this (about fifteen minutes in we knew we were in trouble):

Primer never needs to be super consistent and perfect looking (it often looks uneven and rough but still totally does the job) but we experienced almost immediate bleed-through in a number of spots (when the orangey-brown stain of the wood seeps through the primer and threatens to ruin your paint job). Not good.
Step 4: We waited for that to dry a bit and tried a second coat of the same primer in certain obviously-bleeding spots, hoping it would block more nasty orange seepage. Nope. It did not.

Step 5: We noticed that we had a can of Behr Primer + Paint (in white semi-gloss) in the basement from a previous project (which is low-VOC and nice and thick) so everything got a coat of that (yup, the trim, beams, and paneling got another full coat).
We still had bleed through. Not much, but in certain places it was definitely still there. And it was maddening.
Step 6: We went to Home Depot and found Kilz Clean Start No-VOC primer. It said “stainblocker” right on the label so we gave it a shot on everything (yup, another full coat of a third type of primer went up on the trim, beams, and walls).
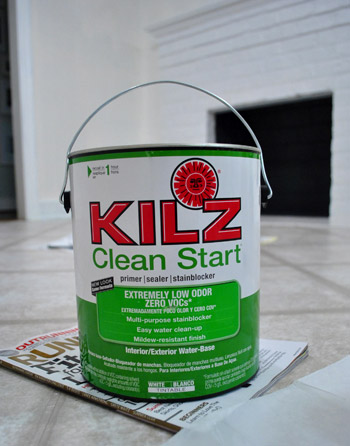
It worked. Angels sang and two white-haired Petersiks rejoiced in the privacy of their freshly primed (finally) kitchen.
Step 7: We painted just the trim and beams with our Behr Primer + Paint (in white semi-gloss) since leaving things primed but not painted for the long term can lead to a nasty and grungy hard-to-wipe-down mess (it’s a dust and dirt magnet since primer is intentionally sticky for paint adhesion). Happily the Behr stuff had great coverage over that last coat of Kilz and looked glossy and amazing. A sight for sore eyes (and arms).

Step 8: We removed all the painter’s tape while the last coat of paint was still fresh for the cleanest lines possible (waiting for everything to dry can cause the paint to peel when you remove the tape). In cases when it was stuck to the primer/paint, we used an exacto knife to carefully slice it along the line of the tape so the primer/paint wouldn’t get pulled off with it.
We’re usually happy to avoid painters tape when we can (I rely a lot on this little miracle short handled brush instead) but since I’m short and I’m the resident cutter-inner/edger, I don’t have as much control up on a stool. So taping around the ceiling trim (and in this case tossing down a quick frame of tape around the baseboards) helped me go faster while I was happy to freehand around the door frames and fireplace.
About 48 hours after the beginning of our priming adventure, it finally looked like this. The trim looks whiter because it’s topped with that semi-gloss Behr paint and not just a flat finish white primer (which was more creamy and less snow-white-ish in color). Now we just have to paint those walls.
We’re not sure if the Kilz No-VOC primer worked because it was the best choice for the job or because it was layered with the other methods beneath it (perhaps on its own you’d need two or even three coats of it to get full bleed-blockage) but we definitely would recommend 2-3 coats of Kilz Clean Start No-VOC primer followed by two thin and even coats of latex paint if you’re planning to paint your paneling without messing with fumey VOCs. Fingers crossed that’ll work for ya. Otherwise one coat of oil-based stainblocking primer followed by two thin and even coats of latex paint should do the trick (find more step by step instructions on that method here).
It probably won’t take you an afternoon if you go low/no VOC (it took us two days with some babysitting help from John’s parents just to complete the priming stage). And we’re not gonna lie. It was not fun. But it was worth it as soon as we got through to the other side. You know, when we finally crossed that rainbow bridge from bleed-ville to clean-white-walls… hallelujah. It should be mentioned that in very rare cases bleed can come through weeks or even months later (which would make us want to stick paintbrushes in our eyes). Thankfully we painted the wood trim in the living room using the same no-VOC method (four coats of Olympic Premium Paint instead of with an oil-based stainblocking primer) five months ago and nothing has since seeped through. And because the baseboard and trim in the kitchen is the same exact wood, all signs point to: this should work. Of course we’ll tell you if something supremely annoying happens though.
So if somebody would be so kind as to do a nap-time dance for Clara, we’d really appreciate it. So far swinging her stuffed giraffe back and forth and saying “you are getting sleeeepy” isn’t quite doing the trick. Well it’s making us sleepy, but we’re not the target. Has anyone else tried to paint paneling without VOCs? Or been forced to apply four coats of paint or primer for any reason at all? Sucks right? Let’s commiserate.
Psst- Read more about the whole Phase 1 kitchen plan here.

Johanna says
Love the color idea! That’s exactly what I was picturing when you first started posting about painting the kitchen paneling!
Audra says
I recently painted my basement stairs, walls, and floor. I first tried drylock (awful), then primed each wall (brick and cinderblock) 3 or 4 times. And the wooden door bled through with stain when I primed. I eventually learned I should be using “blockfiller” instead of drylock. Lesson learned. But, I can tell you, KILZ is a life saver. It really does give you a fresh start. I’m using it to re-paint my bathroom ceiling.
My basement paint job:
http://audrasally.blogspot.com/search/label/my%20home%20improvement
Good luck and great job!
-Audra
Carolyn says
Now it’s looking like a Petersik house! That orangey paneling was driving me crazy in pictures–I can imagine how it felt in real life! We have orange-oak 1980s cabinets in our kitchen that we are about to start painting. Thanks for all the great tips! And congrats on your hard work paying off in the end!!
Jenne says
We bought my in-laws’ house, and one room had paneling that my mother-in-law wallpapered the top half and painted the lower half – on two walls. The other two walls she painted & then glazed. When the paneling started to crack & separate, splitting the wallpaper, we knew it was time to redo the room.
Down came the paneling, out came the spackle. 379 spackled holes later, we pulled out our regular, full fume KILZ primer. There were some 70s-era limericks written on the wall in turquoise marker (hubby’s parents bought the house in 1979, and the paneling was already up) but KILZ covers everything, right?
NOT!
We did 3 coats of primer and the limericks kept popping through – like we wrote on top of the primer! We tried just primering over the limericks – 3 times! Nada. We tried gray auto body primer. Ha!
Finally, hubby lost patience and got the rust red, sandable auto body primer & fill. Huzzah! No more limericks. Two coats of Kilz, two coats of paint and finally done.
I don’t know what they put in markers made in the 70s, but I’m tellin ya, if anyone ever encounters it, go straight for the automotive body primer/fill – and save yourself the aggravation ;)
YoungHouseLove says
Holy cow that sounds like a nightmare! Glad you got ‘er done.
xo,
s
Jennifer B. says
When we moved into our house, everything (I mean EVERYTHING) was painted the same strained peas/asparagus color. The walls, the ceiling, the doors, the trim, the vents, the door hinges…. it was a nightmare. With the help of lots of friends, we painted with Behr paint+prime and mostly loved the results. I stare up at our bedroom ceiling every night and notice the crappy job of cutting in that we did (first room we painted, definitely needs another coat). A year later, we’ve only got the front door & back door left to paint! Hooray!
Erinn C. says
I SWEAR by Kilz…its all I have ever used for my painting projects. I have been wondering about the low VOC kind but too afraid to try it out in fear that it didn’t work as well.
http://www.oururbanrenewal.blogspot.com
Jennifer B. says
By the way, the kitchen looks AMAZING already. You guys rock.
Cindy says
We just bought a house and started painting… all the rooms are in semi gloss, including the ceiling. The ceilings are taking 2 coats of flat white to cover and the walls (including the beautiful bright yellow *gag*) are requiring 2 coats of primer to cover. I’m about to pull my hair out and hire my dad to do it.
Emily says
Looks great! Isn’t it fantastic how much a few (or dozen) coats of paint can change a room?
My kitchen cabinets took forever. So many coats. I cried a bit. But now every time I look at them I think it was so worth the tears and labor.
Leah says
We used Kilz primer on our wood panelled den– painted a year ago and no bleed through. It worked way better than we were expecting!
Suzanne says
What a huge difference already even with the primer but no paint on the walls!! I’m excited to see the cabinets painted.
Debbie says
It already looks a hundred times better! well worth the effort.
Here’s something I found recently that I think is genius… have you seen it? do you have any plans for your fridge??
http://www.bhg.com/kitchen/remodeling/makeover/dramatic-diy-kitchen-makeover/
YoungHouseLove says
Oh yeah I love that project! We want a less rounded counter depth fridge someday though. But it could be fun in the meantime though.
xo,
s
Korie says
I just pinned that exact picture on Pinterest! The green paint is so refreshing :) By the way, you should go check out the sale section at West Elm online, I saw your fave Coco Mirror back in stock!! For $159.99, I think. I saw it this morning so you might be able to snatch it up in time!
YoungHouseLove says
Wahoo! Thanks!
xo,
s
bridget b. says
guess what! if you stop by the store you might be able to get it even cheaper. i bookmarked some bedding items online at west elm late last saturday night (right after i read your kitchen table post as a matter of fact).
when i went by the store on sunday afternoon, everything that was already on sale on the web was marked down even more in the store. SCORE!
Sevi says
Hey guys,
Is that panelling made from pine? Cause in Turkey (that’s where I live) pine cabinets (and paneling but not very often) with a terrible orangey finish were veeeery very popular, before they found out mdf and much cheaper solutions could be used for kitchens as well.
On those pine cabinets, there’s always a thick and shiny coat that drives you crazy when you think of sanding and repainting. I have never seen anyone who dared doing it here. Even my mother-in-law has just recently changed her wood(pine) kitchen cabinets even they where in great condition to a non-wood solution.
So I was waiting for your work in the kitchen (to tell all Turkish DIY lovers it could be done lol) but I thought you’d sand those panels and was wondering how you’d manage it. Now you did surprise me :)
YoungHouseLove says
I think they were a thick faux wood (trim was pine though). Annoying but worth it for sure!
xo,
s
justine @ you're so martha says
this post comes at the exact right time, thank you. i’m doing my first furniture makeover piece, a dresser. i’ve done two coats of zinsser bulls eye 1-2-3 primer (water based) and have these weird brown spots that i couldn’t figure out what they were or why they were coming through two coats of my primer – and if they would come through my final coats of paint. google was no help (i couldn’t believe it)! now i might run out and buy the oil-based primer or the kilz primer and see if that helps.
the white is a huge improvement, can’t wait to see the final color!
melissa says
the first thing we did when we moved into our house was paint the god-awful paneling on the wall – if you can call it paneling – it kind of looked like someone laid a hardwood floor vertically – interesting. we debated ripping the sucker down but opted to paint and we love it – a little texture in the same color as the rest of the room – a focal wall without it screaming at you like the wood floor wall did before. we sanded the HECK out of it (i think we went over the wall 2 or 3 times with the palm sander), then primed & painted 2 coats – so far it’s holding up great! :)
Kim @ Yellow Brick Home says
That grellow looks great with the white cabinets – I’m loving your inspiration photo!
We used a similar color (Behr’s Honeydew) the first time we painted our kitchen, but it just didn’t work with our wood-toned cabinets… it was too, I guess… jarring? The color itself sounds exactly what you’re going for though! And luckily a pale blue soothed our worries (and a blackboard back splash!).
Can’t wait to see this progress!
Tina says
The change is amazing!
Lonely Wife Project says
What a difference even the primer makes! Looking forward to the next step!
Emily says
We have the exact same inspiration pic for our kitchens! (And i’ve got the black counters to match!) Have you chosen a green yet? I was leaning towards Bher’s mojito (the swatches have been on my walls for a month now)but i’m having trouble biting the bullet. It feels too yellow…
YoungHouseLove says
We still haven’t made a final decision but we’ll share it when we land on it for sure!
xo,
s
Veronica says
We have paneling in our library that we painted over. We used a Kilz latex primer with an oil based paint over it. We used the oil based paint becuase all of the trim in our house was already painted in that (by previous owners) so it blended it. I recently noticed some bleed through in a couple of areas (about a year later!) Ever heard of that with an oil based paint? Any suggestions?
YoungHouseLove says
Oh man I haven’t. Maybe in those areas it just needs an extra coat of the primer (or two) to further block that worse-than-average bleed? Maybe try asking at the home improvement store to see what they recommend?
xo,
s
Ariel says
http://www.westelm.com/products/ikat-ogee-linen-window-panel-s010/?pkey=csale-new
Sherry,
Your drapes have gone further on sale…surely you still have a need for some window panels somewhere! ;)
Ariel
YoungHouseLove says
Thanks so much for the tip!
xo,
s
Melissa S says
It is going to look amazing when finished!! I can’t wait to see it. Out of curiosity though – do you think the white appliance with white cabinets will look okay? Or do you plan to replace those too? Thanks for the help! :)
YoungHouseLove says
We definitely plan to replace them someday with stainless ones that are energy star rated- and that actually match (since some are white, some are bisque, and some are black).
xo,
s
annabelvita says
Have you guys noticed that the phrase “Young House Love” is being used as a metaphor for mom n dad working together on Ohdeedoh today? (Just above your fab profile):
http://www.ohdeedoh.com/ohdeedoh/ohdeedads-where-were-you-in-the-nesting-process-150235
Love it!
YoungHouseLove says
Haha- we LOVE it. Lots of blushing over here.
xo
s
elaine says
Looks great! Quite the marathon but if any team can do it, it’s you two! Keep up the great work ;). Imagine this your virtual water station as you sprint past towards the finish line!
Jennifer says
Roughly 50% of our house was wood paneling and I used no VOC Kilz primer… it was amazing! I have not had any bleed through at all!
Love your inspiration kitchen :)
Susanna says
Were the previous owners (or maybe even the ones before that?) indoor smokers? That looks like tobacco bleed through. Even when the smell is gone it can seep through the paint.
YoungHouseLove says
Not that we know of – but it was right above the fireplace, so we thought it might have been soot related?
xo,
s
Penny says
It is starting to look awesome! I am about to start on my paneling and was anxiously awaiting your post today. I do have a quick questions, do you have an easy tip for getting into the grooves of the woodpaneling?
Love your posts and am a huge YHL fan! Have a great week!
YoungHouseLove says
I used my brush to go over anything that the roller didn’t get. Thankfully I caulked the very deep grooves in the corners of the room where the paneling met, so the groves between each panel wasn’t usually too deep (so the roller got in there for the most part).
xo,
s
Laura says
Have you used/seen Sherwin Williams’ “Multi-Purpose Oil-Based Primer — Low Odor Oil-Based Formula”? I recently decided to tackle a paint-the-furniture project (inspired by one of your posts!) and used the above as a primer. Worked GREAT. No bleed-through and I never noticed a smell (granted, I was working in the garage with the outside door open).
YoungHouseLove says
Haven’t tried that one, but thanks for the review!
xo,
s
Sharon Schech says
John & Sherry,
My poor husband had to paint our youngest daughter’s bedroom eight, yes I said eight, times to get the hideously orange color she had chosen. It was her school color and she wanted it so much that we caved and agreed. Well we are now getting ready to redo her room into a more pleasant color. I just hope it doesn’t take the same amount of work to “undo” her first choice. We will definitely prime first then a soft gray so I no longer need sunglasses to walk into her room. Yeah for small miracles. Just wait your turn will come when the little bean chooses her paint color and you cringe through the smile.
Mary @ stylefyles says
grellow will look awesome in there!!!
Jill says
LOVE the kitchen color! My closet is painted a very similar shade of grellow with a pickled white wash over it. LOVE IT. Yes, it is just my closet. lol
I am so glad yall found KILZ. I don’t trust ANY other primer. It usually KILZ it in one good thick coat. We use it when painting over wallpaper (gasp, I know, cardinal sin #137 but we’ve done it thrice now with rave reviews). I am definitely going to go for the low/no VOC thing next time simply because paint fumes give me a mondo headache for daaaaaays. We have one more wallpaper laden room (Master Bath with ceilings up to the heavens) to tackle. Just trying to figure out what color to do!!!
Jenna says
It looks amazing. My old roommate painted his walls in reggae colors… needless to say black and red are insanely stupid to paint over. The rule was “you paint it crazy colors, you paint it back when you move out.” He didn’t paint when he moved. It took me three primer coats then a coat of behr primer & paint to cover all of it up!!!!
RebeccaMac says
We’ve painted a lot of paneling too. Over time (a couple years), the knots will bleed with latex and oil based primers. Shellac primer is the way to go to guarantee no bleeds. Smelly though. Good luck. Can’t wait to see the final result!
Meagan says
Now you see why so many people hate painting… haha! The inspire kitchen was one of my inspire kitchens when we redid ours a few months back. I love a fun green kitchen!! Can’t wait to see how it turns out!
lilcg says
yes, I painted the paneling in my family room last summer. it took two coats of the kilz no voc primer and then two coats of no voc sherwin williams white paint to cover it.
my only regret? I wish I had caulked the seams between the paneling sheets. I kind of like the lines, but the seams between the sheets themselves don’t look that great.
Natasha says
Looks like it will be fabulous! Good Luck!
Erin says
Been there. Done that. Twice. Ugh.
I’ve been burned by the whole bleed through issue too many times so now I spot prime all knots with BIN shellac primer to seal those suckers up FOREVER. But if there was ever a paint that is NOT low VOC, that has to be it and I don’t blame you for wanting to go that route with Clara around.
It’s a total pain but it’s SO much better!
Monika says
The power of paint (and an obscene amount of primer) never ceases to amaze me. It already looks a million times better, it finally feels like the kitchen is starting to fit with the rest of the house. I’m super excited to see what the grellow will look like.
I hope that the painting process goes much smoother than the priming! :)
Kayla says
If you decide that oil is the best way to go next time, definitely check out this primer! I know the VOC’s are still an issue, but you won’t have any problem with the heavy, oil paint odor, and will still get oil-based results! It’s a compromise, at least.
It’s called Kilz Odorless Interior Oil-Based.
http://www.lowes.com/pd_124986-807-10941_0__?productId=3010355&Ntt=primer&pl=1¤tURL=%2Fpl__0__s%3FNtt%3Dprimer&facetInfo=
Cari says
Wow – even the white makes such a difference! I once lived in a rental with the same paneling all throughout the living room and I tell you it was the bane of my existance not being able to paint it!
Loving the idea of the ‘grellow’ to tie in the other rooms. I have the napkins from Crate and Barrel and I think we both need this rug for our kitchen:
http://www.habitat.co.uk/candy-rug///fcp-product/980318
YoungHouseLove says
Oooh fun.
xo,
s
Heather says
Okay. Even just primed, the kitchen looks SO. MUCH. BETTER. Paneling is the bane of my existence too, and I’ve never even had to paint it!
And I absolutely adore the color you’re planning on going with. We’re actually planning on doing ours the same shade!
Ashley @ 7HL says
Wow! The primer makes such a big difference! I literally said “Whoa!” when I scrolled down and saw the “after” photos! Looking forward to watching the rest of progress :)
Morgan says
We have Benjamin Moore’s Beacon Hill Damask in our house which is a greeny yellow. It’s in our kitchen/family room and we love it. But it definitely reads more yellow overall. Good job so far!
YoungHouseLove says
Thanks for the paint tip!
xo,
s
Lindsay@Tell'er All About It says
Yay! Looks like I didn’t need to come out and help you guys paint after all! haha! Looks amazing – even if it is JUST primer! Wow, what a difference!
Rhiana says
Our finished basement is full of knotty pine. About three years ago we used the kilz no voc primer and we haven’t had a bleed or peel yet and that part gets lots of abuse because it is my son’s playroom. We also painted the whole thing with paint brushes, I felt the roller leaves a bit of a texture behind that I preferred not to have. We also gave the big, dark knots a swipe with the paintbrush before we really started priming for just a bit of extra coverage. There is nothing fun about this chore but it is gratifying once done! Can’t wait to see the new color for the walls!
YoungHouseLove says
Wahoo! That’s great to hear since you did it so long ago! Three years with lots of kid contact is definitely the test of time! Here’s hoping ours has the same staying power!
xo,
s
Christy says
Wow guys, it really looks great already! Can’t wait to see the walls with some color. We are currently trying to decide on a color for our kitchen cabinets. We are almost 100% on Valspar’s Smoked Oyster. I would love to do a fun color on the wall like you guys but my DH isn’t seeing my vision, lol!
Dana says
Lookin’ goooood!! It looks like a totally different house!
Megan says
I know how you guys feel. In our old house our living room was dark wood paneling. We primed and painted for days it seemed. We also had the help of my parents. I can’t remember how many coats of each it took but I know it was A LOT. It was so worth it in the end though!!
Mary says
I’ve always read that if you’re refinishing wood cabinets, you should de-grease them first. I’m planning on painting my wood ceiling (dark tongue-and-groove that makes the room feel small). Do you think I should de-grease it first or just stat with the primer?
YoungHouseLove says
It definitely wouldn’t hurt. I would say just go for it so you’re not worried about it later in the process. Good luck!
xo,
s