And now, for the dang paneling update. Hold on to your hats ladies and gents. This post = wild ride.
As you probably know, we’re no strangers to priming and painting paneling. Sure we could remove the paneling, but it would mean removing and rehanging all the cabinets since they’re hung in front of it – and revealing goodness knows how many scary issues behind it (they’re old plaster walls so that just felt like a big ol’ can o’ worms). And we could attempt to drywall over it (but it would mean drywalling around the existing cabinets and a lot more expense/trouble than just painting it). So we decided early on that we’d once again say yes to painted paneling – just like we did in our former den (which ended up being our favorite room in the house) when it (slowly over the course of 4.5 years) went from this…
… to this:
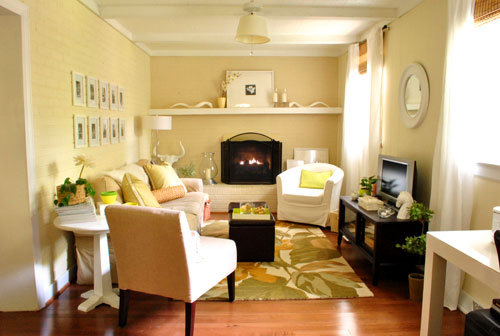
We never regretted the whole painted paneling choice – I guess it’s just like painted brick to us (we don’t mind the grooves that remain after it’s painted since they just add charming and subtle texture). But folks have caulked or puttied those grooves to hide ’em, so you can always do that (or rip it the heck out) if it’s not your thing.
But this time there was a slight variation to the painted paneling process since the last time we tackled it. That variation: the time that it took to get ‘er done. Last time it took us an afternoon (more on that here). So we went into this whole priming and painting thing with high hopes that it would be a quick little project. Yessiree, an afternoon spent completing the paneling would have been awesome (as would seeing a unicorn on our front lawn or finding out that Burger laid golden eggs). Spoiler alert: that didn’t happen.
The time difference was all because we decided to attempt to prime and paint our paneling the no slash low VOC way this time. Just because we like the idea of avoiding as many harmful fumes as we can since we work so regularly with paint and caulk and primer (especially now that we have a baby around). We knew this choice wasn’t a short cut. Heck, it would crack our margin for error right open (since oil-based stainblocking primer is the only professionally recommended way to guard against nasty yellow-orange wood-bleed, which can ooze through as you prime and paint). But we thought it was a risk worth taking in the name of family health. And it was in the end… it just took a while to get there. So here’s how it all went down.
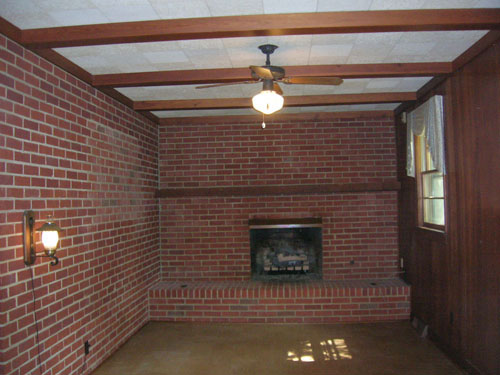
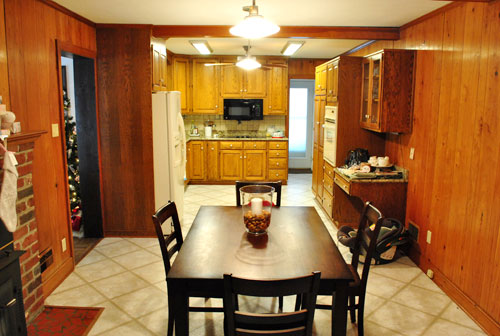
First, here’s what our kitchen looked like before we embarked on our little priming adventure:
And here’s an old shot of the kitchen from the other direction just for reference (it was actually taken a while back, before we removed the wood stove and painted the fireplace):
Step 1: We wiped down the paneling, beams, and trim with a moist cloth. Some people use TSP for their wipe-down, but we didn’t (didn’t use it last time we painted the den paneling either – but it’s not a bad idea, especially if your paneling feels especially greasy). We also didn’t sand at all (didn’t last time either) but you can if your paneling is especially tough, splintery, or super glossy & shellacked.
Step 2: We removed the vent covers and outlet covers since we decided that we’d be replacing them all (they were bisque and we wanted fresh white).
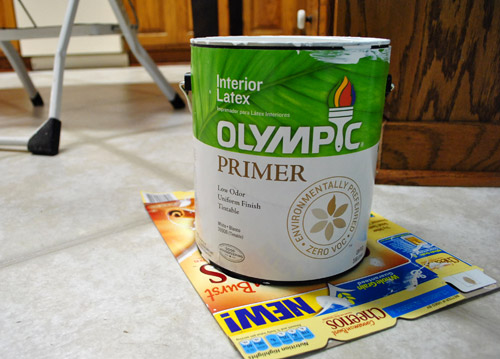
Step 3: We spent about three hours applying a coat of primer to the trim, beams, and paneled walls with Olympic No-VOC primer.
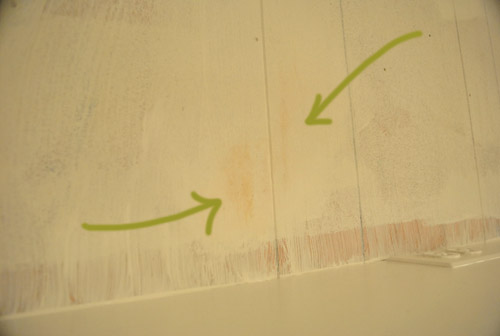
After our first coat it looked like this (about fifteen minutes in we knew we were in trouble):

Primer never needs to be super consistent and perfect looking (it often looks uneven and rough but still totally does the job) but we experienced almost immediate bleed-through in a number of spots (when the orangey-brown stain of the wood seeps through the primer and threatens to ruin your paint job). Not good.
Step 4: We waited for that to dry a bit and tried a second coat of the same primer in certain obviously-bleeding spots, hoping it would block more nasty orange seepage. Nope. It did not.

Step 5: We noticed that we had a can of Behr Primer + Paint (in white semi-gloss) in the basement from a previous project (which is low-VOC and nice and thick) so everything got a coat of that (yup, the trim, beams, and paneling got another full coat).
We still had bleed through. Not much, but in certain places it was definitely still there. And it was maddening.
Step 6: We went to Home Depot and found Kilz Clean Start No-VOC primer. It said “stainblocker” right on the label so we gave it a shot on everything (yup, another full coat of a third type of primer went up on the trim, beams, and walls).
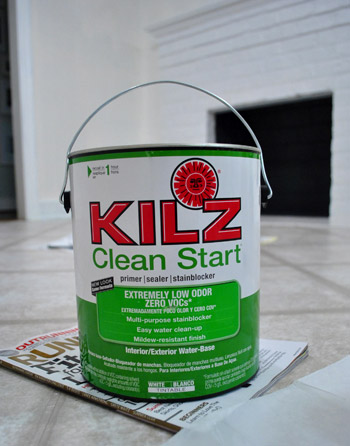
It worked. Angels sang and two white-haired Petersiks rejoiced in the privacy of their freshly primed (finally) kitchen.
Step 7: We painted just the trim and beams with our Behr Primer + Paint (in white semi-gloss) since leaving things primed but not painted for the long term can lead to a nasty and grungy hard-to-wipe-down mess (it’s a dust and dirt magnet since primer is intentionally sticky for paint adhesion). Happily the Behr stuff had great coverage over that last coat of Kilz and looked glossy and amazing. A sight for sore eyes (and arms).

Step 8: We removed all the painter’s tape while the last coat of paint was still fresh for the cleanest lines possible (waiting for everything to dry can cause the paint to peel when you remove the tape). In cases when it was stuck to the primer/paint, we used an exacto knife to carefully slice it along the line of the tape so the primer/paint wouldn’t get pulled off with it.
We’re usually happy to avoid painters tape when we can (I rely a lot on this little miracle short handled brush instead) but since I’m short and I’m the resident cutter-inner/edger, I don’t have as much control up on a stool. So taping around the ceiling trim (and in this case tossing down a quick frame of tape around the baseboards) helped me go faster while I was happy to freehand around the door frames and fireplace.
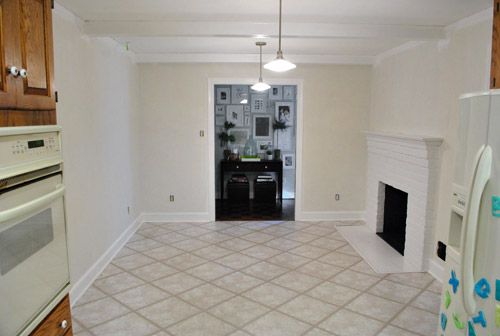
About 48 hours after the beginning of our priming adventure, it finally looked like this. The trim looks whiter because it’s topped with that semi-gloss Behr paint and not just a flat finish white primer (which was more creamy and less snow-white-ish in color). Now we just have to paint those walls.
We’re not sure if the Kilz No-VOC primer worked because it was the best choice for the job or because it was layered with the other methods beneath it (perhaps on its own you’d need two or even three coats of it to get full bleed-blockage) but we definitely would recommend 2-3 coats of Kilz Clean Start No-VOC primer followed by two thin and even coats of latex paint if you’re planning to paint your paneling without messing with fumey VOCs. Fingers crossed that’ll work for ya. Otherwise one coat of oil-based stainblocking primer followed by two thin and even coats of latex paint should do the trick (find more step by step instructions on that method here).
It probably won’t take you an afternoon if you go low/no VOC (it took us two days with some babysitting help from John’s parents just to complete the priming stage). And we’re not gonna lie. It was not fun. But it was worth it as soon as we got through to the other side. You know, when we finally crossed that rainbow bridge from bleed-ville to clean-white-walls… hallelujah. It should be mentioned that in very rare cases bleed can come through weeks or even months later (which would make us want to stick paintbrushes in our eyes). Thankfully we painted the wood trim in the living room using the same no-VOC method (four coats of Olympic Premium Paint instead of with an oil-based stainblocking primer) five months ago and nothing has since seeped through. And because the baseboard and trim in the kitchen is the same exact wood, all signs point to: this should work. Of course we’ll tell you if something supremely annoying happens though.
So if somebody would be so kind as to do a nap-time dance for Clara, we’d really appreciate it. So far swinging her stuffed giraffe back and forth and saying “you are getting sleeeepy” isn’t quite doing the trick. Well it’s making us sleepy, but we’re not the target. Has anyone else tried to paint paneling without VOCs? Or been forced to apply four coats of paint or primer for any reason at all? Sucks right? Let’s commiserate.
Psst- Read more about the whole Phase 1 kitchen plan here.

Eliza says
Oh, I still have nightmares about Olympic’s LoVoc primer.
I moved into a new house three months ago and recalled that you guys were fans of the Olympic brand. I became a fan of the price at Lowe’s, because it was on sale and had a LOT of priming to do.
I covered a dark red wall with three layers of primer and the wall still looked like an animal had been beaten to death and had its blood smeared throughout the abode.
I’m glad to know it wasn’t just me that didn’t have the greatest of luck with that primer.
Kaitlin says
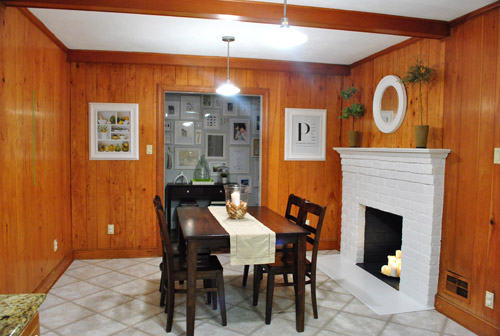
This picture was my kitchen inspiration as well! I love it! We used valspar Bella mint and the color is awesome!
Rachel says
Ah yes. In my last rental I had a fully paneled living room, including a paneled ceiling. I decided to tackle it one weekend that my husband was out of town…that was a mistake. I did use the regular Kilz oil-based stain blocking primer (full of VOCs), and it worked amazingly and stunk up the entire place for days. I did one coat of primer and one coat of regular paint with no bleed through and perfect looking color. Unfortunately, I had to use a brush on the entire thing. I could have used a roller, but I would have had to use a brush for all the in between spots so it seemed quicker to use a brush for the whole thing. It took two 10 hour days to prime & paint, and the ceiling was probably the worst painting experience you can imagine. I still had to use a brush because our paneling and deep and wide grooves. Pretty traumatizing, BUT worth it for the room’s brightness with paint.
On a more positive note, I love the cheery color you’re doing for the kitchen. Have you made a decision yet on your granite? I’m having trouble envisioning it with that paint color.
YoungHouseLove says
We’re keeping the granite at least for phase 1 (and possibly forever). I’ve pinned a photo of a white-cabineted kitchen with that exact granite (over on Pinterest) and it’s amazing how that oak-to-white change makes the granite so much more neutral. Time will tell!
xo,
s
JennyB says
I zipped over to Pinterest to check out that photo and you’re so right about the granite counter tops blending well with the white cabinets. Our granite looks exactly like this too, and I was having trouble figuring out what would look good with it. It’s great to see how neutral it becomes when with paired with white. Hooray!
Deborah says
Try, try again! That’s the motto of my husband and myself, too! Great job, guys! And your inspiration photo? LOVE! It’s the one my husband and I used when giving our dated kitchen a face-life awhile back. We ended up using Sherwin Williams Hearts of Palm on the walls. It’s a bit deeper in color than the pic but we love it all the same! I can’t wait to see the final color selection you guys pick!
Corien says
so much BETTER already!!
Carole White says
Looks great so far! The second I read about your troubles my thought was “they should’ve used Kilz.” When my husband & I moved into our house about 2 years ago – all of the trim needed to be painted white, as well as paneling & exposed beams and all different surfaces of different natural wood finishes. Kilz worked every singles time after other brands didn’t & now I’m a loyal fan of Kilz for painting things that haven’t been painted before, it just can’t be beat.
Can’t wait to see more of your kitchen! Insane how different it looks already!
Jennifer says
We recently painted our kitchen and I feel a bit of your pain. For some reason, the walls in new houses across the southwest are textured. Not sure what kind of sadist decided this was a good idea, but it is the biggest pain in the rear to paint. Maybe part of it was because we were painting over flat paint, but it took us three days to finish. We would look at a patch of wall we had just painstakingly painted and see little dots of tan showing through our blue paint! I think it was air bubbles. NOT FUN. Anybody else have this issue?
YoungHouseLove says
Oh man – I’m not sure about air bubbles. If you painted over oil-based paint (not primer) with latex, it can cause that. But sometimes a bad roller can rile up the paint and cause bubbles too (especially if it’s rolled on really fast, which can make those little bumps pop up). So sorry for the trouble and good luck!
xo,
s
Kate says
I feel your pain. We’re actually in the midwest (WI) but a lot of the houses around here also have texture (kind of like sand that was painted onto the walls and then someone combed it out in half circles). I just painted four rooms before we moved in (two moderate sized bedrooms, one master bedroom with a half vaulted ceiling, and a bathroom) and it was a PAIN! I got the exact same thing, I’d paint the wall and then little white specks would appear once the paint settled. I’m convinces it was something with the sand texture since I tried several roller covers/brushes with no luck. In two rooms I ended up having to solve the issue with two coats (one room was a dark blue and the other was over semi-gloss in the bathroom, so they really didn’t cover well) and the other two I got by with one coat by painting over a section, moving on for a minute, and then rolling over the previous section again while the paint was still wet but after the white spots appeared. There are a couple spots to touch up, but all in all it’s looking good.
Sara says
I live in the midwest and our walls have a knock-down texture to them. They are very annoying, especially if you have to make repairs to the wall. It’s almost impossible to get the texture to match.
I have found that slicker paint finishes such as satin go on the texture much smoother and easier than flat paint. Satin paint seems to fill into the little crevices better. Of course, the shinier that paint, the more noticeable the texture. You can’t win either way!
Shunta says
you all never cease to amaze me with what you can do with a few cans of paint and/or primer. I’m pretty excited to watch this room evolve!
Robin @ our semi organic life says
Wow looks so great! Hey you live and learn right?
Katherine says
Great Scott. Those walls look fantastic, even with just the primer! Absolutely stunning what a coat of paint (or three or four) can do. Good work, guys. So excited to see how it turns out!
Elizabeth says
Wahoo! You made it through. I can’t wait to see that grellow color up!
Chelsea J says
Wow – looks like a long, hard road but it’s totally worth it. The room already looks 100% better. I have a paneling paint job in my future soon too. Not looking forward to it.
Cari says
I actually primed and painted our kitchen yesterday too! I really like the way the tile looks in your “breakfast” area now that everythings painted. I know you guys don’t plan to keep it in the end but I think it’s way more tolerable now.
Sarah says
LOVE the white beams…can’t wait to see what color you choose! :)
Stephanie says
Lookin’ good!
Funny Kilz story: My dad packed a Kilz product into my mom’s suitcase to aid in fixing up our family house in Portugal, and didn’t think much of going through airport security. Um, really? You have a can of something that says KILZ in your bag, that’s not gonna fly. Literally. My poor mom is unofficially on all sorts of airport screening lists, or so she thinks. It probably wasn’t funny at the time, but I still laugh about it…
YoungHouseLove says
Oh no! Your poor mom.
xo,
s
amanda says
It looks amazing and Im sure will tie the living room and hallway together so much better. I love watching you guys transform this house. We bought a total fixer upper in 08 and had paneling ours unfortunately rippled and buckled off the wall so we had to have a plaster come out and fix our walls what a headache that was!
Erin says
Your hard work paid off. It looks great and so much brighter. What a difference. And with minimal fumes. We primed our bathroom with an oil base paint on Sunday and I can still smell the fumes. Even though the no-VOC took many coats, I am sure it is better than soaking up those fumes.
I also love your idea for the kitchen. The grellow is a great color against the white.
JillM says
I’ve always had good luck with Zinsser primer covering stains. I used it over paneling and over water stains on plaster walls under a window sill and it never bled through.
lucinda says
My husband and I bought our 70’s home 13 year ago and believe me when I say it was a lot of paneling. We sanded, primed, then lightly sanded after the primer and then used an oil based paint. My husband is a no shortcuts kinda guy but 13 year later it still looks pristine. We did the same with our kitchen cabinets.
Cait @ Hernando House says
It’s looking better already! Love the inspiration pic!
Good to know Kilz makes a no-VOC primer! I’ve heard great things about Kilz but we’re trying to go no/low VOC in our house. And every time we use Olympic the coverage sucks and we have completely terrible results.
Kayla @ AtHomeHeroes says
My brother used an oil-based primer from Lowes that had no odor! Not sure of the VOC content but it was some kind of miracle that it had no smell. It took two coats but it did the trick! He painted over wooden, poly’d wainscoating.
Lisa @ Life in Green says
Wow good job of getting the results you wanted.
I have not painted paneling before, but have a paneled back porch that has need a painting for quite sometime now.
I’ll definitely look for that kind of Kilz for the project.
Kate Battle says
I painted our den with Kilz (not the low VOC kind) and it still took two coats of primer and then two coats of paint! Ahhhh! but it looks so much better!
I had to totally TSP the heck out of the paneling first too because the den has a wood burning fireplace in it and there was soot all over the walls!
This is my blog post about it!
http://retroranchrevamp.com/2010/11/28/prime-time/
Barb says
Sherry and John:
I feel your pain as I am the painter in the house and moving into a 1960’s cape there was panelling galore and wallpaper layering …to boot. All in all a total nightmare. But with perseverance and patience (something I work on daily…) I got it done. The painted panel room I don’t even notice it is paneled anymore. No bleeding through but I had to do numerous layers of KILZ. My panels were dark chocolate brown and now are a happy, happy yellow.
I LOVE your color choice. So anxious to see it. You two are amazing!!! Don’t get discouraged. Just think how far you have come in so short a time and the place looks amazing. I read lots of decorating/DIY blogs and yours is the best….and your house is the best!!!! I say keep up the great work and remain patient. You are getting so close!
B.
Dave says
kitchen walls tend to have coating on them from cooking that is not always evident to the touch (ie feeling greasy) if you had used TSP or sanded the walls with a palm sander a little bit it would have done a lot easier. But hey live and learn. The room looks great and hey you now have a good story to tell.
megan says
I recently used the Kilz you mentioned over dark chocolate brown paint and it too two coats because the first had bubbles and odd spots. Second coat covered most up. Then I had to use three coats of semi gloss paint over it. The end result was worth it though…all bright white trim instead of chocolate brown!!!
JennyB says
Our kitchen/dining layout is almost identical, down to the paneling and the fireplace. We painted the paneling with Kilz and it worked great. We painted the walls a gray/beige, which I like, but shazaam–I love that kitchen color in your inspiration picture! Anyway, not a bit of bleed-through so far, and it’s been 10 months. It’s amazing how huge it looks just with the white primer!
I hope you take a day off–you deserve it!
Kathy says
Wow it is like a different room entirely. It is amazing how dark the brick and paneling can make a space. Looks good! I love “grellow” and have gotten a few odd looks from people trying to explain that in so many ways, it IS a real color these days :)
Laura says
Kilz is amazing. When we were building our house, some hooligans broke in and spray painted our freshly primered walls with a glossy red spray paint designed for metal! Talk about the worst possible paint for bleed through! It took 10 coats of Kilz to block the redish pink bleed, but it was worth it for the glorious sky blue bedroom we have now!
Great work on those pannels– now, if only you guys had a hot tub to soak away the sore painter’s arms!
Hannah says
WOW! What a difference! That kitchen is going to look so inviting and cheerful once it’s all painted!
meryl rose says
Oh man, that’s TERRIBLE! When we painted our kitchen about 2 years ago we also went with a grellow color and I LOVE it. Although I think ours is a bit too much of a “dirty” shade than I think you guys are going for (there are definitively some brownish undertones)
http://picardyproject.blogspot.com/2009/07/outback-not-steakhouse.html
It’s Behr’s Outback. Here it is in our now finished kitchen
http://picardyproject.blogspot.com/2011/01/before-after-kitchen.html
YoungHouseLove says
Gorgeous!
xo,
s
Steph @ Birdhouse says
Wow, a lot of work but it looks amazing! So excited to see it with the green paint and white cabinets.
Michelle says
it looks awesome! i’m so excited about the color you chose for the kitchen! when we moved into our house a year and 1/2 ago, we chose a color very similar for our kitchen & dining room. our families thought we were nuts picking such a “neon” color but once it was done they all said how wrong they were & how much they loved it. it always makes me smile when i wander in there in the morning. :)
Nicole C. says
Holy Moly (or is it “moley”?) – that was a lot of work! Definitely worth it, and as usual, I can’t wait to see the rest of the transformation!
And tell me I’m not the only one who noticed that the table/chairs in the inspiration photo are so very similar to what you currently have??!! Looks like the slipcovers on the chairs is that appley green you first considered, too! I had to blink a few times to see if you photoshopped your actual dining room into the pic!
YoungHouseLove says
I know, isn’t that funny?
xo,
s
Emily says
We moved into our house almost two years ago and have painted six rooms (and still have a ways to go). We’ve tried different brands of paint and found Sherwin Williams to work the best for us. The last room we did, I wanted to try Olympic (based on your good feedback) and the people at Lowe’s looked at me like I was crazy. She said there’s so much water in it that it goes on 10 times lighter than other brands and would require a lot more coats, which I guess is why its so much cheaper. I ended up getting Valspar, but they messed up my color-match and I had to take it back. So in the end, I ended up going with Sherwin Williams, which has excellent coverage does not have an odor.
I’d still like to try Olymic to test it out for myself, but I just wanted to let you know that the people at my local Lowe’s do not recommend the brand whatsoever :(
Amber says
I read your blog everyday!!!! I’ve been waiting sooooo long to see you two do this! With just the primer it already makes SUCH a difference. Cleaner. Brighter. AMAZING!
We have paneling on one wall in our living room. It was a similar color to yours when we moved in. We decided to do it with a “white wash” technique so we wouldn’t have to worry about too much blead through. I’m happy we did it. It adds alot of charecter to the house. Since most of our furniture is on the modern side, the wall tones it down with a bit of vintage/country..
Keep up the AMAZING work! :)
YoungHouseLove says
Ooh that sounds really pretty! Upload a photo or two to our Facebook page if you get the chance – we’d love to see it!
xo,
s
Katie @ Domestiphobia.net says
Hey there! I’m really sorry if you answered this already (there are a lot of comments!), but I’m wondering why you chose to prime/paint before you removed that huge section of wall leading into your dining room. It makes it seem like you used a lot more paint than necessary, and aren’t you worried about possibly damaging the painted portions of the wall you’re going to keep when you knock out the rest?
I looks fantastic! I admire you two for sticking to your guns on the no VOC thing — even after all that work. Can’t wait to see it finished!
YoungHouseLove says
We primed and painted paneling in the last house and then later added a doorway through it, so we knew it could be done (we didn’t have to worry about damage beyond the frame because the paneling can be cleanly cut so it doesn’t crack or splinter out and the paint stays nice and mint looking). Since we need a permit and a pro’s help to make that opening happen (it’s a load bearing wall) we realized that might take a while. But that dark paneling had to go – so we took action!
xo,
s
Val says
I’ll have to keep the low VOC primer in mind. My go to trusted primer is zinsser. Always works! Love the inspiration photo. It’s a southern living image and the designer used Valspar Signature Color in Belle Mint. I tried it in my home office and liked it ok. Without a ton of sun light it tends to go a little darker than I hoped. However, it definitely isn’t neon, but gives you that lime green feel! So I can live with it :)! Good luck on the rest of your kitchen remodel! Can’t wait to see it finished as always!
Beth @ 990 Square says
Our beach house in Delaware had dark brown stained barn boards throughout the whole house when we bought it. It took two coats of killz primer (5 gallons!) to cover it all. So I feel your pain (before and after shots of the nasty paneling here: http://www.990square.com/2010/10/beach-club-makeover-phase-1/)
YoungHouseLove says
Woah- looks like lots of work! But worth it.
xo,
s
jess says
looks so much more “you” already! :)
sarah @ handbagsnpigtails says
Oh it looks so much better already! And while my arms arents sore from the job you guys did, my hands are all blistered from the front porch scraping job the hubs and I have been doing. Yesterday we scraped layers of old paint for hours and hours. I hurt so badly but it’ll be worth it in the end. Just keep that in mind:)
YoungHouseLove says
Oh man I feel your pain. That’s a tough job. Good luck!
xo,
s
Annette says
As for the naptime dance: When I worked as a nanny, a little nappytime-song used to work wonders on my 2-year-old.
In my case the beatles, the first verse of “All my loving”:
Close your eyes and I’ll kiss you *gie a kiss on the cheek*
Tomorrow I’ll miss you
Remember I’ll always be true
And then while I’m away
I’ll write home every day
And I’ll send all my loving to you
And then walk out and don’t return until the beeb’s asleep. It took a little while for the first few times, but once, the routine was established, it worked like a charm. Sing song, leave and the baby knows, it’s time to sleep. She even asked for the “close your eyes-song” when I forgot it once.
Might not work for every child, but worked great for my little Katie. I guess it’s worth a try.
YoungHouseLove says
What a cute idea. We’re a Beatles-loving household, so I’ll have to give it a try.
xo,
s
Kelly says
Sorry it was such a pain, but it looks a billion times better already! Good job guys :)
Ellen says
I used the Olympic no voc primer and paint to refinish our bath vanity here: http://designingmainstreet.com/2011/01/02/new-year-new-green-vanity/
Guess what? I’ve already had to redo part of it. If I wanted I could scrape a piece and then peel off all the paint like you would a fruit roll up! Lesson learned. Sanding may have helped. Kilz is the best (but unfortunately not so good for the planet or you). Your house is looking great though. You wouldn’t want paint peeling off the walls! You made the right choice.
Jen @ The Decor Scene says
OMG can you say “different kitchen”!!! WOW, just the primer and painted trim looks awesome!!! I can’t wait to see which wall paint color you pick out. And that inspiration picture is to die for. GORGEOUS!!! Funny how it even has those green parson chairs you originally wanted. ;) Can’t wait to see the cabinets painted now. The kitchen will be so bright!!!
Erin says
That DOES suck. What an ordeal! I can’t believe how great it looks just in white though – I definitely got that angels-singing feeling when I scrolled down to the “after” pic.
Looking forward to cabinets next, or dreading the process?
I painted the balusters on my staircase and had some bleed-through after two coats. I should have primed, but it was an impulse project and I was too impatient. I ended up doing 4 coats and it still looks great, months later. Hope you have the same results.
YoungHouseLove says
Totally dreading the cabinets. Although we did just learn of a high quality low-VOC alternative to oil-based paint (we definitely don’t want to take any shortcuts with our cabs for fear of peeling) so we’re a bit more excited. It’s still gonna be pretty hardcore when we get there though! Haha.
xo,
s
Kristina Strain says
I had a similar experience with the ceiling in our new house. It was so dinged-up from the previous owners’ chain smoking, we needed that oil-based (stinky) goodness to get ‘er done. Did I mention it was a coffered ceiling? Did I? LOTS of brushwork. Four coats of paint. No fun!
YoungHouseLove says
Holy cow- that’s a ton of work. Congrats for living to tell the tale!
xo,
s
Liz R says
Please tell me this primer-induced frustration caused you to at least bicker with John. My husband and I are suffering from caulk-causing snippy-ness currently and can’t wait until the guest bathroom is FINISHED.
I had my own VOC-ridden primer experience a couple weeks ago. It refused to spread on certain areas of drywall and then I managed to dump a bunch of it on my gold bracelet that I foolishly didn’t take off. Any tips for removing oil-based primer from a bracelet, or is it a lost cause?
YoungHouseLove says
Haha- I think we just went into numb robot mode and sang along with the radio while applying coat after coat. We did have some disagreements when it came to what color we wanted to go with for the walls (John wanted the less yellow swatches and I wanted the brighter more yellow ones). We definitely have our share of disputes. Haha. Oh and as for oil-based clean-up… I always have luck with mineral spirits. Not sure if they’re ok with gold but I hope so! Maybe test a tiny spot? Good luck!
xo,
s
Van says
nice job sticking to the plan… are you going to wait a little to make sure there’s no further bleeding or paint right away?
YoungHouseLove says
Paint right away! Well it’ll be about 48 hours between finishing the primer and painting if all goes well (there’s a slight delay when it comes to doing and posting about something since we have to take pics and write things up). So far nothing is squeaking through though. Whew. It’s a ton of layers of primer, so we’re definitely optimistic!
xo,
s
Elizabeth says
We painted wood paneling using Kilz latex primer (2 coats) and latex paint (2 coats). Worked great! It was prior to more readily available no-VOC stuff. Unfortunately, prior to putting our house on the market we hired out the re-painting of our kitchen cabinets (they were a creamy/looked-kind-of-dirty color against white appliances) and they used oil based paint. STINKY!!! I was pregnant at the time, so I had to be out of the house for over two weeks. Our realtor finally brought in an ionizer air purifier thing that took the stank out. Never again oil based paint!
YoungHouseLove says
Yeah- it’s amazing how long the stink can stay! Our refinished floors smelled forever (like a year).
xo,
s