And now, for the dang paneling update. Hold on to your hats ladies and gents. This post = wild ride.
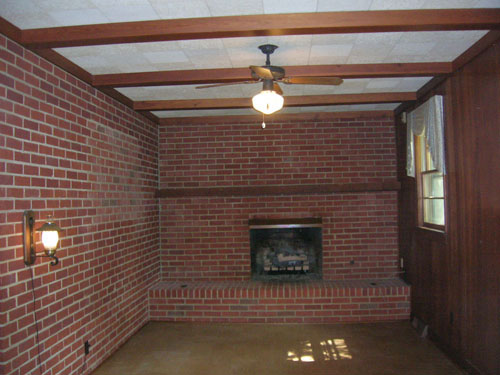
As you probably know, we’re no strangers to priming and painting paneling. Sure we could remove the paneling, but it would mean removing and rehanging all the cabinets since they’re hung in front of it – and revealing goodness knows how many scary issues behind it (they’re old plaster walls so that just felt like a big ol’ can o’ worms). And we could attempt to drywall over it (but it would mean drywalling around the existing cabinets and a lot more expense/trouble than just painting it). So we decided early on that we’d once again say yes to painted paneling – just like we did in our former den (which ended up being our favorite room in the house) when it (slowly over the course of 4.5 years) went from this…
… to this:
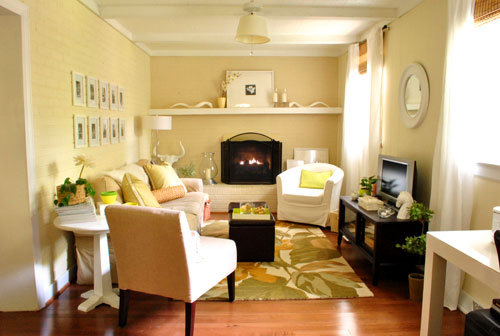
We never regretted the whole painted paneling choice – I guess it’s just like painted brick to us (we don’t mind the grooves that remain after it’s painted since they just add charming and subtle texture). But folks have caulked or puttied those grooves to hide ’em, so you can always do that (or rip it the heck out) if it’s not your thing.
But this time there was a slight variation to the painted paneling process since the last time we tackled it. That variation: the time that it took to get ‘er done. Last time it took us an afternoon (more on that here). So we went into this whole priming and painting thing with high hopes that it would be a quick little project. Yessiree, an afternoon spent completing the paneling would have been awesome (as would seeing a unicorn on our front lawn or finding out that Burger laid golden eggs). Spoiler alert: that didn’t happen.
The time difference was all because we decided to attempt to prime and paint our paneling the no slash low VOC way this time. Just because we like the idea of avoiding as many harmful fumes as we can since we work so regularly with paint and caulk and primer (especially now that we have a baby around). We knew this choice wasn’t a short cut. Heck, it would crack our margin for error right open (since oil-based stainblocking primer is the only professionally recommended way to guard against nasty yellow-orange wood-bleed, which can ooze through as you prime and paint). But we thought it was a risk worth taking in the name of family health. And it was in the end… it just took a while to get there. So here’s how it all went down.
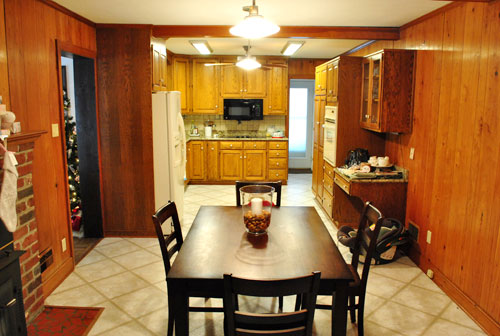
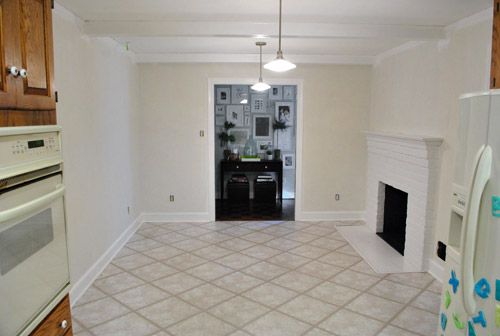
First, here’s what our kitchen looked like before we embarked on our little priming adventure:
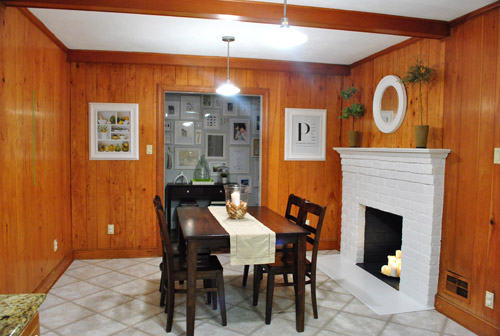
And here’s an old shot of the kitchen from the other direction just for reference (it was actually taken a while back, before we removed the wood stove and painted the fireplace):
Step 1: We wiped down the paneling, beams, and trim with a moist cloth. Some people use TSP for their wipe-down, but we didn’t (didn’t use it last time we painted the den paneling either – but it’s not a bad idea, especially if your paneling feels especially greasy). We also didn’t sand at all (didn’t last time either) but you can if your paneling is especially tough, splintery, or super glossy & shellacked.
Step 2: We removed the vent covers and outlet covers since we decided that we’d be replacing them all (they were bisque and we wanted fresh white).
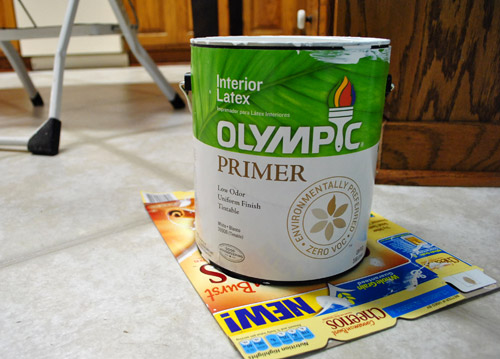
Step 3: We spent about three hours applying a coat of primer to the trim, beams, and paneled walls with Olympic No-VOC primer.
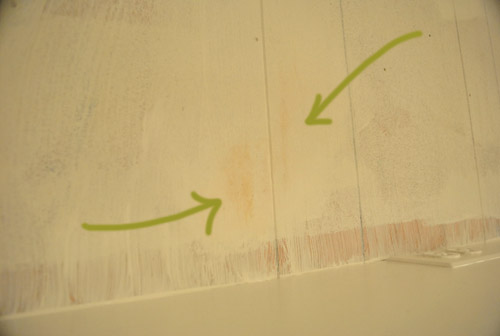
After our first coat it looked like this (about fifteen minutes in we knew we were in trouble):

Primer never needs to be super consistent and perfect looking (it often looks uneven and rough but still totally does the job) but we experienced almost immediate bleed-through in a number of spots (when the orangey-brown stain of the wood seeps through the primer and threatens to ruin your paint job). Not good.
Step 4: We waited for that to dry a bit and tried a second coat of the same primer in certain obviously-bleeding spots, hoping it would block more nasty orange seepage. Nope. It did not.

Step 5: We noticed that we had a can of Behr Primer + Paint (in white semi-gloss) in the basement from a previous project (which is low-VOC and nice and thick) so everything got a coat of that (yup, the trim, beams, and paneling got another full coat).
We still had bleed through. Not much, but in certain places it was definitely still there. And it was maddening.
Step 6: We went to Home Depot and found Kilz Clean Start No-VOC primer. It said “stainblocker” right on the label so we gave it a shot on everything (yup, another full coat of a third type of primer went up on the trim, beams, and walls).
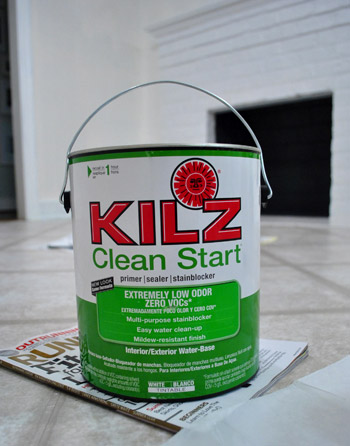
It worked. Angels sang and two white-haired Petersiks rejoiced in the privacy of their freshly primed (finally) kitchen.
Step 7: We painted just the trim and beams with our Behr Primer + Paint (in white semi-gloss) since leaving things primed but not painted for the long term can lead to a nasty and grungy hard-to-wipe-down mess (it’s a dust and dirt magnet since primer is intentionally sticky for paint adhesion). Happily the Behr stuff had great coverage over that last coat of Kilz and looked glossy and amazing. A sight for sore eyes (and arms).

Step 8: We removed all the painter’s tape while the last coat of paint was still fresh for the cleanest lines possible (waiting for everything to dry can cause the paint to peel when you remove the tape). In cases when it was stuck to the primer/paint, we used an exacto knife to carefully slice it along the line of the tape so the primer/paint wouldn’t get pulled off with it.
We’re usually happy to avoid painters tape when we can (I rely a lot on this little miracle short handled brush instead) but since I’m short and I’m the resident cutter-inner/edger, I don’t have as much control up on a stool. So taping around the ceiling trim (and in this case tossing down a quick frame of tape around the baseboards) helped me go faster while I was happy to freehand around the door frames and fireplace.
About 48 hours after the beginning of our priming adventure, it finally looked like this. The trim looks whiter because it’s topped with that semi-gloss Behr paint and not just a flat finish white primer (which was more creamy and less snow-white-ish in color). Now we just have to paint those walls.
We’re not sure if the Kilz No-VOC primer worked because it was the best choice for the job or because it was layered with the other methods beneath it (perhaps on its own you’d need two or even three coats of it to get full bleed-blockage) but we definitely would recommend 2-3 coats of Kilz Clean Start No-VOC primer followed by two thin and even coats of latex paint if you’re planning to paint your paneling without messing with fumey VOCs. Fingers crossed that’ll work for ya. Otherwise one coat of oil-based stainblocking primer followed by two thin and even coats of latex paint should do the trick (find more step by step instructions on that method here).
It probably won’t take you an afternoon if you go low/no VOC (it took us two days with some babysitting help from John’s parents just to complete the priming stage). And we’re not gonna lie. It was not fun. But it was worth it as soon as we got through to the other side. You know, when we finally crossed that rainbow bridge from bleed-ville to clean-white-walls… hallelujah. It should be mentioned that in very rare cases bleed can come through weeks or even months later (which would make us want to stick paintbrushes in our eyes). Thankfully we painted the wood trim in the living room using the same no-VOC method (four coats of Olympic Premium Paint instead of with an oil-based stainblocking primer) five months ago and nothing has since seeped through. And because the baseboard and trim in the kitchen is the same exact wood, all signs point to: this should work. Of course we’ll tell you if something supremely annoying happens though.
So if somebody would be so kind as to do a nap-time dance for Clara, we’d really appreciate it. So far swinging her stuffed giraffe back and forth and saying “you are getting sleeeepy” isn’t quite doing the trick. Well it’s making us sleepy, but we’re not the target. Has anyone else tried to paint paneling without VOCs? Or been forced to apply four coats of paint or primer for any reason at all? Sucks right? Let’s commiserate.
Psst- Read more about the whole Phase 1 kitchen plan here.

Monika says
Guys you are saving my sanity! We recently bought a house with some wood paneling. Biggest pain in the neck was our paneled living room wall with the fireplace. Of course my first reaction was- the heck with those panels we are ripping them off! But two different contractors told us we would loose the mantel piece (I absolutely love it!) as it is attached to the paneling. With the help of your great blog I am painting the panels and saving the mantel piece not to mention the money. Thanks!
YoungHouseLove says
So glad to hear you’re having luck with your paneling and you can save the mantel!
Best,
John
Sarah says
Does anyone have advice for painting the wood beams on the ceiling white? Do I need to paint the ceiling to match? Tackling that project soon :) weeeee!!!!
YoungHouseLove says
You might want to paint the beams and see if the ceiling looks off. If it does, just paint that with the same color as the beams. Good luck!
xo,
s
Kelly says
I just recently discoverd you site and i love it. I am gettin ready to pain my wood panneling and have a question.If you’re painting panneling with groves, i guess you’d say, do you use a roller and then a little paint bursh if you want to keep the effect of the panneling?
YoungHouseLove says
Yep! Depending on how deep your grooves are, you may be able to get into them with your roller just fine. We usually have to go back with a brush to really push the paint in there, but we always go over everything with the roller as a last step so everything has the same roller texture – don’t want those brush strokes showing!
-John
Shayla says
Paint still great, without bleed through? :) I am about to try this myself.
YoungHouseLove says
Yep, still going strong!
-John
Deirdre says
So, I have applied 3 coats of the kilz low VOC and still have bleed-thru…At this point, I’m doing 2 coats paint and primer in one and it seems to be ok, so far. I figure I will be hanging LOTS of art in this room to strategically cover-up as needed. Unfortunately, we’re hosting a graduation party in a couple weeks, it’s raining, and I’m ‘over it’ being perfect in this very moment– otherwise I’d do it all over with oil-based primer. But your room looks GREAT!–Had to leave it on a happy note (0;
YoungHouseLove says
Aw, hope it all works out! A tip would be to look for the word “stainblocking” on your primer can! We have found that Zinsser Smart Prime is a great not-oil-based primer that still blocks bleed since it says “stainblocking” and it’s low-VOC! Good luck with everything!
xo,
s
~Maria~ says
I have a paneled mudroom straight out of the 70’s that I primed and painted to try to update. However in this small room it still looks like an outdated but painted paneled room. I can’t remove the paneling and install drywall because it’s glued to a rigid foam type insulation and has exposed heating pipes. Installing a traditional stud/insulation backing to drywall would certainly mean relocating (yikes….an expensive job) the piping and radiator. With that being said I’m looking for an inexpensive option for working with the ugly paneling and was wondering if I could do a tuscan look plaster treatment over it but troweling on drywall mud randomly. Have you ever used this treatment over paneling? Do you think since I already primed and painted the surface that I would need to prime again? Also do you think the recessed panel lines would show thru? Any other suggestions for updating this room would be appreciated.
YoungHouseLove says
Hmm, we haven’t tackled that at all, so your best bet would be to find an article about it online or hunt down someone who has. Anyone have any tips for Maria?
xo
s
Kim says
Oh geez…I’m rethinking my recent primer purchase for painting my paneling. I’ll be re-reading labels tomorrow and it may be going back to the store! It said, “Sticks to anything” but I wasn’t even thinking of bleed through of the paneling. Hmmm.
Kim says
This is a comment for Maria. My sister in law had damaged, uneven, partially paneled walls and used a textured wallpaper over them, then painted it. The wallpaper was made to be painted, and it looked like the Tuscan plaster you describe. I’m not usually a big fan of wallpaper, but it came out nicely. That might be an option for you. I also am thinking back to my days watching Trading Spaces on TLC years ago. They used a lot of fabric on walls to cover ugliness. Maybe you could hang some floor to ceiling curtains (using washable fabric, of course!).
keisha says
Can I just say again how much I love this blog! Seems like every time I google for some help on a home-improvement project, YHL is in the top three search results! Anyway, our mid-’90s bathroom appears to have wood paneling (at least one wall) underneath the peeling wallpaper, and I was worried about how to address this (wanting to paint but unsure about what primer to use since the room had no windows and I knew fumes would be an issue). So I will look for the aforementioned Kilz waterbased. So sorry you had such a tough time, but I have to admit it makes me feel a little better to know that this home improvement game is tough on all of us at one time or another.
YoungHouseLove says
Aw thanks Keisha! You’re so sweet!
xo
s
Anjuli says
I’m painting my son’s room from a light green to an off white. I’ve using the same Olympic primer you used on your first and second coats of the kitchen paneling.
My question is this: Do you usually only use one coat of primer when painting your non-panel walls? I’ve always used two to make sure everything is uniform, but if I only need to paint one coat to get a surfaced covered, even if some of the old color is peaking through, you may have spared me a lot of extra time I would have otherwise put into it
YoungHouseLove says
We typically only use primer on non-panel walls if we’re going from a dark to light color or vice versa, which we haven’t encountered much. And in those cases I think we’ve usually gotten away with just one coat of primer.
-John
Kim says
Do you have a suggestion for a primer to use on new drywall? I was going to use Clean Start but I can’t find it anywhere (I checked Home Depot, Lowes, Ace and others). Also when you prime new drywall should you do one coat or two?
YoungHouseLove says
We like Zinsser smart prime a ton! Hope it helps. We just do one coat usually.
xo
s
Tiffany says
Now that’s been 2 years since this post… :)
Would you recommend Zinsser Smart Prime or KILZ CLEAN START? Moving to a new house with a basement of 1000 square feet and all the walls are wood paneling! My arm hurts thinking about it. Hah. So as few coats as possible would be most ideal. I have little ones, so no/low voc overrules my impending sore arm.
Thanks so much!
YoungHouseLove says
Zinsser Smart Prime is our favorite, but it’s getting harder and harder to find. Such a bummer, but it’s the best!
xo
s
Tiffany says
Thanks so much! Maybe I’ll buy it off of amazon. $130 with free shipping for 5 gallons.
Sasja says
Hi Sherry, your kitchen looks beautiful. I hope it still does?
Right now I am in the proces of painting my wood panels in the kitchen. I was told I could use latex paint (especially made for bathroom and kitchen), if I used another product beforehand. In Dutch it’s called ‘voorstrijk’ and I’m not sure that translates exactly to ‘primer’ but I think it comes close. My walls look pretty much like yours did after the first coat.
It’s certainly not a stainblocker because I too am experiencing bleed through.
I went on a dutch forum to ask if I should apply another coat of the ‘voorstrijk’ and got the crap scared out of me because a professional painter told me latex was the worst thing I could have used, that I should sand the ‘voorstrijk’ that’s already on there off. Having to sand that all off would be a nightmare.
Do you have any problems with the latex? aside from the bleed through? Because they told me latex on wood will crack and come off. I’m a little unsure what to do now.
At this point I think I’d prefer putting on a coat of stainblocking latex primer. What do you think? I’d be really gretful for your feedback.
YoungHouseLove says
Oh no! We have had no issues with ours, we just had to do a few coats to get the bleed to stop and then followed it with paint and were fine for years. No peeling or bleeding or anything! Hope it helps!
xo
s
modern interior design says
It was great to read your post. Blog is very helpful to get some ideas to design our home. Thanks to share with us.