Let’s see… when we last left off on Monday, our open shelves had been primed in preparation for their big hanging debut.
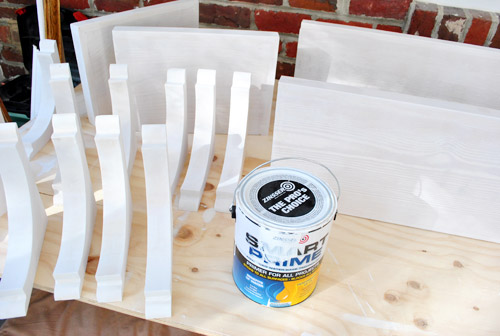
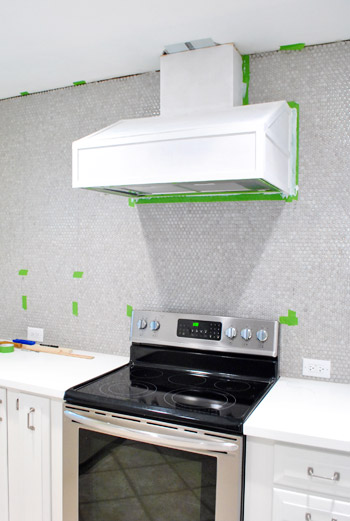
While we had the primer out we went ahead and slapped a coat on the hood cover too (using a 2″ angled brush in the cracks followed by a small foam roller to smooth everything out). Things were instantly looking less wood-sy on that wall.
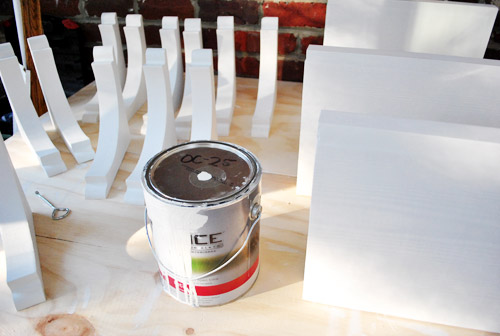
Once the primer dried on both – we used Zinsser Smart Prime which is low-VOC and was recommended by a few pro cabinet painters that we know – out came the same high-durability paint that we used on our cabinets (yes, there’s still plenty left!) and we gave the brackets, shelves, and the hood a couple of coats. Two thin and even ones over one coat of primer did the trick. We also applied those with a 2″ angled brush followed by a small foam roller to keep things smooth and even. Oh and the paint is Benjamin Moore Advance paint in Cloud Cover, bee-tee-dubs (which many pros use to paint the inside of their clients’ cabinets along with the outside, so it should stand up really well to everyday use once it’s nice an cured up).
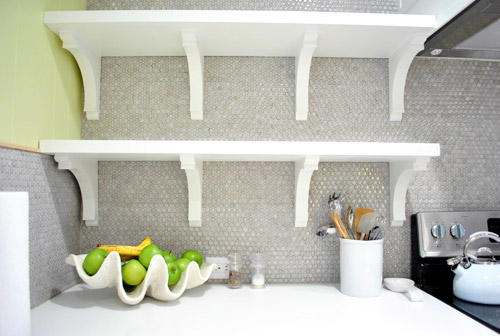
But the exciting stuff really started to happen when we finally got to the point of ACTUALLY PUTTING STUFF ON THE WALL. Yowza. Sorry for the caps. I said we were excited, right? Excited might be an understatement actually. Luckily, since we had already drilled all of our screws into the wall, the hanging step was pretty easy. Up went the brackets on the short side…
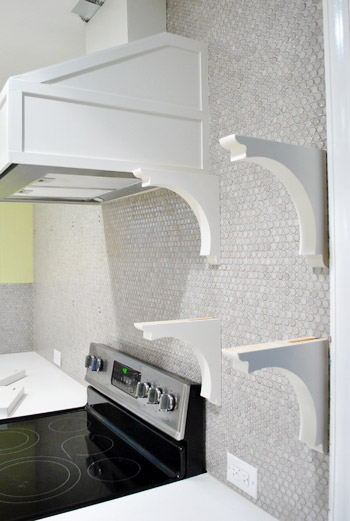
…followed moments later by the shelves themselves. Can I get an “Ooooh”? How about and “Ahhhhh”?

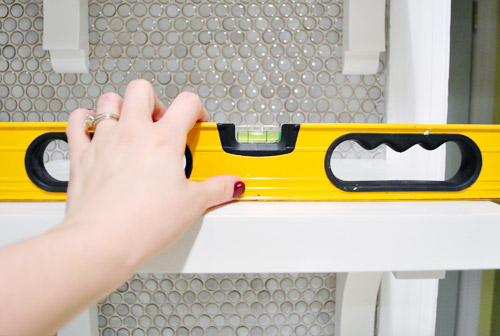
Don’t worry, we weren’t gonna just let them sit there unsecured. We just had some other things to do first – like making sure everything was still level. It was. Phew.
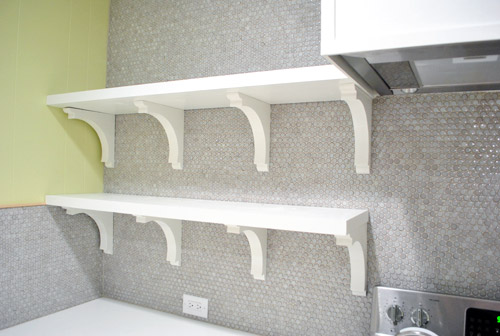
So then we put everything up on the long side of the wall.
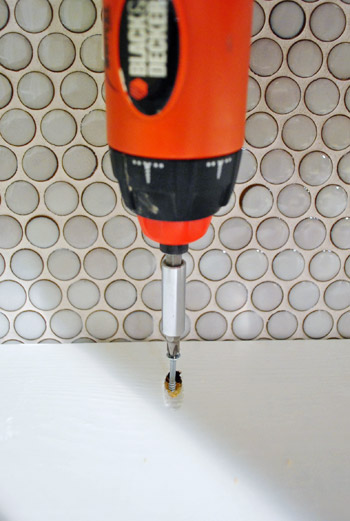
We had mentioned in the previous post that we had originally planned to screw the shelves into the wall (we even made some pocket holes in preparation for this step). Well, after feeling how solid the brackets felt (more on that here) and not really wanting to put 12 more cringe-inducing holes in our tile – we opted to just use those pocket holes as a spot to screw the shelves firmly into the brackets (so the screw actually went straight down, not at the angle of the pocket hole). In hindsight, we definitely could’ve skipped the pocket hole step, but at least now the screw will be hidden in a spot that we can easily caulk over.
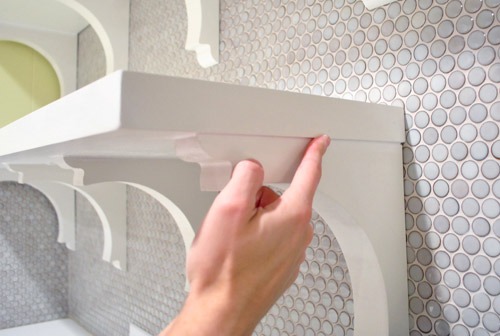
Speaking of caulk, that was our next step after everything was drilled together. Since there were some dark seams where the shelves met the brackets, we just ran a thin bead of white paintable caulk along the top of each bracket and smoothed it with our finger to make the shelves and brackets look more like one unit. Tedious? A smidge. Worth it? Totally. Then of course we painted over it so everything matched.
And with that folks, we were done! Except for more waiting. Booooo.
As eager as we are to immediately fill them with plates and bowls and cups, we resisted that urge in order to let all of the paint cure a little bit longer – just because we caulked those screw holes and around the edges which called for some touch up paint. We definitely don’t want to jump the “fully cured” gun (which could result in a bunch of dents and dings in our shelves during their first few days of use). So for now we’ll just have to enjoy these empty “after” shots thanks to following the full curing time on the paint can’s directions. But tomorrow – oh baby, it’s on. Sherry’s even planning to shoot a little time lapse video of the process of loading them up.
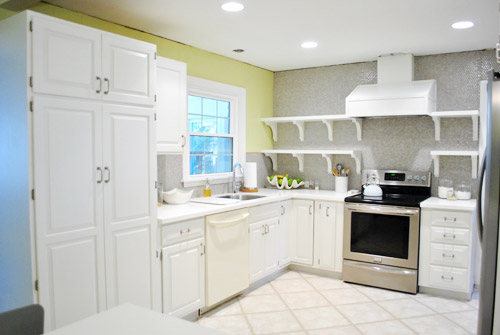
Oh and of course we still have to add crown molding to the ceiling to finish things off and make the top of the hood a lot more seamless. But slowly it’s all feeling a lot closer to “done” than “just started” – especially now that the hood is painted too (never mind the fact that we still have some patch work to do on the ceiling along with that aforementioned crown molding).
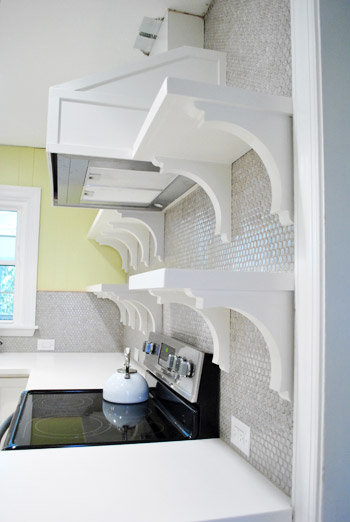
We’re really happy with how the brackets turned out, so we haven’t thought twice about our decision not to do true floating shelves. We think these are really charming – and they’re super stable so Sherry could probably hang off of them if she wanted. Instead she wants to fill them with ceramic animals. Same difference.
It’s nice that there’s still plenty of room to load them up and make them really functional, even with the brackets (no, they will not actually end up full of ceramic animals- not on my watch). Our shelves are deep enough for our 12″ dinner plates and the brackets are 15″ apart so we should have lots o’ room to put everyday stuff up there – which we hear from other open-shelf-having folks works really well, since it’s used often enough not to get dusty).
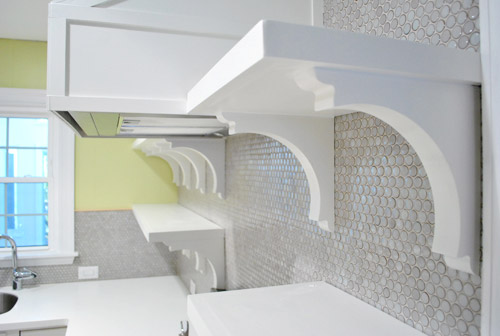
And even though it was a bit weird at first to see our wall of penny tile suddenly broken up by these bright white lines, it’s cool to see the thing we’ve always envisioned come that much closer to being a reality.
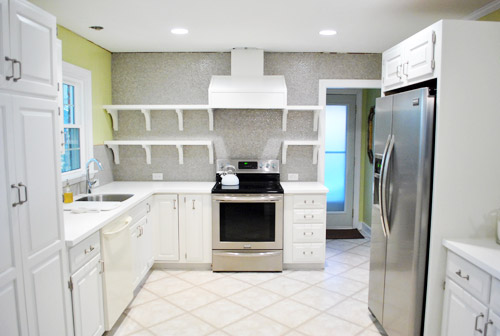
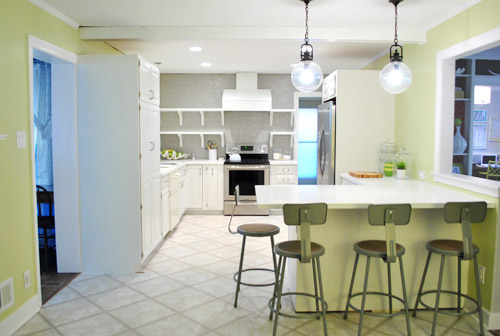
So we should have pics (and a video) of the shelves all filled for you tomorrow. Until then, we’ll leave you with this slightly-closer-to-after shot of the room. We’re definitely getting there. And we’re counting down the seconds to Operation Cork My Floor (along with adding that crown molding, patching the ceiling, adding a pendant over the sink, covering the base of the peninsula with some decorative wood planks, hanging some art to the right of the fridge, do something to the side of the pantry, etc).
We feel especially giddy when we look at old photos of the room back when it looked like this:
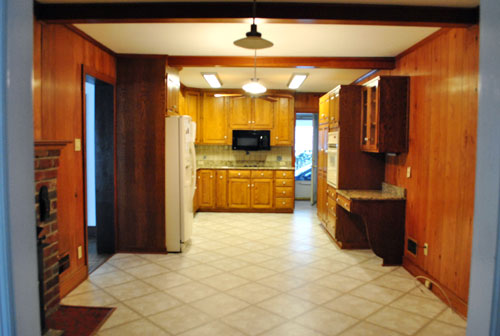
We can hardly picture that old room anymore. Isn’t it funny how quickly your brain replaces things? It’s so crazy that we lived with the room just like that for over six months before even painting the paneling. But once we finally got the ball rolling… well, it’s still rolling. Haha. Is anyone else in the home stretch of one of their home projects? Though I probably should knock on wood when I say that, since it sounds like a sure way to jinx myself into some last-minute wrench in the plan (he says as he gets up to literally go knock on wood while crossing his fingers and eyes).
If you’re interested in more ideas for adding shelving or vertical storage, this post has a bunch of DIY shelving projects and ideas for you.

Donna says
Looks great! When does the flooring arrive? I am living vicariously through you guys, decorating wise!
YoungHouseLove says
It’s here! Just waiting to do it until we do things like the crown in case we would have dinged it up with the latter and dripped paint on it! Haha.
xo,
s
Sarah K says
Looks AMAZING! Can’t wait to see the shelves styled. Oh and am definitely looking forward to hearing your review of how dusty things get on those open shelves.
Also, did I miss where you talk about all the awesome nail colors you’ve been sporting Sherry? I recently got into painting my nails some darker colors and I just love it!
YoungHouseLove says
Haha- I’ve been having to paint them for the book (in-process shots of my hands were looking crazy-rough with all the grime/caulk/paint under my nails) so I basically take off my dark polish and redo it in another dark color every few days so my hands look ok in the shots. Haha.
xo,
s
Bretta Wimberly says
The shelves look great!!
Hey Sherry, your “Dude Get On That Already” challenge motivated me to complete my last project! Check it out!!
homesweetnest.wordpress.com
YoungHouseLove says
Love it!
xo,
s
Sara says
Beautiful transformation!
Michelle says
Great job you guys! I’m loving it! Clean, Modern, Industrial and quite Charming if I do say so myself! (Seriously I can’t believe how vocal poeple are with their negitive critiques! Luckily, they don’t have to live with it!) Love it and Own it!! xoxo
Karina says
I looks lovely!! You guys are AMAZING (I just as exited as you)!! I have an idea for the side of the pantry……how about turning it into a magnetic blackboard?!!! That is was I am doing with the side of my pantry!! Looking forward to seeing the shelves filled with ceramic animals!!!!
YoungHouseLove says
Always fun for sure- and definitely a possibility!
xo,
s
Valerie says
Can’t wait for them to be filled up! Are we there yet???? :)
Jennifer Hohner says
Looking really good!
Pia says
Looks great with the shelves!
It might be just me but i think that it would look more balanced with another shelf above the two? In hight with the door. Well might change my opinion when the shelves are loaded.
And the transformation from the finnish sauna to a kitchen is amazing! Thanks for sharing your jurney!
Gale says
LOVE it!!!!!!!! Yay for you :)
Julie says
The penny tile backsplash makes me want to cry. I LOVE IT. Nice job with the whole keeping it clean, fresh and fun. Your blog is really enjoyable to read (and it inspires me :D)
Heather says
I’m not totally in love with the shelves, because right now my eyes are getting sucked in to the brackets and that’s all I can see. But I’m sure once there is stuff on the shelves, I’ll want to have some kind of commitment ceremony with them & the rest of your kitchen. Those before and after pictures just blow me away.
And I think this is a great idea for the side of your pantry: http://www.landeeseelandeedo.com/2011/08/magnetic-command-center-accessories.html
Oh my gosh, I am so excited about tomorrows post!!!
YoungHouseLove says
Such a cute idea! Definitely another possibility!
xo,
s
Andreea Sfarlea says
It looks awesome! :) you have done a great job !
I am wondering if you have considered a third row, maybe? I think it would look good!
Enjoy your beautiful kitchen!
BR,
Andreea
YoungHouseLove says
We did think about it but it would be hard to reach and we think once the crown goes up and we get stuff on the second shelf it’ll align with the top of the door and feel nice and balanced!
xo,
s
Jen @ The Decor Scene says
Love it!!! How exciting!!! I wish I had open shelving. OK, I’ll just drool over yours instead. ;)
Londen says
So very gorgeous guys!! I love watching your progress, you have thought this through and it shows. The side of your pantry would be a perfect spot for chalkpaint…I think every room can use a touch of black…even better when its useful.
Mackenzie says
You should put a giant, vertical, framed chalkboard on the side of the pantry for Clara to draw on or grocery/to-do list. And it would add some contrast to all the white, though I’m sure the floors will do that too.
YoungHouseLove says
It’s definitely a possibility!
xo,
s
caitlin says
I was so hoping you would have a photo of the ‘old’ kitchen. It’s really an amazing change… and really speaks to the amount of work you did and can do on your own! Truly inspiring.
Tonya says
Hurry up and put dishes on them! I’m dying to see the really finished product!
Laura says
Awesome! It looks great. Can’t wait to see how you decorate the shelves with plates and bowls and everything else. When are you going to start on the floors? Get to work! ha ha. Just kidding. I can’t even believe you manage to do the blog, the projects and the book all at once.
YoungHouseLove says
Haha- we’re not sure we can start the floors until the book crew is out of our house, but in about a week and a half they’ll be gone so it might be the magic time! And in the meantime we have lighting/trim/crown/art/and other stuff to attend to!
xo,
s
Deana says
This is absolutely gorgeous. Your talents always amaze me. I know you are busy with the blog and the book, but I have been thinking that you guys should do an I-phone App!! I would be the first to buy that!
YoungHouseLove says
Oh man that would be awesome if we could figure it out! Here’s hoping!
xo,
s
JR says
I am loving the shelves (and the kitchen redo).
I totally want you to paint those chairs a teal-ish color…
Kaa Doyle says
I am having incredible kitchen envy!! You have made some amazing progress in your kitchen and I can’t wait to see the final results. Thank you for the continued inspiration :)
YoungHouseLove says
Aw thanks Kaa! So sweet of you to say!
xo,
s
Kelly David says
you guys are amazing – the before and after shots are so inspiring! congrats! can’t wait for the loading of the shelves!!!
Laura says
I’m loving the range hood now, and those brackets look seriously fantastic! And I think I’m the only one who is bugged by it, but those shelves just look too low to me. Like they aren’t balanced on the wall. And how the top shelf lines up with the range hood doesn’t look quite right either. Any thoughts about adding a third, higher shelf? But maybe some super tall crown moulding would help fill in the space and make the wall less bottom heavy as well. Anywhoo, love the progress guys!
YoungHouseLove says
Check out tomorrow’s post for that info! Once stuff goes on the top shelves they’ll line up with the top of the doorway for great balance! If we did a third shelf it would have been really hard to reach and we worried it would be too cluttered and block too much tile. Hope tomorrow’s pics make it all make sense!
xo,
s
melrose says
LOVE the brackets! They are just perfect….
YoungHouseLove says
Thanks Melrose!
xo,
s
dee says
Not trying to bash but am wondering why you delete “negative” comments? Can’t believe that no one has been constructively critical about the shelves, especially given the comments on other blogs/sites about them.
Truthfully, not posting the more critical comments makes you seem a bit thin-skinned :/
YoungHouseLove says
There are negative comments, just scroll back! Here’s one convo and here’s another just to name a few. I actually haven’t deleted a comment for a few months now. We just delete completely non-constructive comments like “your baby is ugly” – because that’s wack. Haha. But there are 499 comments on this post (many pages of them, so maybe you only read the first page?). Lots of folks are loving the brackets, and some folks aren’t. Decor is definitely subjective!
xo,
s
shannon says
it looks GORGEOUS!
y’all are so close and have done so great so far!!!
VV says
Oh well done you guys!! It looks incredible – you must be so chuffed with yourselves.
It looks so clean and very chic. You’re definitely the disciplined type of people that would be able to keep the sides closest to the stove grease-free and keep the shelves tidy. Much envy!
Even if I had the discipline, it’s probably not a good option for our earthquake-prone city. I’m lucky I’ve only lost a cupcake stand yet. My friends lost all their vases and jars! We are now Blu-tacks best customers :)
YoungHouseLove says
Aw, so sorry to hear about all the shaking! But blu-tack’s the best! Hope it helps!
xo,
s
Heather S says
Wow, completely amazing! I love them!! You guys are working so hard & it looks so gorgeous & the details aren’t even done! Pat yourselves on the back!
As for the side of the pantry….I’d say chalkboard paint. :)
YoungHouseLove says
Thanks Heather S! Lots of folks have been voting for chalkboard paint so we’ll have to see where we end up!
xo,
s
Kristin H. says
So this is totally random (shelves/kitch look AWESOME!) but I was thinking if you ever needed an idea for a post, to do one with all the crazy lesser-photographed angels of your house.. Like when you showed us the pointy sunroom that time! It’s not that I’m confused (because I know you guys have mapped it out extensively for us) but for some reason I have a hard time visualizing it all together. Like the hallway down to the guest/Clara’s room? Or views “through” the rooms? Or views from the rooms into the yard? Or am I getting a lil creepy now?! Probably silly and only my craziness, but just a thought! (as if your 500+ comments on this post were not enough.. ha) love u guys :)
YoungHouseLove says
Haha- I think that sounds like a good time! One of the funniest things about blogging is people saying “I never pictured that side of the room/house/layout” so it’s so much fun to share other view points!
xo,
s
Kelsey D says
The kitchen is looking A-MAZING! I don’t usually comment, but you mentioned you were wanting to put something at the end of your pantry. We have the same side-of-pantry-is-out-in-the-open issue, and I painted the whole side of it with chalkboard paint – and we love it! We use it everyday, listing out the weekly meals, grocery lists, and other little notes/reminders. You can see it here, but ignore the awful brown cabinets, they have since been painted white!
https://www.facebook.com/photo.php?fbid=564722456286&set=a.532282765686.2042870.177501993&type=3&theater
Just my two cents… keep up the good work, and can’t wait for the book :)
YoungHouseLove says
Would love to see it but your pics on FB are marked private. Sounds so charming though!
xo
s
Landry Thomas says
Hi Youngsters!
First I would like to say how much I LOVE the kitchen! ALL OF IT! ! Can’t wait to see the shelves decorated and the cork floor go down. (We are also considering cork for our kitchen, so I especially exicited about how the process will go you for you guys!)
Second, I think that putting a pretty large chunk your life out there for everyone to see is super brave! No matter what feedback you get!
Third, I did (I promise) comb through the comments to see if you answered this question, but where did you get that gorgeous yellow radio?? If you answered that question already and I missed it sorry, I know you’re busy, but its totally fab!! (could that have been a longer run-on sentence?)
Rock on, Youngsters, Rock on!
YoungHouseLove says
Aw thanks Landry! That radio was something we found on clearance on jossandmain.com, but since they’re a flash sale site, maybe try searching for a “Tivoli radio” to see what comes up? That’s the brand!
xo,
s
Suzanne says
Love the shelves…and the whole kitchen-quite a transformation! Seeing the before picture made me think…do the former owners know that you all are bloggers/how you are transforming the house? Just curious. If it were me and you all had bought my house I would be very proud to know how much love the new owners were giving my former home! :)
YoungHouseLove says
They do! They found out about our blog when we purchased the house (we told them) and they follow along and sometimes even chat with us on Facebook about it). They’re the sweetest family and say they love seeing what we’re doing and watching the house change without them having to “break a sweat” – haha.
xo,
s
Robyn says
Watching your kitchen come together has been incredible!! I bet you guys are just giddy! Its truly turning out beautifully :)
YoungHouseLove says
Aw thanks Robyn! So sweet of you to say.
xo,
s
Lovey says
We added a pantry to our kitchen too. Giving us a big white wall of boring. So we adding a stick on white board type paper and a diy magnet board/menu planner with sheet metal. I’ve been meaning to frame the whole thing out with some trim but it still makes for an great keep things organized area.
YoungHouseLove says
So cute! I love that idea.
xo,
s
Shannon says
I’m pretty excited for the day I can pin your (at least more finished looking) kitchen. I am so in love with how it is coming together. Makes me want open shelves!
Harmony says
I am so excited for the texture the planks on the peninsula will add! I am betting they provide the perfect contrast to make the space really pop:-)
Nathan says
I follow this kitchen redesign closer than the news, which is kind of sad. But going with that, can you give us a picture of the window? My OCD kicked in and I want to see it centered now that the shelves are there. Looks great. I want to tile something…
YoungHouseLove says
I think we’ve got a pic like that in tomorrow’s news, er, post. :) Stay tuned!
-John
Susan Akers says
Been waiting for the big reveal! Do you think that maybe just 3 brackets on the left hand side would have been enough? Probably will look alot different after you guys fill the shelves and get the floor in. The hood cover looks great!
YoungHouseLove says
We wanted to space them out all the same distance, so since they were 15″ apart on the right they looked best spaced the same way on the left to us! Just three of them felt oddly separated and off-balance. It was also where the studs were. Haha. Hope it helps!
xo,
s
Kel says
Wow. Check out the before and almost after photos. Aaaamazing!
Can’t wait to see the shelving decorated. Decorating is my favourite step in all DIY projects.
Amanda says
Am I the only one who thought the support pieces looked like rib bones from one of those large skeltons of animals they have at mueseums? lol no idea why but that’s the first thing i thought of when i saw them.
YoungHouseLove says
Haha, I can kind of see it! Someone pointed out they’re rounded like our penny tile and our pendant lights so now I love that they’re “curvy” like other things in the room. Yay for happy accidents! Haha.
xo,
s
Dita says
great and cool, your kitchen look so nice.
josh o. says
firstly, kitchen looks amazing. some might even say amaze-balls. i won’t, but some might.
i have followed youse guys on and off for a while – love what you’re doing, all around. since i’ve been in and out, i haven’t totally scoured the full archive, but i was wondering about your decision making process, and your ability to compromise. i’ve got some wacky ideas for around our house, and my wife likes to play it safe. if i could say “look honey, this lovely couple does it like this….” that might get me closer to a black bathroom (walls only, not fixtures) or painted cabinets, or something.
any advice?
YoungHouseLove says
Oh yes, we can totally relate! There are lots of things we don’t agree on when it comes to decorating but a few years back we came up with a Full Agreement Agreement, which basically means we don’t get or do anything unless we both sign off on it. We realized we didn’t want either of us to resent the other one for a purchase/color/other decision and we didn’t want our house to feel half-Johns and half-mine so it means a lot of waiting around an stalemates but it usually adds up to finding the right color/piece that we both love after lots of debating and searching and starting over and then we’re both so happy we held out! Oh and here’s a post about how I try to get John to “see” things that I’m envisioning (sometimes getting them to picture it is all it takes to sell ’em on something! haha).
xo,
s
josh o. says
that actually makes sense. i often revert to the “but i’m a designer” argument, which, while it is true (really – commercial, corporate and retail design in st.louis) never works to my advantage. coming in with documentation and examples probably would.
thanks for getting me to consider it in a different light.
keep up the awesome work – i’m off to read the “no longer empty shelves” post right now – cant wait to see how it turns out!!
YoungHouseLove says
Aw thanks Josh! Good luck with everything!
xo,
s
Knitandmake says
Looking great cant wait too see the shelves filled. :)
vicky says
Beautiful! I love the detail on the shelves. makes me wanna rip out my upper cabinets!!!
Janie says
you both did a beautiful job! amazing “after”; love the penny tile. but, gotta tell you—those open shelves are too close to your range…..everything on them will get greasy, dirty….unless you really don’t use the range.
YoungHouseLove says
Check out this post for that info (we did our research, got a great quality range, and hung it according to their instructions so grease shoudn’t be an issue at all- will keep you posted though)!
xo,
s
aml says
have you guys considered buying a compressor and spray can to avoid all the hand priming and painting?
it will really save you time ….
YoungHouseLove says
I think we’re oddly old school about it – haha. It doesn’t take us too long and we worry about drips and inconsistencies with a sprayer (a foam roller really couldn’t be easier to use when it comes to depositing thin and even coats without any brush strokes or drips). I think the idea of cleaning a compressor every time we change colors scares us too since it’s so simple to clear a brush and a roller, so maybe we worry it’s more time on the back end?
xo,
s
Anita says
I love almost everything you guys do & I adore the kitchen in pretty much every aspect but *gasp* I’m not digging these shelves :/ eep.
It’s not the open shelves really, it’s the brackets. I even like the style of the brackets, but it’s the size of the brackets that is totally throwing me. I’m a fan of clean, floating shelving, but I get that people like brackets & it’s more of a classic feel, but those just seem too big to me. It might appear differently in person, but the shelves already seem cramped next to the fan, so the brackets seem kind of big & busy. Maybe the addition of plates & such will draw the eye away from them but right now they seem a bit like an eyesore.
Just my opinion & I’m by no means a decorating aficionado. & to each their own. Looking forward to seeing how the whole place comes together & what the finishes touches will look like!
YoungHouseLove says
Yup, I think without anything on them the brackets are all you see! Completely agree! But now that we have stuff on them (wahoooo!) we love the look! You’re right about it being one of those subjective things though for sure!
xo,
s
Brandan WH says
It really is just beautiful. What a difference! Total inspiration for when my husband and I start “re-designing” our kitchen next year. SO excited for you!
YoungHouseLove says
Aw thanks Brandan!
xo,
s
Emily says
it’s FILL DAY FILL DAY stuff’s goin up on FILL DAY, everybody’s looking forward to the platesandcupsandboooowls, FILL DAY FILL DAY, no teasing us on fill day, EVERYBODYLOOKINGFORWARD TO. THE. PLATES. AND
yesterday was hang day hang day
today-ye is fill day fill day
we we we so excited
we so excited
for a ceramic animal today
…i woke up singing it.
kloveyoukbye!!
YoungHouseLove says
Bwahahahahahahhah, is 8:34 too early for comment of the day? Nope. Done and done. Love you Emily.
xo,
s