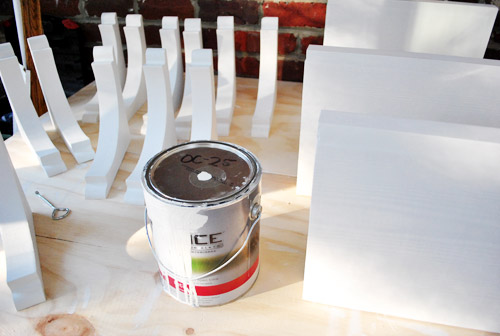
Let’s see… when we last left off on Monday, our open shelves had been primed in preparation for their big hanging debut.
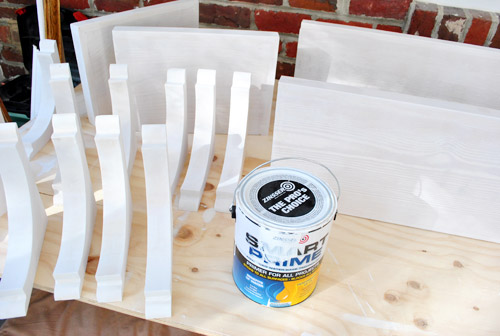
While we had the primer out we went ahead and slapped a coat on the hood cover too (using a 2″ angled brush in the cracks followed by a small foam roller to smooth everything out). Things were instantly looking less wood-sy on that wall.
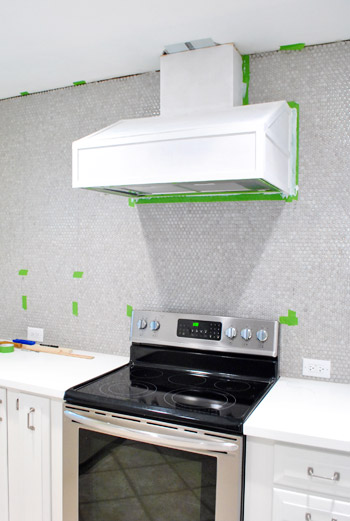
Once the primer dried on both – we used Zinsser Smart Prime which is low-VOC and was recommended by a few pro cabinet painters that we know – out came the same high-durability paint that we used on our cabinets (yes, there’s still plenty left!) and we gave the brackets, shelves, and the hood a couple of coats. Two thin and even ones over one coat of primer did the trick. We also applied those with a 2″ angled brush followed by a small foam roller to keep things smooth and even. Oh and the paint is Benjamin Moore Advance paint in Cloud Cover, bee-tee-dubs (which many pros use to paint the inside of their clients’ cabinets along with the outside, so it should stand up really well to everyday use once it’s nice an cured up).
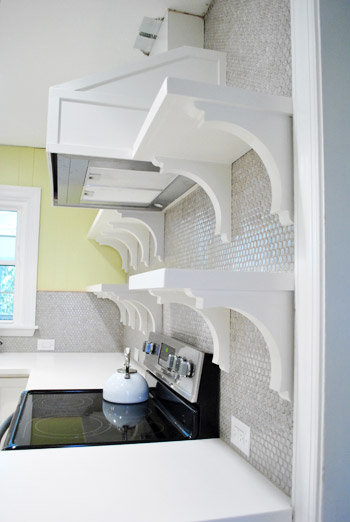
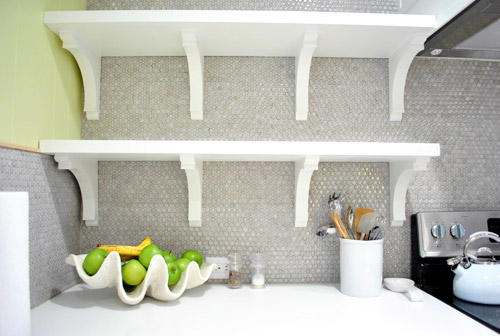
But the exciting stuff really started to happen when we finally got to the point of ACTUALLY PUTTING STUFF ON THE WALL. Yowza. Sorry for the caps. I said we were excited, right? Excited might be an understatement actually. Luckily, since we had already drilled all of our screws into the wall, the hanging step was pretty easy. Up went the brackets on the short side…
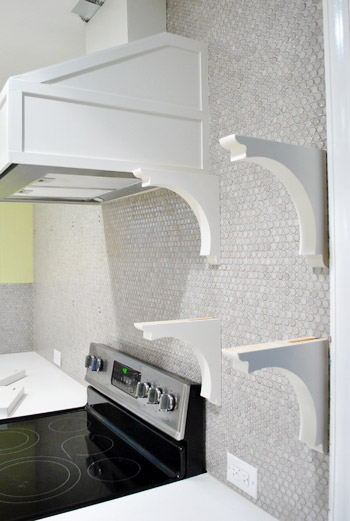
…followed moments later by the shelves themselves. Can I get an “Ooooh”? How about and “Ahhhhh”?

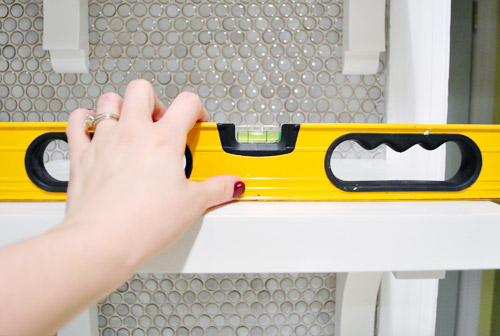
Don’t worry, we weren’t gonna just let them sit there unsecured. We just had some other things to do first – like making sure everything was still level. It was. Phew.
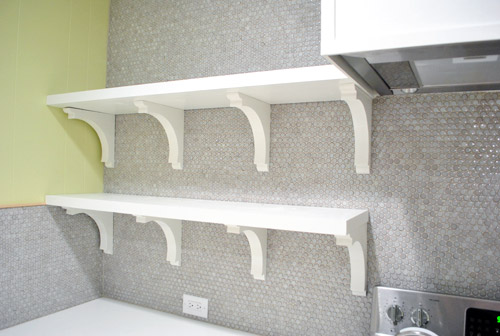
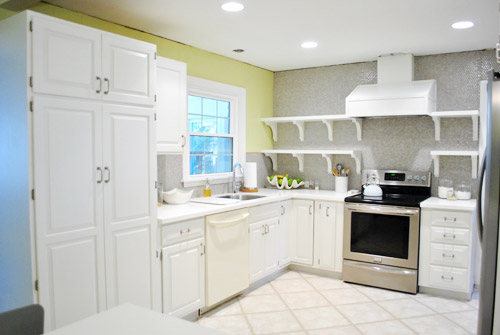
So then we put everything up on the long side of the wall.
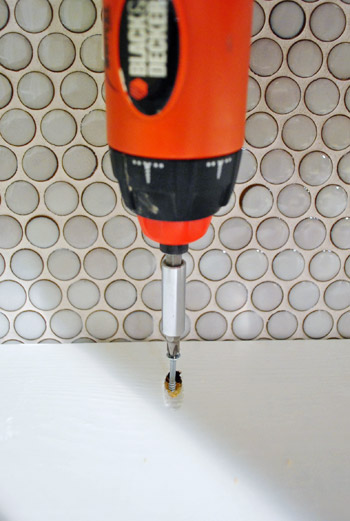
We had mentioned in the previous post that we had originally planned to screw the shelves into the wall (we even made some pocket holes in preparation for this step). Well, after feeling how solid the brackets felt (more on that here) and not really wanting to put 12 more cringe-inducing holes in our tile – we opted to just use those pocket holes as a spot to screw the shelves firmly into the brackets (so the screw actually went straight down, not at the angle of the pocket hole). In hindsight, we definitely could’ve skipped the pocket hole step, but at least now the screw will be hidden in a spot that we can easily caulk over.
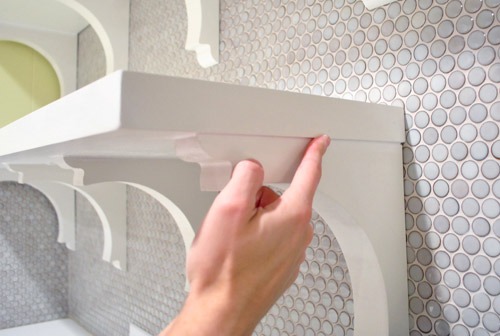
Speaking of caulk, that was our next step after everything was drilled together. Since there were some dark seams where the shelves met the brackets, we just ran a thin bead of white paintable caulk along the top of each bracket and smoothed it with our finger to make the shelves and brackets look more like one unit. Tedious? A smidge. Worth it? Totally. Then of course we painted over it so everything matched.
And with that folks, we were done! Except for more waiting. Booooo.
As eager as we are to immediately fill them with plates and bowls and cups, we resisted that urge in order to let all of the paint cure a little bit longer – just because we caulked those screw holes and around the edges which called for some touch up paint. We definitely don’t want to jump the “fully cured” gun (which could result in a bunch of dents and dings in our shelves during their first few days of use). So for now we’ll just have to enjoy these empty “after” shots thanks to following the full curing time on the paint can’s directions. But tomorrow – oh baby, it’s on. Sherry’s even planning to shoot a little time lapse video of the process of loading them up.
Oh and of course we still have to add crown molding to the ceiling to finish things off and make the top of the hood a lot more seamless. But slowly it’s all feeling a lot closer to “done” than “just started” – especially now that the hood is painted too (never mind the fact that we still have some patch work to do on the ceiling along with that aforementioned crown molding).
We’re really happy with how the brackets turned out, so we haven’t thought twice about our decision not to do true floating shelves. We think these are really charming – and they’re super stable so Sherry could probably hang off of them if she wanted. Instead she wants to fill them with ceramic animals. Same difference.
It’s nice that there’s still plenty of room to load them up and make them really functional, even with the brackets (no, they will not actually end up full of ceramic animals- not on my watch). Our shelves are deep enough for our 12″ dinner plates and the brackets are 15″ apart so we should have lots o’ room to put everyday stuff up there – which we hear from other open-shelf-having folks works really well, since it’s used often enough not to get dusty).
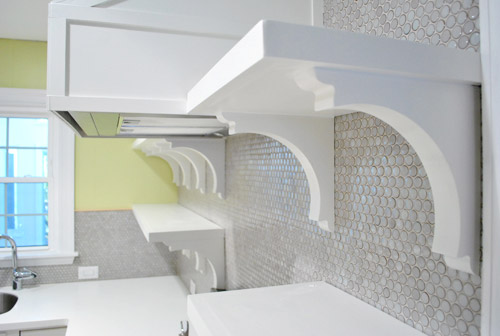
And even though it was a bit weird at first to see our wall of penny tile suddenly broken up by these bright white lines, it’s cool to see the thing we’ve always envisioned come that much closer to being a reality.
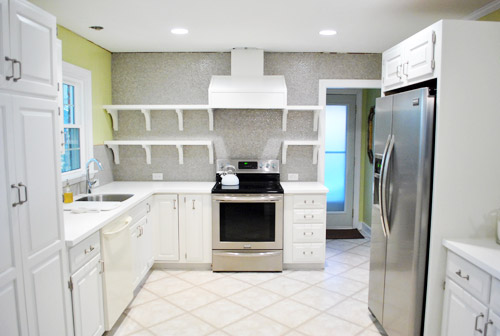
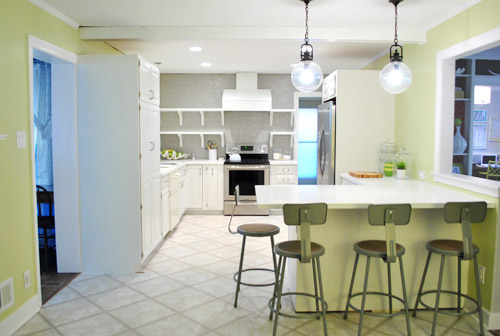
So we should have pics (and a video) of the shelves all filled for you tomorrow. Until then, we’ll leave you with this slightly-closer-to-after shot of the room. We’re definitely getting there. And we’re counting down the seconds to Operation Cork My Floor (along with adding that crown molding, patching the ceiling, adding a pendant over the sink, covering the base of the peninsula with some decorative wood planks, hanging some art to the right of the fridge, do something to the side of the pantry, etc).
We feel especially giddy when we look at old photos of the room back when it looked like this:
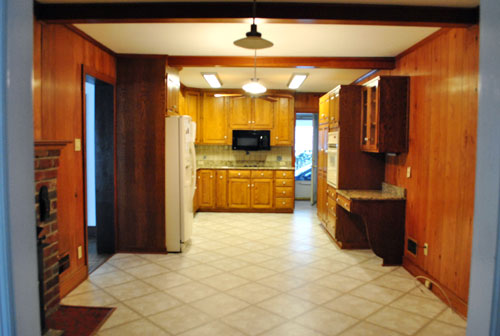
We can hardly picture that old room anymore. Isn’t it funny how quickly your brain replaces things? It’s so crazy that we lived with the room just like that for over six months before even painting the paneling. But once we finally got the ball rolling… well, it’s still rolling. Haha. Is anyone else in the home stretch of one of their home projects? Though I probably should knock on wood when I say that, since it sounds like a sure way to jinx myself into some last-minute wrench in the plan (he says as he gets up to literally go knock on wood while crossing his fingers and eyes).
If you’re interested in more ideas for adding shelving or vertical storage, this post has a bunch of DIY shelving projects and ideas for you.

Jessica says
Looks great, y’all!
Eric Estate says
I love the look, but would love to suggest Glass shelves instead of the wood ones – they will cast less shadows, and might look less heavy.
Shelley says
What a beautiful job you guys are doing! I really like the addition of the brackets under the shelves. Can’t wait to see the flooring go in!!
Megan says
Eeep! So excited for y’all! It’s been so cool to watch the room come together.
Suzy says
BEAUTIFUL!!!! Just Wow, it’s all coming out really cool. I don’t fancy white kitchens too much but it’s impossible to dislike yours.
Lisa G says
The difference is ah-mazing!! So happy for y’all. It looks great. Our kids are going to nana’s on Saturday so we can paint the kitchen- BM Blue Haze. Exciting!!
Joe Anna says
Super exciting!! I love seeing it all come together :) Thanks for all the tips. We weren’t sure if we could tackle painting our crazy cabinets but thanks to you guys we feel pretty confident we can do it!
Emily says
Pretty pretty!! I can’t wait to see them all “dressed up”- haha. And I’m looking forward to seeing the kitchen with new floors- oooh. We’ve been busy re-flooring our downstairs- funnily enough we added more wood to our kitchen- the opposite of y’all! Here’s a sneak peek of how it looks! http://davenportdiy.blogspot.com/2012/02/sneak-peek.html
YoungHouseLove says
So pretty!!
xo
s
Adrienne says
It’s so great to know that you guys didn’t even start painting the paneling until you’d been living there for 6 months! Lately I’ve been feeling almost lazy because I haven’t started any big projects and we’ve lived in our house for about 2 and half. Slow and steady, right?
Shannon @ Bungalow960 says
I am in LOVE! I can totally see some awesome turquoise Fiestaware looking amazing on those open shelves!
Claire says
The shelves look great!!! My husband & I rent now but I can’t wait to own again so that I can git my home improvement groove on again!
Like Sherry, I’m a petite/vertically challenged mama at 5’1″. I’ve always said if I was a rapper my name would be “Sweet n Low”.
Aaaannnyyyyway, the top shelf looks high…does Sherry have problems reaching it? I can barely reach things in our rental ‘built for a tall person’ kitchen. The upper cabinets have 4 shelves, I have to get on tippy toes to reach the 2nd shelf so the 3rd & 4th shelves might as well not even be there. Ahhh…the downside of being short.
YoungHouseLove says
Sweet N Low is an awesome name! And Sherry can reach the top shelf – we even have it captured on film for our next post!
-John
shelby@honeysuckle says
You are basically creating my dream kitchen – i love all things white! My hubs actually just built almost identical shelves for our dining area though: http://honeysuckleblog.blogspot.com/2012/01/two-steps-forward.html
Can’t wait to see how you style yours!
YoungHouseLove says
Aw thanks Shelby! You’re sweet. Also love the shelving! So pretty.
xo,
s
Cher says
In the third-to-last pic, there is wood between the paneling and the tile… are you planning on painting that white? (Please say yes, otherwise that whole John-and-Sherry-up-on-a-pedestal-because-they-design-perfectly-for-my-taste ideal will be crushed!
On another note, did you measure the height of the tallest items you want to keep on the open shelving to determine the distance between shelves, or did you just figure where you wanted the top shelf and half that to get the location of the bottom shelf? I’m trying to figure out where to put shelves in my place and I’m having a hard time determining where (vertically) to put the different shelves. Any advice would be great!
YoungHouseLove says
Yep, it’s getting painted – we’re thinking a grey actually to help it blend with the tile. As for the height, we knew we wanted the bottom shelf to be 18″ from counter and were initially going to do 12″ for the top shelf but then eyed it and decided 14″ would be better (it also made the height of the hood better in this case).
-John
Krystle @ ColorTansformedFamily says
It looks really good! I think the style brackets you choose works with your existing cabinets perfectly. They both have a touch of traditional to them but with white paint lean more modern. I love it!
Alissa says
Looks SO good! Can’t wait to see them full of white ceramic animals, and maybe an aubergine rooster.
And I just realized that the backsplash tile matches your blog backsplash. Nice work coordinating cyber decor and real decor. :)
LuLu says
I keep saying it but I have to keep saying it. You guys are amazing!!! And SO inspiring. YAY YOU!!!
LuLu
Jaime says
What is the little gap between the brackets and the wall trim? Still looks great. Just wondering why it isn’t flush to the wall or door trim?
YoungHouseLove says
To keep them hanging from the studs and also to keep the spacing even we had to sit them a little bit away from both the wall and the door trim.
-John
Nicole says
Yay! It looks amazing!! I think the happiest day for me will be when you are finally able to install your new dishwasher… the bisque color against all that crispness is killing me!
Lisa P. says
STUNNING!!! I (like everyone else) cannot wait to see the next step in the process.
Maureen @ This (Kinda) Old House says
Oh my God!!! LOVE!!!!!!!!
The transformation is amazing so far. Really. Do you know if they previous owners follow your blog at all? I bet they wouldn’t even recognize the place!
Maureen @ This (Kinda) Old House says
Sorry, I just saw that someone else already asked this! LOL
YoungHouseLove says
We think they read! They’re so nice they say they like watching us go since they don’t break a sweat and get to see the results!
xo,
s
Christine says
Have fun loading! After we finished our kitchen this summer – I took an entire Saturday to load. The day started with a trip to Homegoods with a gift card and ending with me working until 2 AM organizing and finding a spot for everything. It was one of the most fun/best days ever. Weird?
Keisha says
Looks so much brighter than the before picture! I am really looking forward to the cork floors, I think they will really warm up the room and complete it. Thanks for letting us share in watching the transformation!
Tom M says
Operation Cork My Floor made me think of the old Jimmy Fallon SNL sketch. So thank you for making me crack up in a roundabout way.
cjr says
looks great! congrats!
Christie says
Yay for kitchen posts!
I love the proportions on each side of the hood/range. I love the asymmetry, yet the balance of it. That really makes it look intentional, and also goes with the asymmetry of the rest of your kitchen floorplan (the fireplace is especially what I’m thinking of since that being off-center was a design challenge for you.)
So I’m wondering what you think of asymmetry? How did you make it work so well? Is it the fact that there are several asymmetrical elements in your kitchen, each balanced in their own way, and complementing each other. Would a totally symmetrical wall look out of place? I know your window wall will have equal distance on either side of the window, but the asymmetry comes with the pantry, right?
I don’t know … just curious what you think! Its a very successful design, and not the easy, obvious design with total symmetry.
YoungHouseLove says
Aw thanks so much Christie! We just tried to put the brackets at the same distance on each wall, so even if there are four on one side and two on the others it makes spacial sense. We’ll also load them up with accessories that makes sense hopefully! And having that whole wall be tiled helps with the balance. A totally symmetrical wall would look great too if you have a kitchen that makes that work!
xo,
s
DJ Sherry says
Well done! I think the shelves really enhance the tile. Looks even more substantial and high end. Definitely polished!
Liz says
Looks great!
Question-how did you determine how many brackets you need? Could you have gotten by with just two on the shelves to the left of the range hood or no? Don’t get me wrong I love the brackets, just curious how you came up with that number.
P.S.-I still pet my monitor when I see the penny tile up clse. Every. Single. Time.
YoungHouseLove says
We just held them up in different places and found out where the studs were and did what made sense for the studs and what looked best in our eyes. But you could totally have done three on the long side (two might make the wood bow/warp over time though). Hope it helps!
xo,
s
e-lee says
Love love love the look and think you’ve made incredible progress – totally insiring. My only small fear is the load that will be on the shelves. I know you didn’t want to drill into the beautiful tile too much, but there’s usually some serious blocking in walls for shelving that’s expected to hold that much weight. Yikes!
Victoria says
OMG. So. Much. Better. SO. MUCH. BETTER!! That before was looking pretty scary, and now it’s so light and airy and inviting. Can’t wait to see the rest of the updates.
Mel says
Its probably my favorite step so far in the kitchen! It all just looks so ELEGANT. Especially the shelves. The brackets totally make it.
Chelsea says
WOW!! What a transformation. It makes me so inspired to start working on my own home! You guys are great. :)
Katrina says
I love how it is all coming together. The cork is really going to be a game changer!
Christine Schwalm Design says
Wow, congrats for having the vision to see past all that wood panelling! I have a friend who is starting to plan her kitchen redo and I’ve sent her here to get some affordable DIY ideas.
Angela says
They look so great!!! I held my hand up in front of the screen to block the laminate floors and tried to imagine the cork… it’s going to look so snazzy!
Gwenalyn says
It looks amazing you guys! Seriously, like night and day. I never noticed it before but your old kitchen was VERY dark, wow! Quick question, do you guys have a tutorial that you recommend that teaches people how to caulk stuff? I had a mishap with it the other night that I would rather not repeat. Haha! Any advice would be appreciated. Again, nice work, you two! Your kitchen looks lovely. http://randomrantingsofaramblingredhead.blogspot.com/2012/02/i-screwed-up.html
YoungHouseLove says
We should make a video of that soon! Thanks for the suggestion! Maybe try youtube to see if there are any there already to help in the meantime?
xo,
s
Gwenalyn says
I always forget that they have videos of everything. Thank you!
Kristi says
I am pretty sure Katie Bower has one up over on Bowerpowerblog.com
Lisa says
wow! I love the shelves! great job!
Tracey says
One word comes to mind—AMAZING!!!!
The before and after pics are just amazing!
You definitely have come over from the dark side and into the light.
Emily says
Love it! Can’t wait to see it functional (loaded up with your stuff)! Such an amazing transformation, what vision and execution you guys have!
Ashley says
Love how it’s turning out! Have you ever thought of blackboard painting the side of the pantry? We had a similar situation and painted magnetic primer/blackboard paint over the entire exposed side of the pantry, which our two year old LOVES! Just a thought.
YoungHouseLove says
Yes, we’d love to do something with that!
xo,
s
Lindsay says
Hi. It looks great! I know you guys are crazy busy but could you tell me how many gallons of paint you used for cabinets/shelves?
You have totally inspired me and we are embarking on this project over the three day weekend coming up!
Thanks!
YoungHouseLove says
Just one gallon and it’s still going strong! We have lots left! Primer helps a lot I think!
xo,
s
YoungHouseLove says
We haven’t even gone through a full gallon of paint or primer yet!
-John
Lindsay says
Thanks so much for the reply! I have no idea how you guys do it all. I hope you are getting a little rest in between the craziness!
We will also be painting cabinets during naps and after bedtime, we have an 18 mo daughter so I can appreciate a *little* bit of your insanity.
YoungHouseLove says
Aw, good luck! I’m sure it’ll all be worth it!
xo,
s
Angela says
Yall have done such a fabulous job on this kitchen, its been fun to watch. I love the open shelves, my only opinion, and we all have one, is that I would have used 3 brackets instead of 4 on the longer shelves. But maybe it looks different in person.
This is absolutely not a critisism tho. I really enjoy your blog.
YoungHouseLove says
We thought about that, but we needed to do the four in the middle to take advantage of the studs that were there on that wall.
-John
Stewart Pillow says
Don’t worry guys… I squealed out loud at work when I saw this in my inbox!!
YoungHouseLove says
Haha- nice!
xo,
s
elaine says
Gorgeous! Nice and chunky yet completely streamlined at the same time – beautiful! Love all the details (moulding, brackets etc). Can’t wait to see those babies all dressed up!
Ashley @ sunnysideshlee.com says
It’s amazing how far this kitchen remodel has come! It’s now so beautiful, open and BRIGHT! love love love it!
Lindsay says
As soon as you add your final touches to these shelves, i.e. dishes, etc. I am going to just die. LOVE it so much.
YoungHouseLove says
Aw thanks Lindsay!
xo,
s
Amy says
Holy canoli that looks amazing! I love the brackets. You guys always make huge projects look so easy. Thanks for breaking them down so nicely. Can’t wait for your book!
Deidra says
I loved scrolling back and forth, back and forth, back and forth between the before and afters. What a world of difference! I’m anxiously awaiting the cork floors— I think they will look great!
Jessica Laing says
SUCH A GREAT JOB! Myself and two other girlfriends often talk about your blog. Sometimes the conversation starts with “Did you read about Sherry and John’s latest kitchen updates?” As if we’re all on a first name basis. Our husbands laugh at us. :)
YoungHouseLove says
Aw, you’re so sweet. I love you guys.
xo,
s
Natalie Royall says
You guys thought about doing floating shelves, which might have been cool looking, BUT I love the brackets, I think it adds so much more to the area. GREAT CHOICE, in my humble opinion. And once the molding is up, it will be perfect. Have really loved watching this project unfold.
Emily says
Looks awesome! How did you determine the distance between the top and bottom shelves?
Also – what department did you find the brackets in at Home Depot? I was there Saturday and they looked at me like I was a little wacko :)
YoungHouseLove says
We just taped off different placements on the wall with painter’s tape to see what we liked and we ended up liking two shelves with the top one aligning with the bottom of the hood. It seemed functional too because I can still reach the top shelf. Wahoo! As for the brackets, we located the studs and decided we liked them all spaced the same – so we just taped that off, liked it, and went for it. Oh and the brackets are in the wood aisle with the trim and all that.
xo,
s