“Oh what a feeeeeeling, painting on the ceeeeeiling.” Why yes that was a Lionel Richie reference. You’re welcome.
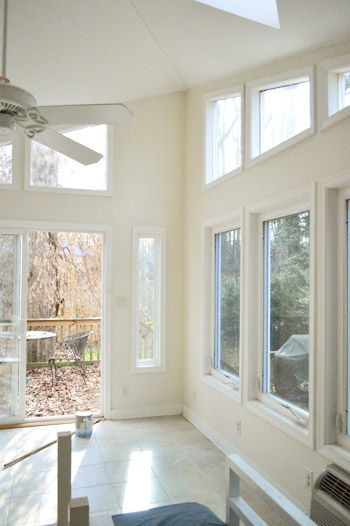
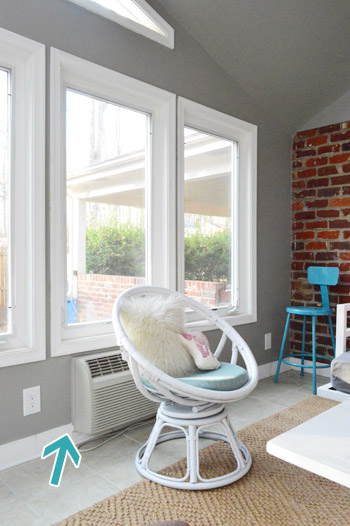
It was time to get some paint up in this heezy. And by heezy, I mean sunroom… hence the furniture being all piled in the center.
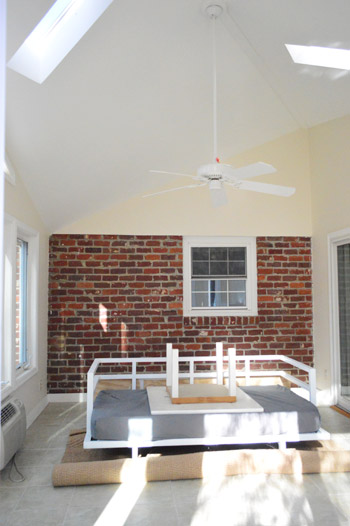
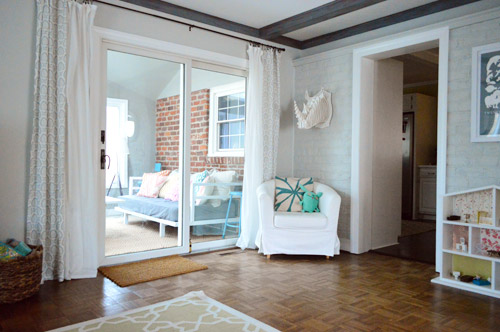
But before we get to painting, let’s talk about the half-brick wall in this room – since you guys offered up lots of thoughts and suggestions in the last sunroom post. Some had suggested covering the drywalled portion in brick veneer or reclaimed wood.
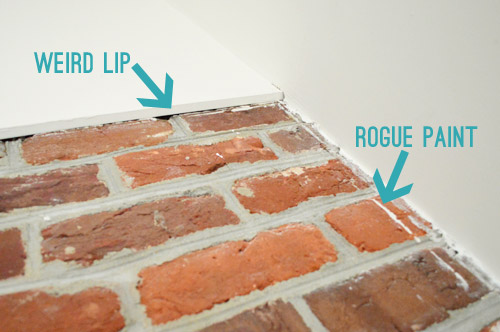
Unfortunately the dry wall sits in front of the brick, so there’d be this weird lip between the real brick and the veneer/wood (so we’d prefer not to add anything up top to make it stick out further like an awkward above-the-window overbite). We’re actually leaning towards either trying to distress/fade the brick or straight up painting it (like the same brick that was already painted by the previous owners in our living room, especially since it already has some splatters on it from the previous paint job).
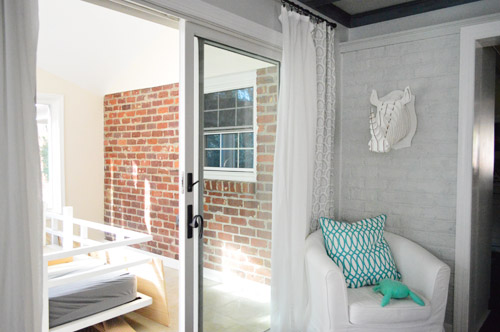
See how the last owners of this house had already painted the wall of brick in the living room (on the other side of the sunroom doors)? Since they’re both in the same sight line, we think painting that small u-shaped expanse of it in the sunroom may be the most cohesive solution – so the sunroom feels more connected to the rest of the house.
But before doing anything rash, we wanted to give the brick the benefit of the doubt – so we decided not to take any action on it yet. First we wanted to paint the rest of the old yellowy-cream colored walls in the room to see if that influenced our decision about the brick at all.
So we readied the rest of the room by moving out almost everything, which turned our living room into a temporary disaster zone. This shot below is for all of you who love the chaos of DIY. Oh yeah, it spreads to at least a few other rooms when you’re painting one…
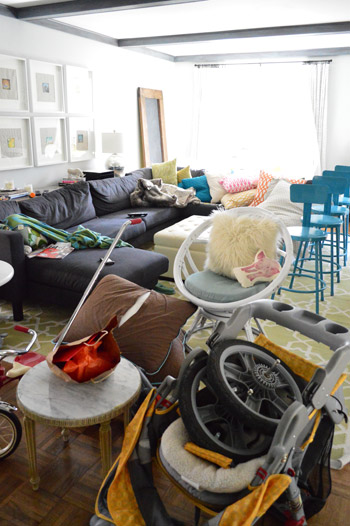
Burger didn’t seem the mind the temporary influx of extra pillows to curl up on. This is his “excuse me dude with the camera, someone’s trying to nap here” face.

And thankfully Clara was on a play-date with my parents, so we could dive in and do as much as we could without worrying about her getting into paint or tripping over the massive pile o’ chaos on the living room while we painted.
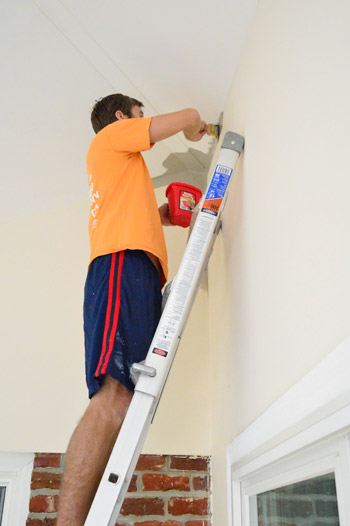
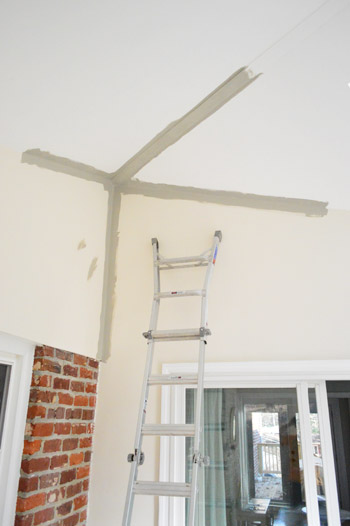
But back to the sunroom. Painting is one of those projects we can practically do in our sleep by now… except for when it involves 12 foot ceilings. That was a new challenge for us. But we couldn’t live with those white ceilings and those yellowed old cream walls anymore (yes, they were two different colors) so we dove right in.
How? We just busted out our ladder and go to work.
Oh yeah, forgot to tell you the paint color. We went with our current favorite: Rockport Gray by Benjamin Moore (which is also in our bedroom, and is actually more of a warm brownish-gray than a cold cement gray). I’ll explain why we made that choice when we get to the after pictures, so just hang on for the time being. I realize it’s not much to look at when all you see so far is the edged corners…
Edging actually took a long time – even with us both doing it – since this room is basically all corners and windows. And if I do say so myself, I’m not half bad at it. Yep, there may be a new edging sheriff in town. Take that Deputy $herdog. Ok, I take that back. Sherry can pretty much lap me when it comes to edging. So she did all of the edging around all of the doors and windows except for the few windows up near the ceiling, which I tackled on the ladder.

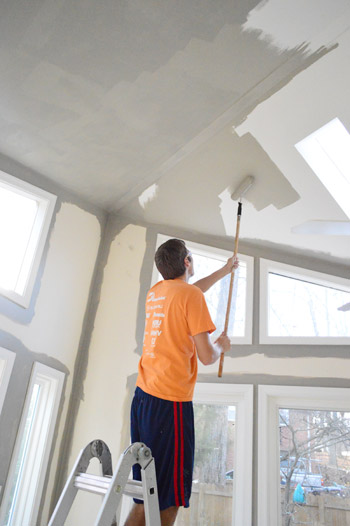
Once all of the edging was done, Sherry did a second coat around all the doors and windows while I took to the pole. Wait, that sounded bad. I’ve actually never painted with a roller that’s attached to a pole before. Even when doing other ceilings (8ft ones, that is) I usually just stand on a stool. And I gotta say I was impressed with how relatively easy it was. Granted it did get tiring to hold your arms and neck up like that for so long, but it wasn’t terrible.
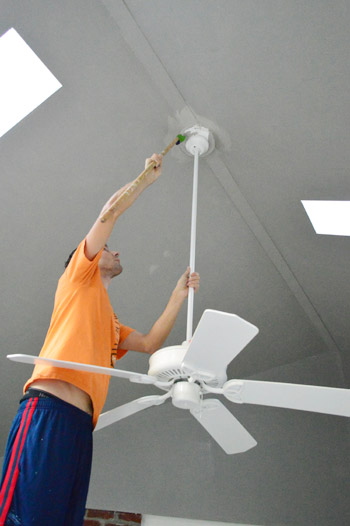
But the rod extending pole couldn’t help us get the area where the fan attached to the ceiling (where we needed to be more exact than a roller ever could be). And my ladder couldn’t get me high enough to edge that area by hand either. So that’s when Sherry and I whipped up this contraption. Yup, it’s a brush taped to a pole. We’re true professionals around here.

If you weren’t convinced of my edging prowess before, just check out this magic going on. That’s what we call painting with surgical precision. Although I realized I should’ve taken a detailed after shot of how awesome this actually turned out. Seriously, it worked like a charm, guys.
It took us two coats and a total of about seven hours across two days, so it certainly wasn’t our fastest paint job in the world – but we’re really happy with the results.
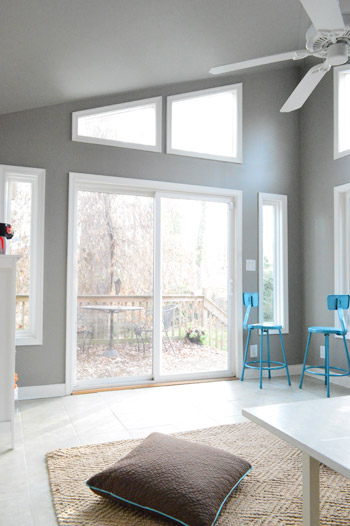
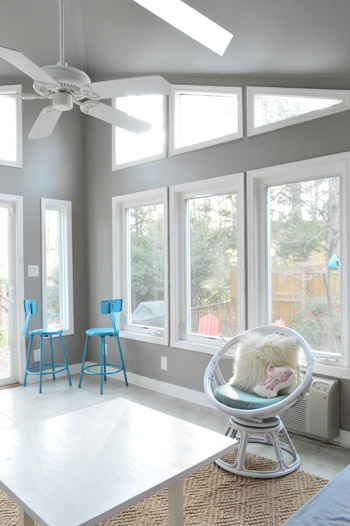
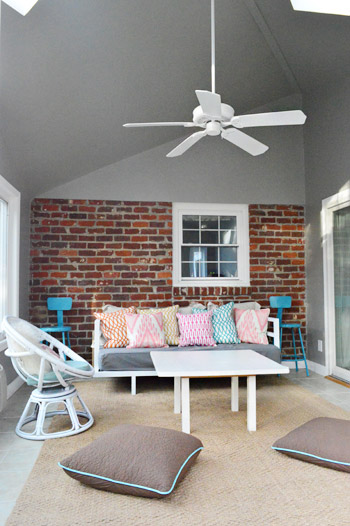
Trust us: despite the warm gray color, this room is far from gloomy. Light floods in (which is one of the reasons we knew we wouldn’t regret going with a darker tone in there) and even the tiled floors feel less yellow now that the walls aren’t the same creamy-bisque tone. Although we’re the first to admit that the room still has a looong way to go until it’s a functional, finished room (remember how the middle makes no sense?).
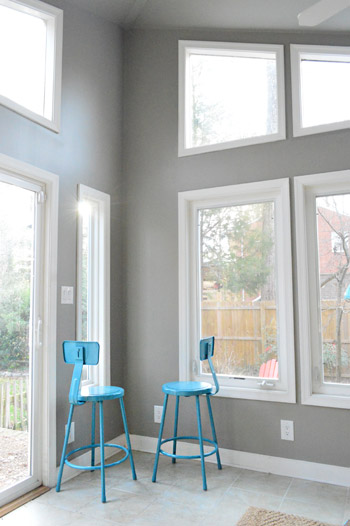
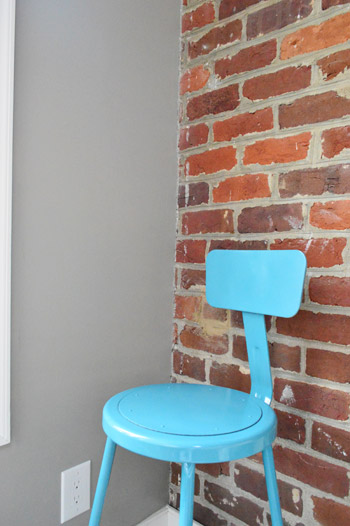
And if you’re wondering about the two blue stools having a hushed conversation in the corner together (stool meeting is now in session!), we’re just experimenting with some layout ideas. The stools are helping us picture maybe tucking a small cafe table in that corner, but we’re not married to anything yet. We’ll keep you posted!
Oh, and I promised I’d explain the rationale behind Rockport Gray a bit more so here we go:
- It really makes all the white trim in the room stand out, so it feels crisp in a way that the old yellowed cream walls didn’t (this paint choice did the same trim-crisping thing in our bedroom, which we loved about the color)
- The room has a pretty crazy ceiling (it slopes away from the house and up, like a rocket ship) so we thought a moodier and darker color might downplay the strange angles and make it all blend together more than it did with the previous white ceiling and creamy-yellow walls
- As we mentioned a few photos up, the tile floor feels a lot less monochromatic and yellowed since the walls are no longer the same exact tone (it felt like a beige box with an oddly shaped white top before)
- We also thought it’d tie in well with the living room’s Moonshine walls as well as the grellow walls of the kitchen (both of which you see from the sunroom – so whatever we chose had to go with both)
- In the spring, summer, and fall (aka, any other season than the bleak and bare one that we’re currently in) we want the greenery outside to be the star, so we thought picking a moody not-crazy-or-compete-y color would keep from overshadowing it
- The brownish-gray helps us camouflage that similarly colored heating/cooling unit a bit
We also thought the new wall color picked up the tone of the mortar too, just in case we decided to keep the brick as is.
And now that the room is painted, here’s where we stand on the brick: we’re not sold on leaving it as-is. It still feels really awkward to us since the top end of the drywall above it rests oddly on the window (like it’s squishing it or something). And since there’s already a whole wall of painted brick to the right of the slider (in the living room) it still feels awkwardly disjointed from the rest of the house in a way that a painted brick wall would not.
We did think about trying to gray-wash it a little first (with watered down paint, stain, or even by rubbing some cement on it) just to see if that helps to tone down the red – as demonstrated by my poor Photoshop attempt below…
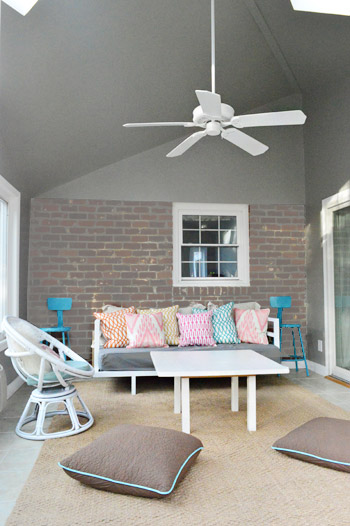
…but that still feels like not-as-seamless-of-a-solution-as-painting-it like the brick in the adjoined living room. So that might be where we end up.
As always, we promise to keep you posted! Oh and speaking of future planning in here, we’re putting more thought into the window-seat-under-the-window-wall idea, so that should be exciting if we decide to go for it. You know we’ll share all the details as we creep along.
Oh and as much work as we still have to do in this room, I must say that this has definitely reconfirmed for me (once again) that painting a room is an awesome way to make it feel like it’s yours. Our sunroom suddenly doesn’t feel like a forgotten project-room stuck on the side of our house, it’s actually starting to feel like a place we can hang out on a lazy Sunday – which is exactly how we used the sunroom in our first house, so it has us all sorts of excited about the possibilities. What did you guys do this weekend? Was there any painting or planning? Any other pole-related projects going on?

Criss says
So the egg chair has been replaced with what looks like the chair from the kitchen? And the egg chair might find a new home in the sunroom? I know WAY too much about your house!
YoungHouseLove says
Haha! The egg chair used to be in the corner of the living room but then the old kitchen chair moved into that corner when we got the new chair in the kitchen which freed up the egg chair for the sunroom. Hurrah!
xo
s
Nicole @ Liberty Belles says
looks awesome! and I agree on painting the brick – I love unpainted brick in lots of situations, but this just ain’t one of em :)
Carla says
I was Team Distressed Wood and Exposed Brick before, but have changed my mind after seeing the view from the living room. :) Being reminded that the living room brick is painted it now makes sense and feels more consistent to paint the sunroom brick. I spy an egg chair change of locale. :) I used to live in a town home with cathedral ceilings – and we rented a scaffolding to paint; as a nurse I’ve heard one too many scary ladder stories – falls leading to life-altering injuries and blood vessel dissections from hyperextending necks too long leading to strokes and other life-altering symptoms. Not to freak you out, but it might be worth the expense to rent a scaffolding if you ever need to repaint out there. :) Bravo on the color. I look forward to seeing how the room evolves!
YoungHouseLove says
Eeks thanks for the tip Carla!
xo
s
Kate says
I think if you played up the orange/red tones in a bold graphic rug, the brick would look killer.
Love the paint choice!
Runt says
Wow! Changing the wall and ceiling color made a HUGE difference! Want to come paint my house now? =]
YoungHouseLove says
Haha, sure! We’ll be right over!
xo
s
Roberta says
I love the grey color…but I think I like the brick wall too! BTW I just got my book! My husband gave it to me last night as an early Xmas gift!!! I started looking through it and end up going to be at 1am LOL
Love, love, love the book.
YoungHouseLove says
Aw you’re so sweet Roberta! So glad you’re enjoying our book!
xo
s
Crystal says
Wow it looks amazing!! Can you move in with me and choose all my paint colors? ;-) I am 100% on the paint the brick train, can’t wait to see what you end up doing. I’m also secretly hoping you decide to build a window seat, I’ve always wanted one and since I have no place in my current house for one I have to live vicariously through you.
Caitlin @ Desert Domicile says
So pretty! Beautiful color choice :) Can’t wait to see the brick!
Caitlin @ Desert Domicile says
Painted brick, I should say. I’m hopped up on cold meds, sorry haha
YoungHouseLove says
Hahaa!
xo
s
Laurel says
What about trying to trim out the brick the same way the windows and doors are? might make it look more like a statement. Easy enough to try in photoshop. You would need to treat the wall like a display wall — I’m thinking lots of mismatched-interesting-shaped-and-similarly-painted mirrors. I think the brick could add some warmth to the room where it’s all hard edges, glass and grey.
I also saw a really cool ceiling featured in Fantastic Homes or something like that on HGTV where the ceiling has plaster designed like a scroll rolling away down the middle of the room, revealing the aged wood ceiling/floor boards beneath. I just tried googling for it, but couldn’t find it. But I wonder if there’s something creative people like you could make of that as a treatment over the brick.
YoungHouseLove says
Yeah we thought about adding a shelf or some trim over the brick part, but it sitting right on the window like that felt like it would be awkward and heavy! Wish the brick extended above the window a little but it just ends there!
xo
s
Louise says
it’s looking great! I vote for painting the brick – it sort of (from my lap top screen) looks kind of external rather than internal for a wall that’s inside your home, I hope that makes sense?
oh and I love that colour of the stools agains the grey, are you keeping the circle swivel chair white or is the little chap going to be that lovely colour too?
can’t wait to see what you do with the space :)
YoungHouseLove says
Exactly! There’s lots of pretty unpainted brick outside, but to make this room connect to the inside of our house we’re leaning towards painting it so it’s a lot less jarring and “separate” looking!
xo
s
Amy says
I love the color with all of the crisp, white trim! Have you guys thought about painting the brick and then building a ledge where the brick and drywall meet? I think it would help make the wall more cohesive and it could be a cool place to display photos or art in chunky, bright colored frames. Or even white frames in all sorts of shapes with bright prints… So many possibilities!
YoungHouseLove says
Yes, we thought about a shelf there but thought it would be awkward just sitting on the window like that. We’ll have to see where we end up!
xo
s
Kimberly @ Painted Love Blog says
Love the colour! Because you’ve got so much natural light filtering into the room you can definitely do a darker colour…like I tell my clients, if you’ve got it flaunt it ;)
Justine in CT says
I didn’t read all of the posts above (I’m at work) so this may be a “repeat,” but did you consider adding a small floating ledge or shelf UNDER that weird lip??? Then you can showcase more of your great art &/or doodads???? My husband installed a 22′ long shelf (2-11′ lengths) in our last house’s great room above 2 sets of sliding doors to break up the 15′ height and it was a focal point. Just a thought.
YoungHouseLove says
Oh yes we thought about that but thought it would be weird just sitting awkwardly on the window! Sort of heavy-looking and oddly-placed right on top of the window trim, ya know?
xo
s
Karen says
Oh, you gotta leave the brick as is. Seriously, go study that picture with the red brick against the lovely gray walls and ceiling. It’s gorgeous! Whitewashing it doesn’t look good to me– I think painting it would be fine, but man, I’d leave it as is, distressed brick and all.
Sam M. | Atkinson Drive says
Oh boy, it’s GORGEOUS! And I think painting the brick would be awesome!
Amanda says
Have you considered framing in the brick? I’ve seen people put moulding around the perimeter of the wall and it looks really good!
YoungHouseLove says
That could work if it wasn’t so oddly u-shaped I think (since the window would touch the tip right of the trim it might look even weirder, you know?
xo
s
Holly says
Love the new sun room color!
Thoughts on the brick wall: Have you considered covering it up? You could do a pallet wall (or something equally cool/funky rustic); or you could leave the brick (painted or not) and add a fun molding/shelf just under the odd drywall bump out. Then it would look even and give you a cool place to display schtuff/art frames.
Good luck!
YoungHouseLove says
Definitely another alternative! We wish that wall was symmetrical (it slants to the right at the top) so we’re weary of accenting it too much since it’s such an odd shape. We love how the paint sort of took the weird angles out of the room!
xo
s
Ashley says
Maybe you should patent screw on brushes? I’m just sayingggg hahah!
Love how it turned out – the moldings and tile floor really have their own identity now. It’s too bad you couldn’t extend the brick up one more row or add some trim so it doesn’t feel like the window is being squished. Can’t wait to see what you come up with!
Sue says
I’m in the minority, but I must make my plea to NOT paint the brick!! I agree the wall is a bit awkward looking now, but a big shelf across the top of the brick, with both the wall above and the shelf accessorized well would look great.
Holly says
Gah, just left a comment and realized someone just barely wrote a similar thing about the molding/shelf idea. So! New plan: Drywall over the brick and maybe do a board and batten-esque thing.
Or…what’s underneath the drywall? Is it more brick from the previous exterior? Cause that would be uber cool to uncover that and just have a huge brick wall (painted or not).
Or, along the same lines, go ahead and do the reclaimed wood thing on the entire wall so there’s no break in materials.
YoungHouseLove says
Haha, thanks for all the ideas Holly! The brick stops there because above it was the roof (they added this addition and just used drywall to extend the ceiling up but there’s no more brick back there).
xo
s
Keisha says
Love the paintjob. Since you can’t do a whole wall o’ brick, have you considered making the wall uniform by covering the brick w/ drywall to match the “lippy” area at the top, and then paint that the same gray as the rest of the room? Would you be able to get it fulsh? I mean, flush, to the upper lip? That might make the whole room more cohesive than having a drywall lip above the painted, or unpainted, partial brick wall…
YoungHouseLove says
Always another possibility! I’m not sure we’d get it super flush though (and we love the texture of painted brick) so it’s what we’re leaning towards!
xo
s
Jeanna Walton says
Does anyone know what is under that odd half drywall wall? Did the previous owners just hate brick, and this is what they came up with? I would be curious to see if the brick goes up all the way under that, because you’re right, the drywall does look odd the way it sort of sits on top of that window. It would end up looking especially awesome painted if the entire wall turned out to be brick :)
YoungHouseLove says
This house is a one-story ranch, so that’s as high as the brick goes (it was a roof there, but they made this addition and removed the roof and then made it taller, so that’s why the brick stops). Hope it helps!
xo
s
Jeanna Walton says
duh, I knew that, but I forgot…………
YoungHouseLove says
No worries!
xo
s
Allison @ House of Hepworths says
I LOVE the gray. I usually leave my ceilings white, but the gray looks perfect on the ceiling of the sunroom. I may have to venture out and paint a ceiling now. :) Also, your roller on a pole comment – I NEVER paint with just a roller, even if it’s on a wall right in front of me. Adding the pole makes a huge difference all around. It puts the paint on more evenly, you have more control over it, you can use two hands to control the roller, and it makes your arms about 110% less sore at the end of the day. Try it sometime!
YoungHouseLove says
Who knew?!
xo
s
Lisa R. says
Agreed! I always use the pole when I use a roller, unless I am in a closet or tight space where I don’t have room. It is way easier and smoother!
Sarah Bucior says
Now that you have painted the walls gray (which makes the trim look great, what if you painted the bricks a much darker gray? With maybe white trim separating the two and some really bright art on the walls?
I’m lovin’ it though, looks great.
YoungHouseLove says
Another possibility for sure!
xo
s
Suzanne says
That’s a tough one! The paint color looks great! I can definitely see y’all putting a no-sew faux roman shade on the window top and I’m picturing a long, very shallow shelf to the left of the window, to lean various heights of artwork on to balance out the window. Can’t wait to see the room come together.
Claudie says
I love what the paint did for the room! All that white trim! There’s something about crisp white trim-work that makes me giddy. Maybe it’s just my way of pretending that I’ve already finished painting all of the trim in my own house? Who knows!
I’m really into brick in a room and I’m usually one for leaving it as-is, but I think you should definitely paint it. It seems to stand out more (in a not-so-good way) with this new paint color. You could paint it the same color as the walls or the color from the adjacent room and I think it’s going to look great!
Leah says
Wait…hanging out on a lazy Sunday??? Don’t you have enough projects to keep you busy?? haha! Looks GREAT you guys, and I vote for painting the brick too!
Have a super week.: )
Leah
YoungHouseLove says
Haha, you know Lazy Sundays are like Blue Moons, right?
xo
s
Marcie says
Drool. The new color really makes the space pop! It looks more “indoor” now but still light and bright with all the windows. Nice work.
candace says
loooove Rockport Grey! I may have to use that in my house – it’s the perfect grey!
Jenn says
PAINT THE BRICK!!! That already looks 1000% better. I’m serious. It looks like a completely different room and it shows off the angles so well. I love it!
YoungHouseLove says
Aw thanks Jenn!
xo
s
julie s says
love the grey – paint the brick
texture is a great design element too and a lot less bossy than that red brick
YoungHouseLove says
Haha, I love your use of bossy. So true!
xo
s
Stephanie B. says
Love that paint color!
I just rigged up the same brush-duct-taped-to-pole thing to touch up the edge of my 22 ft living room wall… my family thought I was nuts.. but it worked!
Also, I am on the painted brick team… I think it would really make the room feel more united with the rest of the interior of the house…
Mary says
This has probably been suggested (I only scanned the first page of comments) but have you considered drywalling over the brick? That seems like the only way to get rid of the ‘weird lip’. Or could you even make it flush?
YoungHouseLove says
We’re not sure we could make it perfectly flush so we’re leaning towards painting it since we actually like the look/texture of painted brick! Especially since it’s already in the living room!
xo
s
Lindsay says
Here’s an idea – although you’re bound to hear this from a load of other readers too… in order to get more of a flat wall there, why not see if you could put up some thin planks over the brick? Horizontal planked walls are all the buzz right now.
YoungHouseLove says
We did think about that but since the ceiling slants oddly to the right on that wall (it’s no symmetrical) we thought that would emphasize that. We love how the weird angles of the ceiling seem to be toned down from the paint which helps them all blend :)
xo
s
Nicole says
I agree, paint the brick! And you are so right, painting the sun room does make it feel like a part of your house and not an add-on.
Holly says
I think wood planking would be nice. Bc it would bring more warmth and coziness. If you should do a photoshop but then again it may not look good.
Jill Stigs says
Looks great! I am guessing that you have already painted the brick. :)
YoungHouseLove says
Not yet, but it’s at the top of our list! Haha!
xo
s
emily says
that grey (gray?) really is the best warm gre(a)y! love how you took it all over the ceiling and love it w/ the white trim! ooh, what about painting the brick a bright/pop accent color?
YoungHouseLove says
That could be fun! We just wish it didn’t have that off center window that goes to the edge. Will always look like an odd U-shaped expanse of brick if we make it an accent we think!
xo
s
Marie says
Fresh! Nice! : )
If you add a treatment to the odd drywall above the brickwall you could hide indirect light under it. – I love how brick looks, when the the sun strikes it in a flat angle, maybe such a “cool illuminated wall effect” could make it less “awkward teenager standing in a corner and doesn’t want to dance with the others”…?
One question: How do you not get splatters on the windows from rolling the roller? Do you go snail-speed? But then how does it go on so smooth? Or are you simply paint magicians?
YoungHouseLove says
John is the roller master (I always get splatters but he goes slow and steady and doesn’t seem to). I cut in around windows/trim though, so maybe keeping the roller away from them and doing that stuff with a brush helps?
xo
s
Robyn says
Usually I would be all for painting the brick wall, but for some reason I really like it as it is! It seems more cottage-y and rustic (not sure if that’s the route you’d want to go down though…). I would dress it up with a bunch of green plants going up the wall, maybe a window box or something too (as long as that wouldn’t interfere with the daybed). Kind of like outside-in.
Cara says
I love the turquoise stools and pillow against the grey. I see lots of turquoise in there when you get to accents!
Melissa @ HOUSEography says
I love the paint color! I would paint the brick wall too. Looks odd and inconsistent with the rest of your house.
Lauren Nicole says
Lionel Ritchie. Works every time.
DC says
What about painting the triangle section of wall above the U-shaped brick a different color – maybe something close to black…?
YoungHouseLove says
We wish it were a symmetrical triangle! Something about accenting a wall that leans to the right is weird for us, but some folks might love that about it!
xo
s
DC says
What about just a symmetrical dark stripe above the brick to help the transition.
YoungHouseLove says
Another option for sure!
xo
s
heather says
I’m normally on the leave brick alone scale, but I’ve got to jump on the paint train with this one. I think if the brick ran above the window for a few courses it might be different, but it’s really odd that there isn’t a single brick above the window, and then it’s bricked in on three sides. It almost makes it look like it’s just oddly floating? Does that even make sense? Painting it would be really nice, and even a similar sized piece of art of the left would balance the window to be more symmetrical on the wall.
YoungHouseLove says
Totally! That’s what it feels like in person! Like someone shoved a window randomly in the middle to make a u-shaped expanse of brick with an unbalanced triangle of drywall above it!
xo
s
Jamie says
I’d say leave the brick if it went all the way to the ceiling, but the way it ends is really abrupt. Paint!
Suzy B says
Love that color….just used it on my 14yr olds room along
with some other crazy colors. I vote to paint the brick white. Goes with all the trim and always looks so clean.
Painting is so much work. My daughter’s room has soooo many angles, but using frog tape save the day with all the taping I had to do! Yea! Good luck with the sunroom makeover.
richard says
Well, my office is now Rockport gray, thanks to your recommendation in an earlier post, and i LURVE it! I may have to do my bedroom in the same color, I love it so much. Speaking of, my bedroom has a vaulted ceiling like your sunroom, but has less light. What do you recommend for my ceiling? White, the gray, or something else?
Oh, and about the brick…Can you take down the drywall? I actually like the red brick with that gray. Looks super “urban.” I have also liked red brick with high gloss varnish. That’s really “urban Richmond”, if I remember correctly. It’s been a decade since I lived there!
YoungHouseLove says
Sadly there’s no brick behind the drywall- that’s where the roof was, so the brick wall ended there and the sloped roof began (later when they added the sunroom they just used wood framing and drywal to build up the wall higher above the brick portion). As for the vaulted bedroom with less light, I would totally go with a half-tone of the wall color (just have them add 50% more white) or even a very very soft blue. So pretty!
xo
s
Christina says
Nothing to add except an official THANK YOU for your Lionel Richie reference and all the punny / corny titles for your posts. I love them (my husband rolls his eyes at my punny sense of humor) so please keep them coming :)
YoungHouseLove says
Haha, you’re welcome Christina.
-John
richard says
Oh yeah. I also used a tip I read about on a painter’s website. If you use tape on just your baseboards, you can save so much time and that crick in your neck and knees you get by trying to edge in the baseboards. Seems like it’s so much harder edging towards the floor….You can just “zing-zing” the paint at the tape, and no worries!!Good tip for even the best edger!
YoungHouseLove says
Thanks for the tip Richard!
xo
s