We mentioned a few times that we wanted to get a bookcase for the office/guest room/playroom since they’re so great for storing things, displaying things, and adding some architecture and height. We thought a bit about placement and quickly realized that the area to the left of the uncentered window on the far wall of the room would be the best place for a bookcase, so we headed off to Ikea with the measurements of that wall on a little scrap of paper in my purse. And in a few short hours we found ourselves assembling our $69 Billy bookcase:
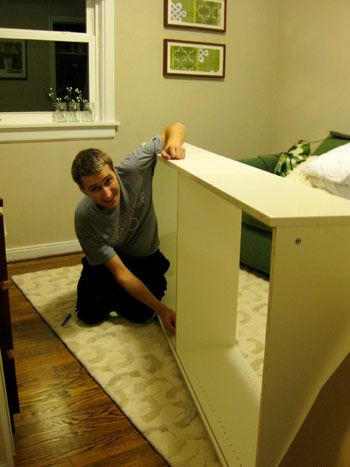
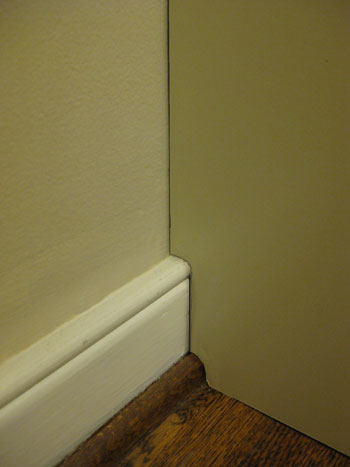
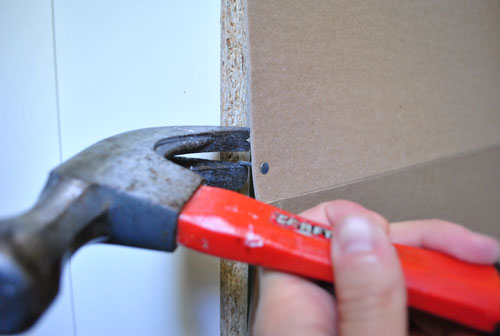
We actually checked out a few other Ikea options (like the Expedit and the Lack bookcase) but the measurements of that wall seemed perfect for the width and height of good ol’ Billy (and the $69 price tag wasn’t to shabby either). Plus whenever we snag something affordable we don’t feel too bad taking the time to tweak it a little. So when we realized that it wouldn’t sit flush against our wall thanks to the baseboard and shoe molding we grabbed a small coping saw and chiseled out the perfect shape.
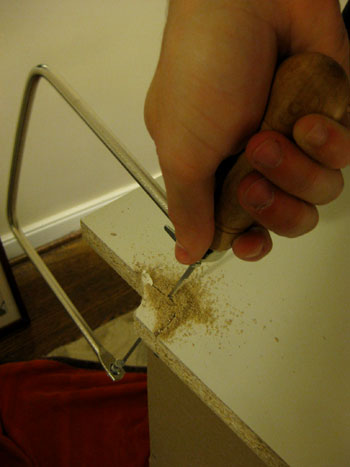
About ten minutes of sawing left us with this nicely customized setup. Flush bookcase = happy dance.
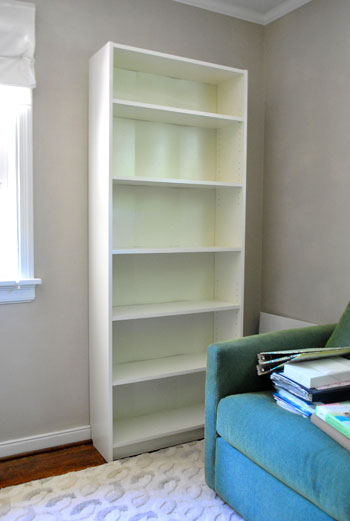
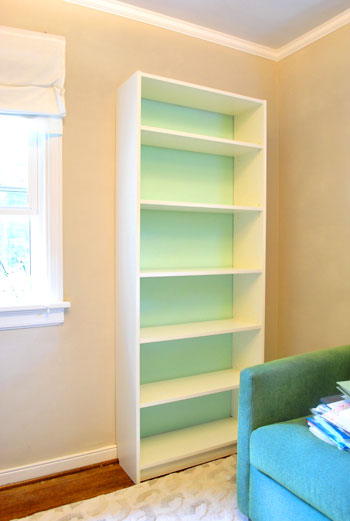
And when we stepped back and surveyed the full scene we loved how the bookcase added some much-needed balance to the entire wall. The height that it introduced on the right side of the wall really worked with the height of the window to the left. And the fact that it tucked right in next to our sleeper sofa without feeling crowded (thanks to the modest footprint of the bookcase) was the icing on the cake. But there was something that totally rubbed us the wrong way about Billy. The thin cardboard-ish back panel was folded into thirds in the flat-packed box, so when we unfolded it and secured it to the back of the bookcase with small finish nails it still had some telltale creases and looked a bit shoddy to boot. Cripes.
So we decided to take a moment to brainstorm a few possible solutions. We decided we could grab some foam core and cut it to the size of the six rectangular openings in the back of the bookcase and slip it back there (to obscure the view of the creased back). Heck we could even paint, wallpaper, or cover the foam core with fabric for a nice little customized look. But that seemed like a lot of foam core and a fair amount of work. Then came our second idea. What if we removed the back of the bookcase altogether and painted the wall behind it for the same effect? So off came the back:
Then we realized that we could apply a quick and dirty tape rectangle around the wall (with the bookcase still in place) so we knew where to apply our background color. After we stuck up some Frog Tape and removed the bookcase, here’s what we were left with:
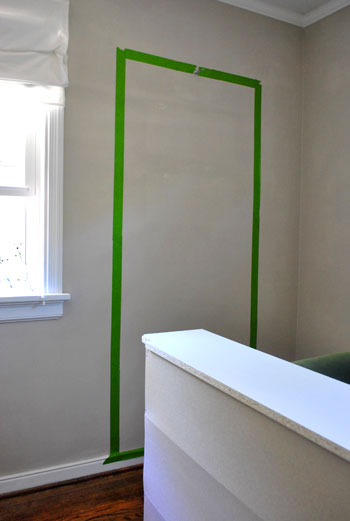
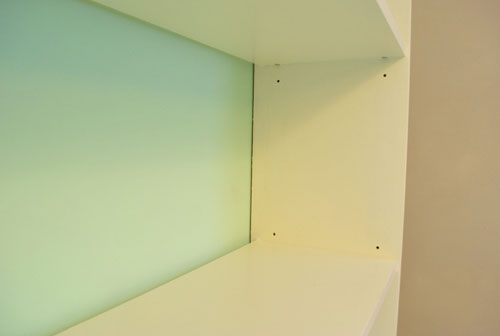
We opted to go with Mythic’s Adanna Aire, which was paint that we had leftover from the nursery ceiling. Gotta love a soft aqua tone that’s 100% free. Plus it worked really well with our blue-green sleeper sofa. Then we just slid the bookcase back into place in front of the painted portion of the wall.
But we had a second eyesore to solve. Removing the back panel left a dark crevice in the back of the bookcase that we could definitely do without. And all the holes for moving the shelves around didn’t exactly look high end either.
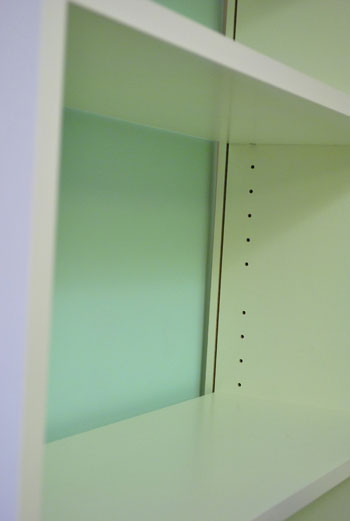
So we broke out some white caulk and filled them in. We opted to leave one hole above and below each shelf (in case we wanted to shift things slightly to accommodate something a smidge taller or shorter) but we loved the look of six unformly spaced shelves, so we knew we’d never use the other holes to create extra tall or short ones. And in an oh-happy-day moment, the white Dap window and trim caulk that we used turned out to be nearly identical in color to the bookcase, so it definitely obscured that ridge near the wall along with all those extra holes:
We did notice that deciding to lose that back did slightly compromise the bookcase’s sturdy-factor. By no means was it super rickety, but it didn’t feel quite as reinforced as it was with that panel in place – even though it was basically just a folded sheet of cardboard.
Happily, after anchoring it to the wall at the top it added back a bit more of the structural integrity, but for even more dependable sturdiness and kid-safety we would highly recommend adding some metal L-brackets for more structure (which can be painted white so they virtually disappear). We definitely plan to take that reinforcement project on soon when we do other kid-safe things like anchor the TV in the den and a few other bookcases around the house.
When it came to loading up the bookcase, we aimed for equal parts function and form. Since the room would have to work as an office and a guest room, we didn’t want it to feel like it was all business, but we also didn’t want to sacrifice practicality in the name of guest ambiance. So we actually whipped out a pad and a pen to jot down everything that we wanted to store (to be sure that we got the function in there before moving on to the form):
- office supplies like envelopes, tape, scissors, a stapler, notepads, etc
- extra printer paper and cardstock
- paint decks galore (since we refer to them while blogging, they were too far away in the den ottoman where we used to store them)
- books & binders
- a clock (I feed Clara every few hours on the sofa in here, so I knew that would come in handy)
- a few of Clara’s favorite stories and toys (since one of us plays with her while the other tends to the blog)
- treats for Burger (can’t forget about our other baby)
- a few decorative items to keep it from feeling too office-focused when we have overnight visitors
And here’s what we ended up with:
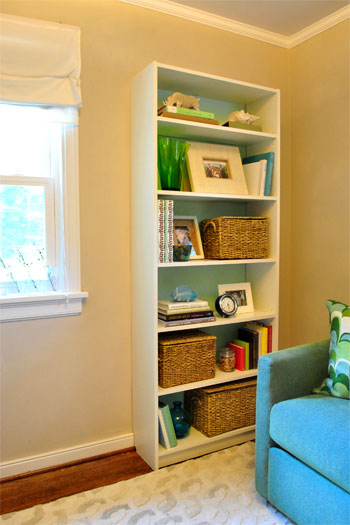
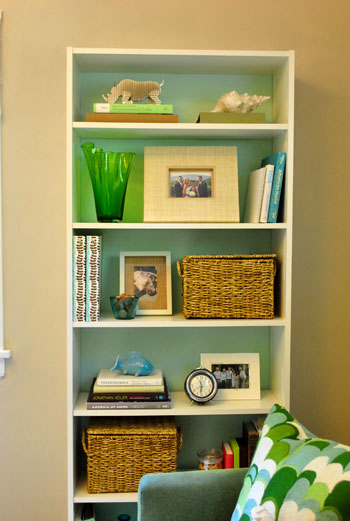
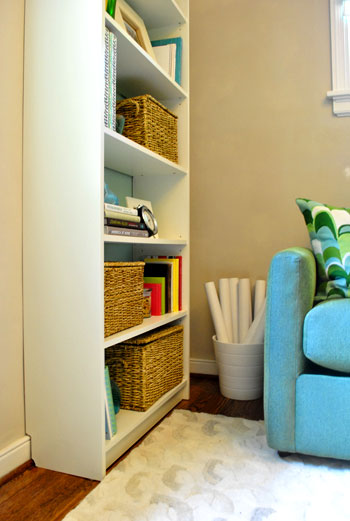
The baskets (from Michael’s for 50% off) easily housed things that we’d rather keep out of view (office supplies, extra paper for the printer, Clara’s books and toys, and a slew of paint decks) while everything from books and binders to a glass container of treats for Burger got premium placement on the shelves. We even had a small clock sitting around and a few decorative vases, frames, and other accessories on hand to keep it from feeling too industrial and office focused so our friends and family feel right at home when they spend the night.
Of course we still have a bunch of files and other paperwork that we’re planning to store over on the desk side of the room (stay tuned for those details) but we love the balance, practicality, and visual interest that a simple $69 bookcase (along with some free paint that we already had on hand) added to the space. Oh and we even had room to squeeze a white planter that we already had (from Ikea) into the corner to hold some mailing tubes (which we use to ship shop stuff). Hooray for even more storage space.
So that’s the latest office update. What have you guys been up to this week? Any bookcase makeovers going on at your house? Any basket-buying going on to add concealed storage somewhere else in your casa? Do tell.
Psst- Wanna follow the entire office/guest bedroom/playroom makeover? Click here for the intro post, here to read about the big sleeper sofa hunt, here for the DIY desk play-by-play, and here for the homemade light fixture project.

Katrina says
great idea to the Hack the ikea to fit your needs – the color on the back adds so much visal interest!!
Amanda says
Absolutely love the idea. I have a very similar book case, but it’s black, and has the same awful back panel. I’m loving the idea, and will definitely be considering this when we redo our home office.
Great job!
Tammi says
Oh I love that!!
I nailed some pretty fabric on the back of the IKEA shelf in our living room a few months ago. Now it fits in much better with the rest of the room. :)
Amber l says
Love it! What a smart idea! If we ever buy furniture with a plywood back again I will definetly keep this in mind! Oh and off topic I went to homegoods for the first time ever yesterday and LOVED it! My hubby said something about Me being like a kid in a candy store.
Maura says
We used the Billy bookcases to do something similar in our nursery. Love, Love ikea hacks!
http://coleandmaura.blogspot.com/2010/03/princes-pad.html
Amy B. says
I love using baskets to store things. My favorite are the banana leaf ones from Target. There are several in our son’s room to hold diapers, pjs, etc. on the bookcases we repurposed and we have them in the living room to hold everything from magazines to dog toys to our son’s toys for when he’s playing in the living room.
Carolyn says
Wow! I would have just bought a bookcase and filled it with books and be done with it! :) i’m always amazed at your meticulous decorating sense. I’m also amazed that John only buys books “attractive enough to display”??!?!?! I’ve never known a man who thinks like that!
Thanks for sharing some ideas for storing stuff. Good food for thought.
Brit says
The bookshelf looks awesome!
Question: Where do you store your printer? Is the small one by the desk in your den the only one you have? I work from home, and have a medium-sized printer, and just can’t figure out where to store it that it’s not in plain view all the time. All the offices I find online don’t have a printer in view, and it leaves me wondering…where is it?
YoungHouseLove says
Brit- We’ll definitely be tackling the printer situation soon. Stay tuned…
Carolyn- I’m a lucky lady eh? I think our past in tiny NYC apartments really made us minimalists at heart, so we always prefer borrowing library books to buying them. And when they’re gifted or we cave and buy a few a year we usually pass them along to friends when we’re done with them (or even donate them to the local used book store). The ones that remain are all of our big hardcover books (John has photography ones and quirky graph or math related art-ish books while I go for the glossy home and design related ones). And thankfully these more special books of ours look great out in the open thanks to the handsome hardcovers and punchy spines. Which explains why we have stacks of them in nearly every corner of every room!
xo,
s
Diane L says
You will probably want to bolt this bookcase to the wall once Clara progresses to the climbing stage.
YoungHouseLove says
Hey Diane,
Already done! We anchored it to the wall with the kit that Ikea supplied, so it’s nice and sturdy for our little monkey!
xo,
s
Leah says
I didn’t read through all of the comments, so I don’t know if someone already asked, but does the rest of the Billy feel pretty sturdy? I keep thinking about getting a few of them, along with the matching cd tower, but the price does make me wonder how well made they are. And my husband and I have a LOT of books, some of them heavy dictionaries and reference books. Thanks!
YoungHouseLove says
Hey Leah,
Yup, very sturdy indeed. Especially if you get a few of them and line them up together. It’s the look of built-ins (and a super strong structure to boot) on a budget. Hope it helps!
xo,
s
shannon says
looks fabulous!
LOVE IT!
Sara says
I have that same bookcase (bought it back in ’06) and I love it! You’re right about the flimsy back panel..mine is separating in several spots. I might have to copy your idea of painting the wall!
MISSY says
You guys are awesome and I love your blog. i don’t make comments all the time and was disappointed to hear the negativity on the reel mower post from some folks. As someone who writes a blog, I know how much work it is to keep up. I appreciate it.
Thanks so much,
Missy
Felicia says
Sheer brilliance! I wouldn’t even have thought abt it! Thankfully when we bought our Billy, the backing wasn’t tri-folded like that.
Deirdre says
I do have to say, if you fill a bookshelf with books, you very quickly cover up the faux wood backing and tend to need that support for the stability of the shelf. But if your purpose is decorative then you have a great idea.
erica says
Great job! I love how you cut it out for the moulding. I have baseboard heaters and that will work perfect (in a perfect world:) Crossing my fingers that it will work!
Courtney says
Great stuff, guys! Wanted to give you a little tip- we have a billy bookcase as well, and after a year or two of storing heavy magazines on it, I found the shelves started to bow. We flipped them over, and they evened back out, but we realized that it probably warrented a more permanent solution than constant shelf rotation….So we got some white finished boards and cut them to fit vertically between the shelves. They’re they same thickness as the shelves, so it formed little cubbies, which is actually a cool look (we placed them at different points on each shelf so they support the weight, but give it a bit of assymetrical flair). I know you love some form AND function! Hope that helps.
YoungHouseLove says
Great solution Courtney! Thanks so much for sharing!
xo,
s
Paula M. says
Gasp! That’s a great idea, to use some trim caulk to fill the bookcase shelf holes!!!
I have some bookcases very similar to these — they’re at least 20 years old, pre-Ikea-in-U.S., if one can imagine such a bygone era ;) (actually from a Danish company, as I recall), and I love them for their simplicity and the fact that someone can leave off the backs, as I did to let the wall paint color show through, or put up other backs. (You’ve wisely strapped or anchored yours, I think, whereas I have not, even though I live in, ahem, earthquake country -whee!)
And they have the similar adjust-a-shelves and the holes, which I’ve never liked but pretended to ignore. But caulking them is a fabulous idea!
Question: If I caulk them and then years from now (assuming, cheapskate that I am, I still have these same shelves) I want to re-set the shelves to different heights, I’m assuming I could easily pierce the caulk to reveal the hidden holes underneath, yes?
YoungHouseLove says
Oh yes, you can definitely use a screwdriver or even a paperclip or a stiff piece of wire to pry out the caulk if you’d like to use the shelf holes down the line. Hope it helps!
xo,
s
Alicia (Atypical Type A) says
I love the pop of colour that you get from painting the inside of a bookcase. Never thought of painting the wall instead!
Pencils says
Looks great! We recently bought a large white glass-door bookcase for our living room, the six-shelf Hampton Bay from HomeDecorators.com, and I’m planning on painting the back board in a similar manner. I think I’m going to paint the back a shade lighter aqua than our walls–I’d like to do darker, or use wallpaper, but the bookcase was bought to showcase my ceramics collection, and I don’t want to compete too much with the colors of the glazes. I hope it turns out!
Dana @ House*Tweaking says
OOOOH! I love the bookcase. Your decorated shelves always look so effortless. I know you did a post about decorating shelves a while back but mine never seem to look as nice as yours. You must have the Midas Touch. I’m impressed with the fitted bookcase at the floor molding and also with the painted wall behind it. Fab, as always.
As for me, been workin’ on the boys’ room…
http://www.housetweaking.com/2010/06/16/a-mood-board-boys-bedroom/
Thanks for sharing your office transformation!
Laura says
Ohhh….. guys. You might want to make sure that large, tall piece of furniture (Shelf!) is secured to the wall. I have two little ones who would have given me a heart attack pulling up on that bookshelf– esp. since you have that heavy glass vase and picture frames on there.
Call me paranoid, but it’s better to be safe than sorry, right?
YoungHouseLove says
Not to worry, Laura – we’ve got that sucker anchored to the wall at the top as Sherry mentions in the post. It not only helps keep it sturdier now that the back has been removed, but by holding it to the wall at the top it keeps it from toppling over on little Clara once she starts moving and grabbing things!
-John
LW @ Aisle to Aloha says
Looks great guys! I love the aqua color on the wall and the accessories too! I’d be hesitant to paint the wall in my own house because I’m constantly moving things around and I’d probably have to paint over that rectangle alot!
I did my own bookshelf makeover last month. I painted a lattice pattern in green on the back of the bookshelf and I love how it turned out! I posted about in on my blog here:
http://aisletoaloha.blogspot.com/2010/05/bookshelf-redemption.html
(Oh, you can also get a glimpse of the artwork I painted inspired by your Crate and Barrel artwork recommendation!)
Susan says
This is why I love your blog! Instead of alwyas advocating the most expensive option, you guys never fail to find a way to take something most of us already have or would buy and show us a way to make it look much, much more high end.
I bought two bookcases that were nearly identical to the Billy Ikea ones for $25 each at a Christmas doorbuster event. Only less than a year later I ended up giving them away because they always looked too college dorm-ish. Now I’m just kicking myself!
Keep it up guys!
Diana says
My house is filled with Billy bookshelves (I think it’s a professional hazard to have so many books). My favorite is the one in my office — like you, I removed the back so that the beautiful exposed brick shows through. Unfortunately, it doesn’t feel sturdy to me, either, and because it’s a brick wall, I don’t think I can secure it with L brackets. Not sure what to do.
YoungHouseLove says
Hi Diana,
That sounds beautiful with the brick behind it! You can screw into brick walls, you just need to get a masonry bit for your drill to get the hole started. The other thing you could try is installing some L-brackets within the bookcase itself (like to reinforce the angle between the sides and the top shelf). Either of those would probably be a good improvement!
-John
Sharon says
I have a Billy bookcase also and instead of using their back I got a piece of beadboard and used that. It makes the bookcase stable and provides an intersting backdrop.
christen says
Ugh! I hate that trifold backing!!!!!! So glad you guys found a solution! Looks great!
Leigh says
Your ingenuity is inspiring!
k&b adventures in renovating says
i really need to do this on a lot of my bookcases around the house… we have thick baseboards so nothing sits too flush. nice work!
-katie
Amanda says
Ha! I just went to get Mythic Paint for my new townhouse yesterday, and I plan on doing stripes in my guest room I grabbed the trusty ol standby blue painters tape, and the salesman just about wouldn’t let me leave. He saw the tape and asked (sounding like a dad) “What are you doing with that?” and when I told him, he took it away and brought me frog tape. I’ve never used it before, but I just noticed that apparently, you two do. I suppose that bodes well for it’s worth being that it being an extra buck. Here’s hoping…
YoungHouseLove says
Hey Amanda,
We love Frog Tape! Here’s a little write up about the first time we used it: https://www.younghouselove.com/2010/01/nursery-progress-painting-the-walls-ceiling/
Good luck!
xo,
s
YoungHouseLove says
Oh yeah, Amanda – we love Frog Tape. We think you’ll be happy the guy stopped you!
-John
Caroline says
Hi There! This is my first comment but I’ve been following you guys for about a year and absolutely love your creative ideas! I have a “burning question” for you…. I noticed in your office that the quarter-round under the molding is the same color as the wood floor. So my burning question is whether you would paint out the quarter round to match the trim (white) or leave it woodgrain to match the floor? I have both situations in my house, and am unsure if I should paint the rest out.
Keep up the fantastic work – I love reading all your posts and am even inspired to paint my kitchen cabinets this summer because of your post on that subject. Cheers!
Caroline says
Uh, me again… read through the previous posts and saw that you already answered my question about painting the quarter round (shoe rail as you call it).
feel free to disregard ;)
Cheyanne says
I love the pop of colour that adds to the room. Your post inspired me to do a quick write up on my own solution to the very same problem with an old cabinet. Great detail to use the coping side to have it sit flush to the baseboard, it’s all in the little details.
Cheyanne
- Sarah :-) says
Funny you should say “what were you up to this week” because I was making a little pinafore dress for a girlfriend of mine’s little 9 week old daughter. And I’d LOVE to make one for little Clara, but wouldn’t have a clue where to send it. Any chance I could sen done your way as a simple “Welcome to the World” gift? If not, I totally understand, but just thought it couldn’t hurt to ask, right?!
I put in my e-mail address AND blog, so let me know!
PrarieGal says
An alternative would be to paint or paper the back of the bookcase instead of painting the wall. You would maintain the case’s structure, and if you decide to change your room’s layout you don’t have to repaint. Looks great!
Katy says
We were thinking about putting a whole buncha Billy bookcases in our living room, but now I’m worried about the backing. I’m in no ways crafty and my husband is even worse than me at these things! I see that many folks used beadboard—any idea how to fasten that to the Billy?
many thanks!
YoungHouseLove says
We would use Liquid Nails on the back edge of the bookcase to adhere the beadboard (you can lay the bookcase with the glue on the edges down on the beadboard so the weight will help it stay in place and cure). Then adding few finish nails around the edge will definitely do the trick and make it even more stable and secure. Hope it helps!
xo,
s
katy says
Perfect. Thanks so much!
Laurie says
I used fabric once for a Billy bookcase and it worked really well – the track is large enough to accommodate a piece of fabric lapped to the back. I adhered it to the backing just using double-sided tape. Once it’s in the track, the track does a great job of holding it in place. Nice job, guys!
Ashlie F says
I am currently prepping for a home office redo and I couldn’t be more excited to get this all up and running. I just picked out the colors and have been slowly tackling the most brutal, organization-lacking issues before I get started to eliminate some aggravation. I’ll send some before and after photos once I have finished because this makeover is going to be a HUGE improvement from its current disastrous state.
Terri says
What a brilliant idea! I’ve got several bookcases with the ugly trifold backing that I haven’t replaced yet. This would definitely be an inexpensive and fun way to make those bookcases look better.
Natalie says
Ooooh love it!
Very resourceful AND chic :)
Tobi says
Absolutely love that you made such a custom looking space with that Ikea shelving unit. I just came across your blog today and adore you guys already. Me and my hubby are doing the Jr. version of what you are up to over here in San Jose, CA. We are enjoying decorating our first place together, but unfortunately, we are still renting (and only 300 sq. ft.) so theres a lot of things we are still itching to be able to do. Weirdly enough, we did our own bookcase makeover and concealed storage project a couple of days ago! Here’s our post:
http://jakeandtobi.blogspot.com/2010/06/before-after-entertainment-cente.html
Happy Decorating!
Crystal says
I love it! I hate that folded backing, too. I love a previous poster’s idea for covering the backing with fabric. I also love those baskets. I use the same one in my bedroom on my dresser to stash all of my unsightly products that there isn’t room for in the bathroom!
jja says
I solved almost similiar my Billy dilemma, but I do feel sorry now, since back wall keeps better the dust away and would protect better my books. After years and years of open shelves now i do like more clear clas door to keep everything clean.
Robyn in Chicago says
Hi guys,
I just read Caroline’s comment/question above about the quarter round and painting it or leaving it stained to match the floor…but unlike her, I can not seem to find where you discuss this. Would love to read your old post on the subject…
Thanks!
Robyn
YoungHouseLove says
Hey Robyn,
It’s actually not a post on the subject, but we answered that question right here in the comment section of this post (it’s just further back). Hope it helps!
xo,
s
Robyn in Chicago says
Ah, got it. Thanks Sherry!
YoungHouseLove says
Glad to help!
xo,
s
Patti Carver says
I would like to add crown to a bookshelf, but it there a paint that will match? Thank you, Patti
YoungHouseLove says
Sure! Just bring home a slew of white paint chips and hold them up to your bookcase to see what matches the most! Happy hunting…
xo,
s
Destiny says
I love what you’ve done w/ the bookcase. I just wish I didn’t have so many books. My hubby can’t bare to part w/ them and the book case looks so cluttered and makes me not want to ever dust. Any suggestions as to have it still look neet and how to dust it quickly?
Kathy says
Hi Sherry,
I just came across your website while Googling the Billy bookcase. I’m glad to see that others have found alternatives to the back of those bookshelves. I bought two Billys yesterday, took everything (I thought) out of the boxes and then sat down for a well deserved cuppa while my dear son took the boxes outside to crush them for the recycling. Naturally, he thought the backing cardboard was rubbish. So it got torn up, and otherwise mangled, and is now useless. So I’ve got two bookcases, unassembled, and am now trying to work out what on earth I do about it!
YoungHouseLove says
Good luck with your bookcases! We’re sure you can make do without that backing! And of course you can always reinforce them with metal L-brackets (which is something we’re toying with since we’ll have a toddler hanging on them one day). Just attach one end of the L-bracket to the wall with a screw and an anchor and go into the side of the bookcase with the other end of the metal bracket (so it doesn’t wiggle from side to side). The result should be stronger than the original backing! Hope it helps.
xo,
s
alli says
hey guys, i bought a bookcase from target, just a room essentials $19.99 black “wood” bookcase. and i have similar issues with shelf holes, on the inside, and nail holes, on the outside, of the shelf. without using the cheesy black covers. do you have any suggestions for covering these in black, maybe caulk and a bit of flat spray paint? thank you!
YoungHouseLove says
We’d do caulk and then hand paint them with a small craft brush (spray paint could get everywhere and be messy and drippy). You could bring home a slew of black paint chips and pick the one that matches the bookcase best, then pick the finish that matches best (ex: flat, eggshell, glossy, etc) and then just get a test can of that color & finish whipped up for a few bucks – hopefully it’ll match perfectly. Oh and make sure the caulk you’re using is paintable!
xo,
s