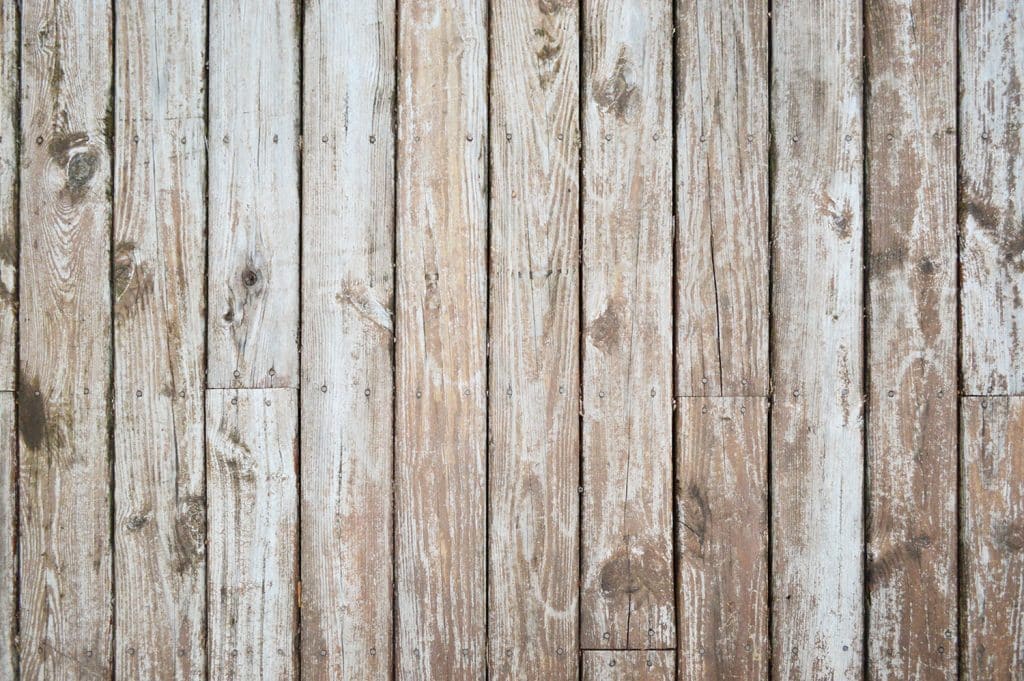
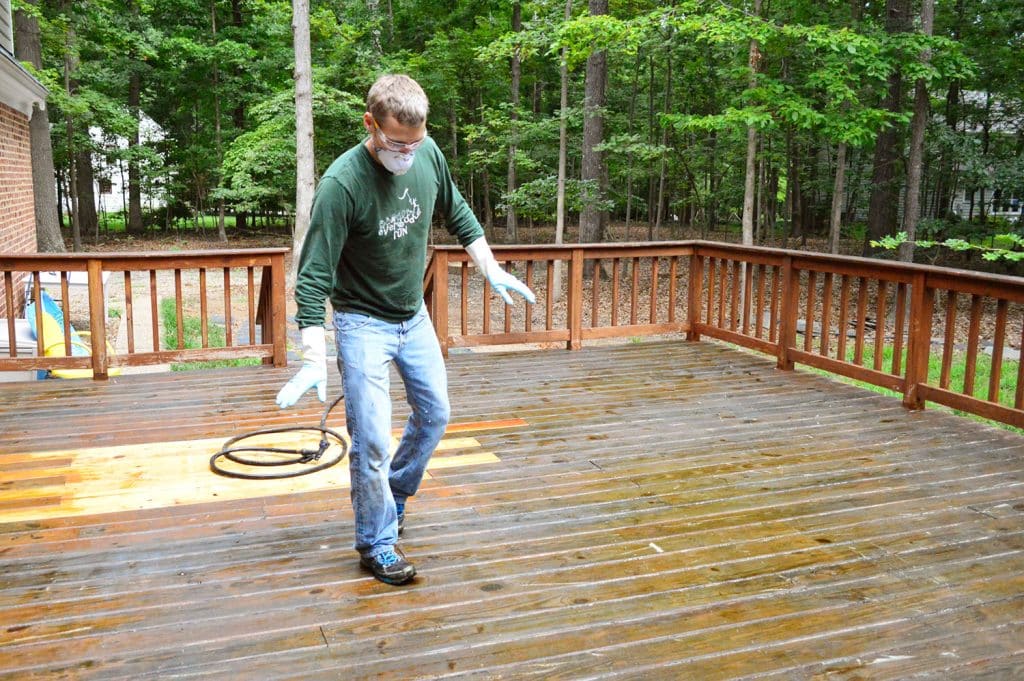
When we bought our house, the deck was in ROUGH shape. Before we could revive it with a fresh coat of stain, we had to strip off the old stain first. It definitely took some time and effort – our deck is nearly 700 sq. ft! But it was totally a doable weekend project for even a first-time stripper. Sorry, I couldn’t help myself.
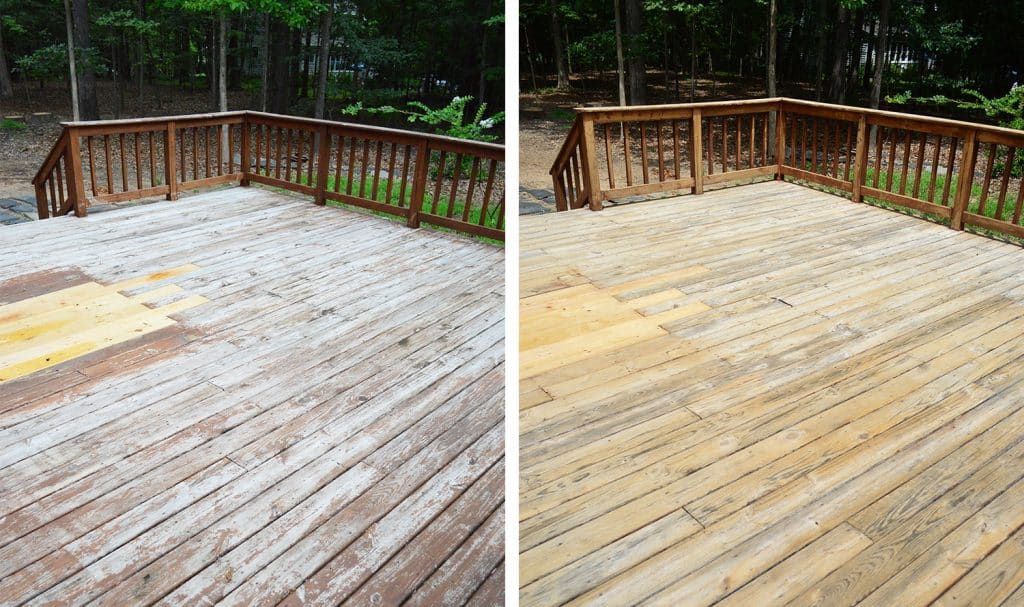
That’s the before-and-after of the stripping process, but if you’d like to see how it turned out with the new stain, check out our How To Stain & Seal A Deck tutorial.
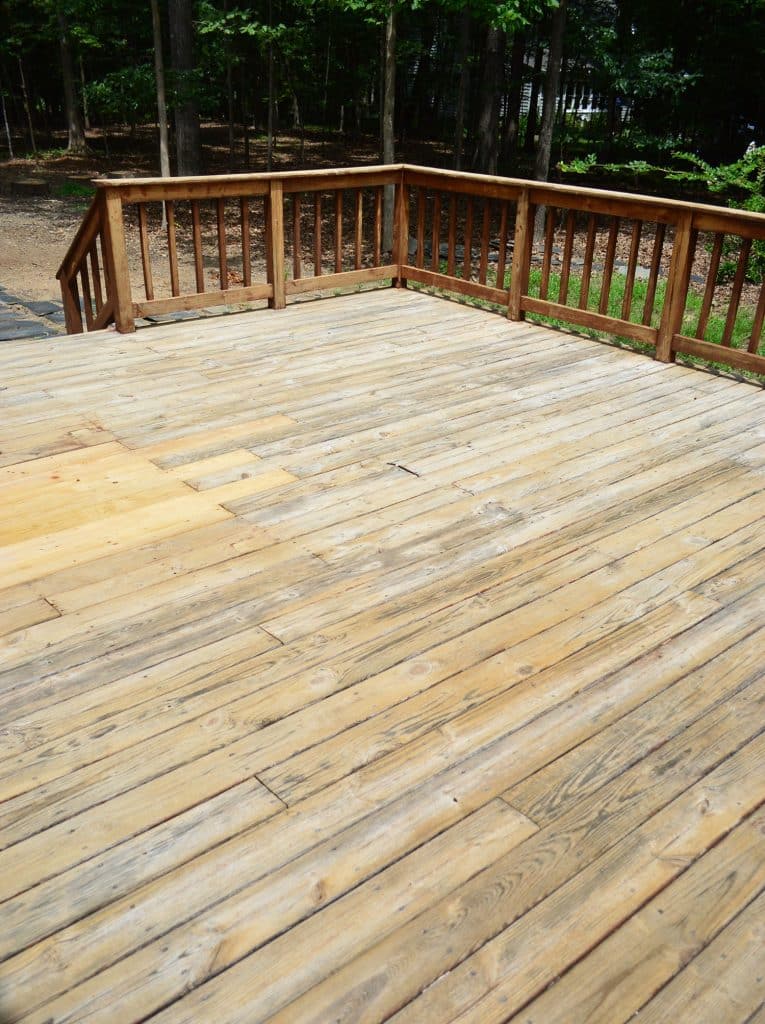
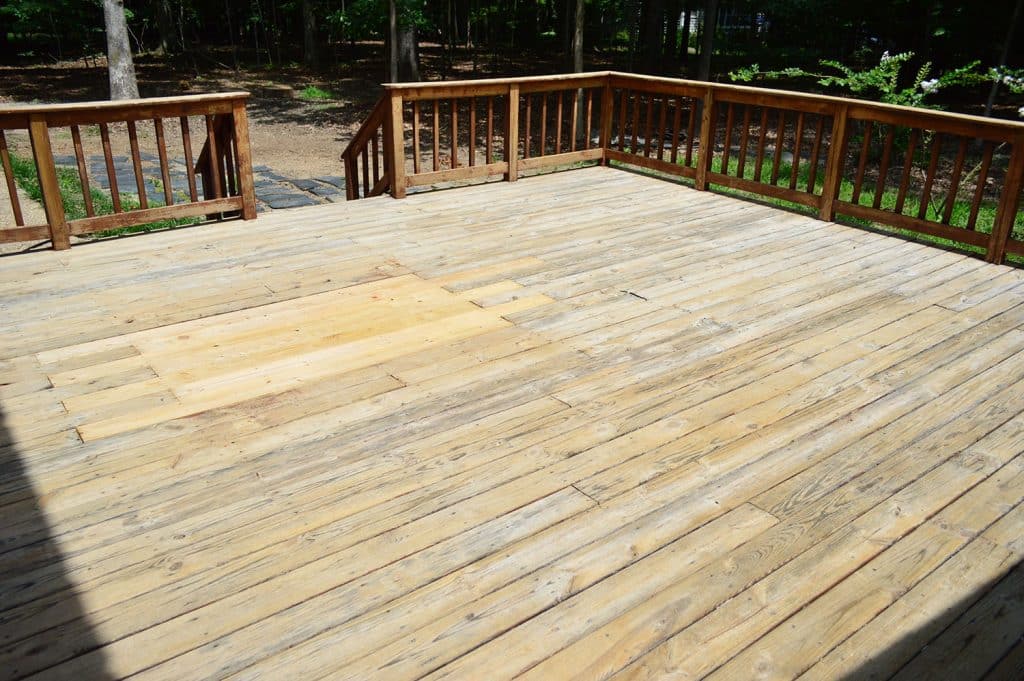
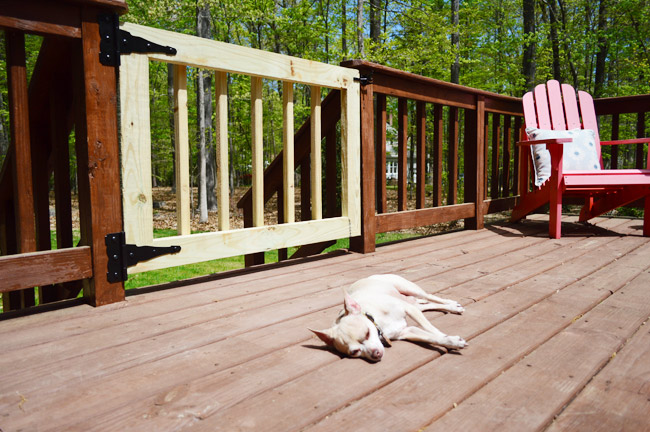
And ignore the patch of new wood. We had to repair a section where a tree had been growing through the deck. We also have a tutorial for Patching a Wood Deck if you need it!
Can I Skip The Stripping Step?
If you plan on restaining or repainting you wood deck, you need to remove the old finish for the best, more durable bond. However, there ARE some products that are designed to be applied directly over your existing coat. Both Rust-Oleum Restore and Behr DeckOver create a thick layer of paint over your deck for almost a plastic-like end result. We personally didn’t like the rough texture of Restore and, while DeckOver was smoother, it would’ve been pretty costly. We also wanted a more traditional stained wood finish in the end, not the thicker coat those products would’ve given us. So that’s why we chose to proceed with stripping our deck.
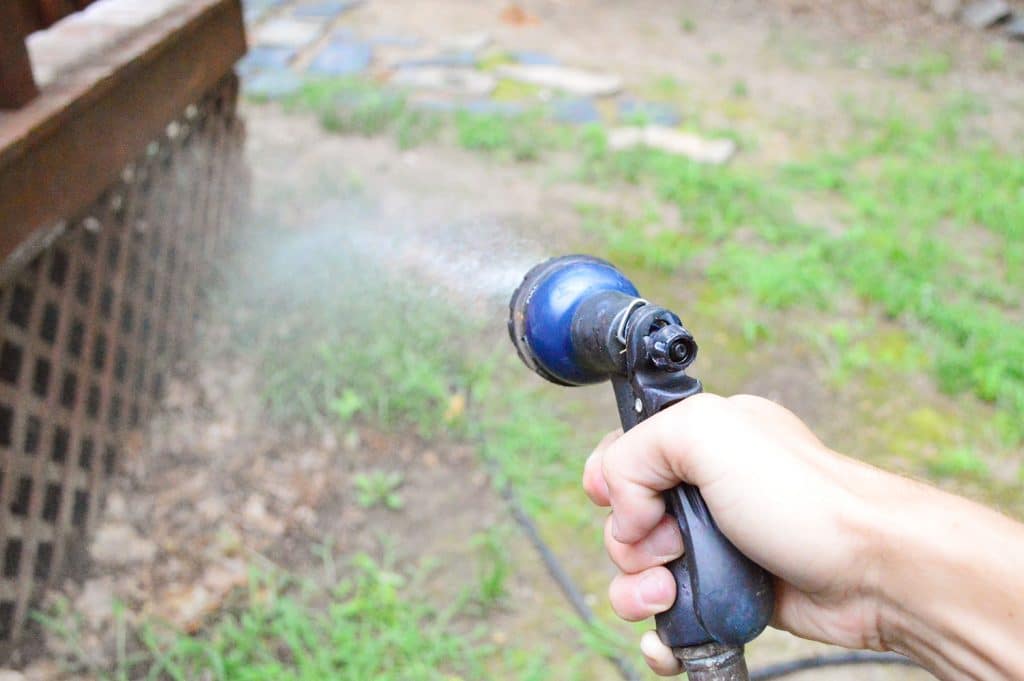
Can I Just Use a Pressure Washer?
Maybe! Power washing CAN be a really quick and effective way to strip old paint or stain from a surface, especially when combined with some of the chemical cleaners listed below. In fact, we used our pressure washer to help revive the wooden outdoor shower at our current home. We weren’t removed stain though, just layers of dirt, grime, and mildew, so we didn’t use any chemical to clean it.
For the deck shown in this post, we chose NOT to use a pressure washer because the wood was in such rough condition. It was soft in some spots and rotting in others and we feared the pressured water would damage the wood too much. We knew the wood on this old deck was way past its prime, so our goal in refinishing it was to extend its life another couple of years before we could afford to replace it.
But if you want to try using a power washer, you can read our Pressure Washing Guide here and grab our favorite power washer for just $99!
How To Strip Your Deck Yourself
Here’s a quick overview the 6 steps to stripping the finish off your old deck, porch, stairs, or railings. Depending on the size of your deck, it can easily be completed in a day or maybe a weekend.
- Ready You Deck
- Wet Your Landscaping
- Apply Your Stripper With A Roller
- Scrub Off The Old Paint Or Stain
- Neutralize The Deck Stripper
- Enjoy Your Results!
Tools & Supplies To Strip Your Deck
Here are the materials we gathered to strip the old finish off our deck:
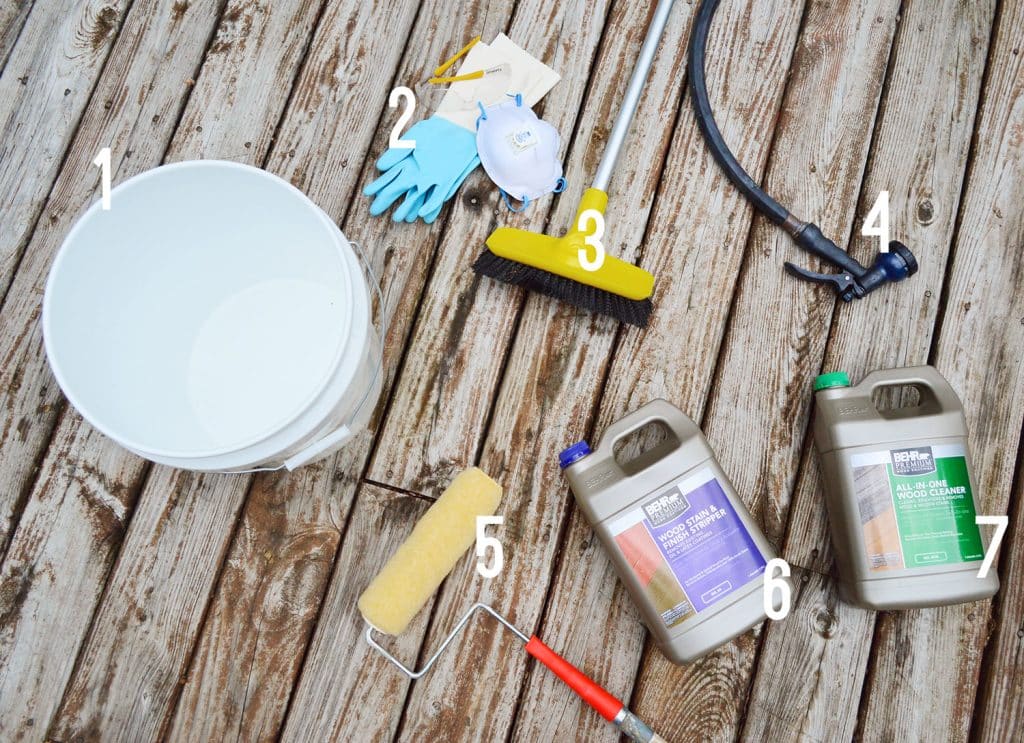
- Bucket – to pour the stripper into for easy dipping of my roller
- Protective Gear – rubber gloves, goggles, and a mask (this stuff STINKS)
- Stiff Bristle Brush With Pole
- Hose
- 1/2″ Nap Paint Roller With Extension Pole
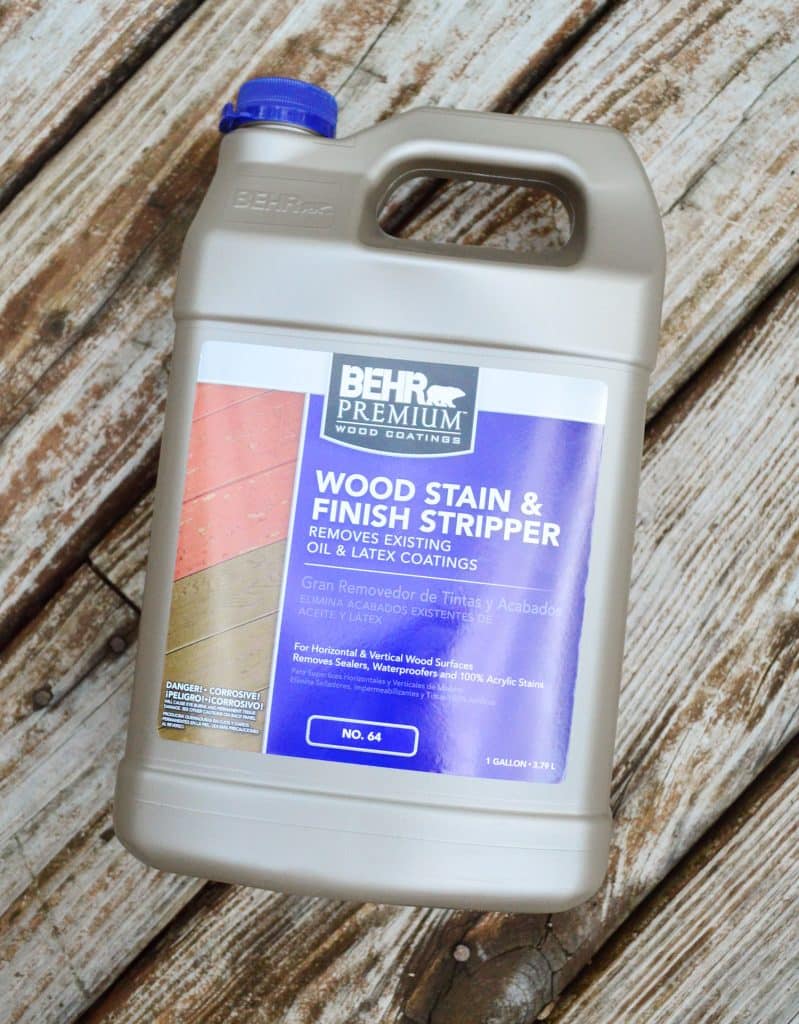
- Wood Stain & Finish Stripper – we bought 4 bottles (at $19 each) but ended up only needing 3
- All-In-One Wood Cleaner
- Pump Sprayer (not pictured) – we still had this one leftover from cleaning our last deck
Step 1: Ready Your Deck
Prep your deck by removing any furniture or obstacles that may prevent you from accessing the whole space. You’ll also want to check your weather forecast to make sure you have time to complete your entire deck without interruption from rain. Preferably it’s a cloudy, cooler day too because you don’t want the stripper fully drying during the application process.
Step 2: Wet Your Landscaping
Before you begin, use your hose to wet down any surrounding plants to help protect them from the runoff. The stripping agent is “biodegradable with easy water clean-up” but you still don’t want it sitting on your bushes in high concentrations. We don’t have much greenery worth saving around the deck, but I did it anyway. You know me, I’m a rebel rule follower without a cause.
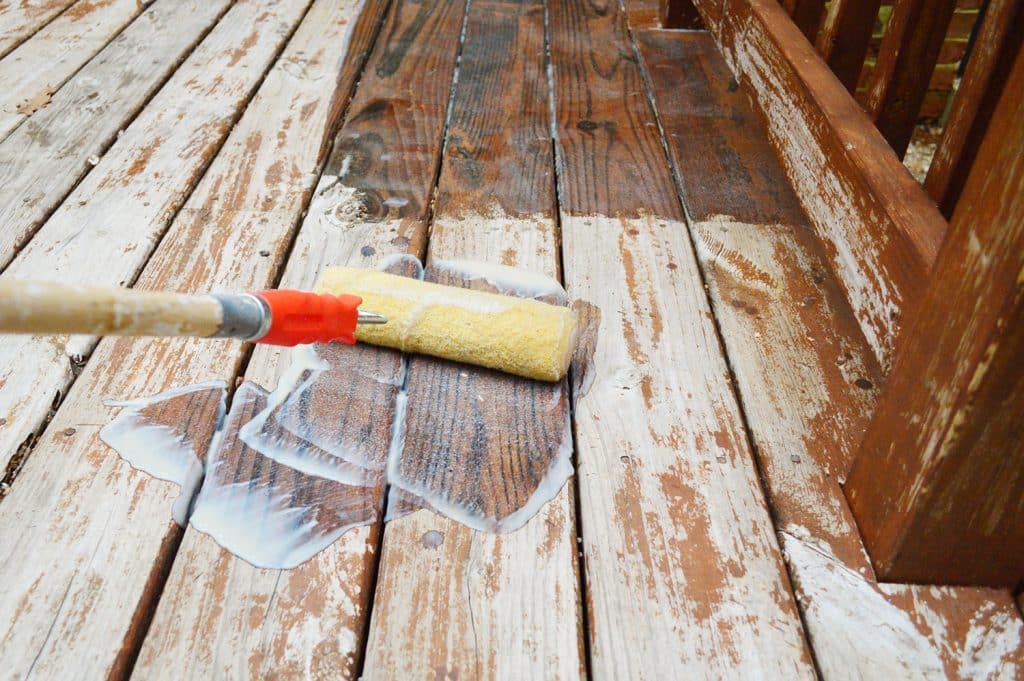
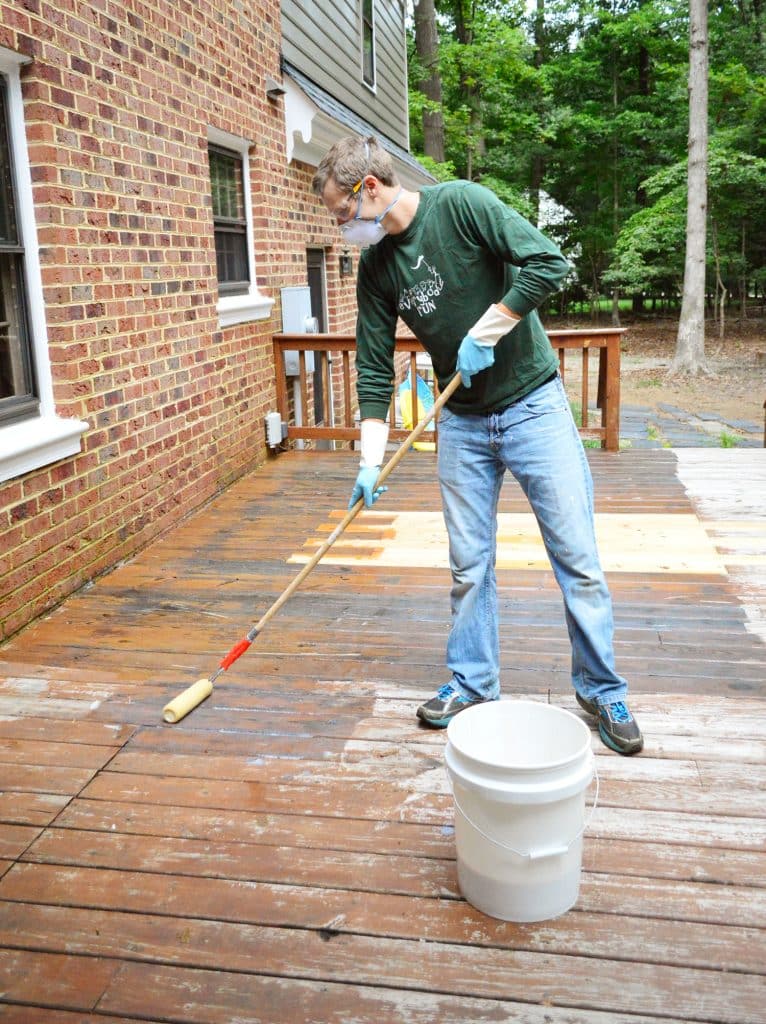
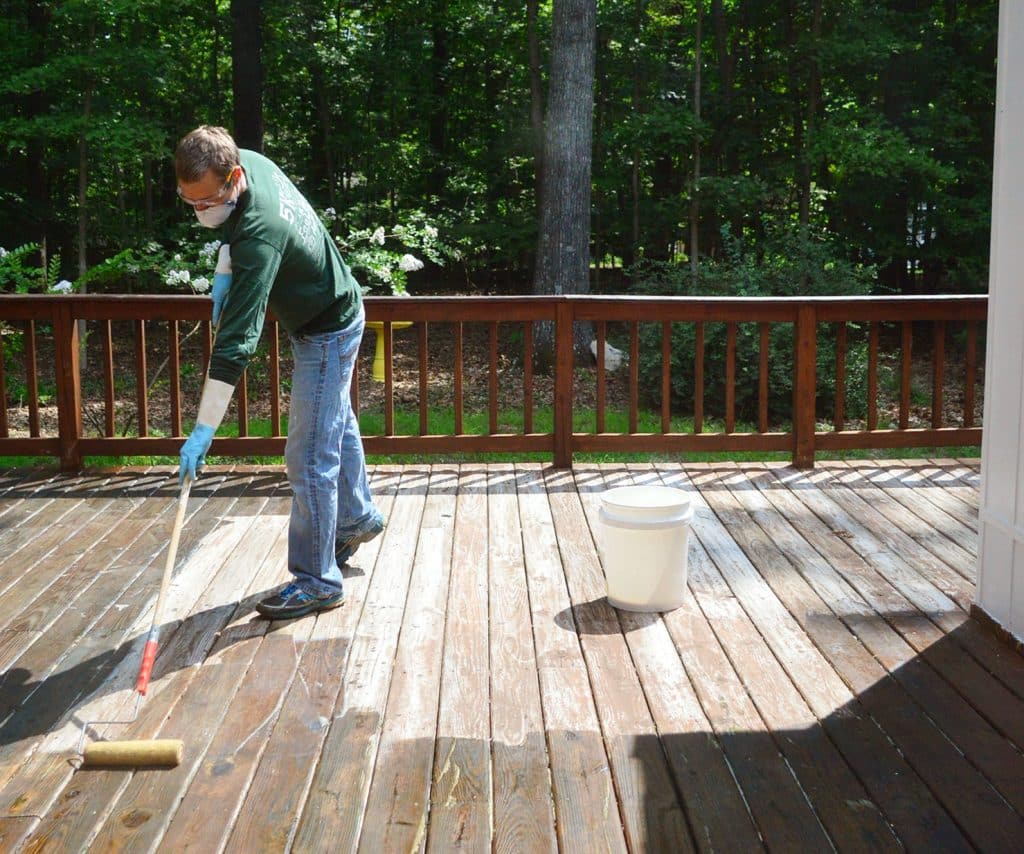
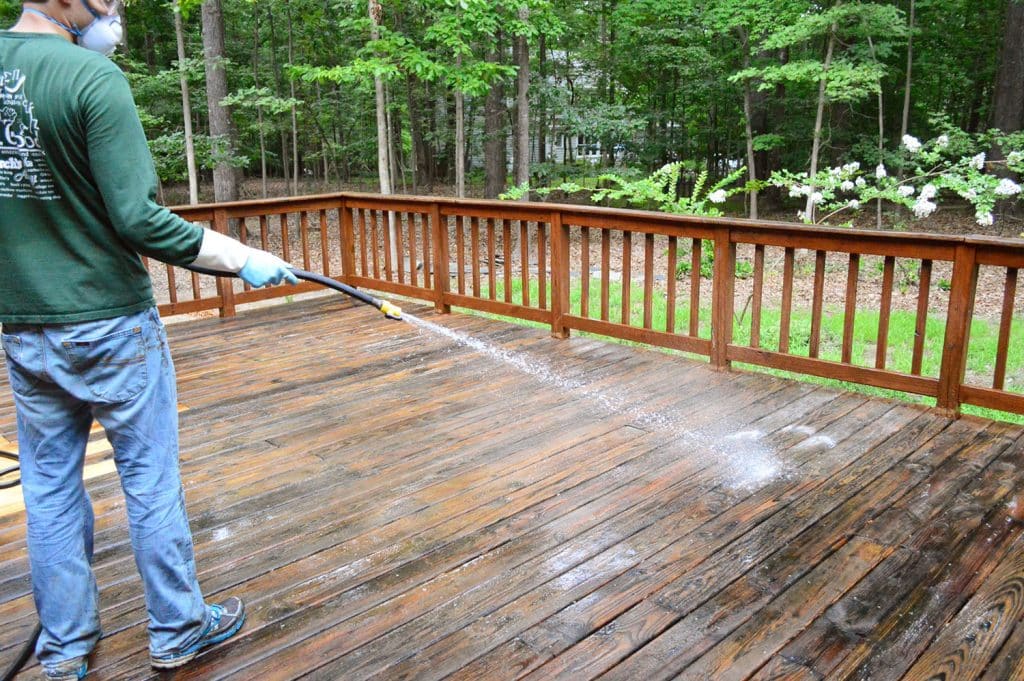
Step 3: Apply Your Deck Stripper With A Roller
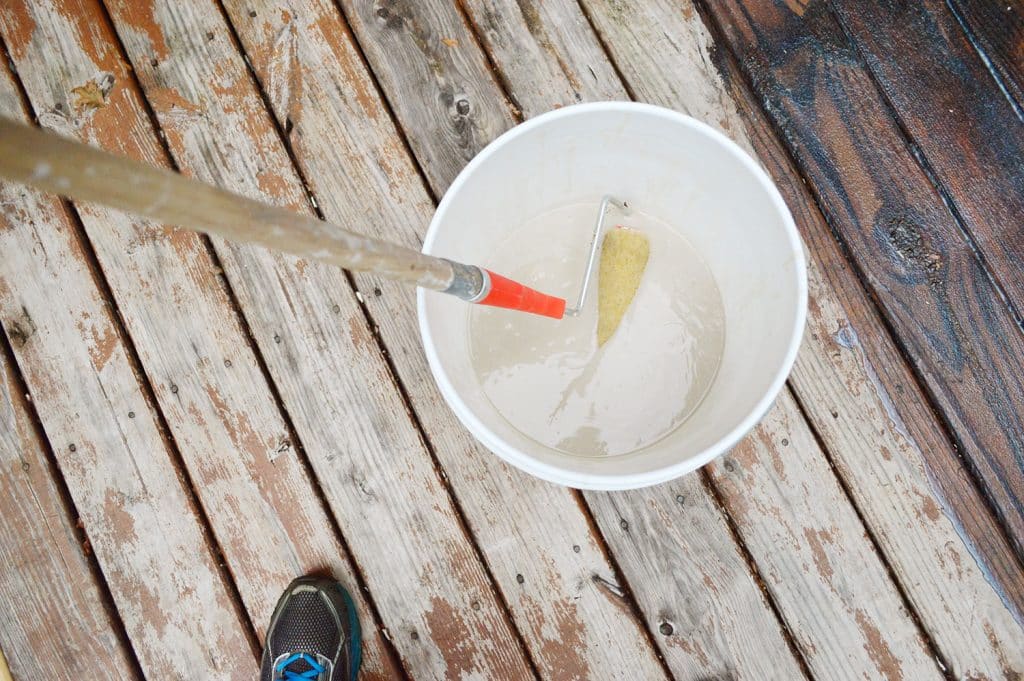
Since we’d be applying this stain stripper with a roller, I combined a couple of bottles into the bucket for easy dipping. A deep paint tray would work as well, although I found the bucket really helped me get my roller saturated.
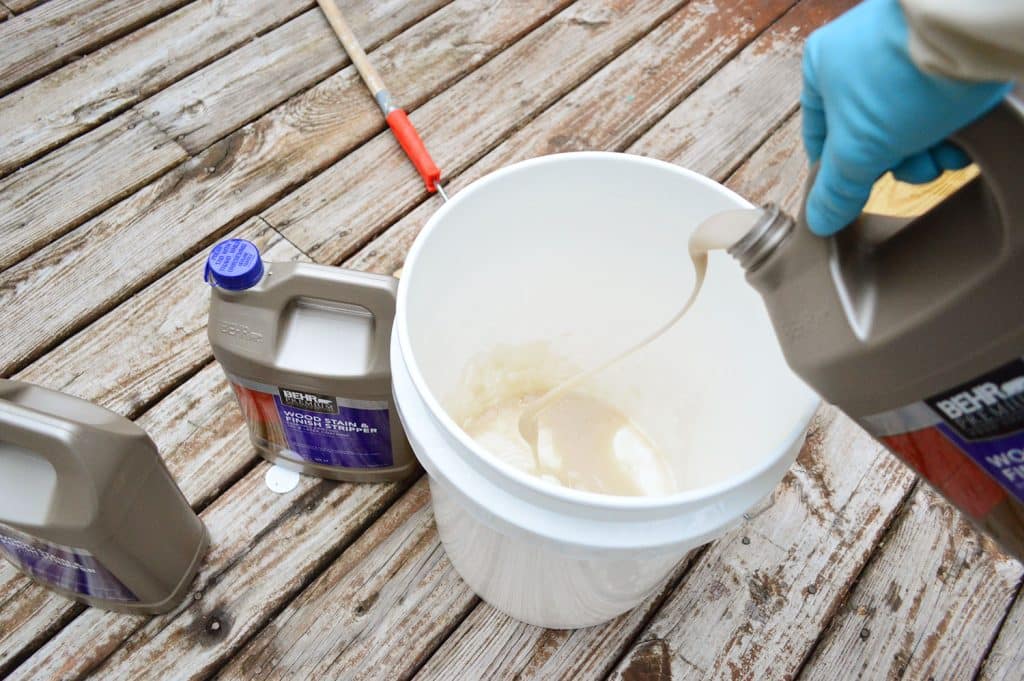
The deck stain stripper is pretty gloopy (a technical term). Almost a gluelike consistentcy. I imagine it to be what porridge looks and feels like. But hopefully not what it smells like. Otherwise Goldilocks has terrible taste in stolen snacks.
The consistency actually makes it really easy to apply. It’s thick enough not to drip off your roller too wildly, but thin enough to spread nicely. We just worked methodically to make sure we coated every board.
The instructions tell you to spread it “liberally” over the surface and let it sit for 5-45 minutes. In that time you’re supposed to not let it fully dry, which is why choosing a cloudy, cool day is best.
I waited a good two weeks for the “perfect day” and even then it turned out to be to sunnier than I had hoped. Stupid clouds never stay put, do they?
Luckily, the instructions tell you to just lightly mist any spots with water if they are drying out before you can finish your application.
One warning – this stuff is also pretty slippery. I did my best not to walk on it at all, but when I did it felt like it was almost moving under my feet.
That’s when I realized it WAS MOVING UNDER MY FEET. It was slippery because the finish was literally coming off under my feet. Suddenly my caution turned to excitement. It was working!
Step 4: Scrub Off The Old Paint Or Stain
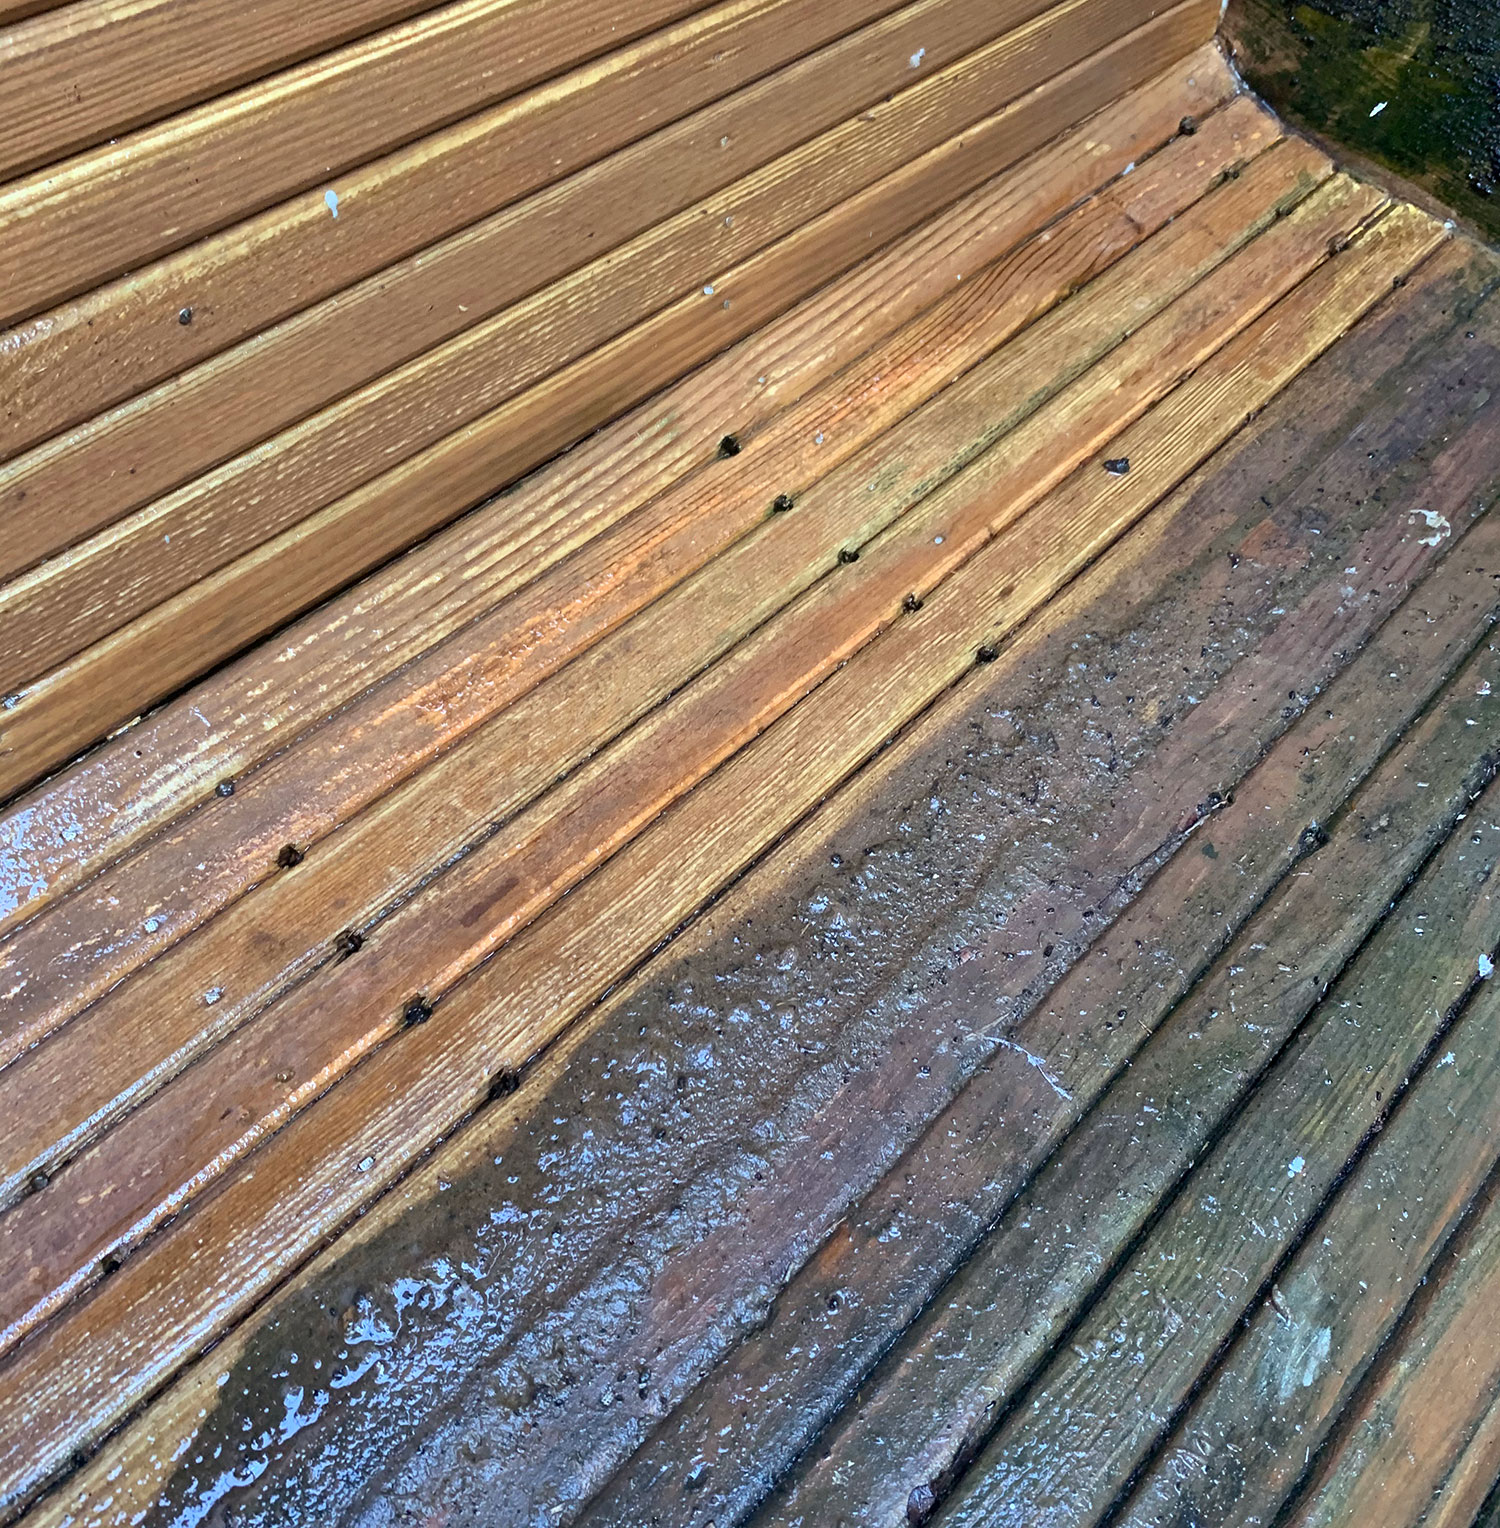
The stripper will help lift the old finish, but it needs some friction to actually remove it from your deck. It had been about 25 minutes since we started and, since it was literally coming off under my feet, we took that as our cue to move on scrubbing!
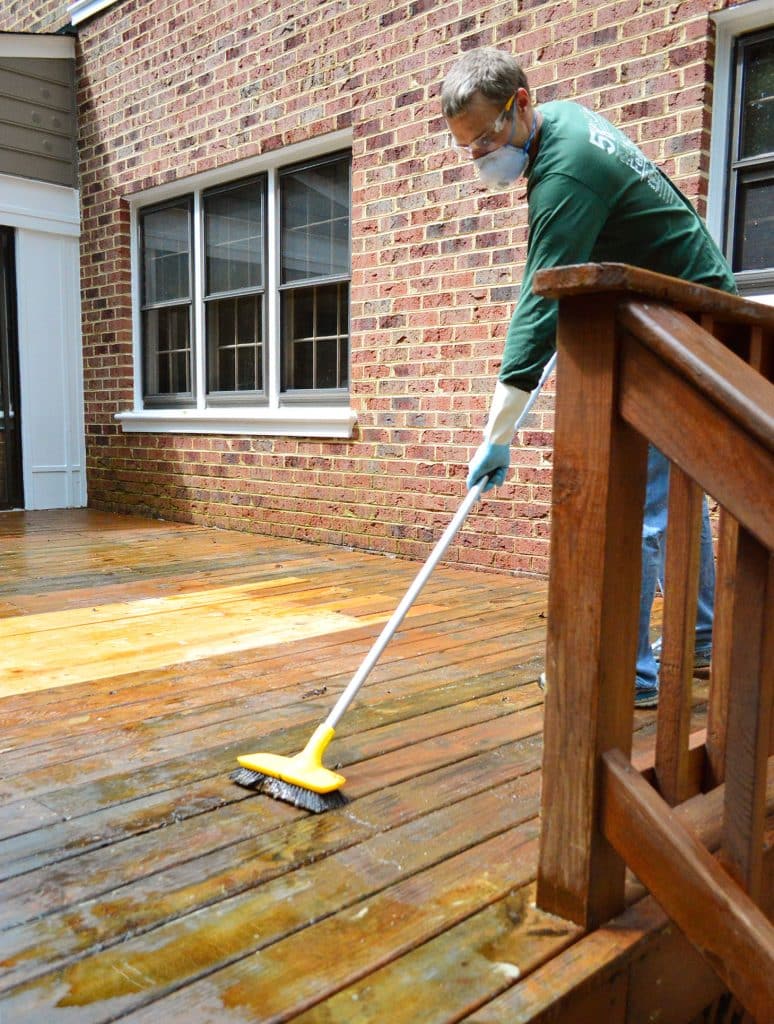
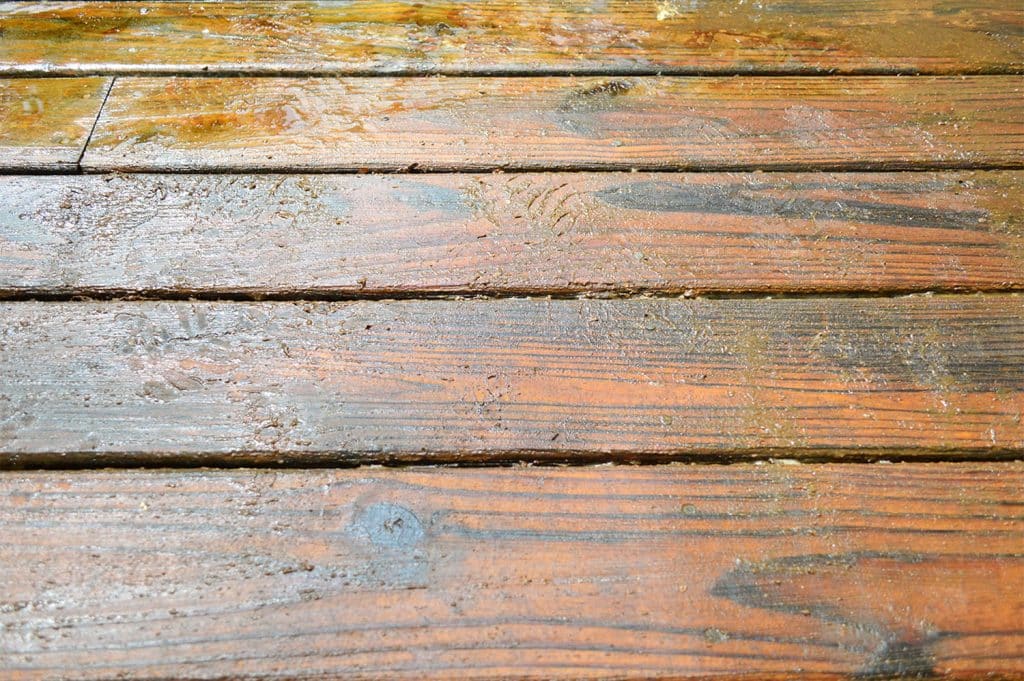
This stiff-bristled broom did a great job, but it did take a little bit of force/pressure. In most cases I could get the finish off with just a couple of swift strokes on each board. It came off in sort of a brown sludge, but after a rinse you could really see how the wood grain was reappearing.
The job went a lot faster once I realized I could hook up my hose to the back of the brush I had bought. It meant I could kinda scrub and rinse all at the same time, which made it easier to see the progress I was making.
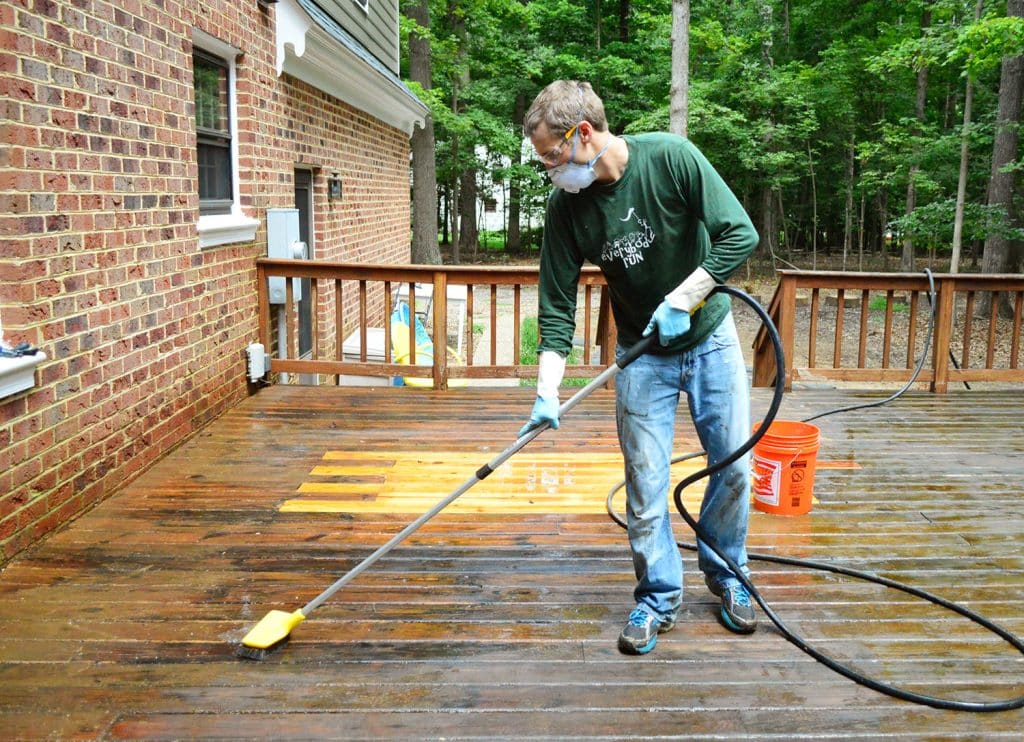
The scrubbing part was definitely the longest part of the process. It took me about 45 minutes to do my first pass, and then I went back and spot scrubbed parts that I had missed or that took a bit more oopmh. Even then it took two or three rinses to make me feel like I had actually gotten all of the sludge off.
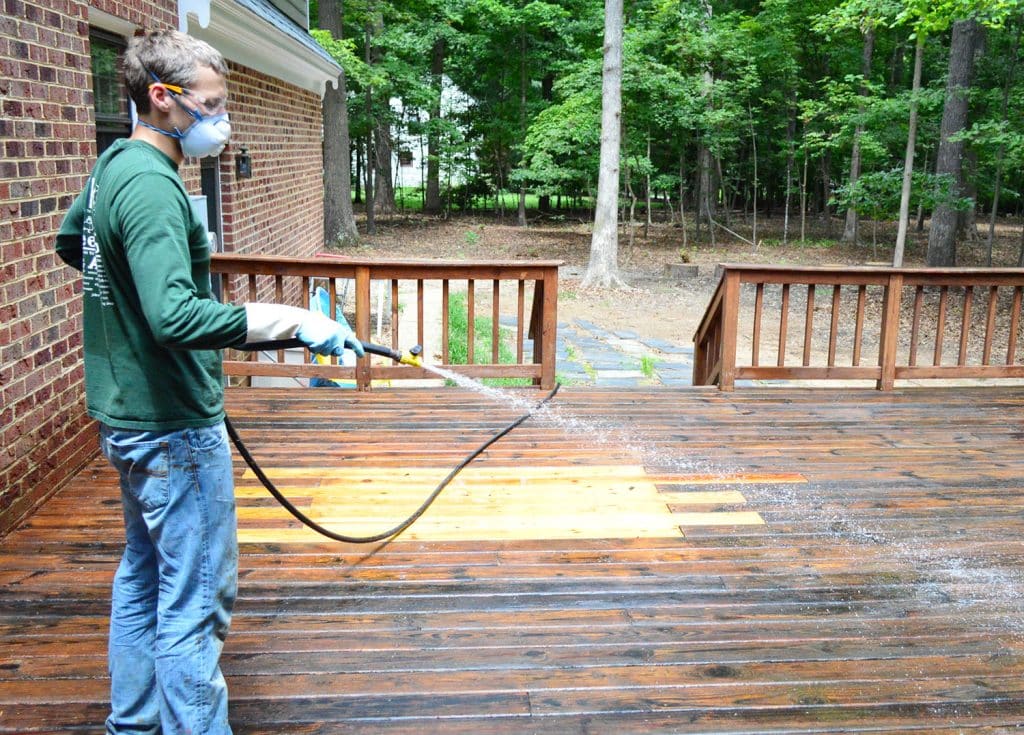
Step 5: Neutralize The Deck Stripper
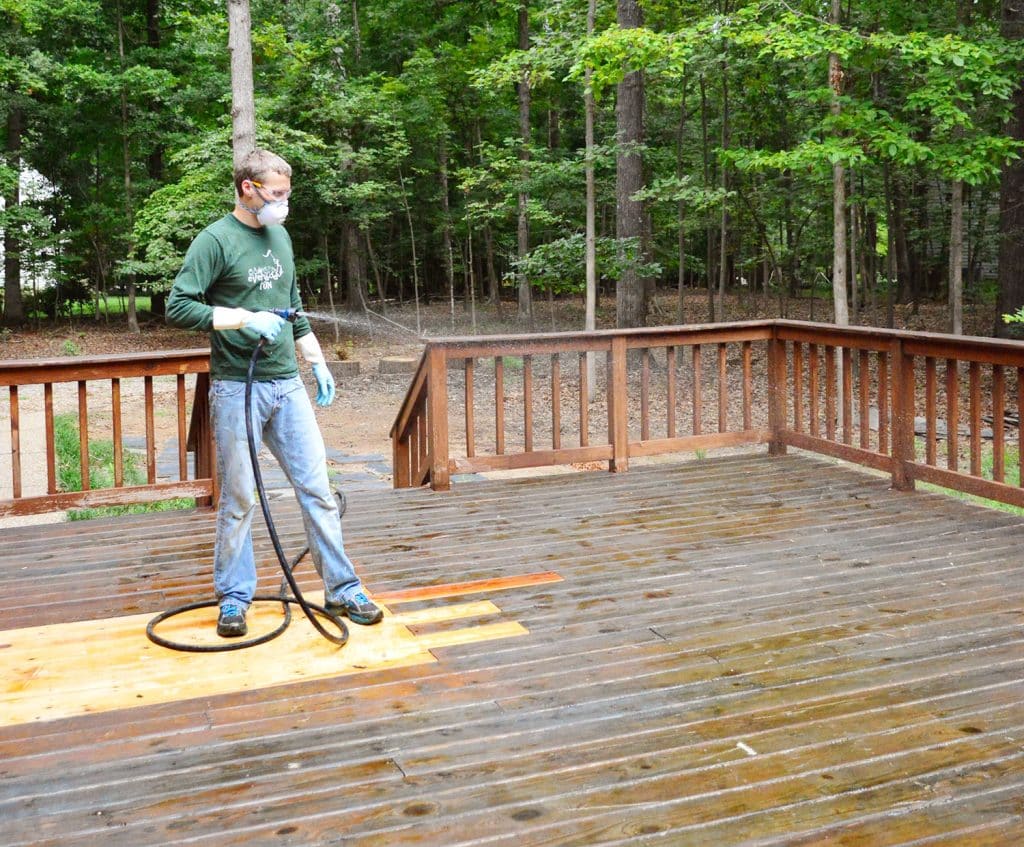
To finish the process, you need to apply a deck cleaner to brighten the stripped wood and, more importantly (to me at least) neutralize the stripping chemical. We applied this with a basic pump sprayer filled with 1 part water and 1 part cleaner. You don’t need a thick coat, just be sure to get every spot you applied the stripper.
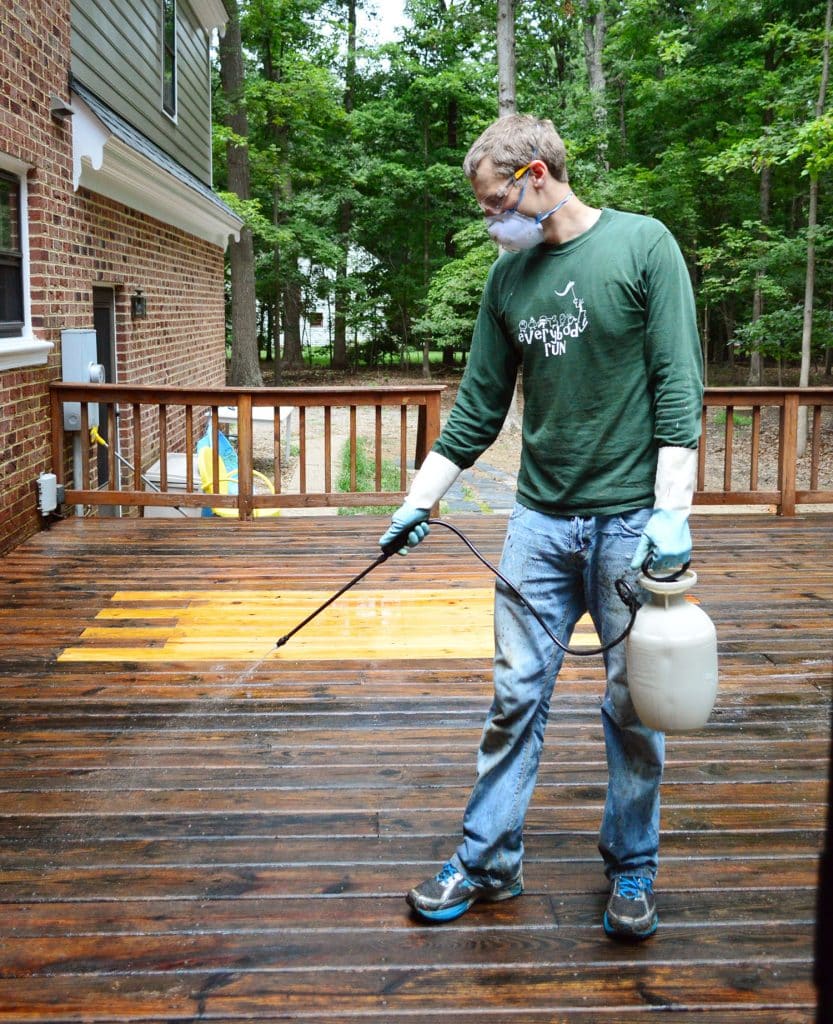
The Behr cleaner recommends that you scrub the deck cleaner into the wood after letting it sit for a few minutes. So after thoroughly cleaning our brush, went spent about 20 minutes or so of brushing our giant deck again. It said it would “foam” but I didn’t get much foaming action.
But foam or no foam, I proceeded by giving the deck one last good rinse down to hopefully rid it of any residual deck stripper and cleaner.
Step 6: Enjoy Your Results!
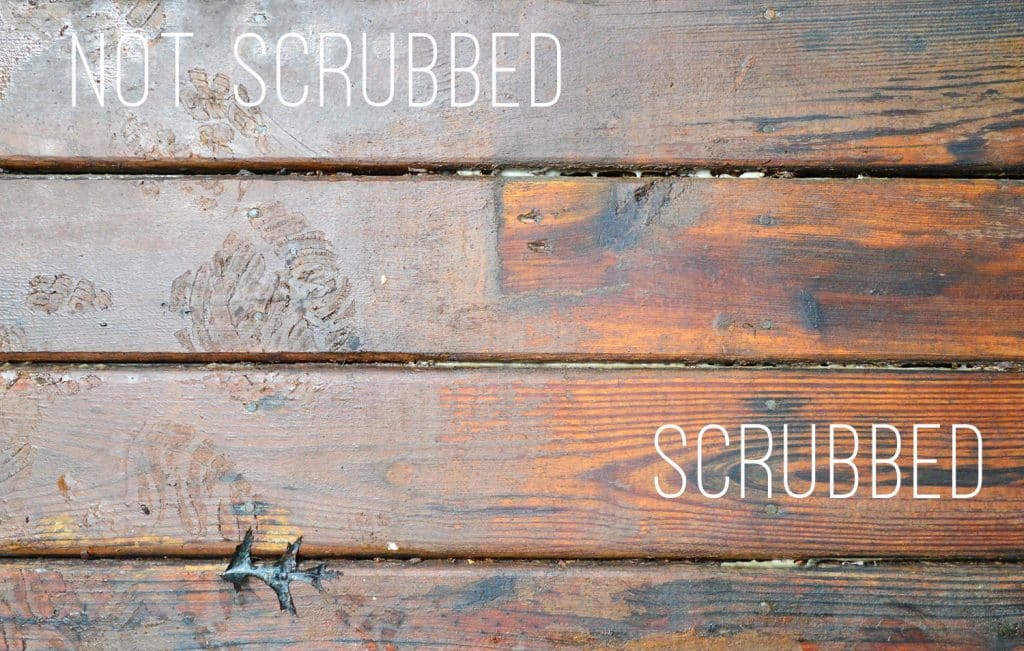
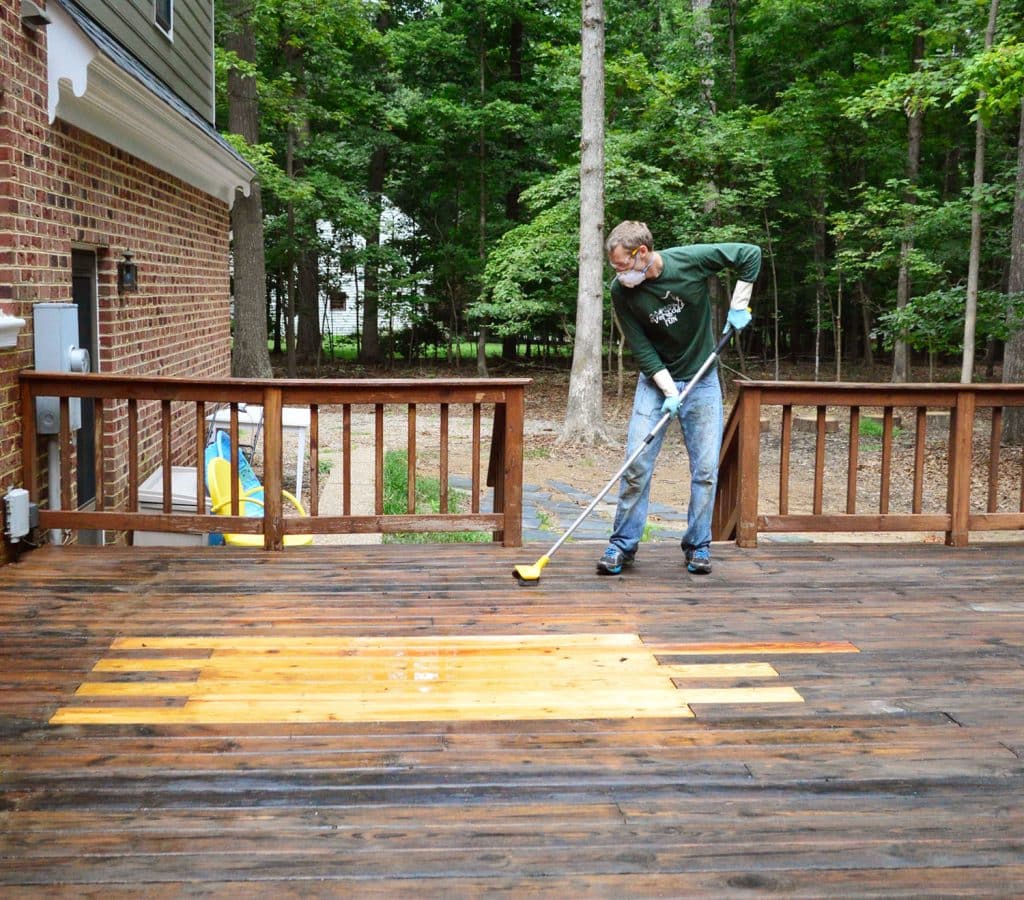
We were VERY impressed with the results. It seems to have gotten rid of not just the peeling paint, but a lot of the gray weathering too. It almost looked like new, albeit bleached, wood. It almost blended perfectly with the new wood we added where we had to have a tree removed.
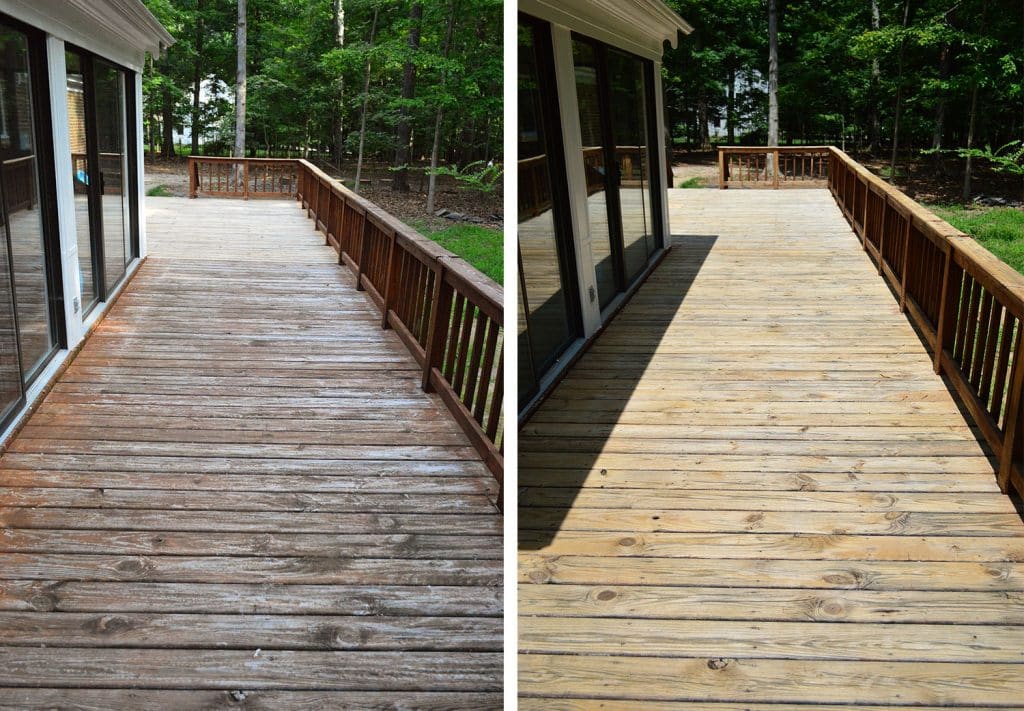
Here’s that before and after again so you can see how much better it looks, even without the new stain coat applied yet!
The whole process took me about 3.5 hours and I was pretty tired and sweaty (okay, and hungry). Wearing pants and long-sleeves in 85° will do that to ya. So we actually did our deck in two sections, and we completed the next area the following day. But at least my half-attempt makes it easier to see the difference the stripping made. See that obvious line where the sunroom ends?
Our plan now is to stain it with a semi-transparent stain that’s similar in color to the previous rich brown color. It must have been glorious in its day, before it started to wear away. In fact we didn’t go through the trouble to fully strip the small vertical railings (because it would’ve taken a million years, but also because we liked their color and they were in much better shape). So we’re hoping using something close in color that will make the whole thing look seamless when we’re done.
UPDATE: You can see how the stained deck turned out here!
So yeah, that’s the stripping story. I guess the lesson is that even if you have a rough-looking deck, some elbow grease (I think I scrubbed this thing thirty times) might just save it. Either way, we’re pretty pumped about being one step away from breathing new life into this baby. Deck stain, here we come!
BONUS: More Deck Posts
We’ve got more tutorials for making the most of your deck (or, at least, how we made the most of ours). Here are some other posts you might be interested in!
- How To Build A Gate For Your Deck
- How To Stain & Seal Your Deck
- How To Build A Deck
- Why We Decided To Tear Our Deck Down
*This post contains affiliate links, so we may earn a small commission when you make a purchase through links on our site at no additional cost to you.

Callie says
“Bucket to pour the stripper into for easy dipping of my roller” Ummm…That’s what he said!
YoungHouseLove says
Haha!
xo
s
kb says
how did yall miss the opportunity to title this “I’m in love with a stripper”?!
t-pain classic right there.
YoungHouseLove says
Oh man, we dropped the ball right there.
xo
s
Justynn @ Creative Life Antics says
I used the same stuff!! My deck was 6 years old, really greyed out and in need of some attention. That stuff worked AMAZINGLY and let me put a nice red stain on it.
Pictures are here:
http://creativelifeantics.com/2013/05/06/mondays-weekend-round-up/
xox Justynn
Shelley @ Green Eggs and Hamlet says
Wow, it looks fantastic! Great job and great commitment especially on an 85 degree day in long sleeves and pants. Well worth the effort, I’d say.
Laura C says
Great job – it looks amazing!
Yvonne King says
Does this same process work for fences? Ours is in some serious need of some love.
YoungHouseLove says
I believe it should. I’d read it just to be sure, but we did the sides of a few rails and the top railing and it was great. Anyone ever use it for fences?
xo
s
Betsy says
I love this!! And you’re right, it looks like your patch won’t show up all that much – however a little bit is cool – helps you tell the story of a tree that once was. :) I envy your perfectly white trimmed windows outside. I have lots of window work to do….
Also I love how u guys jump around from indoor to outdoor projects. When I seriously buckled down and started reading this blog I became inspired to do the same thing. It totally makes us feel like we’re making double the headway on our new place!
YoungHouseLove says
Thanks Betsy!
xo
s
Maria@TheBrooklynFig says
What a difference! It really shows in the picture that you labeled stripped and not stripped. I’m interested in why you didn’t power wash, as that is what we did to our deck this summer after moving into our first house- so I’m going to take a look at those comments you mentioned. Thanks for another great, detailed how-to post. They are really helpful.
Gretchen in Tennessee says
Wow. I mean WOW. That is uh-maze-ing! Looks SOOOO much better! GOOD WORK!
Tipling says
Our deck has a Rust-oleum Restore type product on it and it is peeling like crazy so we are trying to figure out if this stripping process will work on that as well. Perfect timing with this post though, out of all your projects, this is the one I have been looking forward too the most!
KimberJ says
So glad to hear you didn’t use the Rust-Oleum Restore. I talked to the “paint and stain” expert at Home Depot, a contractor who had actually installed it for a customer (at the client’s insistence), and also called Rust-Oleum. The first 2 both told me that under no circumstances should you ever try to power wash a deck with this on it or even use a strong spray from a garden hose. The only way to clean it is with a spongey mop and a light mists of water. Rust-Oleum didn’t say it couldn’t be power washed or sprayed with a stronger spray from the garden hose, but they highly discourage using either method. End Result: Extremely difficult to maintain and clean. We ended up power washing our deck (built in 1971) then just sealing it.There was nothing left to strip off after so many years. The sealant slightly tinted it a warm pecan color which goes perfectly with a deep sage green cedar sided house.
YoungHouseLove says
Who knew!? I never heard that garden hose thing!
xo
s
Meredith says
I’m pretty sure I read this blog purely for a shot of your “can-do” attitude. Sometimes it’s better than coffee! I mean, I appreciate all of the actual tips and advice, but I always finish a post and go, “Ooh, I’m gonna go do something, too! ….. Or…. I could just keep stalking their blog abd feel productive vicariously.”
But often it results in me actually doing something, so thank you for that.
Oh, and the deck looks fantastic. Goooo, you guys!
*okay, I had a cheerleader moment. Now it’s over. Thankfully.*
YoungHouseLove says
Haha, thanks Meredith!
xo
s
LauraCinIndy says
Looks awesome! We are headed to Home Depot now!
Emily @ Life on Food says
It looks so good. Great job!
Sally says
The deck looks great, but on a random side note, you guys have never eaten porridge?? :)
YoungHouseLove says
Neither of us have. Is that weird? We’ve have other things like grits and oatmeal, but not porridge. Is it tasty?
xo
s
Annie says
Americans are so weird. You think certain things are universal in the English speaking world, but it turns out they just got dropped out of their culture with the revolution. Like tea, and, apparently, porridge. Have you guys ever had toast?
If you’d like to lose your porridge virginity, quarter of a cup of quick oats, half a cup of milk, a teaspoon of brown sugar, shake of cinnamon, then two minutes in the microwave on high, stir, then 2 min on 50%. Warm, creamy, tasty, nutritious and a whole lot better for you than a pop tart!
You can put any toppings on you like
http://www.realsimple.com/food-recipes/recipe-collections-favorites/quick-easy/oatmeal-recipe-00100000099427/index.html
YoungHouseLove says
Thanks Annie! I drink tea every night, so I’m keeping that tradition alive. And toast = a staple in our house too. Poor porridge. We better get on that.
xo
s
Helen says
I was also SHOCKED by this ;-)
Especially since John’s a runner. Here in the UK it’s practically a law to have porridge as your pre-race breakfast.
Deck looks amazing btw!
Laura F. says
Not deck related, but the 17th is National Thriftshop Day- any big plans?
YoungHouseLove says
Ooh, I think I need to go pop some tags. Haha! We actually have a thrifting post coming up this week for ya.
xo
s
Nancy says
Just curious.. I noticed that John wore regular shoes as he stepped onto the stripper goo.. So no specialize workboot needed? In my experience, this stuff eats to everything, no?
YoungHouseLove says
Those are just my “getting dirty” shoes (I mow the grass in them, do exterior staining in them, that sort of thing) so since they’re already on their last legs I thought they might get all ruined on the bottom but they just… got dirtier. But no eating away at the fabric or soles or anything!
-John
Sally says
Porridge is yummy! It’s just oats heated up with milk, a bit of honey on top make it extra scrumptious. I guess as a Scot it does seem odd that you’ve never had it but its probably not a popular breakfast in the USA.
YoungHouseLove says
That sounds delicious. you had me at honey.
xo
s
Andrea says
We did this a few months ago to our deck and it was miserable!! Ours looked just like yours – except add some green mildew since we live in Destin (loved your vacation pics by the way!). We stupidly decided to strip the vertical bars as well and it took us a million years just like you said. So smart that you chose not to!!!
susan says
One word: Wowza! Hitting the ground running after your vaca?!
Looks great!
Jean says
Looks much better now. But this is why I prefer a patio to a deck. They require less maintenance! :)
Lara says
We used the sandy stuff from the blue store. It’s peeling off, and hubs followed directions. It also does not feel good on the feet, but it DOES clean the dog hair off my broom!
Mamaw says
Good job on the deck! Looks great!
LeeG says
Looking good! Quick question…after you built your new deck on the old house, how long did you have to wait to seal it? We used pressure treated pine (with some new more eco friendly chemical) and read different opinions….some people say to wait 4+ months, others say to do it right away.
Thanks!
Lee in Bethesda
YoungHouseLove says
We waited about six months since we had heard the 4+ months thing. I know if you do it too soon the rumor is that it’ll trap the moisture in and cause issues for you down the line. Hope it helps!
xo
s
leslie says
Good info here and the results are great! Can’t wait to see your deck complete!
We recently pressure washed our 5 year old pergola and I was shocked at the gunk that came off the wood. Worried about chemicals? Um, the mildew that was hidden in that gunk made me itch every time I stepped out side. Not until we hosed everything off with water and some bleach could I relax out there.
I even did a behind the scenes post about it.
http://paperdaisyme.blogspot.com/2013/08/behind-scenes-of-backyard-makeover.html
bfish says
The deck came out really nice! And good for you for not using chemicals in your yard to kill anything. With all of the rain this summer weeding is a never-ending project around here but it’s worth it to avoid any eco-threats. (I’m assuming you’re likewise committed to eschewing insecticides, as they (IMO) are even more harmful than herbicides.)
YoungHouseLove says
Oh yes, aside from burning a citronella candle or two, we’re insecticide free! I recently read a really scary article about how harmful they can be to pets since they hang out in the grass too.
xo
s
Toni says
We have a huge deck that is painted a green tone paint. Can this process be used for paint as well as stain?
YoungHouseLove says
I believe it says that it’s for paint or stain on the stripping agent, but I’d read the label before buying it to be sure!
xo
s
Louise says
I just stained my deck using FLOOD semi-transparent stain in Bark. Turned out great, covering and evening up areas that were darker or lighter than other areas but still letting the wood grain come through. Have you considered this product? Sorry if someone else mentioned it in the 217 replies before me :o)
Here’s a before and after pic of a section of railing.
http://textiletrolley.blogspot.com/2013/08/slow-down-and-smell-roses-then.html
YoungHouseLove says
Thanks Louise! We’ve heard awesome things about Flood, both the last time we stained the deck we built and this time!
xo
s
Joseph says
Have you ever heard of weathering with vinegar and steel wool? I’ve seen quite a few things done with it and it gives a cool greyish weathered look. The reason I mention it is because it might be a quick, cheap, and easy way to get that newer patch to look like the rest of the deck so that it all stains the same way. It doesn’t sound like you’re that worried about it but I just figured I’d throw it out there. Here are two links about the process:
http://www.instructables.com/id/Steel-Wool-and-Vinegar-Wood-AgingEbonizingWeathe/
http://www.instructables.com/id/tea-staining/
YoungHouseLove says
Love that method! I totally want to build a console table and give that a try!
xo
s
Joseph says
That’s exactly what I want to use that method for too! I have my eye on some plans for a Rustic X console table I found over on Ana White’s blog.
YoungHouseLove says
Sounds awesome!
xo
s
sarah @makingitmyhome.blogspot.com says
wow-what a difference!
Nichelle says
It looks wonderful! Makes me want to get out and freshen up our outdoor space. :-) The title also has me singing: “Back to life. Back to Re-al-i-ty.” :-)
YoungHouseLove says
And… now I’m singing it. Haha!
xo
s
JoDi says
It was interesting to see how you stripped your deck because my husband just refinished ours. He rented a floor sander for $50 to do ours, and it went pretty quickly with minimal effort, but we have a cedar deck. I’m not sure it would be a good idea to sand a pressured treated deck with all the chemicals. And you definitely wouldn’t want to power wash it. He also just power washed our pressure treated fence, and it definitely gets fuzzy/splintered. That’s no so bad on a fence but would be a pain on a deck. The chemical method definitely looks like a lot of work, but as usual your careful research led you to the right method for your circumstances!
Lacey says
The deck looks great! Those jobs can be tedious but are always worth it.
And, sorry if someone has already mentioned this above, but porridge = British/Australian word for what you call oatmeal. Goldilocks has good taste, don’t worry.
YoungHouseLove says
Then we’ve totally had porridge! Who knew it was oatmeal?! Love that tip.
xo
s
Lucy Holub says
We have the same problem before, good thing is that our deck is a little bit smaller than yours. So just a little stripping happened! That’s the way it is. lol
Deb says
Tip of the decade,invest in a gas powered pressure washer,I invested in a 1700 electric,over ten years later I needed to borrow one for my moms house(she lives in another state),I borrowed a 3,000 psi ,easy start Generac ,whew ,what a break ,it normally took me two days with my lil 1700 psi ,the 3,000 psi did the whole job in two hours,no pre-soaking,no harsh chemicals which by the way is harsh for long term use ,my decks are over twenty years old ,the water soaks into the wood causing it to expand(splinters) ,the sun ,after several days dries and shrinks the wood back to normal ,the so called splinters disappear ,the harsh stuff breaks the wood down ,just like bleach on fibers ,weakens it over time ,trust me ,try it next time ,you will be hooked ,just wish I had learned all these facts sooner .
Pam Levario says
I actually have this stripping product sitting, awaiting me to use it. My deck is much smaller, so hopefully I won’t hurt my already messed-up back. I appreciate your comments comparing staining vs. the DeckOver or Restore products. What did you end up doing? You don’t know how grateful I am to have this, as a single, old-woman (OK, not THAT old), home owner, to refer to. Thank you, Thank you, Jeff and co.!
YoungHouseLove says
If you click to the next post (at the bottom of this post) that’s the one about what we used and how we got ‘er done! Hope it helps!
xo
s
Ellen says
Any particular reason you used a Behr prep (stripping) product and then an Olympic stain? Would you not recommend the Olympic prep product or was it just a one step at a time decision?
YoungHouseLove says
We just read reviews and talked to a few people and they had great experiences with them (sometimes one brand is better at one thing than another). Then when we tried them we were happy with them as well.
xo
s
Joanna Banana says
I’m so jealous of your gargantuan deck! It’s probably bigger than my backyard! Great tip on stripping vs. power washing!
ColoradoDude says
This write-up is awesome! I wish I’d seen it before I went this process, MUCH more clumsily and less effectively than you did! I sent your write-up to my grandmother in Missouri who may be doing hers soon.
One thing I’d add for people looking to do this: Wear long sleeves, long pants, and shoes! The chemical is NASTY and not only was it very uncomfortable to have it spray on me (it burns), but I even have some lasting red burns that I hope will heal normally.
Also very important, as author says, to scrub. I nearly missed that part and in fact DID miss that part on some of the deck (before I noticed). On that early part where I washed the solvent away without scrubbing, some of the stain remains. It is all gone where I scrubbed, though.
I, too, skipped the vertical parts. I tried to do them, but it didn’t work well — too much trouble to do it right. I’m just going to cover them in Deck Over, I think.
Also: You NEED a plastic brush like the author used. I used a natural fiber brush, which the chemical completely ate away to the point that it was totally ineffective by the end.
I wish I’d prepared my gear in advance like the author did: I used far too much solvent since I kept rewetting with solvent instead of with a handy little mister.
It’s not kidding about the sun: Try to do it early in the morning or later in the evening. I ignored that part, which also led to using more chemical than I needed.
Glad to hear it’s biodegradeable! I was concerned, because the stuff is pretty nasty!
Thanks again for the excellent write-up. I aspire to be as well-prepared and thorough as you in my next project.
Andrea says
Hi folks: tried this same project today but alas, my results weren’t as good. Lots of old paint still on our deck. I’m heading back to HD tomorrow to ask for a refund, and we will probably need to sand before painting — after a full day od stripping/cleaning! Posting just to validate the mixed reviews on the HD website — not a fan of this stripper for this job. (In fairness, there was more old paint on our deck than on yours.)
Thanks as always for the careful breakdown of steps and materials — much appreciated!
YoungHouseLove says
Aw man, that sucks! Wish it had done the trick!
xo
s
Carol Solle says
I want to strip our deck, but there is a cement patio underneath. Will the stripper/paint stain the cement when it is hosed down?
YoungHouseLove says
Hmm, we haven’t tackled this. Anyone know? Maybe read the packaging to see if it has warnings against using near cement?
xo
s