This is it. My most favoritest art ever. Yes I know that’s a big statement. A big statement with a non-word, at that. But it’s all deserved because I’ve framed and hung my bike art and I’m in love. Not only with how the final product looks, but how easy and cheap it was to achieve. So forgive me if my enthusiasm is more annoying than usual today. I’m a man with a love of all things bike and all things easy. Wait, that sounds wrong…

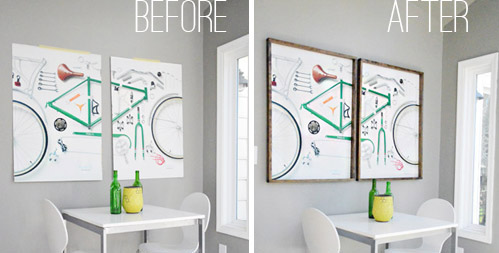
So here’s that wall before with my retail display cast-offs just pitifully taped to the wall.
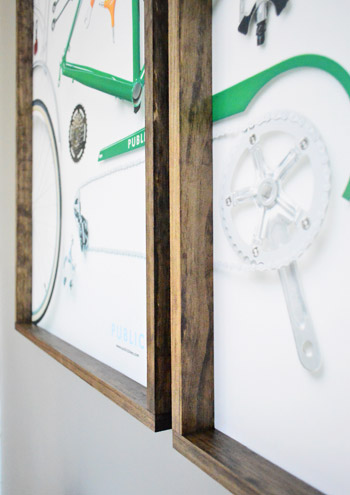
And here they are all framed up. In frames that only cost us $14 to make ($7 each!) and whose most challenging step was finding the patience to let the wood stain dry before I could finally hang them. Seriously, they weren’t hard to make in the least.
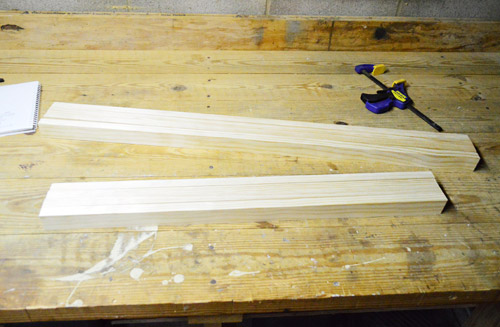
Here’s how it all went down. Er, up. My $14 was spent on four boards of 6 foot long 1 x 2″ pine from Home Depot.
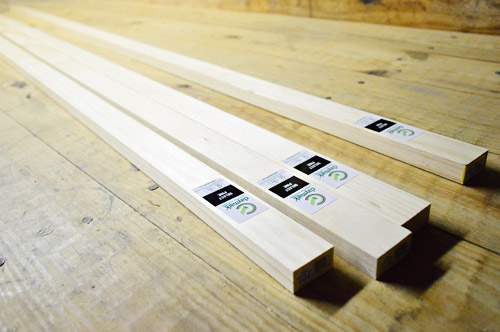
Since we were building two frames, that meant we needed four boards of the same length (for the sides of each of the two frames) and four shorter boards of the same length (for the top and bottom of each of the two frames). To make sure I cut the four sides of my frames (and the four tops/bottoms of my frames) evenly, I clamped four boards together and cut them all at the same time (you could have your boards cut to size at the store if you don’t have access to a saw, btw).
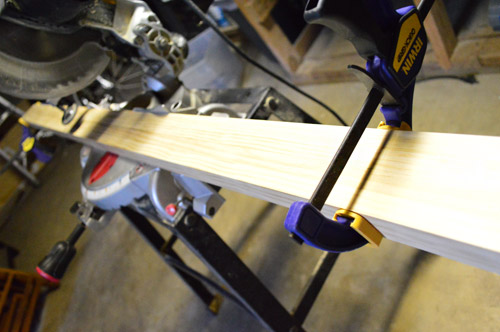
So two clamped cuts later I had four long boards (for the two sides of the two frames) and four short boards (for the top and bottoms of each of the two frames).
The short boards were cut to 1-inch longer than the width of the poster to create some overlap (i.e. each poster is 27″ wide, so I made the boards 28″ wide). The side boards were cut to 1-inch longer MINUS the width of the two top boards (i.e. each poster is 39″ tall + 1″ – 0.75″ for the top board – 0.75″ for the bottom board = 38.5″). This will make a bit more sense soon, I promise…
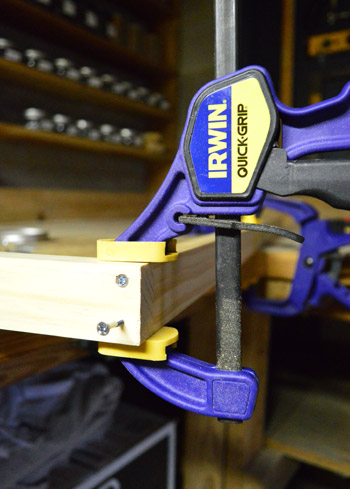
I chose not to complicate matters by doing mitered corners and went for more of a rough and raw look. So attaching the boards into a rectangular frame was pretty easy and completely miter-saw free (seriously, if you had Home Depot cut your four boards to the right sizes, all you’d need to do is the following part at home).
I clamped the pieces tightly together and screwed through the top and bottom boards into the side boards. Oh and it did help to make pilot holes first with a small drill bit so my wood didn’t split when the screws went in.
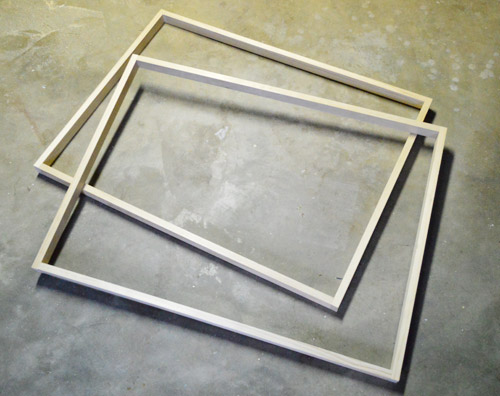
Here’s what my two frames looked like once everything was screwed together. I didn’t do anything to cover up my screwheads since I figured not many people will be staring at the tops or bottom of the frames once they’re hung (you’d have to be pretty dang tall or lying on the floor to see them). Plus I was going for the raw and imperfect look anyway. A bike’s gears show, so what are a few screws in a few not-easily-seen locations?
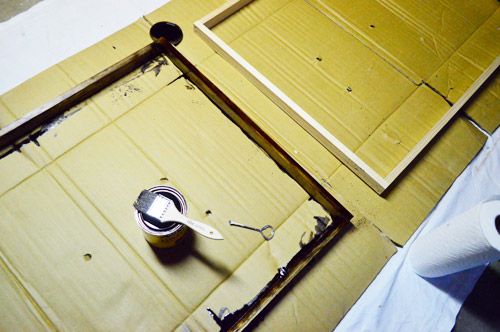
I contemplated leaving the wood raw (since that’s how we originally saw them at store) but Sherry and I agreed they’d look better in a dark stain (we used Minwax’s Dark Walnut since we still had a small can leftover from some project long ago) to tie into a few other wood items in the room like a wood side table and some wooden art over the daybed. Once the stain dried, I put a coat of Safecoat polyurethane over it and patiently waited another night (torture I tell you) to put everything together and hang them up.
With everything dry, I laid my posters face down on the back of the frames. The inch I added to each side meant the poster sat on the frame comfortably without being visible along the edges. My poster was printed on pretty sturdy paper (it’s similar to thick poster board) so I was able to just staple it around the edge in a few spots as a means of attaching the art to the frame. If you’re trying this with a poster on thinner paper you might want to consider gluing it to a piece of sturdier poster board to make it less flimsy (maybe use a glue like rubber cement or spray adhesive that won’t make the poster wrinkle when it dries?).
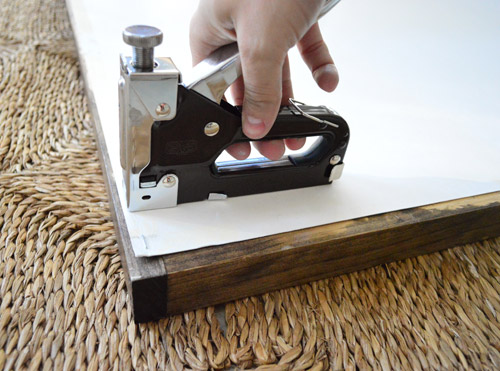
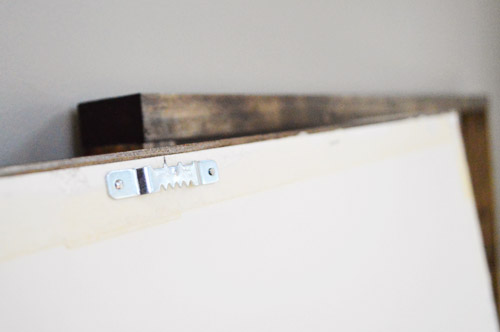
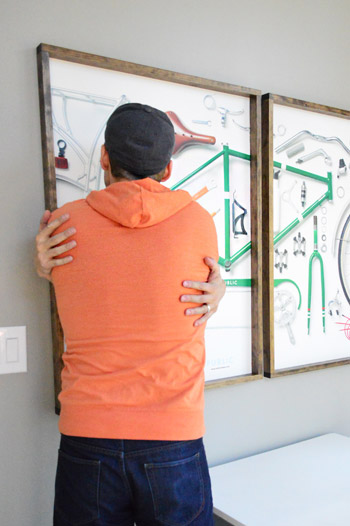
Once I put a few staples around the edges (I did about four per side, but depending how stiff your paper is you might need more) I attached some simple picture frame hanging hardware through the poster and into the wood of the frame – so it wouldn’t show through on the front or anything:
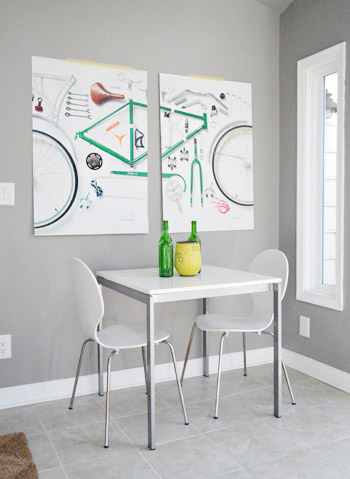
Then those babies were ready to hang. Cue the angels. Part the clouds. I am in bike art heaven. Oh yes, and ignore the way-too-airy table and chairs. Once we have a chunky storage piece of furniture (we have our minds set on something, so we should have that update for you soon) the bike art will have the nice grounded and proportionate look that it deserves.
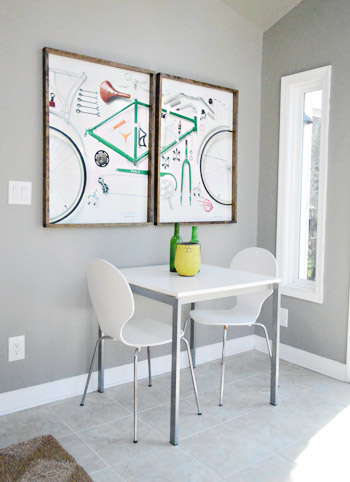
Seriously though, I’m pretty stoked about how they turned out. Obviously the art itself (featuring a deconstructed bike by Public Bikes) is the real star. But I like to think that my frames have at least earned a “best supporting actor” nomination. And heck, they’re honored just to be nominated.
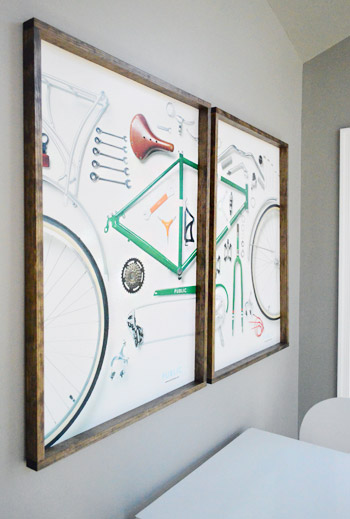
We’re both really happy with our decision to use the boards so they raised off against the wall a little bit – giving the poster some dimension instead of just being big and flat. That thick frame feels uncommon and artful – and thanks to the posters being so firm and un-delicate, we don’t anticipate any issues with there being an absence of glass. They’re just like poster board so we think they’ll hold up for a nice long time (of course we can always add glass or plexi if we change our minds, but for now we love them completely unobstructed).
Then I had an impromptu make out session with them.
Sherry probably won’t have to witness that again (I can’t make any promises), but I’m glad I can see these babies from the window over our kitchen sink. So she may catch me gazing lovingly at them while doing dishes. And it might just be a love triangle since she occasionally lovingly gazes at me while I do dishes.
So that’s the latest in the sunroom. Can’t wait to share the storage-y piece of furniture that we’ll be adding under the bike art. Soon I hope!
Update: We finally created this Shop Our House page to help you hunt down any furniture/accessories that you see in our house, along with all of our paint colors.

katalina says
a man that does the dishes, vacuums, organizes, goes to the goodwill
be still my beating heart…..
brothers? clone?
YoungHouseLove says
Haha I have no idea how I snagged such a catch. John’s the man.
xo,
s
kate says
These look so awesome! I’m right there with ‘ya that it is probably fine without a glass protection, as it is posterboard anyways. BUT, I would recommend perhaps pulling out the staples that are holding down the bottom corners of the pieces. Gravity likes to do its thing, and over time the posters may appear wavy/warped due to the strain of hanging.
Just a little tip I received from an art professor long ago, hope it helps!
YoungHouseLove says
So smart!
xo
s
Kathy says
How are you doing with your resolutions to write only a certain number of blogs a day? I had to memorize how many times you’ll be posting so that I don’t keep checking all the time. John was my biggest inspiration when he built the deck in the VA heat. We blew in cellulose insulation ourselves, then had the drywall patched and skimmed. It was up to me to paint those 3 bedrooms, then cut, paint, and install new baseboards and door casings alone. I kept telling myself that if John could do it, so could I. Thanks, John! I so appreciate you both for the sense of fun and love in all that you share. You bring a bright spot to my day!
YoungHouseLove says
Aw thanks Kathy! Sounds like you’ve been busy! We’re doing good with our resolution, although we had an extra post last week since we always add in one more on Sponsor Shout Out day, so this week will be the first week of 7 posts. Hope it goes ok! Haha.
xo
s
JP says
This looks fantastic! It looks easy enough that I’m almost tempted to try this out even though I don’t own so much as a table saw…
Leslie says
For a minute there I thought you said you were pretty spoked about how these turned out.
I like how your stapled the posters to the frames. That never would have occurred to me.
YoungHouseLove says
Haha, best bike pun ever!
xo
s
Kate says
John you are so funny! Loved this post.
Jordan G @ The Happy Homebodies says
We just did something really similar to frame my latest artwork! And by “we,” I mean my husband. I painted my piece on scrap MDF, so he framed it out the same way to avoid the raw wood edges. We ended up painting ours white. It was so easy and helps it look finished!
http://www.thehappyhomebodies.com/2013/01/art-fire.html
I love your stained version, too. What an improvement.
YoungHouseLove says
Love it! And the art is awesome too!
xo
s
Libby says
there’s a lotta love in this post
Randa says
Hahahahaaaa! That last photo was hilarious, and totally unexpected.
I gaze lovingly at my Jon too when he does dishes. Cause yep, it means I’m not doing them! :)
Great art, and fantastic frames.
Heidi Rew says
Thank you, thank you, thank you for posting this John! My husband got two movie posters (Hobbit & Skyfall) and he wants to add them to his man save (oops..cave…same thing)but the posters are from a theater so they don’t fit regular poster frames. This is perfect! They look awesome! <3 Heidi Rew
Staci @ My Friend Staci says
Haha, that last bit about the love triangle was so funny. Loving this quick and simple artwork!
Jessica G says
#1- I think those look amazing!
#2- Even though I’m *cough* obsessive *cough* about reading y’all’s blog…Your change to one post a day on Tuesdays has been awesome. I mean, I hope it’s more relaxing for y’all, but with having 2 on M and 2 on W, I’m not even going through withdrawals. Cheers to y’all for making that good choice for your family(and your sanity). :)
YoungHouseLove says
Aw thanks Jessica! So glad to hear that!!
xo
s
KatieLou says
Fantastic!!! Love those pieces, and they look amazing! What an inspiring project!
Carrie B says
sunroom is looking great!! I have read all of the posts over time and probably just missed it, but what is the paint color on the wall? it looks to be a true grey, which I love and have been looking for. thank you!!
YoungHouseLove says
It’s Rockport Gray by Ben Moore. Love it so much it’s in our bedroom too!
xo
s
Wrenaria says
Looks fantastic. I’m totally in love with those posters. I kind of want to make out with them myself.
Cindy says
Looks great but you should remind readers how to moutn with rubber cement. One thing you should remember from your art school days is that you need to double coat rubber cement if you’re mounting anything and it still will sometimes show through or lose adhesion over time. If you’re doing a thinner piecee of art it’s more stable if you take it to a frame shop and have it dry mounted to a foam core board. It’s usually a fairly inexpensive option and more stable over the long term.
Cindy says
Opps! Excuse the typo above. It should be “mount.” But I really do like the bike print and the frames.
YoungHouseLove says
Great tip! I’d totally use spray adhesive I think! John’s the rubber cement fan. Ha!
xo
s
Amber says
Bravo. My husband would be so jealous!
sarah k says
Fantastic! This looks like something my not-too-handy husband and I could actually attempt!
Beth @ the Modern Home says
Been following YHL for years and this might be my ‘most favoritest’ post ever simply because of the make out photo! I laughed so hard!
Ally says
I absolutely adore this kind of personal art for the walls. It looks awesome and unique, and it’s also meaningful to you. Love the frames. Very simple and sophisticated. Nice job.
Amanda Leather says
LOL! love it!!
Magpie says
I’m seriously considering trying these. I have a bunch of pictures without frames I want to hang, but I’ve been concerned they won’t match the height (depth?) of all the gallery wrapped canvas prints we have. This would solve that problem, I think. Plus, WALNUT STAIN!? Be still my Mid-Century heart!!!
Stephanie says
I LOVE these frames! They are nice and simple and showcase the art. I also love that they are super do-able and could also be treated as an almost shadowbox – you could prop something small up on the edge, don’t ya think?!
YoungHouseLove says
Ooh that’s a fun idea! I bet small scrabble tile letters or wood printing block letters could sit on the lip!
xo
s
Wendy says
Love it!
It makes me think what could be done when the hub breaks down his bike and packs it away for the next race- as far as photographing it goes and creating something special for him.
For now, we live with the bike in the living room: 3D art- and when he rides it’s poetry in motion. #sappywife
Mary | lemongroveblog says
Great thinking! I love how big the artwork is – it is really a statement piece in that room. Love it!
Katie says
Love it! Looks great :)
Elizabeth says
I kind of love these with my whole body, and now I need to find a poster just so I can make this happen.
Also, I like your exposed screw mentality! Nothing wrong with a bit of hardware here and there.
Natalie says
Score!! Big impact for a small cost!
Michelle Kersey says
Awesome!
Sarah says
I love these frames! Great job, John! Those posters look great.
Sarah
Cassondra says
Love how the frame brings out the green and really makes the pictures pop! Also love how it has a 3D look with the frames sticking out a bit.
Meredith Jones says
Hahahaha… the make-out-sesh with the posters pic bring me back to middle school/high school and silly boys doing that when they “liked a girl”. Must be true love John. Congrats on finally getting them up somewhere you love! :D
Chelsea says
I don’t think I’m missing this, but it’s entirely possible (I’m battling the flu, and a little out of it), but have you said where it is in your sunroom this is? I’m just a little confused about the layout of this. Is this next to the door from your living room?
YoungHouseLove says
Oh yes, this is the door from our living room, so it’s the wall that has the media cabinet with the TV on the other side of it (the living room side).
xo
s
Chelsea says
Thanks! Good to know! (I don’t know why, ha, but I was curious.)
YoungHouseLove says
Haha, of course! Hope you feel better soon!
xo
s
Jane says
What a great project!!! Well-done and a super addition to your sunroom. Can’t wait to see the new storage you are working. You always make my day with your super creative ideas. Thank you for all the tips you pass along…you are wiser than your age! :)
Sarah B says
OMG how do you guys have such perfect timing?! I so needed this! My boyfriend got me an awesome NOAA map that is HUGE and I couldn’t decide how to frame/hang it… until now! This is going on my to-do-soon list (as opposed to my to-do/finish-eventually list, which is super long). I got some new tools for Christmas, too, which should help! So excited!
YoungHouseLove says
Aw, so glad! Good luck Sarah!
xo
s
sally says
You know, I’ve heard it said that the best frames are those that you don’t even notice, meaning that the art inside should be the main focus, not the supporting cast as it were. Looks like you did it!
YoungHouseLove says
Never heard that but I love that!
xo
s
Stephanie Nelson says
Great job and so fun that it was a simple and attractive project. I’m sure that is all you guys can fit in these days anyway. :)
Interesting reading that old posts comment thread. Amazing how much stuff stores give/throw away. It’s going to make me pay more attention the next time I am in a regular retail store. (Big thrift store person here)
Melissa @ HOUSEography says
This is such a fun room! I wonder if this will become the default playroom since it’s so sunny and bright, the floor is indestructible, and you have definitely gone in a playful direction with the decor. Also you can see it from the kitchen and family room…bonus!
YoungHouseLove says
Totally possible!
xo
s
Christina says
Looks great! Love the rusticity (is that even a real word!?) of the frames and the contrast with the more modern poster. Okay….almost spit my tea out as I scrolled down to the making out picture! I’ve gotta keep liquids away from my computer when reading you all!!! :)
sarah says
That looks simple enough even I could do it! I have a ton of stuff not framed on my walls.
Sar=)
http://www.etsy.com/shop/owleyevintage
Courtney says
wow. I found your blog last week…where have I been, under a rock? anyways, I liked what I was reading in 2013, so I went allllll the way back to the beginning and read every single last post. I can’t believe it. I’m also kind of sad it’s over and now I have to be patient now…but I loved every minute of it. thanks for sharing your life <3
YoungHouseLove says
Aw, thanks Courtney! Wow, I think people who go all the way back deserve an “I survived the YHL Archives” bumper sticker. Haha!
xo
s
tosha says
!!!
in.credible. the color of the frames is perfect too. amazing!
Erin says
Loved the “love triangle” comment. You’re hilarious… in such a good way. Great post John!
LARY @ Inspiration Nook says
Awesome job John! My dad made a frame for us for an art piece he brought us as gift. It’s one my fave art pieces in our apartment. Also without the glass, I just love how they look “all natural”
Megan says
Love this! Such a great idea…you’ve inspired me to build some huge frames!
Laurie says
That looks awesome. And it’s exactly what I need for the two pieces of art I bought from a street vendor in Cuba that are waiting to go up in the family room. I felt like something was missing and now I know what it is…
Jen says
How would you add plexi or glass if you decide to later on? Would you just get it cut to a size that you could sort of wedge it inside the frame? Wouldn’t that show any imperfect edges/corners of the glass? Thanks!
YoungHouseLove says
Oh yes, Lowe’s and Home Depot sell plexi (they even cut it to size for you) and the edges and corners of the glass will be perfect since they cut it very cleanly for you, so we could just use clear adhesive to attach it to the front of the frame and box in the posters :)
xo
s
Leighton says
This is so cool! Where did you get the actual poster?
YoungHouseLove says
Someone sent it to us (from The Gap) a little while after the post that we linked to in this post. We were so surprised to see it pop up in our PO Box!
xo
s
Geraldine says
Woah… It’s terrific!! And totally made me want to make out with some art I have to frame for days (weeks? months? years? decades???). I think making out was the missing element with this art. But now that I know how to handle it… ;-)
Just an additional question though. How would you add glass or plexi in order to make sure it won’t damage the poster and won’t fall either?
Thx for your blog, seriously love it. Oh and my reupholstered chairs and stenciled wall are waving at you too! :)
YoungHouseLove says
Haha, thanks Geraldine! Lowe’s and Home Depot sell plexi (they even cut it to size for you) and the edges and corners of the glass will be nice and perfect since they cut it very cleanly for you. So we could just use clear adhesive to attach it to the front of the frame and box in the posters :)
xo
s
Geraldine says
Thanks for the reply Sherry! And such a smart one! I was actually wondering how to put the plexi INSIDE the boxes (dough! ^^). I like better your idea which also solves the dust-within-the-box question. Less dust cleaning, me likey! :-)
PS. Forgot to tell you that my homemade headboard was waving too. So much of HYL spirit in this little parisian appartement :-)