When your kid reaches the stage where they beg you to hang up nearly every painting, drawing, and stickered creation that comes out of her school bag, you may find yourself needing some more display space. Here’s how we hooked up our daughter with a giant cork board wall with a nice framed-in look and lots of room for art galore.
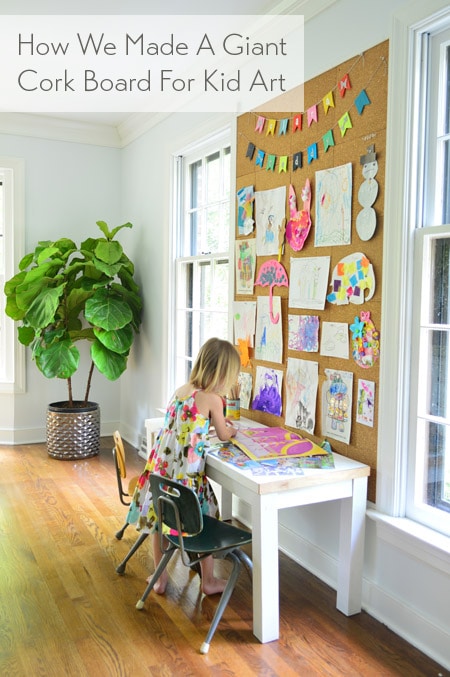
The “bell-etin board” that she used to be referring to was this smaller fabric-covered cork board that hung in our office for the last eight months or so (it was originally made by Sherry for our old closet) – but it had been getting pretty crowded. Sherry had the idea to turn things up a notch and take that cork board wall from window-to-window so that we’d have more room to display stuff – and so that it would more clearly define that little section of the room as Clara’s (and eventually Teddy’s) workspace.
Creating A Base For The Cork Tiles
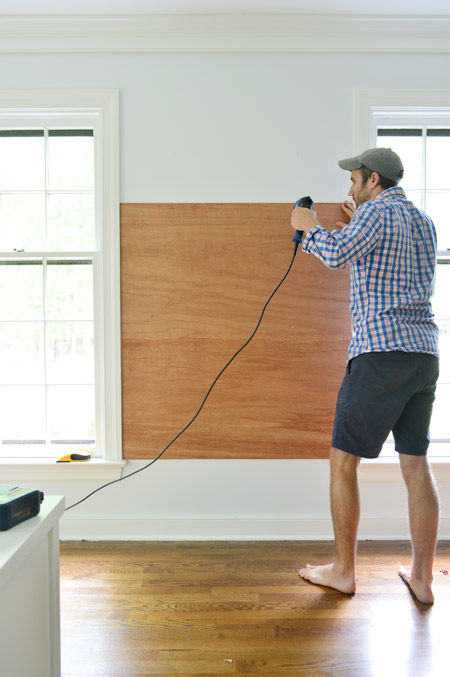
We started by hanging a thin wood base for the cork tile squares to be adhered to. Not only would this make the squares hang more securely than individually tacking them up, it would solve a slight problem of the existing board: some of the pushpins poke all the way through the cork and into the wall, which would mean a plethora of wall holes over time from window to window if we skipped the backing.
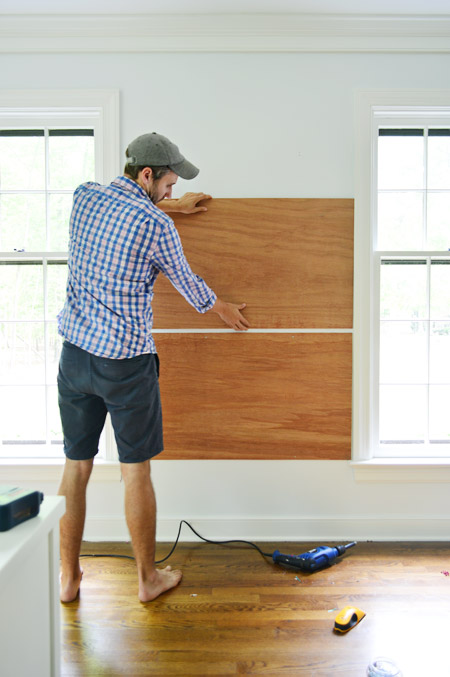
Now we’ll only have a few screws to remove if we ever want to take this down, and a few small holes to fill – as opposed to a swiss-cheese-like wall full of divots.
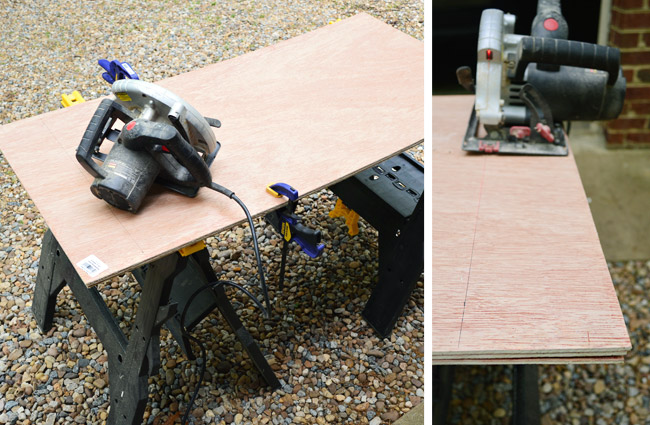
The wood backing was made of three 2 x 4′ sheets of 5mm underlayment from Home Depot. All of them needed a little trim to fit the 43″ wide gap between the windows. I clamped them together tightly and cut them all with one slice of my circular saw.
Starting from the windowsill, I attached each board with a few 2″ wood screws each, using my stud finder to be sure they were going securely into studs.
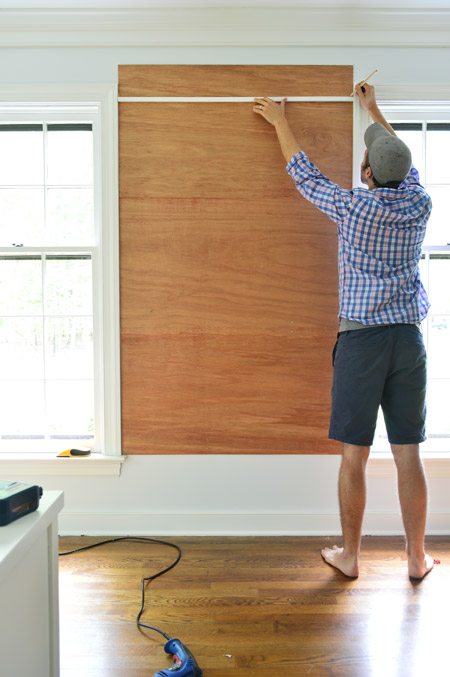
We wanted the third board to stop just slightly below the window for a stepped-down inset effect, so Sherry stepped back and eyed things so I could mark where it needed to be cut with a pencil. I also sliced two thin strips of wood to act as a basic molding for the top and the bottom, just to give it a more polished look so the cork didn’t just end.
Gluing The Cork Tiles To The Wall
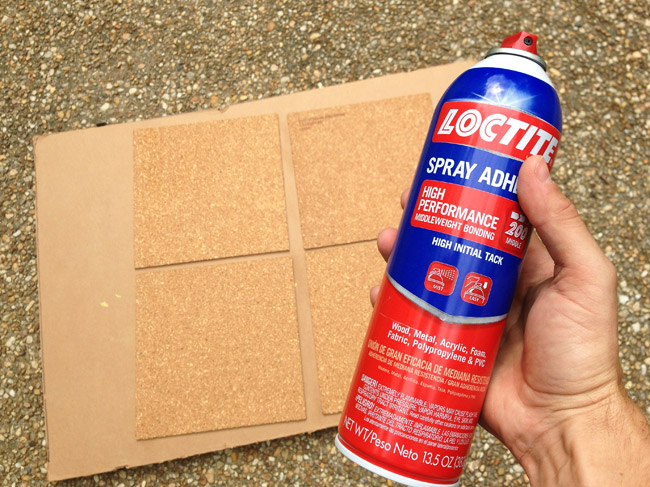
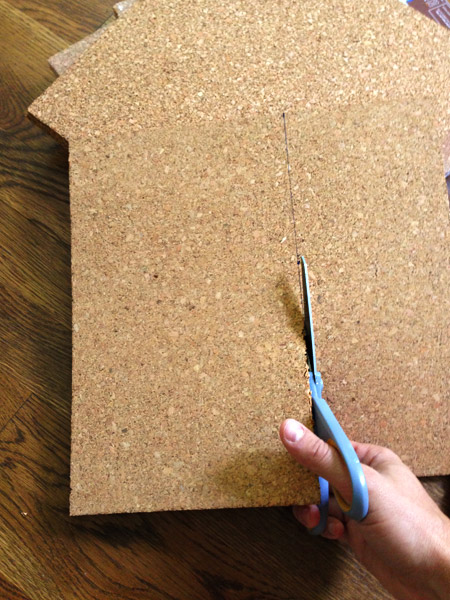
With the boards all cut and attached to the wall, we could start attaching the cork squares. We used this Loctite Spray Adhesive, since the back specifically said it worked for bonding cork to wood. It suggested spraying both surfaces, but since I didn’t want to spray indoors – I just spayed the back of the cork outside and Sherry carried each square in and stuck it up. Seems to have worked just fine so far.
Tiling the wall was pretty straightforward (read: it went really fast), especially since we could use full squares for most of it and we were tag teaming things. We did all of those first before doing any partial pieces.
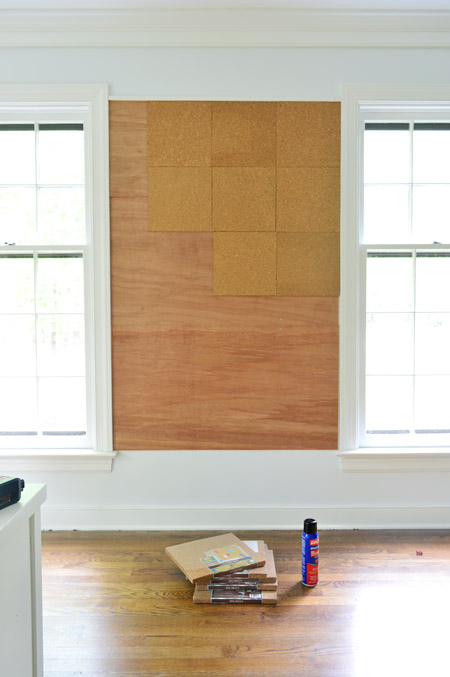
Sherry marked the partial squares with a pen and a ruler and then we just used regular old scissors to cut them. We discovered that making small cuts (rather than using the entire length of the scissor blade) helped keep the cork from cracking, which made for a cleaner edge.
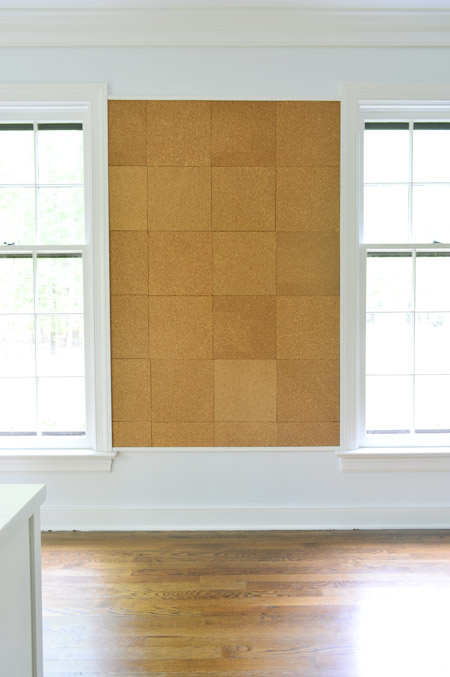
Here’s the finished cork board wall. Ideally, the seams would be less visible (we even considered covering it in fabric or painting it a pattern, or just the plain wall color) but ultimately decided that once art went up the lines would be a lot less noticeable. So since we both liked the natural color and texture it added to the room, we opted to leave it as is for now.
Arranging Art On The Cork Wall
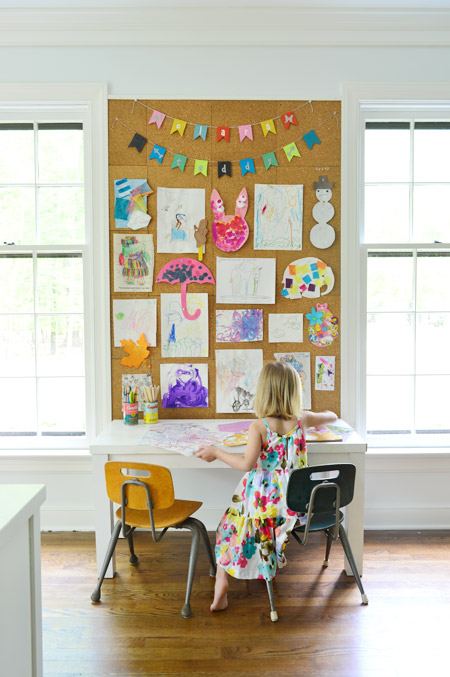
Sherry literally sprinted to arrange Clara’s current body of work on the board the second we finished hanging it (picture her rubbing her hands together and whispering “faaaavorite part starts… now!” Clara helped with choosing what to put where, and after a few minutes of shuffling things around, we ended up here. The artist herself was also quick to assume the role of producing more stuff to hang, although we’ve explained that even with a bigger board, we’ll still need to switch things out to make room for new stuff. So far she’s cool with it. She even seems to like the challenge of choosing what to remove to make room for her newest creation.
As for the rest of her art, we have a box full of other paintings/drawings/crafts that we save, and Sherry has a new app on her phone called Artkive, which she uses to take/store photos of it, with the intention of making a photo book full of her creations someday. We think it’ll be really fun to look back on (both for us, and for Clara).
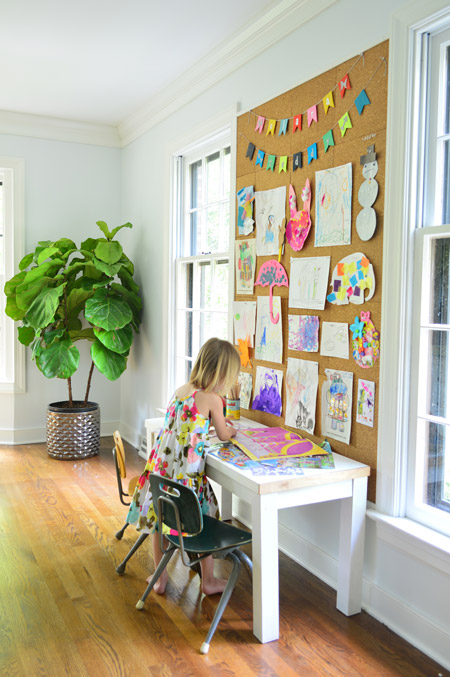
We’re really happy with how our new cork board wall is adding some personality and color to the office, and Clara couldn’t be more proud. We’ve realized it will get in the way of any curtains we might have hung, but we’ve been thinking about doing some inside-mount roman shades for the room anyway.
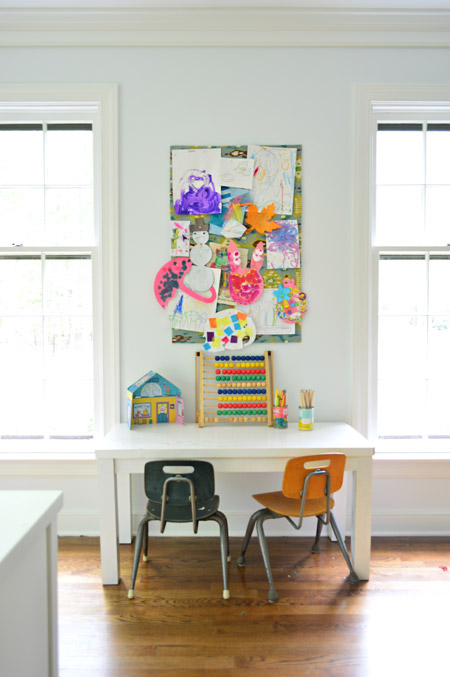
Oh, and those felt name banners are a little homemade surprise that a sweet reader sent us (thanks so much Jes!) as a welcome/big sister gift for Teddy and Clara. I like that it sets the stage for Clara that she’ll eventually be sharing her gallery space. Although I’m sure we’ll have a tough time bumping some of her stuff up there. We’re especially enamored with Grumpy Snowman.
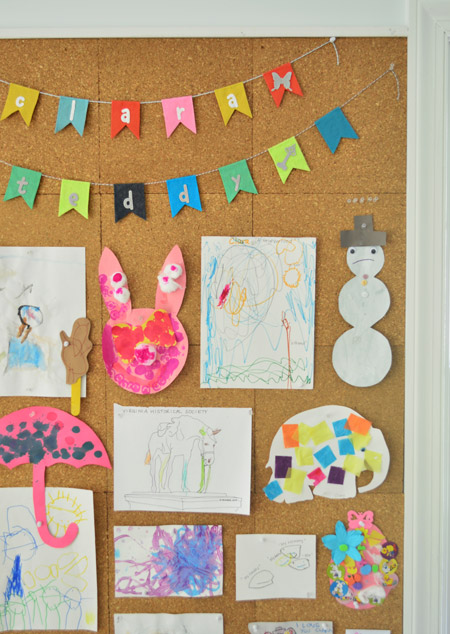
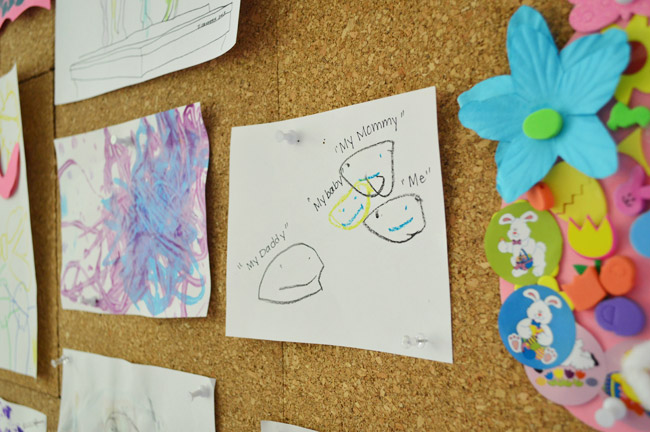
A clear family favorite is this drawing that came home from school last winter, where Clara had drawn a portrait of her soon-to-be-bigger family. She did it shortly after we told her that Sherry was having a boy, so it was a huge relief to see her embracing the idea of having a brother so quickly. Especially since she almost immediately started calling him “my baby.”
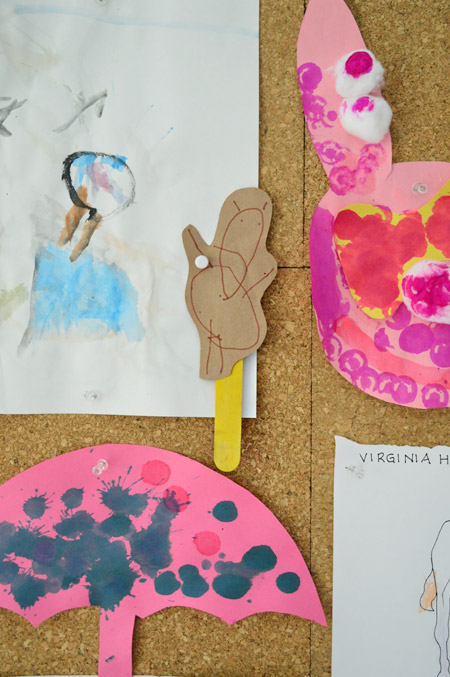
We’re also pretty big fans of this bear-on-a-stick that she made at school. It shows the evolution of her people drawing skills, since they went from just having heads to suddenly having bodies. Although some people still don’t get a torso, so this bear was pretty lucky.
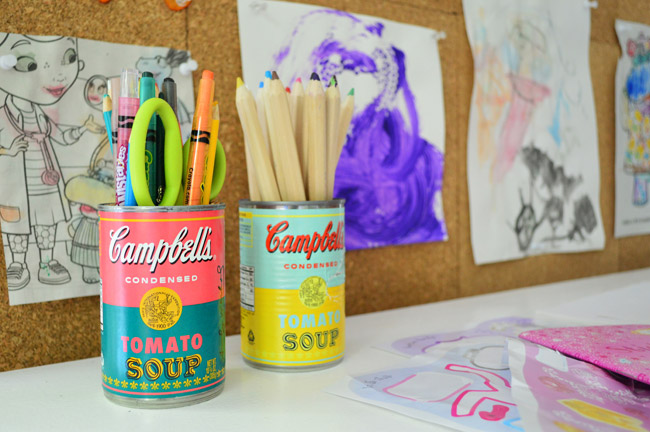
You may have also noticed that our repurposed Campbell’s soup cans (the limited edition Warhol ones from this old project from two years ago) are still going strong.
The rest of the office still hasn’t made much progress, but with Teddy keeping one of us occupied pretty much at all times, there isn’t really a rush on getting the double-desk thing going just yet. For now, Clara will just have to be our most productive office-mate.
Update: We love to share an update when something didn’t work out the way we thought it would – and explain how we fixed it! – so here’s how we dealt with the cork board curveball that this wall sent our way.
Note: This project was originally published in May 2014

Emily says
Love the look and I’ve been contemplating something similar since our clothespin line is overflowing with “art”. I’m paranoid about the pushpins, though, especially since we have a toddler running around who still puts everything into her mouth. Any alternative suggestions for art displays that don’t use push pins?
YoungHouseLove says
Hmm, you could do clotheslines with big clothespins to hold things up (they’re too big to be swallowed I think). Or maybe hang a grid of clipboards and clip things up and rotate things out easily?
xo
s
Dagny says
Can I ask what the cork squares cost you? I priced these at my local Michael’s, Hobby Lobby, and Office Max, and they were insanely expensive, especially for so many.
YoungHouseLove says
I got them in 4-packs from JoAnn and used 50% off and 40% off coupons over a few different transactions to get them for nearly half price. I don’t have the receipt on me right now (holding a sleeping baby) but I think it was around $15 for all the cork? Maybe $17?
xo
s
Jennifer @ Brave New Home says
I love how the corkboard is framed by the windows. I think I may need to do something like this for our little one, too. He’s been taping his art all over the house and asking for a hammer and nails once things start falling down.
Mallory says
In regards to Clara’s people not having torso’s – my mom told me (when we were looking through all my sisters’ and my old drawings) that when kids are Clara’s age it’s developmentally appropriate for their drawings of people to just be giant heads with arms and legs sticking out of them. When you think about it, from a toddler’s perspective, that’s pretty much what adults are!
YoungHouseLove says
So funny!
xo
s
Jessica says
I LOVE the Artkive app. I mean, obsessed! I’ve been using it for 2 years and it has made such a difference in my clutter keeping. I take pictures of projects as they come home, before they go on the wall, and then at the end of the year once the book has come in, my son and I look through it and sort through the pile and decide what to keep (holiday pieces, etc.), what to gift the grandparents and what to “donate to the trash can’s art collection”.
I also upload pictures of the first/ last day of school, school events and snap a picture of the class photo to include at the end of the book. Turns it into a year book of-sorts!
YoungHouseLove says
I love that!
xo
s
Jamie says
Looks great! I’ve been looking for some different ideas to display my sons’ artwork as well – they bring home a lot of it from daycare and are so proud! Some of the best art in our home is what they have made for us. P.S. I think you will love Artkive – I use that app as well and, although I have yet to make a book, it has helped me to preserve a lot of the work my older son (almost four) has brought home since he was around one year old.
Nikki says
the grumpy snowman. omg. best ever. I want one for my office, too. ; )
Emily @ Life on Food says
This project really defines that space. I think it came out great. I will be interested to see what you do with the curtain issue. We have baseboard heating so curtains don’t work so well in the winter. I am debating about Roman curtains. We are getting new windows so no decision is need too soon.
JustAng says
OK, a few things:
When we had one kid, OCD probably would have made me center the middle tiles and cut the others to fit on both sides. Or I would have covered the whole thing with a seamless sheet of cork, faux bois contact paper or cork fabric (etsy).
Now we have another kiddo. I would pat my back for getting anything on the wall at all. I’d spend less time picking apart the background and more time complimenting my child on her awesome masterpieces. (We have a few friends for Grumpy around here too). Looks like you’ve got the priorities figured out already! So good job, you guys!
Also, I mentioned Artkive to you way back when. (Many others probably did too). Well, we’ve finally made our first book. It’s awesome! Can’t wait to see how it changes as the kids grow!
YoungHouseLove says
Love that! Thanks for the Artkive tip too!
xo
s
JustAng says
Oh and to relieve myself of any mommy guilt, sometimes I use my kids’ old artwork to wrap family members’ / kids’ birthday party gifts. Their project paper tends to be oversized and works well on small presents. Also, it seems more personal than another ($$$) roll of Dora or Minnie Mouse wrapping paper.
YoungHouseLove says
Such a sweet idea!
xo
s
Terri Fisher says
Love it. Jealous I don’t have a wall I could copy it with
Plus I love grumpy snowman. You should frame it
So that it doesn’t crumble as it ages.
Carol says
I’ve used cork available on a large roll before. It’s thinner, but no seams!
YoungHouseLove says
I worried about the thin-ness of that (they sold it at JoAnn too) – I thought the pins might not hold as well and might pop out on the floor. Did yours hold pins just fine over time?
xo
s
Karelia says
Tiny typo…”Hone Depot” :)
Love Clara’s art and the Campbell’s soup cans!
YoungHouseLove says
Thanks Karelia!
xo
s
Sayward says
This is so sweet! I can’t wait to see occasional shots of the art’s evolution and am DYING for your eventual post on using that app to make a little art book.
Question for other readers who have already been to Homearama: I’m coming this Saturday from out of state, and would LOVE any insider tips or observations about parking, strategies to navigate the event, how long it took to see everything, are the food trucks worth it, etc. so I can maximize my trip.
YoungHouseLove says
So exciting! Anyone have tips for Sayward? I think getting there earlier in the day might make parking easier and then you can get through a few houses, pause to eat/hang in the tents (we hear the food trucks are awesome along with the live music), and then do the rest of the houses.
xo
s
Liz says
That brings so much fun and color into the room! Cute!
It looks like you still need to add “paint the edge of Clara’s table” to your “Dude, Get on that!” list. Haha! Do you still have that?!
YoungHouseLove says
Do I ever! It’s been like that for years!
xo
s
Ashley says
This “bell-etin board” is AWESOME! (She is so funny…add that one to the Clara Conversations list!) As a former Kindergarten teacher, this kind of thing makes my heart happy! Kid art is just plain fun and imaginative! Just a tip…on the back of their art, write the month/year and how old they were when they made it…it’s fun for them to see those details when they’re older! I love getting art from my niece and nephews. My 3-year-old niece sent me a picture she drew of me, and she had dictated it to say, “Aunt Ashley has pigtails!” So funny…pretty sure I was 3 the last time I wore pigtails! ;)
YoungHouseLove says
LOVE that!
xo
s
Annie says
You might want to mention to your readers with young children who can drop pushpins on the floor for babies to eat, that this product http://www.amazon.com/Bostik-Blu-Tack-Blu-Tack-Re-usable/dp/B0006DPMSG is the best for sticking stuff up. Because I had an older child creating preschool artwork while my younger one crawled around eating dust bunnies and shrivelled peas it wasn’t safe to use pushpins or strong magnets in our display. So I framed a section of wall and used blu-tack to put things up. Looked great, worked well and was safe for them to move their own stuff around.
YoungHouseLove says
Thanks so much for the info/link Annie! Such a smart solution!
xo
s
Kelly says
Thaaaaaank you!!! I’ve been plotting something similar for my oldest daughter, but just couldn’t decide on how to do it. A whole room of corked out walls wouldn’t be enough for her, but this is better than nothing :)
Alison says
If you want to avoid corded window treatments, you could also consider cordless roller shades… there are some great fabric options these days, and especially if you install them reverse roll they can look really nice installed inside mount. Personally I think they look better inside-mounted than roman shades do. The final bonus is that they tend to be super budget friendly if you get them online. Just my two cents. Love the bulletin board!
YoungHouseLove says
Thanks Alison!
xo
s
Katy says
What an adorable idea! I already shared this with all my friends/family who have kids! My husband and I are planning to start our own family soon (queue my giddy/nervous laughter) and I think I’m going to steal this idea and modify it for our nursery. I love the natural tone and texture it adds so I think having a section of our nursery like that (for cards and other decor until he/she is old enough to add to it him/herself) would be perfect for the ideas swimming in my head! YAY babies!
PS – Congratulations on Teddy! And to Big Sister Clara, too! :) He’s beautiful!!
Kathy says
I run a pet grooming academy here in Raleigh for part of the year. This would be perfect to put up job postings for our students! Can these be painted? If so, what could I use. We need some pops of color.
YoungHouseLove says
I’d just use regular old wall paint (maybe a flat finish if you have it, although other finishes would probably work). It’ll probably soak up a ton of paint (meaning you’ll need a few coats for full coverage). Hope it helps!
xo
s
Alison says
This is SO awesome, I love it!! And, btw, I really love, appreciate, and support you guys slowing down to be with the fam – we have made that decisions many times (we have a 1 and 3 year old, both boys), and we never ever regret spending more time hanging out with them. Way to go!
And, thus far I’ve never been disappointed – every time I check in, you have something awesome for me to read.
Congrats, welcome Teddy, and great job on the wall!
:)
Melanie | Melanie Makes says
Artkive ROCKS! I used it last year for my daughters’ school projects right before we moved. Loved that I was completing one as the movers were actually packing our stuff.
You can see a finished project, here: http://melaniemakes.com/blog/2013/07/review-artkive.html
YoungHouseLove says
So cool!
xo
s
Tina L. says
Hi,
Love the cork board, we have a similar area in our home that we call “the wall of Fame” my daughter is 8 so it now shows off favorite school assignments as well. We have also converted our coat closet as well, it used to house toys but now houses homework supplies and more art supplies than toys! We keep an empty handled basket in it as well so that our daughter can shop for the items she needs for artwork or HW in the basket to bring it all to the desk then it is easier for her to bring over supplies, as well as clean up. It works really well and she knows she is responsible to out Those things away when she is finished! I also keep a rolling cart with drawers in there for when we are doing really big painting projects etc that require a larger space
Hope that all makes sense:)
Serina says
This is perfect! Also, just to throw it out there, you could possibly just curtain the outsides of both windows and leave the insides curtainless. Kind of like all three sections are just one big window ??? Looking great in there so far though!
Mindy says
Great idea. I’m going something similar for our home school wall. Kids love seeing their work. I also scan my kid’s artwork and projects into our computer then make a photo book at the end of the year. Our 6 year old loves her ‘preschool artbook’. Books are much easier than keeping everything, which is what I’d like to do because I love it all. Plus once Teddy starts creating you’ll be glad boxes and boxes aren’t gathering.
YoungHouseLove says
Love that!
xo
s
caroline [the diy nurse] says
How sweet! It reminds me of one of the showhouses that did an entire wall like that- which would be so cute for those teenage days when there’s boy posters all over. Something to look forward to ;)
Erica M says
This came out beautifully and I love you guys for the Artkive reference, I downloaded the app before even finishing the post!
Koliti says
What a spectacular art display! Love how it makes a grand statement, defines the area, and adds fun color!
I think Grumpy Snowman is leery of Psychedelic Bunny.
Love Clara’s Family Portrait.
(And John, there’s some pics and captions in the post that could most definitely go in your “Hunky DIY” Calendar. – I hope you’re working on that – I’ll take a signed copy please :) )
Tracy Carson says
Looks awesome, guys! We paneled an entire closet with that kind of cork in our office back before we had kids and randomly did projects with NO foresight… It was a cool effect but miserable to take down once we transformed the room from office to nursery. WISE choice to use wood behind it! It even looks like a simple enough project that I could do…even on bed rest, maybe for a smaller space! 32 weeks yesterday and hopefully at least 6 more to go to keep our little guy cooking!
YoungHouseLove says
Good luck Tracy! Hope he stays put!
xo
s
Lori says
Dude it is super unsafe to do work in bare feet!! If you drop that drill (god forbid) it could go right through your foot or break some bones!
YoungHouseLove says
Thanks Lori!
-John
Anna says
I wish I was lying but my dad actually drilled through his foot when I was a teenager. It was not pretty, much like his foot these days. John, please use some common sense.
Dena says
Bear on a stick and grumpy snowman are my favorites. My son did a series of sad emo pumpkins (colored blue) when he was 3 and 4, and bear on a stick/grumpy snowman remind me of that :)
Ang says
Love the cork board! An idea for the future if you do want to use the roll of cork – we backed one with rigid insulation – I think 1/2 inch thick – and edged it with some type of aluminum trim that I got in the gutters section. Made a 4×8 foot cork board. Worked GREAT! I used some type of paint-on glue.
YoungHouseLove says
Sounds great!
-John
Traci says
I’m loving those Cambells cans!
T. says
Thanks for the Artkive mention. I hadn’t heard of it until now. At first I was thinking “Aw, man, I wish that would have existed when my kids were little. Then I wouldn’t have all those boxes of their artwork in the basement.” Then it slowly occurred to me that since I still have the artwork, I can archive it now. Duh! It’s not too late! And maybe I can clear some stuff out of my basement.
3girls1apple says
That is so creative. Such a great idea. Love it! Thanks for sharing from 3girls1apple.com
Emily-Jane @ Not A House, But A Home says
The scale of this cork board is so much better! And the bunting flags are such a sweet touch :)
carolyn says
I love this. The name banners are pretty perfect, too! I love that you made room for both kids’ names on the cork board.
We have a 9 month old and I can say with confidence that her older sister is the most productive member of our household most days!
Congrats on your new family addition!
Deborah says
Great idea! You might want to cut out some paper frames and put those up. Then Clara will feel like a “real” artist and the art will have to be picked carefully to go up on the board.
YoungHouseLove says
Love that!
xo
s
Jenna Tsu says
Ahhh you guys rock! I’ve been daydreaming about a bell-etin board for my own big-girl office but got stuck at the why. #morereasonstoloveyou
Nicky at Not My Mother says
I tried Artkive and it’s good but in the end I went with the more low-tech and kid friendly option of buying a large scrapbook of the sort we had as kids and just gluing them in. There’s room to annotate with what it is and when, and B can flip through them whenever she wants. I look forward to having a mass of them, one for each year!
Beth@ Through the Eyes of the Mrs. says
I absolutely adore this. Such a fun way to share all of the artwork. Wish I had room in our house for something like this.
Belle says
Love this! Looks great!
Anne says
I love the corkboard! I am still also a huge fan of your previous house garage makeover with the pegboard- so I can’t wait to see what you do with your garage here.
Would you mind explaining how you attached the small white trim pieces? I’d like to make a cork wall in my house, but will need trim on the sides. I think yours looks so simple and good!
YoungHouseLove says
Just a few picture small picture hanging nails through those held them nice and firmly at the top and bottom. Good luck Anne!
xo
s
Beth M. says
Artkive is such a great app! I try and take weekly pics of my daughters work, hang some, then recycle everything. No piles of paper! And she knows I make a book so she will see her art again and doesn’t get upset when I toss it. The books are very high quality too!
Teresa says
Glad to see that I wasn’t the only one cringing at seeing John barefooted with power tools nearby. ha! Clara’s artwork and drawings are so sweet and the new corkboard is awesome.
Teri says
LOVE, LOVE, LOVE!!! I definitely need to do this for my little boys!
Heidi says
For future tackboard projects, have you considered homasote? I think the big home improvement stores sell big sheets of it, it’s paintable, thicker than cork, and made of recycled paper. We used it at the design school I went to… Everywhere you looked was homasote for pin up space. :)
YoungHouseLove says
Really cool! Never even thought of that but it’s a great alternative.
xo
s
Laurie gilmer says
Gluing colorful buttons to the top of flat push pins might be a fun craft to add to the bulletin board.
YoungHouseLove says
Fun idea!
xo
s
Jihane says
I love it! You inspired me to do the same … for MY art :)
I also wanted to say that I decided to stop commenting, just because it’s the only thing I can do to support your choice to have a more balanced life, so now I’m gonna tell you something that I could write after every post of yours : I love your blog, I love your family and THANK YOU for being so genuine and inspiring.
YoungHouseLove says
You’re so sweet Jihane!
xo
s
Emma says
Hey guys! Maybe I missed the blog post, but I was wondering about the paint color in the office. Is that the same color in your kitchen? Nelson Blue right? My husband and I are about the purchase our first home so I am all about paint colors right now :)
YoungHouseLove says
It’s actually softer with a little more of a green tint (Palest Pistachio by BM).
xo
s