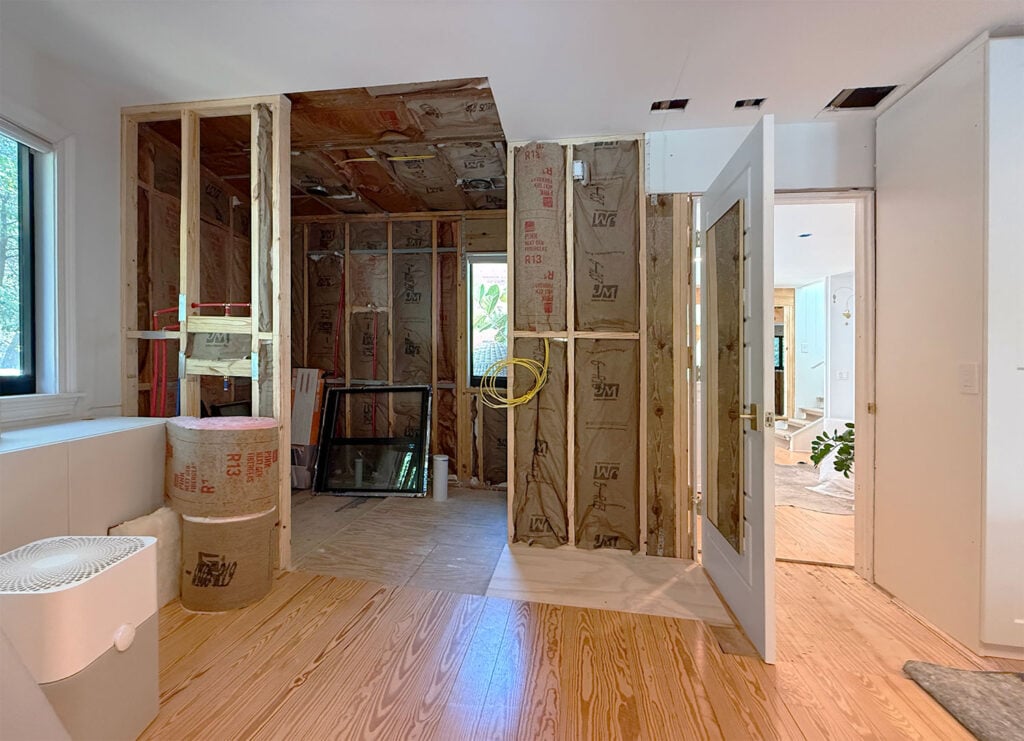
I’ve shared a lot of real-time renovation updates on Instagram Stories, but here’s a quick catch-up blog post for anyone thirsty for the longer format (we know we’ll love having these posts to look back on). We’re about 7 weeks into our biggest renovation in over 5 years, and the house pretty much looks as chaotic as expected. Who remembers our mantra from 2012: “the middle makes no sense“? Over the past month and a half, walls have been busted open, ceilings have been torn out, and entirely new rooms have been framed. So… lots of progress, but lots of dust… and a lot more to do. Did I mention it’s dusty?
The easiest way to catch up is to watch the video below, where you can hear me yapping about every space, what has been done, and what’s next on the agenda. If you can’t watch with sound right now, come back later for the info (it covers a lot more than I can in words, but the rest of this post will give you a quick status update in the meantime, plus tips for the dust & smaller house optimization ideas).
Note: You can also watch this video on YouTube
As a reminder, two sticking points emerged and slowly began to nag at us over the last half a decade of living here. They both felt important enough that we didn’t want to settle on just fixing one of them and thankfully, nothing felt urgent enough that we couldn’t wait for the right idea to come to us. It certainly wasn’t the first idea that we had. It took a few years, but we finally hit on a plan that would accomplish both goals while feeling a lot more exciting and less complicated than many of the other options we considered (no moving the kitchen, always having a working bathroom throughout the reno, no attempts to run plumbing upstairs, which would be extremely complicated in our house, etc). Plus the estimate came back under what we expected to pay, which never happens! So without further ado, our two main goals:
- Enlarge our son’s small room (what’s great for a 6-year-old isn’t always great when they’re twice as big and very into every crafting project under the sun)
- Get better access to & views of our backyard pool area (a long hidden hallway that felt detached from the main living area wasn’t ideal)
And one bonus thing we threw in “since it’s going to be extremely dusty anyway” was to add an ensuite bathroom to our bedroom. Surviving covid times with just one bathroom for the last almost-6 years truly showed us that we don’t NEED a second bathroom, but it made sense to add one while we were undergoing this renovation. Especially because our contractor pointed out how easy (and inexpensive) it would be to run all the plumbing under our raised deck.
Finishing The Porch
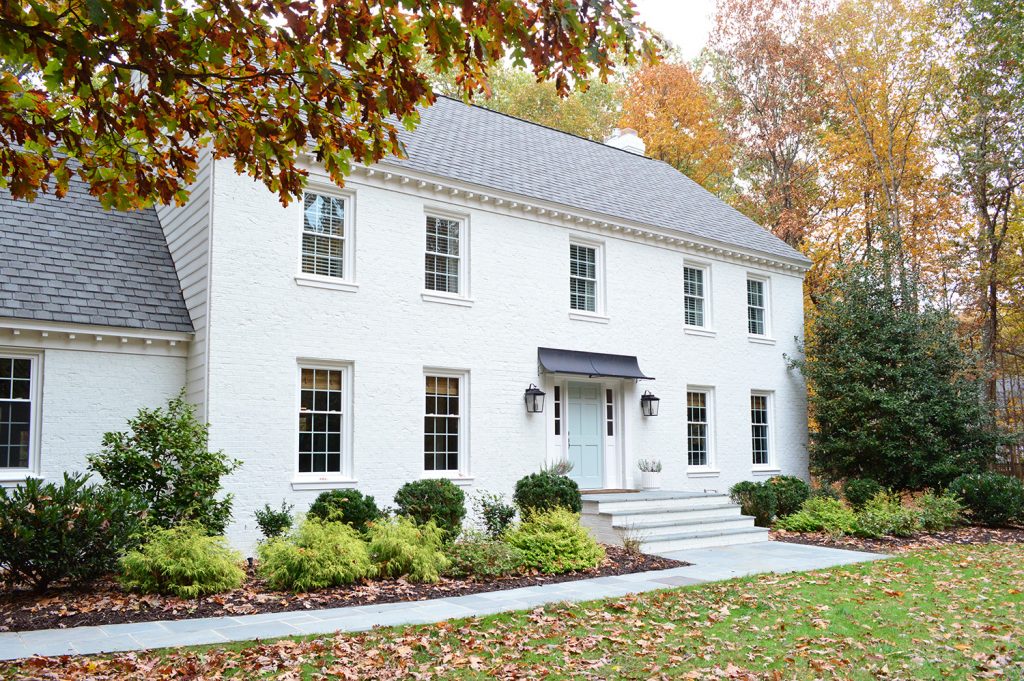
After many years of percolating and debating approximately 101 other options, one day we realized that if we just finished our covered front porch (seen in the old photo below) into a fully conditioned room, all of our goals would be accomplished in one fell swoop. Turning that into our daughter’s new bedroom (it’ll be slightly larger than her last one, but pretty similar) would allow us to open up her old bedroom to the kitchen and sitting area, which existed right behind it, creating a large L-shaped shared space that would lead to the pool with some giant glass doors. Plus we could absorb the old pool hallway into our son’s room to enlarge it (making it not only significantly wider, but also deeper). Definitely watch the video above – even without sound if you can’t listen to it – to see the stunning change that one move has made for us!

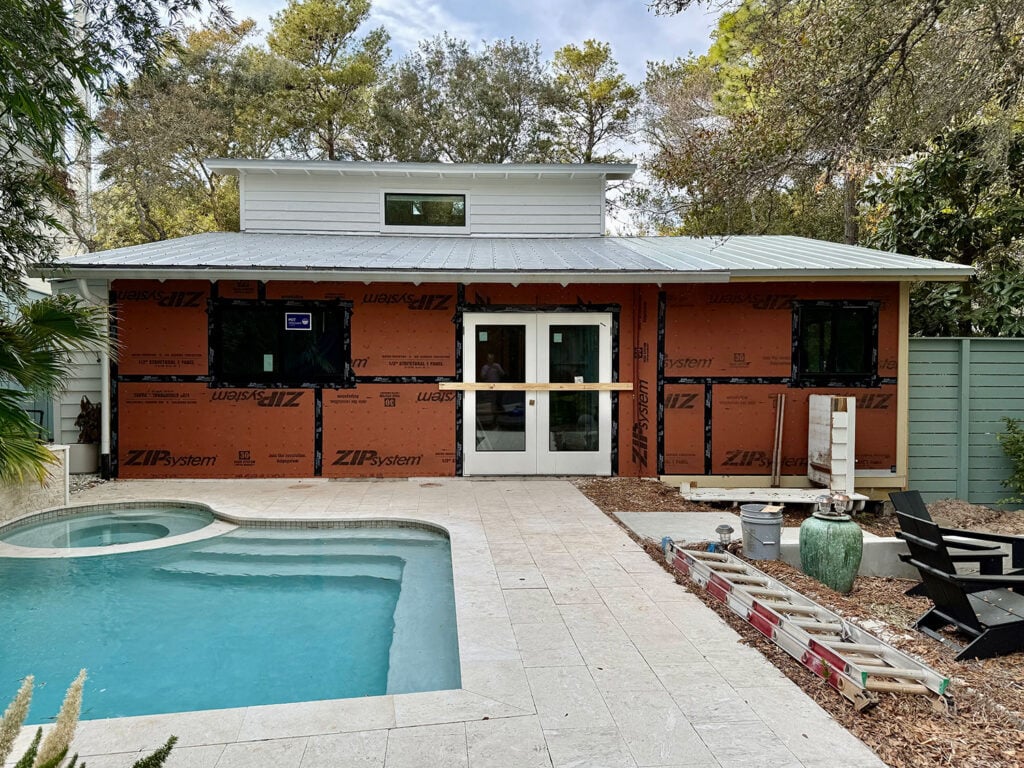
Here’s what the outside looks like now. They’ve fully built the new bedroom, but you can see in the video above that there’s still a lot to do to finish the interior of it. And of course it still needs to be fully painted.
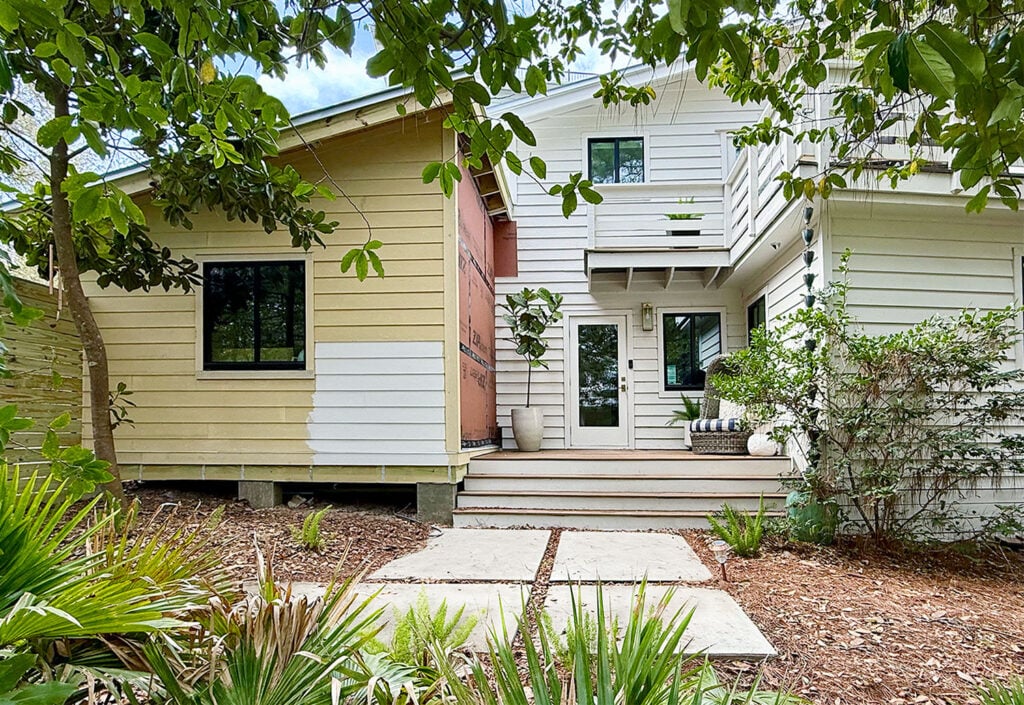
That one patch of white paint was put on because we were originally told that our house’s electrical boxes had to be mounted there, but we figured out a way to relocate them on the fence that you see on the left of this photo instead, which hides them a lot more (both from the curb and the front porch). Now when you walk up the path to the door and stand on the porch, you won’t even see them (versus seeing three large metal boxes in that painted white square).
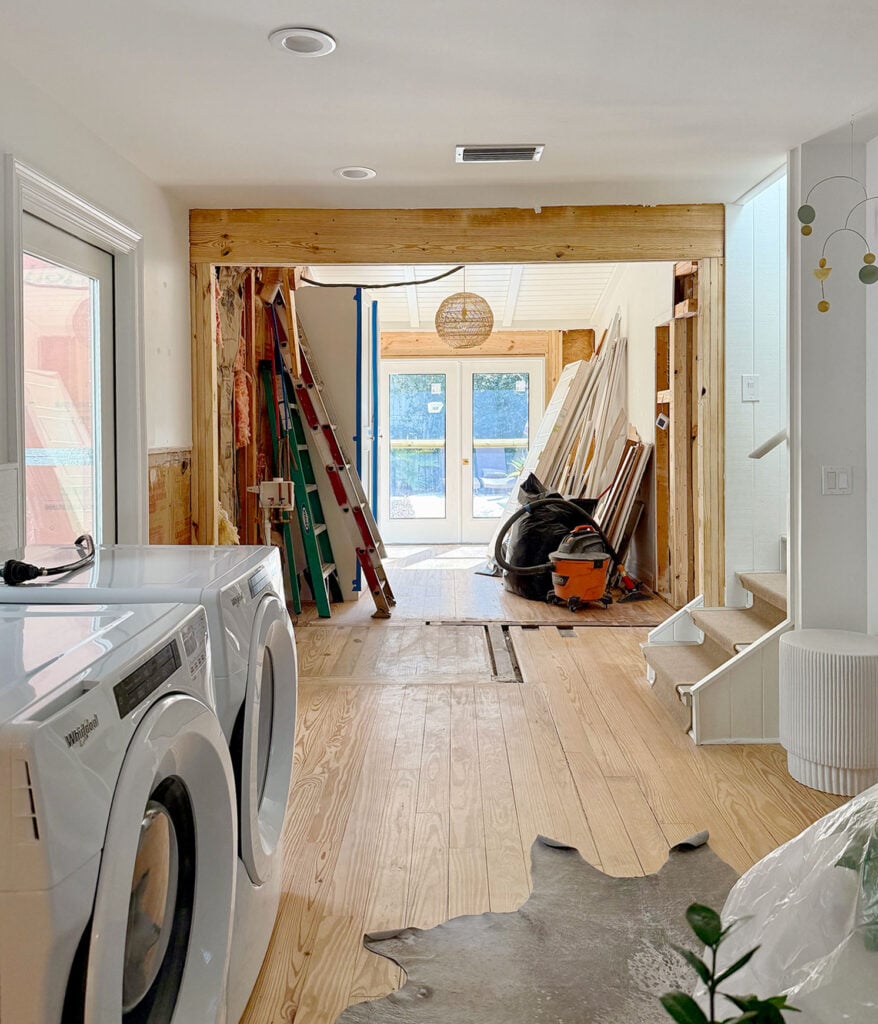
A Better View (And Access) To Our Pool
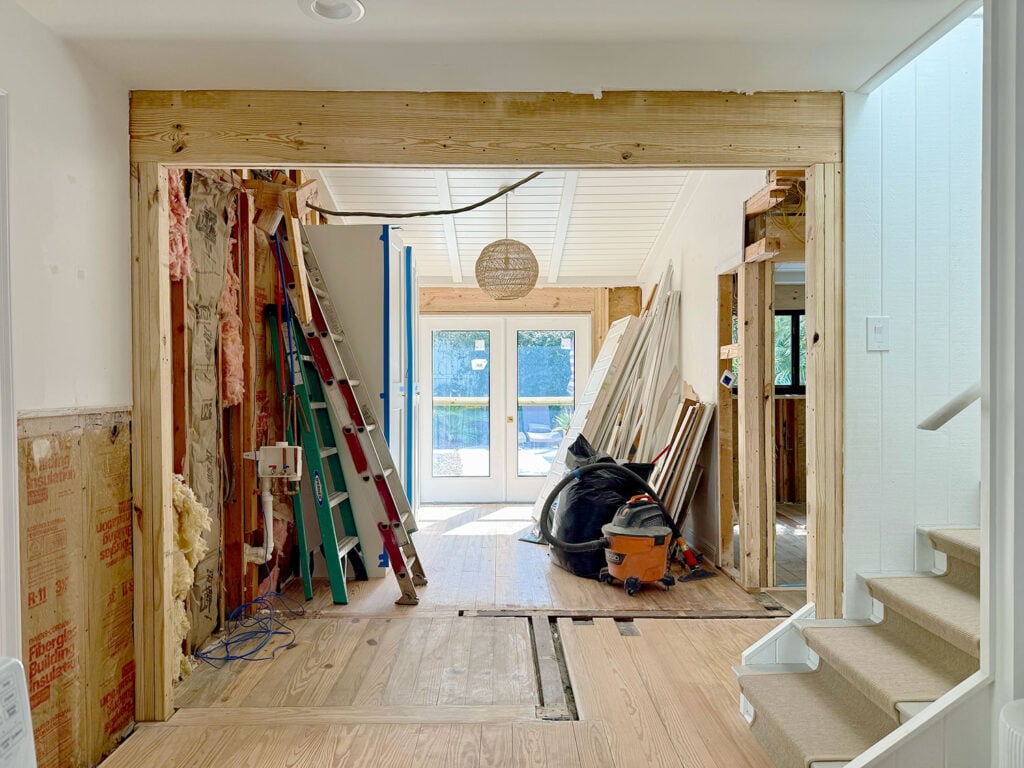
Moving back inside, this was the old “view” of our backyard pool from our downstairs living area. Notice how you can’t see it at all? Yup, that was the problem. It was fully blocked by the laundry room (behind those doors) and our daughter’s bedroom (behind the laundry).
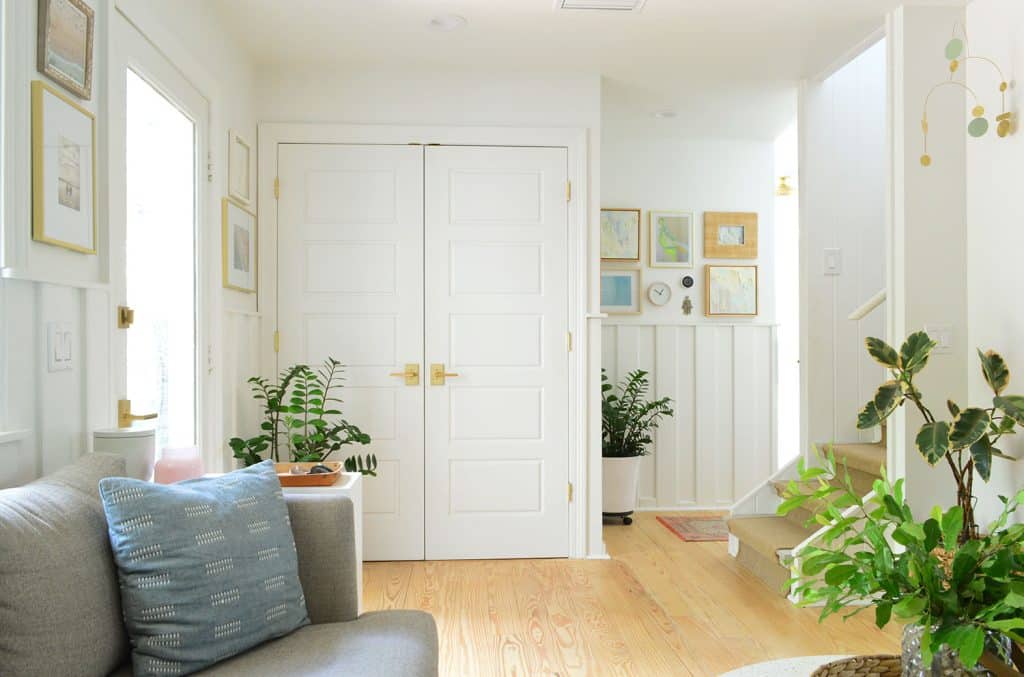
And this is how it looks today! Hello new room full of light where we all can enjoy with the best view in the house! Hello easy pool access from the main living space, and getting to sit on a sofa overlooking it all when we entertain. Hello extra hangout spot with a TV that the kids negotiated (we’ve had just one TV in the house since we moved in) so they’re beyond excited too.
It’s incredible how much light this one renovation move has unleashed into our house (which was already the brightest home we’ve ever had!). It’s also wild how much bigger everything feels, which is like winning the lottery in a small home. Literally my goal is: less to clean, care for, and pay to heat/cool/furnish… but let’s make it feel as open and airy as possible!
And since the sitting area function that used to be in our kitchen will be moving into this newly adjoined space, our kitchen can stretch out a little more to include some extra cabinetry and a peninsula with some stools, and our dining table can float in the area that used to be the sitting area. That way it can seat 8 people instead of only 6 (it’s currently sandwiched in a narrower area between a fridge and a wall). We often have 10 people in this kitchen with friends over, so seating for 8 at the table and 3 at the peninsula would be amazing.
This new “lounge” area will be vaulted (like our daughter’s room was originally) which will also make the room feel bigger and airier. The photo below was taken from our bathroom and it shows how open this view has become. You can look at the framing on the floor to get a sense of where those light-blocking walls used to be:
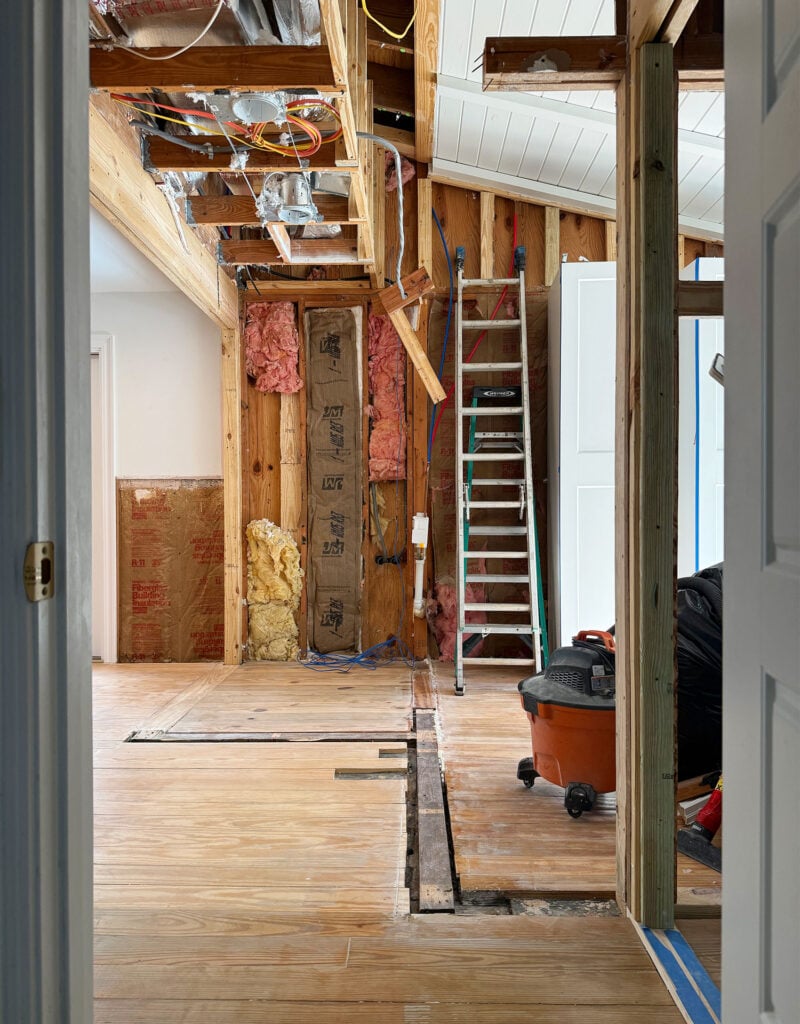
This view also shows where the new laundry closet will go. There will be a door on that wall (under that header with the HVAC ducts) that will house our stacked washer and dryer. The closet itself recesses into our daughter’s room with her bedroom closets next to it, so it won’t take a weird bite out of her floor plan (her new room will be a very similar size and shape to her old room). I know it’s hard to picture how a laundry closet can recess into another room and fit together with a closet in that room, so watch the video for a better idea of how everything fits together if you can.
A Bigger Bedroom For Our Son
Since we’ll now access the pool via the lounge area, the old hallway that led to the backyard can become a part of our son’s room… widening it from a snug 7′ to a whopping 11′ feet! You can see from the mark on the floor (and where the ceiling planks end) how much narrower his room used to be – and it’s such a great change. We were also able to move the entry door to his room further back (again, stealing space from that hallway) to make his room deeper. Adding a window that’s twice as big as his old one was the icing on the cake. The difference is wild.
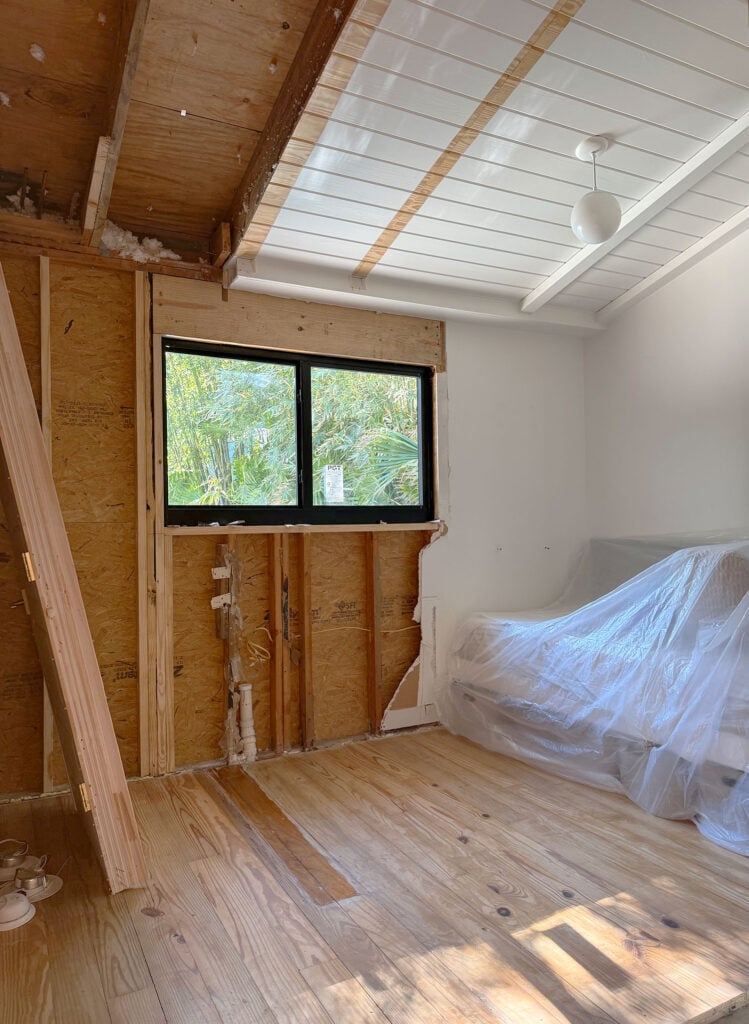
We were also able to vault his ceiling higher (since his room increased in depth, which means more of the highest peak of the house is included in his room). We’ve all been stunned by how these changes have come together to make a giant difference. This kid can’t wait to fill his new, bigger space with craft supplies and yarn galore.
Oh and this is also the room where we discovered a secret safe buried in the concrete foundation of the house! Don’t forget to check out “The Safe” archived circle on our Instagram if you missed that whole story. I’ve never felt more like Indiana Jones.
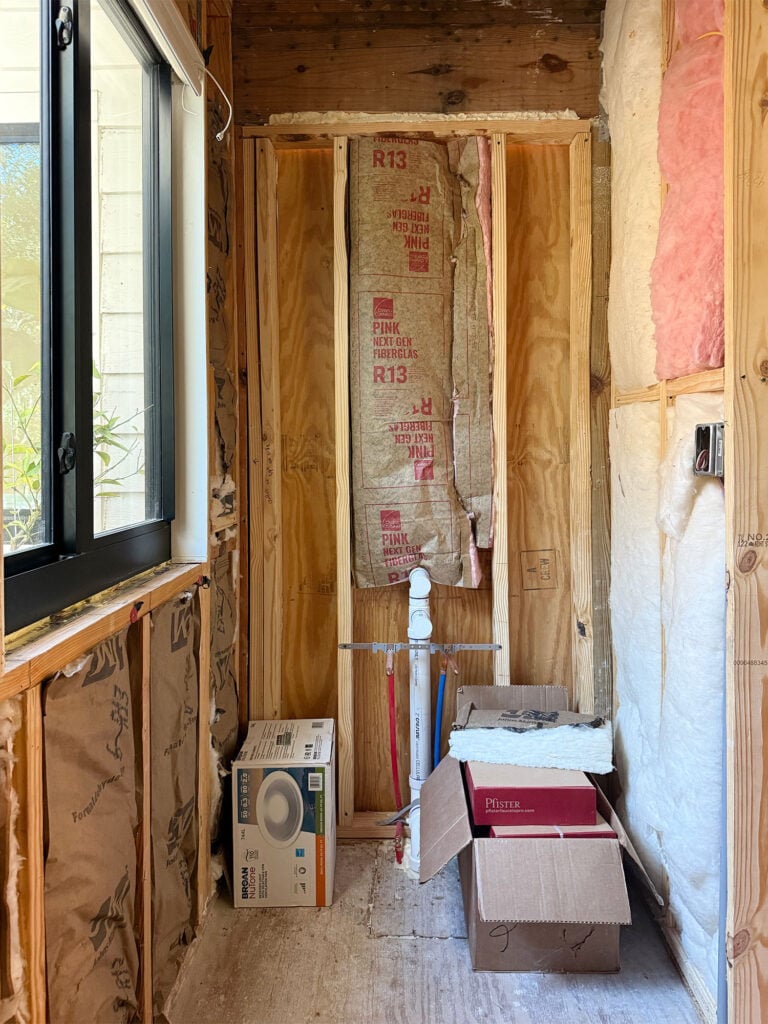
Our Ensuite Bathroom
Living with one bathroom really hasn’t been a huge headache (we thought we’d move in and immediately want to add one, and now it has been almost 6 years), but when we were planning this reno with our contractor, we all agreed it made sense to go for it while we’d have plumbers, electricians, and drywallers in the house. Running the plumbing over to this space couldn’t be easier because there’s a raised deck between this room and the new bedroom we made for our daughter (formerly the covered porch, under which all the house’s plumbing was housed!). So tapping into it took less than a day! Such a win.
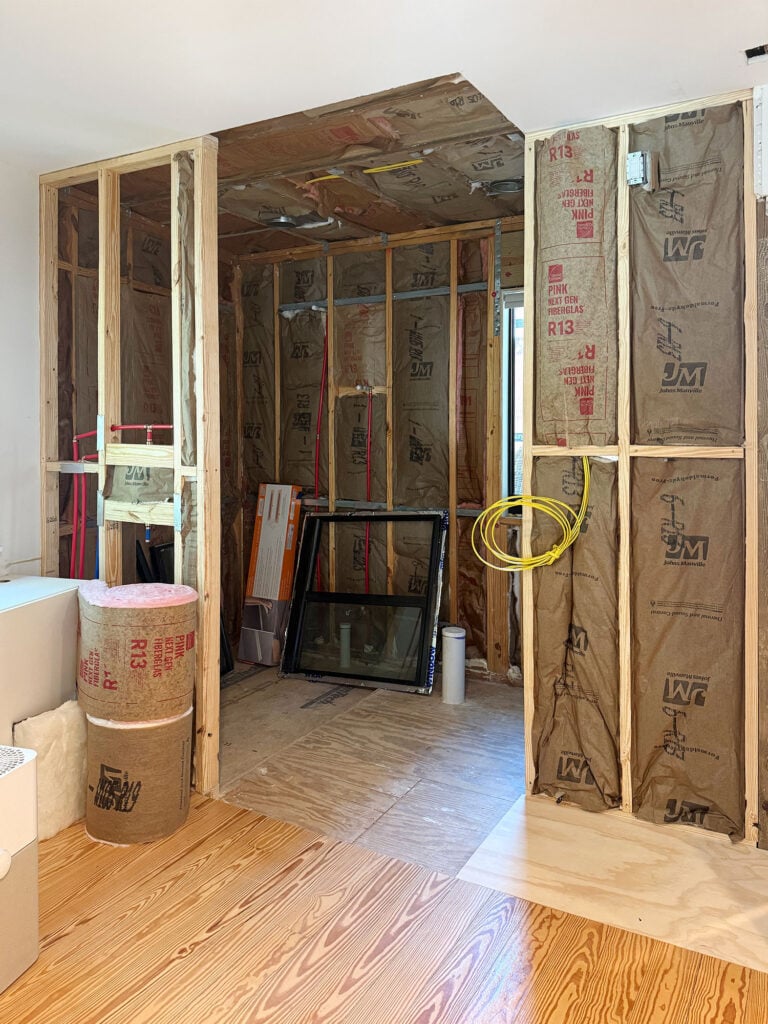
The new ensuite bathroom is taking over a nook in our bedroom where our floating shelves used to live (see below). The room used to be sort of an L shaped space, and now the bedroom will be a normal rectangle with an attached bathroom off of it.
Even though it’s far from finished, it already feels like it was meant to be this way!
Turning this corner into a bathroom required more maneuvering than just taking out those shelves. We had to relocate our bedroom door to our closet wall, which meant one of our wardrobes will now be placed to the left side of the door – where you see that lighter wood rectangle on the floor. We’re just waiting for drywall to go up on the wall behind it and we can place the wardrobe. Don’t worry, there’s a vision. We’ll also have a cabinet over the bedroom door, and actually, that entire side of the bedroom will appear to be seamless built-ins. It’s just hard to explain in words right now for you, so you’ll have to trust us ;)
Shifting the bedroom door into the large rectangular part of the room meant we could make the entire corner that made the room an L shape into our bathroom. Now we have the wall you see below (that used to be the doorway to our bedroom) to make a gorgeous floating bathroom vanity nook. Picture a huge gleaning mirror over it. I know, you have to squint very hard to picture it.
The bathroom won’t be huge by any stretch of the imagination, but it’ll provide plenty of function with a sink, a toilet, and a wall-to-wall zero-entry shower full of gleaming tile to the ceiling (that’ll be along the wall that’s opposite this nook – the one on the left in the photo below). You can see how the floor appears to dip down in that area, but once it’s all tiled, it’ll all be level and smooth. Zero entry excites us because I want to live in this house until I die, and then haunt it indefinitely.
Other Renovation To-Dos
Beyond those main changes that have been going on, there are several other little things we’ve had to figure out or shift along the way. For example, we’ll be rebuilding an outdoor shower on the back of the house (sort of where you can see the remnants of the old one). It’ll be accessed from the side facing the new french doors, so we’ll need to extend the patio slightly too. You can see from the color change in the roof (the new stuff will patina to look like the older stuff) how much interior space we gained, just by finishing off the front porch! It’s amazing.
Also, that random window you saw on the floor of our new bathroom a few photo up is actually going into our existing bathroom. That window used to be our son’s room, but rather than get rid of it, we’re swapping it with our current bathroom window, which is smaller and what I’d call “aggressively frosted.” We DIY frosted the old window that was in this bathroom, but when we replaced our windows and doors for hurricane-grade ones, we chose “factory frosted” for the new bathroom window. What arrived was a textured gray tone. It’s hard to see in photos, but it blocks SO MUCH LIGHT compared to the old one we had frosted ourselves (using our tried-and-true DIY method), which still provided complete privacy.
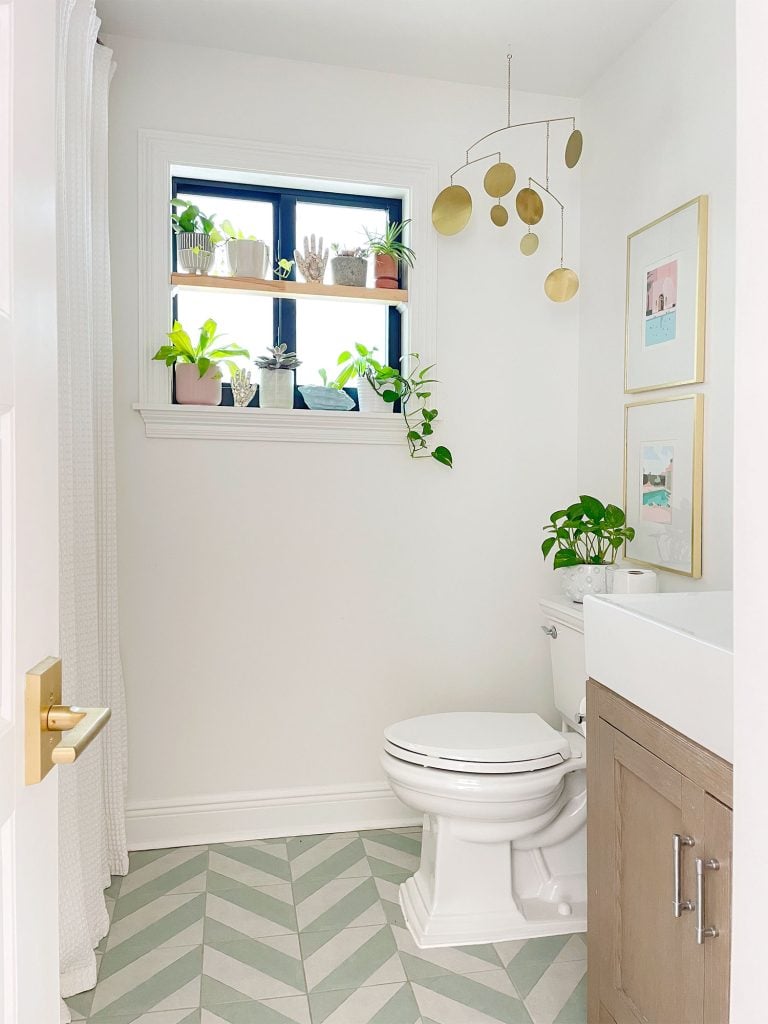
So we figured that reusing our son’s old window could correct a regret from the past, and not only let in more light because the frosting won’t be as dark, it’s actually about 6″ wider and taller, so it’ll be really great to make that room feel airier and lighter too. Gotta love using what you have.
How Are You Handling The Mess?
Yes, I mentioned dust several times. Renovations are messy. People are in and out all day, stuff gets tracked in, demo unleashes flying debris, things get cut and drilled, sawdust flies 20′ in the air. Heck, we haven’t even gotten to drywall yet, which is the dustiest part! So here’s what we’re doing to stay on top of the chaos while we’re living in our home during the renovation:
- Drop Cloths – We use these to cover things like our sofa, our bed, and even to tape off entire doorways sometimes. You’d be amazed how they can be working around a corner or across the room, but dust can get literally everywhere.
- Small Shop Vac – This is great for little piles of sawdust or debris that you encounter (random staples, etc). Our contractor is the most neat person we’ve ever worked with (he shop vacs and sweeps before leaving every day and even blows off our walkway for us) but stuff gets in weird spots that you miss, so we do another pass with our shop vac if we find a little pile of sawdust on a chair rail or in a corner.
- Tineco Wet Vac – This has been the MVP, and we cannot believe we just bought it this January, because it’s making such a difference! It’s a vacuum mop, so it not only sucks up a ton of dust, it literally mops the floors for us in one pass of the vacuum, which means all the dried dust and chalky haze that would be left if we only vacuumed comes right up! Our feet and socks are clean when we walk through the house during this reno… which literally has never happened before with just sweeping and vacuuming.
The tip here? Do whatcha gotta do to stay sane during a reno. It gets old. And you’ll miss the days of a house that feels significantly less torn apart. This one isn’t even that bad because we haven’t ever lost our kitchen or bathroom (except for a few brief hours when the water had to be turned off). But even though renovations never feel like a walk in the park, they can be so exciting and full of possibility. We’ve been renovating houses for 20 years, and we’ve never regretted a single renovation after it’s done! (During… maybe. Ha!).
Our Tips For Living Large In A Smaller Home
Since this is a common question we get, so after almost 6 years of living here, here are some things we’ve learned in our downsizing journey:
- make sure the bedrooms don’t feel cramped but aren’t ridiculously giant (our bedroom always felt too big and our son’s room felt too small – now both will be solved)
- maximize sight lines and light that flows through shared living spaces (this feels more expansive) and vault the ceilings whenever possible (again, it just feels a lot less cramped)
- furnish rooms, especially shared spaces, so you’ll actually use them, and not just for special occasions (if you don’t use your formal dining area much, maybe make it an art/homework room that gets tons of use)
- take note of sticking points (this reno is solving two big ones, but we also get to address smaller things, like seating more people in our kitchen, adding a bathroom to our weirdly big bedroom to optimize how much that corner gets used, etc).
- consider bigger furniture (often in a smaller house you think you need smaller furniture, but that can make it feel piddly. Think: two larger sofas instead of lots of small chairs and loveseats, maybe even a bigger bed in your room so you feel like you’re living large, etc).
- remember that storage is king, and really brainstorm how to add it (from switching out a giant water heater for a tankless one to gain more space in a closet to building in some cabinetry along an entire bedroom wall, there are so many ways to make a smaller home more functional & efficient)
As a reminder, this house was 1400 square feet before this reno, and will end up being around 1520 square feet after converting the covered porch into interior space. So it’s definitely not a tiny house, but it was a big downsize for our family.
By comparison, our last house was 3150 square feet (plus a two-car garage, big detached shed, and a giant walk-up attic!).
When we started house hunting down here we thought 1900 square feet (like the pink house) would be ideal, but we went even smaller to be in this exact location. Our house is walkable to the beach and shops/restaurants in a tree-filled neighborhood that we fell in love with – so we chose location over square footage and we’re so glad we did.
The crazy thing is that everything in our neighborhood went crazy price-wise during and after covid, so it’s for sure much much much cheaper (like over 10X cheaper) to do this reno than attempt to buy a slightly larger house in our location. Plus we just love this exact lot, the pool we added, etc. So I guess another small space tip that I have is that it can be far more cost-effective to renovate than having to sell and buy and pay all the closing fees and have a whole new house you have to decorate and redo anyway.

It already feels like an embarrassment of riches (even in this very rough state) to have such beautiful views of the pool area from the front door and the downstairs living area now.
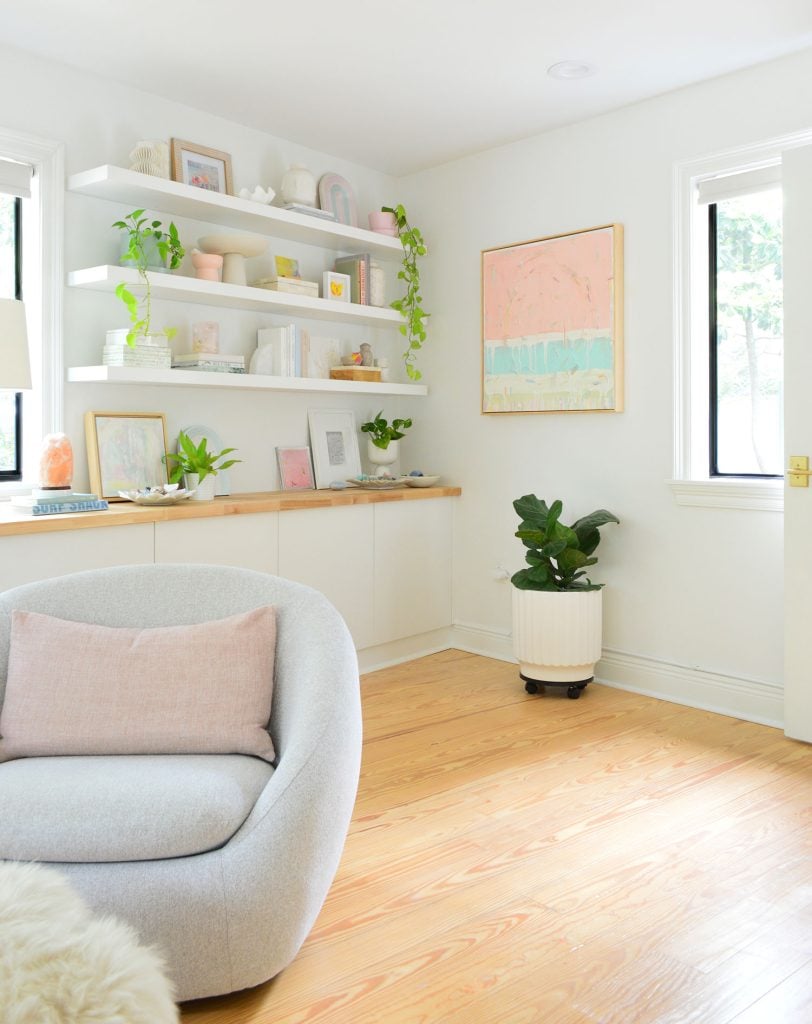
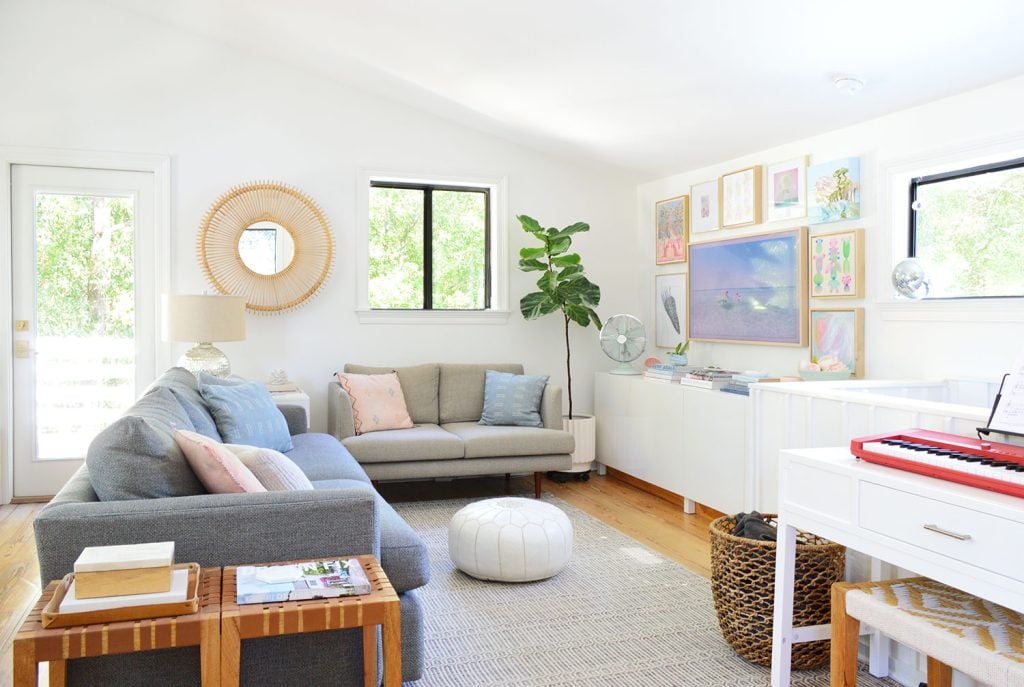
And having a bonus shared living space upstairs where the kids can get messy crafting, host sleepovers, or watch a loud movie with a bunch of their friends while we entertain the adults downstairs is such a great feeling. I talk more about that in the video, but I think two common areas that aren’t on top of each other = another way a small home can feel much larger and more flexible. This is an old picture of our upstairs room because it’s currently full of lots of things from downstairs – but we’ll have to snap some updated shots of this space after this reno, because we changed how the sofas are placed and it’s even more functional for us!
We’ll post another reno update after we’ve made more progress (next up: a few final electrical tweaks, insulation, drywall, tile, fixtures, and flooring). In other words, stay tuned to Instagram for more real-time updates, and we’ll be back here with another update, maybe sometime in March?
P.S. Did you miss our first post about this reno? It has tons of info and some other images to shed even more light on this project right here.
*This post contains affiliate links, so we may earn a small commission when you make a purchase through links on our site at no additional cost to you.
