When our saga last left off, our heroes were being shuffled around the kitchen. That is, if a refrigerator and a pantry are your kind of hero.
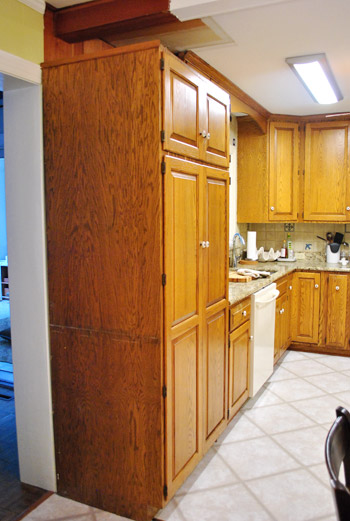
But before our new appliances arrived last week, we had to put the moves on a few more things. First in line? The cabinet that held the wall oven.
You probably recall that we were ditching the wall oven because it was burnt on the front, bisque colored, and cooked things unevenly. We opted not to replace it with another wall oven because (1) wall ovens are expensive – usually 1K more than ranges, (2) our cabinet is unconventionally narrow – most modern wall ovens wouldn’t even fit, and (3) the tall cabinet was big and bulky (we’d like the pantry and the fridge to be the only two tall things in the room). So that whole tall cabinet was getting the axe – but of course we’ll be repurposing parts of it.
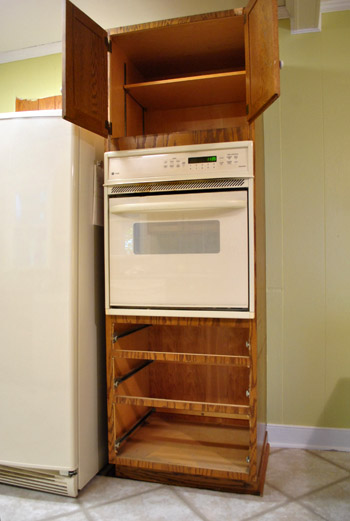
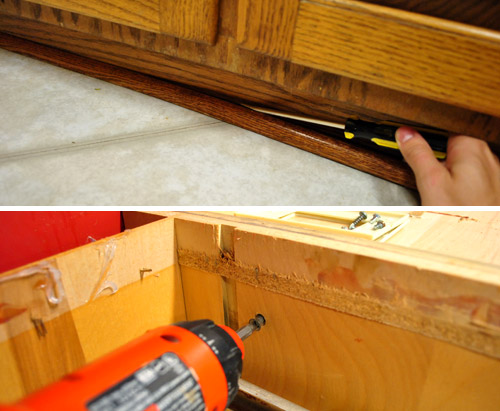
Once emptied, we unscrewed it from the back wall, removed any trim, and shimmied it out of its hole in the floor. Oh yeah, this was all after turning the power off.
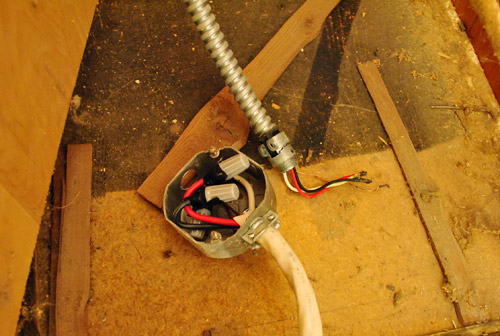
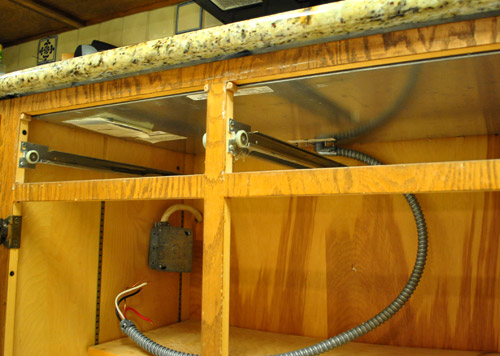
The darn thing was hardwired, so rather than just unplugging something, I had to do a bit of “unscrew this, rescrew that” to get it disconnected. Don’t worry about the crazy exposed wire. I capped it, put everything into the metal box (which had a lid) and left the electricity turned off to that area of the house until the electrician arrived this morning to take care of it all – and to finally figure out what that mystery wire is above the pantry (details as soon as we know!).
With a few more screws unscrewed and a bit more shimmying (we feel like we do a lot of that lately) we had the oven out of its wall hole and ready to be moved out of the room (we’re donating it to the Habitat For Humanity ReStore).
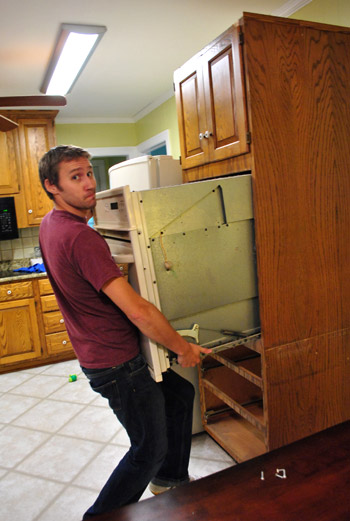
Once the oven was removed, the cabinet itself was awesomely light, so it joined our stockpile of kitchen scraps in the sunroom (we’ll be reusing things like the doors and drawers and possibly some of the other oak trim). We’re hanging on to everything until we’re done with the kitchen just in case a piece comes in handy (so our sunroom looks crazy – we should snap a photo for you guys). Then once we’re done, we’ll try to donate or craigslist as much of it as we can.
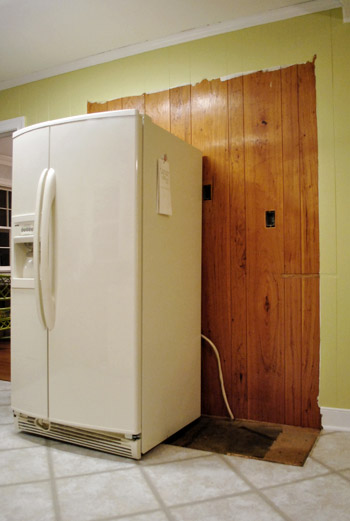
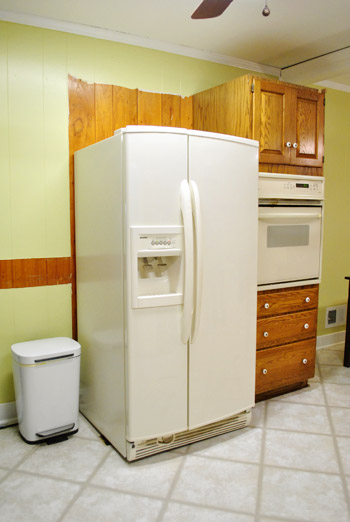
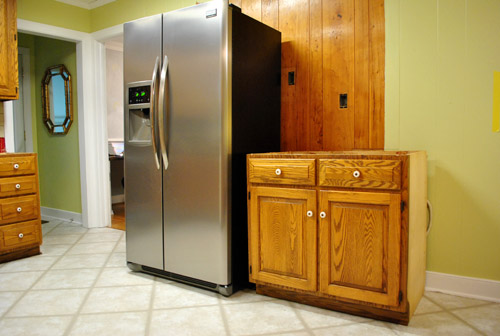
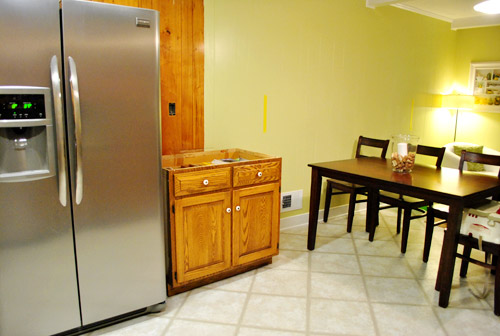
The womp-womp of having just exposed more unpainted paneling wasn’t so bad. Mostly because the next morning our new appliances arrived. Joy. The fridge got installed in place (the old one was hauled away to be donated to a local church) and the new stove temporarily sat by its side (not hooked up, because it will soon live on the wall to the left of the fridge as you face it – more on the future floor plan here). The dishwasher and microwave are sitting in boxes in front of the fireplace. Yes, our kitchen looks pretty insane right now if you couldn’t tell. And although the only new appliance that we’re actually using is the fridge, so far we love it.
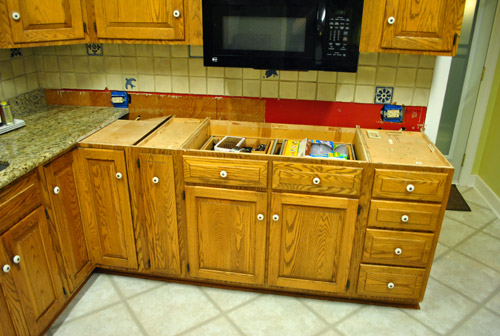
With the wall oven gone and the new stove not in place, we’d lost our baking function in the kitchen. No good. So our next mission became getting the new stove installed in its soon-to-be-permanent home. Only problem? This stood in our way:
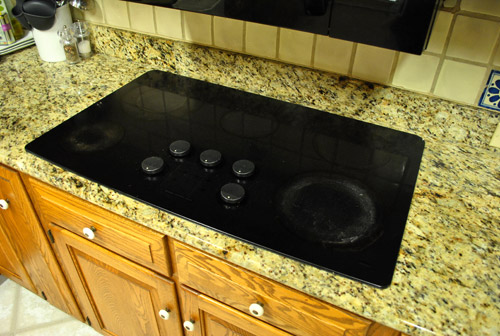
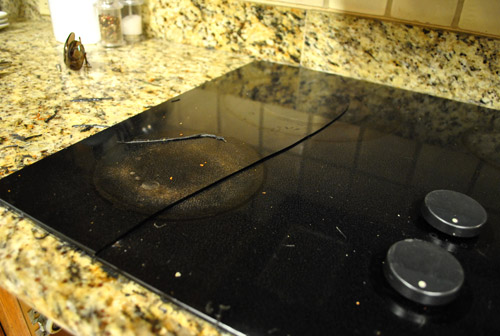
It was time for the cooktop to join the wall oven in craigslist/donate purgatory (we planned to craigslist it because it’s a pretty nice JennAir model). We started by emptying the cabinet below and I disconnected the electrical in the same turn-off-power-and-cap-it-all-in-a-metal-box-and-leave-off-power-to-that-area-until-the-elecrician-arrives-this-morning fashion.
Based on the installation manual (which I looked up online), I should’ve just been able to lift the cooktop out (it wasn’t screwed in)… but this sucker wasn’t budging. That’s when we discovered this:
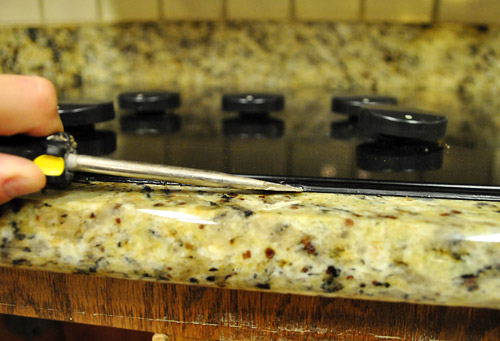
It was glued down with some sort of black silicone. Sherry did some quick Internet research on “removing cooktop glue” and came to the conclusion this was baaaad news. Apparently you’re not supposed to glue down your cooktop because it makes it very difficult to remove (uh oh) without completely shattering the glass (double uh oh) and many folks were rambling about how mad they were at their granite installers for gluing theirs in which they only learned was completely wrong after it needed to be removed to be serviced or replaced and was shattered in the process. Even though it wasn’t looking too good for our “craigslist the cooktop” plan, we were determined to at least give it our best try. So we started gently scraping and slicing the caulk to free the cooktop.
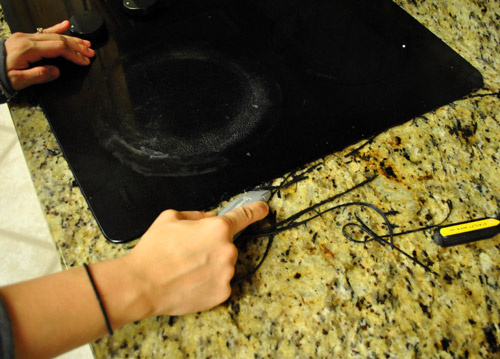
Well, the odds won. After about 15 minutes of trying to sloooowly and caaaarefully pry it up, we got our first crack in the glass. Then our second. Then our third. Then… well, we just accepted the fact that our cooktop wasn’t really sellable or donate-able anymore. Sucks. But from what we hear, any drop-ins that are caulked usually suffer a similar fate. So if you’re adding one remind your granite or countertop folks not to glue it down!
With our rescue mission having turned into a recovery, we plugged away at trying to detach the cooktop from the granite. After all, this whole section of granite was next on our remove-list (to make way for the stove) and it was already gonna be heavy enough without a cooktop piggybacking on it. So Sherry kept working on the cooktop while I started with the granite backsplash – which, ironically, came out quite easily. Having the backsplash out gave Sherry enough room to cut along the back edge of the cooktop (even her small hands couldn’t fit back there with the backsplash in place). Perhaps this would do the trick?
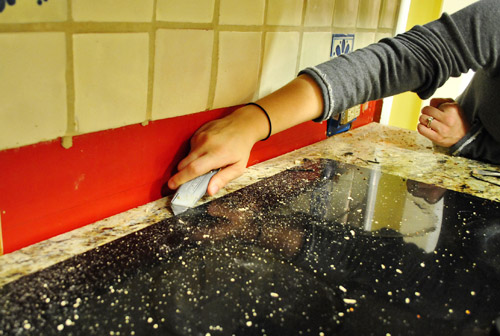
NOPE. No luck. So we gave up on trying to remove the cooktop and decided to just carry it out with the granite instead. Sherry was quite excited to turn her attention to something that (based on my backsplash experience) would be much more satisfying.
And it was. After a few slices along the silicone caulk that held the granite in place, Sherry was able to wedge a crowbar and screwdriver in a few places and start to pry it up within minutes.
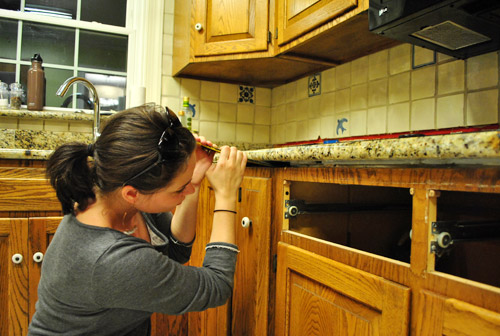
Once it was fully detached, we called in reinforcements (my dad, whom we had invited over to “help with a little project”). Because granite is HEAVY. He must’ve known our definition of “little project” usually calls for work gloves, so he showed up wearing his.
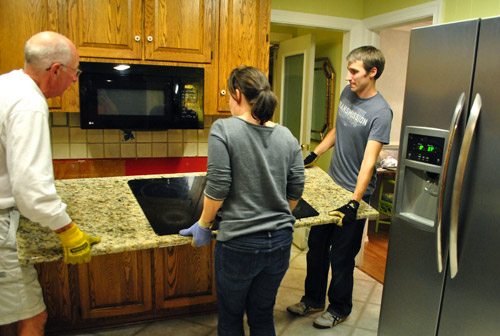
Moving it actually wasn’t that bad. We were able to get it into the carport no problem, where it now sits awaiting – you guessed it – our craigslist/donate bonanza. Meanwhile, back inside we were left with this: no cooktop or granite, but still a cabinet where our stove needs to go.
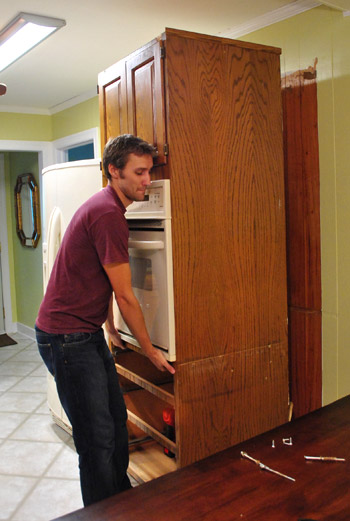
So with everything emptied, we pried out some more trim and unscrewed a few more screws…
…and pulled the cabinet right out of its spot…
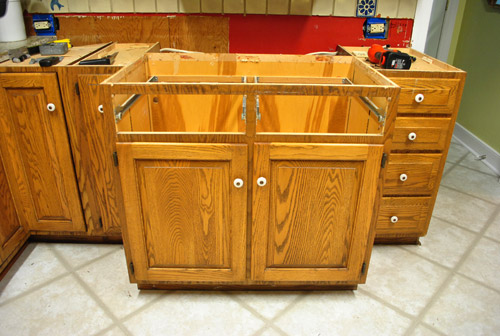
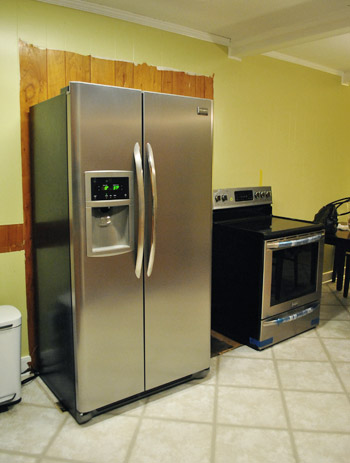
…and shimmied (darn it, there we go again!) the stove into place.

We left all of the wrapping on the stove as a visual reminder not to try to use it (it won’t be ready until the electrician finishes with things this morning since he’ll be converting the raw wires to a standard plug).
A couple of other things to note about that picture:
- See how close the top of the stove is to the bottom of the mircowave? That’s how awkwardly low our microwave is hung. Not normal, right? Can’t wait to upgrade to a properly hung range hood.
- The stove is 30″ wide, but the cabinet base had been 36″- so we’ll add some 3″ filler pieces to make it look built in (since the hood is vented/ducted to be centered over the 36″ opening, moving the stove to one side or the other would be major ceiling surgery that we just don’t want to take on). But once we add 3″ filler pieces and paint everything white we think it’ll be pretty darn seamless – and definitely worth having a work triangle instead of some sort of odd work parallelogram.
- The stove is counter-depth, so although it looks a bit deeper, we just didn’t push it in all the way (since the electrician is coming and we’ll have to pull it back out).
Oh, and speaking of that 36″ cabinet base. It did not end up in the sell/donate pile. Instead, it’s getting put to use where the giant wall oven cabinet used to live:
Yup, it’s gonna be part of the new workspace that leads from the fridge (which will get built in) all the way around to the peninsula that we’ll be adding. By reusing this cabinet it means we only have to buy 2 new ones to create our peninsula (one corner base cabinet and one 21″ drawer base cabinet). But we’ll talk more about that later (we got planz, yo).
With every item that we check off of our kitchen to-do list it seems like ten things get added, so I won’t even attempt to lay it all out here. But the main things are securing materials (backsplash, cabinets, counters, etc), painting the exposed paneling, and scheduling our wall knock-down-fest (we finally picked a contractor to help us – so it looks like we might accomplish it within the next month). Woo hoo!

Alex says
Such a big project that your’re tackling, must feel gooooood!! have fun :)
Kacey @ Refreshed Decor says
You guys are making awesome progress, even with encountering some frustrating setbacks along the way! Congratulations on your new appliances – your kitchen is going to look great.
Alyssa says
Is it just me or does it feel you guys just moved and already the kithen transformation has begun?? Congrats on the kitchen project, I can’t believe you started it and are this far along already!! Looking great, lookin great!
YoungHouseLove says
I know right??? I’m with you! It feels like we just moved in yesterday. Can’t believe we’re already tackling the big kitchen project!
xo,
s
Erica says
I know you just moved your pantry, but have you though about having the pantry over beside the fridge and moving the old cooktop cabinet to where the pantry was? I design kitchens for work and always try to put tall things together to maximize long lengths of counter space. Just a thought!
YoungHouseLove says
We just wanted the folks who sit at the peninsula to not have to stare at the side of the fridge or pantry, so placing the lower cab there meant more space for the people sitting there to “breathe” – ya know?
xo,
s
Mellie in Iowa says
Do you guys ever worry that you are moving too fast and that you will be completely done remodeling in 2 years? What will you blog about then??
Love the progress you are making. I’m just a little concerned :).
YoungHouseLove says
Nah, the last house took us 4.5 and we have even bigger plans with this one (lots more major projects still on the list after we finish the kitchen!). We figure this house will at least take us a few more years and after that we might go in on something with the family (a beach house? a rental?) – we just love fixing up houses so when we’re done with this one I’m sure we’ll figure out a way to share the love with another one somehow!
xo,
s
Katie Rose says
I know 3 inches isn’t a lot of room on either side of the stove, but have you seen/considered this option: http://www.southernliving.com/home-garden/decorating/kitchen-organization-00417000070203/
You couldn’t do something as wide as the example, but maybe enough for at least some lined up spice bottles. Just something to consider. You can never go wrong with a little extra storage!
YoungHouseLove says
Sadly those usually need 5-6″ and we already have great spice storage in the pantry- but they’re definitely awesome for folks who have room for them!
xo,
s
Kara says
So I’m assuming there is a lot of take out going on in your house…
I can’t wait to see the final results!
YoungHouseLove says
Haha- thankfully the electrician is here right now! Gonna have a working stove by this evening!
xo,
s
Carolyn Back says
is there any way you could use those 3″ gaps on either side of the new stove for spice racks, and or cookie sheet type of storage. I’ve seen pics were these tiny skinny “cabinets” pull out from the back, instead of swing open.
Love this whole process….can’t wait till you all come to my house and do my kitchen :)
YoungHouseLove says
Sadly those need about 5-6″, but we’re gaining lots of extra storage with the addition of the peninsula (and have a great spice rack in the pantry)!
xo,
s
Corie says
I just love how you guys aren’t afraid of this stuff! I was scared for you looking at the pics(almost covering my eyes as if I was watching it all happen in real time), and you guys are all “we moved these cabinets and whatevs, we got planz, yo”… major props for being so awesome and brave.
And yes, I still hand out props. :)
Jessica F. says
Oooh this is great! I was super excited when you guys bought the new house for the kitchen make over portion!! I’m amazed how easily it is for you guys to just tackle the project and start pulling cabinets and appliances out. I always feel like I’ll screw it up somewhere and make a huge mess that needs contractors to fix it!
Kaity says
It’s so much fun to watch the progress of your kitchen. It’s great to see all the little details along the way that you don’t get to see on those 1/2 hour remodeling TV shows! You may have already mentioned the reasoning before but I was just wondering, since you went with new cabinets in your old house why you decided to keep the old ones in this time?
YoungHouseLove says
The old cabinets in our first home were from the 50’s so they weren’t standard size (we couldn’t even fit dinner plates in the uppers because they were so shallow). This time the cabinets are from the 80’s – so they’re standard size and a lot more functional! So we’re happy to work with them!
xo,
s
janie says
It’s so much more fun to watch someone demolish their kitchen than to do it yourself!
But I have to strongly strongly strongly advise you guys to fork out for a new base unit there. Yes, it will be $600 or so, but firstly it can be drawers instead of cupboards, and drawers are simply wonderful for kids unbreakable cups and plates and things. They can be totally self-sufficient with getting drinks and unloading their things from the dishwasher. Because in a deep drawer nothing needs to be neatly stacked.
You also are going to lose those two top drawers from your prep space. Where else would you have baking tools, chopping boards, etc?
In my kitchen I have six deep wide lower drawers (I have three three drawer units, with two deep and one narrow), they have plates, baking equipment (bowls, etc), kids eating stuff, lunch boxes, then two dedicated to linens – napkins, old prefolds for mopping up spills, dish towels, etc. Then I have two lazy susan corner cabinets, one for pots and pans, one for tupperware. Then I have a narrower four drawer unit that holds all the kitchen tools, the bottom deep drawer has the blender and mixer.
Going with all drawers in the lower cabinets was the best advice I was given, ever. Those pull out trays are a poor imitation. They require two movements to open them and if you throw stuff from the other side of the room when you’re unpacking the dishwasher it doesn’t stay in place inside them.
YoungHouseLove says
We have drawers where we keep baking tools and chopping bards on the wall of cabinetry by the sink! And we’ll be gaining more drawers and storage in the peninsula. Thankfully the top two drawers of the existing base cabinet also are functional even though there was a cooktop there (it was only as deep as the counter) and buying a new base cabinet would be a lot more than $600 since we need matching drawers – which we’ve learned are impossible to find so they’d need to be custom made by a woodworker.
xo,
s
Kristin says
Someone needs to photoshop a picture of Shakespeare with a cleaver. ;)
YoungHouseLove says
Haha- maybe John will get on that.
xo,
s
shanna o. says
Awesome! I haven’t read all the comments, so apologies if it’s been asked and answered, but is that red paint behind the counters and is that what color the kitchen used to be?
Also, I did see that you commented on your sunglasses and I will say: I have the same issue with headbands. They hurt my head! I have found the greatest solution ever at my local running store: cute cute cute fabric headbands that have like a velvet underneath and cool fabric on top. I use them for running but also they’re my go-to hairstyle with a pony or a bun on weekends and during projects. They stay put b/c of the velvet and look super cute! And are washable! And don’t hurt my head!
YoungHouseLove says
I think so – crazy huh?! Red paint plus dark wood paneling in a windowless room = crazytown. As for the headbands made of fabric- genius!
xo,
s
elaine says
I love that you two are tackling the kitchen right now. So exciting! Wonderful to watch it all unfold. Looking great so far! :)
Laura says
What? No prompt question asking me whether I’ve done something similar? Haha. Here’s my unsolicited answer!
We did something similar in our kitchen last summer. We took out our atrocious 1950s 24″ wall oven and cooktop, cut into the lower cabinets to make room for the standard oven/stove and then added a door to the wall oven “hole.” Now we have a large pantry cabinet and a 30″ oven/stove!
YoungHouseLove says
Haha- how could we forget. Love hearing what you’re up to Laura!
xo,
s
Stephanie Phillips says
Laura, we did the same thing at a rental house! We felt so smart and loved the result.
Chloe says
I remodeled the kitchen in my townhouse, and love seeing your progress on this project – I love the penny tiles you picked out! I wanted to let you know that I also had a 3″ gap in the layout of my kitchen, and I stumbled across these types of 3″ pull-out spice cabinets: http://www.thehardwarehut.com/catalog-product.php?p_ref=258336 I was going to try a DIY version of one of these (it doesn’t seem that hard to do, with the right kinds of pull-out hardware), but then I got married and had to move. :) This type of cabinet probably wouldn’t be a priority since you have a good amount of storage in your kitchen, but it’s an option if you want to make use of those 3″ gaps!
YoungHouseLove says
Ooh those are so awesome and super tempting! Sadly we only really have 2 2/3″ on each side and not a full 3″ once everything is set into place- so they won’t fit. Sad girl.
xo,
s
Chloe says
I just noticed that a few other people suggested the same thing, but I guess they were linking to wider versions (you thought they needed 5-6″), and also you replied that you have plenty of spice storage in your pantry, which is awesome! But just for others’ reference, there is indeed a 3″ version for people who have a tight fit! :) It’s a cute little guy.
YoungHouseLove says
Thanks Chloe! We remeasured after seeing some awesome 3″ ones but we actually only have 2 3/4″ on each side (since there needs to be a smidge of room for the stove to slide in and out since it’s not 100% fitted and squished like a base cabinet). So sad.
xo,
s
sarah says
we did the 3″spice rack cabinet next to our stove and love it, but it was one of the most expensive cabinets to buy! (We did it to make the flow go all the way to a doorway instead of just having a stove on the end) i think you’re spacers will be much more YHL budget friendly :)
Regan @ RenovatingRothenbergers says
Awesome! I can’t wait to see your updates!
Ashley @ Lewis in Love says
Man, you guys constantly impress me. I LOVE LOVE LOVE your new stainless appliances. Swoon!!
SingleMama says
Oh my goodness! This looks like A LOT of work! Are you guys ordering in for most meals right now?
YoungHouseLove says
We just demo’d stuff out last night and the electrician is here now hooking the new stove up so we should be able to cook dinner at home tonight! Wahoo.
xo,
s
anglophile.ash says
It looks so exciting! You guys (and your lists!) inspired to do a room-by-room breakdown of to-do’s, to-buy’s, and to-DIY for my new house that I bought in August.
I’m also curious, if it’s not too nosy, what you guys are doing for meals in the interim of kitchen renovations?! Take-out/delivery, grilling outside, eating with friends?
YoungHouseLove says
Thankfully we demo’d out this stuff last night and the electrician is here this morning hooking up the stove. So we’ll be counterless and living amid chaos, but we have a sink and a stove/range and a fridge- so we’re happy to eat at home!
xo,
s
Kathryn says
You guys are hardcore!! And making it look dangerously easy… I’m so excited to see the progress and final result- I am loving your choices and your bravery for taking on such a huge project! You guys rock!!
Amber says
You guys are ‘super explainers’, so I’m sure you’ve already done a post on this, but how do you pick your contractors?
I have a few odds and ends at my house that are out of my comfort zone (ie electrical and drywall) but I’m not sure how to pick the right contractor or where to start.
YoungHouseLove says
We’ll share all about how we finally picked our guy when we get into using him for the wall project but in general our process is to ask around for recommendations and get people out for estimates and see how we like them (and their estimates of course) – we’re sticklers for asking for contractor #s and making sure they’re licensed, and then we just go with the one who feels like the best fit (and gives us an estimate we feel is fair).
xo,
s
Kendra says
Ya’ll are rockstars! Thanks for the tip about not gluing down the cooktop. Ours is getting put in sometime this week and we will make sure they do not glue it down! THANKS!
Firesparx says
I think the biggest thing I’ve learned from your blog (other than house renos require alot of shimmying) is to be fearless. The whole time I was reading I kept thinking “Wow! they are so brave! I would be too afraid to try that! How did they know it would work out in the end?” Sometimes being afraid to take chances can lead to becoming paralyzed. Or maybe it’s more about redefining what is scary. Taking a box cutter to your granite probably isn’t in your “scary list”.
Thanks for your inspiration!
Elizabeth says
I’ve been loving all the kitchen progress lately! New appliances are beautiful. I just have to say you two are so brave tackling this yourselves!
Angie says
I am so excited to see all that you’re doing in your kitchen. I would LOVE to remodel our kitchen some and this is really helping! I do have a question though – how much space will be between the bottom of the microwave and the cooktop on the range? That’s one of the first things I want to do to our kitchen but so far it seems like we won’t have enough space between and I’d really hate to shorten our cabinet to make room, given we have very little cabinet space as it is :(
YoungHouseLove says
We’re removing the microwave and hanging a standard height range! We’ll just google around to find out what standard height is. Hope it helps!
xo,
s
Britt says
I just measured mine. Its 19″ above the cooktop. Seems to be a good height. I never thought it was low or high.
YoungHouseLove says
Thanks for the info Britt! I wonder if that’s standard? Anyone know?
xo,
s
Rhune says
My OTR microwave installation sheet said:
(a) 66″ minimum from floor to top of microwave
(b) 30″ minimum from cooking surface (or countertop) to top of microwave
So the distance should be (30 minus microwave height) inches.
YoungHouseLove says
Thanks!
xo,
s
Dawn says
Can’t wait to see the new big hole in your wall! The new appliances are great. We are doing the slow re-model – replaced the dishwasher a couple of years ago, got a $2800 Kenmore french door frig for $900 (mortgage foreclosure situation) and a new microwave. Now we’re looking for a deal on an oven then cabinets, countertops and backsplash!
Jennifer Hamilton says
While the filler pieces would probably be easier (like that would make a diff to you!), do you have enough cabinet parts to make a 5″ skinny cabinet for sheet pans and cutting boards? It’s one of my favorite cabinets in my new kitchen. Such a useful use of skinny space!
YoungHouseLove says
We have one of those to the left of the opening actually! Since we don’t want to move the vent hood stuff in the ceiling (which would need to be done to center the hood if we scooted the oven to one side or the other) we just figure trim pieces are the cheapest easiest fix!
xo,
s
Sarah Mc says
Wow! When you guys go, you go! I really admire how you start AND finish projects in a resonable amount of time.
One question, why are you donating your burned-doesn’t-cook-evenly oven to the ReStore, instead of just getting rid of it altogether? Just wondered if someone else would actually want it, or if they will know it cooks unevenly when they go to check it out? Not familiar with how the ReStore works, really.
YoungHouseLove says
They sell less than perfect things to make money to build more Habitat For Humanity homes (things are priced at a steep discount so someone with no oven – like a church out building, would gladly upgrade to that one for a few bucks). We figure it’s a better cause than sending it off to the landfill!
xo,
s
Britt says
I can’t wait to see it all finished! I am so glad you all are doing all of the research for me. We are going to be building a house soon (that is if we can sell our house…if anyone is interested in a townhouse in uptown Charlotte: http://tours.tourfactory.com/tours/tour.asp?t=794669 sorry for the plug but we want to sell it, already). Everything you are doing in your kitchen is very similar to what we want.
Vanessa says
Its coming along great, cannot wait to see how this turns out! :)
jess says
Yay! I missed the tile post yesterday because I was sick, but I LOVE THE PENNY TILE! :-) Great choice! Also, congrats on getting everything shuffled around- that’s a BIG JOB!
Katy @ Turtle House says
I really wanted that first link to go to a video LMFAO’s Party Rock Anthem. Is it stuck in your head all the time as you shuffle? ;-)
YoungHouseLove says
Haha- I do tend to sing that a lot these days…
xo,
s
Kelly says
I apologize if someone already asked this, but I don’t want to read through 200 comments! Are you guys planning on putting the new flooring underneath the appliances? If so, how come that wasn’t done first – is it easy to do it after?
Thanks!
YoungHouseLove says
You want to set all of your cabinets before doing flooring so they’re all on the same level (don’t want to do flooring and then add peninsula and move base cabinets around since it will scratch the floor and things will be on slightly different levels). Flooring is usually one of the last things done unless you’re gutting the whole room (you just pull out appliances like fridge an stove and go under them after all the cabinets are set, assuming you don’t have asbestos tile to deal with).
xo,
s
Elizabeth says
Just reading that makes me tired! Good job!
Makes me want to rip down my cabinets and move them around!
Cheryl says
How about making a narrow little cabinet on each side of the stove to hold cooking sheets and baking racks? Is there room for something like that?
Love the progress!!
YoungHouseLove says
Sadly we don’t think there’s enough room- but we actually already have one of those cabinets to the left of the opening!
xo,
s
Mollie says
SOO impressed. i would totally be having “wth did we want to do with this again and where the eff did we say we were putting it?!” moments. kudos!
Katie says
I love what you are doing with the kitchen – I can really see it start to take shape. I just had an idea – do you think the leftover cabinets from your office desk project could be used for the peninsula? I’m not sure if they are the right dimensions but if I recall correctly you had two remaining.
YoungHouseLove says
Sadly they’re just too short (27″ instead of standard cab height) so building them up might be more trouble than it’s worth (and we’ll use storage space we’d get from finding/building cabs at the proper height).
xo,
s
Sam Cross says
hehehe very cool that the kitchen is on its way to what you want, best of lucks you two!
On a side note, I giggled through the entire post because of the photos hehehe, I just LOVE that with the current knobs all your cabinets look panicky hahaha: “wait! what are you doing?! where am I going?! what is happeniiiinnnngg?!?!?” heeheehee
YoungHouseLove says
Haha, they’re totally scared for their lives!
xo,
s
Micha says
Give it up for some shufflin’ an’ shimmyin’ :o) Things are looking good and seem to be coming along great!
Funny how projects are like a can of worms … does it ever end?
Brit says
This is so exciting, I’m amazed how fast you all do things! When you first announced that the kitchen renovation was beginning I thought it would be months before we saw any real progress, but its already happening! And it looks wonderful! Even with all the exposed paneling haha…
Shelly says
Great work on the kitchen so far, I can’t wait to see more! As a kitchen designer, I hate to think about any wasted or “unplanned” space. Have you ever considered small pull out spice cabinets for either side of the new range in place of fillers. They are made as narrow as 3″ wide and look much more attractive (and add function) than a wide blank filler. Just a thought! Good luck with the rest of the space!
YoungHouseLove says
Thanks for the tip Shelly! Might have to price things out and see if any of the fronts “go” with our existing cabinets! The space is actually 2 3/4″ wide on each side once the stove slides in, so we’re not sure if we can find any that small!
xo,
s
Theresa says
Go team go!! Don’t forget to think about adding some shelves that slide to your cabinets. We did that in our remodel and I love the accessibility all the way to the back.
http://www.shelvesthatslide.com/
YoungHouseLove says
Love those!
xo,
s
Andrew says
Love the kitchen so far its gonna be great. Even better when you poke through into the next room. I have been meaning to share my kitchen reno with you. But just now got have gotten around to putting up the pics.
I too moved the fridge and stove AND opened up 2 walls.
http://twistedimagedesigns.blogspot.com/2011/10/kitchen-reno-madness.html
YoungHouseLove says
Wow- that looks great with the freshly opened walls!
xo,
s
El says
You guys are inspiring me. I hate my new kitchen, but can’t justify changing anything so I keep plotting what to do when our little peanut is older so we can do something about our kitchen as then it should be old enough for my DH to not care what I do.
I wanted to mention before you rule out shifting the stove 3″ due to major ceiling work is to check how much space you have for not running the duct centered within the hood. I know there has to be some play in there to not run it centered as that may not always work for people in a renovation. The chute tends to be much wider than the actual duct. You’d just have to do a gradual bend when connecting it up.
YoungHouseLove says
Thanks for the tip El! We’ll have to check that out!
xo,
s
SarahB says
I’m giddy with excitement over your kitchen makeover as though it were my own! I have remade my own kitchen in my mind a hundred times in the last 4 years we have lived here….alas, we rent and none of it will ever come to being. thanks for letting me live vicariously through yours :)
Sierra says
I love demo! This post was so exciting!! I’d actually rather do demo stuff than “putting it back together” stuff. lol
Rachel says
I never comment here because you’re always so inundated with responses, but I just had to say that this morning’s post made me so excited. It’s like I’m sucked into good reality TV and can’t wait to see what happens next.
Thanks for providing such a welcome morning pick-me-up!
michaela says
Love the new appliances. Instant update! Excited to see the kitchen coming together!!
Ellen says
I love that you are re-using your cabinets. It’s so much more interesting than gutting the place and starting from scratch.