Let’s take some shelfies. You know, as opposed to selfies.
If only we had Beyonce around to photobomb them, they’d be the best shelfies ever…
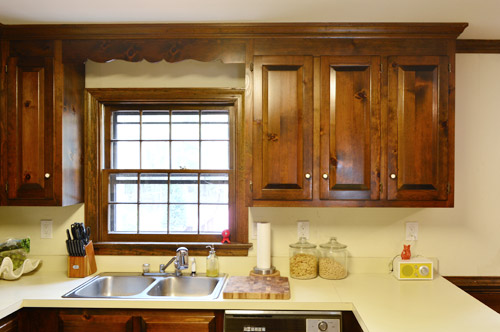
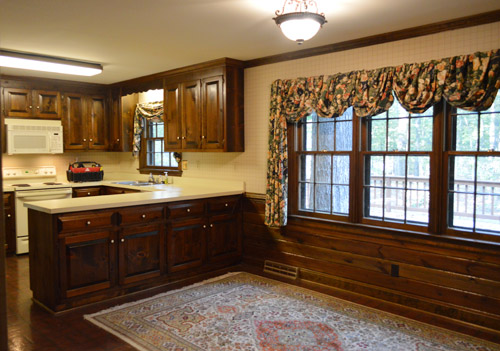
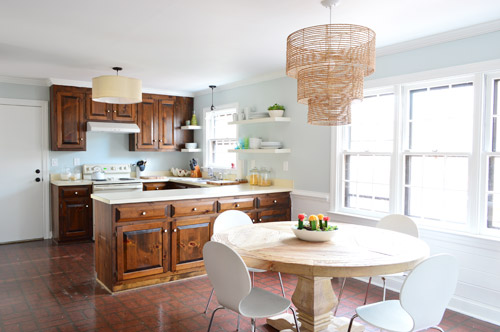
The no-Beyonce consolation prize is that we finally got the Ikea floating shelves up in the kitchen, and it suddenly feels like we’re turning a corner. We still have a few major things on the list (like painting those cabinets) but the shelves make such a gigantic difference as opposed to the dark cabinetry that used to hang on either side of that window. Here’s how it looked a few weeks ago after we removed the wallpaper.
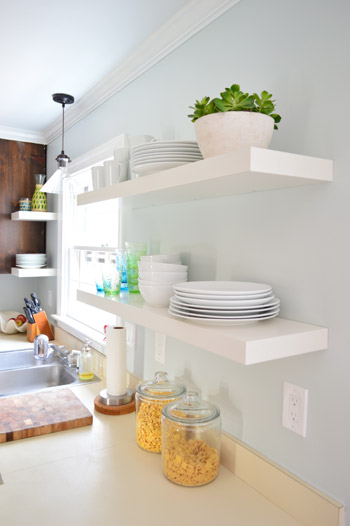
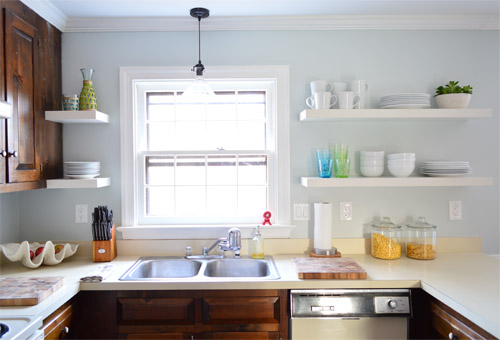
And here it is from the same POV now, after removing the cabinets, re-hanging the crown molding, patching/priming/painting the walls, trim, and ceilings, upgrading the lighting, and hanging those new shelves of ours. These pictures don’t even do it justice – it’s literally at least twice as bright and feels a lot bigger and more open as well.
When it comes to how we hung them (they’re lack shelves from Ikea), we decided to line the bottom shelf up with the cabinet on the left of the shot above (18″ above the counter) so that they all related to one another. The pre-made sizes allowed for a couple inches of breathing room around the window too, which we liked anyways. We just spaced the height of the second shelf by eye and chose 14″ above the other shelf, which gave us enough room to load up the bottom shelf without things feeling cramped, but also allows a shorty like me to easily reach items on that top shelf.
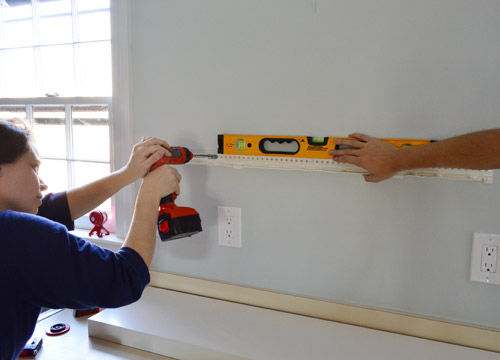
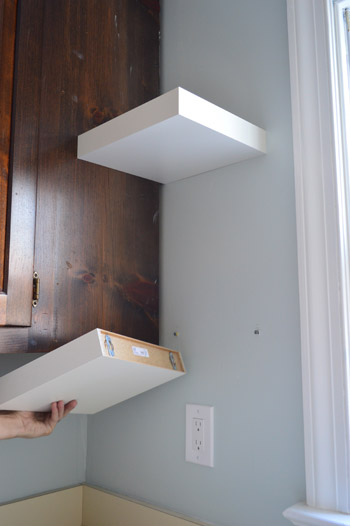
As for actually hanging them, we held up the bottom shelf in place and made sure it was level…
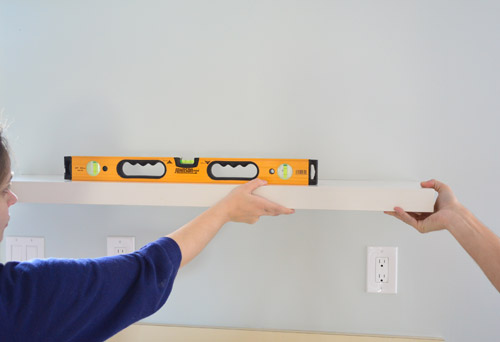
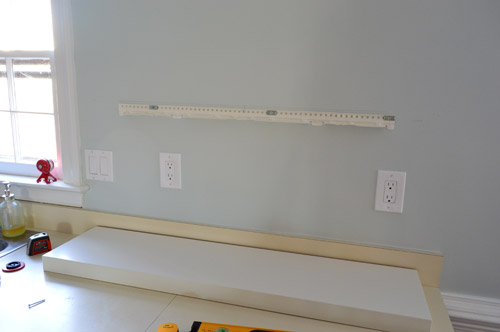
… before marking the top corners on each side and drawing a line across the top, like you see below.

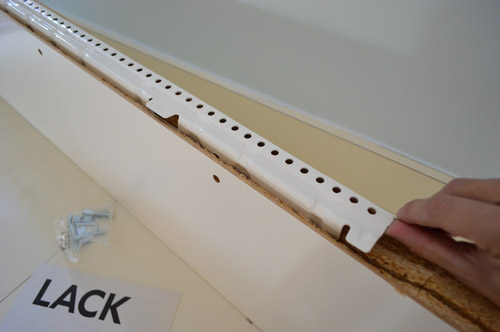
These longer shelves come with a metal hanging brace and screw, so when you open things up, this is what you’re dealing with.
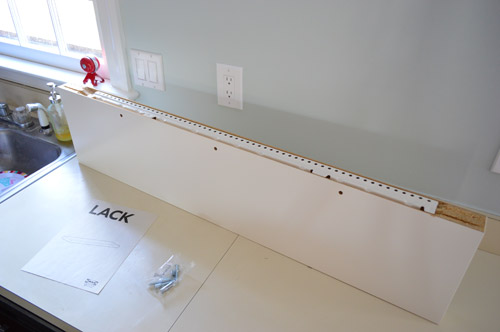
The metal brace is actually pretty smart. It has a bunch of holes all along it so you can just find a stud (we used a basic stud finder) and screw into at least two of those along the span of the shelf, so you know it’s extra secure. The instructions show a few recommended screw-to-stud placements.
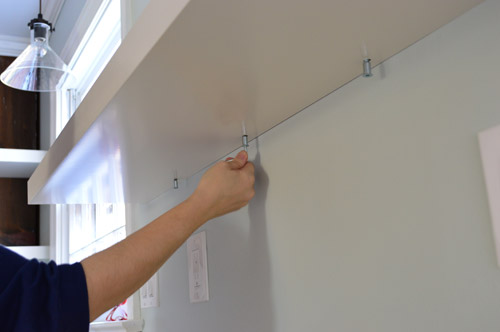
Next I placed the brace along the horizontal area where we wanted to hang the shelf. I just measured in a few inches on each side from our little pencil corner guides since the metal brace doesn’t run as long as the shelves themselves) and I used one screw into the drywall right in the middle, just to hold the brace in place.
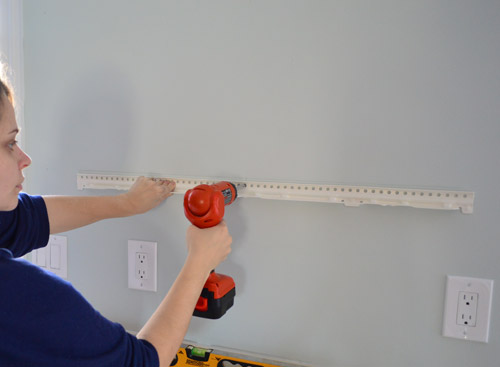
That freed up my hands so I could use the stud finder to find the actual studs, and drive two more nice long screws (provided with the shelves) into the studs on that wall, so it was held up really strongly (John aided me by holding the level to be sure it didn’t tweak up or down on a certain side as I went).
There are these little metal plates that you use when you drive the screw into the stud (they’re sort of like washers, they go under the screw and hold the brace even more firmly than a screw alone could), so those three metal rectangles that you see below are where two went into studs (we also added one more with an anchor for even more holding power).
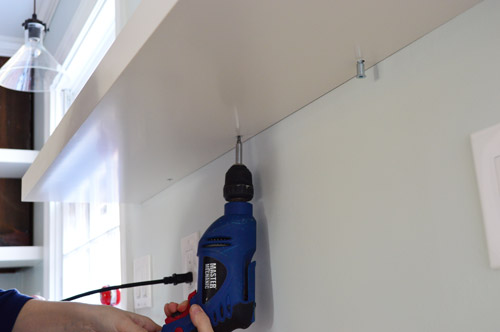
Then you just slide the shelf onto the brace and tighten the three provided screws that go into the three pre-drilled holes in the shelves. At first I did it by hand, all allen-wrench-style. That was for the birds (took a million years)…
… so I broke out the power drill to drive those in a lot faster.
We repeated that process for the higher shelf, and when it came to the little side shelves, those were really easy. We just used heavy duty anchors driven into the pre-selected spots on the wall that aligned with where we wanted to hang each shelf. As opposed to the longer shelves, which are screwed into place pretty firmly in three places each, these can also be popped on and off easily, which is awesome because we’ll temporarily remove these guys when it’s cabinet painting time.
They’ve been really sturdy so far. The stronger the anchor you use, the more stable your shelves will be – and of course if they’re not placed perfectly level into the wall, they might wobble. So be sure to measure at least twice and break out that level for the best result. I think as the room evolves, the items on each shelf will too (for example, I might hang a small framed photo above that stack of plates on the wall, or place something taller on that bottom shelf for some fun color/height).
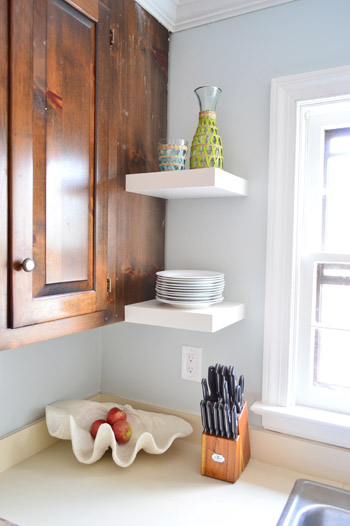
But for now they’re super functional – I just filled the bottom ones with the stuff we use all the time, and the top ones with items we just love to see. For example, things I might leave out on the counter to be decorative (like a potted plant or a pitcher-turned-vase) along with other items we use a lot that didn’t quite fit onto those bottom shelves (like more plates and mugs).
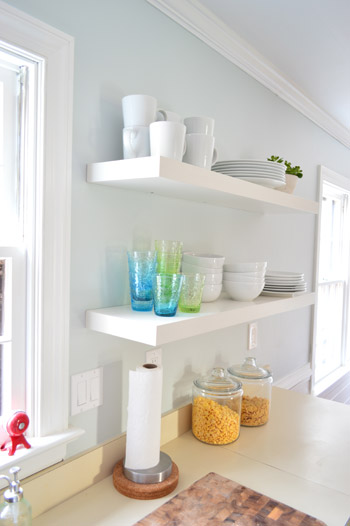
Here they are from the other angle. Oh man, it’s so much faster to unload the dishwasher again (we seriously missed that perk of open shelving from our last house) and we love that although they flank the window on each side, they don’t really block any light since they’re shiny and white (they bounce light around a lot themselves) and they’re not dark and solid like the old cabinets were.
Update: These longer shelves should each be able to hold 33 lbs according to Ikea if you go into studs (we went into two of them), and so far ours have been really strong no matter how much china we throw at them put on them. Giant upper cabinets full of dishes are held up the same way (screws into studs) so that definitely helps to ease our mind, along with the fact that we had good luck with the same type of Lack shelves in the dining area of our first house for 4+ years.
It’s certainly a far cry from the room that we started with around 6 months ago…
… and we’re crazy excited to lighten up those upper cabinets and go even deeper/richer with the lower cabinets. We’ve never had a tuxedo kitchen, but we’ve been such huge fans for a long time (just look at how gorgeous this one is). In fact we’re sanding and priming this week, so we hope to have a whole “new” kitchen for 2014!
Was anyone else doing last minute home projects this weekend in anticipation of the holidays? Do you have any big projects planned this week? We seem to have a tradition of doing something big and house-interrupting right in the middle of the Christmas craziness…
Psst- We’re taking more quizzes on Young House Life. And this one was crazy accurate!

Connie says
I love the look of open shelves in the kitchen. I had them in an old apartment and can’t wait to rip out cabinets and put in some shelves!
Harmony_G says
I probably don’t have to tell you, I mean, you already know, But those shelves look FANTASTIC. especially with that great wall color. thumbs up!
thatsewray says
Those look amazing. I know this is a silly question but don’t the open style take a lot more dusting?
YoungHouseLove says
We added open shelves to our last house’s kitchen, and really loved them, but they’re definitely not for everyone. We try to put stuff out that we use so often it doesn’t have time to get dusty, like everyday plates and cups and bowls along with other things that are out somewhere anyway, like potted plants – which are never in cabinets anyway (more on that here, with an update on how we liked living with them here).
xo
s
diy room decor says
I do not think I can keep a stack of dishes, such as that on the shelf floating and not expect to rip out of the wall. What do you expect the age of the shelves to be?
YoungHouseLove says
We had these Ikea shelves in our first house’s dining area for 4+ years and the new owners even used them to hold their TV & components (they’re still going strong nearly seven years later). The key is getting into the studs with those long screws (heavy things like giant cabinets full of plates are screwed into studs and don’t rip out of the wall) so since the ones in our first house are going on 7 years of use, I hope for the same with these. Will keep you posted of course!
xo
s
Jenn in AZ says
Funny you should ask about holiday projects… We just finished sprucing up our fireplace inspired by a certain fireplace makeover:
https://www.younghouselove.com/2013/03/fireplace-makeover-stick-a-fork-in-it/
Now our stockings have a pretty place to hang! Thank you for your awesome ideas.
YoungHouseLove says
Wahoo! I love it! Congrats!
xo
s
Lisa says
This looks awesome. I couldn’t have glass jars of cereal on my counter without scoffing handfuls though!
Up State Life says
Wow! The open shelves make such a difference to the lightness and brightness of your kitchen.
Dawn says
LOVE the post title. Made me giggle.
anna says
i think it’s amazing just how less naff the lower cupboards look with all the lightness around now (the floor is definitely my least-favourite thing now!) – so even though i’m a big fan of all-light kitchens, i’m quite interested to see how you run with the dark lowers…
Heather says
What time do you wake up? Do you nap? Do you watch TV!! Sometimes I get tired just reading your blog! No really you both seem super human…and one of you is making a human!!
YoungHouseLove says
Aw, you’re so sweet! We definitely sleep and watch TV, we just love DIY. Even before it was a job we did it all the time for fun. In other words, hanging shelves is our idea of a good time!
xo
s
Diana says
I’m amazed and inspired by your transformation! I’m fully convinced I want some open shelving in our next kitchen (we don’t plan to be in this house long enough that that kind of kitchen renovation would be worth it here).
Kelsey says
Im jealous of all the house improvements you guys are able to do together. I have been working on my kitchen table and chairs. The table has been done for a while now but…. the chairs have been outside patiently waiting to be refinished. One chair left that needs to be sanded and then they can all be painted….. hoping Santa will finish the job for me… ;]
YoungHouseLove says
I hope he will too! Or that he at least sends some elves to help ya!
xo
s
Jennifer says
Love it! Also diggin’ the pendant over your table. Is that from Ikea as well?
YoungHouseLove says
Thanks Jennifer! Here’s that post for ya: https://www.younghouselove.com/2013/12/three-new-kitchen-lights/
xo
s
Karen J says
Wow, what a huge difference. I know someone already mentioned it, but you have to try some DIY remedy for your countertops (like the concrete)!!!!
YoungHouseLove says
Yes, we’d love to experiment with something! Will keep you posted for sure!
xo
s
Nicky says
Hi guys! I have a question about these floating shelves. I LOVE them and want to incorporate them in our kitchen (we literally JUST bought our first home last week!) but my boyfriend is worried about dust collecting up there and as a result that the plates would not be as clean as they would be in a cupboard.
Since you had these in your last house as well, what is your experience? Do you need to dust these regularly and have you ever experienced your plates/glasses/… not being as clean as they should be?
YoungHouseLove says
We did have to dust the shelves just like we dusted our counters and console tables and every other surface in the house, but the dishes themselves got used and rotated out and washed so often they didn’t get dusty if that makes sense. So it was just the shelves we dusted, and the plates and bowls and cups were in almost-constant motion, haha!
xo
s
Avone says
Hmmm. I always put those three finishing screws on the top side. Wonder if it makes a difference for stability? I’ve used Lack in 3 homes now with only one crashing down.
YoungHouseLove says
We actually tried hanging the top one with the screws on the top and the stability felt a little wonky, so we flipped it over and did it with the screws on the bottom (it means you can see those a bit more than if they were hidden on top, but we worried it would fall). Hope yours stay put! Our old ones (there was another model before this one) worked with the top one flipped, so maybe our attempt here just was a weird case.
xo
s
Sassafras says
Looking CRAZY fabulous!!!! The before and afters should be in every realtors playbook to show to the doubting Thomases of fixer-uppers!
Meanwhile, I spy an almond fronted dishwasher…have you ever considered doing a test of the stainless products that you can just slip into the front??? Or even just changing it to a sheet of white something so it matches for the interim? Many of those old dishwashers have a panel that is colored differently on the backside and you can just flip it.
Hope the P’s have a marvelous Christmas. Thank you for sharing so much of your lives with us! Hugs to Clara & Burger.
YoungHouseLove says
Someone else left that tip to look under it to see if there’s a white option behind the panel (or if it’s replacable) and I LOVE IT! We definitely want to look into that and report our findings!
xo
s
Caitlin says
Y’all always amaze me with your ideas. When you said you were doing this, I just couldn’t imagine how it would look but I LOVE it. On a side note, where is your cutting board from?! It is just the size and style I am looking for! Happy Holidays!
YoungHouseLove says
Thanks so much Caitlin! It’s from HomeGoods!
xo
s
jillian says
so much light! beautiful
SJ says
LOVE the open shelving! I wish I had pretty dishes like yours…mine are better kept hidden behind cabinet doors. Yesterday we had the mad scramble to finish about 10 projects in our basement before carpet gets installed. I was up again bright and early this morning cleaning up all the mess and now the carpet guys are here! Merry Christmas to us…and a FINALLY finished basement!
YoungHouseLove says
Wahoo! Congrats SJ!
xo
s
3girls1apple says
What a huge difference it makes. And loving Beyoncé shes so dreamy. The place look’s great!!!
Maria says
I love what you have done with the kitchen so far, it’s definately a lot brighter just with the small white improvements! I will be looking into these lack shelves, isn’t Ikea the best! Love it.
Stacy says
I can’t even believe how small your kitchen is, just from the pictures. I guess all the dark cabinets and the dark molding and paint made the room actually seem more closed in and in some ways bigger in some of the shots. Now with everything brightened up, I’m seeing how small it actually is. I can’t wait to see how the cabinets look once painted white. I am loving your phase one overhaul. Everything looks fresh and clean.
Everdry Atlanta says
Those floating shelves are amazing! Love organization!
Veronica Greear says
looks beautiful! The previous and current pictures are amazing:)
kylha says
Hey, odd question John or Sherry (I doubt ‘Burger or Clara know or care, lol). Do you ever find that the stuff on your open shelves get super dusty, greasy, or greasy AND dusty? I’ve pondered putting in open shelving a lot, but I just hate that dusty/greasy layer that ends up on stuff in my kitchen. I was wondering how you combat this. Okay, Maybe I should have just directed this to Sherry alone, lol.
Anyways, looks awesome guys.
YoungHouseLove says
We added open shelves in our last kitchen and loved them so much we wanted them again here! We did have to dust the shelves just like we dusted our counters and console tables and every other surface in the house, but there wasn’t any grease (we had a vented range hood) and the dishes themselves got used/rotated out/washed so often they didn’t get dusty if that makes sense. So it was just the shelves that we dusted, and the plates and bowls and cups were in almost-constant motion!
xo
s
Emily @ Life on Food says
Oh I really like the shelves. We are doing that in our kitchen but not till we can do all of the cabinets too. Taking a break on all house work over the holidays.
Barbara says
Is there a way you could link me to the time John built shelves like this? I can’t seem to find it thru search.
YoungHouseLove says
Let’s see, John built book ledges here. And Ana White shared a tutorial for shelves like this here. And we built shelves with brackets (sort of like this, but not floating) for our last kitchen here and here. Hope it helps!
xo
s
Danielle Kirchner says
What color paint did you use in your kitchen?
YoungHouseLove says
That’s Nelson Blue by Ben Moore (satin finish).
xo
s
Jill says
Hi guys! Love how the kitchen is coming along! I hate to ask this because I’m sure you’ve mentioned it before on the blog but I can’t recall…where did you find the round table in your breakfast room? I’m looking for something like that but can’t afford the steep price on some I’ve seen. I need it to accommodate 6 chairs, and it looks like yours would. Crossing my fingers it was not one of your super finds on Craig and his list :)
YoungHouseLove says
Aw thanks! Here’s that post for ya, Jill. https://www.younghouselove.com/2013/10/im-still-laughing-about-blardware/
xo
s
Rachel says
This looks incredible. I can’t wait to see your “new” cabinets. It’s amazing the difference that some white and paint can make it a room. It almost looks like an entirely new room!
Kerry says
Do you guys have a problem with the greasy kitchen dust? In my last apartment, I had a couple of open shelves, and everything on them was covered in that nasty, greasy dust. But that kitchen was quite a bit smaller than yours seems to be. I love the look of open shelves, but the thought of washing plates just to dirty them up again drives me bonkers.
YoungHouseLove says
We added open shelves in our last kitchen and loved them so much we wanted them again here! We did have to dust the shelves just like we dusted our counters and console tables and every other surface in the house, but there wasn’t any grease (we had a vented range hood) and the dishes themselves got used/rotated out/washed so often they didn’t get dusty if that makes sense. So it was just the shelves that we dusted, and the plates and bowls and cups were in almost-constant motion. So far that has been the setup here as well, but we’ll keep you posted if it’s a different experience this time!
xo
s
Melissa says
Your house is looking great! I love the white trim!
Quick question… what would you have done if the trim had been oil based paint? We think our trim is an oil based and it is off white. We would like to paint it semi gloss white, but are not sure of the steps to take. What do you recommend? Do you have anything that was painted with oil based in your house? I worry about the VOCs if we have to paint it with a white oil based to cover the old yellow oiled based :(
Thank you!
YoungHouseLove says
We have dealt with that in the past, so all you need to do is lightly sand (check to be sure it’s not lead paint of course before doing that) and then use an oil-based primer (can’t be water-based). Once that’s on and dry you can use any paint you’d like (water-based is fine since the oil-based primer neutralizes the oil-based paint under it). Hope it helps!
xo
s
Jamie P-M says
I need to hit up ikea for some of these shelves!
Bailey says
I can’t get over how much better you guys are making this house look!! I just made my boyfriend come look at the kitchen’s before and after pictures haha – I’m obsessed with all the changes you’ve made!!
Bailey
YoungHouseLove says
Aw, thanks so much Bailey! We’re so excited to be done with these cabinets – I think it’ll be such a relief after living in such a dark room for so long!
xo
s
Gabi says
Our Christmas decor didn’t go up until December 21st because we installed board and batton in the entry and mixed and painted the entire downstairs! Glad to know we weren’t alone :)
YoungHouseLove says
That sounds so awesome Gabi! Congrats on getting it done!
xo
s
Jen F says
Yay, definitely starting to look more like “Your” place! I think the dark cabinets below, etc. will look fab! Happy New Year to you all!
Jamie says
The kitchen progress looks AMAZING!! Where oh where did you get your dining room light fixture? It’s so fun! Does it allow for bright lighting?
Also, do you guys help others decorate, kinda like an interior decorator? I’m right outside of Williamsburg, VA and my husband and I had a gorgeous rustic house built but I’m having a difficult time blending rustic and chic- mostly on the walls. We have almost no wall decor/art up!! We don’t have kids yet but I’m trying to keep their future needs in mind so that when we do it’s an easy transition and we don’t need to re-do everything to make it child-friendly. I guess I’m just wondering if you guys would see yourselves popping in and helping fix up a room, or four! ;)
Thanks so much for all your blogging and wonderful ideas! Through you I’ve found the bowerpower blog and chanty chic and “borrowed” a lot, A LOT, of ideas from you all!!
Xo,
Jamie
YoungHouseLove says
Aw, you’re so sweet, Jamie! As for the light over the table, there are a bunch of details on that here and here for ya. It’s light enough for us since we have other pendants in the space. And as for decorating, we’re afraid we’re not currently dropping in on folks and making over their spaces, but we do take submissions for free online advice (just send photos and your dilemma to advice at younghouselove.com and we’ll hopefully get to tackle your question sometime). And Happy New Year!
xo
s
Steph Reiner says
So you guys totally sold me on open shelving and the tip on emptying the dishwasher with ease is how I convinced my hubs! Question though… Your last open shelves had to be altered to fit your 12″ plates. Ikea’s website says these shelves are only 10.5″ wide. How did you make it work?
YoungHouseLove says
Weirdly enough they seem to fit! I think they technically hang over a little but since they flute up (they’re not flat, they curve and the base is something like 6″ wide) they seem not to be too big for the shelves! So glad that worked out, because we didn’t even think about it until we loaded up the shelves after we hung them!
xo
s
Lindsey Makrygiannis says
First day back at work and I’m scrolling back through your posts. I have never laughed so much as I have laughed at Clara’s comments on your calendar! Good on you for documenting these for posterity!
YoungHouseLove says
Aw, thanks Lindsey!
xo
s
Claire says
What made you decide to use corbels in your second kitchen but not this one? I love the look of both!
YoungHouseLove says
I think we just thought they’d look nice in the last kitchen (the doors had curves at the top, so they felt slightly more… curvy I guess? These doors are more rectangular, so they felt a little cleaner, like floating shelves would be a nice match?
xo
s
Claire says
That makes sense. Thanks so much!
Claire says
On the Ikea website it says “Different wall materials require different types of fasteners. Use fasteners suitable for the walls in your home (not included)”
How did you know which ones to use.
Have they proven to be sturdy so far? How much weight do you put on them and does that see limiting?
Thank you!!
YoungHouseLove says
We used the screws that they provided and went right into wall studs with them. That provides the strongest hold (for maximizing the weight limit) since it’s how cabinets full of dishes and plates are hung on the wall by builders when they’re making your kitchen! Hope it helps!
xo
s
Kathleen says
Hey there! Loving your kitchen! You guys are amazing! I am trying to find the right shelves for our bathroom. Ideally, I want floating shelves that are 28″ to 30″ long and 7.5″ deep. I haven’t worked with the Ikea Lack shelves, but they look perfect for the space. Since you guys used them, could you tell me: Can you cut them to the correct length? And could we cut them to the correct depth? If not, can you recommend the best place for shelving? Otherwise, we will have to make them ourselves, but we live in Minnesota and its a little to cold to work outdoors. I don’t want to wait for Spring. Thanks!!
YoungHouseLove says
Hmm, I think you could cut them to the right length pretty easily (would just have to paint the raw side to blend it in I think… although I’ve never tried it). Changing the depth would be a lot trickier though (you couldn’t cut from the back since that’s where the hanging hardware stuff goes, and if you cut from the front, that whole front edge might look all janky and unfinished. Anyone have tips for Kathleen?
xo
s
Kathleen says
Thanks, Sherry! I couldn’t wait another second, so we decided to go the normal bracket route. We may eventually make floating shelves to fit the space and move these shelves to another room. But it turned out great and now we have storage in our bathroom! No more having to yell to my husband to bring me TP…(Sadly, this actually happened three times in the week we had without bathroom storage. Yikes!)Thanks, again for the Lack shelf tip!
YoungHouseLove says
Sounds awesome!
xo
s
Heidi says
After reading your post and MANY of the comments I decided to buy some of the longer shelves for my dining area like you did in your first house. How many screws did you use on the longer ones? Is just 2 enough like for these shorter ones?
Thanks :)
YoungHouseLove says
Oh gosh, that was a while ago so I don’t think I remember. Maybe four? I’d at least aim for three into studs or heavy heavy duty anchors (I remember we used the metal ones for this guy). Hope it helps!
xo
s
Jenn says
Ok, you guys are wayyyy faster at posting than me (I guess I would be more efficient if I blogged for a living, too), but I wanted to brag on my open shelves and say “great minds think alike”. Check out my kitchen shelves if you have a minute…http://culdesaclife.com/2014/02/05/open-shelving/
I love seeing your nursery progress—the built-ins look SO AWESOME!
YoungHouseLove says
Those are awesome Jenn! Congrats!
xo
s
Evaa says
How is the color of the shelves compared to Simply White? Is it about the same?