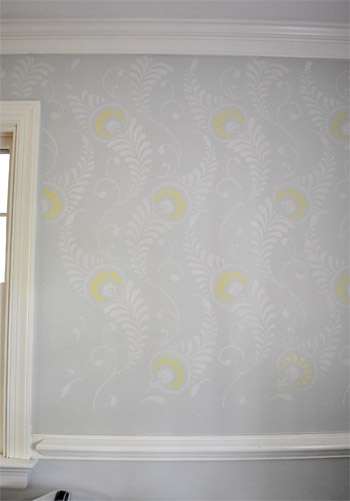
All week I imagined a big office stencil reveal post here. Sadly, it’s not done yet. Oh DIY, why do you take such pleasure in toying with my emotions? Quit playing games with my heart, home improvement. But regardless of the fact that it’s not exactly a quick project, it’s looking awesome and totally going to be worth the blood, sweat, and tears (all three of which have occurred, incidentally). So hopefully by this weekend I’ll be doing some celebratory Rocky laps around the house (yes, with music blaring and fists in the air) and I can share photos & deets of the whole shebang on Monday. Woot! Until then, here’s a still-needs-to-be-finished wall (the bottom edge above the chair rail is still on the agenda):
In the meantime, how about a bloodless-sweatless-and-tearless project in the “quick, easy, and free” vein? See, John had this genius idea that we should try to get an ombre effect on paper (that we could then frame) using food coloring. Namely soaking it in food-colored water and waiting for it to travel up the page and potentially upping the intensity by adding more color to the water and letting it soak a bit less for a two-toned effect.

Yeah… that didn’t work at all. Zero travel-age back up the paper. Just wetness. Haha. So…
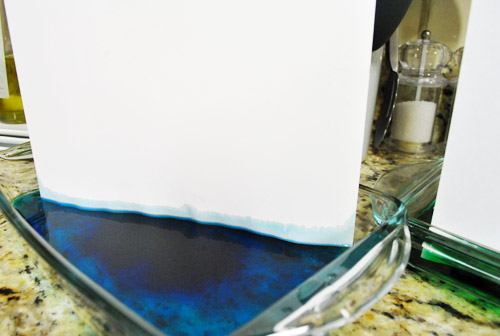
… fail!
But we had some fun messing around with drips and drops, just to see what we liked. First I made an ode to Dexter with a few drops of red food coloring.
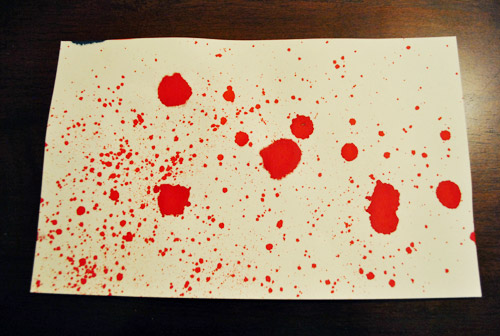
How fun would stuff like this look framed all over the house for a Halloween party? You could even take regular family photos and splash “blood” (aka: red food coloring spatters) over them to weird the observant people out at your little shindig (or use a red sharpie to create the effect on clear transparency paper and place it over them so as not to ruin the original prints/photos).
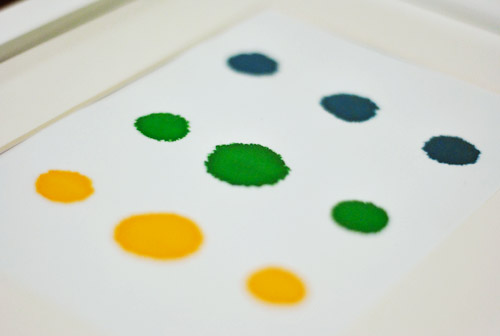
Anyway, then we started messing around with drips down the page but we really fell in love when we hit on this simple collection of dots (we were using regular old card stock by the way):
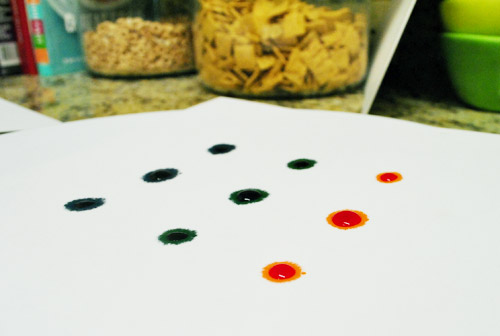
All we did was make three dots of each color next to each other (squeezing a bit harder on the middle one so it was a wee bit larger). Then we just waited for it to dry…
… and framed it…
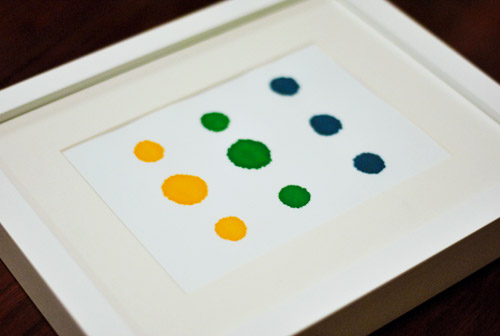
Bam, an instant zero dolla (holla!) “food coloring masterpiece” for our always-changing gallery frame wall:
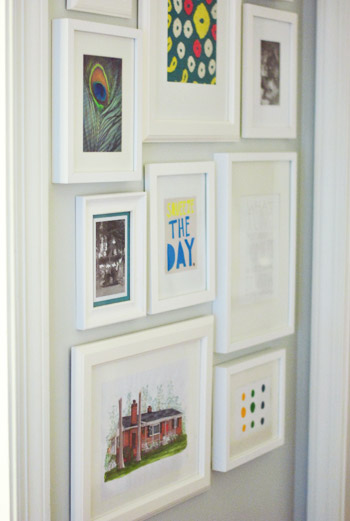
I actually love how it picks up on the circles in the fabric that we framed a few feet up (in the middle). And it’s so fun to tell people who come over (and just stand in front of that wall for twenty minutes) that it’s just drops of food coloring. I can’t really explain why, but it looks kind of exotic and collector-ish. So it’s always fun to see the look on their faces when they realize it was done in five minutes with cupcake baking supplies.
Anyone else going to try their hand at some food coloring art? Or throw a Dexter-themed Halloween party? If so, I would LOVE to see pics of any and all faux blood spatter that you use as decor! Geek for life.
In other news, that might be the shortest post I’ve written in about a year. Hootie hoo for trying to meet some recently mentioned goals. We’ve definitely had our share of long beefy posts this week, so sometimes a quickie here or there feels nice too. Wait, that didn’t come out right.

Carter says
just did a chromatography lab in chemistry class tuesday night…weird…
wanted to tell you i really like how you’ve updated us about the stenciling project as you’ve gone! gives us a good/real sense of how long it’s taking you and also lets us see how it progressed. thanks for all the hard work you do and all that you share with us!
Gloria @ A Little Paint says
It wasn’t exactly “art” but when I brought home a can of expensive paint that had been mixed horribly wrong I used anything and everything to get it to a shade I loved, including food coloring. It’s now all over my bedroom walls!
Angelique says
You can actually do that ombre effect with markers and coffee filters! (I totally did it for a science project in grade school.) It’s called chromotography. http://www.itsjustabox.com/Sciencefair.htm
YoungHouseLove says
Love it!
xo,
s
elaine K says
My kids loved to drop food coloring on paper and blow it with straws into “fireworks” Maybe Clara will like to do that one of these days!
YoungHouseLove says
So cute!
xo,
s
Julia @ Chris loves Julia says
We aren’t going Dexter…but we are throwing an awesome (hopefully!) costume party that we just announced yesterday. We had a blast making our invitations that drove the costume theme home:
http://chrislovesjulia.blogspot.com/2011/09/our-costume-party-invitations.html
Also…your luck finally rubbed off on me. We scored 2 GORGEOUS Ayers nightstands for $12.50 a piece! I thought “this must be what the Petersiks feel like.”
http://chrislovesjulia.blogspot.com/2011/09/swank-stands.html
YoungHouseLove says
Love it! Both the invite and the nightstands!
xo,
s
Marije says
I like it! And can I just say I love the Ribba Ikea frames? I have a LOT of Ribba’s in my house :)
elizabeth says
How often do you guys entertain? Do you have people over to eat a lot or just family visitors? Or family over to eat… I swear this was a better question in my head. I’m just curious since we don’t get a peek at that too often.
YoungHouseLove says
Haha, entertain is too formal of a word. We have family or friends over about once a week I’d say. But rarely for fancy meals. Just spaghetti or game night.
xo,
s
heather says
If you haven’t seen it yet check out the melted crayon art (everywhere on pinterest I would think, I’ve seen it a few times). I loovee it.
YoungHouseLove says
Oh yeah so much fun!
xo,
s
Gloria @ A Little Paint says
Oh and I wanted to add that my halloween costume last year was a couples costume, my husband as dexter with apron and syringe and me as his kill. I made a saran wrap minidress, surprisingly only took one package, completed with stab wound to the chest and slit on my cheek. It was awesome.
YoungHouseLove says
Amazing!!!
xo,
s
Momlady says
Okay, gonna dig out the old art class techniques braincells.First off I’d consider starting with a fairly large piece of paper..cuz what you will probably want to do is crop the painting..culling the herd for the tastiest bits..so to speak. Wet your paper then take a brush..doesn’t have to be a fancy one..you can use the cheap-o flat soft bristle brushes from your favorite home improvement store..or for that matter you can use one of the foam ones…and dip it in non-diluted coloring agent of your choice(you can get some pretty cheap watercolor paints at Michael’s..I’d use the ones that come in a tube..though if you do that you will want to add a bit of water)oh, and have the paper/cloth flat on a slightly tilted board..then just paint a strip across the top..it will bleed down into the unpainted part of the paper. If you want it to have a two color effect or even the same color..just turn it 180 degrees and do the same thing but only wet the paper to just before the color from the last round..that way it won’t bleed too far. You can also try wetting paper and dropping primary colors near each other and so they can mix and give you a third color. I’ve done many of these over the years…it’s fun and you can really get some beautiful effects. Just remember to use more paper than you think you need for you picture/mat/frame..it’s a random thing and you’ll want to be able to crop for the best effect.
YoungHouseLove says
Love the tips everyone! Thanks.
xo,
s
Mabell says
What a wonderful idea! I love that you guys come up with these Free DIY Art projects!!
Lindsey Rivir says
I’ve did that with wool yarn before but I used a dye specifically for yarn. I dipped the whole skein of yarn in the jar of dye then inch by inch and very slowly took it out to create the ombre effect. Then I knitted a scarf with the yarn, it turned out pretty neat.
Christa says
When I was in College studying design, my instructor had us do this project with Watercolors where you splatter big, messy, wet drops on the paper and then blow on them through a straw to create paths where the water drops have traveled. Repeat until your whole paper is full of intricate little paths and a combination of vibrant/ muddied colors. It was actually really cool and fun for a Friday art class in the middle of summer… until she told us we had to outline every. single. line. with an ultra fine Sharpie. Cut to me spending 6 hours tracing the outline of thousands of microscopic watercolor squiggles. Not awesome. Anyway, your food color experiment (and the fireworks comment above) reminds me of some sort of toned-down version of that… which I might end up going home and trying now. It also helps me (on a small scale) sympathize with your frustration over the office wall stenciling. You know it will be worth it though! :)
YoungHouseLove says
Haha, love it! For some reason that sharpie outline sounds fun to me. I’m crazy.
xo,
s
Francesca says
This is so simple but the result is really great. It reminded me of a craft I used to do at daycare with toddlers (hopefully this doesn’t offend you). Anyway, I thought you could try it with Clara. You’d need: liquid watercolors (or diluted food coloring except that stains),an eye dropper, and coffee filters. Show her how to use the eye-dropper to drop the watercolors onto the coffee filter (it’s good hand-eye coordination and fine motor development). The watercolors bleed together and create some tie-dye prettiness (as long as she doesn’t have too many colors 2-3 work best). It’d be a circle too and could look neat framed near your food coloring creation. Plus Clara would feel proud to see her work up on the wall, too. I’ve only done this with toddlers as young as 18 months old, so Clara might still be a tad young? It’s definitely a fun one-day craft though. :)
YoungHouseLove says
Love all the ideas guys! Fun!
xo,
s
Momlady says
opps..forgot to mention..let the paper dry completely before you add the second color/strip.
Carol N. says
You had me snorting diet dr. pepper out of my nose with that last line!
Tina Bland says
So…my BFF just signed up for Pinterest (I told her she does not know life if she does not know Pinterest! lol) Anyways, your Pinterest handle came up as “someone to follow” or something like that! how fun is that?
YoungHouseLove says
Haha, I love it! No idea how that happens but I’ll take it!
xo,
s
amy c says
Like everyone else has said, a pre-wet watercolor paper would probably have netted the result you were try for. Maybe next time. :) Also for next time, you could try some crayons for a little wax resist or throw some salt on the “paint” for a neat effect.
Thanks for the simple project.
YoungHouseLove says
Fun ideas!
xo,
s
Erin says
Did the all over wall stencil thing ourselves a few weeks ago. Loved the end result but it will be a LONG time before I undertake that again! The food coloring artwork is great in its simplicity…good idea that’s even better because its affordable.
Carter says
Ok, hi. I’m the weirdo who pauses your Young House Life videos to see if I can make out what Clara is reading. Weird? Sure, but I have a feeling you would think that is somewhat cool?!
Anyway…the real point is…these dots are amazing! Have you heard of the book Press Here by Herve Tullet? {Clara would like it!} It’s almost like you framed an illustration straight out of the book…which is a fun idea in itself. And obviously great artists think alike!
I have a very new and VERY nerdy blog about graphic design in picture books, so this post and the desire to confess my YHL-book stalking habits left me no choice but to drop in and say hello:)
YoungHouseLove says
Yes! We actually have that book! Just got it as a gift from John’s mom. Clara loves it! And it might explain why she lightly taps the food coloring art too. There’s definitely a resemblance!
xo,
s
Kiera says
would the ombre dying project work better if you soaked the paper in water first then tried dipping in food coloring?
YoungHouseLove says
Sounds like it might! Anyone try it yet?
xo,
s
Megan says
Hi! I love this idea! My husband and I just bought our first house so I’ve been searching for cute (and cheap) things to put on the walls. Our whole house is echoing right now :)
I have a totally random question- where do you guys keep your toaster oven and other small appliances? Right now we have our toaster on the counter. I’d rather use the space for something nicer looking but I wonder if it will be really annoying to constantly be pulling it out of a cabinet to use.
Thanks!!
Megan
YoungHouseLove says
We got a stainless on a few years back it would be kind of cute on the counter (we also had a stainless blender that was out sometimes). But at this house we’ve been using them less (toddler = less time for things like toast, haha) so they’re kept in a base cabinet so we can break them out occasionally. But if you use them all the time I’d look for nice looking ones at a place like target or amazon.com and set them out on the counter. Good luck!
xo,
s
Stephanie says
It gave me a childhood flashback: candy buttons on paper! It’s really cute!
Julie says
Nobody’s commented on that last line? Either I’m the only one that immature or people have missed it – ha ha!
And… how the heck did you draw blood stenciling???
YoungHouseLove says
Haha. I would just look at the splatter marks from the food coloring and try to mimic those wiggly edges with a fine pointed red sharpie!
xo,
s
Julie says
Ha – I meant how did you bleed while stenciling the dining room (blood/sweat/tears…) :) No need to answer, just wondered about it.
YoungHouseLove says
Duh! Haha. As for how I managed to bleed, let’s just say fatigue of climbing on and off of the desk got the best of me and I scraped my shin on the way up after the 500th time. Boo! But I lived to tell the tale.
xo,
s
KathyG says
When hubs and I do a project, we have a saying…if I’m not wheezing (me) and you’re not bleeding, then we’re not working hard enough. ;-) Cheers to blood, sweat, and tears.
Emily Z says
Try spraying the paper first so it is damp. Also works with coffee filters, which can have a cool effect.
Wom-mom Ethne says
Might also be a fun project for Clara in the not-too-distant future. I might try it with my kidlets.
Lisa says
Cute! These days food coloring means homemade playdough! So much better than store bought. Loving the neon colors.
Latoya @The Scotts Crib says
You two are very very clever. I like this a lot:)
Robin says
I appreciate the short posts! (including young house life)
Kathy says
The stencil is gorgeous, your DIY food coloring art is fab and you are hysterically funny! So far, I’ve copied from you the paint the back of bookshelves (mine are red) and am in the process of covering a huge wall with white framed thingies. Thanks for all the great ideas!
Kristin says
Aah, my science-loving heart screams TLC – meaning … thin layer chromatography, of course. Whad did you think? Haha.
That’s an experiment we do with our freshman students:
http://www.demochem.de/D-TLC-e.htm (acetone or alcohol should work too)
Some others:
http://library.thinkquest.org/19037/paper_chromatography.html
http://www.ncsec.org/cadre2/team24_2/Plantpigments.htm
http://tlc.howstuffworks.com/family/science-projects-for-kids-classifying-plants6.htm
Have fun trying this out!
YoungHouseLove says
Fun! Thanks!
xo,
s
Colleen in MA says
Enjoying reading all the advice posted that was learned from science experiments! The decor in my house is classic/urban/comfy/industrial. It works, trust me. Some science experiment art might work.
In other news, had some flooring guys over today and I got to vent to them about how much I hate the bathroom floor and they got to show off their knowledge about all the cut corners and why is was so crappy. Win-win.
Shannon says
Ooh, I get to use my chemistry degree! I know it’s been mentioned to use rubbing alcohol, but there is a special kind of paper used in thin layer chromatography (or paper chromatography). It’s thick absorbent paper usually made of cellulose. Amazon carries a brand called Whatman.
Hmm, I think I need to show my daughter some science experiments this weekend. My parents never let me have a chemistry set growing up. That’s why I went to college for a chemistry degree!
YoungHouseLove says
Haha, hilarious.
xo,
s
Liz says
Have you seen the Dexter blood slide suckers on Instructables? Awesomeness. So excited for the Season premier. (We actually ordered Showtime just so we can watch the new season without waiting). Also just finished season 2 of True Blood. And I totally dig your foodcoloring art. I can totally see that on a really big canvas in my house.
YoungHouseLove says
Haven’t seen those on instrucables- will have to check them out! Jealous you have Showtime! We have to wait for Netflix…
xo,
s
Caryn says
You can use coffee filters instead of paper and it will travel up – chromatography at work!
Kim says
Liking the short posts! Clara will soon be making art like this that you can hang all over the house. Kid art is the best-and free. The hard part is deciding what to keep. But take it from someone who years ago didn’t cull enough; keep only the best, developmental ones, and hang them where you can enjoy them every day instead of storing them.
YoungHouseLove says
Very smart!
xo,
s
Karen says
I have another suggestion for spreading the food coloring around the paper… Years ago when my kids were in pres-chool (they are all in college and beyond now!) we did a project with paper and … are you ready?… SNAILS! The kids loved it… you put a few drops of food coloring on the center of the paper and set the snail in the puddle, and you get the tracks all over the paper! Very pretty, especially with different colors. You can even do races with each person haveing a different color and snail! I bet Clara (and John) would LOVE it!
YoungHouseLove says
Woah! Definitely never heard of that method!
xo,
s
Bob says
I have a [sad face] for art today. The world shall mourn.
YoungHouseLove says
Haha, sorry Bob! I was wondering where you’d land!
xo,
s
sarah says
i loved this cute little idea. and. i instantly thought of ‘Bob’ and wondered if he’d chime in. at least we’re being consistent :)
Amanda says
I love the simplicity of the art (plus it is my favorite analogous color scheme! )
We have a huge Halloween Party every year and we go all out…every room decorated, backyard full of gravestones, bonfire, food buffet, dance room, professional fireworks (which I think you guys would appreciate is free because our town puts them on every year for a falling leaves festival inthe park behind our house!)
Anyways, we are thinking about decorating one room as a Dexter Kill room!! Plastic sheeting…a table, some pics (not gross ones like the barrel girls or anything) and maybe a dummy wrapped in saran wrap!! We are pretty excited about it..is that weird? :)
YoungHouseLove says
BEST. IDEA. EVER.
We want to come to your party.
xo,
s
Regenia says
Could probably accomplish some creepy blood effects on the family pictures just by using red sharpie or expo on the glass. Then just a quick swipe with a cloth slightly dampened with windex or alcohol should clean it right up. No time spent on taking down and rehanging the pics, and no risk of harming them either.
YoungHouseLove says
Smart!
xo,
s
Demi says
Love it! So simple yet cool looking. Totally off-topic question but have you dusted the light fixture in your bedroom ‘yet’? I bought the same one as you guys (and said hello to Karl and Ed when I was at Ikea!) back in April and for the first time since getting it, I ‘dusted’ it off with a blowdryer last week. There was just a thin layer that could only be seen when one was standing on a chair but yeah, just wondering how yours is hanging ;)
YoungHouseLove says
Still haven’t dusted ours yet. Haha. But I love the hair dryer tip! Did you put it on cool/low just in case of fire? Haha.
xo,
s
Demi says
I just put it on cool indeed, love the fixture way too much to risk a fire!
YoungHouseLove says
Haha- so smart!
xo,
s
Anne says
Maybe if you tried a porous paper like cotton paper or the kind that is used for resumes. That might soak up the food coloring.
Jess says
For your first art attempt, Koolaid would have been a great option! When it travels up the paper you can see all of the different colors used in the mix. I did a science project on this in elementary school… But maybe it should stay with the science project category…I think the dots made a better piece of wall art.
YoungHouseLove says
Haha, fun!
xo,
s
Rachel @ The Avid Appetite says
Love Dexter! I actually just did a Dexter Theme Party mood board on my blog today:
http://www.theavidappetite.com/home/2011/9/29/create-a-dexter-theme-party.html
YoungHouseLove says
So spooky. I love it!
xo,
s
Katrina says
I hope your arms won’t be too sore for a really good Rocky impression. And that John gets it on video. I just suggest that you wait until after Clara’s naptime…
Can’t wait to see the final results of all of your hard work!
YoungHouseLove says
Oh man, at this rate I might have to duct tape them to my head to keep them up during victory laps. Haha.
xo,
s
Jenn A. says
This DIY art reminds me of the crayon art from Megan Duerksen’s blog here:
http://megduerksen.typepad.com/whatever/2011/08/you-knew-i-was-going-to-make-one.html
I love this idea!
Your dots turned out awesome. :)
YoungHouseLove says
Oh yeah that’s so much fun!
xo,
s
Sarah says
It reminds me of those sugary dot candy things. I don’t know their real name. Dot candy…or something.
YoungHouseLove says
I love those things! Some other folks have said that too! In short: you guys make me hungry.
xo,
s
Sarah says
I totally love those things! I used to have a dot candy maker…wow, thank god for the anonymity of the internet!
YoungHouseLove says
No way. You can buy those? Man, I’m jealous.
xo,
s
hunter says
On the off chance you decide to play again, fabric works wonderfully well for this. Also (and this is high on the ‘smells great’ scale, which is unusual for home improvement projects) kool aid is a GREAT fabric dye. You need to use wool fabric (or other animal hair), but you can get sheets of wool felt quite cheaply. Then, just mix up your kool aid, and dip away…try folding or twisting it and just dipping tips and corners. Lots of fun!
YoungHouseLove says
You guys amaze me. There are so many amazing project ideas here in the comment section. Thanks for sharing!
xo,
s
Melanie says
Well, I see a few people have given you some tips on the paper chromatography already (Google “paper chromatography art” for some more ideas on how to do it)! Since watercolours have been mentioned too, I thought I’d pass along some of my fav tricks for interesting watercolour textures.
1. Tip the bristles of an old toothbrush in your (not TOO watery) paint, aim at the paper, and run your thumb along the bristles to make random little splatter effects.
2. After putting a wash of color on the paper (again the amount of water has different effects), sprinkle a little salt on there. This is my fav.
3. Texturize your paper before you start painting. Use whatever you want and just see what comes from it – wire brushes, the end of a paper clip, your fingernail, whatever!
YoungHouseLove says
Fun!
xo,
s
Jen says
Maybe this will help with your color experiment. http://www.kids-science-experiments.com/colorbreakdown.html
YoungHouseLove says
So pretty!
xo,
s