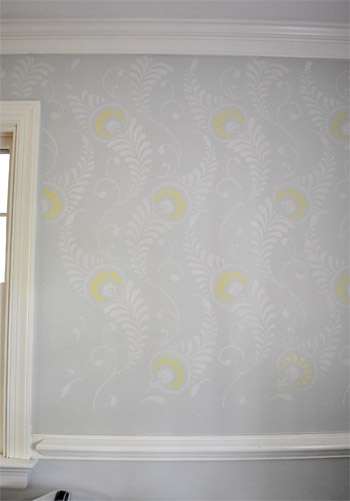
All week I imagined a big office stencil reveal post here. Sadly, it’s not done yet. Oh DIY, why do you take such pleasure in toying with my emotions? Quit playing games with my heart, home improvement. But regardless of the fact that it’s not exactly a quick project, it’s looking awesome and totally going to be worth the blood, sweat, and tears (all three of which have occurred, incidentally). So hopefully by this weekend I’ll be doing some celebratory Rocky laps around the house (yes, with music blaring and fists in the air) and I can share photos & deets of the whole shebang on Monday. Woot! Until then, here’s a still-needs-to-be-finished wall (the bottom edge above the chair rail is still on the agenda):
In the meantime, how about a bloodless-sweatless-and-tearless project in the “quick, easy, and free” vein? See, John had this genius idea that we should try to get an ombre effect on paper (that we could then frame) using food coloring. Namely soaking it in food-colored water and waiting for it to travel up the page and potentially upping the intensity by adding more color to the water and letting it soak a bit less for a two-toned effect.

Yeah… that didn’t work at all. Zero travel-age back up the paper. Just wetness. Haha. So…
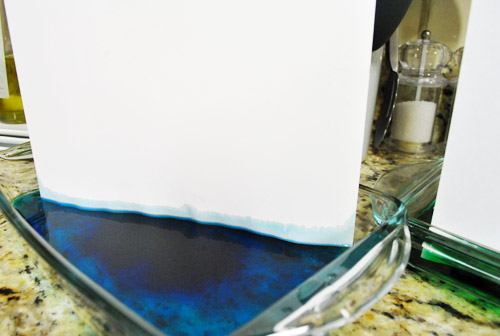
… fail!
But we had some fun messing around with drips and drops, just to see what we liked. First I made an ode to Dexter with a few drops of red food coloring.
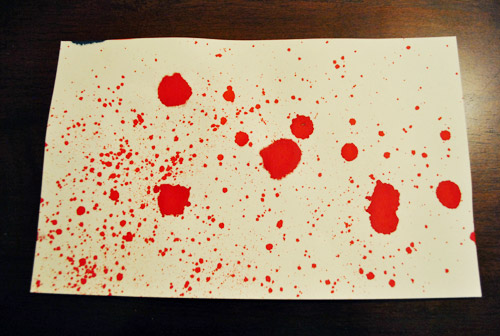
How fun would stuff like this look framed all over the house for a Halloween party? You could even take regular family photos and splash “blood” (aka: red food coloring spatters) over them to weird the observant people out at your little shindig (or use a red sharpie to create the effect on clear transparency paper and place it over them so as not to ruin the original prints/photos).
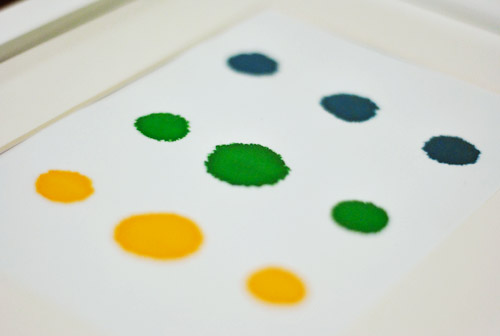
Anyway, then we started messing around with drips down the page but we really fell in love when we hit on this simple collection of dots (we were using regular old card stock by the way):
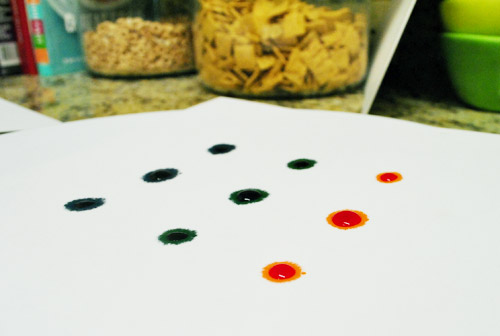
All we did was make three dots of each color next to each other (squeezing a bit harder on the middle one so it was a wee bit larger). Then we just waited for it to dry…
… and framed it…
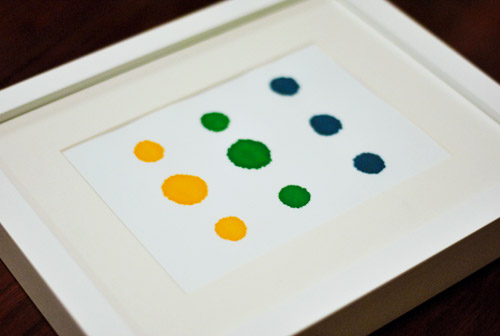
Bam, an instant zero dolla (holla!) “food coloring masterpiece” for our always-changing gallery frame wall:
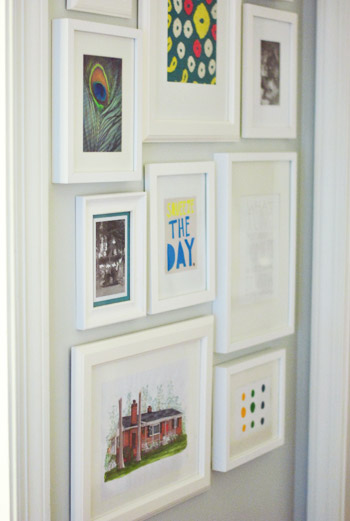
I actually love how it picks up on the circles in the fabric that we framed a few feet up (in the middle). And it’s so fun to tell people who come over (and just stand in front of that wall for twenty minutes) that it’s just drops of food coloring. I can’t really explain why, but it looks kind of exotic and collector-ish. So it’s always fun to see the look on their faces when they realize it was done in five minutes with cupcake baking supplies.
Anyone else going to try their hand at some food coloring art? Or throw a Dexter-themed Halloween party? If so, I would LOVE to see pics of any and all faux blood spatter that you use as decor! Geek for life.
In other news, that might be the shortest post I’ve written in about a year. Hootie hoo for trying to meet some recently mentioned goals. We’ve definitely had our share of long beefy posts this week, so sometimes a quickie here or there feels nice too. Wait, that didn’t come out right.

Christina Bailey says
Ohhh man!!! I stenciled two walls totaling FOURTEEN HOURS of back…errrr, arm breaking labor (although my back hurt too!)
In the end its totally worth it and you will take a step back and say WOW! And even better, all your friends will say WOW too :)
You guys are amazing, love the blog!
Tanya from Dans le Townhouse says
Wow, those little food colouring dots looks pretty cute teamed up with your other art. I like how the colours all work together and the uniform frames are asuch agood choice.
I’m such a fan of easy-peasy DIY art. My own DIY projects page on my blog is quickly becoming more about DIY’d art than anything else. I’ve used wool, I’ve used paint. Now I’m going to have to look at food colouring different!
My projects:
http://dans-le-townhouse.blogspot.com/p/diy-projects.html
YoungHouseLove says
Fun!!
xo,
s
hyzen says
Whoa, looks like I’m first, but I’m sure that’s not possible…. Anyway, just wanted to say that I like the ombre idea, and I wonder if it didn’t work because of the kind of paper you used. It seems like something thick, maybe with some cotton content, might do the job–now I want to try it. Love what you ended up with, though!
YoungHouseLove says
Oh yeah that’s a good suggestion!
xo,
s
Meredith says
I think watercolor paper (at Michael’s) would work pretty well, too, since it’s meant to absorb the water.
Gaidig says
I agree with meredith about using watercolor paper, and I would suggest pre-wetting the paper, then adding the pigment on one side to create a graduated wash.
heather says
We did this as girl scouts with homemade paper (so I guess a thicker cottonish one would work too?). Only we did bottom, then turned to top, then did each side (of course in crazy colors because we were kids), but you might be able to use the same effect. I’m not sure if it would soak up the entire page without the paper falling apart but by letting it dry, and then turning it to do the other side, it might work.
Lori says
Love the idea of an ombre effect. As Hyzen suggested your best chance of achieving this effect is using paper composed with cotton. You can easily test this suggestion by using a coffee filter but you have to keep a watchful eye on it because it wil soak up the liquid quickly.
Mim says
coffee filters absorb colored water wonderfully — my kids’ preschool got these industrial size coffee filters (no idea where one finds something like that) and they made this cool art, which we hung in their bedroom windows for a few weeks til they faded and got all scraggly. Might be a fun project for you with Clara sometime?
http://mim.dsl.spiretech.net/gallery3/index.php/family/2011/March-2011/newart2
http://mim.dsl.spiretech.net/gallery3/index.php/family/2011/March-2011/newart3
YoungHouseLove says
Definitely sounds fun!
xo,
s
Lauren says
Oooh I love it! And that’s a great idea for Halloween with the blood splatter on family photos. Get us there! I’m ready for autumn!
p.s. My coworkers can blame you for me humming The Backstreet Boys’ first single all day…
Maureen @ This (Kinda) Old House says
So cute! Definitely fits in with your frame wall. How do you all think of this stuff? And free is ALWAYS great. :)
YoungHouseLove says
Haha, we’re like mad scientists. We open the kitchen cabinets and look around for ideas. It’s such a weird brainstorming process. And John is almost always the one who has the best idea. He’s the brains of this operation.
xo,
s
Isabel says
Adorable! And it picks up the colors from the peacock feather too!
LauraC says
That’s what I noticed first too.
Kristen @ Popcorn on the Stove says
What fun art! To bad John’s idea didn’t work. Maybe a fabric would’ve soaked the food coloring up better? Maybe it’s worth a second shot!
Can’t wait to see the finished stencil project (you’re right – they do take foreverrrrrrrrr!)!!.
YoungHouseLove says
Oh yeah that’s a fun idea! Maybe fabric would do the trick.
xo,
s
Nikki says
You could try making a puddle of a few drops at the bottom of a piece of paper and then using a straw to blow it in different directions to resemble corral. Short bursts of air through the straw and changing angles make the ink jut out in different directions. I did this with india ink on a larger scale and it looked great! (Sorry I don’t have a pic to send you!)
If it doesn’t turn out then you only wasted a few drops of food coloring and a sheet of paper :)
This project is super cute!
YoungHouseLove says
Sounds fun!
xo,
s
Carol says
Short and sweet is good!
Dana says
I super like this idea!! It would be really cool to do a large piece with a gradient of dots…hmmm.
Amanda @ Our Humble A{Bowe}d says
Too bad the ombre didn’t work. I recently had an ombre dyeing issue of my own. http://ourhumbleabowed.wordpress.com/2011/09/19/and-then-tweak-for-perfection/
I love cheap and free art. I made a shadow box you might like: http://ourhumbleabowed.wordpress.com/2011/08/31/box-step/ It was pretty easy to do, and I think Clara’s little foot would look adorable in the gallery.
I still haven’t seen any of Dexter season 5. Boo. I guess that’s what happens when you have older kids who are aware of the violence and profanity. Do you guys like Criminal Minds?
YoungHouseLove says
We haven’t checked that out yet, but would probably love it!
xo,
s
Karen J says
Totally off topic, but didn’t you get those Reebok toning shoes for your birthday? Reebok was recently “kicked in the butt” about their fraudulent advertising claims. You may be eligible for a refund: http://www.ftc.gov/bcp/cases/reebok/index.shtm
YoungHouseLove says
Just found out about that this morning! So crazy.
xo,
s
Chrissie says
Aww man, I totally wanted some of those! What a bummer theyre not supported by fact (totally unintentional puns there, for your reading pleasure)
Faith says
Food coloring art?!! Brilliant. I WILL be doing this soon. Hmmm, I wonder if I could use it on a canvas too…..
YoungHouseLove says
Ooh that could be fun! Maybe try using a cheap test canvas first?
xo,
s
Caitlin @ Desert Domicile says
So simple yet so pretty!! Off to pin this :)
JMB says
Cool…and oh so simple…like it lots :o)
Amy @ Lovely Nest says
I’m wondering if the food coloring would travel up the paper if you got some of the paper wet before letting it sit. Not sure if it would work, but just a thought!
YoungHouseLove says
Great idea!
xo,
s
ellis says
This was my thought too- it seems like that’s what I hear to do to get coloring to travel up. Yup, gonna have to test it. :)
Ashley says
If you wet the paper prior to dipping it in the dye, it should travel a ton better. Also, lower weight paper would make it easier for the dye to travel.
Sara says
Yeah! I was thinking the same thing. I bet if they did watercolor paper AND pre-wet, it would work like a charm. :)
Amy says
Would it have worked if the paper was wet? I remember doing something similar with coffee filter paper in high school.
YoungHouseLove says
That definitely could have helped! I think watercolor paper might have helped too.
xo,
s
Ali says
Thanks for inspiring even the not-so-creative folks (like me) that anything can be art!!! I’m inspired!
Allyn says
Dang it! Now I’m determined to figure out how to make ombre paper. It’d be the perfect (and free!) art for our sadly bland bathroom.
Angie @ The Country Chic Cottage says
Welll…I did make a wreath with food coloring..does that count? BTW — it fades in sunlight…but it sort of a ombre effect…
http://www.thecountrychiccottage.net/2011/03/spring-wreath-with-coffee-filters-and.html
YoungHouseLove says
Cute!
xo,
s
Julia says
Love it! How often do you change the art in your hallway gallery, btw?
YoungHouseLove says
Hmm, we probably rotate something in once a month or so. We like to keep it sort of organic and always-changing.
xo,
s
Emily V. says
Love it!
Robin @ our semi organic life says
oh how darling!
nichole says
Such fun ideas… as usual.
John had a great idea, the only thing that he needed to do is soak the paper first.
At least that is how I would do it with watercolors… same principle, right? maybe?!?
I’m sure someone else has already mentioned it.
But I also wanted to thank you for your inspiring diy. Thanks!!!
Ashlene M says
So inspiring, we are going to be decorating and putting together an office in our basement, definitely have told husband that we are doing a frame wall down there, the food coloring picture is wonderful.
Emily says
Looks great! Free art projects are always fun, inspiring and accessible.
Jess @ Little House. Big Heart. says
I love the dots, but would really love to see the ombre! You might try it with uncoated paper since the sheen on some papers might make it harder to absorb the dye. It might also work to wet the paper slightly first? I might have to give this a try!
YoungHouseLove says
Oh yes prewetting might have worked! And maybe using watercolor paper?
xo,
s
Ami says
LOVE! This would be awesome as cheap art in a kids room!
Caity says
My husband and I just started watching Dexter…we’re on episode 4. It is awesome! So I liked this post :) You guys are so creative!
Alissa says
I love that you said “hootie hoo”!
I live in NYC and passed Top Chef Carla on the street last week – it took a lot of restraint for me to not yell “hootie hoo”!
YoungHouseLove says
I would have SCREAMED that. Hahaha. You have excellent restraint.
xo,
s
Robin @ our semi organic life says
I would have too sherry! My husband gets so embarrassed when I yell it in public!
Kimberly says
You can try drops of food coloring across one edge of the paper and then spraying water with a water bottle across the paper from the side with the drops to get your ombre effect.
YoungHouseLove says
That sounds fun too! Thanks for all the good ideas guys!
xo,
s
Callie Jennings says
Did you dampen the paper before you tried to let the color climb? I did a science fair project on chromatography in 5th grade and while that was “several” years ago, I remember that having a much more dramatic effect. Also, coffee filters do really well with the effect you’re looking for too. What gets really crazy is if you use different colored black pens and see what they’re made of as the colors climb.
YoungHouseLove says
Thanks for all the tips everyone!
xo,
s
Lauren says
Ok that last line is cracking me up right now.
I’m going to a Murder Mystery Halloween party this year (with assigned characters and everything.) I’ll have to mention the Dexter art to the girl throwing it.
Barb says
So how much of the walls do you have left to stencil?
YoungHouseLove says
Grr, about a fourth of the room. Just things like edges and corners and a small part of the wall.
xo,
s
Lynnette says
Your first food coloring idea would actually work if you mixed the food coloring with rubbing alcohol and water. In college we used hydrochloric acid but rubbing alcohol will get that effect for you. Place it in about an inch of the mixture and leave for almost an hour. Nerdy science trick. :)
YoungHouseLove says
AMAZING tip! You guys are so smart.
xo,
s
katie says
love it! so easy, too :)
you guys are smart!!
kristen says
*patiently waits for bob to show up*
YoungHouseLove says
Haha. Can’t wait to hear what he thinks!
xo,
s
Meagan says
I am totally doing the same thing. Bob, where are you?
Sayward says
That was my first thought too!
Polina says
What a great idea! Would be a fun project to do with kids too!
Lynnette says
Its called chromatography if you’d like to look it up
YoungHouseLove says
Thanks!
xo,
s
Sarah says
What if you tried watercolor paper and soaked it first?
YoungHouseLove says
Probably would work a lot better!
xo,
s
megs & bacon says
Um, the dots are awesome. You totally need to go find the kids book “Press Here”. It makes my heart so very happy.
And…….. BSB forever.
kate says
The fact that the stencil does not go all the way down to the chair rail looks absolutely incomplete and bad. Sorry :(
YoungHouseLove says
Oh yeah that bottom area’s not done yet! Haha. That’s part of what I’m still working on. More finished pics of the whole room on Monday I hope!
xo,
s
rachael says
I’m not usually one to say something bad, but it erks me when I read comments and people have asked questions or said something that is CLEARLY in the post. Is this a picture book? Come on people, READ! Exmaple: “Until then, here’s a still-needs-to-be-finished wall (the bottom edge above the chair rail is still on the agenda”. Pretty sure you were very clear in pointing out what area needed to be finished. Plus, you mentioned in your blogiversary week that you moderate each individual comment and reply to a lot of them, which takes tons of time so why can’t us as readers take the time to read the whole post before we comment? Probably would save you a heck of a lot of time. *sigh*
End rant.
Stephanie says
That’s really cool! My mom used to do an art project like that with her students..they’d use bingo blotters and she had them do it on Paper towel. It really helped with the color bleed. Or was it coffee filters…
Anyway..Tre chic!
Mollie says
reminds me of twister! perhaps you can make another one for clara’s future dollhouse. ;)
YoungHouseLove says
Hahaha. I love it!!!!
xo,
s
Bridget says
i LOVE the Dexter reference! I’m obsessed and can not WAIT for the premire this Sunday!!! Wahh hoo! I’m researching some Dexter inspired treats for the event :)
http://www.citysbest.com/new-york-city/news/2010/10/27/seven-killer-halloween-cupcakes/
YoungHouseLove says
Haha, love it!
xo,
s
Brandi @ His Shabby Her Chic says
I would have NEVER thought about using food coloring for art work on paper…totally awesome idea!
Are you as pumped as I am for the season premier of Dexter on Sunday?! I’ve been watching last season all week to catch up!
YoungHouseLove says
We don’t have showtime so we have to wait for Netflix. So sad. No one tell us what happens!!!
xo,
s
Erin says
The dots remind me of those dyed sugar dot candies you had to peel off paper. Yumm! Good memories. :-)
Original_Ann says
I love it! They’re totally reminiscent of a childhood favorite: those button candies on paper!!
YoungHouseLove says
Mmm, those are one of my favorite things ever.
xo,
s
Kerry says
Love the dots! Also, love the Dexter reference. I’m in Salem, MA, so we’re already Halloween crazy out this way. My husband and I throw a big Halloween party every year and we’re already planning out what to do in each room for decor. I went as Carrie last year, so I took a thrift store dress and found some spray cans of fake blood and I covered the dress in bloody streaks then let it dry so I didn’t track blood all over the house. Not sure what our neighbors thought when they saw a bloody dress hanging off of our clothesline the day I did it.
YoungHouseLove says
Haha. Glad no one called the cops on you!
xo,
s