You guys may remember Kara from Kara Paslay Designs thanks to the amazing house crashing tour that she took us on a while back. And when she sent over some photographs of a stunning ottoman that she DIYed, we begged her to treat us to an exclusive little YHL tutorial. And- oh happy day!- she was game. So without further ado, we’ll hand this post over to Kara so she can take you through the process of making your very own version of the lovely (and surprisingly doable) ottoman that she whipped up. Gorgeous, eh?
Hello YHL readers! I am so excited that John and Sherry have invited me to share the details about my DIY tufted ottoman! Here we go:
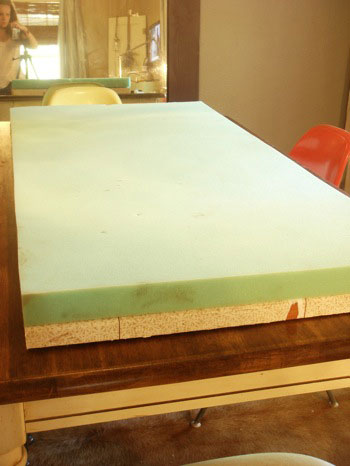
Step 1- Cut a piece of wood (or MDF) to the coffee table size of your choice, unless of course you are using your current coffee table to save some moolah. If you’re building it from scratch, I’d suggest using 3/4″ plywood (or MDF) to avoid sagging. Next, choose the spots where you’d like to add button tufts (6 or 8 or as many as you’d like) and pre-drill small holes through the MDF or wood. Then cover your wood top with contact cement and place 2 inch foam (cut to the same dimensions) on top. You can find the foam at your local craft store.
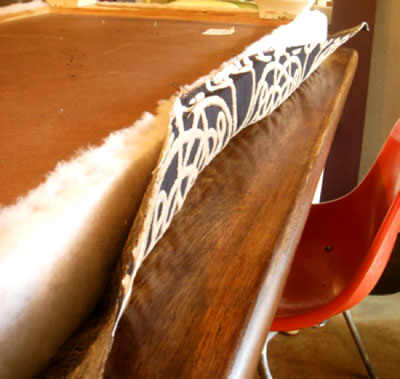
Step 2- Cover your top with extra-loft batting, securing it underneath the table top with a staple gun. Then trim the excess.
Step 3- Cover the batting with your chosen fabric. If your fabric has a pattern, make sure it is straight before placing all your staples. When upholstering a simple square or rectangle: put a few staples in one side, then go to the opposite side, pull it tight, and add a few staples there. Do the same with the other two sides. This ensures that your fabric is taut and you don’t end up with bunches and bulges that you didn’t expect. Also pay attention to how tight you are pulling the fabric and keep the tension the same all the way around for a professional look!
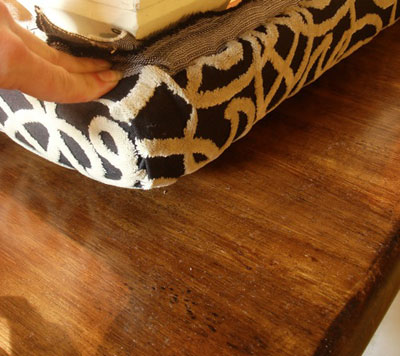
Step 4- Finish out your corners. They should look like the photo below at the beginning.
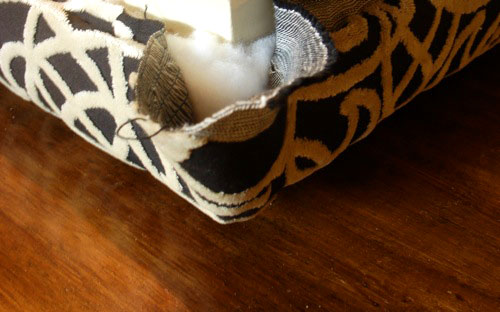
Then pull the left flap to the right and staple. Next pull both flaps to the left and staple, being sure to smooth out any lumps and humps because regardless of what the song says, these are NOT lovely or ladylike! Here’s what you should end up with:
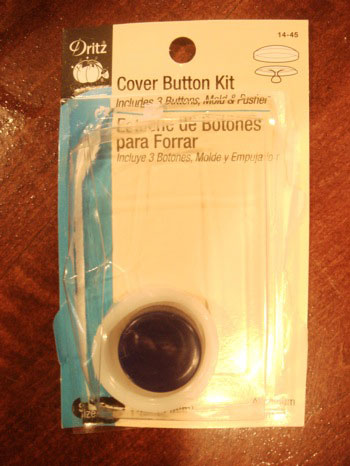
Step 5- Now it’s time for tufting. You can find buttons and cover kits at your local craft store. Once home, cover your buttons using the instructions on the packaging.
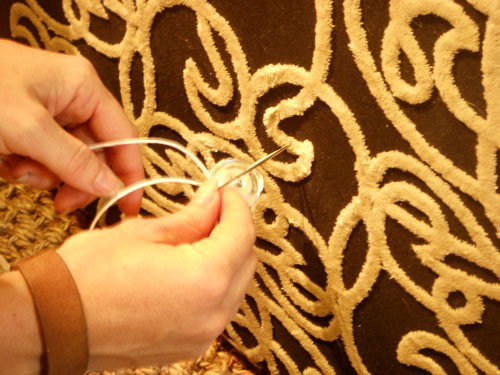
Step 6- String a heavy and strong thread through the eye of a very large needle. Do not cut the thread.
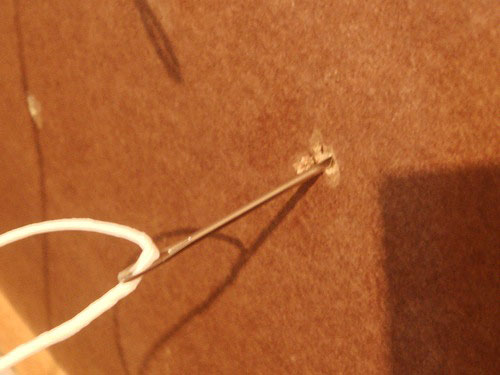
Step 7- Push the needle and thread through (from the back to the front) of your piece, through a pre-drilled hole where you want your button tufting to appear. You may need to use pliers to grab the needle and pull it through.
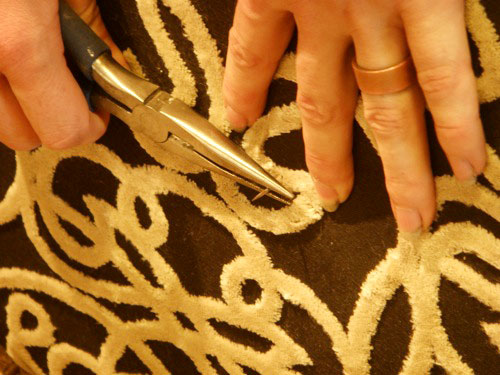
Step 8- String your button onto the thread and then push the needle back through. It may take a few tries to find the hole, but keep trying and you will get it!
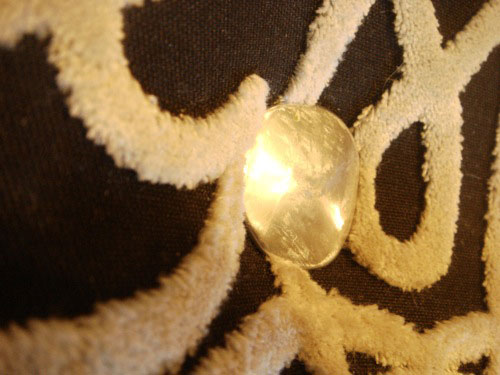
Step 9- Thread a washer onto one end of the string and then use both ends to tie a knot ensuring nothing comes loose. Have a friend or spouse push the button in on the other side while you tie the knot to ensure that all your tufts are the same depth.

You tufted button should look like this once completed:
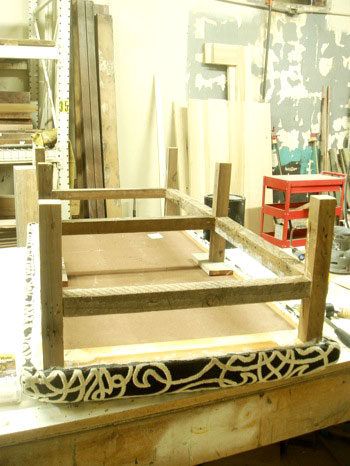
After you do all of your buttons this way you should be left with a beautiful tufted HEADBOARD!!!! All you’d have to do is hang it! But we needed an ottoman, so Tim and I put together some “look at me” legs. I always like a piece with some history, so I chose to make my base with old 2 x 2s that we removed from our house during its renovation. Our house was so old/not up to code, a few walls were made up of 2 x 2s set in a grid pattern (instead of 2 X 4s centered on 16s). YIKES!
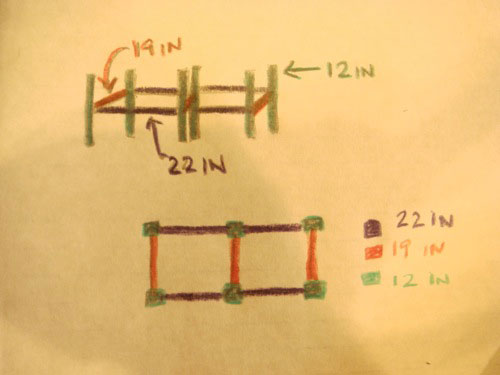
Step 10- Next we cut our wood into: six 2 x 2s at 12 inches, three 2 x 2s at 19 inches, and four 2 x 2s at 22 inches. Here is a color coded drawing to show you how we put the pieces together. The 1st drawing is a side view while the bottom drawing is a birds eye view.
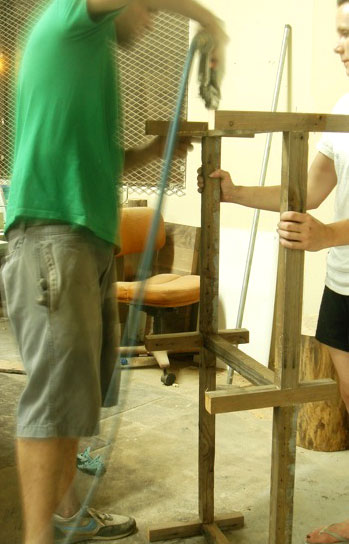
Step 11- Bring your base together. Now would have been a great chance to use that Kreg Jig that John has been loving, but unfortunately we don’t have one. So, we opted for a 1-2 punch of finish nails and Liquid Nails. You could also use screws and Liquid Nails. Things are pretty sturdy in the beginning, but once the Liquid Nails hardens up, things are Jillian Michaels tough!
Step 12- Attach the base to the top. We used Liquid Nails again and then toe-nailed our finish nails to secure the top to the bottom. To “toe- nail” simply means to nail things in at a diagonal. You should also do this if you are using screws (and be sure to pre-drill)!
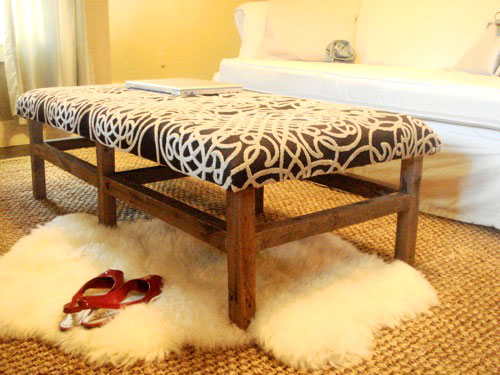
Now that we’re finished, here’s what it looks like in our living room!
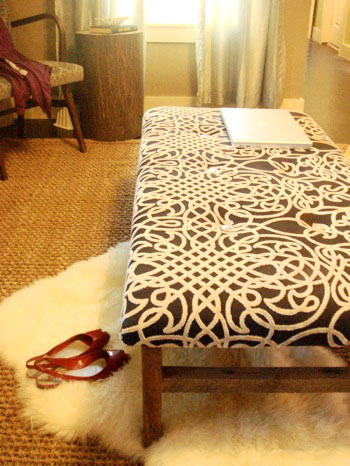
We are so excited to have a brand new piece of furniture that is incredibly functional, serves as a reminder to our renovation experiences, was made from mostly reclaimed materials, and only cost us about $35! Here’s the budget breakdown:
- Top from former coffee table- FREE
- 2″ thick foam- $27 (with 40% off coupon)
- Contact cement- already owned, aka: FREE
- Fabric (scrap piece) – FREE
- Tufting buttons- $5
- Reclaimed wood legs- FREE
- TOTAL COST: $32
Although we lucked out by finding pieces we could reuse, we’re sure you can do the same by upholstering a coffee table you already have, using an old curtain panel for your fabric, and scouring your local thrift shop or Habitat For Humanity ReStore for wood scraps or pieces that you could reinvent as an ottoman. Good luck!
Doesn’t that DIY ottoman look fantastic? And you can’t beat that price. We’re sending out a huge thank you to Kara and Tim for providing such amazing photos and this awesomely detailed play by play of their upholstering and building process. What do you guys think? Anyone out there who will be referring to Kara’s tutorial to whip up one of their own? We must admit that we’re more than tempted to try our hand at one for ourselves!

Randa says
I love it! I wonder if it’s strong enought to sit on? I’d love to do something like this at the end of our bed.
Lexie says
I love your blog! I came across it over the weekend and I love all the ideas! This tutorial is perfect – I’ve been looking for an ottoman for our living room to replace the trunk we’ve been using as a coffee table. I’m going to give this a shot. :)
Alicia Damron says
I’m bookmarking this page right now! I’ve been wanting a coffeetable/ottoman with open airy legs, now hopefully I can make one myself, thanks for sharing!
KARA @ KARA PASLAY DESIGNS says
HEY EVERYONE!!!! Thanks so much for your sweet comments!! I am ecstatic that so many of you feel empowered to take this project on yourself!!! I’ve been running around like a crazy woman today so I am just now getting around to answer your questions!
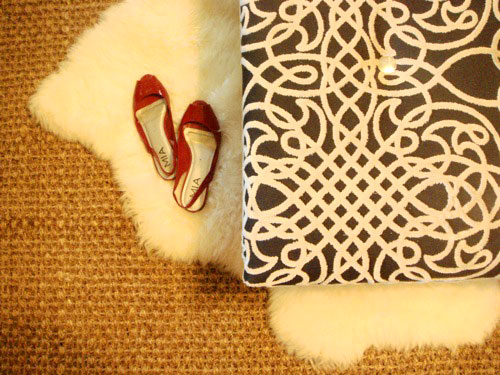
1. The FABRIC is called VV NOR by PROSETEX (an Italian based company). I snagged this piece at a local store when they were getting rid of their samples (which just happened to be HUGE). Sorry I can’t be more help here.
2. For those of you wondering the ottoman is definitely strong enough for two people to sit on.
3. We actually did attach the legs before upholstering it, but then I decided I didn’t like those legs, so I hammered them off and came up with the 2X2 option.
4. Someone noticed that there are small blocks under the middle legs. These are there because our table top had a step down and the legs all needed to be the same height. I should have just cut the middle legs a bit longer to make up for the slight recess but I had already made the cut and we were out of 2×2 – so we improvised. It seems you have to do that a lot in home improvement!! :)
John and Sherry- thanks for giving me the opportunity to share my DIY ottoman. You guys really make a girl feel good! :)
YoungHouseLove says
No thank YOU for sharing your amazing project with us Kara! We’re even considering an ottoman inspired by yours (since the glass table in the living room might not be too toddler-friendly)!
xo,
s
ivy marasigan says
i SUPER LOVE tufted sofas and ottomans! thanks for sharing this. i’ve got 2 black square ottomans here that i want to put together like a bench and have them tufted. i just don’t know how to go about it. im hoping i can get my hubby to do it. haha!
Lindsay says
My husband and I have been searching for the perfect ottoman…now the search is over! Thank you! Looks like we’ve got our weekend planned out for us already!
Annie B says
Fantastic! We have 2 scrufulous square coffee tables at our cabin in the NC mountains, and we’ve wondered what to do with them? We also lack ottomans. Killed two birds with one stone (is there a better expression? so violent!) Anywho – this is IT! And how great is it to be able to introduce a little more color, pattern, texture into a space? Can’t wait!!!!
Elle says
I’m so excited about this! We’ve been looking for an ottoman/coffee table that fits the budget, our style and most important, soft edges for our rambunctious 14 month old :-) This should do the trick! Thanks!
Jill Young says
I love this idea and how your ottoman turned out Kara! I have been thinking about an ottoman project for a while and wondering if I could do a round ottoman. Any ideas how to adapt this for a round table top?
YoungHouseLove says
We would just suggest grabbing a round piece of wood and carefully stapling everything around that (and tufting that). Same process, just a different shape!
xo,
s
Kendell says
Very cool! It seems like ottomans are so darn expensive for such a simple piece of furniture. I’m putting this on my list of things to do right now.
kita says
I have just one quick question….
Do I have to use that tough upholstering fabric for this or does that even matter?
I really can’t wait to get started on mine! :)
YoungHouseLove says
Definitely go for something with a bit of heft to it (something thin and silky won’t hold up and might look loose and stretched out after a bit of use). Just ask the pros at the fabric store about anything that you’re not sure about. Hope it helps!
xo,
s
Jenny says
My sis-in-law and I started on one this afternoon! We have the top done already, just need to finish and attach the legs. If we only had a Kreg Jig! We’ve also been working on the farmhouse headboard from Knock Off Wood.
Jessica says
I’m so glad to see this project! We’ve been searching high and low for ages to find a new coffee table we like without success. We already have a habit of using out table as an ottoman, so this is a perfect solution. We plan to try and add a shelf, if we can wrap our novice brains around how to engineer one that will be stable. Thanks for sharing!
k+b adventures in renovating says
I’m really loving this… what an easy way to update an unused piece of furniture. You could totally change this up with fabric as you got bored of it or changed the mood of the room… which happens for me on what seems like a daily basis. =X
Kate says
This definitely looks doable, but I’m curious… What sort of tool do you use for cutting the 2″ thick foam?
Casey says
Okay I am LOVING this. And my hubby is NOT a DIYer but he is exxcited to make this together, so I’m stoked!
I love the look/finish of your ottoman legs, Kara… how can I get my plain old Home Depot 2×2’s to look like that? Stain them?
jenn says
i just found your blog today and i have been reading it for like an hour now.. AWESOME stuff. I just painted a craigslist coffee table black and wasn’t really liking it.. but then i saw this post and i know what i need to do to make it just right. i just need to decide on what scrap fabric to use. thanks for all kinds of inspiration i’m finding on your blog. btw, great house makeover. I am about to tackle something similar :)
Kristen says
Hi!
Your site is amazing!! (I’m sure you hear that a lot but it really is!!!!) I have a question about this awesome ottoman! My husband and I have been trying to think of ways to add seating cheaply to our extremely tiny and windowless oddball room. So my question is would this be able to hold a person sitting on it or is it strictly a coffee type table (a cute one nonetheless) but we’re trying to find an ottoman and we love that we could make it match our decor(which is a lot like your style). Thank you!!! And thanks for this site! We have a two year old so we don’t know how you guys can do all this with a little one around! Kudos to you guys!!! And thank u Kara for sharing your awesome idea!!!
Kristen says
Oops, I didn’t see the comment from Kara about the two people thing. Nevermind! I still meant the comments though. :)
YoungHouseLove says
Thanks Kristen! We’re so glad you found us!
xo,
s
Kim says
like everyone else i love this idea!! i bought three tables from ikea (for like $9 each) and put them together to make a long bench at the end of my bed. i have been thinking about how to spice them up a bit! this is such a great way! thanks for the info!!
Kim says
I love your ottoman and am in the planning stages for making one of our own. Could you tell me what the dimensions were of your ottoman top? I just not sure how much bigger to make it than the legs.
Thanks so much!
YoungHouseLove says
Hey Kim,
Here’s hoping Kara stops in with that info. Of course you can always pop over to her blog to ask her directly. Hope it helps!
xo,
s
Shelby says
I love this tutorial, I was actually going to attempt it this week but would using broadcloth be too thin of a fabric? Would I need a sturdier fabric?
YoungHouseLove says
Good question! You might want to use something stronger and thicker (like sailcloth or thick linen-like cotton) under it and then use broadcloth over that for a more enforced and sturdy effect. Perhaps asking around at the upholstery shop will yield some good advice!
xo,
s
Tiffany says
I was so excited to find this! I was just looking up large ottomans and they are so expensive but seemed simple to make. I want to do a fairly large one, like 4 X 4 with short legs kind of like ones that would be on a bed or something. Since it is going to be bigger what kind of wood should I use? I would like it to be strong enough to sit on. Do I need to build a base or can I do the same technique above and just use shorter legs? http://www.westelm.com/products/essex-upholstered-ottoman-g176/?pkey=cchairs-ottomans-benches This is the one that I LOVE!! Anyway, any advice would help a lot!! Thanks guys!
YoungHouseLove says
Hey Tiffany,
Here’s hoping Kara drops in with more info for ya. If not you could just ask the pros at your local home improvement store to show you strong dense wood (like poplar over pine) and ask them how much reinforcement they recommend (even bringing photos with you for reference). Good luck!
xo,
s
Clara says
Just came across this post, and I am totally making an ottoman this weekend! I am starting to get into my nesting phase (baby due in 3 months!) and want to have the house nice before I no longer have time to think about it! I have an old coffee table to use, but the legs are gone, so that’s the only part I really have to still figure out. Wish me luck!
JennW says
Any chance you can list the dimensions of the wood kara used for the top?!
YoungHouseLove says
Here’s hoping she stops in with that info!
xo,
s
Amy says
Hi there!
I love this project and am getting started on my own this week. I was wondering what the dimensions are of the ottoman top. I am going to get some wood cut this week and am trying to figure out how big that piece should be what with the dimensions of the 2×2’s and
Thanks for your help!
-Amy
YoungHouseLove says
Hey Amy,
Here’s hoping Kara stops in with that info for you! Feel free to scroll back through the comments to see if she’s answered it before or follow the link over to her blog for more info. Good luck!
xo,
s
katie says
Hello, I just love this tutorial! I am planning on doing something like this with my cheap/old/ugly coffee table. I have one question: How do you wrap the corners with legs that are already on? I can just picture myself making a mess hehe
YoungHouseLove says
Hey Katie,
We’d just recommend doing it slowly and adding in one staple at a time (which you can always pop out if it looks wrong). Feel free to head over to Kara’s blog for more info if you’d like. And good luck!
xo,
s
Henty says
I am a DIY junky and discovering this page REALY gave me my fix, I feel feel like a kid in a candy store. Thank you very much for sharing!
Sarah S says
What size boards did you use for the stand? (legs)
YoungHouseLove says
Here’s hoping Kara can drop in with that info for ya!
xo,
s
brooks_25years says
LOVE this. Love the fabric! I have a small ottoman that I am in the process of making over…putting this fabric on the list of maybe.
cynthia says
What staple gun do you recommend?
YoungHouseLove says
I just have one for about 20 bucks from Home Depot. It’s all silver and doesn’t even have a brand name but it does the trick.
xo,
s
Randy says
Quick question – were those true 2×2’s? or were they 1.5×1.5’s?
Thanks,
Randy
YoungHouseLove says
Hi Randy,
I can’t be certain myself – but I’d guess they weren’t true 2’x2’s. Hopefully Kara will find her way back here to answer the question, but given that it’s an older post it may not be anytime soon. Sorry!
-John
NancyB says
Thanks for this post! I’ve been looking for an idea to make something out of some sentimental fabric of my son’s (long and funny story how it became sentimental). After reading this I’m going to use it to make an ottoman! Like you I already have legs from another table, sturdy old wood table top, 40% coupon for the foam, etc. On my way to give him a wonderful gift for Christmas! Thanks again!