Yes, that’s an electric slide reference. And I’d bet money that it’s cracking my mom up while my brother is rolling his eyes and vowing never to read this blog again.
Let’s talk about electrical updates, like hanging a new capiz chandelier in the bedroom, and putting our heads together to gain a few bonus outlets and cut down on drywall holes while running electrical wiring. After last week’s post about our four new outdoor sconces, we mentioned we had some other wiring work done inside at the same time, so here’s the rundown on everything we added, where it went, and how much it all cost.
We’ll start with the prettiest result so far – the new light in our bedroom.

We had the electricians add ceiling fixtures to all four of the upstairs bedrooms, since we like the look and convenience of overhead lighting, but all the bedrooms were without it. Thankfully there was no drywall-disrupting work necessary other than the hole in the ceiling for the fixture box because they could takeover the existing switches, which used to just operate various wall outlets in each room. So not only did we not have to add additional light switches, we no longer accidentally turn off random things like the cable box or the sound machine as we leave those rooms.
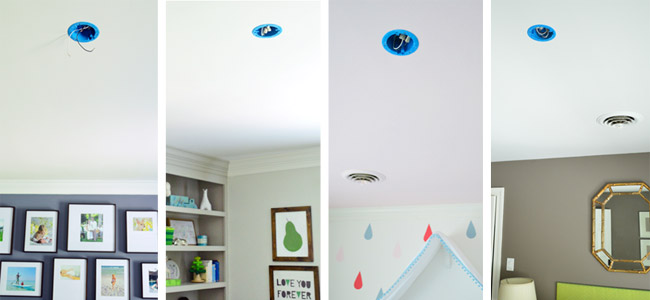
We don’t have fixtures for the kids rooms or the guest room picked out yet, so we’ll just add white metal covers to minimize the whole blue-circle-with-wires-in-it look until we find some. But we did have the master bedroom light ready and waiting. It’s this Large Lotus Pendant that we ordered from World Market waaaaay back when we bought our hallway lights. It was going out of stock and we got the same 25% off deal on it as the other three lights, so it was $112 instead of $149 with free shipping.

Our only gripe upon receiving it was that it didn’t include a light kit (we somehow missed that bullet on their website). Then we noticed that World Market’s light kits only come in black or silver, so we hunted down these two bronze options from Home Depot and Lowe’s. They’re the kind they make so you can pair them with their decorative glass shades (like the ones they show on the packaging) but we thought they could work for this application too (fingers crossed). We liked that they had a few finish options and came with all the other hanging hardware (and a ceiling canopy) that we’d need.
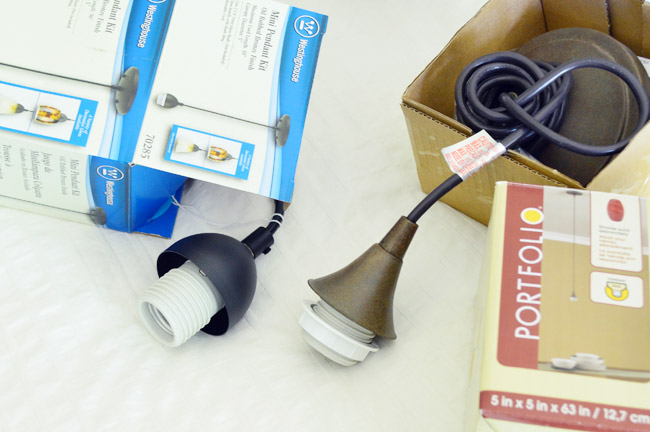
The “aged” finish of the Portfolio brand pendant from Lowe’s (it was $18) was a better match to the fixture, which was lucky because it was the only one that ended up fitting. The ring on the capiz fixture was slightly too small to screw it on normally, so instead it rests on the flared part of the light kit like so:
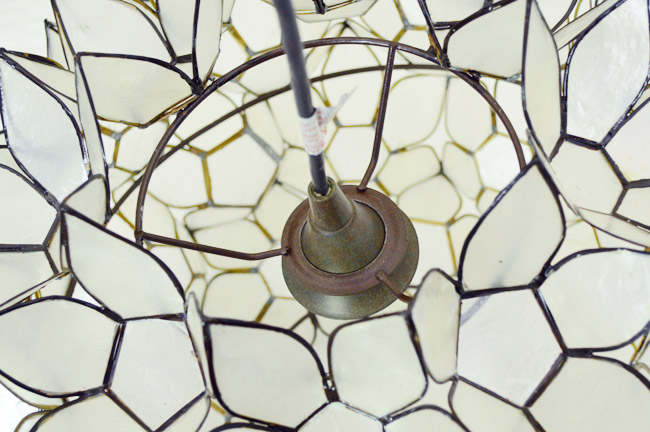
Once we realized that nesting the cord and shade that way would work, the installation process was pretty straight forward. In fact it might be the quickest light install we’ve done here so far, clocking in at under fifteen minutes yesterday morning. Bingo. Bango. And not once did John poke himself in the face with a metal flower petal. I was not so lucky.

It takes one 60-watt bulb so it’s nice bonus lighting on top of the two bedside lamps that we’ve been surviving with so far in this room (since we’ve lived with only those for over a year, we knew anything on the ceiling was just icing on the wattage cake for us). But can I just tell you how incredibly novel it feels to walk into a bedroom and flip the light on from the doorway. Seriously, it’s almost akin to living without a dishwasher forever and then getting one. Suddenly you feel like royalty.

But let’s switch gears to a quick overview of the whole electrical job. Here’s everything that was accomplished in the three mornings they were here (it was too hot to be in the attic or crawl space later in the day, so they spread out their work across the cooler morning hours):
- Added ceiling fixtures to four upstairs bedrooms via our attic
- Converted light switches in said bedrooms to operate ceiling lights instead of wall outlets
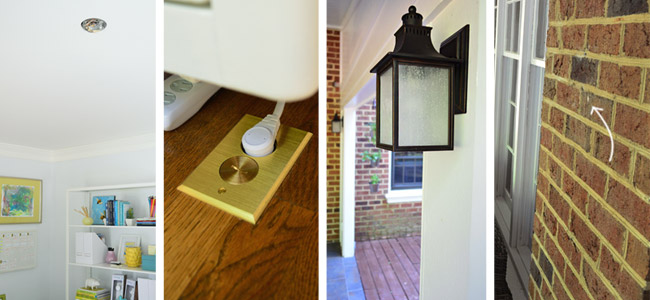
- Added four sconces out back in the veranda (operated by an existing switch in the living room)
- Safely terminated some old radio/intercom wiring in veranda
- Added a ceiling fixture in our downstairs office (and converted an existing light switch)
- Added a floor outlet in the office beneath our floating desk
- Added two additional wall outlets in the office (more on those in a second)
Update: You guys are asking for more office floor outlet details, so here they are: it was a really simple addition since they could come up from the crawl space. Didn’t take them too long at all. They just wired it up from below and drilled a small hole in the floor from above and popped the outlet cover on. You can see the finished result below:
We got the bill this weekend, which totaled around $1,500. The breakdown was $270 for materials and the rest was labor/time. It was definitely one of the larger electrician bills we’ve received, but we paid around $900 for the lighting in our first kitchen, so getting nine fixtures across six rooms and three new outlets was a lot more work/time, and we were pleasantly surprised to realize that it calculates out to an average of about $100 per item, not including all of the switches they converted or the intercom they terminated. If we had electricians come out to tackle these rooms individually instead of bulking them all, it would likely have been a few hundred bucks per room each time (they’d be in and out of the attic a bunch of times instead of being able to do everything all at once). So efficiency = saved money, especially when you’re paying by the hour.
Besides passing along the try-to-combine-lots-of-jobs-if-you-can tip, this was also a good reminder that it helps to be available if at all possible when this type of work is being done. In this case, it saved us from lots of unnecessary holes in our office ceiling. Thanks to being there, we were able to put our heads together to come up with an alternate wire route than the first one they proposed, which ended up causing a lot less drywall destruction:
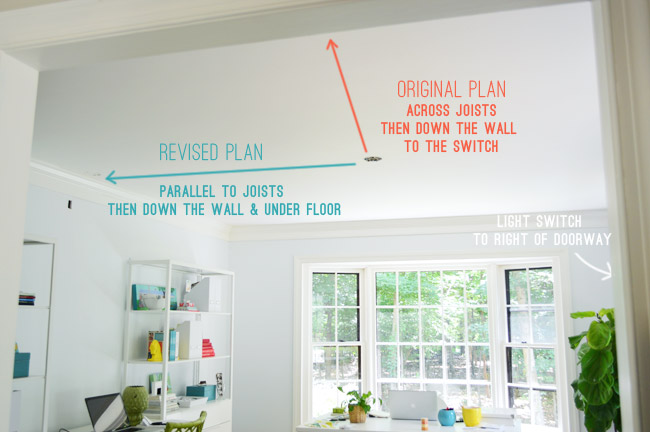
Instead of going through multiple joists and making tons of ceiling holes, we realized if the wires were run parallel to the fixture box joist, it could be snaked down that wall, and fed over to the wall switch via the crawl space instead of the ceiling (they’d be down there anyway adding that floor outlet). That option only required one small hole in the ceiling (near the tip of the blue arrow above) instead of nearly ten holes had we gone with the first method. It also meant there would be a few down the wall, but those would have been made near the light switch if we went with the other method anyway, and patching walls holes feels much less perilous to us than ceiling ones anyway (ceilings just tend to catch the light more and show every last imperfection, whereas wall ones are more forgiving).
Another little bonus that we came up with after putting our heads together was gaining this outlet right under the surface of John’s desk:
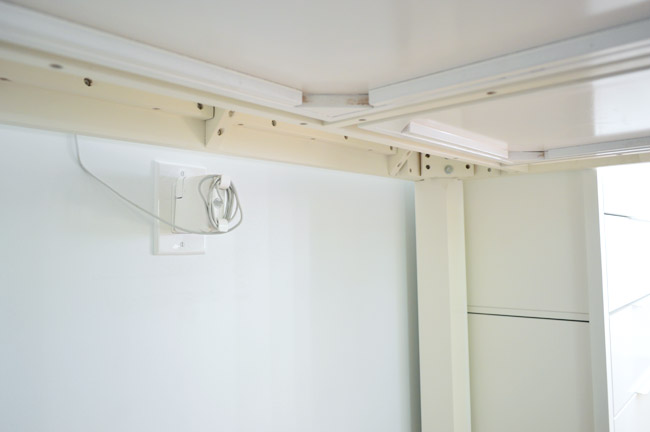
When the electrician told us a hole would end up around that area as he snaked the wire down, I asked if we could place that hole below the desk line and put an outlet there to fill the hole (instead of having to patch yet another area). He said no problem, and now John can keep his cords out of sight better (the original outlet he was using was behind one of the shelves that we anchored to the wall, so a big power strip had been resting on the floor beneath the desk).
We did the same thing on the wall under the light switch where he was going to have to make a hole anyway. That extra hole-filling outlet meant we could plug in our printer and that lamp without the cords having to snake out to the outlet under the window. So being home and talking through options might add up to more functional outlet/switch placement and less spackling & sanding.

Oh, and that’s a painting of a monster that Clara brought home from art camp last week. I think it’s our new favorite creation of hers, so it might just get a permanent home there eventually. One that doesn’t involve masking tape.

So obviously you’ll be getting some light fixture updates for the office and the rest of those upstairs bedrooms sometime in near (ish?) future as we find fixtures for those spaces. Now if only we could punch our ceilings up a foot or two to give us more options. #8ftceilingproblems
*This post contains an affiliate link

Summer says
I love the light fixture!!!
Emily @ Life on Food says
That light is so pretty! We are looking for a new light for a nursery!!
Julianne says
Nice tip (and savings) – knowing what electrical jobs you want done everywhere and bulk them all into one job. Love the bedroom light, too! Gorgeous :O)
M says
I love that light! It is gorgeous. Very different, yet somehow classic at the same time.
lauren says
GREAT light! it’s amazing! i would be in heaven if i woke up every day looking at that. okay, so on a side note, where did you get your frames above your bed? and where do you get your pictures developed? we used to use Ritz, but they closed, so i’m looking for somewhere new. thank you!!
YoungHouseLove says
Thanks Lauren! If you click back to the post before this one, it’s all about buying/hanging those frames and getting the photos printed. Hope it helps :)
xo
s
Lee @ Emonili says
That light is fabulous!
sara says
Where are all the frames above the bed from?
YoungHouseLove says
Here’s that post for ya: https://www.younghouselove.com/2014/06/photo-finish/
xo
s
Soraya says
Love the light! We recently had to add lights to our bedrooms too. Did you center the light with you bed or the whole bedroom.?Our bed is a bit more to the left than to the right so it’s not exactly in the middle of the bed. Wondering if it’s going to look odd when we hang a light :/
YoungHouseLove says
We centered it over our bed since we got to pick the spot for the fixture box when we had it added. We figured that would look more balanced in our room since it’s so long. I wonder if you can swag yours so it looks centered over the bed if it bothers you if it’s not. Hope it helps!
xo
s
Bee says
Looks fantastic, but how are you going to clean it? Those lovely little bits and pieces will collect soooooo much dust :(
YoungHouseLove says
There have been so many awesome ideas that I can’t wait to try. Someone said hairdryer (with the cool button) so I think that would be fun (then just vacuum the rug afterwards) or a swiffer duster on a rod. I also thought my feather duster might work, and yet another person suggested the vacuum with the brush head or even using an air compressor!
xo
s
Jenn says
We have always had a ceiling fan in our bedroom, which I hate the look of. I would LOVE to switch to something stylish like this, but I’m not sure how to sell my husband on it. How do you (or other readers) like not having a fan? Has anyone had it both ways and can tell me if it really IS better to have one?
YoungHouseLove says
We like a nice high quality tabletop fan set to oscillate (Hunter makes a good one).
xo
s
Lauren says
RANDOM.. where are John’s glasses from? they’re awesome :)
YoungHouseLove says
They’re from Warby Parker.
-John
Jamie G says
You have such a beautiful home! What an inspiration!
xo
Jamie
http://snapginger.com
YoungHouseLove says
Thanks so much Jamie!
xo
s
renee says
did you already say where you got that white drawer unit thing? did i miss that? :)
YoungHouseLove says
That was from Joss & Main a few years ago.
xo
s
Molly says
Jon looks HOTT in his glasses.
Molly says
I mean John….sorry, I was too distracted by the hotness to spell your name right.
YoungHouseLove says
Ha! I love Beardy Glasses John.
xo
s
Samantha says
Probably an idiotic question… but how do you tell if the pendant cord can handle the weight of the shade? I ask because I have a similar glass & metal larger shade I would love to hang like you have here… but I worry that a simple pendant cord won’t handle the weight. Thoughts? Looks like your new light is much heavier than the intended shade for the cord you purchased, which is why I ask :)
YoungHouseLove says
Not an idiotic question, it’s smart! You definitely don’t want a light falling out of the ceiling from a cord that can’t support it! I think I read somewhere that they typically don’t need a chain unless the fixture is 5 or 10+ lbs (our bedroom one is really light – sort of like a capiz tea-light holder) but for something like a metal chandelier it’s chain all the way. Most light kits will tell you their weight capacity too, so that can reassure you.
xo
s
katie mcg says
Love the light, but I’m curious what it looks like when lit. Do you get weird shadow lines on your walls from the lines on the fixture??
YoungHouseLove says
If you use a clear bulb you get shadows, but a frosted one cuts down on those. We shared a picture of it all lit up at the end of this post (love the shadows on the ceiling it makes): https://www.younghouselove.com/2014/07/light-side-table-action/
xo
s
Erin Young says
I was thinking about using the large capiz lotus light for our dining room, but have not seen it in person. Do you think it would work for that?
THANKS!!!!