Alternate post title: “In A Minute, I Have To Hairdry The Chair”
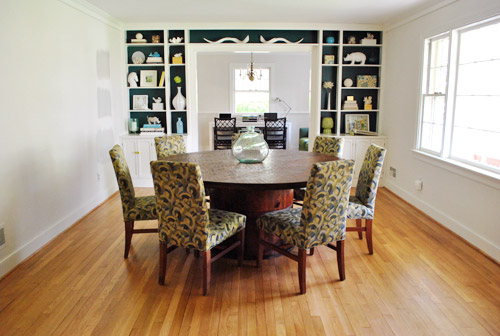
Guys, I did something crazy. Since we’d like to take our $25 hotel-ish dining chairs to a crisp not-patterned apple green (the curtains I want to make will be patterned, so I just want chairs in a fun color but without a pattern that I’ll tire of) I decided to paint them.
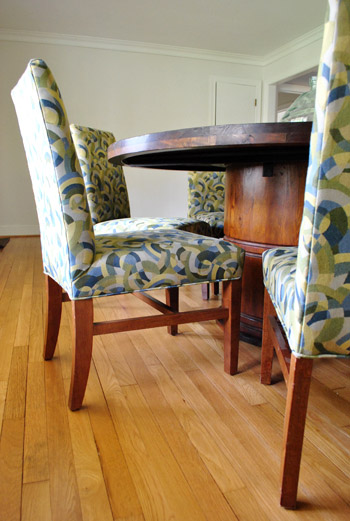
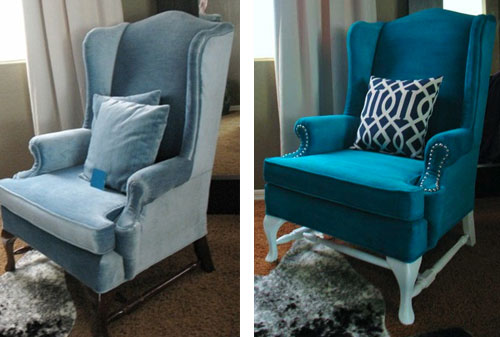
I know. Insane. But I didn’t think I had much to lose since the backup plan is to reupholster or slipcover them (both of which would still be entirely possible if I didn’t like how the whole painting thing turned out). I went into it as a hmm-this-experiment-should-be-interesting thing. Nothing was guaranteed and I felt like a crazy person the whole time. Yup, I was skeeeeered. I mean who paints a chair? Well besides a few amazing bloggers who have posted about how well it went for them. For example, this tutorial was up on my iPhone the entire time for reference and encouragement. Just look at Kristy’s amazing chair transformation. She did that with paint!
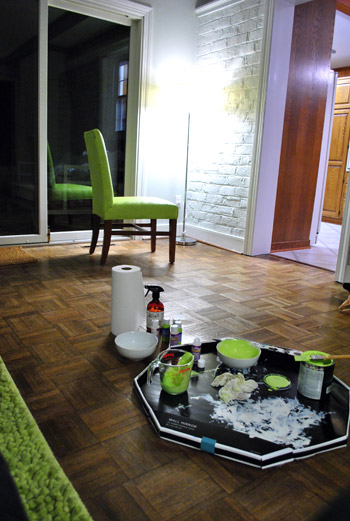
So here’s how it all went down. I pretty much just based my method on Kristy’s breakdown with a bit of flexibility since the directions on some of my supplies conflicted with a few steps. And speaking of supplies, here they are (that’s the Top Chef finale in the background BTW):

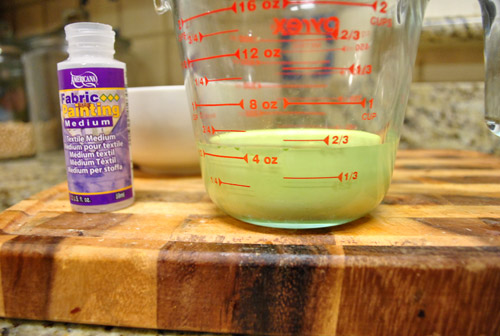
I got three tubes of “Fabric Painting Medium” and three tubes of acrylic paint in cheerful apple green from JoAnn Fabrics for under $10 total. I also picked up a quart of satin interior paint by Glidden in Granny Smith Apple (I thought it was meant to be since I’ve always talked about “apple green” chairs).
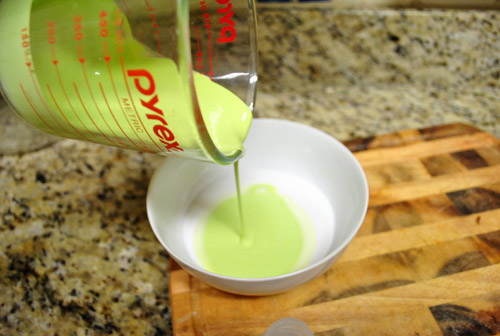
Then I just followed Kristy’s directions for the most part (admittedly not to the letter because I was also trying to adhere to the instructions on the back of my specific fabric medium, so I tried to walk the line between those and Kristy’s) and mixed one part latex paint and one part textile medium in a bowl. In order to get an even ratio I even got all type-A and dumped out the fabric painting medium into a measuring cup so I would know how much paint to add to keep the amounts equal. Here you can see that it was about a third of a cup:

Of course I accidentally dumped way too much paint into the measuring cup so I had to pour a good amount back into the can, but I was definitely happy that I wasn’t just trying to eye things (would’ve had way too much paint in the mix).
Eventually I got down to a third of a cup of latex paint and poured that into the third of a cup of fabric painting medium that I already had in the bowl.
And mixed that up with a brush that I had on hand. I was a little worried because the whole thing was looking pretty yellow but paint is always kind of an odd color until it dries and gets darker.
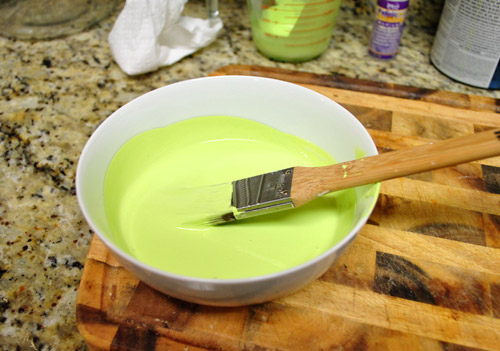
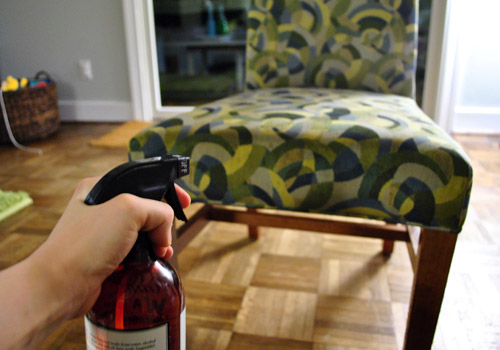
Then I added about a quarter of a cup of water to the bowl to thin things out a bit per Kristy’s suggestion. Next up was spraying down the chair with water (I reused an old cleaning bottle) so it was moist and ready for paint to glide over it evenly (instead of soaking up too much and getting all clumpy).
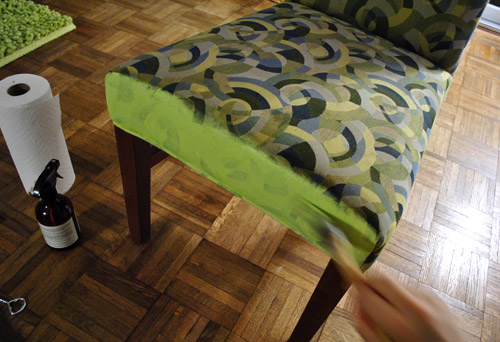
Here’s an in-progress painting shot that John grabbed over my shoulder as I went (I was too afraid of getting it wrong to stop and pose for a clear pic).
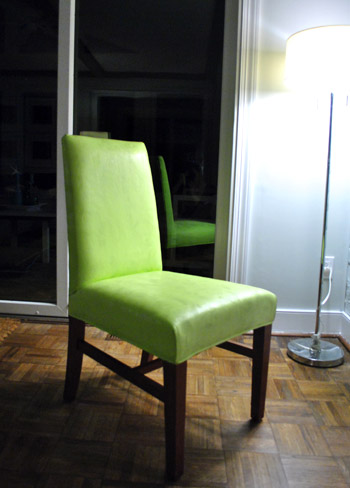
And here’s the after. Well actually I still had a few more steps left, hence the “wait a minute I have to hairdry the chair” title. John asked if I wanted to watch The Soup and I said, yup you guessed it: “wait a minute I have to hairdry the chair.” Which struck John as hilarious for some reason (I can’t imagine why) and he proclaimed that it had to be the title of this post.
The reason I was supposed to hairdry the chair was to set the textile medium (it needs heat, and when you can’t toss whatever you’re painting in the dryer, like a chair, you can apply heat with a hairdryer. But I reread the instructions on the textile medium tube and it said that I had to wait a day for the heat-setting step. So we watched The Soup and my crazy painted chair sat in the corner of the living room drying.
Here are a few first impressions:
- It’s way too neon and not as apple green as I’d like (my fault since I chose the color, but that could be fixed with different paint).
- Man, that took forever! Over an hour and a half to paint one chair (I applied a few even coats for better coverage). That factors out to 12 solid hours to do all eight chairs.
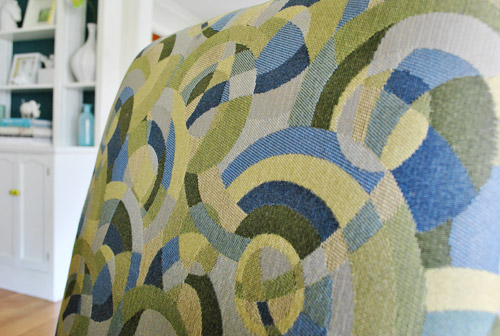
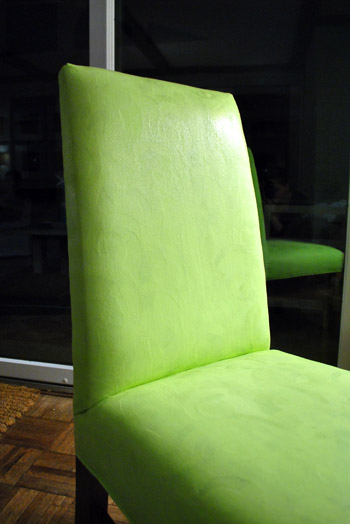
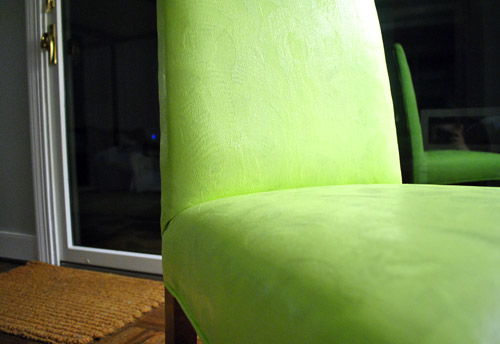
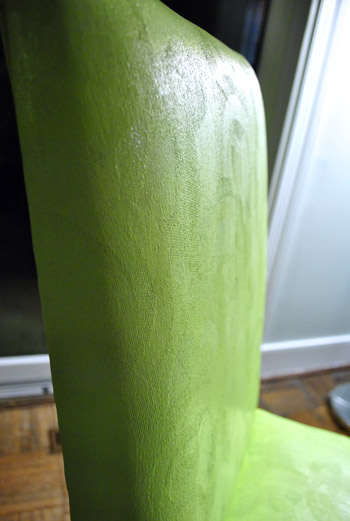
- It looks kinda cheap and those annoying swirls in the fabric still show through. See?
And here’s where we ended up after sleeping on it:
Slipcovering or reupholstering is a better solution for us since we’re not happy with the swirly texture that still shows through, the semi crunchy feeling (they’re not as smooth as vinyl, more like a rough burlap), and the odd look of painted seams (the flat parts of the chair don’t look as crazy, but the seams/folds in the corners just look gunky and unconvincing – as if they’ve very clearly been painted – since they have).
This method is obviously one of those it-depends-what-you’re-painting experiences. Because seriously, how amazing is that turquoise painted chair at the top of this post? I’ll save you the scrolling trouble. Here it is again (with a full tutorial here). So inspiring, right?
And although we didn’t have the same success, we’re glad that we tried this whole crazy process just to have it under our belts and share it with you guys (well, we didn’t end up applying the last coat of acrylic paint to finish things off because we decided to abort the mission, but I did later hairdry it to set it). And it’s definitely set for good, so for anyone wondering if a painted chair will rub off on the person who sits on it, nope. It’s just like how you can wear and even machine wash your painting clothes over and over again without worrying if they’ll smear. Once that paint is set into your shirt it’s hard and permanent (and the fabric medium is meant to help soften the paint so it’s less crunchy, in case you’re wondering about that additive).
So as of right now the green painted chair is living in the crazy cluttered playroom while the other seven unpainted chairs are still hanging out in the dining room waiting for reupholstering or cheerful apple green slipcovers.
We’ll keep you guys posted as this crazy chair adventure continues. Who knows where we’ll end up (our guess is slipcovers but you never know)…
Psst- We’re talking about how kids never fail to want the only non-toy items within their reach (the remote, your cell phone, the keys, your sunglasses) and we’re divulging Clara’s very favorite (and admittedly very weird) not-a-toy toys over on BabyCenter.

Beatrice says
YouTube!
http://www.youtube.com/watch?v=gB8zc1hVNFI&feature=related
Don’t give up yet. You can do it!
YoungHouseLove says
Aw you’re so sweet! Hilariously enough, that’s exactly what I’m doing! Infuriating I tell ya. Haha. I’ll survive though. Somehow.
xo,
s
Karen says
I am sure that you have looked at every website to solve your seat issues…..I can see where the swirls could and probably would drive someone CRAZY!!
I did find this website….
http://www.stretchandcover.com/slipcovers_P_322_467_Medium_Dining_Chair_Cover_Short_Skirt_-_Cobblestone_Chenille_-_Olive
They have them for $11.95 per cover on clearence.
Happy shopping!!
Karen :)
YoungHouseLove says
Ooh, off to check it out!
xo,
s
Ansley says
I’m with you on the sewing hate, and being told it’s easy just makes me feel like that much of a failure. It’s kind of like when someone gives me driving directions and says, “It’s easy. You can’t get lost.” That’s pretty much a guarantee that I’m going to get lost. Sigh.
I actually gave up trying to sew when I became a mom. All that cursing just wasn’t appropriate unless we wanted our daughter’s first word to be #$*%&! And I’m too tired to fool with it after she’s asleep.
I vote for re-uphostering. That would look sleek and finished and just heavenly in the beautiful apple green you have in mind.
Laura says
Honestly… you have me on the hunt on Craigslist! I’d love a chair project like this for my guestroom.. can’t wait till I find a perfect cheapo chair to give this a whirl on!!!
Annette says
Hey guys! Just read this on a post this week from Censational Girl
http://itsgreattobehome.net/2011/04/07/the-saga-of-the-breakfast-room-chairs-finished/
Apparently the blogger will post some how-tos soon…made me think of your chairs. :) Maybe it will help.
YoungHouseLove says
Oh yeah we love that project!!!!
xo,
s
Christine says
At least now you know! The color actually looks close to the green in your shag rug. Speaking of which, how is yours doing with shedding? I’d like something similar to it but wonder if I’d constantly be dealing with wool hairs everywhere…
YoungHouseLove says
We love our rug so far! We vacuum it once a week but otherwise don’t do a thing, so far no crazy shedding at all. In fact it’s less sheddy than our PB rug in the guest room was when we first got it.
xo,
s
Kaitlin says
Hey Sherry, don’t know if you’ve seen this yet but looks like Flip cameras are not going to made anymore…
http://www.nytimes.com/2011/04/13/technology/13flip.html?hp
YoungHouseLove says
Nooooooooooooooooo!
xo,
s
Alissa says
Just wanted to let you know, Sherry, that I am a sewer and have had a *lot* of sewing meltdowns. Some days I’ll be sewing happily, and other days the machine gets tempermental and I want to chuck it in the dumpster.
So go ahead and fume. Sometimes sewing bites even for those of us that seem to know what we’re doing. Feel validated! :)
Kevin says
Do you know anyone who has tried this stuff? I hear it doesn’t have that crunchy texture that you ended up with.
http://www.simplyspray.com/upholstery.html
YoungHouseLove says
Has anyone tried this? Looks scary!
xo,
s
Jen @ Domesticated Nomad says
I have not used this on upholstery, but I have used Simply Spray fabric paint on a shirt before. The packaging looks slightly different, but I’m sure it was the same name.
It works like airbrushing. I thought it worked well, covered well and just like an airbrushed shirt it stayed soft. I think this product would work better than the method that was tried on the chairs if you really want to stay soft. The only thing is that it’s not going to cover up texture like the swirlies on these chairs. If you don’t like the texture, you’d want to slipcover or reupholster.
Marcy says
you may want to try using a higher quality acrylic– that looks like joann’s house brand, which from my experience doesn’t have a very high pigment concentration. (i use acrylics with a fabric extender to screenprint on canvas)
the best brand that’s comparable to what you have is americana, which is about twice the price of joann’s and sold right alongside it. it might give you the less-rubbery/richer look you’re going for. or its possible that velvet (like the sample chair) just takes better to this method.
also i saw you mention in the comments that you’re not good at sewing. i didn’t think i was either until i found the right machine– and i think that is what many people experience as they are given some cheap and/or hand-me-down machine that jacks up the bobbin every ten seconds and is almost impossible to work with at the beginner level. the second i started using a good machine everything changed. you might want to pick up a new singer and give it a try, you can always return it if its not workin’ for ya!
Marcy says
just read that you have a fairly new brother– that might blow my theory out of the water, but for me, a singer changed everything. you might also want to try finding a sewing class where you bring your own machine– let someone with lots of experience see you at work and they can help you troubleshoot the machine you will be working on at home.
YoungHouseLove says
Hey Marcy,
I didn’t even get to the acrylic step! Haha, I just did the latex and textile medium and then later set it by hair drying it and then I was over it (no top coat of acrylic was going to keep the seams from looking painted or correct the scratchy feel or bad color). As for my sewing machine, it’s a brand new Brother machine that had an awesome 5 star rating on amazon so sadly I think it’s just me. Haha. I am a sewing disaster. Haha.
xo,
s
Katy says
This has nothing to do with the chairs (great idea though!…too bad it didn’t work!) but I found a website (sprik.blogspot.com) where you can download free prints. You know, like graphic-y design-y (those are words right?) prints. When I found the site I thought of you guys and the grid of framed paper on your wall and how you thought you might want to replace the paper with prints.
YoungHouseLove says
Oh yeah we love that site and the prints they make! They have great geometric ones and a sweet bee print I love too.
xo,
s
janie says
I’ve made slipcovers and I’ve upholstered, and upholstering is much easier. With a slipcover you need to make a perfect pattern, then sew each seam perfectly in the inverse. With upholstery you just pull it tight and staple-gun it in place.
janie says
Ooh, I’ve used spray dye, too and it took a whole can to not even cover the pattern on a section of a sofa. not a viable option, IMO.
Caitlin says
OK, here I go again: Dharma Trading Co.
You can buy sturdy, dye-able canvas by the yard for a really good price and pick up the dye there too, dye it whatever color your heart desires! (much easier than trying to find so much fabric on sale in the right color) 16 yards of 63″ canvas duck will only run you about a hundred bucks. :)
It’s a thought — I’m finding myself spending waaayyy too much time on there lately thinking up new projects for myself.
YoungHouseLove says
Thanks for the tip!
xo,
s
Mandie says
DUDE! You guys are daring. I am way to scared to try anything like that. Glad I have you to try it for me :)
Debbie says
I tried to read most of the comments, but did anyone mention that there are different needle for different fabrics. If you’re sewing heavier fabric like denim, you need a stronger needle.
Also I never mess with the tension, because I did once and had to take my Grandma’s old sewing machine to the shop. I needed a tune up anyway after 50 with my Grandma sewing up a storm.
I’d like to see John try to sew on this machine. My dad used cut pants off that my Mom would hem. He said she did not cut straight. He also got the job of sewing them too. Ha, ha.
YoungHouseLove says
Yup, I’ve read the manual 50 times so I know all about adjusting the tension and using the right needle for the fabric. I’m just using thing cotton so I just think I’m cursed. There’s no other explanation! Haha.
xo,
s
Kristin says
Been reading through the comments a bit and I just wanted to say SEWING IS NOT EASY!!!!!! And I have zero advice for you. I have a mucho expensivo space age sewing machine (we bought for our business bc it embroiders our logo all by itself) AND I STILL CAN’T SEW FOR THE LIFE OF ME! Embroidered complicated multi-colored logos and designs? Perfection. Curtains? FORGET IT!!! Have broken 2 needles on it. It’s not the machine. It is me. You are not alone :)
YoungHouseLove says
Haha, thanks Kristin. I feel a little less like the only sewing loser in the world now. Haha.
xo,
s
Joanne F says
I’m impressed you paint without a drop cloth!
YoungHouseLove says
Oh yeah I’m crazy. I just keep paper towels on hand for errant drops.
xo,
s
Carla says
Those chairs would be a cinch to reupholster yourself, after some trial and error with the first one. Keep reading those tutorials people are posting and you’ll start to formulate your approach. It would look much more polished than slip covers. I would really enjoy reading that.
Patty says
Sorry the paint didn’t work out for you, but glad to see you weren’t afraid to try!
Wondering if you have considered a dye job? Surefit has 100% cotton duck slipcovers that would take very well to dyeing: http://www.surefit.net/shop/categories/dining-and-folding-chair-covers-and-accessories-shorty-dining-chairs/cotton-duck-shorty-dining-room-chair.cfm?sku=33073
I’m guessing the attached bows won’t suit your style, but I’m willing to bet that you could work around that issue with your know-how. RIT has a rainbow of colors that you can use in your washing machine;Dharma trading company has even more.
YoungHouseLove says
Oh yeah- finding a simple slipcover that fits and dying it apple green is totally my preferred solution. Fingers crossed…
xo,
s
Micha says
Hmmm, actually I kind of like the green of the chair but the (still visible) texture and the scratchy paint finish puts a damper on things. I wonder why you need to have two different kinds of paint (latex and acrylic)? Maybe it’d be less scratchy/plastic-y/rough with just latex paint mixed with the fabric medium …?
YoungHouseLove says
We didn’t even apply that last coat of acrylic paint so we only used the textile medium and the latex paint watered down before giving up. Once the chairs dried crispy I knew that adding more paint wouldn’t make the seams look any less painted or fix the crunchy rough texture that occurred. Oh well, might work better with different fabric (like how Kristy used velvet and hers came out awesome).
xo,
s
Jamie says
So funny! I reupholstered an arm chair last summer… it was super easy. there are pictures of it here:
http://saltdecor.blogspot.com/2010/08/reupholstered-armchair.html
I didnt write a tutorial, but basically i was careful removing the old fabric so that i could use it as a template for the new fabric. i also took a picture literally every step of the way so that when i went to reassemble it with my new fabric and staple gun i could look at the pictures in reverse and it would be like a step by step how-to!
Love your blog, ive been a reader for a few years now. I cant wait to get my own house (Im only 22!)
YoungHouseLove says
HOLY COW. You did an amazing job!! It looks like you’re a sewing whiz with those detail shots of the piping. So jealous.
xo,
s
Erin says
I think you would be happiest with reupholstering the chairs, so you can get exactly what you want. (In apple green leather or vinyl.) But, if you want to make your own slips, I believe that Ana White posted plans for parsons chair slipcovers aimed toward people who don’t normally sew?
YoungHouseLove says
Oh yeah I love that tutorial!
xo,
s
adrienne gilliam says
Ha! I love that you tried that! I have done so in the past, got halfway thru and ditched it! Totally inspired but others success though! I have reupholstered countless chairs and you could do these chair so easily and without much cost! Good luck, I look forward to see the chair drama unfold! :)
http://www.pickfair.etsy.com
Kelly says
I’m sure tons of your readers feel this way, but I keep thinking I wish you two were my friends. You watch The Soup and play Bananagrams and love to DIY stuff and hang out at home and you’re nerdy-cool… I think I have told people that you two are a lot like my hubby and me, except you are awesomer and have our dream jobs.
Ok, I’m going to try not to get too stalkerly on you. We live clear over in the farthest corner of the contiguous US from you, so I guess it won’t be an issue.
YoungHouseLove says
Hahah, I think we’d be a huge letdown if you ever met us in real life.
xo,
s
heather j. says
haha…kelly, i’ve met them briefly, and they were just as cute/sweet/cool in that ten seconds of real life as they seem on here :)
r8chel says
I’d say that the chair looks good from a distance, but not-so-good at close range. :)
And I definitely vote for slipcovers. As a parent of two young children, I can’t imagine having upholstered chairs at our dining table. Yikes.
Heidi S says
The fabric you have most likely has a acrylic back (used in hotels and hospitals to prevent moisture from getting into the cushion). It allows for the fabric to be cleaned more easily and doesn’t ruin the whole chair. I was wondering how the paint would take. In the link you had up the paint probably absorbed at a much higher rate and probably ended up with a better texture.
Can’t wait to see the slipcovers!
Lynne says
I’m sure I’m in the minority here, but I loved the chairs (colors and pattern) the moment you brought them in and put them with the table!
Christina says
NOOOOOOOO! I really like the concept of painting fabric, but I would have done it on a slip cover first. Dang it. Loved those chair just as they were.
Jenn says
It looks like you sent your chair to timeout in the corner. Ha! Those pesky swirls deserve it! :)
Ali says
A for effort! Too bad it didn’t work out. I would have given it a try, too!
lauren duke says
I love this idea. I have the exact same chair as the teal one, only mine is pink. I have absolutely NO purpose for it, or room in our house, but I hate to just put it on the street when I know it is some crafters dream. I think I’ll put pics on my blog with links to your blog to see if anyone wants to give it a try!
Kristy Swain says
What about creating a no-sew slip cover? There has to be a tutorial somewhere that deals with stitch witchery. ?
YoungHouseLove says
Could work. Hmm…
xo,
s
Jen @ Domesticated Nomad says
First, I love that you were mixing paint on a cutting board. Why in the world was a cutting board involved? Love it.
Did you put the chair in the same position as your lamp watching chair post on purpose, or was that just a coincidental laugh I got to have?
YoungHouseLove says
Haha, well the area of the counter where I was taking photos had the cutting board on it so I was too lazy to move it- it became the “stage” for the pics. Haha. As for the chair that was a total accident (I pushed it over to the light so I could see it best at night (and make sure I was painting it evenly). How funny is it that it ended up in the same “time out” position as the old chair post?
xo,
s
Relevant Notes says
Even though it didn’t work out for you guys, I love the idea of painting chairs. Never would have crossed my mind, but it’s nice to know that it sometimes works!
Andrea says
Hey Sherry: I’m sure you have found this post already, but just in case:
http://blog.fabric.com/2010/10/upholstery.html
Key point for you: “I learned very quickly that upholstery is very little sewing and more hammering and folding. It is a great stress reliever.”
just in case you go that route with another chair, to try it! good luck to you!
YoungHouseLove says
Thanks so much for the link Andrea! That’s an amazing chair makeover!
xo,
s
KatelynLikesThis says
Ha-ha, when I saw the start of this post I thought “painting a chair? She must be nuts!” You’re very determined!!! The trials and tribulations of home ownership are well worth it, especially despite the things that don’t work out quite like planned!
Kate says
Hey Guys,
Kristy’s chair may have worked because it is a velour type material?
You could make pleather slip covers that cover only the fabric portion and then strap on under the chair with velcro or ties so that they are easy to clean?
xo
YoungHouseLove says
Yup that’s definitely one possibility!
xo,
s
Kristin says
I’m sure it would have worked better with a different type of material, like in the tutorial. Hey, you wouldn’t know until you tried! ;)
lesli devito says
hi, you get an A for effort and humor!
IF you do go with slip covers, email me and I will give you a guy, near you who is WICKED affordable!!!
LiveLikeYou says
Always wondered what the texture would be. Nothing like good old fresh upholstery!!
Elizabeth Horn says
I agree with you, that another solution for your chairs will probably look better, but who knew you could paint an upholstered chair! Amazing idea and that turquoise chair does look fab.
Kim says
My theory on sewing is that it is construction/building only with different materials. Think about it-if you build something out of wood, or plywood or whatever, you are cutting a “pattern” out of wood on a machine that cuts wood instead of fabric. So if John is good at that stuff, I bet he’d be great at sewing!
YoungHouseLove says
The issues is the technical stuff that gets in the way (at least it feels like that) with sewing. When it comes to painting or staining or building or demo it’s very hand focused. You swing a hammer or point a drill and pull the trigger or guide a brush back and forth. The darn sewing machine is not that hand-simple (yes that’s a term that makes no sense that I just made up). It is not as intuitive as dipping a brush in paint or hammering a nail. You have to thread it and adjust the tension and guide the fabric in a certain way. So when the needle breaks or the thread gets tangled it seems a lot more complicated (probably only to a beginner like me) than sawing a piece of wood or swiping stain onto something and wiping it with a rag. Someday I plan to crack the code, it’s just tougher than I wish it were for a novice like me. Off to read the manual for the 50th time. Haha.
xo,
s
heather j. says
such a bummer…
they’re still pretty hotel-ish looking. i’m sure that your permanent solution will be brilliant, though! looking forward to seeing what you guys do!
Susan Borland says
I love the slipcovers that hang down to cover the bars at the bottom. maybe that’s just me, but I totally envy your gusto to go for it and paint a fabricated chair green! Congratulations, even though it was a failure (spoken lightly!!) it’s a great experience and now you can advise people otherwise.
And…I must confess I am obsessed with your blog, but clearly I’m not alone. Thank you, THANK YOU for posting 2xs a day. I’m so pumped when I’ve forgotten to read it for a few days and I get to read several and see what you’ve done on your house. ok, rant. over.
Laura Kisailus says
So sorry to hear about the experience! When you first posted your purchase of the chairs I thought they were perfect as is! It adds texture to your room and the colors seem consistent with your color scheme…
Leslie C. says
Hi Guys!
Im not sure if anyone has mentioned this yet, but on Ana Whites website she has a post on sewing a slip cover!
As for learning to sew, I bought a sewing machine for myself at Christmas and just took a class at my local community center here in Hampton Roads! It was Saturday mornings for an hour and a half for 6 weeks and we brought our own machine, so that we would learn how to work it. I took the class with my best friend which made it super fun!
Good luck, I am excited to see how everything turns out!!
YoungHouseLove says
Oh yeah I love that post! Ana can do anything!
xo,
s
Monique says
I give you Kudos for experimenting with the chairs. If you have a friend who sews, slipcovers would be a great option and you can change it out or only cover half the chairs. Whatever you decide to do, I know you will come up with a fantastic solution.
Shan says
I know you may not be into spray painting, and I wasn’t either…until I found Rust-oleum’s Painter’s Touch, Ultra cover in Eden. It’s gorgeous!!
*I never read blogs, but I’m addicted to yours! We are remodeling an old house as well, you guys keep us motivated!! Thank you!!
Liz says
I must admit I was skeptical when you first posted about painting these chairs, and then I actually sat in booths in a restaurant a few days ago that are that EXACT SAME FABRIC. [cute Twilight Zone music] I saw the texture in it in real life, and thought, “no way.” Good effort, but slip covers will be way nicer! And probably less expensive than you think!!
YoungHouseLove says
Yes! It’s a you-have-to-be-there thing. They definitely look worse in person. Haha.
xo,
s