“I’m Blue Da Ba Dee Dabba Da-eeeeee” (anyone remember that song?). Picture us maniacally singing it while priming and painting trim for hours days. We’re slowly losing our minds, but we’re having fun doing it. Please feel free to click over and jam out so we feel less alone (and slightly less certifiable).
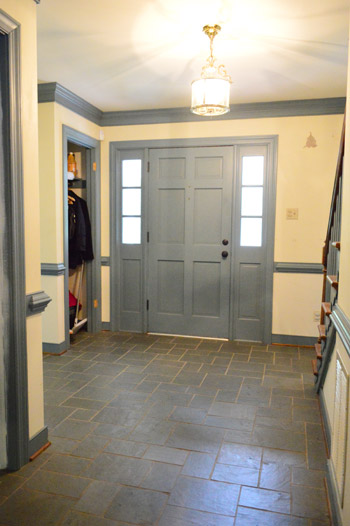
Ok, so when we last left our hero, er, our foyer, he was sporting some snazzy blue trim.
We had stripped down all the wallpaper, and had also removed two closet doors and the bathroom door so we could take them out to the garage and use our paint sprayer to apply a coat of primer and two coats of white semi gloss paint.
As for how we like our paint sprayer, it has definitely been a huge help in these two scenarios:
- when we can remove something and lay it or lean it on a drop cloth and spray it (like doors, cabinetry, or crown molding before it’s installed)
- when we don’t have a ton of other rooms/floors/areas to tape off (like when we had removed the carpeting upstairs and could quickly spray all of the trim and doors without worrying about getting it on any of the floors upstairs)
We’ll still definitely roll walls and ceilings (we think the sprayer is best for when we tackle trim, doors, cabinets, furniture, etc). Like how you wouldn’t spray paint walls but you might spray paint cabinets, doors, or furniture.
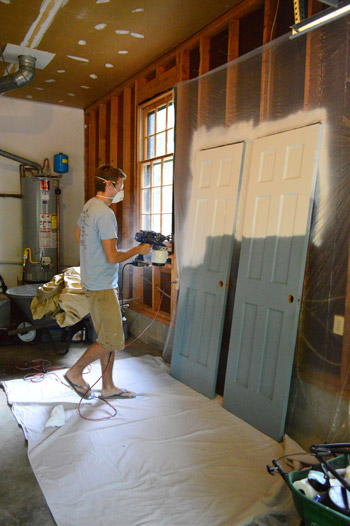
Here’s a video of it in action, just in case watching the motion of someone using it helps you picture things. John’s moving a little slow here, so for an even smoother finish we learned to go faster (it lessened the chance of drips).
The pros that we’ve found to this particular model (we had a Graco True Coat II – but we’ve since switched to this Wagner model) are:
- great coverage (it goes on thicker and smoother than a brush or roller for a faster finished result)
- you don’t have to water down the paint with anything (many sprayers require this, and it’s nice and easy not to have to worry about it)
And just to be balanced, here are the cons:
- as with every paint sprayer, there’s overspray, so it’s not as controlled of an application as using a roller or brush since you get paint flying around outside the item you’re sprayer (check out the image above – all the paint on the plastic drop cloth behind the doors is overspray)
- you have to learn how to control it so you don’t get drips – spray quickly and don’t hold the sprayer too close to the surface (this just seems to take some time to master, so it’s not as much a shortcoming of the sprayer as it is a skill that the operator has to hone)
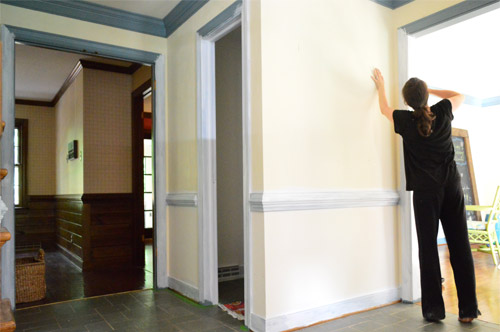
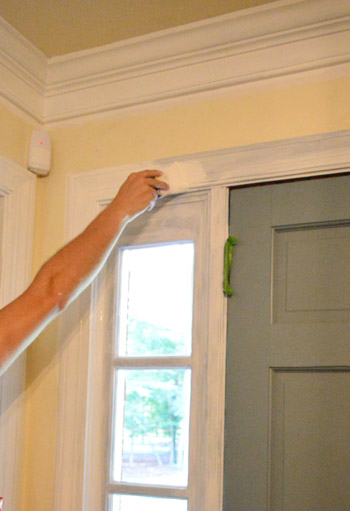
So with the doors out in the garage being primed and painted with the sprayer, we dove into priming and painting the rest of the trim in the foyer by hand.
As for why we didn’t remove the trim and spray it in the garage like the doors, we were all for using it on the doors that way (which were easily removed and brought out to the garage) but removing and reinstalling all of the baseboard, chair rail, and crown in the foyer, as well as the trim around the seven doorways (!!) in there would have taken forever. We also considered taping things off and then spraying while standing in the foyer, but it leads into the kitchen, the dining room, the office, the portico, two closets, and the bathroom – so taping those all off to protect them from flying paint would have taken about a million years.
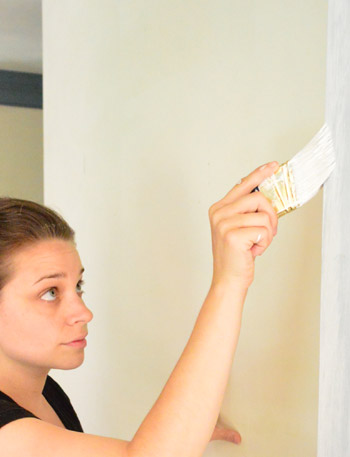
So we primed, and we primed, and we primed, and we primed (two coats on all of the blue baseboard, trim, chair rail, and crown). This is my tired of priming face.
If you have shiny wood trim or glossy painted trim, you’ll want to rough it up with sandpaper and wipe it down with liquid deglosser before moving on to the primer and paint step (be sure to use a stain-blocking primer if it’s raw wood). But since ours was chalky and matte painted wood, we didn’t need to sand or degloss it, and we could skip right to applying a primer followed by some semi-gloss paint.
It really depends what color you’re starting with when it comes to how many coats you’ll need of primer and paint, but in our case it was four coats (so after two coats of primer we could move onto two more coats of paint). We used Benjamin Moore’s Simply White in semi-gloss just like the trim and the doors upstairs. Here are some other designers’ best white paints you could use instead.
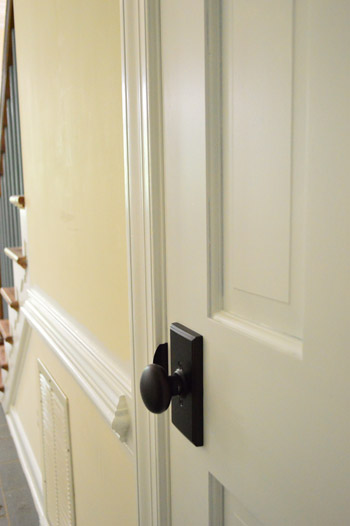
Finally after everything dried we could rehang the doors (with the new knobs that we ordered to match the ones upstairs).
We have yet to paint the back of the front door in the same teal color as the front of it (or ebonize the stair railing and paint those blue spindles white)…
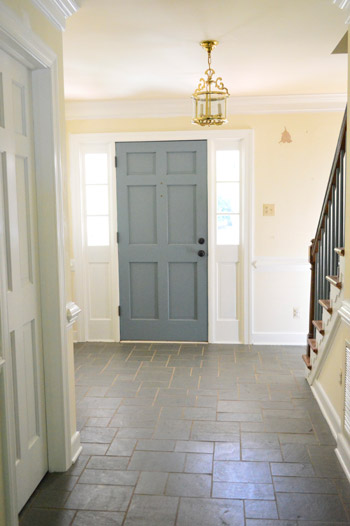
… but it’s already a lot lighter and more open than it felt when we inherited it with blue trim and wallpaper aplenty.
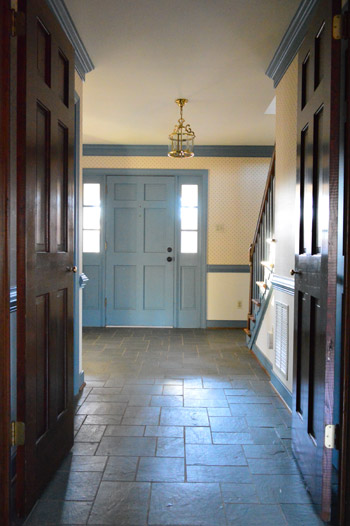
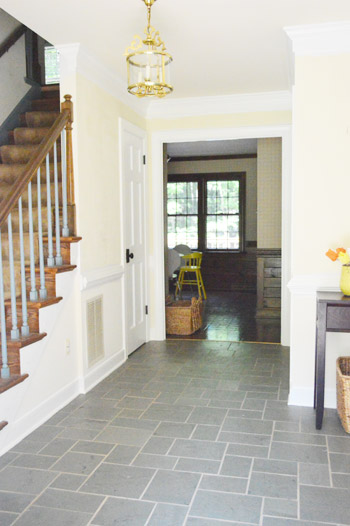
Here’s a before picture from the other side.
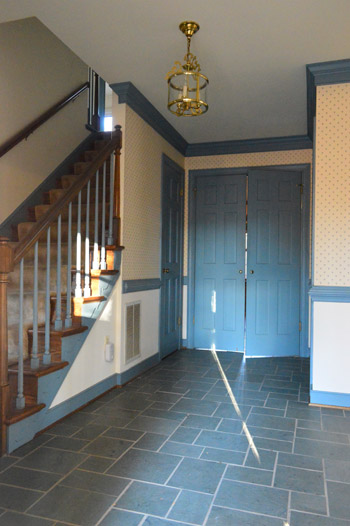
And a now shot with the white trim and doors. It’s also funny how much less blue the slate looks now that all the blue trim isn’t reflecting on it. It definitely still has some blue undertones, but it feels more neutralized now that we de-blued the trim.
So while the stairs are still quietly mocking us, we’re slowly inching towards a fresher looking foyer. We can’t wait to paint those yellowed walls.
And just in case you’re worried that we might be close to done painting blue trim, you’ll be comforted to know that it’s still hanging out in our office and our dining room – both of which not only have window trim and baseboards, but also have crown molding (along with blue chair rail and built-ins in the dining room). So there’s a fair chance you might be reading about us painting blue trim for the next decade or so. While we softly cry into our paint brushes.
But man oh man, does the glossy white result make us happy. The things we do for love.
Psst- In family news, here’s what we did for the Fourth of July and here’s how we spent our sixth anniversary.

myamogabi says
My! What a difference it made! It already looked so much better!!! Keep it up, guys!! Good work!
Amy L. says
Lookin’ good! I feel your pain on the yellowed walls. We lived in a rental for a few years and were not allowed to paint. We had the same shade of yellow, dull, ultra flat paint on EVERYTHING! Doors, trim, walls, mantel, all built ins, etc. I swore that color off forever after we moved.
Nicole says
It’s looking so great! As a previous comment said, the foyer now looks so much more “Young House Love”. I have to admit, I wasn’t so sure how you guys were managing to love this new house with all the awful-looking blue EVERYWHERE. I was having trouble seeing past the cosmetics to the bones (it was just in your pictures, after all). I can hardly wait to see what happens in the living room/family room when the coral pink walls undergo transformation.
caroline [the diy nurse] says
Wow! It’s like a breath of fresh air. Cant wait to see it more ‘you’ – I was feeling overwhelmed with how big your house was but I can already see touches of you are spreading :)
caroline [the diy nurse] says
Do you like that by the way? How I’m stressing for you?? because stressing about my life isn’t enough. Goodness!
YoungHouseLove says
Haha, thanks Caroline! I love you for that.
xo
s
Stardancer says
The foyer looks unbelievably different! The lighting isn’t the same between photos, but even so, the floor looks like a completely new material. Even the spindles on the staircase look less blue :)
By the way, I discovered your site a couple of weeks ago and am currently devouring your archives. Where I’m reading, Sherry’s about four months pregnant! It’s so much fun to see your lives/houses/baby move in fast forward.
Julianne says
WOWZA!! Amazing what a difference! It opens up the hallway so much. What an incredible change & those new knobs look fab. From here, it seems you lucked out on the foyer light, too. A little bit of your fav. Rustoleum oil-rubbed bronze & it’ll fit right in! ;O)
LauraCinIndy says
Is John loving having a garage? House is looking so good!!
YoungHouseLove says
The man’s IN LOVE.
xo
s
Marianne in Mo. says
SO MUCH BETTER AND BRIGHTER! Can’t believe they painted the spindles too – ugh.
On a safety note, it looked like there’s a water heater in the garage – hope you all are careful of that – some guys here burned down a garage and almost got blown up doing what John is doing. Even if it’s an electric one, apparently doesn’t matter from what the fire dept. said. Be safe, shut it down, blow out the pilot, or paint elsewhere. I enjoy you guys and would hate to lose you!
YoungHouseLove says
Thanks Marianne! Off to drill that into John’s brain right now.
xo
s
Hayley says
My house had blue trim (the exact same colour), blue ceilings, blue walls and blue kitchen and bathroom counters! What is wrong with people! Lol. I feel your pain! – but it’s so worth it, isn’t it?! X
Kelsey says
What a massive improvement! You must feel like you can finally take a big deep breath in there!
Penny Smith says
OK, the floor looks pretty awesome now! (much better than what you inherited int he kitchen! ha!) Are you planning to keep it?
When you say “ebonizing” the stairs, what do you mean? My stairs are dark brown stained, but need freshening… I am dying to know what you meant! (and what you’ll do!)
YoungHouseLove says
Yup, ebony stain (deep chocolate/charcoal color). We’ve seen it with oak stairs and white spindles and it’s so pretty! Check out Pinterest for pics. As for the floor, we’d love to keep it once we hopefully repair it.
xo
s
Marissa@ohhhsolovely says
i’m really happy to see John in action with the sprayer. i’m tackling my kitchen remodel right now & have been totally apprehensive about spraying my cabinets. i know it’s not easy, but i was glad to see the video. it gave me a bit more confidence!
Shay @ Whine Less, Breathe More says
What a great, new look!
kat says
Did you keep your extra doors? They may be useful down the road. So – you may want to order matching knobs while you have the chance!
YoungHouseLove says
We did keep them in the storage room just in case :)
xo
s
Em says
Looks fabulous! :) The doors look great!
Jessica says
Random question… Did you start truncating posts or did my feedly just accidentally do it to this one? Just curious. :-)
YoungHouseLove says
Yup, it was a feedly glitch. Boo! So sorry about that. We think we have it figured out now. It was some bad video embed code that messed things up this morning :)
xo
s
Chris says
WOW!
Brush on a little paint…what a difference it makes.
I’m dying for you guys to rip the carpet off the stairs.
Diana Buchanan says
Sherry, this looks great!!!! I was shocked at how much better the foyer looks with the trim painted! And, um, TOTALLY jealous of the paint sprayer. Are you renting this out? Haha I’m so excited to see more progress!
Carolyn says
For anyone having reader troubles… I switched to netvibes (free) when Google Reader announced the big break-up. Nothing gets truncated unless the author purposely truncates their RSS feed. Just another option to throw out there for folks. :-)
YoungHouseLove says
Thanks for the tip!
xo
s
Felicity says
You’re right, the white paint makes the slate floors look so much better. Can’t wait to see what you do with this house.
Nicole says
Love the brightening up! Just curious…are you keeping the chair rails? I was wondering if you would be taking those down as part of your updating. I get them at the top of wainscoting but have never understood the look just randomly on a wall. Would love your thoughts.
YoungHouseLove says
We’re thinking down the road we might like to add wainscoting in here, so we’re leaving them as-is for now just to see where we end up.
xo
s
Kaitie says
So I was just seized with an irrational urge to know what your floor would look like with black grout, so I spent some time in Photoshop. And because if there’s anything I’ve learned from Sherry, it’s that we should embrace the weird and awkward things we do, so I’m going to share my creation. http://i277.photobucket.com/albums/kk73/copper_and_blue/foyer_zpse9decdda.jpg
I think it looks kind of chic, even with my hastily cobbled together new wall colour. Sex it up with some black accessories. And it would definitely stand up to stains. So yeah, from my mind to yours, if it wasn’t something you were already considering (or had soundly vetoed :D).
PS The de-blued trim already looks a bajillion times better. Yay you guys.
YoungHouseLove says
Wahoo! I love a little photoshop fun.
xo
s
Randy says
Hey Guys!
Just wondering why you choose simply white in this house? I know you have always been a fan of decorators white. We have used decorators white several times and loved it! We just bought a new house too and are starting the wallpaper removal process. Thanks for the post!
Thanks,
Randy
YoungHouseLove says
Lighting is different in every house, so here Decorator’s White almost looked blue-white and Simply White looked white-white here, so we went for it :)
xo
s
Hanna says
We painted all our dark brown trim white recently (well ahem paid someone to paint) and in some areas we were up to 5 coats total! well worth the $$ and effort, changes the house completely! Your new house is very much like ours so i hope you don’t mind but many of your ideas will be duplicated in Oz :)
YoungHouseLove says
Don’t mind at all. Love it, actually! Send pics :)
xo
s
Kara says
Listen. I’m obsessed with this post. I’ve looked at like four times today. White trim is the cure for what
Kara says
… ails you. If you’re a house. Sorry my phone spontaneously posted the first half of this comment of it’s own volition.
YoungHouseLove says
Haha thanks Kara!
xo
s
carla says
i never even noticed how substantial the crown molding really is! i dont think i wanted to look directly at it when it was blue…haha! it really is noticeable now. looking great!!
Alyson says
Looks great!! Will you put a rug in the front foyer?
YoungHouseLove says
Sure, we’d love to find one someday.
xo
s
Kim says
I think the real question here is: What possessed the previous owners to paint ALL of the trim that horrible color?
Sassafras says
That was a style that was popular in the mid 80’s, at least I think it was the mid-80’s. It was called country or colonial and was the traditional style of the times.
Gail says
I love reading your blog & house fixing up journey. :) Y’all are so fun & I love all the unexpected surprises you add to your home-like painting the inside of the door-so cool! Never would have thought of that! The white trim looks awesome and I gotta say, I’m kinda digging the slate flooring now that the blue trim is a goner. :) Great job guys!
Gail
Jamie says
that’s looking amazing! I think it might look cool to do your spindles in the same color as the door, with white or light walls to make it an unexpected pop of colour.
Katie says
Slightly off topic, but why do you have so many of those garden stools? Off hand, I can count like 5.. red one, white one, green one, teal one… why so many? and what are they actually for??? I always thought outside seating/side table but I see all your are inside, with one even tucked under the console table…. am I missing something?
YoungHouseLove says
I just love them! They’re great for side tables both inside and outside and you can tuck them pretty much anywhere for a pop of color or pattern. I find most of them at HomeGoods for $29, so you could say I have a garden stool problem. Haha!
xo
s
Kristin G. says
Not sure if the slate in the entryway is damaged, but it sure does look great with the white trim! I would say keep it if it doesn’t bother you too much.
Yvonne @ Dress This Nest says
I bought this spray gun based on your earlier reviews of it, but haven’t mustered up the guts to spray my doors yet. It looks like you didn’t do any sanding or prep work before painting. Did you have any trouble with the door sticking or fitting tighter?
YoungHouseLove says
Thankfully ours have all gone back up and been just as good. We have heard from others who have painted them and felt them swell a little though, so I think it depends how tight the fit is to begin with.
xo
s
esther says
Looking good!!
Watching the short vid brought back memories from late last year when my husband was spraypainting the attic of our newly constructed house. The endless sound of the thing hehehe. I painted all of the walls downstairs and on the first floor myself using a roller, gosh was glad thát was a quiet ordeal or I don’t think I would have managed to finish it al.
We had a professional painter come in and (spray)paint our ceilings downstairs, as we had them plastered smooth and were told it was very difficult to get a large surface (750 sq ft) like that rolled properly yourself without it leaving markings. Does your ceiling have structure in it that you can roll it yourself or are you just magicians?!:)
YoungHouseLove says
Wow, I’ve never heard that about ceilings! We use flat paint so that hides a ton of imperfections and have never had an issue rolling them (although it’s totally back-breaking work so it’s our least favorite thing to paint).
xo
s
Danette says
It is looking fantastic guys!! I just thought I would mention a product called ‘zinser’, it is an undercoat, primer, that you can put over all types of paint, and surfaces without sanding back anything!!! It is AMAZING! I know you didn’t need to sand back this time around, but thought I would give you the heads up for next time. (I’m sure you’re cursing for mentioning a next time right now) I’m in Australia, so it may be called something different where you are? I painted all our timber furniture white a few years ago, no sanding at all and it still looks great! :)
YoungHouseLove says
That’s awesome Danette!
xo
s
TJ says
Massive improvement! I love how clean and airy it looks.
Ashley says
Wow – almost every project helps me commit to to tackle a project I have been waffling over. I have been so scared to use a paint sprayer – today, I am committing… my husband will be thrilled – HA!
Patrice says
Looks Fantastic – how are you going to tackle the blue posts in the staircase? Just curious
YoungHouseLove says
I think I’ll tape off the wooden stairs and then just use a brush and a whole lotta patience.
xo
s
Shannon [Our Home Notebook] says
It’s amazing how much brighter it is in there without all that blue trim! I can’t wait to see what colour you go with for here.
Rishia says
For once John, short and sweet on two issues.
1. When priming/painting over a dark colour to a lighter one, as is your case with this all too familiar BLUE TRIM …my youngest son Jonathan (35), had in is twenties a successful residential and commercial painting business. RULE NUMBER ONE WHEN DEALING WITH ABOVE STATED ISSUE ….HAVE THE PRIMER TINTED SEVERAL SHADES LIGHTER THAN THE EXISTING COLOUR…This makes the second primer coat often not needed, only a second coat of the semi-gloss white.
Worth a try, save some money. Just bring in something already painted in the original blue, so the tone of tinted primer is dead on in the same tonal range. You guys buy enough stuff from Lowes, REMIND THEM gently of this, and try to get a FREE pint mixed up to try.
2. Epsom salts will work on stump….takes several years though to actually kill it, it slowly turns itself into compost, kinda.
YoungHouseLove says
Love the tips Rishia!
xo
s
Sassafras says
Oh man, I feel your hand cramping from all the way over here!!! The foyer is looking awesome though!!! Time & effort well spent.
Carole says
I love it! I have painted trim that is screaming for a white update as well. My problem is that the trim is older and has lots of nicks and paint layers. Any tips for how to smooth it up for painting until replacing it is in the time table or budget? Skim coating with drywall mud just doesn’t seem feasible on trim.
YoungHouseLove says
I would ask the pros at the paint desk (they might have a stripping agent you can rub them down with or just some sanding or scraping recommendations.
xo
s
KEK says
Your paint isn’t shiny, but as a PSA for others (or other projects)- Lowe’s has a new primer made for bonding to shiny surfaces. Per the directions, you don’t even need a deglosser or sanding, just make sure the surface is clean. I’m embarking on a kitchen cabinet painting project, and I’ll be darned if that primer didn’t do exactly what it said – and even adhered better than regular primer + degloss/sand that I had tried on our bathroom cabinets with the same finish! Definitely a huge improvement, with way less work.
YoungHouseLove says
That’s awesome!
xo
s
Chrissy says
Looks great! Slate is not usually my favorite, but now I am beginning to see that maybe it is because often it is paired with rich blues like your previous trim. I like the neutral gray tones of the slate now that you have lightened the trim.
Erin says
I’m sure that, your sick of the blue. Butttt, the contrast between the blue door and the white, really looks nice. It looks very cheerful, at least from the pictures.
First House Spouse says
OK, am I the only one noticing the hand-grip on that paintbrush (from it appears both of you)? There must be a gem of a story behind this. Yes, please go ahead and share ;) The masses must know…
YoungHouseLove says
Is that an unusual grip? It’s a short handled brush, so I think that’s just how we hold it. Haha!
xo
s
jenn says
It makes such a difference!
Jenn
With Luck Blog
Adriane says
I looks awesome, doesn’t even look the same house… great job!