I think I’m possessed. What else can possibly explain the fact that I’m laying in bed at 12:52 and thinking these totally-foreign-for-me words: “I’m so excited about my quilt I can hardly sleep.” Seriously. The only explanation is some sort of unbeknownst-to-me lobotomy. I’m the girl who loves to use iron-on hem tape to make curtains and crib skirts (here, here, and here). I’m the girl who whined for about 2,000 words about just how cursed I am when it comes to sewing (here). Can I really be the girl who can’t sleep because of a quilt? Insanity.

But I am. Here’s what I’ve been up to. And it is by no means the right way to do this. I went rogue for sure. I don’t know proper form or correct terms and didn’t even take a class or read a book about quilting. I just took it one this-might-work step at a time and held my breath a lot. So to all of you fancy quilting experts, please don’t snort too loudly with laughter when you see how it all went down for me. I just made it with love. And a bit of wonkyness for good measure. You know, just so it’s obvious that it wasn’t made in a factory. Haha. It’s perfectly imperfect and then some. But I love it so much I can’t sleep. Total shocker. Anyway, on to the crazy feel-my-way-along-as-I-go process. It all started when I came across this gorgeous quilt and was immediately inspired.
I’ve always wanted to use all of the mixed and matched fabrics from Clara’s weekly photo project to create some sort of crazy birthday quilt…
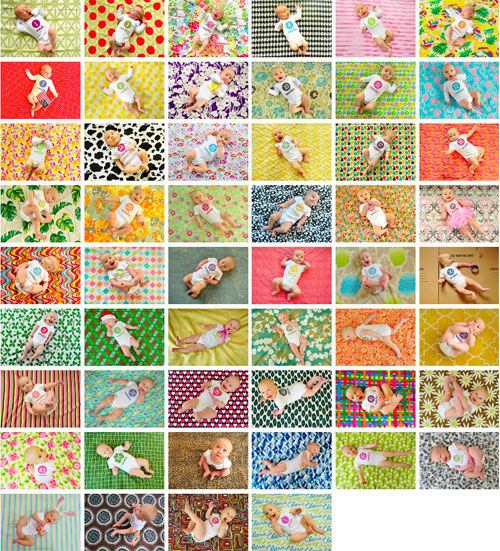
… but I knew it had to be pretty darn simple for me to even have a prayer of pulling off my own wonky version of it. But the un-lined-up corners and white stripes interspersed with different textures and prints had me at hello. This I could do. Maybe. And if not it might not kill me to try, just to learn that it’s not quite within my skill level yet. So I trecked out to JoAnn Fabric and used one of those 50% coupons I always get in the mail to get two yards of white quilt-ish fabric for just $8 (the kind with a quilted cotton front and some thin batting already sewn into it on the back). I figured it would work as the white striped fabric between each strip of textured and printed fabric from Clara’s weekly shots and also as the backing for the entire quilt.
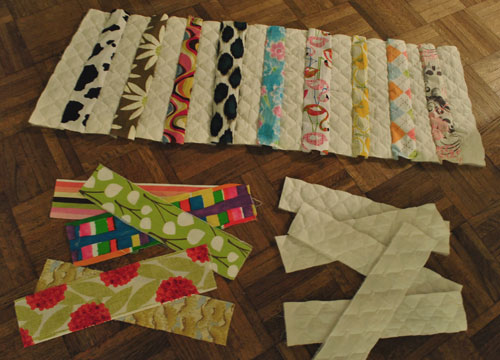
Then I washed all of the weekly fabric along with the new white quilted fabric so it was all nice and soft (and pre-shrunk). Then I had to iron a bunch of it because it was all ganked up from the washing process. Boo. That took a while but you know I did it in front of the TV at night after putting Clara to bed, right? Then I parked my butt on the sectional and cut out three inch by twelve inch strips of each of Clara’s weekly backdrops (except for some which weren’t fabric at all like the yellow rug, the shower curtain, the moving box, and a few other non-fabric items we tossed in there). When it came to the three inch width, I wasn’t exact with that since I liked the not-all-the-same-or-lined-up-look of my inspiration quilt from Pinterest). And I left out some of the crazier fabrics that I knew wouldn’t work that well so I was left with 27 different strips of around 3″ x 12″ fabric (I ditched things like the crunchy gold New Years fabric since I knew it wouldn’t be soft and cuddly like the rest of the blanket). And nobody loves a scratchy blanket. Especially the bean.
Then I cut out 30 three-inch-wide-by-12-inch-long strips of my white fabric. Those 30 strips left me with about two thirds of my yardage of white fabric to use for the backing, which was a pretty happy accident. Then I kept my arse firmly planted on the sofa and just started pinning away (one white strip got pinned to one printed strip, which got pinned to another white strip, and so on – for a striped look).
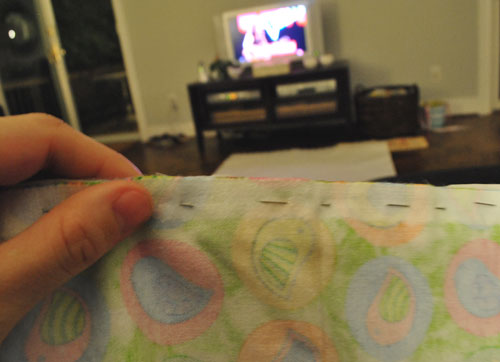
Nineteen strips made up each row (nine patterned ones alternated between 10 white ones)…
… which I would then sew together (using straight invisible seams from the back of the fabric, which I learned are the easiest kind from making my Sue pillows).
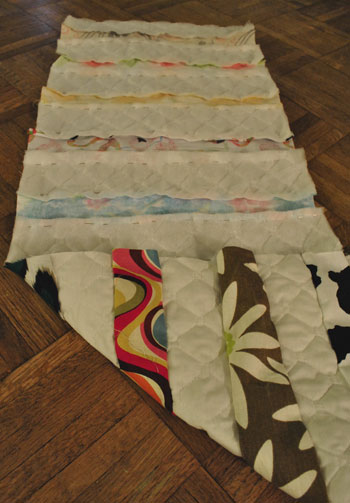
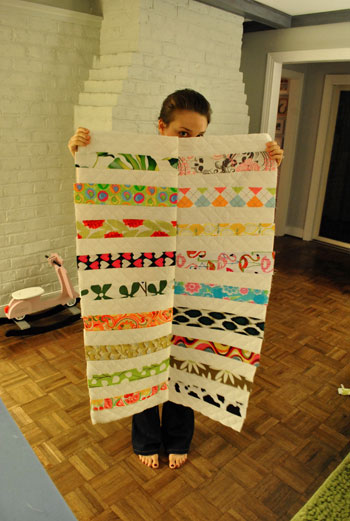
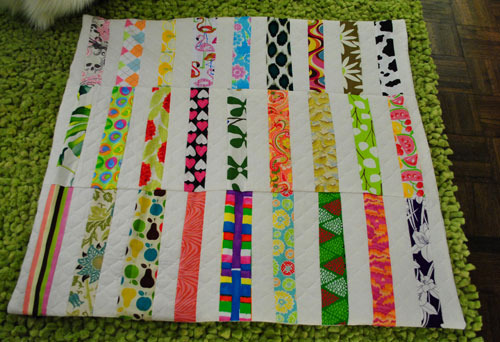
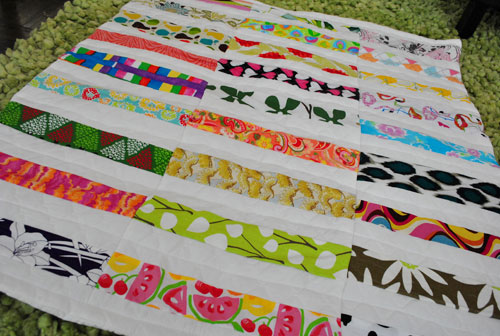
After creating three super long strips that were each about a foot wide and three feet long, I then laid all three of those super long rows next to each other to create this three foot by three foot square that looked pretty reminiscent of my inspiration quilt. I was shocked. It was kind of coming together. This is when I started entertaining the idea that my brain had been switched with a stranger’s.
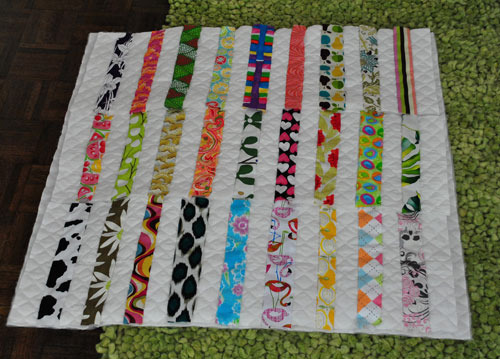
Note: I originally considered straggering the printed strips like some of the rows on the inspiration quilt (theirs line up sometimes and don’t other times) but I laid it out on the floor the staggered way first and it looked too busy for my liking since my stripes were thicker and most of them had large-scale patterns so it looked kinda cluttered. I then laid them out in the above long stripes (instead of staggering them) and liked the clean and simple look a lot better. So that’s how the front pattern came to be.
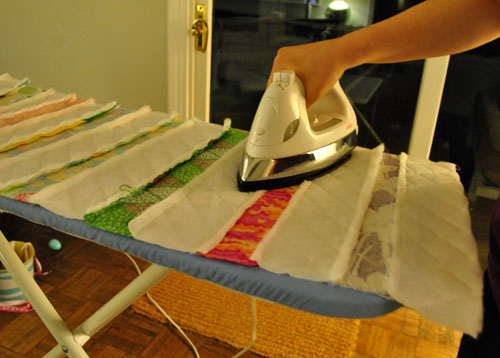
This is the point at which I stood and stared at that giant not-perfect-but-pretty-great striped patchwork-ish square of baby blanket happiness for about an hour. I was in total shock that I hadn’t sew-cried or screamed into a pillow yet. Next it was time to iron down all of my seams on the back since I’ve heard that after stitching fabrics together a huge part of making non-bunchy quilts is to iron the back seams so they lay flat (because once those back seams are covered with quilt backing, it’s not exactly easy to iron them flat).
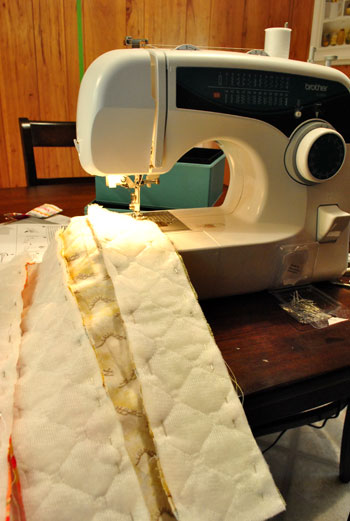
Then after each row was ironed so the back seams laid flat, I pinned one row to another row (with the ugly side out, so once it was stitched the seam would be invisible from the front)…
… and after a quick pass through Oh Brother (my trusty sewing machine) I was left with this:
And may I just say that my sewing machine is so great (it’s a Brother XL2600I that I found on Amazon for $89 with great reviews that I affectionately call Oh Brother). It was all totally user error that was tripping me up in the beginning and I would definitely recommend it. So far at least. It might revolt on me next week. You never know…
Then I repeated that process and added another row (which I again pinned from the back and stitched so the seam was invisible from the front).
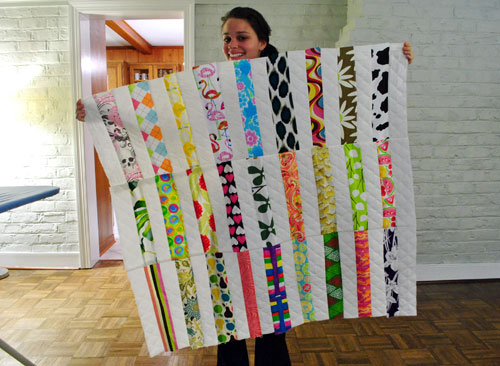
That big smile above is what proud looks like. I couldn’t believe I hadn’t a) sewn my finger, b) created a giant nest of string like I did during my first sewing attempt, and c) thrown a maimed quilt on the floor and stormed out of the room. Holy bananas. My plan was actually working. And I wasn’t even cursing.
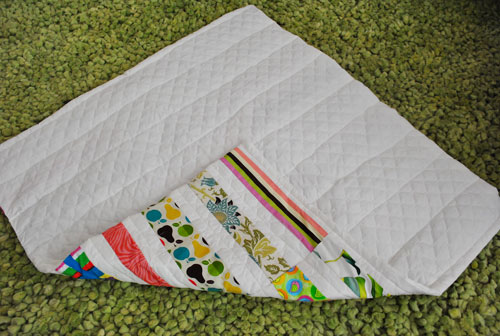
Here’s the back-view (also note that Burger is kindly showing you a chihuahua back-view):
After I ironed those new back seams that I had just created by joining those three long rows, I took the backing and the front of my quilt and faced the good sides towards each other on top of each other (so it was like a sandwich with the good stuff in the middle). Then I pinned around three of the four edges and I used my sewing machine to stich around them while keeping it all inside out like this. Yup, I basically made a giant pillow sham just like I did here with my Sue pillows. I even stitched a bit of the fourth side closed on each end (leaving just the middle portion open so I could flip things right-side out again.

Then I flipped it right-side-out and hand stitched the unsewn middle of the last edge closed (with my butt parked on the sofa in front of the TV of course):
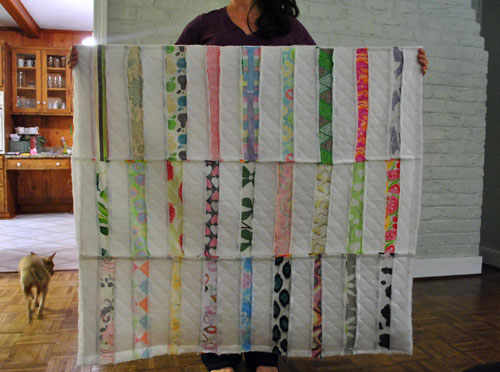
It was definitely starting to look quilt-like, but it was sort of like a pillowcase that had been stitched closed with nothing in it. If you pulled on the backing with one hand and the quilted front with another hand, you could balloon the whole thing out since nothing was holding them together except for the stitching around the edges. So here’s where I actually started to feel like I was quilting. I also started to sweat profusely because I was about to dive into seams that show on both sides of the quilt. No more hidden seams done from the inside. I actually had to stitch down from the top of each white row of strips to the bottom, and the little white seam would definitely be exposed, so any ganked up thread or knotted nests of string would ruin the whole effect in a hot minute. And I would probably have had a full blown meltdown after all that work if things suddenly went south. So I gritted my teeth, held my breath, crossed my fingers, decided I needed them and uncrossed them, and tried to take it slow and steady.

Lo and behold, I was left with this.
And I was also left wondering who the heck took over my body and made a friggin quilt. Insane. It’s definitely not perfect, but a week ago I would have bet you a million dollars that I couldn’t ever sew two strips of fabric together, much less make a quilt (albeit an imperfect one). And I actually love it in all of its not-quite-perfect glory. Hopefully that will remind Clara that it was one of my first attempts at sewing, which she brought out in me (because before she was born you couldn’t pay me to use a sewing machine- let alone convince me to buy one and attempt a friggin quilt, but for some reason she made me want to make her something meaningful with all of her weekly fabrics). In case I’m not hitting this hard enough, I am shocked that I actually made a quilt. Seriously, almost speechless.
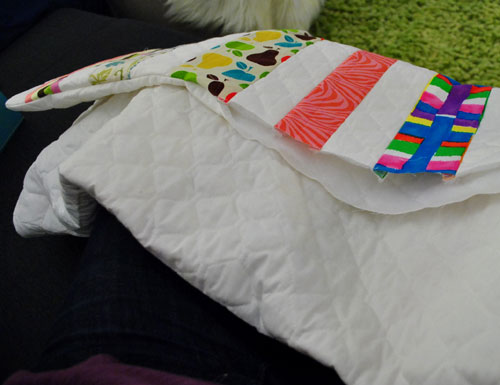
Oh and in the spirit of Burger sharing his hindquarters above, here’s the finished back-view:

Now I get to give it to Beaner for her b-day and I hope that she’ll always have it and know that her entirely undomestic mom (you think I’m kidding, but John does the cooking and the laundry around here) was possessed by some other-worldy being and whipped up a quilt to commemorate her big one year birthday. I’m not gonna lie, there were some victory laps around the house. And yes, John sang the rocky song while I ran around waving my quilt in the air.
In summation: Word to Oh Brother (yes, I just hit you with a word to your mother slash Brother sewing machine joke). Booyah.
Psst- My jazz hands even excitedly created a new category called “Sew Excited” a la Jesse Spano (get that reference here). So you can see the whopping three posts in there by clicking the Topics tab up near our search bar and scrolling down to find it.
Psssssst- We went Nursery Crashing over on BabyCenter this morning. Get in on the fun here.

Rose says
I’m so happy for you! I knew that you could sew bigger projects if you kept at it. Yay!
Chaucea says
*cheers*
Congratulations!!
It IS empowering when you start getting a handle on sewing. The more you do, the better you get and the more you WANT to do.
Keep it up! :-D
Deirdre says
So proud of you–you rock! What a treasure for Clara to always have. I can see her carrying it around for years and giving it lots of love.
marcy says
way to go! I bought a machine last year…and have made 1 pillow to date! But I bought all the fun accessories- now I just have to start sewing stuff :) I bought this sewing cabinet from Walmart- its awesome- has a place for everything and folds out for a work table. Check it out!
http://www.walmart.com/ip/Sauder-Sewing-Craft-Cart-Cinnamon-Cherry-Finish/15690337
YoungHouseLove says
Off to scope it…
xo,
s
Meghan says
SHERRY! AWESOME. I try and dabble in the sewing world from time to time, and this is just impressive for someone who hasn’t really sewn before! Beautiful. Clara will be able to enjoy it for life. So great!
r8chel says
Sherry, your quilt looks great! I’m so glad that you didn’t give up on sewing after your initial frustration!
Laura Jinkins says
Sherry – that is just beautiful. And you want to know something? You didn’t just make a quilt … you made an heirloom! Something that meaningful will get passed down for generations! :)
Kristin H. says
You have totally inspired me!!!!!! I’ve been trying to find something to make with the leftover napkins from our wedding (hubs and I made all the napkins for the wedding.. each table had a different print fabric) and quilting has just seemed so impossible… But YAY! I think I can do this!
beth from MD says
Yeah! It is so cute. It looks perfect for tea parties, too! My daughter has a doll quilt my mom made that we always use for play. Congrats sewing diva!
Alyssa says
So cute, I love it! I have so many wonderful memories of my grandma teaching me to sew, I loved giving my projects as gifts as well :) Great job!
jo says
Sherry, your quilt looks great! I’m so happy you’re friends now with Oh Brother. I read an article somewhere in a sewing/quilting magazine recently about where to keep your sewing stuff. Some people like having their own room, but the argument one lady made was that she feels locked away from the family if she’s tucked away in her own room. She likes keeping her machine out in the living room. Anyway, about two months ago, American Patchwork and Quilting had an issue about organizing your sewing space. I don’t know if your library carries that periodical, but nowadays, i get all my magazines from the library, and I switch them out every week when I take the baby to storytime. Okay, sew I’m way off-topic here. But you know, it’s free magazines.
YoungHouseLove says
Love it!
xo,
s
Becca says
I love it and I think there is hope for me. One of my to-do’s before I turn 30 is to learn how to sew… I think I will try something like this. Thank you!
Mrs.Origami says
Sherry that quilt is amazing. And it’s something your daughter will cherish forever! I love your tutorial too..inspires me to want to make things with my sewing machine which I am very afraid of.. (I always end up with the tangled mess of thread)
Great job!
RebeccaNYC says
I’m so proud of you!!! See? Sewing is not so hard, and what a great first big project! Clara is going to treasure this, for sure…
Susan carter says
Wow!! Fantastic way to create a wonderful keepsake for Clara! I have been saving my 16 mon. Old daughter’s onesies and special clothes to do something similar, but have been scared to get started because I have never made anything like that before…you have given me hope that I can pull it off!!
Teph says
It looks so cute! congratulations!
Quick sewing tip – switch the way you pin your fabric. You want to pin it perpendicular to the edge of the fabric. that way you can actually leave it in while you are sewing, and sew right over it! no need to pull it out as it reaches the needle, risking a bunch in your fabric.
Happy sewing!
YoungHouseLove says
Thanks so much to so many of you for sharing the pin trick! Who knew? Well, all of you did. But not me!
xo,
s
Justine says
Congratulations! I am new to sewing and totally understand the sew-crying and storming out of the room when the machine revolts! I’ve had a few successful projects but haven’t gotten to a quilt yet. You made it look like something I could actually tackle – maybe I’ll try one next?!
erica says
Congrats on your first quilt! It’s only the beginning. eheheh.
I love the quilt design you used and what a great way to showcase all of the beautiful fabrics. I’m sure Clara will cherish forever.
Now back to my time on the couch to finish up a quilt.
Kitty says
It is beautiful! And with the quilt you should give her the picture book “The Keeping Quilt” by Patricia Polacco. It’s the story of a quilt that is made from pieces of family clothing from the “old country” and passed down to every baby in the family. It’s a beautiful book that tells a story, just like your quilt!
YoungHouseLove says
Sounds so cute. We’ll have to check it out!
xo,
s
Grams says
Oh my goodness! That is so cute. It is a keepsake that will last forever. I still have the quilt my grandmother made for me when I was a baby and I’ll be 57 in June. It’s tattered and fragile but I love it and your little girl will love hers too.
JacquiBee says
Yay for you and your blossoming new talent. Can’t wait till you buy your first baby girl dress pattern! I found a little sewing table that has a fold up extension a bit like a small desk, with a drawer so I leave my sewing maching out with the cover on in the (mostly vain) hope I’ll use it more. It definatley helps if your making clothes to have a perminent spot. Its a pain to put it all away when your not finished.
Barb says
Awesome quilt, Sherry!! Wayy better than my first quilt, 25 years ago, when I didn’t know what I was doing. Kudos to you!
Tricia says
Seriously, is there anything you can’t do!? I love how inspiring your blog is to me. I’m sanding down my first table for a new paint job…wish me luck! :)
YoungHouseLove says
Luck!!!
xo,
s
Lindsay says
I’m really not so surprised you ended up doing so well at this. I swear, creatively talented people are good at EVERYTHING – they just don’t realize it. It looks so amazing & will be so special for Clara!
YoungHouseLove says
I don’t know I’m terrrrrrible at cooking. Seriously. Inedible terrible.
xo,
s
Rebecca says
first you convince me that I can diy a patio, and now sew a quilt? You’re amazing. It looks lovely!
Kay says
The quilt is adorable, cheerful, stylish. Congratulations! The next time you’re in Joann’s, take some time to look through the how-to-sew home dec books. They’re inspiring and they’ll suggest some easy techniques to produce nice, neat results.
And in your spare time (!), you can run over to http://www.patternreview.com, where you can browse through years of information and questions. There’s a home dec section you might like, and if you run into trouble with your sewing machine, someone will jump in to help you. Patternreview’s founder was just teaching herself to sew 8,9,10 years ago (something like that) when she came up with the idea for the website; now she manages the website full time, sews beautifully, she’s learned to knit, and she’s a brand new Mom, too. Sound like anyone you know?
Karla says
That looks fantastic Sherry! What a gorgeous momento for your little girl.
HH says
Please reconsider the nickname for Clara; look it up in Urban Dictionary. It’s not a very nice word!
YoungHouseLove says
Thanks for the tip. We had no idea and definitely didn’t mean to offend!
xo,
s
Dani says
Congratulations Sherry, it’s great! I am sure it is something that Clara will have for many years. There is nothing better than seeing something you made worn out years later from use. :)
Parnaz says
Love the quilt Sherry! Did you buy the special Oh Brother bobbins from amazon too? I just got the same sewing machine you have and was wondering if you could elaborate more on your bobbin issue. I have some bobbins at home but am thinking if it’s so specific, it may not work.
Oh, and I’ve never sewed before either, and it’s my growing belly that is inspiring me to make something. Hopefully I can get good at it and make fun things for the baby (like a quilt!)
YoungHouseLove says
The bobbins it came with are the right ones. I had a bobbin in my sewing box (stolen from my mom) that was the wrong size and I used that because I was lazy and it already had thread on it. Bad move!
xo,
s
Shannon Lambert says
My great grandmother made me a quilt (which she knitted and sewed) and it’s always meant a lot to me. I think Clara will love it when she compares her weekly pictures and sees the quilt as she gets older.
Amy S. says
Not sure if anyone has already mentioned it, but the pins should be at a 90 degree angle from your sewing line. If they are, you’ll be able to either slowly stitch over them or pull them out right before the needle goes over the area.
YoungHouseLove says
Yup, I got lots of that tip. Love it!
xo,
s
Nicole says
I just discovered your blog last week and I can’t stop reading it! Found it searching for steps to painting kitchen cabinets. Previous homeowners did not sand so the paint is now rubbing/peeling/sliding off…
I’m so impressed with your quilt! I have the same Oh Brother machine and have made Sue pillows and Bertha curtains in the past (made that one up myself!)… maybe it’s time to tackle a Sherry quilt!
Keep up the great posts!
YoungHouseLove says
They may not have used oil-based primer either- so be sure to try that too! Good luck!
xoxo,
s
Donna Huebsch says
Wow, Sherry, your quilt turned out great! Good call on the way you lined up your patterned fabric strips straight instead of staggered. Your little bean will have something she can cherish forever!
Erin C says
HAHA! Rocky song!! Laps around the house with your quilt over your head!!!??! You’re killin’ me, Smalls!! :D Your post made me laugh out loud. I love it, AND JUST AS INSPIRING AS ROCKY. I love that you jumped right in and did it your own way and I LOVE LOVE LOVE that it turned out so beautiful, imperfections it may or may not have and all.
And yes, a perma-home for your sewing machine is SO nice. You will sew all the more once you have it. Congratulations on your new DIY habit. Hey, its in the “topics”, its official.
Amy says
Congrats on your first quilt! Scrappy quilts are one of my favorite things. Of the many quilts my grandma made, my favorite is a king size cathedral window quilt where all of the colored squares are different fabrics. She said she would pay us a dollar if we could find two fabrics that were the same. My parents had it hanging on the wall, and after many, many years of hunting, we finally found two.
Before your next quilt project, I suggest getting a flannel backed table cloth. You pin it up on the wall and use it like a giant flannel board. (like so- http://lb.vg/EGK21) It makes it really easy to redesign things and keep all of the pieces in the right order and off the floor. You can also fold it or roll it up with the pieces inside if you need it out of the way before your project is done.
Janke says
Wow, I’m really impressed!!!!! Good job, it looks fantastic! Being an entirely undomestic girl myself (my husband does the cooking and is really good at it) I wouldn’t dare to start a project like this! Although I love quilts. ;)
Monique says
Beautiful! I knew you could do it. What’s the next sewing project? Maybe baby clothing?
YoungHouseLove says
I’m thinking something simple like a table runner. Just to take a little “break” – haha. Easy projects build my confidence.
xo,
s
Lotte says
Totally awesome. Sewing a quilt is on my “thirty in my thirties” list. I want to make one with all pieces of my babies’ baby clothes that I can’t toss out (after I’m done making babies of course…). Imagine the sweating there if things went wrong (aaarghhh)!
Anyway, I’ve been looking around the web for good patterns but the one you patterned your’s after is hands down the best. Looks much fresher with the white between and the stripey thing going on instead of those heavy looking blocks (sorry all you quilters, I mean no disrespect here!).
Inspiration!! Thanks. And good on you for pulling this off. You’re totally ahead of me in the sewing department, I can’t even put a thread in.
Moira Benacquista says
Morning,
I doubt you’ll ever get down here to the 441st comment on this post, but not for nothing your entire blog is an inspiration to me, I read it every day and am constantly amazed with the detail and fresh posts that you two get up. As half of one young couple loving the foreclosure we have been gutting and redoing on cheap bucks for the past two years this blog serves to give me hope and ideas for all new projects. After reading this post I’ve decided it’s finally time to get the manual for the sewing machine I have sitting in my guest room and start using it, I hope to make a quilt, curtains and much more, thanks to you.
Moira & Lui, loyal readers from CT
YoungHouseLove says
Every single comment that people leave gets read (we manually approve each one to make sure that we don’t miss a question and can catch spam). So I just wanted you to know that your sweet words were read and appreciated! Good luck with your quilt, curtains, and more!
xo,
s
Andrea says
If you’re up for a challenge:
http://www.cluckclucksew.com/2009/10/tutorial-scrap-buster-fall-pillow.html
Maybe an idea for Clara’s 2nd Bday?
YoungHouseLove says
No wayyyyyy! I already have that pinned as a future project on Pinterest. Love it!
xo,
s
Jackie says
Congrats!
I was lucky enough to learn to sew from my grandmother. (we started by making Barbie clothes) I’m no seamstress but it definitely comes in handy when I have an idea for the house. It’s kind of a love affair and a curse for me. I always see cute things and then think “I can make that myself”. I’ll have to send you pics of both of my daughter’s rooms that I did myself.
Keep sewing! :)
Kim says
Way to go Sherry!!! I’m so totaling ‘BIRGing’ for you right now! I sewed my first quilt last year for my daughter’s kindergarten class – each class does one and gives it to a sick child. I had hand sewn before (my mom taught me) and my dad could sew with his mom’s old Singer machine (which I used to watch him) but I had never sewn a quilt before. I know EXACTLY how you feel right now because I felt the same way! I had proud pics of me holding up my quilt and even pasted it on facebook! This year I sewed 3 for the school and can I tell you it went much easier and quicker. I’ve also started one for my 6 year old but still trying to finish that one. She drew a picture on white fabric for the front (she loves to draw) and I’m sewing alternate pink fabric squares together for the back. I’m also going to attempt a border on this one and also ‘quilt’ it closed with pretty pink ribbon (this would be done by hand and only in certain spots of the quilt). And yes, after finishing that first quilt I got totally hooked into the ‘dark side’ and wanted to sew tons of stuff after that. Of course, having the time is another matter – haha!
I know Clara is going to love and cherish your homemade quilt and show it proudly to her children and grandchildren someday. This present will mean so much to her when she really understands what you did for her (besides giving birth!).
Congrats and so proud for you!
Kim says
I’m so happy for you!
Sherry – I have been sewing for years and have yet to attempt a quilt. Its just seemed too overwhelming, but you made it looks so easy! I am definitely going to pick up some of that quilted fabric at Joann’s and make an attempt.
Brandan WH says
So lovely! Congrats of not letting “Oh Brother” beat you!
Laura says
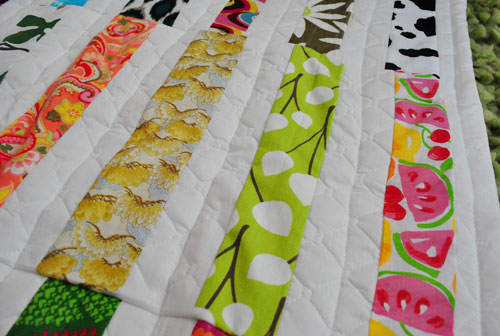
It looks awesome!!! I am totally impressed! How fun to have all her special fabrics keepsaked (is that a word?) for her in this way. Looooooove it! I especially like how the placing of the stitching on the white sort of frames each fabric strip. It makes them all pop a little more and sort of showcased. Was that planned or was it a happy acccident? Oh wait, who am I talking to…of course, it was a happy accident. You are always so lucky like that! :)
I have saved special pieces of clothing from each of my children with the hopes of making something some day, but never had the guts to try. You’ve inspired me. :)
Michelle says
Now I haven’t read all the other comments yet, but i’m also a quilter. It’s seriously addictive. The inspiration quilt you chose is from this book:
http://www.amazon.com/Denyse-Schmidt-Quilts-Colorful-Patchwork/dp/0811844420
which I have and love, except that all of her quilts use patterns, even though they look somewhat improvised. Your version went much faster than hers would have! :)
Anywho, I just wanted to say that your quilt is great for your first shot at quilting!! If you’re going to make any more, I think you should take a beginner class (or borrow a book from the library) and learn the basics. From there, you can improv almost any quilt you can find on the internet and it will be sure to be unique, comfortable, and sturdy enough to be passed on to Clara and her kids one day!
Ashley says
Okay girl…from someone who totally shares the emotional love/ hate relationship with sewing…
I AM SO PROUD OF YOU!
Look at your fun quilt!
Clara will treasure it for years to come and every time you look at it, you’ll think of how brave you were to conquer this project. : )
Katie @ dazed but enthused says
great job. i love that you did it your way and stuck at it even when the frustrations came along. seeing this post gave me a real boost not to be so intimidated by the sewing machine i have sitting idly in the closet. thanks :)
Steph @ BirdHouse Family says
Great job, Sherry! That is such a cute quilt. I’m sure Clara will treasure it forever. I’m at about the same stage you were a month ago with sewing, but I am determined to learn. I got a sewing machine for my birthday last year but haven’t worked up the courage to use it yet. My mother in law is a sewing and quilting expert, so I don’t think I’ll try a quilt anytime soon, but I like the idea of sewing smaller things like pillow covers.