I think I’m possessed. What else can possibly explain the fact that I’m laying in bed at 12:52 and thinking these totally-foreign-for-me words: “I’m so excited about my quilt I can hardly sleep.” Seriously. The only explanation is some sort of unbeknownst-to-me lobotomy. I’m the girl who loves to use iron-on hem tape to make curtains and crib skirts (here, here, and here). I’m the girl who whined for about 2,000 words about just how cursed I am when it comes to sewing (here). Can I really be the girl who can’t sleep because of a quilt? Insanity.

But I am. Here’s what I’ve been up to. And it is by no means the right way to do this. I went rogue for sure. I don’t know proper form or correct terms and didn’t even take a class or read a book about quilting. I just took it one this-might-work step at a time and held my breath a lot. So to all of you fancy quilting experts, please don’t snort too loudly with laughter when you see how it all went down for me. I just made it with love. And a bit of wonkyness for good measure. You know, just so it’s obvious that it wasn’t made in a factory. Haha. It’s perfectly imperfect and then some. But I love it so much I can’t sleep. Total shocker. Anyway, on to the crazy feel-my-way-along-as-I-go process. It all started when I came across this gorgeous quilt and was immediately inspired.
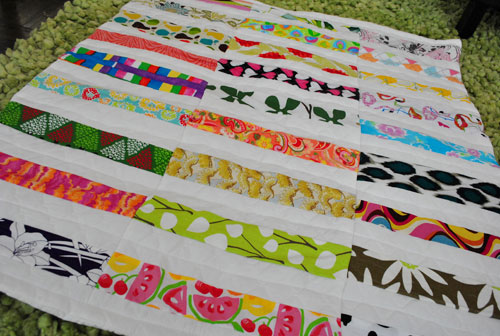
I’ve always wanted to use all of the mixed and matched fabrics from Clara’s weekly photo project to create some sort of crazy birthday quilt…
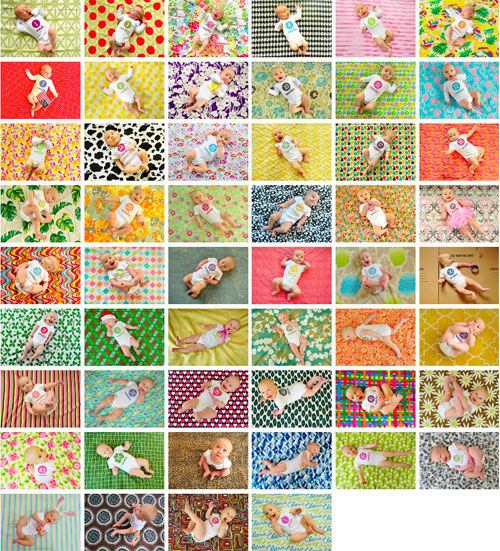
… but I knew it had to be pretty darn simple for me to even have a prayer of pulling off my own wonky version of it. But the un-lined-up corners and white stripes interspersed with different textures and prints had me at hello. This I could do. Maybe. And if not it might not kill me to try, just to learn that it’s not quite within my skill level yet. So I trecked out to JoAnn Fabric and used one of those 50% coupons I always get in the mail to get two yards of white quilt-ish fabric for just $8 (the kind with a quilted cotton front and some thin batting already sewn into it on the back). I figured it would work as the white striped fabric between each strip of textured and printed fabric from Clara’s weekly shots and also as the backing for the entire quilt.
Then I washed all of the weekly fabric along with the new white quilted fabric so it was all nice and soft (and pre-shrunk). Then I had to iron a bunch of it because it was all ganked up from the washing process. Boo. That took a while but you know I did it in front of the TV at night after putting Clara to bed, right? Then I parked my butt on the sectional and cut out three inch by twelve inch strips of each of Clara’s weekly backdrops (except for some which weren’t fabric at all like the yellow rug, the shower curtain, the moving box, and a few other non-fabric items we tossed in there). When it came to the three inch width, I wasn’t exact with that since I liked the not-all-the-same-or-lined-up-look of my inspiration quilt from Pinterest). And I left out some of the crazier fabrics that I knew wouldn’t work that well so I was left with 27 different strips of around 3″ x 12″ fabric (I ditched things like the crunchy gold New Years fabric since I knew it wouldn’t be soft and cuddly like the rest of the blanket). And nobody loves a scratchy blanket. Especially the bean.
Then I cut out 30 three-inch-wide-by-12-inch-long strips of my white fabric. Those 30 strips left me with about two thirds of my yardage of white fabric to use for the backing, which was a pretty happy accident. Then I kept my arse firmly planted on the sofa and just started pinning away (one white strip got pinned to one printed strip, which got pinned to another white strip, and so on – for a striped look).
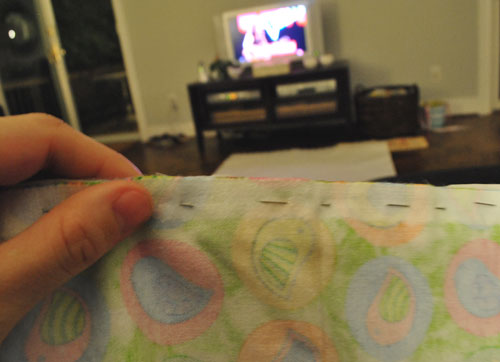
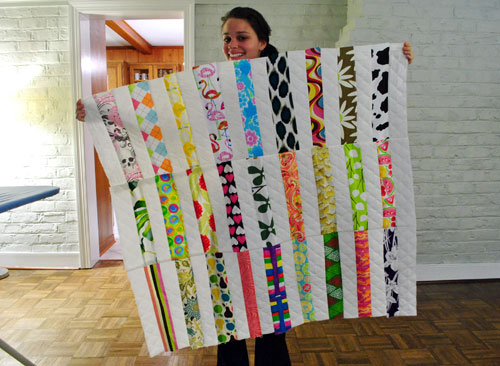
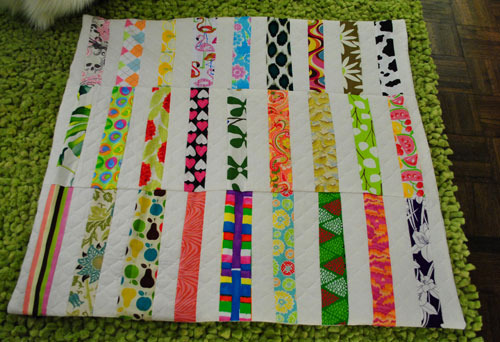
Nineteen strips made up each row (nine patterned ones alternated between 10 white ones)…
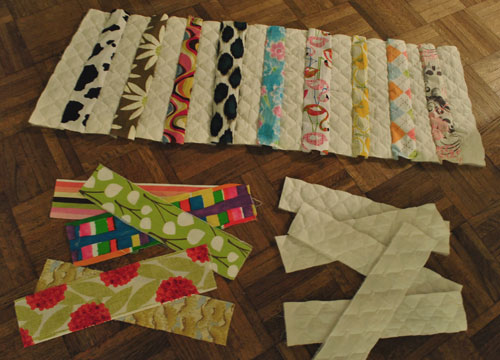
… which I would then sew together (using straight invisible seams from the back of the fabric, which I learned are the easiest kind from making my Sue pillows).
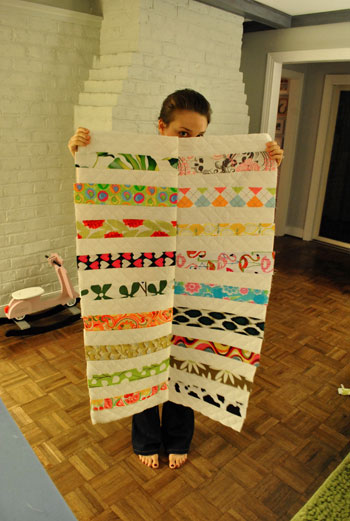
After creating three super long strips that were each about a foot wide and three feet long, I then laid all three of those super long rows next to each other to create this three foot by three foot square that looked pretty reminiscent of my inspiration quilt. I was shocked. It was kind of coming together. This is when I started entertaining the idea that my brain had been switched with a stranger’s.
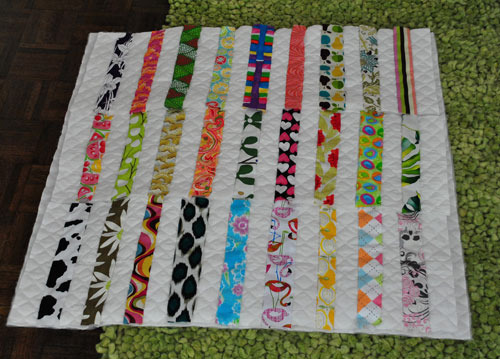
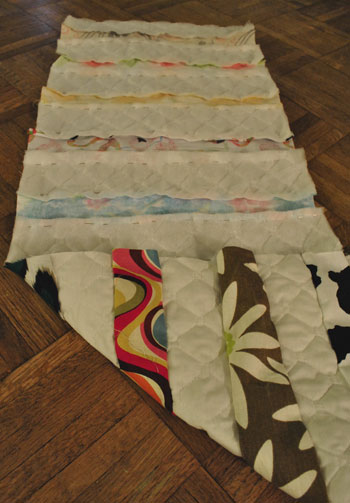
Note: I originally considered straggering the printed strips like some of the rows on the inspiration quilt (theirs line up sometimes and don’t other times) but I laid it out on the floor the staggered way first and it looked too busy for my liking since my stripes were thicker and most of them had large-scale patterns so it looked kinda cluttered. I then laid them out in the above long stripes (instead of staggering them) and liked the clean and simple look a lot better. So that’s how the front pattern came to be.
This is the point at which I stood and stared at that giant not-perfect-but-pretty-great striped patchwork-ish square of baby blanket happiness for about an hour. I was in total shock that I hadn’t sew-cried or screamed into a pillow yet. Next it was time to iron down all of my seams on the back since I’ve heard that after stitching fabrics together a huge part of making non-bunchy quilts is to iron the back seams so they lay flat (because once those back seams are covered with quilt backing, it’s not exactly easy to iron them flat).
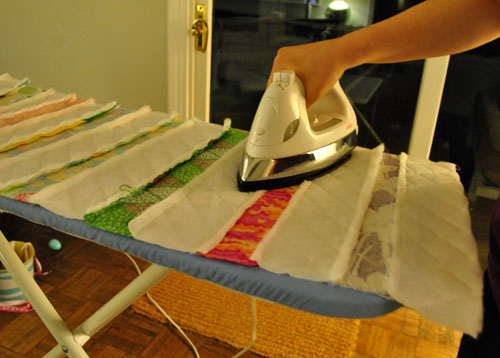
Then after each row was ironed so the back seams laid flat, I pinned one row to another row (with the ugly side out, so once it was stitched the seam would be invisible from the front)…
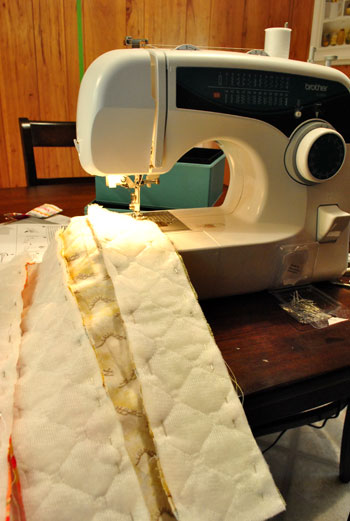
… and after a quick pass through Oh Brother (my trusty sewing machine) I was left with this:
And may I just say that my sewing machine is so great (it’s a Brother XL2600I that I found on Amazon for $89 with great reviews that I affectionately call Oh Brother). It was all totally user error that was tripping me up in the beginning and I would definitely recommend it. So far at least. It might revolt on me next week. You never know…
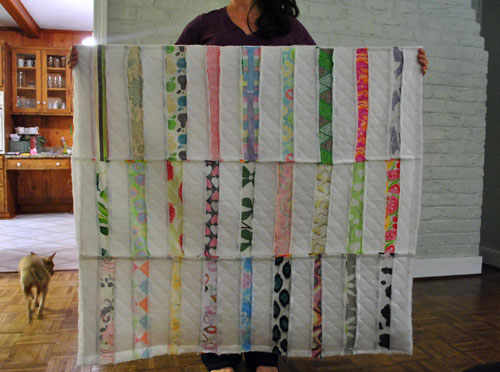
Then I repeated that process and added another row (which I again pinned from the back and stitched so the seam was invisible from the front).
That big smile above is what proud looks like. I couldn’t believe I hadn’t a) sewn my finger, b) created a giant nest of string like I did during my first sewing attempt, and c) thrown a maimed quilt on the floor and stormed out of the room. Holy bananas. My plan was actually working. And I wasn’t even cursing.
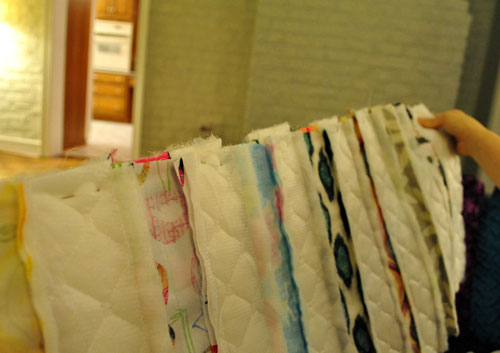
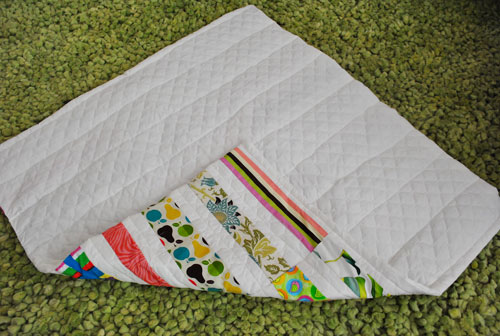
Here’s the back-view (also note that Burger is kindly showing you a chihuahua back-view):
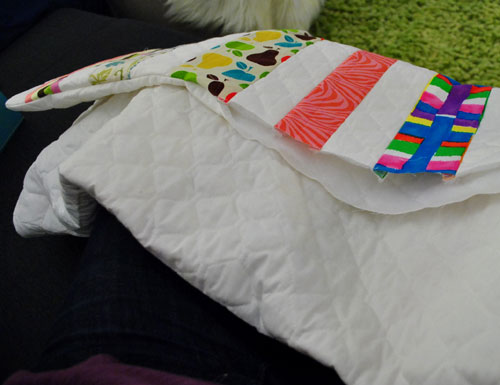
After I ironed those new back seams that I had just created by joining those three long rows, I took the backing and the front of my quilt and faced the good sides towards each other on top of each other (so it was like a sandwich with the good stuff in the middle). Then I pinned around three of the four edges and I used my sewing machine to stich around them while keeping it all inside out like this. Yup, I basically made a giant pillow sham just like I did here with my Sue pillows. I even stitched a bit of the fourth side closed on each end (leaving just the middle portion open so I could flip things right-side out again.

Then I flipped it right-side-out and hand stitched the unsewn middle of the last edge closed (with my butt parked on the sofa in front of the TV of course):
It was definitely starting to look quilt-like, but it was sort of like a pillowcase that had been stitched closed with nothing in it. If you pulled on the backing with one hand and the quilted front with another hand, you could balloon the whole thing out since nothing was holding them together except for the stitching around the edges. So here’s where I actually started to feel like I was quilting. I also started to sweat profusely because I was about to dive into seams that show on both sides of the quilt. No more hidden seams done from the inside. I actually had to stitch down from the top of each white row of strips to the bottom, and the little white seam would definitely be exposed, so any ganked up thread or knotted nests of string would ruin the whole effect in a hot minute. And I would probably have had a full blown meltdown after all that work if things suddenly went south. So I gritted my teeth, held my breath, crossed my fingers, decided I needed them and uncrossed them, and tried to take it slow and steady.

Lo and behold, I was left with this.
And I was also left wondering who the heck took over my body and made a friggin quilt. Insane. It’s definitely not perfect, but a week ago I would have bet you a million dollars that I couldn’t ever sew two strips of fabric together, much less make a quilt (albeit an imperfect one). And I actually love it in all of its not-quite-perfect glory. Hopefully that will remind Clara that it was one of my first attempts at sewing, which she brought out in me (because before she was born you couldn’t pay me to use a sewing machine- let alone convince me to buy one and attempt a friggin quilt, but for some reason she made me want to make her something meaningful with all of her weekly fabrics). In case I’m not hitting this hard enough, I am shocked that I actually made a quilt. Seriously, almost speechless.
Oh and in the spirit of Burger sharing his hindquarters above, here’s the finished back-view:

Now I get to give it to Beaner for her b-day and I hope that she’ll always have it and know that her entirely undomestic mom (you think I’m kidding, but John does the cooking and the laundry around here) was possessed by some other-worldy being and whipped up a quilt to commemorate her big one year birthday. I’m not gonna lie, there were some victory laps around the house. And yes, John sang the rocky song while I ran around waving my quilt in the air.
In summation: Word to Oh Brother (yes, I just hit you with a word to your mother slash Brother sewing machine joke). Booyah.
Psst- My jazz hands even excitedly created a new category called “Sew Excited” a la Jesse Spano (get that reference here). So you can see the whopping three posts in there by clicking the Topics tab up near our search bar and scrolling down to find it.
Psssssst- We went Nursery Crashing over on BabyCenter this morning. Get in on the fun here.

Jenny says
My mom was an exceptionally talented seamstress and was in high demand for handmade prom, bridesmaid, and wedding dresses. I on the other hand cannot sew a button on. My favorite piece she made for me was a blanket to use on high school band trips. It was simple alternating blocks of my high school colors and tufted (for lack of a better word) every so often to keep the quilt together. What made it so special is that she wrote on every block – my name, words of encouragement, high school name and mascot, cheers (Go Cougars!), etc. That blanket was used often and washed many times during my high school years. I still have it some 25+ years later and the words nor the love my mother put in to making it have faded.
My wish for you is that Clara’s blanket gets lots of use and even if the colors fade or the edges get tattered she will know the love that went into making it never fades.
Lori @ Richmond, BABY! says
LOVE IT! Clara will treasure that beautiful blanket for years to come.
angd says
I love your quilt!!! You are so brave to even try this project, call me impressed.
Where do you get your fabrics? Some of those prints are so delicious – must have them for myself! (you know, so my friends who sew can make me something :) )
Beautiful job, Sherry!
YoungHouseLove says
Nearly all of them were from Hancock or Joann Fabrics (usually on clearance or purchased with a 50% off coupon!).
xo,
s
Aja says
Awesome! You should buy some ready-made binding and finish the edges!
Kate says
What was your user error with your Brother sewing machine? My husband bought me the same one from Amazon in October and I laughed at your posts because I was having the same trouble. In fact I tried to get my mom to show me how to use it properly and she gave up on it too! We hauled out her 30 year old sewing machine to get the job done! I really want my Brother to work, but right now it is sitting in my closet out of frustration and I’ve got some sewing projects lined up! I’d love to hear what you were doing wrong with your machine. Maybe it’ll help!!!
YoungHouseLove says
Check out this post all about it (basically I was having issues adjusting the tension and I was using the wrong bobbin). So glad I figured it out!
xo,
s
CourtneyOutLoud says
YOU ROCK! I have toyed with the idea of sewing but it has a lways scared me. However, watching your progression has given me a little boost!
Emma says
Great job!!! I’m so proud of you – your quilt is beautiful. You’re well on your way to becoming a sewing Goddess now. I hope to follow soon as I’m also learning to sew. Happy sewing!
chrissi says
LOVE IT! Clara will treasure this forever, no doubt :) That was a great thing to do for her!
Erika says
Aw, see, there you did it! Great job!
Carla says
Wow! I am super impressed, I think you found your new hobby! As if you needed another one! I have a super cheap Brother (sewing machine) too, and I love her, we have bonded, which is strangely important.
jo says
Once again another inspiration! Thanks!
Robin says
That is a super-cute quilt — the perfect pattern — and how special that it’s for Clara’s first birthday!
And it sounds like you have been bitten — hard — by the sewing bug. I know well the feeling of euphoria over projects and I’m tickled to see you’re so excited. Looking forward to more projects.
Jill says
I am new to quilting – just made my second quilt this last weekend and I totally get the “I can’t sleep, I am so excited about my quilt feeling” you had!
Nicole says
Yay, this is so cute! And it has become my first ever pin on Pinterest!
AlexisS says
Isn’t it funny how sort-of-easy it is? I too just got a sewing machine in March (I’ve never sewed before), and since then I’ve made 2 quilts, full-length lined curtains, pillows galore and so much stuff! I can’t say my projects are technically perfect or anything, but they are good enough and I’m having a lot of fun. Looks like you are too! :)
Sandra says
I haven’t read all the comments, so sorry if someone else already suggested this. But I hope you haven’t wrapped the quilt yet! You -must- take her 52nd week photo with it as the backdrop!
YoungHouseLove says
We already made that Clara fabric from spoonflower for her 52 week photo but we’ll have to snap a picture of her on her quilt too!
xo,
s
Stephanie says
Very, very impressive to do that all in one night! I had the very same feeling of accomplishment after my first quilt: http://turtlesoupdaily.blogspot.com/2009/12/finito.html
and just in the past couple of days, I’ve been itching to start quilt #2 (after CarsonToo was featured on Etsy: http://www.etsy.com/shop/carsontoo). I find the planning and piecing is the easy and fun part, but the actual quilting kind of sucks. So impressed you were able to do it!
Tonya says
After reading about your sewing adventures I decided to pull out the sewing machine I bought last year and give it another go. Thanks to you my feet are now propped on the freshly slipcovered (and originally very ugly) little footstool I bought for $1 at the auction house where I work. Ahhh…sweet success!
Carla says
I love quilts so much, and yours is right up there with the best in my opinion. It epitomizes what quilting is all about. One thing I couldn’t quite follow: Did you insert batting to add more substance to the quilt, or did you just stitch the two sides together? My understanding is that batting comes in different thicknesses, but I’m not really sure. Anyway, it’s really beautiful and I love the quilted white fabric!!
YoungHouseLove says
The white fabric that I used for the strips and the backing was quilted with batting worked into the back already- so it gave it a nice cushy heft. Gotta love a good short cut. Hope it helps!
xo,
s
kristin says
WOW, way to go! I’m so impressed that you “got over the hump” and went for it with this quilt. It took over a year and a half of sewing for me to finally work up the nerve to make a quilt for my daughter. I was so worried about “doing it wrong” that it paralyzed me, but now I’m sooo happy that I finally did. Sewing is super addictive. Welcome to the club!
Jenn S. says
Aw, how cute. Very nice work. I was just telling my aunt that I once made a picture quilt for my mom. I had no experience sewing, much less quilting, but I did it. I have no idea how. It’s amazing what one can accomplish with pure desire and determination.
Great Job!
Melissa says
woot! congrats on the successful sewing project – what a lovely momento for Clara!
Ames says
This is totally going to be one of Clara’s most treasured things! I have two quilts my grandma made for me, one when I was a baby (and it is now pretty tattered) and one when I was a teenager. I love them so much, and always think about my grandma when I sleep under them. You are a fabulous mom!!
betsy says
it is amazing what we will do as mothers for our babies! i love to quilt and i am no expert but i think you did incredible for your first quilt!
Jessiw says
Look at you girl!! Great job! You’ll be making halloween costumes before you know it :)
Amanda S says
Are the edges of the patterned fabrics unfinished? Just wondering what will happen when the quilt is washed…?
YoungHouseLove says
Every edge is finished thanks to sewing each strip together, and then joining the three rows, and then sewing around the entire outside of the quilt while it was inside out like a pillow sham and then flipping it back right-side-in and hand-stitching the last small portion closed. Hope that makes sense! I think the pics might help more than those words. I’ve already washed it once just to see what would happen and other than feeling even softer than before it looks the exact same!
xo,
s
Alicia M says
Congrats Sherry!!! Welcome to the world of sewing! One thought…have you considered top-stitching approx 1/4 to 1/2 inch in from the edge, all the way around, to give it a more finished look and to keep the edges from ballooning and bubbling? Just a suggestion! Great job!!
YoungHouseLove says
Thanks for the tip!
xo,
s
Amanda says
Its gorgeus!! Congratulations! I knew you could sew! :D
Kristen @ Savor the Small Things says
I love it! It looks great and will be something Clara will always treasure! I got a sewing machine a couple years ago for Christmas, because I just *had* to have one…and have never taken it out of the box :(
Ashley W says
Looks great! Now you’ve inspired me to make a quilt for my little 6-month old.
Veronica @ Sweet Pumpkin says
Good job on your first quilt. I did my first one about a year ago (I never finished it though) I did two baby quilts a couple of weeks ago, and am in the middle of a slightly more complicated PIRATE quilt (I’m such a nerd I know!) You can see how it is going at the link below. Although I will say, with a 6 almost 7 month old I am not very far on it yet. I also have tons of pics of my sweet girl over there. She’s younger than yours, I actually made her quilt last week, and haven’t posted about it yet, but I will soon.
http://www.veronicabarnett.com/SweetPumpkin/?p=428
sara says
just curious, but why didn’t you stagger the printed fabric like the inspiration quilt? Its pretty hard on the eyes to look at a stripe that changes patterns 900 times. i think the staggered would of been prettier.
YoungHouseLove says
I laid it out on the floor that way first (I originally planned to follow the inspiration quilt exactly) but it looked too busy since our fabrics are much crazier and in a ton of different tones and colors than the ones in the inspiration quilt. It looked a lot more simple and not brain-scrambling when they “read” as long stripes instead of dashes that were staggered all over the place. So I went with it! I also planned to use the blue binding around the edges but later appreciated the “visual simplicity” of a clean border since again I worried about it looking cluttered with stripes of color running amok. Haha.
xo,
s
Christin says
It’s beautiful!!! Well done! I have done a few sewing projects, but I’m no expert that’s for sure. But this has inspired me to try more sewing projects! Congrats! You should totally feel proud. It’s an awesome accomplishment. :)
KiM says
What a fantastic job you did! Its not perfect but thats what makes it unique and yours. What fun would it be if it was perfect? LOL
I do have a question for you though, and since I really didnt read through all 350+ comments, I hope i’m not repeating a question…
Why didnt you use all 52 strips of fabric from all 52 photoshoots? I know it hasnt been 52 weeks yet, but i’m sure you know which fabric you would be using and you could have just cut a piece and still done her photo Friday. Just curious. Heart yall! Best Blog Ever!
YoungHouseLove says
Some of our background weren’t actually fabric (we used the living room rug, the shower curtain in the guest room, etc) and some of them were scratchy and not soft (like the gold New Years fabric) I worked in all of the soft ones that I could actually cut (didn’t want to cut the shower curtain, haha).
xo,
s
KiM says
Oh! HAHAHAHA– That makes sense! LMBO!
Amy E. says
congratulations! love your work! a quilt of that style is probably the BEST way to get into quilting.
silly me, my first attempt was a block quilt that required quite a bit of accuracy (which i didn’t yet have). luckily, my second attempt has JUST been completed (literally, i stepped away from the sewing machine to find the camera and got distracted by your blog post!), and i couldn’t be happier with it! my third and fourth quilts are already sitting on my sewing table in various stages of cutting and piecing. be careful, quilting can be addicting! especially when they turn out so nice and meaningful as yours!
can’t wait to see what else you try with Oh Brother. maybe some cute skirts or ruffly pantaloons for Clara??
jane davila says
Quick, somebody show her the secret handshake!
You might want to check out the Modern Quilt Guild. It’s a kind of counter-subculture movement that was started on the internet by brand-new young, hip quilters (like someone we know…) There’s even an in-person group in Richmond.
http://themodernquiltguild.com
YoungHouseLove says
I don’t know, that sounds too cool for me. Haha.
xo,
s
Dianne says
CONGRATS Sherry!!!!
Welcome to our “quilter’s world”. I love how you improvised, worked without a pattern, and cut all your pieces with scissors (save your 50% off coupon and get a rotary cutter – soooo much easier). I’ve been quilting for almost 2 years now and totally LOVE it. You don’t really need a class, there are soooo many blogs out there that provide tutorials (my favorire is http://www.ohfransson.com) and the patterns are usually very well written even for a beginner.
Enjoy,
Dianne
Jenny B says
Hooray!! I’m so happy for you! Look at how far you’ve come in just a few weeks? It’s sew amazing (insert groan here).. And the quilt is simply terrific. The birthday girl is going to love it! Congrats-
Diane says
NICE JOB, Sherry!!! You give me hope that maybe I can actually sew something that I don’t end up use for a scrap rag later, lol. FWIW – my husband still has a quilt that his mom made him – Clara will have this hand made gift for years to come. So sweet.
Erin says
Thanks for the inspiration! I actually checked out your nursery crash on my lunch hour and ended up looking at all kinds of things for our nursery. We’re letting the gender be a surpise so i think rooms like that are right up our alley. Fun! I love your blog. It’s usually the first place I start when i want to spend some time on the internet. Keep up the great work!
Emily says
Wow, I was super impressed with John yesterday for building that patio and I am equally impressed with Sherry today for making that quilt!! You guys are on a roll! All thanks to Clara :)
I scrolled through all her weekly photos the other day… what a sweet, fun project (and there were a few that made me laugh!)
seansmom says
WELL DONE!!!! The hardest part of sewing/quilting is just having the nerve to get started. As a sewer/quilter who has been doing it for years, I just want to say I’m VERY proud of you!!! It’s just like anything else you do in life…the more you do of it, the better you get!
YOU GO GIRL!!!!!
kristin says
ak! i’m actually ok at sewing and haven’t finished sewing a quilt i started before my first was born (almost 4.5 years ago). though mine isn’t a baby quilt, it’s a king sized one for my bed, but still… i’m slacking.
three cheers for you! you did great, it looks fantastic, and you finished before clara’s birthday! wowza.
eRin says
YAY! It’s fantastic! And SEW inspiring =)
Carollyn says
You have inspired me! I’ve always wanted to quilt, but I’ve never sewn more than a button. It is absolutely beautiful. Well done!
andrea worley says
It looks awesome! Great job for your first sewing project! I love that she will have it forever!
Katie S. says
Nice work! What a great keepsake for Clara! My grandmother made me a t-shirt quilt from all of my old softball jerseys, and I absolutely love it because of all the love it represents =)
Janae says
Way to go!! It looks magnificent and Clara will be so happy that her mom made her such a special quilt!! You’re a great mom and now a great quilter!!
Casey says
Great job, Sherry! It’s beautiful – congratulations!!
Valerie says
I just wanted to say that this is an awesome first quilt! As a fellow sewist I am so glad that you are taking the plunge & that your machine is working so well for you. One tip for you: If you ever want any help or advice, ask the people at your local fabric store,sewists tend to be a real friendly bunch that love to help each other! Congratulations & keep up the good work. :)
Patti says
I’m so excited to see you accomplish this because now I know there’s a chance for me ;-)