I think I’m possessed. What else can possibly explain the fact that I’m laying in bed at 12:52 and thinking these totally-foreign-for-me words: “I’m so excited about my quilt I can hardly sleep.” Seriously. The only explanation is some sort of unbeknownst-to-me lobotomy. I’m the girl who loves to use iron-on hem tape to make curtains and crib skirts (here, here, and here). I’m the girl who whined for about 2,000 words about just how cursed I am when it comes to sewing (here). Can I really be the girl who can’t sleep because of a quilt? Insanity.

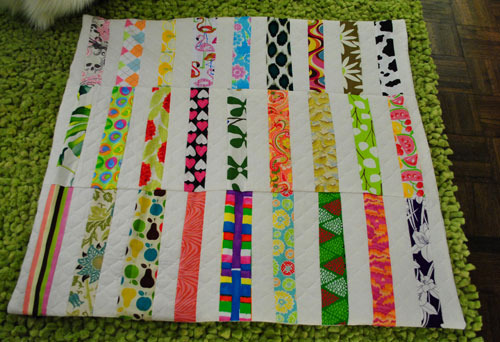
But I am. Here’s what I’ve been up to. And it is by no means the right way to do this. I went rogue for sure. I don’t know proper form or correct terms and didn’t even take a class or read a book about quilting. I just took it one this-might-work step at a time and held my breath a lot. So to all of you fancy quilting experts, please don’t snort too loudly with laughter when you see how it all went down for me. I just made it with love. And a bit of wonkyness for good measure. You know, just so it’s obvious that it wasn’t made in a factory. Haha. It’s perfectly imperfect and then some. But I love it so much I can’t sleep. Total shocker. Anyway, on to the crazy feel-my-way-along-as-I-go process. It all started when I came across this gorgeous quilt and was immediately inspired.
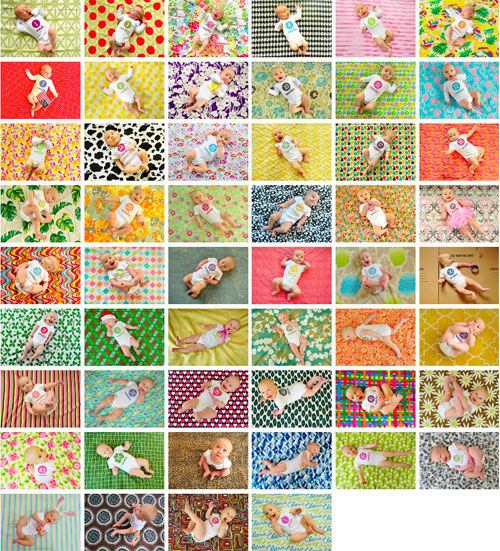
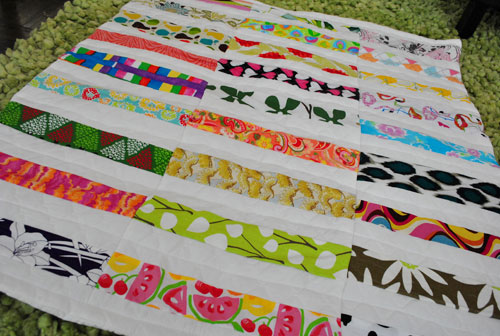
I’ve always wanted to use all of the mixed and matched fabrics from Clara’s weekly photo project to create some sort of crazy birthday quilt…
… but I knew it had to be pretty darn simple for me to even have a prayer of pulling off my own wonky version of it. But the un-lined-up corners and white stripes interspersed with different textures and prints had me at hello. This I could do. Maybe. And if not it might not kill me to try, just to learn that it’s not quite within my skill level yet. So I trecked out to JoAnn Fabric and used one of those 50% coupons I always get in the mail to get two yards of white quilt-ish fabric for just $8 (the kind with a quilted cotton front and some thin batting already sewn into it on the back). I figured it would work as the white striped fabric between each strip of textured and printed fabric from Clara’s weekly shots and also as the backing for the entire quilt.
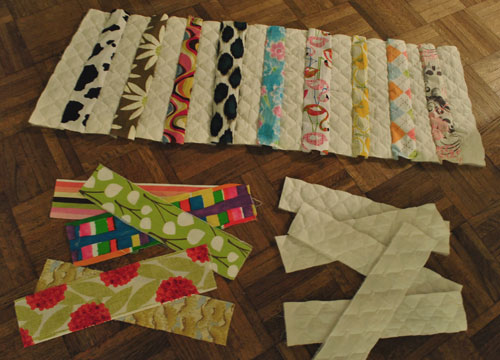
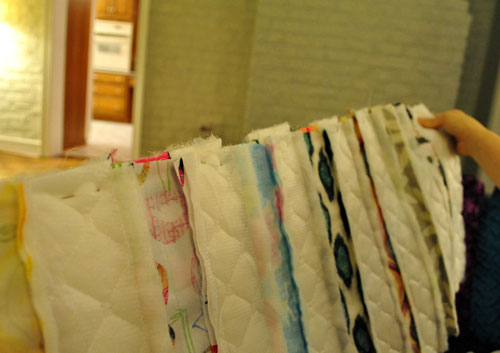
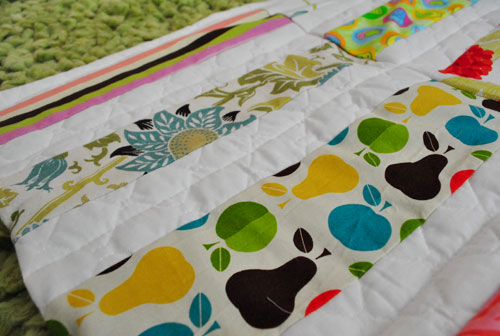
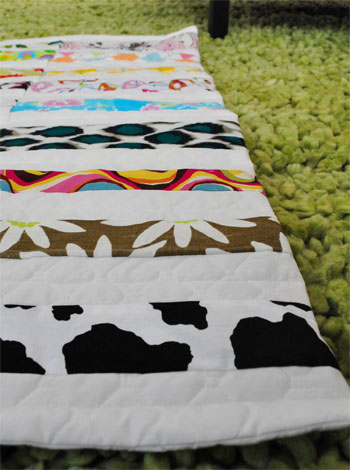
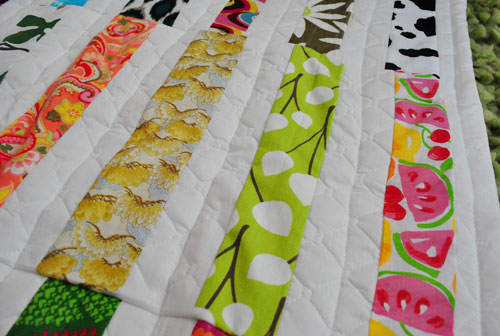
Then I washed all of the weekly fabric along with the new white quilted fabric so it was all nice and soft (and pre-shrunk). Then I had to iron a bunch of it because it was all ganked up from the washing process. Boo. That took a while but you know I did it in front of the TV at night after putting Clara to bed, right? Then I parked my butt on the sectional and cut out three inch by twelve inch strips of each of Clara’s weekly backdrops (except for some which weren’t fabric at all like the yellow rug, the shower curtain, the moving box, and a few other non-fabric items we tossed in there). When it came to the three inch width, I wasn’t exact with that since I liked the not-all-the-same-or-lined-up-look of my inspiration quilt from Pinterest). And I left out some of the crazier fabrics that I knew wouldn’t work that well so I was left with 27 different strips of around 3″ x 12″ fabric (I ditched things like the crunchy gold New Years fabric since I knew it wouldn’t be soft and cuddly like the rest of the blanket). And nobody loves a scratchy blanket. Especially the bean.
Then I cut out 30 three-inch-wide-by-12-inch-long strips of my white fabric. Those 30 strips left me with about two thirds of my yardage of white fabric to use for the backing, which was a pretty happy accident. Then I kept my arse firmly planted on the sofa and just started pinning away (one white strip got pinned to one printed strip, which got pinned to another white strip, and so on – for a striped look).
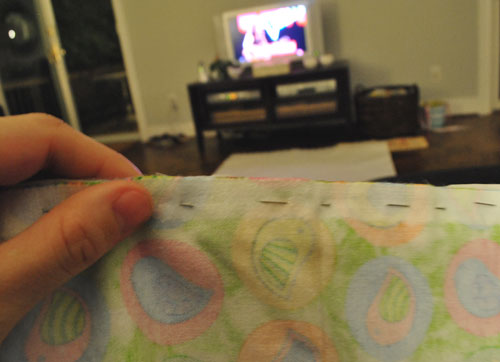
Nineteen strips made up each row (nine patterned ones alternated between 10 white ones)…
… which I would then sew together (using straight invisible seams from the back of the fabric, which I learned are the easiest kind from making my Sue pillows).
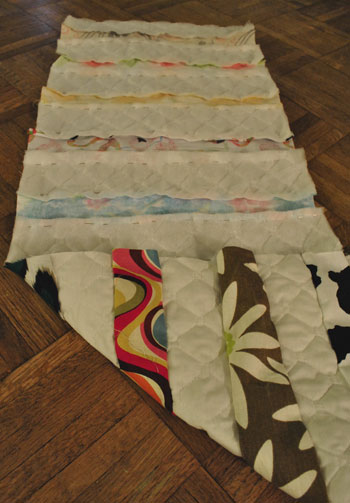
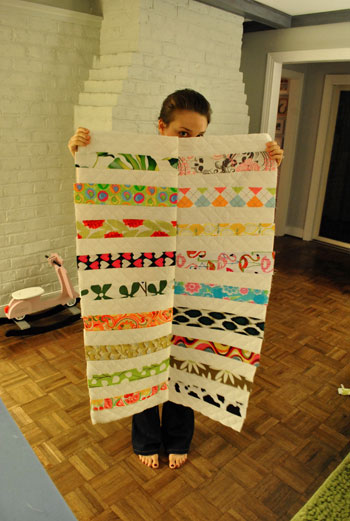
After creating three super long strips that were each about a foot wide and three feet long, I then laid all three of those super long rows next to each other to create this three foot by three foot square that looked pretty reminiscent of my inspiration quilt. I was shocked. It was kind of coming together. This is when I started entertaining the idea that my brain had been switched with a stranger’s.
Note: I originally considered straggering the printed strips like some of the rows on the inspiration quilt (theirs line up sometimes and don’t other times) but I laid it out on the floor the staggered way first and it looked too busy for my liking since my stripes were thicker and most of them had large-scale patterns so it looked kinda cluttered. I then laid them out in the above long stripes (instead of staggering them) and liked the clean and simple look a lot better. So that’s how the front pattern came to be.
This is the point at which I stood and stared at that giant not-perfect-but-pretty-great striped patchwork-ish square of baby blanket happiness for about an hour. I was in total shock that I hadn’t sew-cried or screamed into a pillow yet. Next it was time to iron down all of my seams on the back since I’ve heard that after stitching fabrics together a huge part of making non-bunchy quilts is to iron the back seams so they lay flat (because once those back seams are covered with quilt backing, it’s not exactly easy to iron them flat).
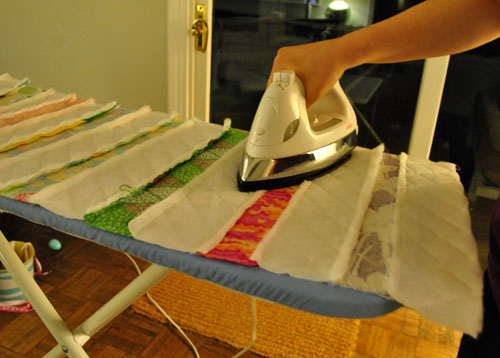
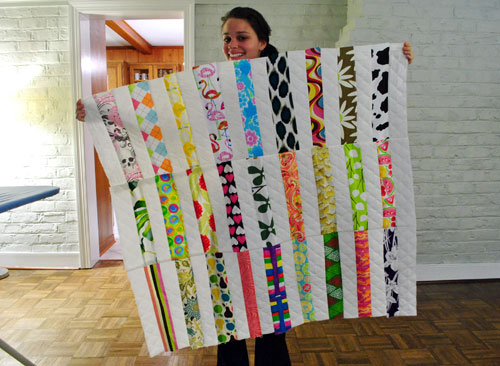
Then after each row was ironed so the back seams laid flat, I pinned one row to another row (with the ugly side out, so once it was stitched the seam would be invisible from the front)…
… and after a quick pass through Oh Brother (my trusty sewing machine) I was left with this:
And may I just say that my sewing machine is so great (it’s a Brother XL2600I that I found on Amazon for $89 with great reviews that I affectionately call Oh Brother). It was all totally user error that was tripping me up in the beginning and I would definitely recommend it. So far at least. It might revolt on me next week. You never know…
Then I repeated that process and added another row (which I again pinned from the back and stitched so the seam was invisible from the front).
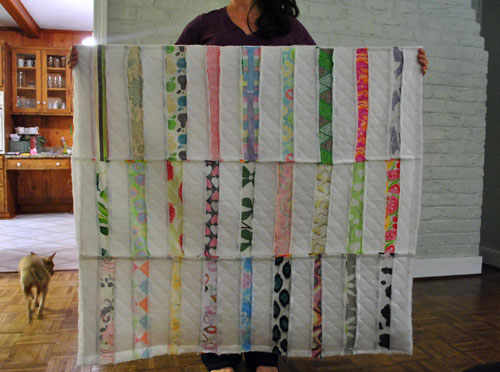
That big smile above is what proud looks like. I couldn’t believe I hadn’t a) sewn my finger, b) created a giant nest of string like I did during my first sewing attempt, and c) thrown a maimed quilt on the floor and stormed out of the room. Holy bananas. My plan was actually working. And I wasn’t even cursing.
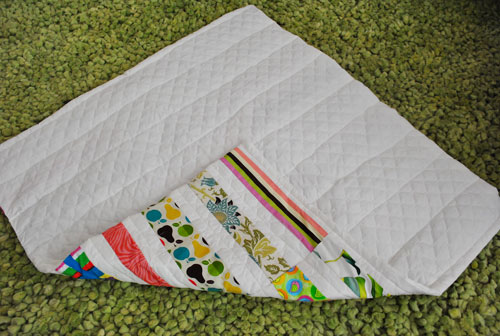
Here’s the back-view (also note that Burger is kindly showing you a chihuahua back-view):
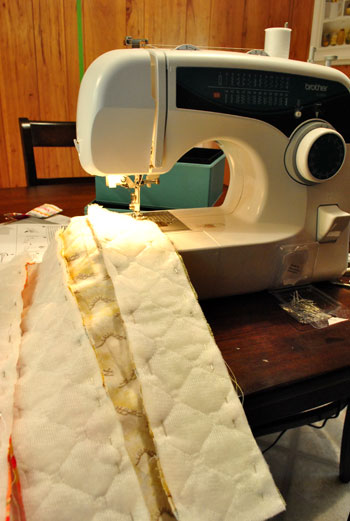
After I ironed those new back seams that I had just created by joining those three long rows, I took the backing and the front of my quilt and faced the good sides towards each other on top of each other (so it was like a sandwich with the good stuff in the middle). Then I pinned around three of the four edges and I used my sewing machine to stich around them while keeping it all inside out like this. Yup, I basically made a giant pillow sham just like I did here with my Sue pillows. I even stitched a bit of the fourth side closed on each end (leaving just the middle portion open so I could flip things right-side out again.

Then I flipped it right-side-out and hand stitched the unsewn middle of the last edge closed (with my butt parked on the sofa in front of the TV of course):
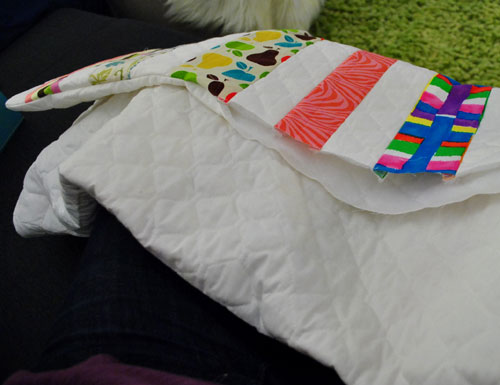
It was definitely starting to look quilt-like, but it was sort of like a pillowcase that had been stitched closed with nothing in it. If you pulled on the backing with one hand and the quilted front with another hand, you could balloon the whole thing out since nothing was holding them together except for the stitching around the edges. So here’s where I actually started to feel like I was quilting. I also started to sweat profusely because I was about to dive into seams that show on both sides of the quilt. No more hidden seams done from the inside. I actually had to stitch down from the top of each white row of strips to the bottom, and the little white seam would definitely be exposed, so any ganked up thread or knotted nests of string would ruin the whole effect in a hot minute. And I would probably have had a full blown meltdown after all that work if things suddenly went south. So I gritted my teeth, held my breath, crossed my fingers, decided I needed them and uncrossed them, and tried to take it slow and steady.

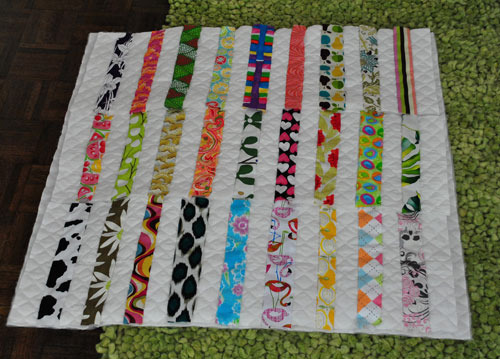
Lo and behold, I was left with this.
And I was also left wondering who the heck took over my body and made a friggin quilt. Insane. It’s definitely not perfect, but a week ago I would have bet you a million dollars that I couldn’t ever sew two strips of fabric together, much less make a quilt (albeit an imperfect one). And I actually love it in all of its not-quite-perfect glory. Hopefully that will remind Clara that it was one of my first attempts at sewing, which she brought out in me (because before she was born you couldn’t pay me to use a sewing machine- let alone convince me to buy one and attempt a friggin quilt, but for some reason she made me want to make her something meaningful with all of her weekly fabrics). In case I’m not hitting this hard enough, I am shocked that I actually made a quilt. Seriously, almost speechless.
Oh and in the spirit of Burger sharing his hindquarters above, here’s the finished back-view:

Now I get to give it to Beaner for her b-day and I hope that she’ll always have it and know that her entirely undomestic mom (you think I’m kidding, but John does the cooking and the laundry around here) was possessed by some other-worldy being and whipped up a quilt to commemorate her big one year birthday. I’m not gonna lie, there were some victory laps around the house. And yes, John sang the rocky song while I ran around waving my quilt in the air.
In summation: Word to Oh Brother (yes, I just hit you with a word to your mother slash Brother sewing machine joke). Booyah.
Psst- My jazz hands even excitedly created a new category called “Sew Excited” a la Jesse Spano (get that reference here). So you can see the whopping three posts in there by clicking the Topics tab up near our search bar and scrolling down to find it.
Psssssst- We went Nursery Crashing over on BabyCenter this morning. Get in on the fun here.

Monica says
Ah! It looks so awesome! With each “Sherry’s Adventures in Sewing” post, I’m more and more encouraged to get out there and get a sewing machine and tackle this thing head on like you did! Keep ’em coming! :]
Holly says
Your smile looks so excited and genuine in those photos. No posed smiles. Yay you! Maybe you can inspire me to be more domestic (although I’m not holding my breath!) :)
Rebecca says
I took a quilting class over 2 years ago and I still haven’t finished the quilt from the class. I had trouble with the final quilting stage. But now I’m thinking I could try it your way and skip the pinning part that I was having trouble with. Plus, you avoided binding. Another bonus! What an awesome gift for Clara’s first birthday. =)
Megan says
Go Sherry! The quilt is adorable. I took up sewing about three months ago and I love it!
aLi says
Wow!!! I can imagine Clara cheerishing her quilt for years to come. She’s one blessed baby and you are one blessed mom. Congrats! :)
Ever - The red house by the lake says
It looks great. Love all those nice colors, and you really should be proud of yourself!
Kerry says
Wow!! I didn’t even know it was possible for us novices to pull this off (all I know how to sew is curtains and pillow covers at this point)! I always thought there was some sort of crazy insider quilt knowledge you had to have….huh. Great photos illustrating all your steps too, thanks!
Allison says
Great job! Quilting is NOT easy, and your first-ever quilt looks fantastic! Clara will no doubt treasure it :)
Caitlin says
LOVE IT! I have benn wanting to make one of these for years, but deathly afraid of my sewing machine. So proud and happy for you!
Jenny @ DIY Newlyweds says
Awesome job! A mommy’s love can get anything done :-) I’m sure Clara will love it!
Tamrah Ryan says
Love the quilt!! You’ve inspired me. I made the top side of a quilt when I was preggo with our first little guy almost 6 (yes 6!) years ago and then he was born, and I haven’t worked on it since. oh my. And now we have 3 (all boys!) and time is short!
I did, though, make them all “taggy” blankets (basically fleece blankets with little ribbon tags all around the edges) when they were small and they all still sleep with them!
Anyway, I’m so inspired by your stickwithitness (is that a word?). GREAT WORK!
brigid says
Wow-way to jump right in-what a perfect gift for Clara. I completely understand not being able to sleep thinking about your completed project. I can’t tell you how many times I have hung one in my bedroom just to look at it as I fall asleep (usually after an all night sewing bender-My friends and family call it my sewing high:) Careful, you most likely will lay awake thinking up new projects to make!
Jess G says
I am soooooo not a sewing person, but my mom rocks at it. You may have motivated me to get some instruction from her – because obviously mommies know best, right? Maybe mommy lessons + wine? Yeah!
Marianne says
I wonder if Rachel Weber Haugo realizes she is famous now. :) ps. I love your pinterest boards!! Your comments always make me laugh.
YoungHouseLove says
Haha, she has good taste, that’s for sure!
xo,
s
Kelly Ann says
You are a natural quilter…there are a couple of great quilt shops in Richmond that would love to help you continue down the slippery slide of quilting…Quilters Corner…and Quilting Adventures…they love to help newbies…also, check out the Modern Quilt Guild, Richmond now has a chapter, very cool and free spirit kind of quilters….good luck!
SShaw says
Woohoo! Great job & I love that you found such a cute way to make a keepsake of her photo fabrics. I think learning to sew takes some persistence, it’s definitely not as easy as it looks!
Susan says
Sherry, you did a beautiful job. I’m not much of a sewer myself (I sound like you, just holding my breath a lot and hoping it will all work out in the end). Congrats on making such a fun keepsake.
A word to the wise: don’t set the bar so high with #1 that you won’t be able to treat #2 or beyond the same. My #1 has two scrapbooks, two samplers (made by each grandma), handmade baby annoucements and a pimped out baby book. #2, who is about Clara’s age–well, he has a lock of hair in an envelope from his first haircut and an email announcing his birth. (and lots of pics since I got my DSLR right before he was born). I feel bad for him but I can’t find the time to do “it all”.
YoungHouseLove says
Judging how obsessed we were/are with Burger, we think every baby will hopefully be equally doted on. Haha. John was number three so we’re definitely sensitive to not just spoiling our first one!
xo,
s
Erin says
Congratulations – i’m so proud of you!
Mikki says
Clara will love this quilt forever. When she no longer uses it (outgrows it), frame it! It will make TERRIFIC ART! My daughter wore a cotton knit dress, everyday!, for a whole year…we had to wash it while she slept. When she outgrew it (thank goodness) I stitched up all the openings and stuffed it. It’s now her favorite pillow and she’s 15! She still loves it! Great Job Girl!
Carrie says
Maybe I should have a baby so I can get sewing inspiration. My mom didn’t sew, besides some regular mending, untime my senior year in high school. she made me a quilt for graduation. Now she hems my pants (I am a shorty) sews curtains, pillows, table runners, stuff like that. I am like you were… a little bit of a mess.
I really just don’t have the patience for it!
Krystina says
Looks great- nothing like a homemade gift- my little one Violet is also about to have her 1st birthday- on the 26th of May and I am making her a doll. I too just got a sewing machine a few months ago as well so you can just imagine my adventures as a newbie!! Totally worth the time and frustration, right?
I wanted to ask- when will you be sharing more details about the bday bash? I was hoping to get inspiration for Violet’s party :)
Thanks,
k
YoungHouseLove says
Yup! I’m planning to share some planning details later in the week and all the pics of the actual party next week! Everyone cross your fingers that it doesn’t rain now that John made that patio for us (he thinks we jinxed ourselves, haha).
xo,
s
Kiran @ KiranTarun.com says
Now I can’t wait to make my own quilt! This looks gorgeous Sherry!
wendy h says
WELL DONE!!!!
Get warmed up… there are Halloween costumes to be made in the future :)
Jessica Z says
Sherry, it’s soooooo beautiful! And it brought tears to my eyes thinking Clara will have something so special to treasure. Just think: you just created a family heirloom that hopefully will be passed down for generations!
Cathy says
Sherry! The quilt is amazing! Way to go!!! I like that you decided to wing it. It makes quilting seem less intimidating for the rest of us.
Amy says
Ok.. I can’t tell you how sweet I think this is. Creating a quilt out of all Clara’s picture fabrics is simply genius. What a fantastic way to preserve such precious memories. Of course she needs to have her Bday picture taken on it!!
Jessica says
wow amazing job! i’m inspired..
Nette @ This Dusty House says
Once things settle around here, I’m totally going to make a quilt like this. I ‘made’ one when I was in high school (ie, I started cutting out the pieces, and then left them lying all over the house until my mom finished it. I think I did MAYBE 1 square of the stitching in total!) and I had forgotten that completing such a project is actually probably well within my abilities. Quilting is not as hard as people thing it is!
It’s absolutely beautiful. I didn’t notice in the pictures… did you put any quilt batting in the middle?
YoungHouseLove says
The white quilted fabric that we bought for the backing had batting quilted into the back, so we already had it built in. Hooray for short cuts!
xo,
s
Cathie says
Thanks, you’ve totally inspired my non-genetically gifted sewing self to get at it! I got a sewing machine for Mother’s Day and would have also insisted before my first child that I would NEVER sew. I’m still getting to know my Brother but am excited to start on some new pillow covers.
Misty says
You inspire me. I got my sewing machine caught up in a big ol ball of knotted thread, got mad and threw it up in the closet where it is still sitting 2 years later. I’m still to mad to get it down. Maybe I should forgive it and try my hand at something new…
Thanks for the inspiration!
Beth-BTW says
YOU ROCK! Just goes to show that you can do anything you really want to do. Woot!!
Sewing isn’t all that hard. Just takes some planning and patience. I love to sew – makes me feel all hot-stuff, too. Go ON wit it, girl!
Gretchen says
Good for you. You did it the long way it looks like though. Just a hint for next time (hopefully, there will be one). If you cut out really long strips of the colored fabric and really long strips of the white fabric and sew them together, you can cut them down to size and mix and match. Does that make sense? By way of example: you take one 15″ strip of blue fabric and one 15″ strip of white fabric and sew them together. Then you cut the sewn piece down to 5″ strips. It makes the process go much quicker!
YoungHouseLove says
That makes sense but I don’t think it would work if I wanted all the patterned strips to be different, right? I wanted each of the 29 strips to be a unique pattern, so cutting long ones down would create duplicates, right? Good tip for later though!
xo,
s
Melissa says
I’m very impressed! And maybe inspired…. I’ve had a sewing machine (also a Brother, I think) for four years, never unpacked from the box. I want to sew so badly and feel in my bones I’d be good at it, but I’m so intimidated to take that first step.
Karen O says
Now get out a fine point Sharpie and sign and date that quilt!
YoungHouseLove says
Ooh that’s a cute idea. Maybe on the back corner…
xo,
s
Sarah says
Aww, congratulations on finishing your first “big” sewing project. What a fun baby quilt. I’ll admit, my inner seamstress was raising her eyebrows at the way things started. But then I saw how sweet the finished product looks, so I’m eating my words and taking my hat off to you and your brilliantly unorthodox success :-). Lucky Clara!
Emily says
Looks great!
Back in my 8th grade Home Ec days, we learned to pin the fabric the other way– perpendicular to the seam your sewing, rather than parallel. It makes it easier to pull them out as you move down the seam. (I’ve also been known to just sew right over them and pull them out when I’m done. Probably breaking some cardinal rule of sewing machine use, but I’ve never had an issue.)
Ana Silva says
It came out so good. I have a sewing machine (my mom gave it to me) that I have yet to try because I don’t really know how to thread it. But once again you serve as inspiration. All I really want to make is some pillow and reupholster.
Leah says
Girly, you need one of these!
http://ana-white.com/2010/10/sewing-table-small-spaces
And after that sofa console, this is a walk in the park :D
YoungHouseLove says
Cute!!
xo,
s
Jen @ The Decor Scene says
Love it! What a awesome job Sherry! You should be very proud of yourself. What a wonderful gift for your little girl. I’m sure it will always be treasured by her.
J'Ann says
Aww this is a very sweet gift :-)
jodi says
it looks great! way to go!!
Halley (Blunder Construction) says
Hooray! You have definitely inspired me to get my sew on… I haven’t tried since I was a kid (I too broke the sewing machines and disappointed my mother.) You’ll be sewing baby bonnets and smocking dresses for the bean in no time!
Amanda says
I absolutely love it Sherry! What a great way to showcase all of Clara’s fabrics and she can keep it forever!
Jamie says
So excited you started sewing!!! Even more excited that today’s post was about quilting!! But of course, I quilt all. day. long. I pretty much taught myself too without following any rules (although my grandma did help me make a mean pair of biker shorts for 4-H back in the day. Very much Spano-inspired) so have fun! :)
Elin Glenn says
I’m so proud of you!!! When you start quilting you can become mired in rules and fabric choices and the “right” way to do things. You, my dear, have thrown it all away and made a quilt your own way. Bravo! I hope you make more!
Carol N. says
Way to go, Sherry! You didn’t let the sewing machine control you, YOU controlled the sewing machine! Next thing you know we will see a ‘how to’ book from Sherry on sewing for kids and home! I think you need to try a cute sundress for Clara as your next project.
Amy @ larryspearslive.com says
Love it! It looks like you just used small scraps of the weekly fabric, so what will you do with the leftovers?
YoungHouseLove says
I have about a million other projects pinned on Pinterest (from a beanbag to a US map of fabric states- so cute!).
xo,
s
Amanda says
Congratulations on making your quilt! Good job. :)
Christie says
It looks really great! Congrats! I like the pillow style closure for your quilt… maybe this will inspire me to make one! Maybe.. :)
Dana says
Sewing is one of those things I always wanted to learn to do but it is to daunting a task. Hemless adhesive is how I survive!