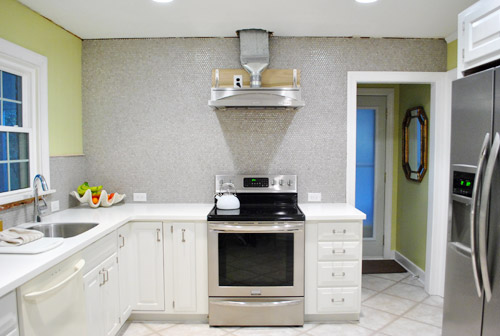
Even though I’m sure you figured we’d just grow to love the look of our crazy exposed hood (“oooh, it’s so unfinished chic”) we were ready to get this hood-covering train in motion. Oh and as for the height of the range hood, we just followed the manufacturer’s recommendations (the JennAir website offered a range and we went right in the middle of that range at 34″ above the counter).
As for the hood cover, the first thing we did was use photoshop to mock up two different options to figure out what we thought would look best. This was our original thought, since it looks most like a lot of the hoods in our inspiration pictures. The squares on the front are supposed to be panels we’d make using trim.
But it looked a bit top-heavy to us, so we tried this version instead:
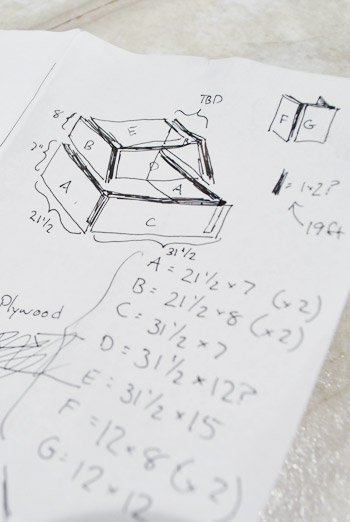
We liked that much better, so I took some measurements and drew up a “technical” drawing of the plan. I roughly sketched the hood to scale (using some graph paper under this white sheet) with pen and then used a thicker marker to design the cover around it.
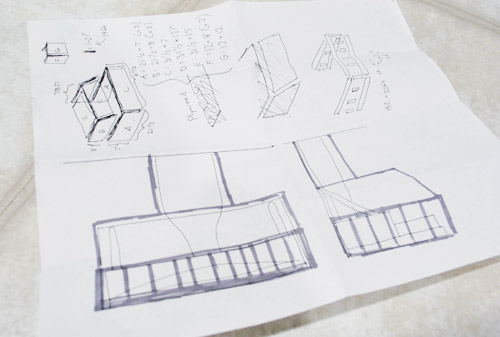
And in the other corner you can see where I started to figure out what sort of wood I would need to actually build this thing. I’m not going to even try to explain what this means now, since it will become clearer as you see the actual cover come together. But just know my goals with this thing were to:
- Make it sturdy (and use moisture/steam/grease resistant plywood so it would last)
- Make it as light as possible (I didn’t need worry about another heavy thing falling off of the wall)
- Make it pretty
When I returned from the store with some plywood panels and 1 x 2″ boards in hand, I got right to building. I was going to build from the bottom up so I started off by building a frame and cutting some plywood panels to size:
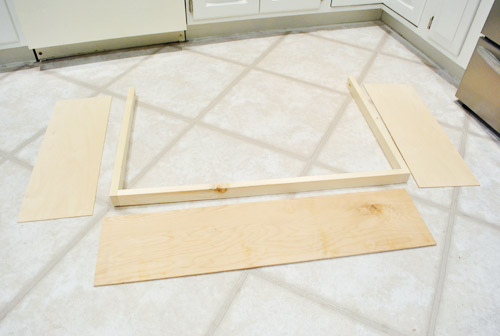
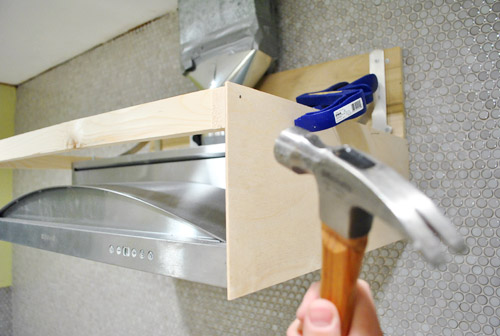
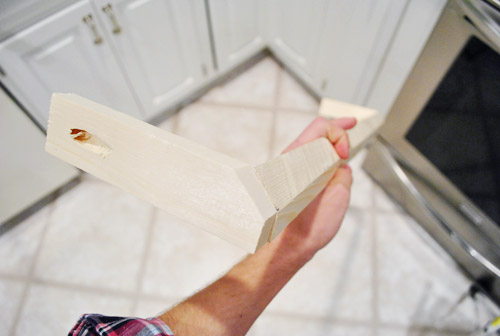
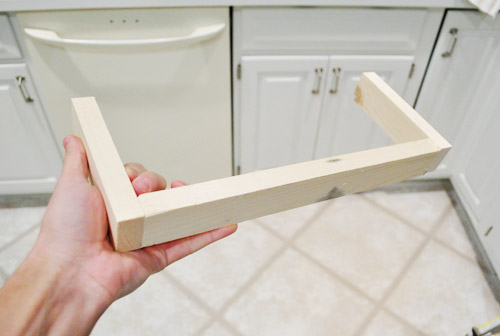
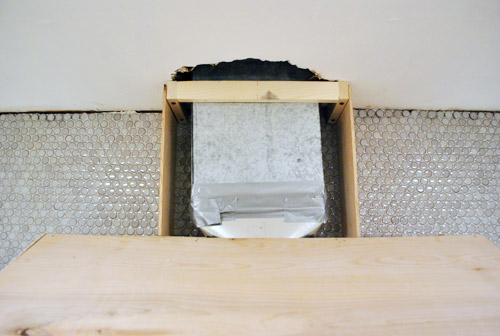
The frame is basically three pieces of 1 x 2″ screwed together in a U-shape using my Kreg Jig. To attach it to the wall, I made a couple more holes with my jig so that I could screw it tightly to the wood plank that we used to mount the hood (see, I told you that weird overhang would make sense!).
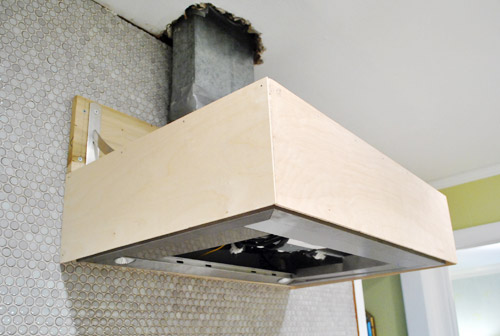
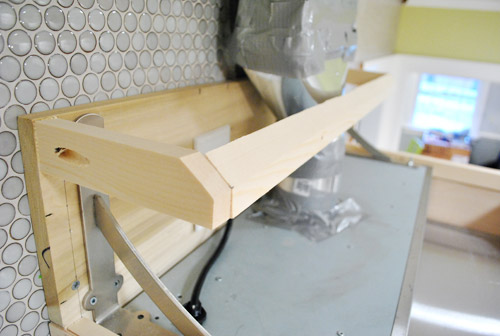
It looked a little something like this. Note that it’s not touching the actual hood at all, so our cover will essentially float around the entire thing (our high-efficiency range hood should have no issue directing moisture/steam up into the hood and up the vent, and our wood surround should stand up to everyday use like many wood hood surrounds built by various cabinetmakers and handymen/handywomen). We’ve heard from a ton of folks in blogland who have built or hired out wood covers since revealing our crush on them and we’re happy to report that everyone seems to have had a great experience with them (no moisture or steam issues with the wood around the hood). It actually makes sense since non-covered range hoods usually have wood cabinets against either side of them and they don’t typically have issues with those sort of things either.
Note: these pics were taken before we realized we should use metal foil tape and not duct tape for those vent joints, but we’ve since swapped it out and will share those pics in another update post about other things we have to share, like how we patched our giant honking ceiling holes, etc).
With the frame in place I started nailing the thin plywood panels in place.
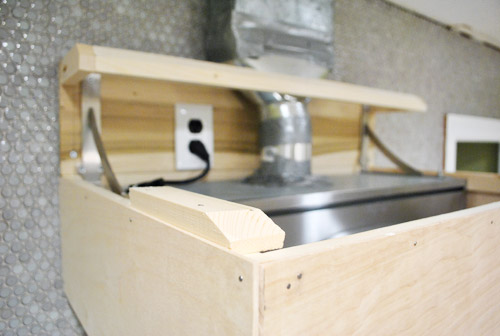
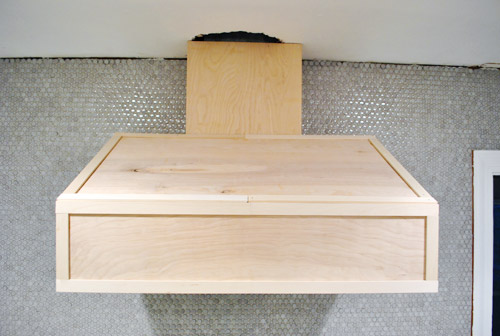
Here’s what it looked like with the first three sides done.
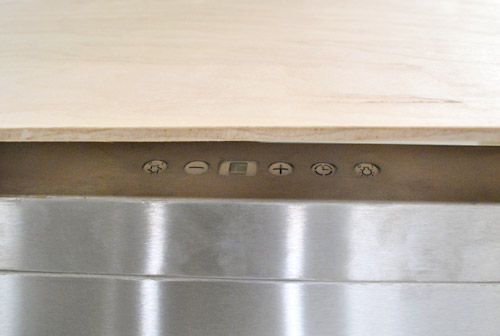
Remember the reason that there’s a small gap around the outside is to leave room for us to reach the control buttons on the front of the hood. There’s enough room for our fingers to slip in, without being a totally garish amount of space.
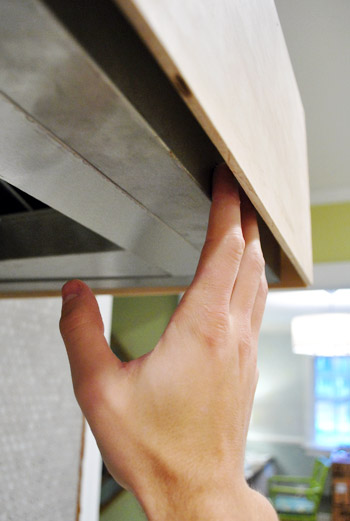
And if you’re Sherry’s height (or me slightly ducking) you can even see the buttons so you don’t have to wonder what you’re pressing (to see any buttons on the underside of a hood you usually have to duck a bit to see them, so we like that ours are just as accessible, albeit slyly hidden).
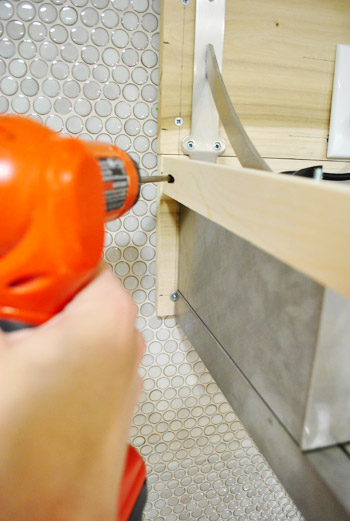
To add the next “tier” to our cover, I had to build a slightly smaller version of the previous 1 x 2″ frame. Since this would be the one against which the sloped part of the cover would sit, I ran it through my table saw at an angle to make it easier for the angled piece of plywood to lay against it. I didn’t measure or anything to make the angle perfect – it was just an educated guess since I figured anything would be an improvement over it meeting the original square edge.
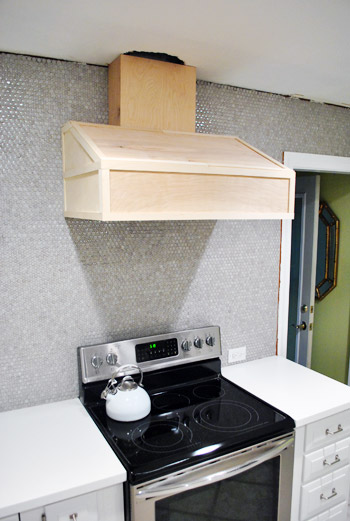
Here it is attached to the upper portion of the hood.
Even though the next set of plywood panels would sit just fine on the top edge of the previous set, I did add a small piece of 1 x 2″ to give me a place to secure them with a nail. And yes, I gave it another guesstimated angled cut to help that sloped piece sit better.
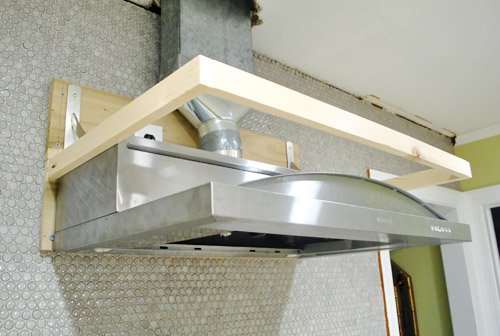
This picture should help make more sense out of this. See the sloped plywood panel in place?
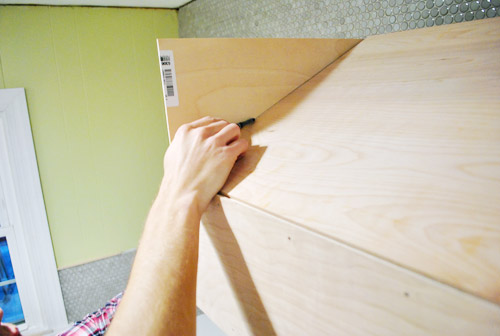
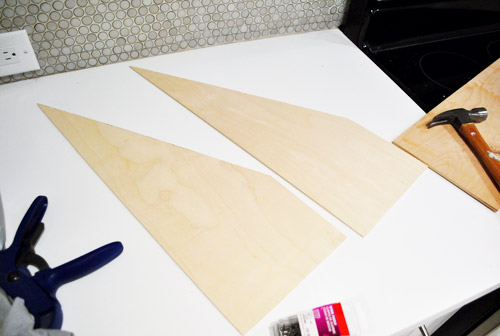
The next two sides would be on only non-rectangular pieces of plywood. Since this angle had to be exact, I held the piece in place so I could mark the exact line that I had to cut.
Then I ran them through my table saw to get these fun little quadrilaterals. Wow, I don’t think I’ve used that term since Mrs. Miller’s 9th grade geometry glass. That’s the class where I decided I should wear my glasses during tests because they would help me feel smarter (even though I just needed them to read the blackboard). Nerd alert.
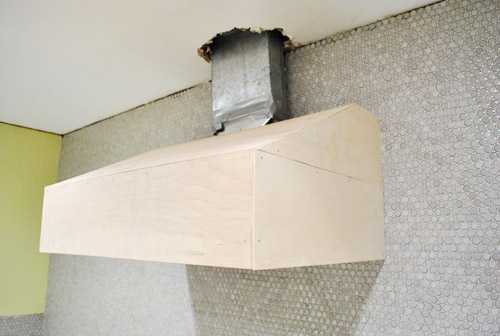
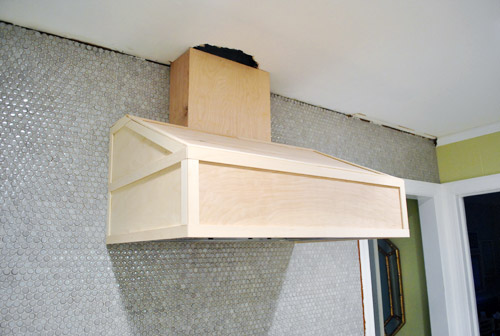
Anyways, here are those two panels attached on the sides. It’s starting to look like something, no? Of course it’s still very clunky and unfinished looking without trim, but we’ll get there in a minute…
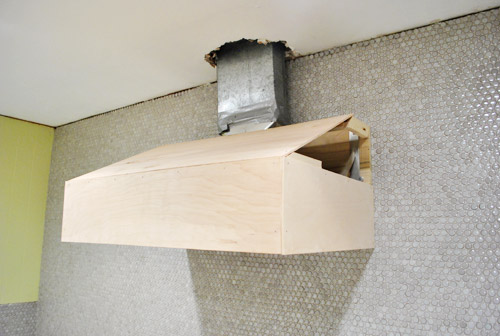
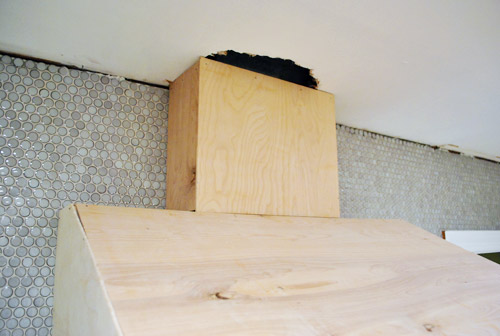
For the third and final tier, we had to cover the vent pipe with the section I affectionately called “the chimney.” First I cut my tiniest 1 x 2″ frame to date. Ain’t he cute?
And then I screwed him straight into the ceiling (hitting nice firm wood that I knew would hold it nice and snug – you never want to drill up into nothing- that hollow feeling is the worst). The only problem was that I hadn’t accounted for how gargantuan the hole was for that vent pipe. Guess we’ve got more patching to do (Sherry’s my spackling queen). And we’ll eventually be installing crown molding around all of this too, so it’ll look nice and polished in the end.
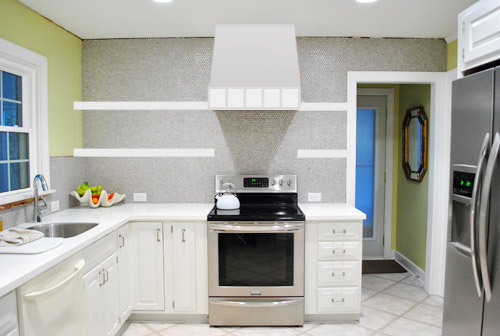
Here’s the chimney covered with the plywood panel, essentially completing the major construction phase of this project.
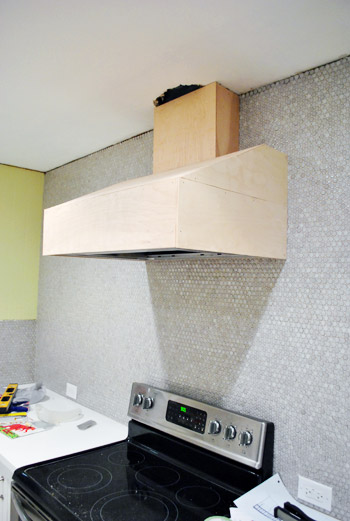
So here’s what it looked like at that point. Hood is sufficiently covered. We still have access to the buttons. It’s plenty secure and we’re happy with the shape of it. It’s just looking a smidge unfinished. Okay, maybe more than a smidge.
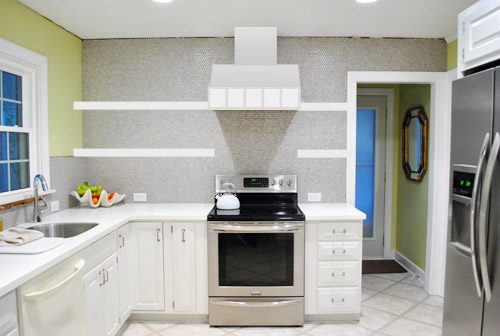
This is where trim comes in. And I’m telling you, it’s one of those “details make the difference” things. I decided to make the trimming portion on this fairly easy on myself. In keeping with the theme of “make it light weight” I decided to use some super lightweight plywood. And to minimize nail holes (and having to hammer against the cover) I opted to glue everything in place. This method should definitely hold up to heat and moisture and all other kitchen loveliness (grease!) – especially once it’s primed and painted with the same super durable Benjamin Moore Advance paint that we used on our cabinets – so we’ll keep you posted.
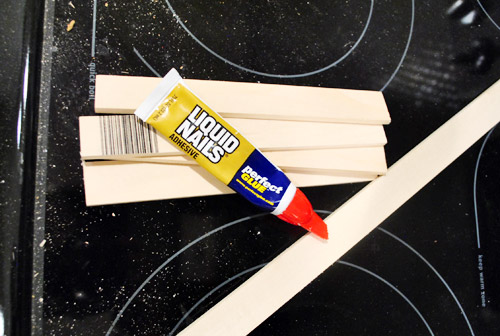
We also ditched the idea of doing panels across the front and sides (as shown in our original renderings) because we kinda liked the clean look better (and worried smaller boxy panels might not jive with our existing cabinets). It also made my job a bit faster, meaning I had the first row of trim cut and glued into place in no time.

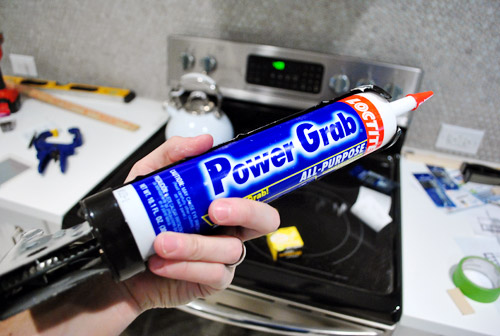
I did like working with the LiquidNails because it gave you a bit of play for the first 10 minutes (hence the tape above to stop it from moving when playtime was over). But I ran out about halfway through (it was an old tube leftover from something else) so I started using this leftover tube of Loctite instead… and kinda wished I had used it from the start. I wasn’t able to wiggle things into place as much (I had to peel it off and restick it instead) but things really stayed in place – meaning no more green tape was needed.
The top portion of trim took me a bit longer (especially because I ran out of wood and had to run out for more in the middle of everything), but by the end of the day I had it looking like this:
The angled cuts on the side took a bit of time too. We opted not to put trim on the chimney part because it’s not really supposed to be a “decorative” part of the hood. Plus there weren’t any open seams between the plywood or anything that needed “finishing.” Once we patch that ugly ceiling hole and add crown molding around the entire top of that wall (and hood) we think it’ll look swankypants indeed.
It’s not 100% perfect. For one, it needs to be primed and painted (we’ll do that when we prime and paint the open shelves we’re about to build) and it needs some caulk in a few places just to make it 100% seamless. But I’m just proud that I accomplished my three goals. It’s sturdy and durable. It’s lightweight. And it looks pretty (if I do say so myself).
Now of course it doesn’t have some of the bells and whistles that a professional hood might have, but once it’s primed and painted it should perform just as well as a painted cabinet would next to or above a hood. And it certainly was cheaper than the $3 – 4K price tag we saw some places (check out this post to see a price that had Sherry spitting liquid at her laptop). In the end it cost me about $90 to complete, mainly because I didn’t realize how much wood/trim I’d need. So I think that brings our total for the hood up to $150 (since the hood itself was $60 thanks to craigslist). Wait, that doesn’t include brackets/wood to hang it, so make that around $175. Still not bad considering we paid $250 for our last kitchen’s stainless steel hood (and it wasn’t an industrial strength JennAir one like the beauty we scored this time).
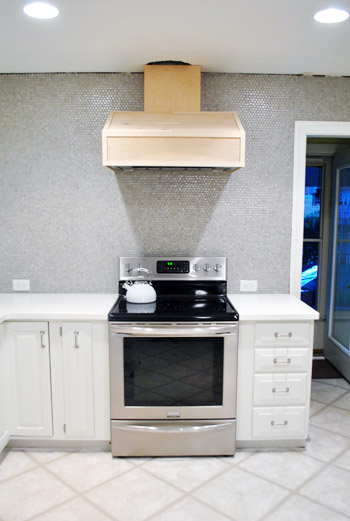
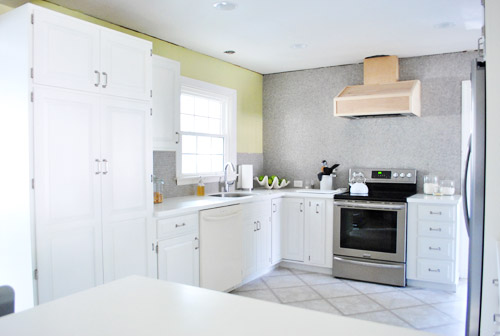
Even though it’s still a big, tan-colored box on the wall – I did take some “after” photos of the kitchen for ya. Mainly because with book photoshoots starting in our house this week I wasn’t sure of the next time our kitchen would look this clean again. It’s definitely still looking pretty raw in there (we need crown molding, shelves, a ton of color that Sherry can’t wait to add with art and accessories, new floors, an installed dishwasher, a light over the sink, etc) but we’re getting there.
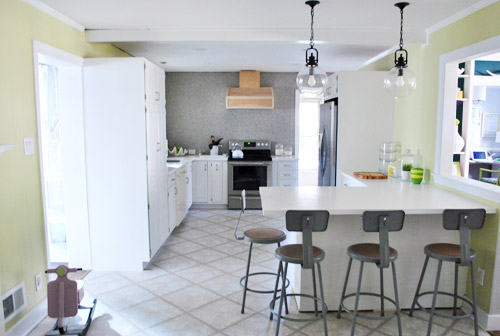
As much as it’s kinda weird for us to see something hanging from this wall that’s been empty for two months, we do like that we’re starting to break up the sea of tile a bit. In some ways it just draws your eye more to that wall so you can stand there drooling. Not that we do that. Much.
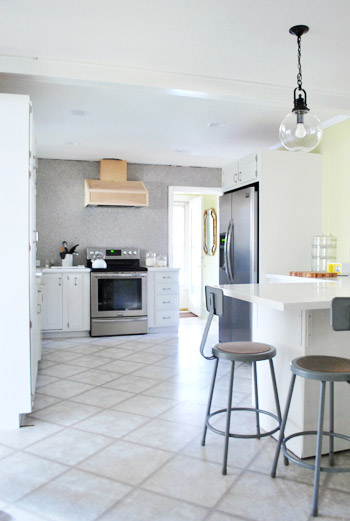
It mainly just makes us eager to get that thing painted, get the ceiling patches sanded and painted, and get those open shelves hung. Sounds like a good project to talk about next, eh?
In the meantime, let’s talk about range hoods. Ever built one? If not, I never had either until a few days ago, so you never know what you might find yourself doing down the road…

KathyL says
I can’t stand it. I love everything, but on my screen its reading like its not centered perfectly. Tell me its my eyes going bad or just the way it looks on my monitor….I even tried to measure the closeups and it appears there is more on the right side….sorry, I’m a pain about that stuff. I’m sure I’m wrong…thanks.
YoungHouseLove says
I promise in real life it’s painstakingly centered to the millimeter! John is a freak about that stuff! It’s just the angle of these shots. Haha.
xo,
s
Kelli says
I’m always impressed with the direction you guys go to save a lot of bucks! Smart cats!
Lorraine says
It looks so good! I think we are going to do something very similar in our kitchen, but I have been waiting to see your finished project with the shelves, but after seeing the hood I don’t think I can wait any longer!
char says
Fully impressed. That is some handy manwork there with the wood working. Hats off, J-Boom. Woot to the woot. I am very interested to see the play by play on the patchwork because I am the queen of making holes and not knowing how the hay to repair them. So do tell and I will watch from the sidelines…
Karen @bellacarina.com says
I’ll be honest that I wasn’t quite sure how this project was going to go at first, but I was pleasantly surprised! Nice job, John! Can’t wait to see it painted. Will you paint the trim pieces an accent color?
YoungHouseLove says
I think we’re just gonna go all white on this baby.
-John
Susan says
DID YOU KNOW that your old bath is featured in Better Homes & Garden? http://www.bhg.com/bathroom/small/budget-small-baths/?rb=Y#page=11
(None of your email addresses seemed appropriate to send you this link…).
BTW, am loving the direction you’re going in the kitchen!!!
YoungHouseLove says
No way! Thanks!
xo,
s
kris says
What an awesome DIY! I hate to point it out, but it is slightly off-center to the left?
YoungHouseLove says
Nah, it’s just the angle of the pics (we never stand perfectly head on for those- d’oh) but John’s a crazy person about measuring that stuff and checking it 20 times!
xo,
s
Lisa R. says
Hi John and Sherry,John,you have amazing skills!!!Great job!Lj
Sarah says
You guys truly are an inspiration! :) It looks great! I can’t wait to tackle our kitchen too (All we’ve done so far is paint it). We’ve got plans. ;) But in time. Your ideas have got me thinking ahead though. :)
Tamra S says
So I scanned the post and comments hoping to find the answer to this and not wanting to bug you if it was already there . . .but don’t see it . . .
The trim pieces you used on the outside, the look thicker than the 1/4″ plywood–what kind of wood did you use and were they already that width or did you have to cut them into long strips? I’d like to put that kind of trim work on some built-ins we are doing, but not sure what wood to use . . .
YoungHouseLove says
We actually bought those strips (they sell them like that at some Home Depots and even craft stores like Ben Franklin sometimes).
xo,
s
Carmen says
I am so impressed!! You guys did an amazing job! Thank you for documenting the process so well! I live in an apartment now, but when I get a house I am super motivated to take on DIY work mostly because yours turns out so well.
Michelle says
I read you guys everyday. You are always doing something fun. Last night you guys were in my dream! All I have to say is that’s really weird. In my dream I was at some resort hotel in Michigan or some other state like that And I saw you both in the hallway. I stopped you to tell you how much I loved the blog and then sherry grilled me on what I liked the most and kept following me around to find out if I really read the blog like I said I did. I woke up really confused!
Is that what you do when you meet fans in real life? Because that could be a little weird.
Keep up the good work!
Michelle
YoungHouseLove says
Hahahha- that’s awkwaaaard. I’m more quiet than drilling. I just don’t know what to say and I get all clammy. Haha.
xo,
s
Angela says
Just wondering if the previous owners of your home follow your blog? I feel sure they would not even recognize the place! It looks AMAZING, and the hood is incredible!
YoungHouseLove says
We think they do! In the beginning they’d email us and chat about it but it’s been a while so we’re not sure if they pop in daily or weekly or monthly! They’re so sweet though- they say they love watching since they get to see the house transform without doing anything work. Haha.
xo,
s
christy says
again, super-impressed by the things you’re willing to attempt and how you somehow always manage to come up with a great-looking finished product. this looks so awesome i want to go out and build one that i don’t even need. can’t wait to see how it looks painted. you two rock!
Jill Foreman says
Sherry, i like how you can’t wait to start accessorizing everything. You just had to put that little teapot in the picture, didn’t you? :)
Can’t wait for the book!
YoungHouseLove says
Haha- my evening cup of tea keeps me sane!
xo,
s
Kerry V says
Hi guys;) quick question….. Ok 2 questions.
1) did you cut down your thin plywood for the strips to cover the seams or did you buy strips?
2) do you just use regular paintable caulk to cover seams prior to prime and painting? Thank you so much for being generous to answer questions!
Kerry
YoungHouseLove says
We bought strips and we used paintable caulk! Always use paintable caulk when you plan to paint something (we learned the hard way a while back).
xo,
s
brooke says
Really loving everything! I am almost bummed when there are no updates! I know it’s annoying when people make suggestions, but I totally picture a chalkboard wall on the side of the pantry cabinet facing towards the fireplace to break up all the white!
Kelley says
Thank you, thank you, thank you! A wooden hood and a built-in fridge are two projects that are on my “to-do list” for the kitchen. Thanks for providing easy to follow instructions and showing us that it can be done and done well!! One request: more info in the post on the kind of wood/plywood used in projects (size, kind of wood, etc). That way maybe I’ll look like I know what I’m talking about when I head to the home improvement store!
YoungHouseLove says
There’s a bit more info in the comments if that helps! It’s just 1/4″ plywood from Home Depot (in sheets that we cut down) and strips of it (usually sold at some Home Depots or craft stores like Ben Franklin) for the trim! Hope it helps!
xo,
s
Sadie says
I LOOOVE your wall in the kitchen…is that a kind of tile that you put up? Do you have a blog post about doing it? I’ve been wanting to do something similar in our kitchen. Looks like small circle mirrors, love it! Let me know!
btw-beautiful kitchen!
:)
YoungHouseLove says
Oh yes, tons of posts about the tile can be found by scrolling back a few weeks on the blog (just a few pages) or by searching “penny tile” – we got it at The Tile Shop and tiled it ourselves (so we have lots of tips and even some video).
xo,
s
Jasanna says
I love it! That was super helpful in the step-by-step process too! Now to show my husband so we can do ours! :)
http://munchtalk.blogspot.com/
Natalie says
It’s kind of funny reading some of the comments after reading your post about handling criticism. I honestly don’t really care what you do to your house as long as you both like it. I just like getting a sneak peak into what you are doing regardless of it being the style choice I would make for myself (though I really love what you guys do). Now if this house was a present for me, then yes, I would like to have some say ;). But it’s one of those things that I don’t really have a right to put in my 2 cents if we differ on matters of style or taste because it’s your house and my style and taste really do not really matter at the end of the day (unless I’m paying your mortgage of something)! Ooo… that’s a good idea. How about you work out a little deal where criticism is OK if it’s accompanied by a portion of your mortgage payment? ;)
The hood cover looks fab BTW. You guys are amazingly quick.
Melissa N. says
I’m totally envious of your killer math skills, John. Haha.
Jill says
So I almost never agree with you guys on anything, but I really like the “top heavy” version better! Maybe once the shelves get in the skinny part of the hood won’t look so nekkid to me. I trust you guys so I’m sure the end result will look great and I will just shut up now…. ;)
YoungHouseLove says
Haha- no worries! I think it’s just one of those 50 people would like it one way and 50 would like it the other way! I think when the shelves go up and the floors go down it’ll definitely complete the picture a lot more!
xo,
s
Jill says
Oh dear! That was supposed to say “I almost never DISAGREE with you guys on anything…” Duuuhhhh. Sorry. But really, and truly. I am sure it will all look fantabulous at the end. I love everything you guys do! So maybe I’m just having an off moment here. :) Besides, who cares what I think? It is not my hizzle.
YoungHouseLove says
Haha, no worries! I know what you meant!
xo,
s
Susan says
Great as always. Are the vertical trim corners made of just the same flat wood, with the front pieces overlapping the side pieces? From the distance of the pix, they look like single pre-formed 90 degree trim moulding, but you’ve probably just made the joint invisible with your magical skills. [hope you can figure out what I’m asking – don’t know any of the technical terms!]
YoungHouseLove says
Yep, it’s all just the same strips of trim that I cut to fit – no pre-formed molding corners here! And it’ll look even better once things get painted!
-John
Jillian@TheHumbleGourmet says
I am just amazed at how beautiful this kitchen is becoming. It boggles the mind that it was once a wood-heavy dark little dungeon-y room. :-)
YoungHouseLove says
Thanks so much Jillian! We’re so excited to see how it’ll all pan out in the end!
xo,
s
Kristina Gulino says
So amazing. Can’t wait to see it all finished! I’m in awe of how you two figure out these things…
Kristina
Nook & Sea
Kerry V says
Thank you for the answer about the plywood ;) This question is about caulk and seams. Did you happen to caulk the slight gaps where the cabinets come together? I am priming my kitchen cabinets and just realized the gaps where they come together is more noticeable now since they are not stained. Did you happen to run caulk in between yours where they meet? Thanks!!! Kerry
YoungHouseLove says
Oh sorry. Yes, we did caulk some of the more noticeable seams between cabinets but most we just left as a subtle depressed line (the paint filled it in pretty well). So it’s really personal preference.
-John
Gale says
I love it – okay and it’s just me (since none of the other 376 people said anything!!) but I thought it looked crooked in the pics.. LOL.. I know, I know… with ya’ll doing it, I’m 100% certain it’s not but I had to laugh at my “critical eye”, cuz it’s BEE-YOO-TI-FUL :) I’m consistently amazed at what you both accomplish and how much fun you make it to be on the receiving end :) Cannot wait for your book!!!!
YoungHouseLove says
Aw thanks Gale! John’s a freak about measuring stuff so if it looks crooked it’s just an angle (we never stand perfectly straight on no matter how hard we try, haha – wish we were better photogs!).
xo,
s
Kate says
I was so scared looking at your plans (oh no, is that really going to work?) and BLOWN AWAY by the awesome results. “180” doesn’t even describe by convert-type love for your range hood. Hehe.
Mellissa says
I am loving watching this kitchen unfold! With every post I get more and more excited. You are doing so great! Keep up the good work.
Lindsey says
Hi John and Sherry!
I love love love your blog, thank you for sharing everything you do SO well! You’re kitchen is so beautiful and just my style aswell.
I scanned through the comments thinking someone would have already asked you this, but I have to know: where is that fruit bowl from??
THANKS GUYS – Good luck with the book projects!
Lindsey
YoungHouseLove says
That’s a faux clam shell from zgallerie. Hope it helps!
xo,
s
Amanda McCann says
Loved seeing the outtakes! Thanks for sharing! I was laughing right along! And that ceiling is seamless!
Jackie says
What are the dimensions of the trim pieces you used? That is plywood too, right? We have old flat front cabinets in our kitchen and I’m considering trimming the outer edge like you did the hood and then painting them white. Your amazing cabinet painting results inspired me!!
YoungHouseLove says
We got those trim pieces from Ben Franklin (often times craft stores like that sell smaller wood pieces for trimming things out) and they’re an inch wide (and about a quarter of an inch thick). Hope it helps!
xo,
s
John says
Is all that wood above a stove safe!?!? Isn’t that why kitchen exhaust fans are metal?
YoungHouseLove says
Yep, it’s safe. Kitchens have wood cabinets above the stove all of the time (with an under-cabinet vent hood, of course) so it’s a very similar concept. Ours was inspired by other built-in style covered hoods which have a metal exhaust fan covered by cabinetry.
-John
Christy Johnston says
HEy there! LOVE THE KITCHEN!! What kind of over do you guys have? We’re looking to replace ours and yours is what we’re going for…
YoungHouseLove says
Our oven is by Frigidaire Gallery. We love it! Had one in our old house too.
xo,
s
SarahDavid says
Oh, how do you 2 ever keep up with all the comments on your posts. :) I’ve only known about your blog for a few weeks, so I’m posting on outdated subjects, but will get caught up soon!
My first reaction to building the facade right around the installed hood: how do you remove the hood, for example, to service or replace it, without demo-ing all of the nice trim carpentry?
Second reaction (forgive me for inserting my own opinions!): why not skin the “chimney” in stainless? Even the stick-on stuff, that high up, would probably look like a perfect match with your appliances. I, for one, would have had a hard time covering up the nice stainless surround with the controls on it, too — I would have probably struggled to find a way to build the wooden facade flush with the top of the control panel.
Anyway, kudos! Your kitchen is stunning. My favorite spaces in your new house are the kitchen, the nursery, and the laundry. I am actually most anxious, though, to see what you do with the basement workspace.
YoungHouseLove says
Hi SarahDavid,
Good questions. Most of the mechanics of the hood are accessible from the bottom (you can remove the filters) so fingers crossed that any servicing it may need can be accomplished through there. If not, it wouldn’t be the end of the world if we had to remove the constructed part. Oh, and we opted not to do stainless because we wanted the white to contrast with the gray backsplash.
Best,
John
Ray Hopkins says
Can you tell me where you vented the range to?
Presently we vent via over the range garage. Do you know if I could vent to the Dryer vent, if accessible easily?
YoungHouseLove says
Ours vents up through the ceiling into the attic and out that way. It was already set up to do that since the old microwave that was there was vented. So sorry we can’t be of more help.
-John