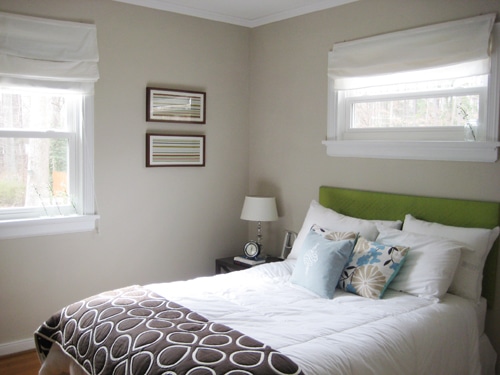
After a bunch of people wrote to us asking how we upholstered the green headboard in our guest bedroom…
… we thought we’d invite you to join us for a quick tutorial. And since John’s sister Emily was itching to make a pink headboard for her daughter Olivia’s bedroom, we got to show her how simple the process can be as well. And don’t be nervous, it’s truly a super easy undertaking. If you can wrap a present, you can upholster a headboard. Honest.
First, visit an art store and purchase a wooden frame that’s meant to stretch canvas. A craft store won’t carry these, but any true art store will. As for the size, you should aim for the exact width of the bed but the height is up to you (you can use painter’s tape on the wall to experiment until you find a height that you like). You’ll also need enough fabric to cover the canvas frame with a few inches to spare, the same amount of batting (the thickness is up to you- the plusher the batting, the plusher the headboard). Then all you need is a regular old scissors and a staple gun (you can purchase a manual one for about $12 at Lowe’s) and you’re ready to roll. *Note: You can substitute a piece of plywood for the canvas frame if you’re looking to create a headboard that’s extremely durable (ie: for people who lean against it all the time to read or for a boisterous child’s room) – it will be stiffer, heavier and a bit trickier to hang, but virtually indestructible.
Step 1: Cut your batting a few inches larger than the frame, wrap it around the back of the frame and staple it in place. I like stapling things at twelve o’clock, three o’clock, six o’clock and nine o’clock first to keep things tight and straight (sometimes starting at one end and working your way around can cause it to slowly shift or loosen, and you want a straight, tight fit). Continue to staple the batting around the frame every two to three inches until you’ve worked your way around the frame and the batting is snug and secure.

Step 2: Cut the fabric a few inches larger than the frame and follow the same stapling steps outlined above. Be sure that your fabric is straight if it has any sort of pattern (line it up carefully and be sure to check for any shifting as you go). When it comes to the corners, just treat them as if you’re wrapping a present and fold them over so that they have a seamless look from the front. (Note: staples can be easily removed, so if you need a do-over or two it’s no biggie).

Step 3: Hanging this type of headboard is easy-peasy since it’s super light (thanks to the canvas frame construction) so it’s just like hanging a picture frame. All it calls for are two nails placed on the wall for the frame to hook over. Using a level can insure that your headboard hangs straight- and look how cute this step can be. Adorable.

Step 4: Enjoy your swank new headboard. Olivia loves her plush pink palace and the polka dot headboard is the perfect punch of personality (say that three times fast).

So there you have it, headboard upholstery 101. And here’s a bonus fabric tip for ya: visit the fancy fabric store in your neighborhood. Every town has one (it’s where the interior designers go) and in Richmond it’s called Williams & Sherrill. This may seem like a surprising suggestion from bargain hunters like us, but you can often find fabulous deals in the remnant section of the store. There’s usually a table full of remnants (leftover pieces of fabric that have been marked down dramatically)- and most are still one to two yards, which is more than enough fabric for this project.

In this instance, Emily and I snatched up two yards of this thick woven swiss dot fabric (originally $24/yard) for around $19 total. Score.
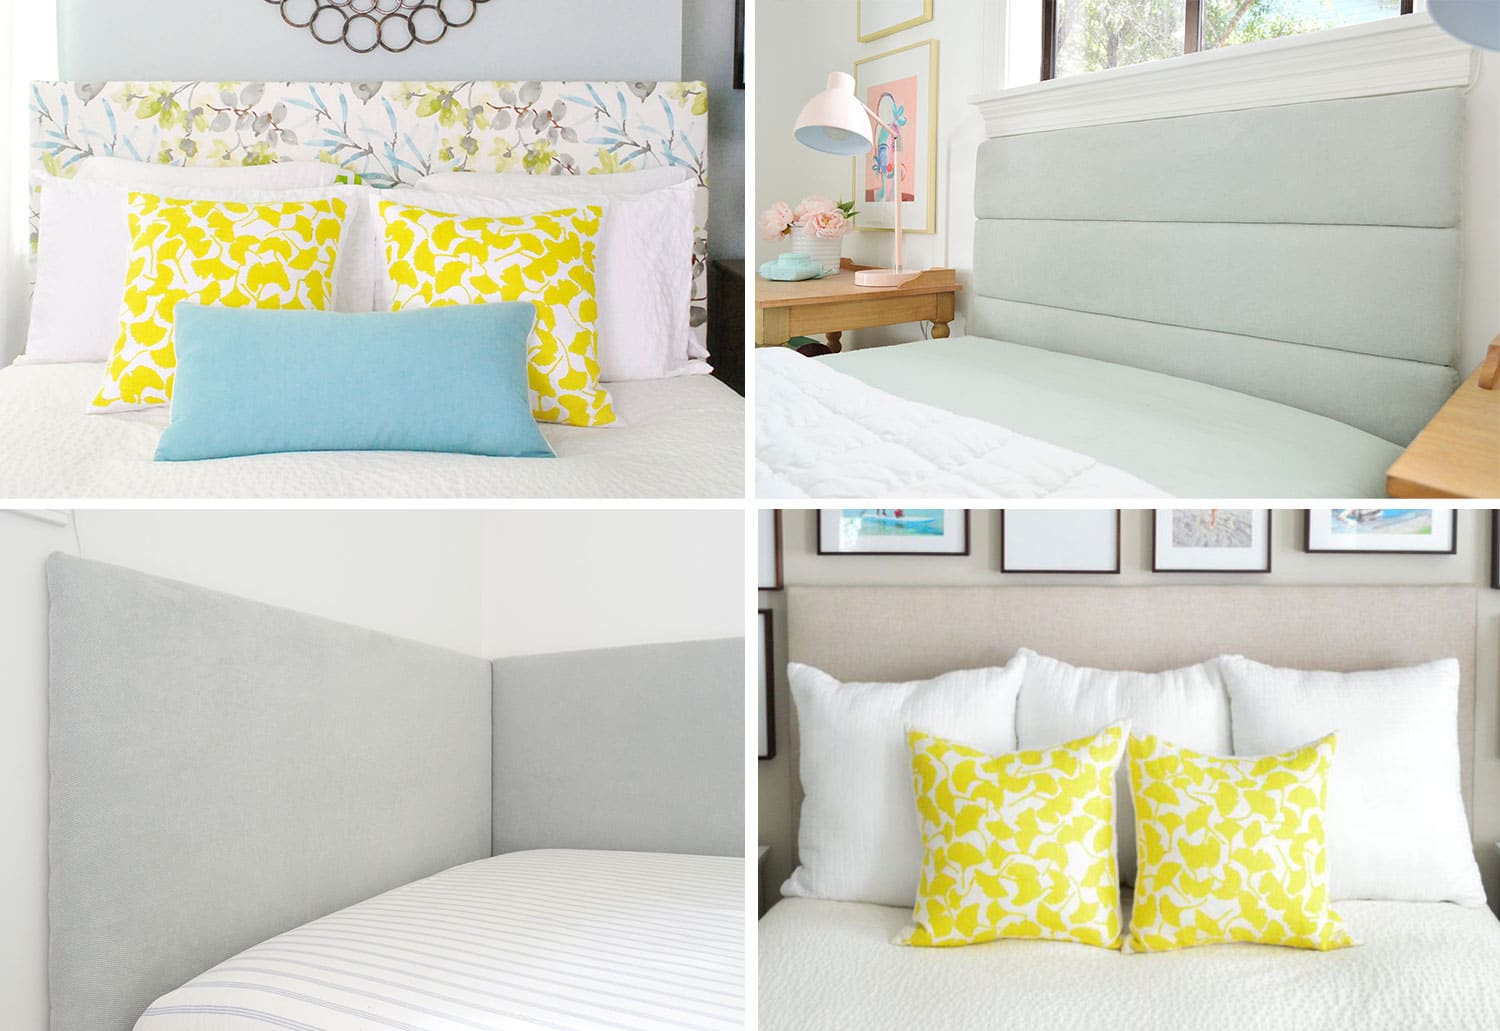
More DIY Headboard Tutorials
Want more DIY headboard ideas? Check out these other projects we’ve made using the same basic techniques:

Lauren McCormick says
Hey guys – when you’re stapling the batting and fabric like this, it’s always good to staple in the following order: 12 o’clock, 6 o’clock, 3 o’clock, 9 o’clock to assure even balance when you’re tightening the fabric. Once you get those 4 staples in, go back to 12 o’clock and staple from the middle, going outwards, then hit 6, then 3, then 9 again in the original order.
Just a little tip from all those painting classes I took in undergrad ;)
YoungHouseLove says
Great tip!
xo,
s
teness herman says
Do you love your West Elm parsons table? I want to buy one but worry about durability. The ones in the store look nicked up and I wonder if I should spend the extra money to top it with 1/2″ glass? Thoughts?
YoungHouseLove says
Love it! I’ve had it since a few months before our wedding almost three years ago and it looks as good as the day we got it (no nicks at all- it’s a super thick lacquer so it’s very hardy). Hope it helps!
xo,
s
Jessica says
Dear YHL: I snapped up a great square, padded headboard (with 12 covered buttons) at Garden Ridge Pottery last year. Loved the style and price, but hate the dreary, not-quite-taupe, micro-suede fabric. Want to recover in a bright, crisp white. Can your headboard-wrapping technique be applied to an already-made headboard? I’m concerned about achieving a clean edge on the corners. What do you think? Thank you.
p.s. Also have had my white West Elm “Parson’s Table” for 3 years. Love it.
YoungHouseLove says
You can definitely get nice clean corners, just act like you’re wrapping a present. Another post that will help is our chair upholstering tutorial: https://www.younghouselove.com/2008/07/how-to-upholster-a-chair/
It’ll show you a photo of the corner up close, which would be the same process for your headboard. The only potential issue we could see with covering your existing headboard would be that the covered buttons might create a lumpy look. Try pulling fabric taut around it to see how it’ll look. Good luck!
xo,
s
Sarah says
Hi
I just came across this blog today and i can’t wait to re-do my headboard. I live in an apartment and i’m always looking for ways to re-do my tiny space.
thank u
natschultz says
I made a tufted headboard years ago and it has held up well. I made the frame of 1×4’s in an Art Deco stepped pattern and then I screwed a sheet of Hardboard (I think this is also called Masonite – the same material as pegboard, but without holes) to the front and used 1″ thick upholstery foam and then batting and then the fabric. Hardboard is very durable, but lightweight. There is no need to use plywood or MDF (way too heavy); 1/4″ plywood is lightweight, but Hardboard is more durable and cheaper too. It is also flexible, so it will withstand abuse from kids and such.
I glued the foam down with a spray glue made for foam. I stapled the batting and fabric, but I didn’t wrap the corners because I covered the edges in wood trim. I mapped out the tufting pattern on the hardboard and drilled holes and then I used big fabric-covered buttons and threaded through with heavy carpet thread. These buttons are great because they have a metal loop on the back so it is easy to tuft with. You can also use twine if you cannot find carpet thread. I mounted the headboard with a cleat made from a 1×6 that I cut in half on a bevel. I screwed the bottom of the cleat (with the open “v” shape up against the wall) to the wall and then screwed the top of the cleat to the headboard (with the upside-down open “v” facing down against the back of the headboard). Then I simply slid the headboard onto the cleat from above – the beveled cleat locks into place so it can easily be removed in the future, but it hasn’t moved at all in years.
The person who was having trouble tufting was trying to tuft without a button – I don’t think this would work unless the fabric is extremely heavy since the thread (or wire) will just pull through the fabric because of the tension. For a non-button tufted look I would use a clear glass bead to stop the thread from pulling through the fabric (I have a pillow made this way and you cannot even see the beads except up close). You could also use a colored bead (like pearl on a white headboard).
Allio O says
I love your blog and check it daily! You have such simple, yet fantastic and creative, tips. I am the busy mom of an 18-month boy, so I am anxious to see what kid-friendly design ideas you share as your little one becomes mobile! In the meantime, I am trying to decorate a guest bedroom and love yours. I love the brown and white quilt! We have a neutral printed Crate and Barrel duvet cover with geometric squares (same color) on our guest bed. Our walls are very similar to your sandy-taupe color. I love the contrast you have with your green headboard. I have the frame for a headboard of my own and am curious if there are any colors you would suggest to make as big of an impact as your green one! The room is very neutral right now, so I could go any direction, but the majority of the furniture is black. Thoughts?
Kelly says
Does the back of the headboard connect to anything but the wall? (it’s separate from the bed?) Love the blog! Thanks so much.
YoungHouseLove says
Yup, it’s separate from the bed. You just place the bed in front of it.
xo,
s
Tiffany says
Love your blog!! I would like to make my own upholstered bed and came across this in your how to. I really like the look of a headboard attached to an upholstered bed frame. (I have never been a big fan of bed skirts.) I just wanted to see if you knew of a good site with a plan to make a bed frame, I will probably attach some cool legs so I really just need a plan for the basic box. I don’t think it would be too hard but I just want to make sure it is sturdy enough to hold my mattress and me! :) Thanks!
YoungHouseLove says
Hey Tiffany,
We don’t know of a site offhand, but there’s probably something to be found by googling around. Happy hunting!
xo,
s
Luann says
What about if you want your headboard to be a different shape? like even just curved on top? that wouldn’t work with the art store frame i’m guessing? would need to go the plywood route?
YoungHouseLove says
Yup, cutting plywood to the shape that you’d like and then using batting and fabric to wrap that piece of wood should do the trick!
xo,
s
Tina says
I am starting some reupholstery projects and hopefully tackle this headboard project too. I am looking for eco-friendly fabrics, organic cotton, etc. I am having a hard time in my internet searches. Any idea where I can find really cool environmentally friendly fabrics (fun patterns) that hold up to wear and tear (like for chairs). I tried looking through your Q&A and other blog comments, but I didn’t see a like about fabric.
Thanks! Love your blog. Gives me inspiration to finally do or finish all the diy projects/ideas I have. And of course you give me some ideas too :) btw starting filling up mason jars with shells, sand and other vacation memories thanks I finally unpacked that stuff and put it on display!
YoungHouseLove says
Hey Tina,
I wish we knew of a source offhand, but we would probably just recommend googling around for “organic fabrics” or “bamboo fabrics” or “100% cotton organic fabric” to see what you find. Hope it helps!
xo,
s
Rachel says
Hi J & S,
I’m working on building a bench in my bay window and I’m going to be upholstering the top of it. I had a few questions and I was wondering if you could help out.
1. Does the fabric have to be extra heavy?
2. Can/Should I spray it with some sort of stain guard or something?
3. I was planning to put foam covered by batting over top (like in the ottoman tutorial) and then the fabric – what thickness of foam would you recommend for a bench? And is there a special kind of batting I should be using?
Sorry for all the questions! You help would be much appreciated! Keep up the inspiring work :)
YoungHouseLove says
We would definitely use heavy “upholstery grade” fabric- just ask around at your local fabric store to be shown something that will work for a bench. As for spraying it with a stain guard, we don’t do that because they can be full of chemicals and non-baby-and-dog-friendly-fumes but that’s a personal decision so go for it if you’d like. As for the foam, probably a 3-4″ piece would be great, but why not ask at your local store what they would recommend (along with what batting they think would work best). Good luck!
xo,
s
Nicki says
Hi guys!
I already have a headboard attached to my bed. I am moving into a new house and instead of buying new furniture I was thinking of adding leather to my headboard. It is designed were it has squares on both sides of the headboard that separate the left and right side (if that makes sense). The upholstery will fit in perfectly in these sections. Will the instructions above be the same for this type of upholstery?
YoungHouseLove says
It could work! We’re not sure without seeing your headboard in person but it’s worth shot! Good luck.
xo,
s
Alana says
Love, love, love your website! I’m itching to try this headboard DIY, but I’m not sure what to do about my bed. We bought an IKEA Heimdal bed a few years ago (http://www.ikea.com/ca/en/catalog/products/S69849769) which has served us fairly well, but….I’m sick of it. Can I use the principles you listed above to try and cover the existing headboard?
YoungHouseLove says
Without seeing your headboard in person we can’t be sure but it’s definitely worth a shot!
xo,
s
Mtn Girl says
Was inspired by your awesome site! So now I am wanting to upholster a headboard in leather–I got a gorgeous whole tanned hide locally for a good price. Any special tips or tricks for leather since it is heavier and slightly less flexible than fabric? I will be upholstering to a piece of plywood that will be screwed to the bed frame because our bed is in front of a window. Thanks so much for your help and great ideas! Love your house…
YoungHouseLove says
Just use the same general instructions (being sure to pull it taught all the way around). God luck!
xo,
d
julie alvez says
Hi!!!I just went through ur website today and I must say I’m SUPER amazed at both of u!Wow!!!I have a question and i really hope u guys can help me..i’ve been wanting to make a headboard made of plywood (i dont know wat other cheap piece of wood i can use) then i want to put mirrors on it. so basically a mirrored headboard. My bed frame is black. I have square mirrors already (5 pcs) about 10×10 inches.Thanks in advance for ur help!!!
YoungHouseLove says
Sounds like a great plan! We say go for it! You can use any adhesive at the hardware store to attach the mirrors (just as them there what they recommend). Good luck!
xo,
s
Mary says
Came to your blog by accident!!! How gorgeous is your home!!! Fantastic work as well. Wish you were in Australia to redo my home. ;)
Tori says
I can’t wait to try this! How many inches below the top of the mattress should the bottom of the headboard be placed? Thanks!
YoungHouseLove says
Whatever looks good is our rule. If you want more of the headboard to be visible, you can just overlap the headboard and the mattress slightly, but if it looks too tall for your liking you can hang it lower so that more of the headboard and the mattress overlap. Good luck!
xo,
s
NillLehothe says
Suplementos musculares radical Xtreme NO e HGH Energize – Para ficar sarado em 4 semanas!
Eu comprei no http://www.jornal-musculacao-brasil.com e chegou em 4 dias (moro em SP)
paguei parcelado em 10 x de R$9,89. Os primeiros efeitos ja acontecerao depois de 14 dias.
Boa sorte para todos!! E importante usar os dois produtos, para perder gordura e ganher musculos ao mesmo tempo.
Para:
Musculos do braço
Acesse o site:
http://www.jornal-musculacao-brasil.com/
Norman Fans says
This is a beautiful site. I might add, that it bring back fond memories as my mother periodically made new covers for her bed head. It was always such a delight to see the changing theme using the same backboard. Very clever.
Ali says
Can’t wait to try this! Thanks for all the tips in the comment section…y’all rock!
Laura says
Hi- I would like to upholster a queen size metal frame the way you’ve suggested above. But I’m wondering how much fabric do you think I should order? (I’m also planning to cover buttons for tufting). Thanks!
YoungHouseLove says
We’d just measure the headboard and allow for at least 6″ of extra fabric all around the perimeter (for stapling and some pulling for the tufting). Hope it helps!
xo,
s
radhika Navelkar says
This is one of the simplest and best tutorial that I have come accross for making a upholstered headboard.
Pamela says
Hi
I just wanted to say thanks for your tutorial. I followed your design and added a couple of tweaks of my own.
http://typearamblings.blogspot.com/2011/05/diy-headboard.html
YoungHouseLove says
Love it!!!
xo,
s
Liz says
I want to make this upholstered headboard tomorrow, but we are going to be putting it up against some windows we don’t use so I would like to add legs to the headboard so that I won’t have to screw anything into the wall. Any suggestions on how to go about doing this?
YoungHouseLove says
I would just get 2 x 4″ boards (or 1 x 4″ ones) that are long enough to create legs and use metal brackets from Home Depot or Lowe’s to secure them to the frame of the headboard. Just ask the pros there to show you where those are if you can’t find them. Good luck!
xo,
s
Shauna says
Hi Sherry,
First and foremost I just want to say how inspired I am after finding your blog. I am a new homeowner within the past year, and we bought an old home that seriously needed TLC. My question is in regards to this particular project. We have a California King Size bed which measures about 76 inches wide. I am unable to find a frame that is 76 x 48. Will I need to buy wood strecther strips and make a frame instead of buying one that is assembled? I am unfamiliar with art supplies…
YoungHouseLove says
Oh yes, I bet you can go to an art store and find something great (a real one, so not michael’s but a local art store). You can also cut a piece of plywood to that size and just staple the batting and fabric around that! Good luck!
xo,
s
Heather W. says
Thanks for the walk through on how to make the headboard. Tried it today for the first time and I love how it turned out! My husband and I are moving into our new home next month and cannot wait to hang in the bedroom!
YoungHouseLove says
Wahoo! So glad! Congrats.
xo,
s
Brenda says
Nice headboard! I love the look of nail head trim on these too. There’s a great DIY for a white nail head trim headboard on picklee.com. Here it is: http://www.picklee.com/2012/02/09/catch-zzzzzs-diy-headboard/
Lisa says
I was looking for a project like this. Glad I found your site. I’m gonna try it this week.
Thanks :)
ohsogirly says
looks great! and Olivia looks happy :D I love the pink polka dot pattern you chose :)
Dinah says
Quick question: do you use nails or any adhesive when putting the stretcher together? Or do you just snap it together? thanks!
ps love the site! You guys are so approachable-seeming and friendly!
YoungHouseLove says
You just snap it together, sort of push them hard and they stay in place. You can glue or nail them but I made one over seven years ago without glue/nails and it’s still holding strong thanks to the batting/fabric. Hope it helps!
xo,
s
Olya S says
We have a metal bed frame that has an ugly wood headboard that attaches to it. It’s sturdy though and has a nice shape – the top and corners are rounded (like a rainbow shape on the top of a rectangle if that makes sense). I was thinking rather than trying to resand it and paint it (it has a bit of a carved design inside the headboard) we could upholster it instead. Do you think the same idea as yours above with the canvas frame could apply??
Thanks!
YoungHouseLove says
Oh yes, I think if you could wrap it with batting and then pull fabric tightly and staple it around the back it should look awesome!
xo
s
Sarah says
I am going to attempt this. But if we only have a bed frame, how would you suggest attaching it to the wall?
Thanks!
YoungHouseLove says
I would google around for “how to make a wood cleat” and use a cleat to hang it on the wall. Hope there are a bunch of tutorials for ya!
xo
s
Nicole says
First time poster here! I’m always looking at your blog for ideas so thanks so much. We just purchased our first house and I am sooo excited to get started on designing and especially DIYing. Our new house just walked out of the 80’s so we have our work cut out for us. I definitely want to make a headboard for our bed. Do you feel as though the headboard takes away from the length of your bed if added in front of the existing headboard? My fiance is 6’6″ so it may matter. Also, where did you get that white duvet cover on your bed? I love it!
YoungHouseLove says
It’s only about 2″ thick, so I don’t think it’s much different but if someone really tall already feels cramped than attaching it to the outside of the posts or the wall might work better? Oh and the duvet is from Ikea :)
xo
s
Tania says
Hi would this work for a king headboard? Thanks!
YoungHouseLove says
Yes, it should. Good luck!
xo
s