Updated January 2022
A stained concrete floor is a great and durable flooring option, and – good news! – staining one yourself is a surprisingly easy task (although you’ll want to avoid one major pitfall we fell into). So anyone with a garage, sunroom, basement, porch, or patio with a concrete floor should seriously consider this super simple process that you can do without any fancy tools or equipment.
Here are the simple steps to getting you a freshly stained concrete floor:
- Choose your concrete stain
- Clean and prepare your floor
- Apply your stain
- Seal your floors
Sounds easy, right? Well… it is!
Step 1: Choose Your Concrete Stain
Most homeowners will be perfectly happy using a water-based concrete stain like the one used by Behr. Acid stains may provide a longer-lasting finish, but they are more complex and unpredictable to use.
Beyond just selecting your stain color, you’ll want to decide between a semi-transparent or solid stain. A solid stain will have a more paint-like finish, whereas the semi-transparent will let the color variation of the concrete still show through. So consider the condition and appearance of your existing concrete floor, as well as the final look that you are hoping for when making your choice.
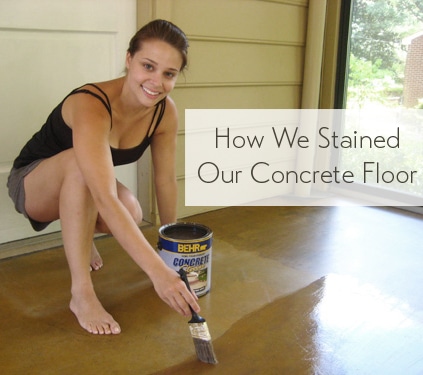
For our project we chose a Behr Semi-Transparent Concrete Stain in “Tuscan Gold” to give our sunroom’s unfinished looking concrete floors a warm wash of honey-gold color:

Step 2: Clean & Prepare Your Concrete Floor
Just like a traditional painting project, you’ll want your surface thoroughly cleaned before you begin. Use a broom or vacuum cleaner to remove all the dirt and dust bunnies and then follow up with a mildly soapy wet rag to be sure that it is squeaky clean. If you’re staining an outdoor area like a concrete patio or walkway, consider using a pressure washer (we love this guy!) to fully remove any caked-on dirt or debris.
Our floor was in great condition, but this is also the step where you’ll want to fill or repair any cracks (using a product like this crack repair sealant or this more pourable concrete filler). You may also need to use a degreaser or paint stripper to remove any stick residue that’s been left on your concrete . Also, new concrete should be allowed to fully cure for several weeks before applying any stain.

Once your floor is completely clean and dry, you can move on to the next step.
Step 3: Apply Your Stain
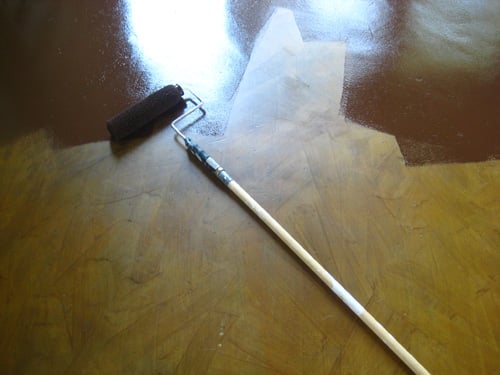
While stains are often applied using a paint sprayer or pump sprayer, you can also use a trusty ol’ paintbrush and paint roller. The roller gave us quick coverage on the large areas while the brush helped us edge around corners. While this application might take a bit longer, it doesn’t involve any extra equipment and you won’t have to do as much prep to protect the surrounding area from the spray.
The key with any application technique is to keep a “wet edge,” meaning that you’re overlapping your new stain only on an edge that hasn’t dried yet. Applying stain over a “dry edge” is the equivalent of doing two coats, which may result in a darker or less transparent finish in those spots.

With a semi-transparent stain, the color will darken or “intensify” with each coat so keep applying fresh coats until you are happy with the result. Just be sure each coat is completely dry before applying the next (dry time will vary based on your conditions). We did 3 coats to get our desired color. We alternated the direction of our application – first going lengthwise, the widthwise, then back lengthwise – to minimize the appearance of brushstrokes.

Just be careful to plan your “escape route” whenever staining or painting a floor so that you don’t paint yourself into a corner!
Step 4: Seal Your Concrete
The final step is to steal your stained floor once the final coat is dry. Concrete sealers come in a variety of finishes, from low-luster sealers (which will give you finished floors a matte or dull finish) to glossy or “wet-look” sealers that really add a lot of shine. These will be applied in a similar manner to your stain, just make sure to follow the manufacturer’s instructions and that your chosen stain is suitable for application on stained concrete.
Avoid The Mistake We Made
Our stained concrete floor held up great – even surviving some appliances being dragged across it with no scratches to the finish! But about two years after we finished the project, we decided we wanted a more chocolate brown color to flow better with the floors inside our house. We thought it would be as simple as staining over the original stain. Nope!
We tried a darker semi-transparent stain (a color called “Loden”) over our existing floor and it gave us the streaky, almost dirty results seen below. We’ve heard from numerous other DIYers since that applying a darker stain over a lighter stain never looks good at all.

So what did we do instead? We ended up painting the stained floor instead and it went great!
So you can follow our tutorial for how to paint a floor if you want all of the details on that process (spoiler: it’s similar to this and just as simple!).
We also later went on to paint a decorative stencil to this same floor to add even more interest to what was once a plain, boring ol’ concrete floor.

So long story short: there are lots of great options for upgrading your concrete floors. Just choose your stain color a bit more carefully than we did!
More Flooring Projects
If you would like to read about other flooring projects we’ve done, please check out the posts below:
- Refinishing Hardwood Floors 101
- How To Install Hardwood Flooring Yourself
- How To Select Hardwood Flooring
- How To Install Hardwood Floors Without Nails
- How To Install Click-And-Lock Cork Flooring
- How To Paint A Floor
- How To Remove Carpet
*This post contains affiliate links, so we may earn a small commission when you make a purchase through links on our site at no additional cost to you.

Mikha'el says
So you’ve been living with your concrete stain since 2008… how has it held up? I just pulled up carpet in one of our rooms to give this technique a try. It’s raw and clean, so I don’t think I really need etcher or bonding primer. I was wondering how yours has endured since I didn’t see you using etcher or primer either. I will also be using a low-lustre sealer. Thanks for the post!
YoungHouseLove says
We actually moved a year and a half ago, but it held up awesome while we lived there!
xo,
s
Tina says
I know I am 4 years late to the party, but THANK YOU for this post! We have been discussing what to do with our basement floor and everything cost so much. Stain is such a great answer!! You seriously just saved me a bunch of money. Thank you thank you!
Taylor Alameter says
That looks so amazing! I am always sad at seeing such a bland look to my concrete floors in the basement, but now I don’t have to! Did you use a concrete acid stain, or just regular concrete stain?
YoungHouseLove says
Just a regular concrete stain since our floors were raw (not sealed or anything first, so they soaked it right up).
xo,
s
Kat says
Why is the man vacuuming? That is woman’s work..
YoungHouseLove says
Haha- we don’t typically stick to girl/guy jobs around here! I’m known to sledehammer, and John is totally secure in his manhood while vacuuming!
xo,
s
Lane says
I have wanted to stain some concrete where we currently have tile. Everyone said this is too hard to do – due to the lines the tile made. I want to just clean it up and leave the tile lines… It would it leave a pattern, (maybe etching look), that I don’t mind – it is the tile that’s awful. Have you ever done this ~ if so what did you think of it?
thx,
LK
YoungHouseLove says
I haven’t done that but it sounds as long as you’re ok with the lines, they could make a nice texture/pattern – so that could be cool. Good luck!
xo,
s
Savanna says
Hi. Thank you for all of the helpful information! I do have a question. Do I need to wipe off excess stain in between coats? If not; wouldn’t it be tacky feeling?
YoungHouseLove says
I would follow the directions to the letter! Ours didn’t have us wipe anything down, so we didn’t!
xo,
s
Missy says
How long should we expect this project to take? Hours or days?
YoungHouseLove says
I’d say around 5 hours. Hope it helps!
xo
s
Edmonton says
Looks great!! We’re getting a concrete contractor in at the end of the month to start our screened-in porch we’re working on. This really transforms the entire concept of a concrete floor, almost like a marble floor now. My wife will be happy to see this since she was hesitant about the concrete floor, but we really had no option since wood and carpet can’t handle the moisture. Thank you!
kim hufford says
Hi! We followed your tutorial step by step for the concrete Painting with the Valspar porch paiint. I have glossy chocolate brown floors just your pictures. My question is; How do you clean them? We don’t want to weaken to finish with chemicals when mopping. Any advice is welcomed!
Thank you for the great instructions!
Kim
YoungHouseLove says
We just use very very mild cleaners (Mrs Meyers watered down on a cloth mop without a lot of sopping wet soaking). Hope it helps!
xo
s
sue says
Wow, I LOVE your sunroom. I can only imagine the calm relaxation and joy you experience in there with your family and friends. You are an inspiration that one can live their dream when one puts their mind to it. Thank you for sharing your space! This is going to be my project for 2013!
Handyman Colorado says
Thanks for the tip about the darker stain not working over a lighter one. I’m going to be resurfacing a bath with a concrete floor and your warning convinces me to maybe tint the concrete a little first. Then add a darker stain to make a richer color. I’ll do a test piece first.
Thanks
Donna says
Maybe if you used the really large roller for driveway sealer you could get a great finish…just an idea.
Tracey says
Awesome, love it. Might try it.
In case you’re looking for a way to go darker like you wanted, I’ve seen them do paper bag paper. You tear it in to large pieces, glue it down. You can do a tinted stain gel on top to go even darker.
YoungHouseLove says
That’s cool!
xo
s
Danielle says
your website in fantastic!!
Therese says
Sherry, I was just searching floor painting techniques. Did you know the photo of you staining your porch is being used on this website? http://www.bolderfloorsandmore.com/floor-paint/
YoungHouseLove says
Thanks Therese! Off to check it out!
xo
s
sar says
Love the idea of staining the floor. We just ripped up the carpet remnant that was in our basement. I have a few questions for you. 1)how do you know if the concrete is already sealed? 2)my basement floor has a nice marbel-y pattern already so I feel like the stain would be a great way to finish that look. Do you think sealing it at the end is something I should do?
YoungHouseLove says
If you drip water on the floor does it absorb in like a sponge or bead up/sit on top? If it sits on top it’s most likely sealed. Hope it helps! And as for sealing it at the end, there’s no need since floor paint has a built-in sealer so you can do it all in one coat :)
xo
s
Brienne says
You say don’t do dark over light stain – but any experience with the other way – light over dark? Do you know if it will still look so smudgy?
Great site!
YoungHouseLove says
Never tried that! Maybe do a test spot?
xo
s
Cassidy says
Hi! I know this is an old thread but just found it doing some research.. We had our floors stained when we built our house 6 years ago, but never had a sealer put on it…We have noticed that the stain in high trafic areas is worn and want to “touch up” with the same colors..SHould we just add another coat on top of existing stain? Thanks for any help pr advice :) we have loved our floors but just want to freshen up our color and look!
YoungHouseLove says
Yes, I think I’d do one coat all over (not just in small spots) and hopefully that will work.
xo,
s
Charles says
How is the floor/stain holding up to the foot traffic and scratches from chairs and such over the years thus far? I notice that you didn’t use the bonding primer in your write up.
Also, did you use Behr’s topcoat sealer such as the High-Gloss or Low-Lustre sealer on top? If you didn’t, do you regret not doing so, or would you recommend skipping the topcoat?
YoungHouseLove says
It held up really well for years until we moved. We didn’t use anything on top or under it, just the product itself (since it had a built-in sealer and didn’t call for anything on top on the can back then). Not sure if the product has changed now though!
xo
s
Jackie says
I justed moved in a beautiful house with stained concert floors, however the kitchen has grease stains. Please tell me how I can remove those grease spots without removeing the stain on the floors.
YoungHouseLove says
We’ve never tackled that. Maybe check the hardware store for something that removes grease from concrete in the cleaning aisle?
xo
s
Carole says
Hi,
we are planning on using Bher’s transparent stain on a 40+ old weathered concrete patio which has been power washed. Is it necessary to etch it & prime it first ?
Thank you , carole
YoungHouseLove says
Not sure! I’d ask the paint pro at the desk when you buy it (and check the can too, just to see what they recommend). Good luck!
xo
s
Carole says
Hi,
Would like to know if anyone has used the stain without etching or priming & what were the results.? The store wants to selL the products so will tell you to use etching & priming.
Thanks Carole
Elysia says
Hi there! So I know it’s been quite a while since you’ve done the floors, but I’m wondering how they’ve held up for you. I’m looking at staining two bedrooms in my home, and while they will be relatively low traffic areas as one is the guest bedroom and the other will have an area rug covering the majority of the traffic area, I want something that’s going to last for a while and that will clean easily.
We’re having a baby in December and I want to be able to clean the messes up with some soap and water!
Thanks!
YoungHouseLove says
We no longer live there but it was amazingly durable and easy to wipe down! Hope it helps.
xo
s
Vinny says
I’m sorry but I haven’t gone through every comment or question: I was thinking that the Tuscan Gold looked nice. My question is, what are your thoughts on doing this on a Limestone Patio that has had paver lock sand/adhesive brushed and watered to it? Obviously I will try it on a small test section, but I thought I would ask.
Thanks Vinny