Whether you’re interested in painting a chair, a table, or any other wooden piece of furniture, the steps are pretty much the same.
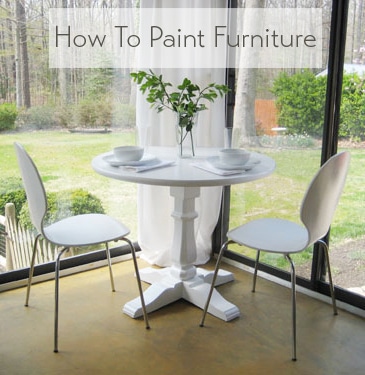
Take this table that we built and subsequently painted along with the accompanying white chairs (which used to be a golden blond wood tone).

Sprucing things up with a fresh coat of white paint took them from thrift store (where we got the table base) to Pottery Barn (which sells a similar version of it for 500 beans) in just a few hours.

But enough jibber-jabber. On with the how-to deets:
Step 1- Evaluate the surface of the piece that you’d like to paint. If it’s a sleek glossy surface (like varnished or sealed wood) you’ll want to gently sand the entire piece with 100 grit sandpaper). If it’s more of a dry chalky texture (like unfinished wood or flat paint) you can forgo the sandpaper and skip right to step two.
Step 2- Break out the oil-based primer to ensure that the paint sticks and no stains come through and ruin your finish (we’ve also used Zinsser Smart Prime with great success, which is a low-VOC stain-blocking primer that’s not oil-based – so it’s less stinky). Give the entire piece a good once over with a small foam roller or a paint brush. This coat of primer doesn’t have to be perfectly even in tone (it’ll probably look thinner in some areas since that’s how primer rolls) but as long as the entire piece is well covered – and it’s not too gloppy and thick – it’s ready for step three once it dries.
Step 3- Use a fresh small foam roller or paint brush to apply two thin and even coats of latex paint (a semi-gloss finish is usually best since it’s nice a wipe-able and durable choice). Many people mistakenly think that latex paint isn’t supposed to be applied over oil-based primer, but the real painting no-no is applying latex paint over oil-based paint, which is a guaranteed bubble-fest and should be avoided at all costs. And a word about small foam rollers vs. brushes: according to experts, all rollers – especially if used too quickly- may rile up the paint and lead to bubbles while paint brushes are the most bubble free application method known to man (although you might have brush stroke issues if the paint isn’t applied thinly enough or given ample drying time between coats).
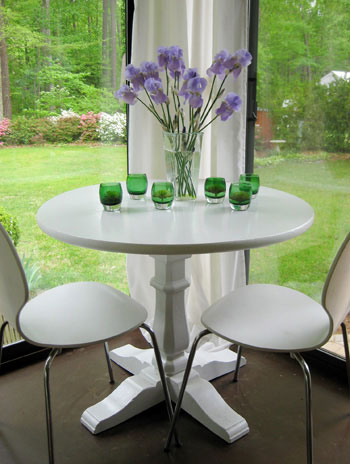
We painted the table above with a paint brush, not a roller. But we have also used small foam rollers with great success, so those are actually our recommended choice for beginners since they cut down on brush strokes or drippy finishes and seem to be the most error proof. No matter what you use, be sure to wait until the first coat of paint is thoroughly dry before applying a second coat (each coat should be applied super lightly and evenly – aim for the thickness of an eggshell or a piece of paper). This thin application is the key to avoiding brush strokes or roller marks for a smooth, gorgeous finish. Repeat after me: three or even four super thin coats are far better than one or two thick and drippy ones!
Step 4- This step is optional, so think of it as extra credit. Brushing on two thin and even coats of water-based poly for wipe-able protection that really goes the extra mile (and provides a glossy oh-so-luxe sheen) can’t hurt if you pick the right stuff. The only two brands that we’ve ever used with unmatched success are these two, so they’re our strong recommendation (other types can yellow or crack over time):
- Minwax Water-Based Polycrylic Protective Finish in “Clear Gloss” (found at any home improvement center)
- Safecoat Acrylacq (which is a low-VOC, non-toxic alternative sold at eco boutiques or online at places like greendepot.com)
We went the extra mile and applied poly to our white table above for a bit of added protection, and we even thinly polyed the chairs since they need to be just as easy to wipe down due to their proximity to food whenever we dine in the sunroom. Thin is definitely the operative word, and again you’ll want to be sure to let the first coat thoroughly dry before going in for the second. Any time you go over semi-wet paint or poly to smooth things out you’ll get terrible drag marks, so work from one side to the other and never go back over things until they’re completely dry.
Step 5- Wait at least a full 72 hours to place objects on your newly painted piece to avoid dents or divots in your finish. If you really want to be on the safe side, we’d recommend waiting five full days. Sometimes factors like humidity and primer/paint/poly thickness can keep things from fully curing up, and you don’t want to get indents from using your newly painted piece too quickly. Waiting this long might take some willpower because you’re dying to sit on/eat on/enjoy your brand new piece, but it’s worth the wait. Promise.
Easy, right? Ok, those were a lot of words, so it might sound complicated. But just take things one step at a time. And remember to breathe. You can totally do it. There’s really no reason to live with wood furniture that’s not exactly the tone or the shade that you’d like. So from painting an old side table a handsome glossy black to giving a scratched up wooden chair a cheerful red tone, it’s definitely a project that you can confidently tackle in an afternoon. Go forth and paint something!
*Oh and it bears noting that if your furniture item is anything other than solid wood or veneered wood (like laminate, melamine, etc) you should visit your local hardware store and ask the paint pro there what they recommend for that surface. There are some great oil-based primers and enamel paints out there (which are changing all the time) so it might be possible to get a great result. The key is really roughing up the surface so it’s less glossy and then priming and painting with the best stuff they have (usually oil or enamel based).Good luck!
Psst- In the market for a quick cabinet painting tutorial? Look no further.
Psssst- Wondering how to paint a brick fireplace? Wonder no more.
Pssssssst- Itching to paint wood paneling? Try this.

Erin R. says
Love you blog and this post! I’ve followed it to a T so far while painting 6 furniture pieces for my school district office and have not been disappointed! However, given I want to avoid the inevitable ‘tackiness’ of laytex paint and have a couple of tables which will see high traffic, I plan to polycrylic it next. BUT, I have one important question…..
Do I need to gently sand my newly painted surface before applying the polycrylic? This seems counterproductive and assume it’s just for bare wood, but with all the work I’ve put in thus far don’t want to mess up. Your response will be very much appreciated
YoungHouseLove says
So glad it’s working for ya! As for sanding the newly painted surface, if it’s not smooth you can use a very high grit paper to very lightly sand it (200+ grit). But if it’s smooth and you applied the paint thinly and evenly and let it fully cure/dry, you’re a-ok to skip the sanding (we often do!). Hope it helps!
xo,
s
Liz says
I have a nice, old Mission-style oak desk that was painted moss green in the early 1960’s. Originally I’d wanted to strip it and refinish it. (My brother has an identical desk which he refinished — the wood is gorgeous!) However, since this desk is bound for my daughter’s room, she wants it painted. Though I feel it is a crime to paint this great wood, I have resigned myself to do it.
I am manually sanding off all the old paint (wearing a mask). Once completed, I will follow your recommendations for oil-based primer and a couple coats of semi-gloss latex paint. I am a complete novice! Will this be sufficient for a desk that hopefully will see a lot of use in the next 6 years? And someday, when I want to refinish it, will this paint strip off alright?
Thanks! Great blog.
YoungHouseLove says
Yup, that sounds like a great plan! Just take things slowly and apply thin and even coats of primer/paint and try to use the most non-toxic stripper when you do that step later (some of it can be really fumey stuff!). Good luck!
xo,
s
Vickie says
Good afternoon guys! I have a question for you…I found a dining table I LOVE at Goodwill for $35 and I’m planning to paint it ‘cuz I LOVE painted wood. This is my first DIY painted wood project and, yes, I read your very helpful tutorial on how to do it. Now for my question…If I’m planning to use the polycrylic finish (and I am) does it matter if my latex paint is less than semi-gloss? Will the polycryclic coat make up for lack of luster if I were to use eggshell or flat paint? I’m wondering ‘cuz I have a TON of leftover paint in various colors and finishes I can choose from. Thanks guys! Have a fab day!
YoungHouseLove says
You’re all set if you follow it with poly, so flat or eggshell should definitely work! Good luck!
xo,
s
DD says
I am starting to tackle a project of a varnished dark desk with intrice detail on he legs (lots of crevices)..I was going to SPRAY PAINT BUT NOW I THINK FROM LAST POST I SHOULD USE A BRUSH What is a good quaity paint brush? And how you prevent “brush strokes” on the top surface?
i plan to also cover a flat type surface dresser to match the white painted desk..does this also need sanded?
YoungHouseLove says
Lightly sanding never hurts, so if in doubt just do a little. As for a high quality brush, we like the 2″ angled ones by Purdy from Home Depot. Super thin applications of paint and ample drying time between them keeps brushstrokes away. Hope it helps!
xo,
s
Jori says
You guys are great! It’s extremely kind of the both of you for sharing as much as you do just to see the ease it brings to other people. I have done all that I can in my apartment living from your site! Which isn’t much, but I take what I can get. Right now, I purchased a desk from someone that has really small lattice on each side (fairly small squares). I know I need to sand the piece a bit since it’s finished wood and use oil based primer and latex paint (I plan on doing an antiqued white), but I’m not sure if I should use spray paint or a brush on that one since it would be a bit difficult. Any suggestions? Also, how do you clean your brushes with the different types of paints? I struggled on my last painting project and ended up throwing away my really nice brushes because the clean-up was incredibly horrendous! Hope to hear back. Thanks for all that you do.
YoungHouseLove says
To clean brushes, I use mineral spirits with oil-based paint and lots and lots of water with latex (I like to clean my brushes for 5 minutes straight until the water runs clear when I squeeze them). Then I lay them out to dry on a paper towel (flat) so they keep their shape. Hope it helps! As for your desk, I would actually use a small brush and very thin and even coats to get into the lattice if you can- just because I worry that spray paint might not match your exact paint color (so spraying some of it and then painting some of it might look mismatched). If you can get someone (like Benjamin Moore) to put the exact same paint color (and finish) in a spray paint can- that could definitely work! But just remember to apply it thinly and evenly- it’s key!
xo,
s
Kristin says
Found your blog through a search on painting my kitchen table and chairs. I have a pedestal table and chairs that I hand painted about 10 years ago. Since then, we have 3 kids (though one is a baby so she doesn’t count for doing damage, yet ;)) and the table is in dire need of new paint job. I used oil based paint and it’s held up well, but I’m wondering…do I need to prime it again and use oil based paint again? The oil was SUCH a pain! Painting the chairs was painstaking in and out of all the rungs…I used a brush. I’m wondering if I could spray or even use Rustoleum from a can? Or maybe that would be all kinds of ‘yuck’ looking? I just want to spruce it up and make it look good again! Any tips are greatly appreciated!
YoungHouseLove says
Since you used oil-based paint you can’t use latex paint over it without applying a coat of oil-based primer (since latex paint over oil-paint = cracking, bubbling, and peeling). If you can find spray primer in an oil-based (or apply it thinly and evenly with a brush) then following that with high quality spray paint could work- you just have to completely block the oil-paint with primer (that’s oil-based) for a “clean start” that can take latex or oil paint from then on. Good luck!
xo,
s
Kelly Myles says
Not sure if you are still reading/updating this thread, since it is older, but thought I’d give it a try … did you do any sanding between your last coat of paint and the poly?
YoungHouseLove says
I don’t just because I keep things thin and even so it’s all smooth. You can if you’d like though!
xo,
s
Jacqueline Clifford says
I am in the process of refinishing a table and chairs (kitchen table). The kitchen table top was stained and poly’d, and the legs and under trim of table were painted with semi gloss paint. The chairs are painted with semi gloss paint, though the seats are stained. My question is, should I only poly the seat of the chairs and not the paint? The paint is black. I used a oil based poly on the kitchen table top. Latex paint. Please advise! Thanks!!!
YoungHouseLove says
It’s usually optional to poly paint whereas stain has to be sealed. You could just do the stain or seal both- just use thin and even coats of the exact poly I mention by name to hopefully combat yellowing. Good luck!
xo,
s
Christina says
Hi Guys!
I just wanted to share, after having asked you for some clarification on this a few months ago, I completed my project and am IN LOVE! I posted about it and credited you all with a link back to this post…thanks so much for making me feel like a pro!
Check out my entryway table re-do…hope you likey like!
http://subfertilefrugalista.blogspot.com/2011/07/call-me-crafty-entryway-table-edition.html
Thanks again, Christina
YoungHouseLove says
It’s perfect! I love it!
xo,
s
Joel says
We’re converting an old desk (dark brown) to a white desk.
I completely sanded down the table so it’s the natural oak color of wood (no brown paint left).
We picked up an ultra white kitchen/bath enamel to use for paint.
Is it still necessary to do a coat of primer first before painting it white?
YoungHouseLove says
I would do it. Just after all that sanding work you want to be safe. And even if there’s not a bleed through issue, primer helps paint grab on and stay more durable. Hope it helps!
xo,
s
Julie says
Hi guys,
Such nice work! I’ve just sanded, repaired, caulked, primed and painted my stair rails and trim on my stairway. This was a VERY dilapidated honey oak stairway and am so pleased with the results. It took me several months, just a couple of hours at a time (I have 3 kids!)…definitely the biggest project I’ve ever done. SO…I am so nervous about applying the polycrylic…don’t want to mess things up at this stage, you know. Can you tell me what tool you used to apply the poly and whether you sanded (or used steel wool) between coats? Thanks so much for helping this gal whose so new at this!
Julie
YoungHouseLove says
Sounds gorgeous! I use a regular 2″ angled brush (Purdy makes nice high quality ones) and apply very very thin and even coats. I don’t sand between them since I put it on so thinly, but it can’t hurt if you’d like to smooth anything out. Good luck!
xo,
s
Monic says
I’m thinking about painting my dinning table and chairs, but I have no idea where to start. I want the top of the table a glossy red and the legs black… the chairs i might just do black. would I be following these same steps? Please help guide me in this process
YoungHouseLove says
Yup, same exact steps. Just follow everything outlined in this post! Good luck!
xo,
s
AdamB says
I have a small concern with some end tables I’m working on…after hours of sanding, I put a thin coat of water based primer on them because that’s what I had lying around the house. The end tables will be painted a shade of white and after reading this post I’m getting worried about it staining in the long run. Should I go back over them with oil based primer before I start painting.
YoungHouseLove says
It definitely wouldn’t hurt and is a really easy step at this point (otherwise you’ll have to sand things way down and essentially start over). Hope it helps!
xo,
s
Madison says
Hey guys!
Quick question, I have the minwax poly finish clear gloss spray paint…would I achieve the same results with that? I used the oil based primer and I am about to start my latex coats on an old night stand.
Thanks!
Madison
YoungHouseLove says
Hmm, I’ve never used that so I’m not sure. Anyone else have any experience with it? Maybe try asking on our Facebook page?
xo,
s
Madison says
I took the risk and it worked! My nightstand is shiny and protected now. Thanks for the inspiration. I will try to post a picture of it onto your Facebook once I get new hardware on it. Thanks again! you two are awesome!
YoungHouseLove says
Awesome! So glad it worked out.
-John
megan says
Hi YHLers!
Have been loving your blog for years :) And, a very late congrats on the new bundle! Ok, so question: I have a fabulous wooden chest thingy I got at a local thrift store. It’s already painted (pretty thickly) with a color I like, a deep red. The problem is, there is a large spot where the paint has come off (oops, thank you nail polish remover bottle tipping over). It’s quite the intrigue, I can actually peel the paint away if I want to, it almost seems goopy where that spot is. My question is, if I want to repaint this bad boy, do I have to sand or chisle off all the old paint? Or can I just slap on primer and go to town like you did for the above table?
Much love from sunny San Diego, thanks for educating and entertaining us, we love you!
Megan
YoungHouseLove says
The key is just to get it smooth again (and rough it up so it hold paint and is durable). I would sand it down a ton until it’s super smooth (paint and primer emphasize rings and chipping, they don’t hide it). Then prime it with oil-based primer (which should take care of the goopiness) and paint it according to this tutorial. Good luck!
xo,
s
Maureen says
Your blog has inspired me to make my apartment a place I want to be but on a budget (which is important since NYC is so expensive)!! It makes me so happy to read all the crafty and cute things you guys do!
I was thinking about repainting an old metal bed frame I have to give my room a revamp – Does anyone know if this strategy works on metal as well? Or is it a total different ball game?
YoungHouseLove says
On a metal bed frame I would use Rustoleum’s Universal All-Purpose spray (it comes with a primer underneath and is specifically made for metal). Just take the bad apart and spray it outside. Thin and even coats are key! Oh but be sure the one you get has primer built in (some don’t for some reason, so if that’s the case grab some spray Kilz, which is awesome primer to put under it). Again, keep it thin and even and you’re good!
xo,
s
Maureen says
THANK YOU SO MUCH! :)
mandy says
Thanks so much for this great tutorial! I’ve been looking for simple step-by-step instructions and I think I’m ready to tackle my first piece!
Steph says
I am sure there is an answer somewhere above, but there are over 1000 comments, and I don’t have the attention span for that, kidding – kind of.
I am planning to sand, prime, paint, and topcoat two wood nightstands I found on craigs.
My want to be lazy question is, can I use spray primer and spray clear coat (not sure which one, but I know krylon had lots of confusing options) with latex paint (leftover, aka free)? Or, is that a horrible idea?
YoungHouseLove says
The most foolproof way is to use a small foam roller or brush (less issues with drips or inconsistencies). But you can always try a shortcut to see how it goes!
xo,
s
Kris says
Hi Sherry,
I’m almost finished painting a birch dining set for a friend of mine. I sanded, primered, used a satin finish latex paint and minwax poly as a finish. My fear: This table has 2 leaves. I worry that with opening/shutting the table, inserting/taking leaves out the paint will stick and chip. Any advice? Also, my friend wanted this dining site white. I worry about people sitting in the chairs and scuffing them with metal buttons on their backsides? Anything I can do before I present this piece to my friend? Thank you in advance!
YoungHouseLove says
Hmm, I think if you followed all the steps and sealed them, as long as you’re gentle when you open and shut things it should hold up well! As for the button chair issue, I would poly them so they’re nice and sealed/protected against that stuff. Hope it helps!
xo,
s
Bree says
Do you guys sand between coats of the polycrylic per the directions on the can? I’m scared to death that if I do sand I’m going to damage the paint. Thanks!
YoungHouseLove says
Nah, I like to apply it so thinly that it doesn’t need sanding, but if you have drips or thick parts that aren’t smooth, definitely sand them down with high grit paper before applying another coat!
xo,
s
Cecilia says
Hi Sherry,
I apologize if you’ve already answered this question. Is it necessary to sand between the first and second coats of poly as directed on the Minwax can? Or will doing so risky messing up the paint job? Will the second coat adhere without a light sanding between coats?
Thanks for your help!
Cecilia
Cecilia says
Sherry, wouldn’t you know that the very question before mine was the very same one i asked?! If it was there last night, I didn’t see it. Sorry about that. Please disregard my inquiry. Thanks!
Cecilia
YoungHouseLove says
Sure, no worries!
xo,
s
Jessica says
I recently painted my bedroom furniture with latex satin finish paint. It was stripped and sanded first. It looks beautiful, but the paint is still “tacky”. Not to the touch, but I hear a tacky sound when I pick stuff up off the top. The felt on the bottom of my lamp “sticks” in the paint. Any ideas on why that happened and what I can do to avoid this in the future?
YoungHouseLove says
Eeks, maybe you didn’t use the oil-based primer? That seems to be key in helping things cure up really well over time.
xo,
s
Kalin says
Hi Guys!
I LOVE LOVE LOVE your blog, as newly minted owners of our first house I’ve been scouring it for all your fabulous thrifty ideas. I know this is an old post but it’s more relevant to what I’m trying to do. We just bought an older solid wood table with a sealed finish that needs some reinforcements but that I also want to paint a black/brown (its currently its natural pine color). When said table was purchased my eyes were bigger than what my hands were willing to do and I thought I could sand the whole thing down (and 8 chairs included) and go from there, I’ve heard rumors of being able to use a solvent paint type product to cut through the finish and painting desired color from there, or just flat out painting a primer over the wood/finish (it also has some decent gouges that need to be filled in. Thoughts/ideas/pieces of brilliance you don’t mind sending my way?
Thanks! Kalin
YoungHouseLove says
I would rough everything up with sandpaper or liquid sandpaper (from a home improvement center). You just need to cut the glossiness do the primer and paint stick.
xo,
s
Alex says
If I am taking on multiple pieces of furniture at a time, wouldn’t it be best to use a top load/gravity fed spray gun with a finish tip on it? Would it make sense to also spray on the primer or no?
Thanks for the help!
YoungHouseLove says
If you’re proficient with a sprayer- go for it! If not, I would avoid it like the plague (novice sprayers can have tons of issues with drips and inconsistent finishes – all things they probably won’t bump into at all with a foam roller or by brushing on thin and even coats). Good luck!
xo,
s
Sarah Roe says
Hi there! I am currently painting an old desk and followed all of your steps except for latex paint..instead I opted to spray paint (light coats X3 with lots of drying time)..do you still recommend poly over spray paint? Thanks!
~Sarah (Avid DIY!!)
YoungHouseLove says
Nah, I’d leave the spray paint alone since most of it isn’t meant to be covered with a top coat! Good luck!
xo,
s
Jamie says
Sherry,
I have enjoyed stumbling across your blog and loved this post. I recently found a large spool sitting outside (like for wire) and plan to turn it into a table for my kiddos. I live overseas, so many of the products you mentioned aren’t available to me. I am planning to sand the “table” smooth and then paint it with an exterior paint since it will spend a lot of time on our balcony. Do you think I can skip the primer step? I’m not sure how to find it here anyway.
Thanks!
YoungHouseLove says
I would look for some sort of exterior paint with primer built in (they sell that a lot these days) or just ask the paint pros what they recommend for something sitting outside. Hope it helps!
xo,
s
Joe says
Hi –
I’m in the middle of repainting a wood fish-tank stand. It had been stained, and I sanded it down, then applied an oil based primer. It seems that the brushstrokes are really noticeable. Should I fine sand the primer before I paint, or should I paint and see how it comes out, then sand and recoat?
Also – any recommendations for a paint on something that may occaisonally get wet? Someone suggested rust-oleum protective enamel paint. Or should I just use a regular latex and coat with the clear poly?
Thanks so much!
YoungHouseLove says
I would sand and then try to use a small foam roller to apply the paint as you go (it keeps it smooth). If something regularly gets wet you should be ok with a semi-gloss or high-gloss paint (those are used near sinks in kitchens and bathrooms that get splashed a lot). You also could use the rustoeleum stuff (that’s generally very durable). Good luck!
xo,
s
Lauren says
Do you have any tips for painting drawers? I want to make sure mine don’t stick shut once their painted.
YoungHouseLove says
I’ll share all that stuff as we go (we remove drawers completely and prime and paint them out in the sunroom, then allow for the full drying time that it says on the can- sometimes extra!). We haven’t had sticking issues using this method before, so here’s hoping we have the same luck this time! Will keep you posted!
xo,
s
Margaret says
When a table has leafs, is there a special way to paint it? You wouldn’t be able to fold the leafs up, it would probably stick. I’m wondering how to get in between the leaf and the base of the table. Hmm… Any suggestions?
YoungHouseLove says
Hmm, I think it depends on how your table functions. Some leaves come out entirely, while others fold against themselves and go into a hidden or in-use position. I’d imagine it would be harder to deal with things that grind against each other or fold ( you don’t want things to scratch) but if your leaves just come out I’d paint them separately like painting cabinet doors (remove those first too) and just wait for them to dry before reattaching them. Hope it helps!
xo,
s
Rio says
Hi, painting an old night table. Have done all the steps you pointed out. Primed with oil based primer. Did 3 light coats of a semi gloss latex, while sanding between coats with a very fine foam sander,and all looks very nice. just confused about the last part. I have the minwax poly clear gloss, however it says to sand before i apply it or it won’t bond to the surface. I don’t want to sand as it is my final coat and turned out very nice. On the white table (above) what was the exact steps you took when applying the gloss minwax poly. Also do you recommend buying the aerosol spray minwax or brushing it on? Thanks,
YoungHouseLove says
Oh no, I didn’t sand before I applied it and it was great! I just do super thin and even coats so there aren’t drips or bumps that need sanding. I use a brush to brush it on in super thin and even coats and follow drying times to the letter. Hope it helps!
xo,
s
Briana says
A couple questions for you. If there are brush strokes in the last coat of paint, do you sand the paint or wait to sand the poly? (How long do you let the paint dry before sanding it?) Or would you sand the last coat of paint, and add one more thin layer of paint?
Also, how long after painting until you apply the poly?
Thanks so much!
YoungHouseLove says
I would sand the last coat of paint to see if they’re fixed that way. A foam roller will get rid of them too. You can apply poly the next day. Good luck!
xo,
s
Evelyn says
sooo happy I came acros this website! Just the information I was looking for to paint my outdated, yet great dining room table and chairs a crisp white! Thank you so very much:)
Cristina says
Hi Sherry,
I just started my table refinishing project. I actually started with a paint stripper, but it didn’t strip any paint off the top (just the rounded edge). I’m thinking that the top must have some sort of veneer and is not real wood? Bummer for me because I didn’t want to paint the top. I’m going to try sanding it and see how that goes. Worst case is I just end up painting it anyhow, right? lol I am now armed with all YOUR knowledge and experience. You rock!!
I also wanted to comment on how amazing you are with all your responses to everyone’s questions. Keep up the great work! I just started my own blog of our DIY adventures and you are teaching me great things! (Now you know!!)
YoungHouseLove says
Aw thanks Cristina! I’m rooting for you! Sanding sounds like it could work so here’s hoping!
xo,
s
Erin says
Hi! Love your website! I was hoping you had some advice for me. I have been working on painting my kitchen table and chairs for a few days now. I started with a solid wood table that had a shellac/crackle poly finish that I lightly sanded, and then used Behr primer/paint in one. The paint went on well with a foam roller and brush. The problem is that someone left a glass on the table before it ws poly’d and now I have a water ring! What should I do? (No one will fess up to the deed, doesn’t matter anyway) Do I sand it and start over? Would you recommend the poly with a roller or a spray poly) thanks!!
YoungHouseLove says
Oh no, I would just try to give it one or two coats of paint to see if it covers it. Then give that drying time and seal it with poly. I like using a brush or a small foam roller for poly too (spray can be drippy). Good luck!
xo,
s
Erin says
Thank you! I will try that!
sm says
Hello,
Thank you for posting those directions! It sounds fabulous. Sadly I did not see them before I started my project. I painted a dresser with the advise from a friend.
After a thorough sand, I primed the dresser, applied two coats of flat back then brushed on Rust-Oleum Painter’s Touch Gloss Crystal Clear Latex Paint. (Letting each coat dry of course.) However, the clear gloss does NOT look good. Is it the brand I used? I have to say it was very difficult to apply the gloss evenly before it dried. There are a few areas that are bumpy and uneven. All the better looking areas are still uneven and you can see the brush strokes.
I am really unsure of what to do from here. The flat black looked great however when I ran my finger over it, there was a lighter colored streak that was very visible. I figured I should put something over it. I would love a smooth finish that is still durable. Can you recommend a simple fix to this? I am hoping I do not have to start from scratch again. I heard of a spray on gloss paint. Or should I repaint it with a semi-gloss black paint? Or the polycrylic protective finish you recommend above?
Thank you in advance for any advise you can give me!
SM
YoungHouseLove says
I would wait for it to dry completely and then sand it down to get it smooth again (with a very high grit paper like 200 so it won’t affect your paint job). Then you might want to apply one more coat of paint if it doesn’t look great or just seal it with the recommended sealer in this post. That sounds easier to work with than what you used, and you can even use a small foam roller to apply it to keep it from showing brush strokes. Hope it helps!
xo,
s
Kendall says
I have been following the steps outlined in this post for repainting an antique tv stand I have. So far your tips have been awesome! I have one last question- I know at the beginning you suggest using a brush or a foam roller if you aren’t an expert and don’t feel comfortable with a brush. This is my first project so I decided to go with the foam roller. However, when applying the top coat does it need to be brushed on or could you apply it with a roller as well? Any help is much appreciated! Thanks :)
YoungHouseLove says
You can definitely use a foam roller for the poly if you feel most comfortable with it! Just do thin and even coats! Good luck.
xo,
s
serena says
I think the “thin” part of the coats is one of those “well duh” details that bloggers forget to mention, as helpful and thorough as they have all been for me. You saved me a lot of tears, more paint, and bumps on my head from hitting it against the wall. I was getting the bubbles with a roller and brush marks, even with Floetrol, til I tried very thin coats, and it made a world of difference. Thanks a lot.
YoungHouseLove says
So glad to hear it Serena!
-John
Tammy says
I have problem my dining room table needs a new life but don’t now were to start with color its all wood furniture from germany its a big china cabinet, bar and dining room table with 6 chairs which I want to replace the chairs. I would like to have the top of the table a cherry color and a light color for legs then im stuck with what to do with rest.
HELP PLEASE
Tammy
YoungHouseLove says
You probably can do a bunch of things so there’s not one right answer! I say just bring home a bunch of swatches of paint to see what combos you like together and just do whatever looks best! Good luck!
xo,
s
leah says
I want to paint my coffee table which is whitewashed from the ’80s but still in great condition. I think it’s wood and veneers, but it’s dinged up from my son and from a lot of loving use, and we’re never getting rid of it. I love the look of furniture with like another color coming through. I don’t know what you call that technique. We want to paint it a flat black with like brown or burgandy coming through. What would you suggest? I don’t know anything about painting, as you can probably tell. Thanks!
YoungHouseLove says
That’s called distressing. Basically you prime and paint it all the color that you want to come through and then paint the other color on top and sand it to reveal some of the first color (once it’s nice and dry). Maybe google “how to distress furniture” for more info?
xo,
s
Jenny says
What if I didn’t use primer on solid wood! What might happen?
YoungHouseLove says
Hmm, it could flake or chip off more easily since primer helps with adhesion. Sometimes people skip it and it’s ok, but I always say it’s worth the trouble if you can add it in there while you’re at it (since you’re done painting I’m not sure if it’s worth sanding down and starting over- might just want to see how it wears and do that if you need to down the road).
xo,
s
alexis meisels says
I’ve gone through as many pages as I could to look for these answers to no avail, so excuse if repeating, and thanks in advance for EVERYTHING you write and share:
1. I’m painting black chairs a light mint green – do I need to paint to white first? Or will lots of coats cover black?
2. Suggestions for where/how a nyc gal can get this paint project done? I suppose a cardboard box somewhere near my basement/trash disposal (if super approves) but doubt I can leave out for 72 hours type deal… also don’t want to fume up apartment. What say you?
YoungHouseLove says
Just use white primer (stainblocking for sure) and it should work! You can do this in your room, just open all windows and have a fan or two running for great ventilation. Maybe do it in a corner that it can sit and dry for a while without being disturbed?
xo,
s
Crystal says
Hi,
I am loving reading your blog! The DIYs you complete are amazing!!! I have a quick question. I started a project before reading this post…ugh…and I used latex primer. Now I have wood grain bleeding through which I am assume will continue to bleed through my paint. Can/Should I apply oil based primer over my latex primer?
Thanks!
YoungHouseLove says
Yes, I’d wait for that to completely dry and apply a stainblocking primer (it doesn’t have to be oil-based, now there are new formulas like Zinsser Smart Prime, but an oil-based Kilz or Zinsser product would block the most). Hope it helps!
xo,
s
Crystal says
Thank you!
Make the web says
hmmm…mine is my desk, which I painted black. The little rubber feet on my laptop leave marks on the painted surface. I may just try to find a glass top for it…
YoungHouseLove says
Hmm, I would sand it, paint it one more time with a thin (this is key) and even coat of paint, let it dry for about 3 days without using it. Then if it’s a little tackly, try sprinkling baby powder on it to absorb the tackiness. Dust it off and you should be good to go. But a glass top would work too!
xo,
s
Jess Perkins says
Just stumbled upon your blog for the first time, and I’ve been reading for hours! I’m impressed and inspired. :)
Will this furniture painting process work well (be durable) for outdoor wood furniture?
Thanks!
YoungHouseLove says
Aw thanks Jess! It should work for outdoor furniture provided you use an exterior primer and paint. You can also use spray paint (meant for exterior projects) on things like iron chairs and tables since metal takes spray paint really well. Just make sure it has a built in primer like Rustoleum Universal. Good luck!
xo,
s
Stewart says
Hey Sherry,
Greetings from Sydney, Australia. I love your blog, I’m new to DIY and you guys have given me the courage to give things a go!
I bought an old table from a thrift store and have sanded it down ready for applying primer. I bought an oil based primer (all good) but could only find enamel semi-gross paint. Is that okay to use? I also bought some Minwax poly though it is called Minwax Wipe On Poly in Clear Gloss and instructions are to wipe it on to wood, doesn’t mention painted wood. Do I have the riight stuff?
Thanks,
Stewart
YoungHouseLove says
Hi Stewart! Good luck with your old table project! It all sounds good but the poly sounds off. You definitely want something you brush on that’s water based and that says on it that it won’t yellow. Maybe instead of Minwax if they don’t have it in that brand just ask at the home improvement store what they have by any brand that meets that criteria for painted furniture- or ask if the enamel semi-gloss paint is enough without poly on its own (it might be!).
xo,
s
Mandi @ Little Boy Blue and Mommy Too says
Thanks for the tutorial! I’ve been wanting a nice white round table, and finally came across a wooden dining table on craigslist for free. This will be perfect to give it the look we want for our dining room! Thanks!
YoungHouseLove says
Sure, good luck!
xo,
s
jen says
Such a great tutorial and blog! Thanks for being the brave ones and trying stuff out first, and sharing what works and what doesn’t. It definitely helps give me confidence in trying something that I can see turned out well for you. My, question is regarding painting something that isnt solid wood. We have a couple hand me down dressers in our daughters bedroom that I am living with until we can afford something better. They are made of what is probably MDF like wood with a veneer on the outside. Can I paint them the same way with an oil based primer and a latex paint? The veneer is not super thick, so should I skip sanding? Thanks again for this fun blog!
YoungHouseLove says
If the veneer really is wood (aka: it can be sanded and has a true grain) this tutorial will work with some very light sanding, but if it’s laminate (aka: can’t really be sanded and doesn’t have a true grain) I would bring a door or drawer to the paint store and ask them what they recommend for that material. Good luck!
xo,
s