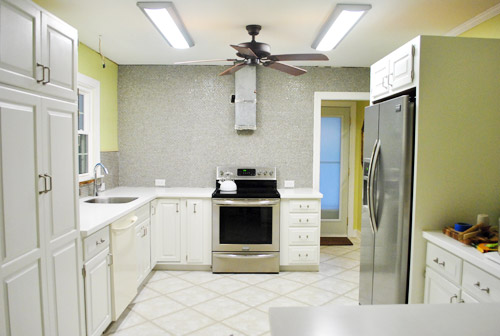
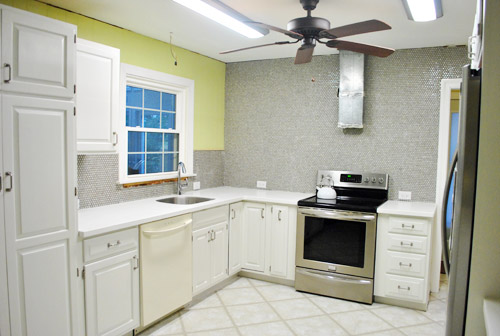
We did it. We tiled the entire back wall of our kitchen in a counter-to-ceiling backsplash move that we like to call Project Crazy, and we lived to tell the tale.
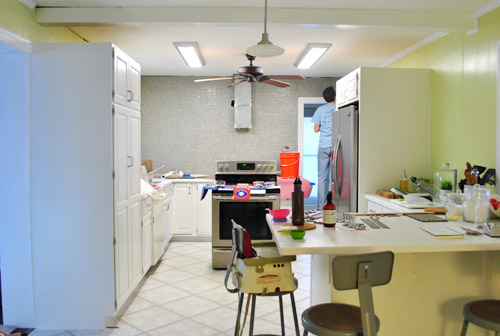
We still have to grout, add a big ol’ industrial range hood and chunky open shelves (those will just be screwed right through the tile with a special drill bit) but when we squint we can almost picture it…
As for the top seam where the tile meets the ceiling, there’s crown molding that runs around the entire room (although we removed some of it on the window wall) so we’ll be adding that back around the whole room so the top of the tile will look nice and finished once we get to that step.

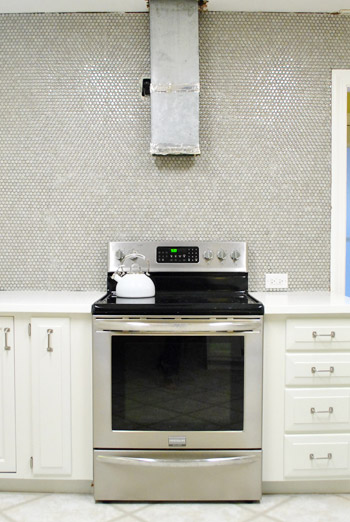
The black box next to the range hood is an outlet for our range hood, so that’ll be hidden once we install ours. We tiled a few inches behind the range hood duct, but didn’t remove it since once we install our industrial hood that area won’t be visible.
Once we add our floating shelves (which will be 12″ deep) along the oven wall, the space on either side of the window will be 14″ – so it’ll finally look balanced again! I mention this in every kitchen post because I. Can’t. Wait. For. That. Moment.
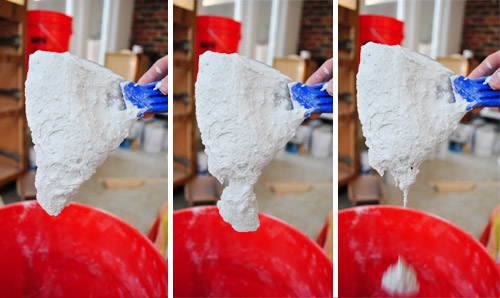
This entire backsplash process took us around 14 hours total. We tackled it mostly in 2-3 hour chunks in the evening after Clara went to bed or on weekends while she napped (so it’s a good indication of what anyone with a day job might be able to follow). That includes a few hours of figuring out how to cut the tile, which we summarized in this video for you (read a lot more on that process here).
We also shared an in-progress post about prepping the room for tiling, mixing and spreading thinset, and placing the penny tiles here. So that might come in handy if you’re at that stage of the project and could use some reassuring.
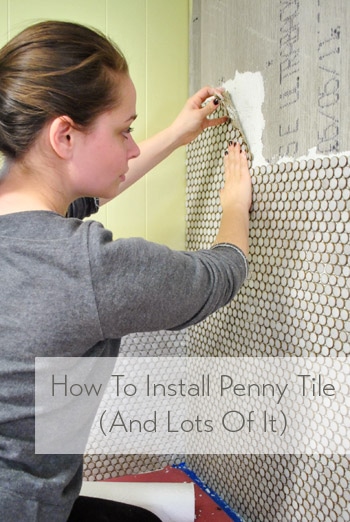
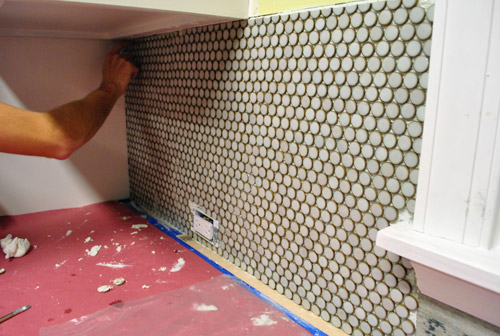
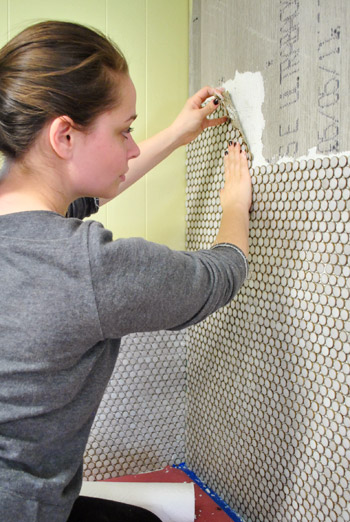
It’s really important to place penny tiles in a way that makes the line where each sheet meets less obvious, so we found that a staggered pattern was the best method for us to achieve a seamless result:

That way your eye doesn’t catch one seam and follow it all the way across the room (more on that here). We also played around with each sheet of tile after squishing them into the thinset, scooching them a bit to the left or the right or higher (since they were on a sheet of mesh it was pretty easy to manipulate them) until they looked evenly placed so the seams weren’t obvious.
Just wanted to recap that stuff for a second so anyone looking for an exhaustive post about installing penny tile would have those pics and links all in one place. Anyway, when we last left you, we were just beginning the back wall, which we knew would be tedious (but hoped wouldn’t make us rue the day that we picked penny tile). The good news: it didn’t. We made it all the way across that wall, baby! Without wanting to poke our eyes out with penny tile once (well, maybe once…).
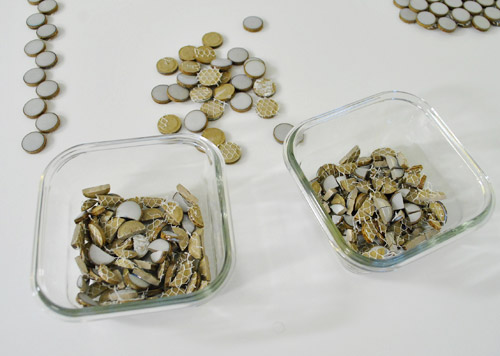
Thankfully, there weren’t many cuts since we could slap a ton of full sheets up in that giant expanse of wall, so although we took our time placing them to keep seams from showing up, we did move faster than having to cut a bunch of tiles. It probably took us three days of 2-3 hour sessions each time. We found it helpful to use little glass dishes to divide full tiles, half tiles, more than half tiles, and less than half tiles. That way if we needed to quickly back-fill an area, like the edge of the wall, with half-tiles or slivers or almost full tiles we already had a little dish of them separated out that we could dig into quickly.
Here’s a video about spreading the thinset and placing the tiles, complete with how to back-fill any tiles that you need to add and how we slid them around and adjusted them to look more seamless. Oh and in the video when I describe it as a brick-layers pattern, I create a horizontal one with my hands, but it’s really a vertical one (two tiles on top of each other and one staggered in the middle of that next to it). Oops. Hope that makes sense when you see it!
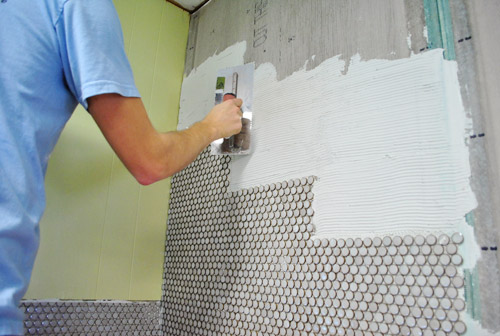
And here are some pics of us making our way across the wall. John applied the thinset with a putty knife (and sometimes a trowel). We mixed enough thinset to set about four to six tiles at a time (so it didn’t dry out before we could set the tile). You can see John applying the thinset in the video above.
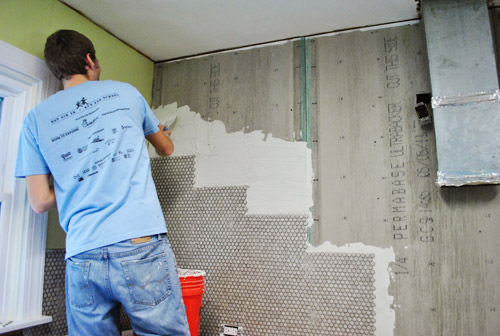
Then John scraped it with his trowel to make little ridges to help the thinset grab the tile and stick for good. Our trowel was a 3/16th notched trowel since penny tile is small, so we heard that smaller ridges were recommended (you can also see this in the video above).
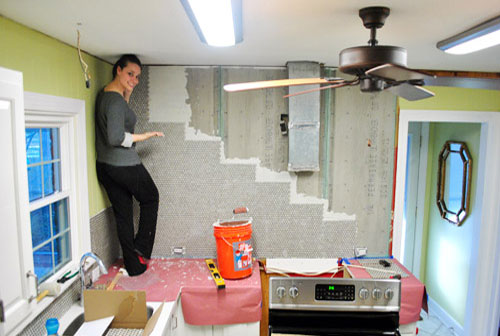
Here I am placing the top tile on the left side of the wall. John got a kick out of the fact that I could comfortably stand on the counter without having to crouch (oh the perks of Team 5’2″). You can see how we worked from the bottom left corner and went up and out to create a staggered staircase effect. This allowed us to build things slowly without having much of a problem with keeping things level since each tile interlocked down the staircase on two ends to keep it from skewing.
Day by day, we inched our way across…
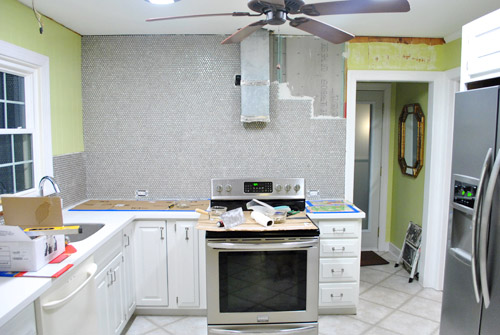
Here we are in the very last corner, finishing things up. You can see that we scooted the oven out while we were working (to gain more access to the wall and keep from getting thinset on it).
Since a few of you have asked for a shot of the corner to see how the tile meets, here ya go:
Let’s get a little closer…
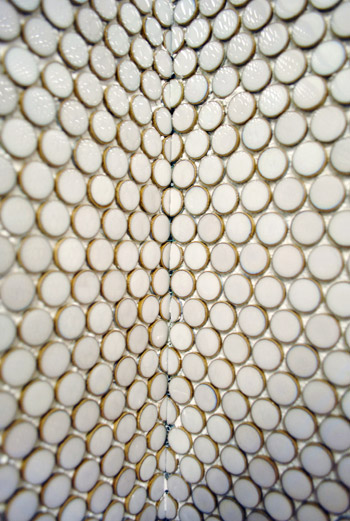
Basically whatever would be placed next to the last tile on the wall where the wall ends just wraps around and gets placed on the new wall. It’s not 100% perfect but once it’s caulked/grouted we think it’ll look pretty darn good (we’ll snap another pic for you then).
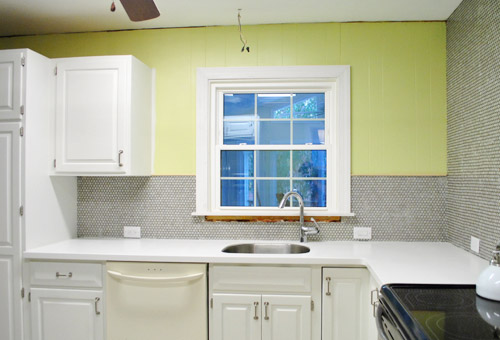
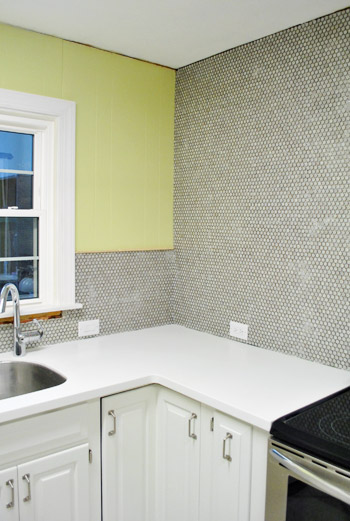
Oh and some other folks asked how we’d be “capping” the 14″ of tile that will be exposed on each side of the window wall, so here’s a detail shot for ya:
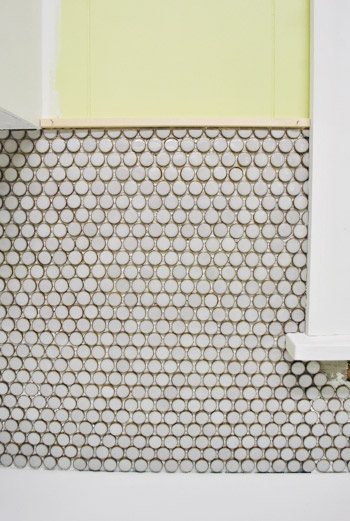
We actually got some thin glass tiles that we thought we’d like, but they just looked too brown and sort of competed with the penny tile, so we decided some thin thin thin pieces of craft wood will make great simple and clean little borders that don’t compete for attention. They’re not hammered in completely yet, since we’ll be pulling them out and painting them white like the rest of the trim in the room after grouting (just to avoid getting paint on the grout).
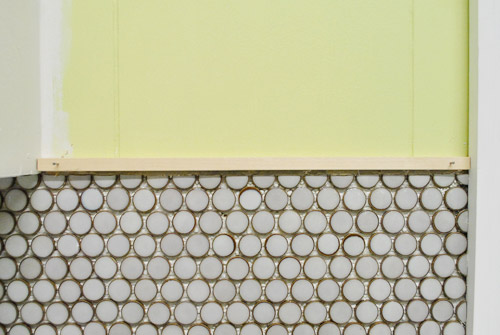
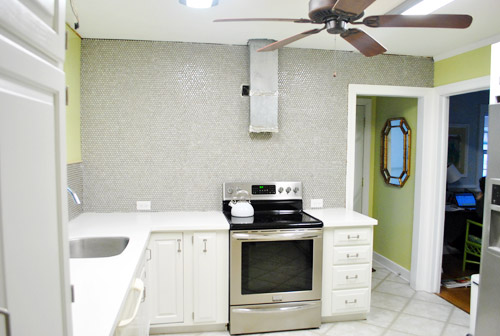
Grellow note: the picture above is probably the most true to life shot of our wall color (in some of the far shots it looks darker/greener/brighter than it is). In real life it’s a soft avocado color (although it can read quite differently on different computer monitors). Here’s a link to it on BM’s site if that helps, since the bad lighting in our kitchen hardly does it any favors. We think once we tackle the new lighting and add the open shelving and some pretty colorful accessories up there (and on the counter) it’ll all tie together really sweetly. You know we’ll share those pics as we go!
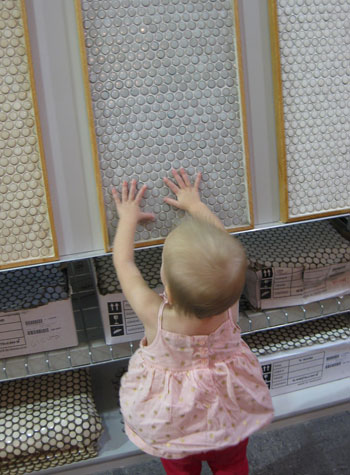
Obviously we still have to spread all that grout, but we’re giving our arms a day of rest before picking up the trowel again (well, I guess in this case it’ll be the grout float). As for the specifics, we picked a soft creamy-gray grout that’s a smidge lighter than the tile. You can see it in this sample shot snapped at the store back when we chose our tile (more on that here):
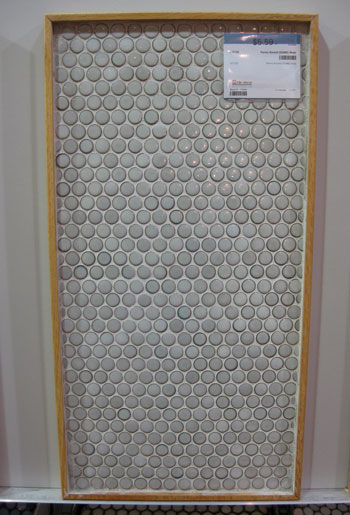
Oh and see how you can kind of see the seam in the picture above (there’s a horizontal line of grout in the middle of the photo that seems a bit thicker/bolder). That’s why scooching things around and stepping back to see how it all looks before moving onto the next tile is so important! We were sticklers about it, but we’re so glad we took the time to keep everything as evenly placed as possible.
Now we just need to grout, get new lighting (and kill that haven’t-used-it-in-13-months fan), add crown molding and some sort of decorative treatment and baseboard to the back of the peninsula, lay our cork floors, install our new dishwasher, and add shoe molding around the room. And probably some other stuff that our tile-drunk minds are forgetting. So we’ll be back with grouting progress in the next few days or so- probably on Wednesday. We’re hoping we can knock it out pretty quickly, but you never know until you’re knee deep in grout… we’ll keep you posted!
What did you guys do this weekend? Do you all have off today in honor of MLK?
Psst- Oh yes there is a Clara vs. Santa wrestling match going on over on Young House Life…

Tracy says
Ahhhhh the penny tile looks fab!! Love it! I have a question: is the new cork flooring running into the laundry room as well? If not, what is your plan for in there?
YoungHouseLove says
Yup, both rooms are getting cork-a-fied!
xo,
s
Ann says
I know I am not the first to congratulate you but oh em gee! That looks amazing and professional. I want to pet it.
YoungHouseLove says
Aw thanks Ann! You guys are all so sweet and supportive.
xo,
s
Paula M. says
Looking super-good!! Aren’t you thrilled to see that whole wall up, where you can really see the impact of the change? Fantastic! Love the shimmer!
One question: how much are you staggering the tiles by, to eliminate the dreaded seam effect you’ve prevented? Do you stagger them by a full horizontal row, or what? (and does that mean you have to cut off a meshed-back row of each set before applying it?)
YoungHouseLove says
They’re actually put on the mesh in a way that automatically staggers the edges so they fit right into each other, but you can still place them on the wall too close or too far away to make the seams more obvious than you’d want (like the seam you can see in the sample from the store in the bottom of this post). So what we mean by stagger is that each sheet is actually staggered (see how we hung them in a staircase sort of effect?) so the seams don’t run all the way across the wall on the same horizontal axis, instead it’s stepped up and down like a vertical brick-layers pattern. Hope it helps!
xo,
s
maria says
I love it!! Something like the seams would totally bug me too, so way to go taking your time and doing it right. It totally paid off! Relax and enjoy your brand spankin’ new wall-o-tile!
Jub says
Excuse-me but… isn’t it awfull to clean ??? I’d like to have your opinion after a few month.
YoungHouseLove says
Oh no, it still has to be grouted and sealed! We installed three walls of tile to the ceiling in our last bathroom for the shower and once we sealed it we didn’t scrub it once for a year- not even before our open house. Sealers are amazing these days! Will keep you posted if we have a different experience here of course!
xo,
s
Jub says
Thank you, it’s just so much seals, compared to big tiles, that I wonder how it ages.
(please excuse if my english is not very good, I don’t have all the vocabulary of building and decorating)
YoungHouseLove says
We figure since we sealed more tile in the shower (since that was three walls almost from the floor to the ceiling) and had no issues with the seal we should have the same luck in here! Will keep ya posted!
xo,
s
Melissa Evans says
Loving gooooodd!! That wall of tile is Ahhmmmaazzingg!
Lyndsey says
It looks amazing! What can’t you guys do??
YoungHouseLove says
Raise our arms above our head. Hahaha. Here’s hoping they work again soon!
xo,
s
Courtney Foster-Donahue says
Some people follow soap operas and reality TV; I follow you guys!!! I love reading about the progress every day — it’s looking great and it’s so inspiring! Perhaps one day when my husband and I move out of our NYC shoebox/apartment we’ll take on similar endeavors. Thanks for blazin’ the trail :)
GreenInOC says
Amazing!
I’m curious if you tiled behind the stove to match the height of the countertop in case you or a future owner gets a flush top stove (I know you said you went behind it, just curious how much and what influenced your decision)? Did you consider going all the way behind the vent in case of a future stove change that has a built in vent?
I changed all of my outlets to black sockets and rockers and then put chrome covers on – it looks modern and retro at the same time. I think it would look fantastic in your kitchen but I definitely don’t have your eye! If you ever see mine, just tell me they look good, okay?!
YoungHouseLove says
Oh yes! We actually used a trick we found online (hang a 2 x 4″ level with the counter across the whole hole left when you pull out your stove and tile down to that like it’s the counter. That way it’s all seamless back there! We didn’t want to assume the future stove might have a built-in vent since most people prefer vents that pull air up and out through the ceiling or wall (instead of just fans that run but don’t draw things up and out) so we don’t think anyone would remove the vent that goes up into the attic and outside since it’s already there and installed!
xo,
s
Megan says
I’m so excited you guys posted this. My husband and I just bought some glass tile this weekend for our kitchen. I’ve wanted to tackle this project for a year and a half now. He is a little hesitant to do it because we don’t know what we are doing. I on the other hand can’t wait to start it and even contemplated starting without him. :) Now I just need to pick up some nippers from Home Depot.
Thanks guys! You two are such an inspiration!
Megan
Marla says
Looks great – was looking forward to seeing this post to see how everything went. Love it!
Have you seen this sweet rug at home decorators? It’s so you guys! Happy
Grouting :)
http://www.homedecorators.com/P/Castleberry_Area_Rug/510/
YoungHouseLove says
Ooh I love that! So cool.
xo,
s
Staci says
Noticing how many people have commented on the paint. I absolutely love it, btdubs.
Do you think a video tour would show the paint color more accurately? I’m just thinking of how the white balance might be what is throwing it off, and when doing videos the light meter seems to change by itself… or something. I am not technical with this kind of thing. Just babbling.
Staci says
Durrr. There is already a video in the post. Ignore me :P
YoungHouseLove says
Haha, oddly enough all of our flip videos seem darker (everything looks darker, from the room in general to the cabinets, counters, walls, etc). Such a strange phenomenon. We do think it’ll get a lot easier to take photos that read more accurately on every monitor once we redo the crazy lighting in there!
xo,
s
Amber says
My apologies if this is too personal… but how much does John weigh? I’m only asking because I would be terrified to stand on newly installed counters for fear of cracking. Did the installer mention how many lbs would be safe??
YoungHouseLove says
Haha- he didn’t stand on the counter (he’s waaaay too tall for that to work, so he’s on a step ladder in those pics where he looks extra tall- not the counter). I did stand on it though, and thankfully it was a-ok! The counters rest on the cabinets under them so there’s not much flexing or anything that goes on- but we’d never stand on the overhang for the peninsula or anything!
xo,
s
laura says
I wish you would get to your cork floors before mine come in (I should start installing next Tuesday) so I can see how yours go before I start mine! If I get stuck, can I call you? haha…just kidding (not really!). It’s a new project for me (flooring) but we’re excited to see how it looks. I have no idea what I’m doing, but like always, I’m asking a lot of questions, reading the instructions and hoping for the best!
Laura
YoungHouseLove says
Haha, it sounds like you’ll be tackling that way before us! Feel free to pass along alllll your secrets and tips! Haha. And good luck!
xo,
s
Angelica says
What an absolutely fantastic job. I am thoroughly addicted to your blog and keep showing my hubby what all you do. So much that he has now decided that if I can come up with good ideas he will DIY a lot of stuff in our kitchen in Goa. Yes I sit in Goa and ogle at your projects :)
I feel my monitor is not showing your avocado as it really is.. it is a yellowish color which just doesnt go with the pretty gray tile.. it kind of creates two separate colors not in flow. Sorry! But I blame my monitor..not your taste.
YoungHouseLove says
Haha, it’s really a soft avocado color, which looks great with white and gray in real life! Hopefully when we redo the terrible lighting in here it’ll be easier to see!
xo,
s
karla says
I LOVE the color. I’m sure it looks even better in person though!
Wendy says
That’s a great job that you both did. Are you putting a backsplash on the other side of the kitchen also?
YoungHouseLove says
We actually originally planned to but have lived without one for months (with just the painted paneling that was over there) and the semi-gloss paint is really easy to wipe down so we opted not to. We worried it would intersect weirdly with the half-wall anyway, so we’re happy that we haven’t found that we miss it over there!
xo,
s
molly says
Good job team YoungHouseLove! You guys are in the home stretch, I can’t wait to see it grouted!
This is definitely motivating me to finally change out my own backsplash. When we renovated last year I installed cream subway tile that is just a little too pink in the space. I thought I’d get over it, but I haven’t, so the new tile is in a box in the garage just waiting for me to break out the thin set. Thanks for the inspiration!
Kelly of www.twosixe.blogspot.com says
lookin’ good guys! I am sure you already have yours picked out but just in case, might I recommend the open shelves we used in our kitchen reno? We love them and you can’t beat an Ikea price tag! http://twosixe.blogspot.com/2010/02/details.html
So excited for the offcial reveal!
YoungHouseLove says
Aw thanks! We think we might have to build ours since we’d like them to be 12″ deep (to hold our big dinner plates!).
xo,
s
Amy says
This looks beautiful! You people are amazing!!
mp says
Looks FABULOUS!!!
Julie says
The up close pictures are lovely but I don’t think the pictures further away do it justice, it looks like cement board!
YoungHouseLove says
I think it’s just bad lighting. Once we get new lights and shelves and pretty stuff on the shelves…. can ya see it?
xo,
s
KiTX says
This looks absolutely awesome- I love it, you guys have such a good eye and did a great job! So excited for you, it already looks like a whole new kitchen!
tricia fike says
so I love the penny tile more than I ever thought I would, it’s so classic but edgy! Question, what is your lighting plan for the kitchen – r u changing things out? i want to put some can lights in my kitchen and remove a florescent light, curious if you’ve had that priced – I also live in a ranch.
Trish
http://www.mash-upchic.blogspot.com
YoungHouseLove says
Oh yes, all new lighting! Will share those details as we go for sure!
xo,
s
Lesley says
Tile looks amazing. Do you not worry that Clara will tip that tall stool over while strapped into it? Maybe I am just paranoid because my two would’ve done that in about 2 seconds!
YoungHouseLove says
I was paranoid about bar height so we went with counter height (only a few inches higher than regular chairs). Our stools are very stable (they’re made for decades of use in schools so they can take a beating and are very solid and not rickety). We just make sure she can’t kick off anything to try to tip (she is always tucked in under the overhang, so there’s nothing there for her to push off of). You know we’re safety freaks! Haha.
xo,
s
Amanda says
The tiles looks so good! I can’t wait to see it all finished up with grout. (Seriously, each time I open your blog for this last week or so, I’m like, oh man, what’s the news with the tile?! This apartment dweller and renter might be living vicariously through you…)
I will say, I would love to see a slightly darker and bolder paint color, now that the rest of the kitchen is so light and white (or gray)! I know you guys are happy with it and it probably feels different in person. But I’m just sayin’, a royal blue on that half-tiled wall would be amaaaaazing…
YoungHouseLove says
We’re definitely still happy with the cheerful soft avocado walls since we think once we add the dark cork (it’s not the medium tone, it’s a rich mocha tone) on the floors we’ll appreciate something dark to ground the room and a smidge of happy color on the walls!
xo,
s
dhw says
It looks absolutely stunning. Well done, you have such an incredible eye. To have seen this possibility in the old kitchen is really pretty astounding. Gorgeous.
Pip says
That corner full of penny tile close-up sends disco tunes through my head. Happy dancing :)
Jenna at Homeslice says
Oh wow. You guys did it! Congratulations. I can’t believe how fast you’re knocking this baby out. It probably seems slow, huh? Well anyway, it looks awesome. I think the wood trim is genius, it’ll be the perfect, simple way to finish it off. Can’t wait to see the grout!
Erin says
Gray grout hint: make sure your sponge is really really wrung out before you sponge off the grout. If it is too wet you can actually leach some of the color out of the grout and then it looks like permanent soap scum is on it. I made this mistake when grouting my shower and had to go back and paint every grout line with a special paint to cover it–I am actually still not done painting!
Lesson learned: it may take longer but the dryer the sponge the better when grouting.
Good luck!
Jessica P says
Love, love, love, the penny tile. But confession time. I don’t like the grellow. I wanted to be fair and see how it looked with the tile, but I still can’t get on board! Any plans for a color change?
YoungHouseLove says
We love the wall color in person but hear it can read totally crazy on other monitors. In real life it’s a very soft avocado color (nothing dark or neon – if people pick up a swatch they comment and say “ooooohhhh! it’s looks so different online!” We hope that once we get better lighting in there we’ll be able to take photos that better reveal it! And we know once we have floating shelves with pops of color and a few accessories on the counter it’ll all make sense! At least to us! Haha.
xo
s
RHome410 says
You did such a phenomenal job with the penny rounds! We used those on our entry floor (a tile ‘rug’), and had trouble with them scootching around on that horizontal surface, so vertical installation would be tougher. They look amazing.
This weekend? NFL playoffs on TV, me painting our new bookshelf, DH installing long-needed window trim. Appraisal for refi on Wed, so lots of spiffing up to do!
karla says
beautiful!!! I bet your arms are so tired! Get some rest! Although there probably isn’t any time for that!
Jrm says
Holy moly I love this and it looks amazing! Super inspiring that “normal” people did this. A local coffee shop near where I live has penny tile and I have fallen hard for it. Sometimes I touch it when the shop is empty (its at the order counter so my fondling is discreet). Looking forward to the shelving. Woo that has got to feel like a huge accomplishmemt.
Kristi says
I love that penny tile! Can’t wait to see it grouted. Our back splash tile goes in really soon!
jeannette says
it looks like a movie star in a gorgeous grey sequinned roland mouret evening dress. ohhhhhhhhhhhhhh shiny!
Brandy says
I LOVE IT! Love, love love. It looks like greeny-grey GLITTER! :)
You guys better spot light that puppy up! It’ll sparkle like diamonds if you do.
Janelle D says
Looks GREAT! You must be hurtin’…
Going with the theme of kitchens: I was really intrigued by this wallpapered island on Apartment Therapy Isn’t it unique? It may be too “compete-y” for your kitchen but I figured I’d pass along the eye candy anyway!
Janelle D says
The link got cut out… Darn you, spam filter. http://gallery.apartmenttherapy.com/photo/house-tour-the-dickensons/item/316628
YoungHouseLove says
So cool! I love it!
xo,
s
Karyl says
That looks amazing! You have completely transformed the room with that tile. And I think you made the right call on the tile over the door. Stopping short might have looked lazy and lazy you are definitely not!
Susanne says
huge, huge congrats guys! It looks awesome.
stephanie says
hey…check out cote de texas blog today……Joni features a ‘real’ penny backsplash!!!
YoungHouseLove says
Amazing!!
xo,
s
melissa says
WOW! great work!!!
Seema says
this is so random, but i love how your nails are always done! shows that DIY girls can have pretty nails too :)
Abby says
That looks awesome! I can’t wait to see the finished product- I know you guys must be ready for it, too haha. This weekend hubs and I worked our our first ever refinishing project. We’re in the process of buying our first house (!!!!!) and decided to use the long weekend before we start back to classes as an excuse to refinish a dresser that will act as a buffet in the dining room and the dining room table. The table is actually the one we used while I was growing up, so it’s got some sentimental value, but both pieces were pretty beat up and just not our style. We stained them a pretty black color (who knew there was black stain?). They’re about 75% done, but they’re taking a few more sanding/painting layers than we originally anticipated since we had to re-drill holes for the hardware. Anyway, we used a few of your tutorials for reference (picture me saying “No no no. They say you should xyz” and hubs saying “who is THEY?!” haha)So thanks for all the help this weekend, the pieces are going to look awesome!
Jacalyn says
Looks great!!!! I just grouted my penny tile today and it was seriously more difficult ad messy than I imagined after watching the clean and organized DIY Network videos. I’ve never done any tile work before though, so I am pretty impressed with the results. Interested to see how your grouting goes! I found that a regular sponge worked much better than that rubber thing. Good luck!!!
karen says
dudes…you did such a professional job. bravo! looking forward to seeing it grouted. so curious about your light too!
YoungHouseLove says
Aw thanks Karen! We can’t wait to redo the lighting- we think it’s next on the list actually because our electrician has some time to come on over! Haha.
xo,
s
Alison Shuman says
No wonder you have such a following – these photos, the details, the ideas, the sharing of what worked (and what didn’t) makes this one heck of a good read.
Your photo of your daughter loving the tile in the store is adorable!
I have the same penny tile (but in “milk”) in my new kitchen, and it has such fabulous, subtle texture.
YoungHouseLove says
Oooh the milk color sounds amazing!
xo,
s
Heidi P. says
(In a deep voice) – I love iiiiit. :)
Yay hooray you’re done! Commence more dancing and more stroking!
Now I can’t wait for the floor!
I posted about some upholstering and did an ode-to-you-guys post title:
http://dhperezfamily.blogspot.com/2012/01/stool-boom.html
:D
YoungHouseLove says
Hahhahahahahahahahaha – John is raising his arms in victory. Best title ever. Love it!!
xo,
s
Jen says
Sherry,
Regarding all of the questions about the wall color, maybe linking to the large Sesame swatch on the BM website would help people visualize it better? I admit I’m one of the people who thought the color wasn’t working well with the tile, so I took a look at the swatch in the BM online color gallery, and that helped (if you click on the “More color combos” link to the bottom-left of the swatch, the combo shown is Sesame with soft grey and white, much like your kitchen). This might not help much for folks whose monitors are at fault (the online swatch may well be distorted, too), but to the extent the issue is the current lighting in your kitchen throwing the color in the pictures off, it might help people to see the online swatch. Hope this makes sense, and great work on the tile!
http://www.benjaminmoore.com/en-us/paint-color/sesame
YoungHouseLove says
THAT’S A GREAT IDEA! That swatch is really true to how it looks! Muted, not bright at all! I’ll have to add that link to a future post for sure!
xo,
s
calliope says
the tile looks fantastic!
And so do the -finally!!- white cabinets!
But…
now… the grellow color isn’t a great match. Or is it just me? Wouldn’t a vintage greyhish, a white or a more muted color make that fantastic tile pop out?
YoungHouseLove says
We’re learning that on certain monitors it reads differently but in person we love it! It’s a soft avocado color (not dark or bright or lime) so picture a fresh cut avocado sitting on a cutting board on our white counters with the soft gray tile behind it. We love it so much more than a completely white kitchen (with white walls and white cabinets and white counters and gray tile). Hopefully when we redo the lighting the paint color will read better!
xo,
s