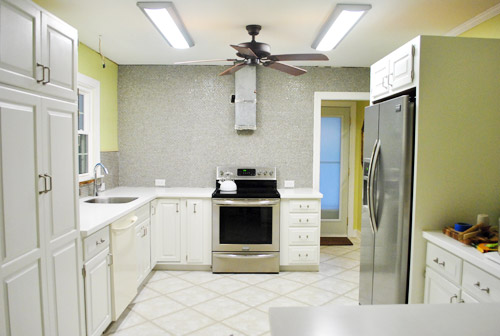
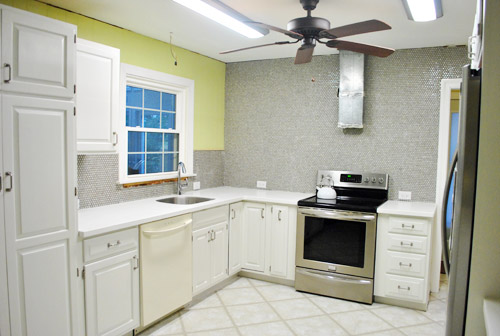
We did it. We tiled the entire back wall of our kitchen in a counter-to-ceiling backsplash move that we like to call Project Crazy, and we lived to tell the tale.
We still have to grout, add a big ol’ industrial range hood and chunky open shelves (those will just be screwed right through the tile with a special drill bit) but when we squint we can almost picture it…
As for the top seam where the tile meets the ceiling, there’s crown molding that runs around the entire room (although we removed some of it on the window wall) so we’ll be adding that back around the whole room so the top of the tile will look nice and finished once we get to that step.

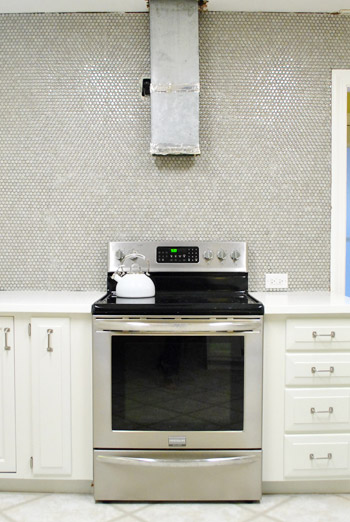
The black box next to the range hood is an outlet for our range hood, so that’ll be hidden once we install ours. We tiled a few inches behind the range hood duct, but didn’t remove it since once we install our industrial hood that area won’t be visible.
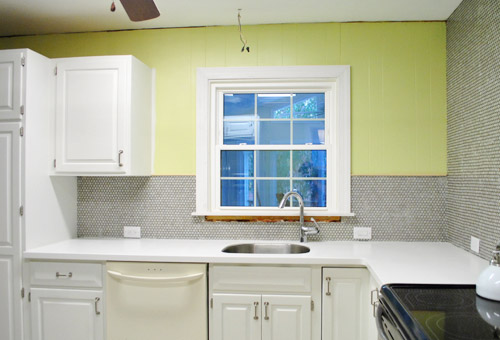
Once we add our floating shelves (which will be 12″ deep) along the oven wall, the space on either side of the window will be 14″ – so it’ll finally look balanced again! I mention this in every kitchen post because I. Can’t. Wait. For. That. Moment.
This entire backsplash process took us around 14 hours total. We tackled it mostly in 2-3 hour chunks in the evening after Clara went to bed or on weekends while she napped (so it’s a good indication of what anyone with a day job might be able to follow). That includes a few hours of figuring out how to cut the tile, which we summarized in this video for you (read a lot more on that process here).
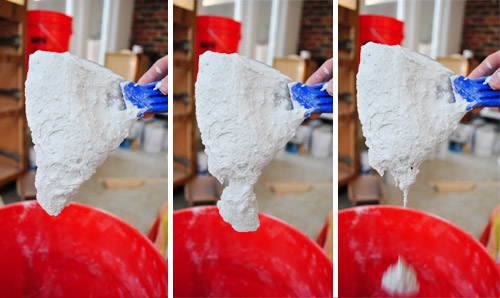
We also shared an in-progress post about prepping the room for tiling, mixing and spreading thinset, and placing the penny tiles here. So that might come in handy if you’re at that stage of the project and could use some reassuring.
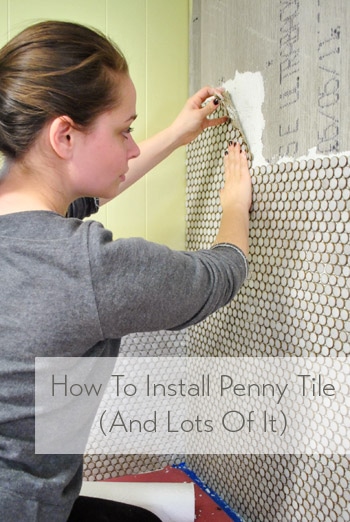
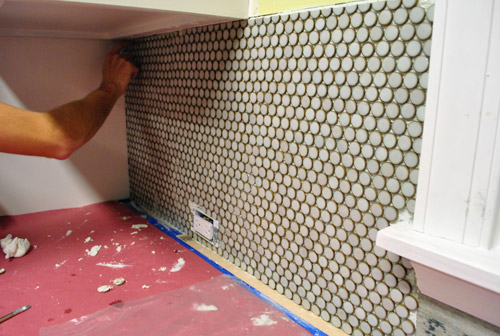
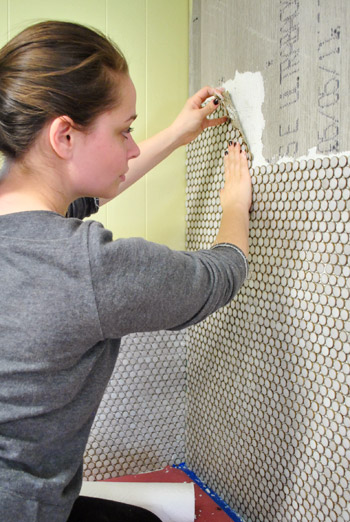
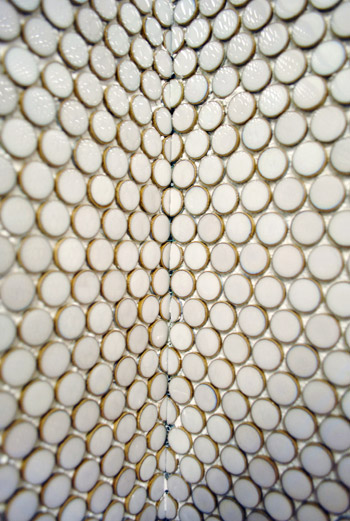
It’s really important to place penny tiles in a way that makes the line where each sheet meets less obvious, so we found that a staggered pattern was the best method for us to achieve a seamless result:

That way your eye doesn’t catch one seam and follow it all the way across the room (more on that here). We also played around with each sheet of tile after squishing them into the thinset, scooching them a bit to the left or the right or higher (since they were on a sheet of mesh it was pretty easy to manipulate them) until they looked evenly placed so the seams weren’t obvious.
Just wanted to recap that stuff for a second so anyone looking for an exhaustive post about installing penny tile would have those pics and links all in one place. Anyway, when we last left you, we were just beginning the back wall, which we knew would be tedious (but hoped wouldn’t make us rue the day that we picked penny tile). The good news: it didn’t. We made it all the way across that wall, baby! Without wanting to poke our eyes out with penny tile once (well, maybe once…).
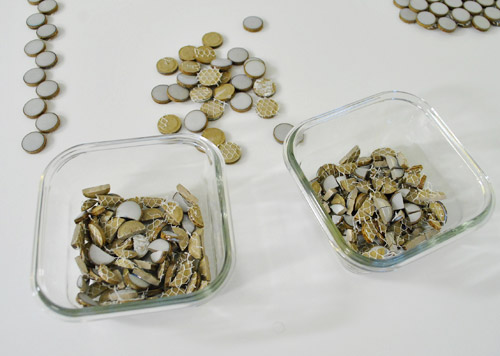
Thankfully, there weren’t many cuts since we could slap a ton of full sheets up in that giant expanse of wall, so although we took our time placing them to keep seams from showing up, we did move faster than having to cut a bunch of tiles. It probably took us three days of 2-3 hour sessions each time. We found it helpful to use little glass dishes to divide full tiles, half tiles, more than half tiles, and less than half tiles. That way if we needed to quickly back-fill an area, like the edge of the wall, with half-tiles or slivers or almost full tiles we already had a little dish of them separated out that we could dig into quickly.
Here’s a video about spreading the thinset and placing the tiles, complete with how to back-fill any tiles that you need to add and how we slid them around and adjusted them to look more seamless. Oh and in the video when I describe it as a brick-layers pattern, I create a horizontal one with my hands, but it’s really a vertical one (two tiles on top of each other and one staggered in the middle of that next to it). Oops. Hope that makes sense when you see it!
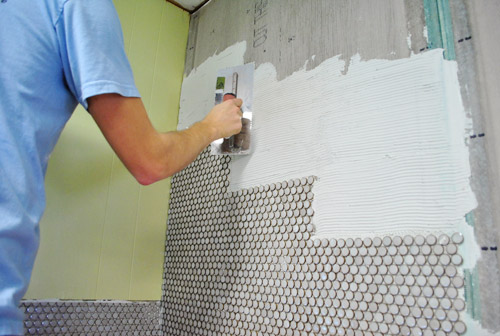
And here are some pics of us making our way across the wall. John applied the thinset with a putty knife (and sometimes a trowel). We mixed enough thinset to set about four to six tiles at a time (so it didn’t dry out before we could set the tile). You can see John applying the thinset in the video above.
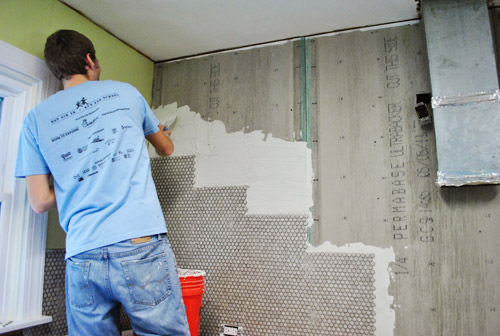
Then John scraped it with his trowel to make little ridges to help the thinset grab the tile and stick for good. Our trowel was a 3/16th notched trowel since penny tile is small, so we heard that smaller ridges were recommended (you can also see this in the video above).
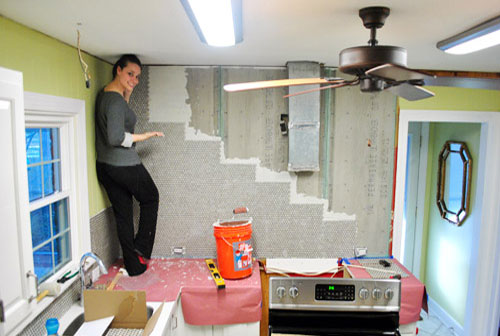
Here I am placing the top tile on the left side of the wall. John got a kick out of the fact that I could comfortably stand on the counter without having to crouch (oh the perks of Team 5’2″). You can see how we worked from the bottom left corner and went up and out to create a staggered staircase effect. This allowed us to build things slowly without having much of a problem with keeping things level since each tile interlocked down the staircase on two ends to keep it from skewing.
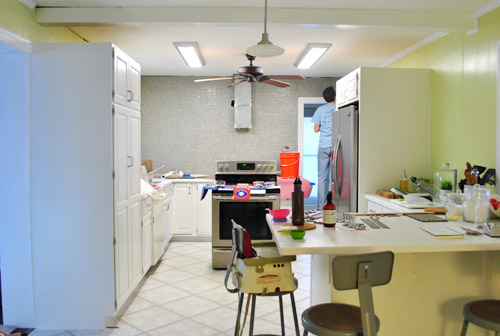
Day by day, we inched our way across…
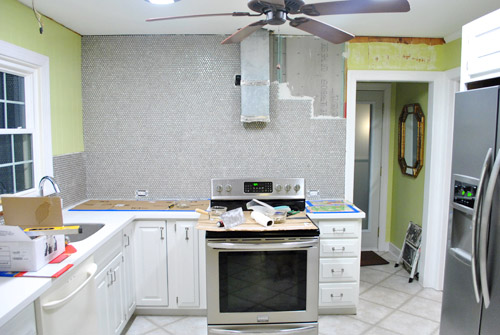
Here we are in the very last corner, finishing things up. You can see that we scooted the oven out while we were working (to gain more access to the wall and keep from getting thinset on it).
Since a few of you have asked for a shot of the corner to see how the tile meets, here ya go:
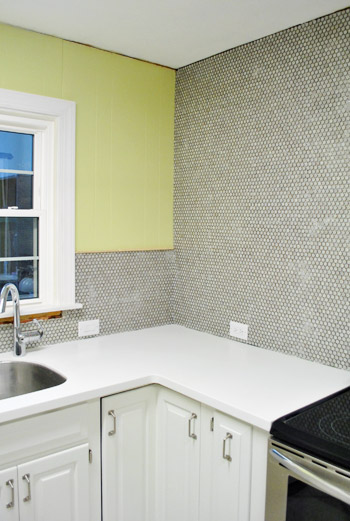
Let’s get a little closer…
Basically whatever would be placed next to the last tile on the wall where the wall ends just wraps around and gets placed on the new wall. It’s not 100% perfect but once it’s caulked/grouted we think it’ll look pretty darn good (we’ll snap another pic for you then).
Oh and some other folks asked how we’d be “capping” the 14″ of tile that will be exposed on each side of the window wall, so here’s a detail shot for ya:
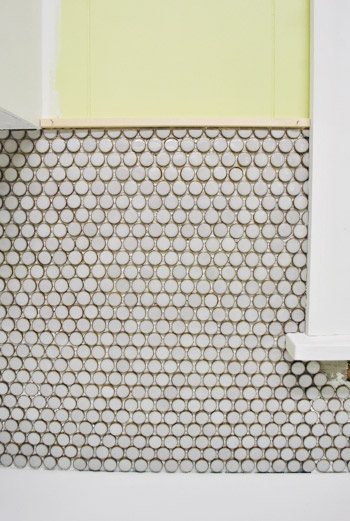
We actually got some thin glass tiles that we thought we’d like, but they just looked too brown and sort of competed with the penny tile, so we decided some thin thin thin pieces of craft wood will make great simple and clean little borders that don’t compete for attention. They’re not hammered in completely yet, since we’ll be pulling them out and painting them white like the rest of the trim in the room after grouting (just to avoid getting paint on the grout).
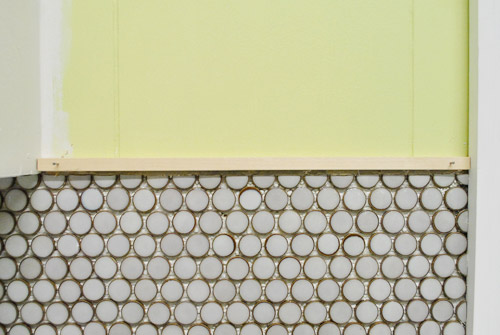
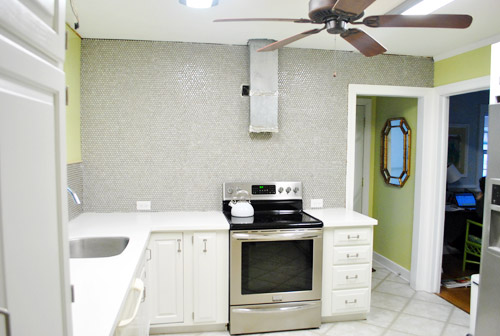
Grellow note: the picture above is probably the most true to life shot of our wall color (in some of the far shots it looks darker/greener/brighter than it is). In real life it’s a soft avocado color (although it can read quite differently on different computer monitors). Here’s a link to it on BM’s site if that helps, since the bad lighting in our kitchen hardly does it any favors. We think once we tackle the new lighting and add the open shelving and some pretty colorful accessories up there (and on the counter) it’ll all tie together really sweetly. You know we’ll share those pics as we go!
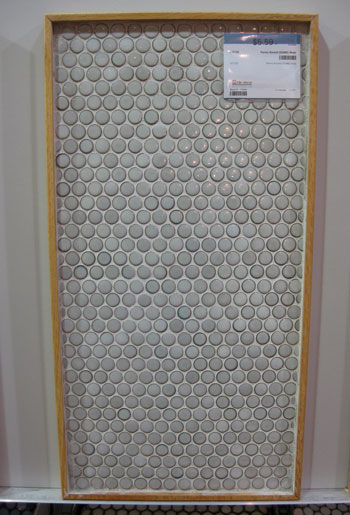
Obviously we still have to spread all that grout, but we’re giving our arms a day of rest before picking up the trowel again (well, I guess in this case it’ll be the grout float). As for the specifics, we picked a soft creamy-gray grout that’s a smidge lighter than the tile. You can see it in this sample shot snapped at the store back when we chose our tile (more on that here):
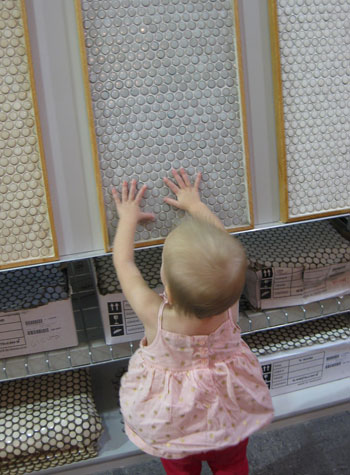
Oh and see how you can kind of see the seam in the picture above (there’s a horizontal line of grout in the middle of the photo that seems a bit thicker/bolder). That’s why scooching things around and stepping back to see how it all looks before moving onto the next tile is so important! We were sticklers about it, but we’re so glad we took the time to keep everything as evenly placed as possible.
Now we just need to grout, get new lighting (and kill that haven’t-used-it-in-13-months fan), add crown molding and some sort of decorative treatment and baseboard to the back of the peninsula, lay our cork floors, install our new dishwasher, and add shoe molding around the room. And probably some other stuff that our tile-drunk minds are forgetting. So we’ll be back with grouting progress in the next few days or so- probably on Wednesday. We’re hoping we can knock it out pretty quickly, but you never know until you’re knee deep in grout… we’ll keep you posted!
What did you guys do this weekend? Do you all have off today in honor of MLK?
Psst- Oh yes there is a Clara vs. Santa wrestling match going on over on Young House Life…

Tae says
the tile looks great! can’t wait to see the floating shelves, and cork floors, and all the rest. Just wondering, though, are you guys completely sold on the yellow/green paint color in the rest of the kitchen? Maybe it’s just hard for me to see the big picture while it’s still in progress..
YoungHouseLove says
Oh yes, in person it’s a soft avocado color. Looks so pretty with the gray and white! Depending on your monitor it can show up brighter or more lime though!
xo,
s
Louise says
I cannot believe how great your kitchen is coming along! I need to send you guys pics of our kitchen…wood panels chipping away, gross stained tile grout counters, 30 yr. old appliances…need I go on?! yuck!! haha…my friend is trying to convince me to paint our cabinets, she even offered to help!…and I just might do so, looking at your cabinets! Love the progress!
Louise Edu
Shelley says
LOVE the texture this adds!! Looks fantastic!
Kate says
Looks great!! Can’t wait to see the finished product. I spent the weekend demolishing my mom’s bathroom with a few siblings. Needless to say, I am better at destruction than construction thus far. And, as I kind of anticipated (but didn’t want to believe) the project is going to take twice as long and cost twice as much. It already looks better in it’s tile and spongepaint-less state than it did before. Took your advice on the deglosser…that stuff is no joke, but totally necessary for bathroom cabinets with years and layers worth of hairspray-funk!
YoungHouseLove says
Aw, so glad! Congrats on all that demo!
xo,
s
Rachel H. says
The tile looks fantastic!!!
Now, onto something completely off-topic…What do you think about this chromatic typewriter? Sherry, I know you have an art background. I’d love to know what you think! Thanks.
http://tyreecallahan.blogspot.com/2011/12/introducing-chromatic-typewriter-2012.html
YoungHouseLove says
Um, that’s one of the coolest things I’ve ever seen! Ever!
xo,
s
Rachel H. says
Me too!!! Some other art teachers I know who are painters are not sure what to think of it, but I think it’s such a neat concept.
Shelley @ Green Eggs and Hamlet says
My fiance and I installed a new kitchen faucet and we LOVE it. The old one was small, chrome, outdated, and corroded and the new one is large and in charge, ORB, and includes a sprayer (which I love for washing dishes!). Fiance also installed a curtain rod in the family room but now we’re struggling to find curtains to go with our new gray couches.
Anyway, yay for productive weekends!
YoungHouseLove says
Wahoo! Congrats on the weekend updates!
xo,
s
Marianne says
I envy your bravery! You just go for it, and it looks fabulous. I paralyze my creative side out of fear…especially with big projects. You guys give me inspiration and hope!
Sara says
I wanted to know what the shelves are called that were above your dinning table in your first house. I know they are from Ikea, but would love to get the name of them. Thanks!
YoungHouseLove says
I think they’re the 72″ lack shelves in white.
xo,
s
Shannon @ Bungalow960 says
Holy cow it looks awesome!
Wom-mom Ethne says
Looking great! Be sure you tell us: which is worse, grouting or thinset?
YoungHouseLove says
Will do!
xo,
s
Sally says
It looks so beautiful. Really awesome.
I was thinking I would’ve gone with a brighter color for the tile, but seeing it actually done, I think the color of the penny tiles is perfect.
Will you be weirded out if there’s a rise in grellow-kitchens with gray tiles across the country?
YoungHouseLove says
Haha, I think that would be awesome actually! The more the merrier!
xo,
s
Brandi says
It looks amazing!! Can’t wait to see those shelves put up on the wall :)
Paige says
Woo hoo! A big round of applause for you guys!
Jana says
It looks great!! At 18 I worked for a summer installing tile with my uncles best friend. I was so glad to learn those skills and I applaud you for your incredible attention to detail and professional results!! :)
Marie G says
I love how it turned out! Nicely done.
By the way, I love how your cabinets turned out. I’ll be revisiting your post about painting them. I’m disappointed with how our painted cabinets turned out and would like to eventually re-paint them. :P Sadly we hired someone to paint them for us, so it seems like a waste. Nothing like doing it yourself.
jodie okun says
it looks amazing! cant wait to see the rest! thanks for always sharing everything including how tos:)
Sabrina says
Looks great! Quick everyone take a drink everytime John/Sherry say penny tile! ahh college memories…….
Meaghan says
Looks awesome! The link to the post about picking out the tile doesn’t work for me. Where can I find it?
YoungHouseLove says
Oops, here ya go: https://www.younghouselove.com/2011/10/lucky-penny/
xo,
s
Original_Ann says
Oh my gosh you two! This looks soo beautiful and I have this incredible craving to rub my hands all over it. Extra-nicey! :)
jen says
wasn’t sure that I liked the tile at first, but now that it’s on the wall it looks FAB!
this weekend at our house we started a banquet bench for in our dining nook of the kitchen. we are constructing it out of old pews to honor the fact that our house was once a church!
YoungHouseLove says
That’s amazing! Would love to see pics!
xo,
s
alex says
This most definitely calls for the Elaine from Seinfeld dance. I would have fist pumped (gently and limply) through the house in celebration of tile completion. And im also loving the “avocado” walls now.
YoungHouseLove says
Haha, you know that happened, right?
xo,
s
Sarah@grownupnow says
I love the way it turned out, but it definitely looks like quite the ambitious project. I can’t wait to have my own house so I can try out some of these cool projects too!
Misty says
I think I might be marveling more at the fact that you have painted nails in some of the pics. I’m not sure why that baffles me so much..
YoungHouseLove says
Haha- I just do them myself so I don’t pay for them only to ruin them. And ruin them I do! Haha.
xo,
s
emily @ the happy home says
my favorite thing about YHL is the fact that you repeatedly mention how long you’ve been in your house. it’s so comforting to be reminded that you’ve been there for OVER A YEAR and are just starting to add finishing touches to your kitchen. my fiance and i are just starting to plan to buy our first house in LA, and since we’re on a budget, our property options are really, uh, rough. it’s nice to be reminded that once we blow half a million on a house, there shouldn’t be a lot of pressure to re-do the place in 2 months. and also: you’re making me lust after penny tile.
YoungHouseLove says
Oh yes, take your sweet time! We learned in our first house that putting that sort of crazy pressure on yourself is no good! Take your time and let things evolve slowly- you’ll like them best that way anyway!
xo,
s
Hil says
It looks beautiful, guys!!
One question- do you think you will regret not taking down the paneling? The whole aesthetic is so clean and contemporary now….will the paneling feel like a throwback? Just curious…I know you specifically chose to keep it. Any regrets now that it’s all coming together?
YoungHouseLove says
We actually like painted paneling! It’s just subtle vertical texture to us so it doesn’t feel dated to us. We painted the paneling in our last house’s den and it was one of our favorite rooms ever- made even cozier by painted paneling and brick than flat drywalled walls. We’re weird, right? Haha.
xo,
s
Christine says
Are you planning on sticking with a stainless steel hood vent? I guess I would be worried about all the grey on grey.
Oh, and I’m in the middle of a master-bedroom redecoration. Bought new curtains yesterday…on clearance even! Woot. I also saw a white ceramic moose (I live in Alaska) and thought of you. :)
YoungHouseLove says
We’re actually debating a white wooden hood cover! More details to come when we pit it down!
xo,
s
Kim @ Yellow Brick Home says
Eek! It’s so, so beautiful!
We spent the weekend putting together (and hacking) Ikea pieces:
http://www.yellowbrickhome.com/2012/01/16/the-weeks-end-6/
On a random note, you mentioned the crown molding you took down. We’re working on that for our studio, and my GOODNESS it’s so much harder than we thought! I searched your archives, but do you have an easy to follow tutorial on how you do it/make your cuts?
YoungHouseLove says
We don’t have a post about it (yet, haha) but we just use a miter saw to make those cuts. Ours has settings that make it pretty easy and reliable, but I think a miter box and saw would be really hard!
xo,
s
Heather S. says
Have you guys ever done crown molding? I remember at your last house you hired someone to do it all for you. My cousin did mine and a miter box is definitely not the way to go since my corners were not 45 deg. as you would hope. The miter box only allows a few angles while a miter saw lets you cut much more precise cuts.
I remember that John got you a tea kettle for a gift a year or two ago and it was blue. I’m loving your new white one in the pics above since it is exactly what I’m looking for (the ones I keep finding have black handles and I want silver) – do you know what brand it is or where you got it?
YoungHouseLove says
That was from HomeGoods! As for crown, we haven’t done it yet but have plans to in many of the bedrooms so we’ll blog all about it! When we do baseboard and window trim and other 45% angle stuff we use our miter saw which is awesomely accurate (although not as inexpensive as a miter box). Hope it helps!
xo,
s
Heather S. says
Never mind – I just read further in the comments and saw that it was on clearance at TJMaxx. :)
Courtney says
It looks fantastic! Great job guys – I really can’t wait to see the rest of the finishing touches.
We went to Lowe’s for some paint testers for our master bedroom this weekend. Colour matched BM’s Marine Blue and Behr’s Observatory to Valspar paint (testers were on sale for $0.98!!!) and now we have to pick. DH likes the Observatory and I like Marine Blue so it might be a death match. Oh, and a great tip the lady at Lowe’s gave me – instead of painting the testers on foam board, we bought a 2×2 section of drywall. That way when we are done, we can prime over and reuse it. She said she has used the same piece of drywall for 10 years doing it that way.
I wish I had today off – no Martin Luther King day here in Canada – it’s -35 Celsius here with wind chill!
YoungHouseLove says
Wow- that’s such a great tip! Stay warm!
xo,
s
Draya says
I love the tile. It looks great. And it goes so nice with the white cabinets and new appliances…but I have to say I really dont care much for the wall color now. I thought it might work when you showed your ideas early on, but the tile just doesn’t work with the paint color for me. It’s just my opinion and I think you guys did a great job all together. As long as you love it, that’s all that matters.
I do have a question, looking at it all together now, do you still think that is the #1 very best paint color…or have you wondered if going with another color would be better?
YoungHouseLove says
The wall color just reads differently on different monitors! In person it’s a soft avocado color so it looks great with white and gray! It also ties into the living room and dining room and will look so great when we get open shelves up with some pops of color up there (and on the counter). So yes, we haven’t thought of any color we’d like more so it’s still our favorite! Haha.
xo,
s
Cole says
I love the look. Are you guys going to put the tile backsplash to the right of the fridge? if not, are you planning anything else to go there?
YoungHouseLove says
We actually have used that space without backsplash to cook a ton and decided the semi-gloss paint is easy to wipe down and they caulked the top of the counters where they meet the wall so we’re all set without it! We worried it would look odd intersecting the half-wall opening so it’s cleaner without it!
xo,
s
Sayward says
I’ve peeled my eyes away from your delicious tile long enough for some random girlie fashion chit chat. What kind of nail polish are you wearing in these pictures? I’m in love with those deep brown-black shades. I wear Revlon’s “hot for chocolate” but it starts chipping off (badly) about 10 minutes after I put it on. I’ve been on a mission to find a more durable, low maintenance version of the same color that won’t give me buyer’s remorse.
YoungHouseLove says
Oh man, mine was super chipped and crazy by the end of this, but it’s by Zoya (called Nina) – I love their stuff because it’s eco but can only find it at random smaller boutiques or online.
xo,
s
Sherry says
Niiiice!!
Also, I’m glad I’m not there because I’d totally embarrass myself with all the pat, pat, patting.
YoungHouseLove says
Haha, you’d be in good company! We do that every hour or so. Haha.
xo,
s
candace says
John and Sherry! Gah, your work is so beautiful!!! I am so thankful for your tutorials too, they really are awesome and thorough. Great job, your kitchen is going to be an amazingly decadent space!!!
Lauren Spekkers says
It looks amazing!! Oh my goodness, I love it. Is it so wrong to wrap a master bedroom in penny tile? Heck, why not a dining room feature wall? Lol, just kidding! I can’t wait to see how the kitchen turns out, it will definitely be magazine worthy!
And on a total side note – where is your white kettle from? Please don’t say Target, Canadians won’t be seeing Targets pop up until 2013.
YoungHouseLove says
It’s actually from TJ Maxx on clearance. I think you guys have that up there called something different but similar!
xo,
s
Melissa says
Looks awesome guys!! Way to go! I hope it comes out exactly as you pictured!!
LARY says
Looks AMAZING! :)
Chantelle says
Aw, man. This is really coming together now guys – looks absolutely amazing. You have fantastic vision… It’s hard to believe it’s the same kitchen as when you first started! Am getting super excited to see the finished result! :-)
Mary says
Looks great!
I’m curious if you decided on an industrial type hood because you like the look? I like the look but they’re so dang expensive and I rarely even use a hood so I feel like the only sensible thing for me is to do a hood/micro. Boring but cheap and space-saving.
YoungHouseLove says
We had one in our last house that was $250 (about the cost of an over-the-range micro in stainless) so we were happy to go that route! The maker was Arietta from Home Depot if that helps. This time we’re actually stalking Facebook and places like the ReStore to see if one pops up. Sometimes people get them in the wrong size or something and relist/resell them!
xo
s
Mary says
Cool, thanks! The Arietta’s on hd’s site seem to start at $370 now. I need that space for a microwave anyway, though.
April Anderson says
Just figured it out that my monitor is way off on showing a truthful colour. I was sitting here with my BM paint swatches and using their on-line samples and wow, big difference! Funny too that the main colour I was leaning towards turn out to be the same as yours — sesame! I love love love that colour!!! Gray, green, dark chocolate and white are all my favorite colours so of course, I love all the colours in your house:) Thanks for the inspiration!!!
YoungHouseLove says
Haha! See! I think people don’t believe me! They think we painted our walls lime green! When you see it it’s super soft. Much closer to the lightest square on the swatch than the darkest one!
xo,
s
aislin says
it looks so great! you two are a wee bit crazy [or perhaps just a wee bit more crazy haha] for doing it all by yourself, but gosh it looks amazing!
cheers!
Sharee A says
You brave souls. It looks fantastic! You guys are an awesome team.
Pam the Goatherd says
You did such a great job on that tile! My arms ache just reading about it!!!
Amy @ Lovely Nest says
You guys! It looks so good and I can only imagine it will look even better with the finishing touches! Tiling is one of those jobs that seems a little intimidating, but you make it seem like something I really could do!
rivka says
Oh boy! What a project with those penny tiles! You did a beautiful job! A question…..I may have missed it, but will you be putting in new overhead lighting? (please say yes (:)
YoungHouseLove says
Oh yes! That’s at the bottom of this post among our long list of still-to-do things! Haha.
xo,
s
Kim W Rily says
Has anyone mentioned that the penny tile looks like the background on your webstite on the sides here?
YoungHouseLove says
Haha- so funny!
xo,
s
Rebecca says
I spy a new Clara monthly photo but no new photoshoot post….soon?
Not like you’re busy with other stuff or anything ;)
YoungHouseLove says
We actually didn’t get many shots this time (no good outtakes to share) so we just put up the “winner” and posted about Santa balloon! Haha.
xo,
s
Anne G. says
It’s going to look amazing when it’s all done! We are thinking about penny tile for our bathroom, so this gives us a good idea of what might be involved! BTW, I have started sharing your blog with my husband to show him how to do different projects and now for EVERY project he is asking if your blog has the answer he is looking for. Pretty soon he’s going to be reading it every day, right along with me!
We are currently prepping our oak cabinets for painting and spent the weekend sanding and deglossing. We couldn’t find the deglosser brand you recommended (we live in Alaska and we can’t always find everything you guys have down there), so we tried a different low VOC product. Some of our cabinets have TONS of grease (from the previous owner of 20 years apparently NEVER wiping her cabinets — yikes!) and the deglosser definitely helped, but didn’t get everything up. So, we are going to have to go over some of them again, either with a different deglosser, or a stronger concentration. :( I just want to start priming and painting, but I know how important it is to prep the surface so the paint will stick (thanks in part to you guys and your thorough posts on your own experience with cabinet painting).
YoungHouseLove says
Oh yes, all that prep stinks but it’ll be so worth it in the end!
xo,
s
Allison says
The wall looks great!!! However since I’m a huge tea drinker, I can’t lie – my eyes went to that new kettle right away! Did you switch from the blue one to white because of the new color scheme?
YoungHouseLove says
Haha, I couldn’t resist the white one (you know I love white ceramic things!) when we saw it on clearance at TJ Maxx!
xo,
s
Kristen says
The tile looks awesome!! I can’t imagine the patience it took. Well done!
Elisabeth says
This looks great! The penny tile photographs cream in the close-up shots but a muted grey in the full room shots. I know cameras can do tricky things with color so what shade is this in person?
YoungHouseLove says
It’s a very soft gray- sort of like the tone of carrera marble.
xo,
s