Sherry is officially half-done with Clara’s canopy wall update, so thanks so much to all 900+ of you who commented with votes and additional suggestions! We shared tons of photoshopped images with Clara and she decided we should combine a few ideas, and well, the kid’s a genius and we can’t wait to share the photos. We might just let her decide what we should do in every room.
But I, ever the party pooper, was determined to check a certain project off of my list that was over a month old before Sherry got to work on that wall: adding chunky double-wide crown molding in there.
So yes, feel free to boo me because I cut the line and knocked it out before Sherry could say “what about my canopy project?!” – which explains why she’s only half-done right now. But she woke up early yesterday to get things moving, and just needs to check off a few more things before she can shoot it and share it – hopefully by Monday).
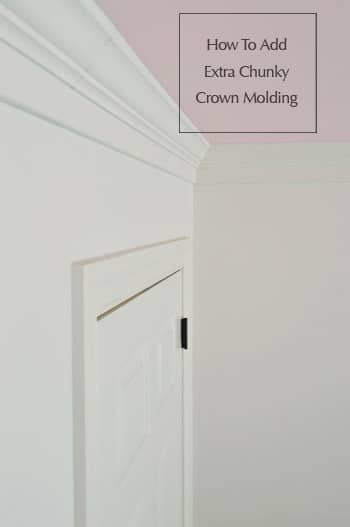
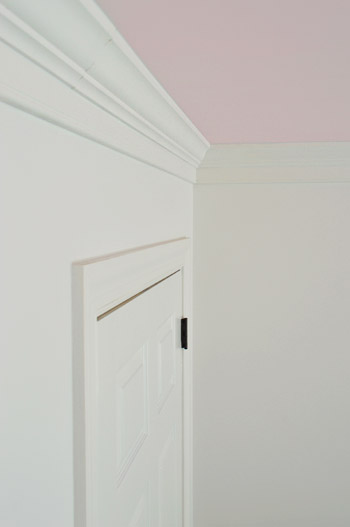
Back to me and my chunky crown. Around a month and a half ago when we painted her walls and ceiling, we didn’t bother to cut in where the white walls meet the pink ceiling so a thin yellowed line of paint remained. Why? Because I planned to install crown molding right afterwards. Soft emphasis on “right afterwards.”

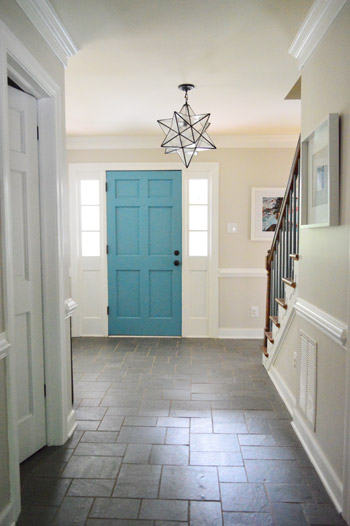
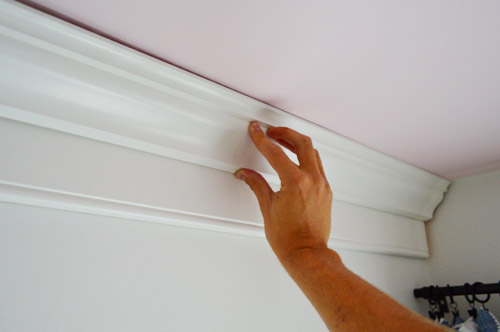
We’ve posted about installing basic crown before (both in photographic and video form) but I wanted to upgrade things this time and beef this crown up bigtime. One, because I had mastered the basic kind first (doing this right off the bat sounded scary, but now that I’ve done a bunch of crown it sounded like a fun challenge), and two, because this house sports beefier crown in many of the rooms that have it, including our dining room, living room, bedroom, office, and foyer – so we wanted the new crown to match the original crown. To give it more presence, the builder appeared to have installed a piece of baseboard before adding the crown on top. See how much thicker it looks?
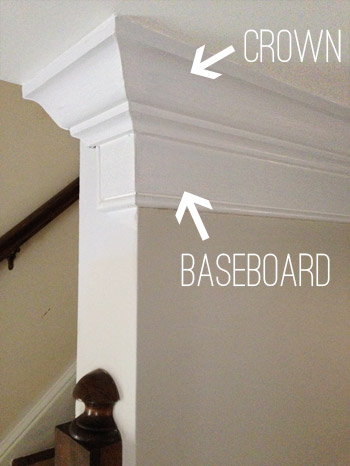
From further away it doesn’t look weirdly baseboard-ish or too thick or anything, it actually seems nicely proportionate with other woodworky details in this house (like the chair rail in some of the rooms, the paneled doors, and the window mullions).
So I purchased baseboard that was 3.25″ tall, which just meant I’d have to float it away from the ceiling a bit to achieve the look we wanted (I could’ve bought wider stuff but I would’ve just been paying for wood you’d never see). So I cut some spacers to help me to keep it a consistent distance from the ceiling all around the room and nailed that in with my nail gun (more on the one we have here). I was sure to use a level to double-check my placement too, since ceilings aren’t always straight and relying on spacers alone could produce some wavy results. Oh and I used a stud finder and a pencil to mark my studs with a dot on the wall lightly below where I’d be nailing them in so I knew where to drive those nails in to be sure I hit a stud for a nice strong hold.
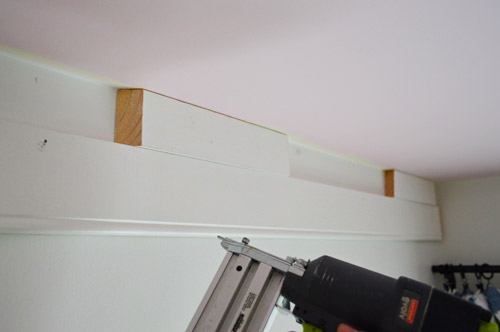
With my first piece of baseboard nailed up, I held up some crown to make sure we liked the look. Up close the baseboard part looked a little thick, so we walked into the other rooms to be sure that’s how it looked in there and to be sure we liked it. Sure enough, we loved the finish look, so we pressed on.
Getting all of the baseboard installed around the room went pretty quickly. It only required some simple 45° miter cuts in each corner, along with some 45° scarf joints where my boards weren’t long enough to span an entire wall. So it was a nice warm up to the more complex calculations and cutting that were to come with the actual crown.
I relied on my Kreg Crown Pro again to help me make accurate cuts for the crown (here’s an affiliate link to the one we purchased). You can read a more about how to make those precise cuts in this post (or watch the video in this one). But the gist is that this Kreg tool (which I bought myself – we have no affiliation with them) helps you hold your board at the right angle on your miter saw. Since crown sits against your ceiling at an angle, it helps to cut on that same angle to get precise cuts so things match up nicely in the corners.

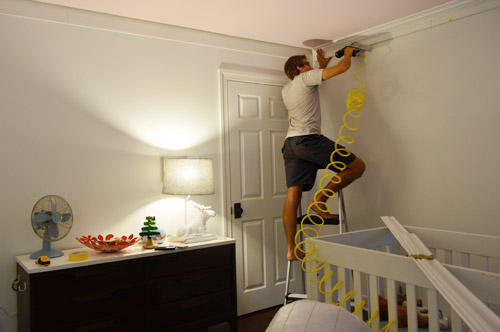
This part definitely took me longer and, thanks to a mid-day meeting, it wasn’t until later in the evening that I finally got all of the crown hung.
The next day it was time to caulk the seams to make the whole job look more finished. In addition to my corners and scarf joints, I also caulked where the baseboard meets the wall, where the crown meets the ceiling and where the baseboard meets the crown. That last step was especially helpful in making our base + crown combo appear more like one chunkier piece of molding instead of two pieces hung on top of each other.
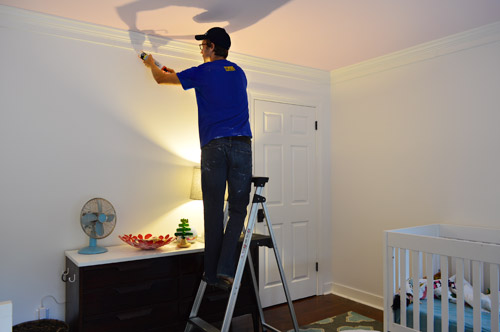
Then we got our touch-up paint on. After you caulk nail holes and gaps you always want to paint again to seal all of that in and get a nice glossy and uniform look (caulk can read as more matte and can even collect dust while the glossier part deflects it so it’s well worth a coat to cover that up).
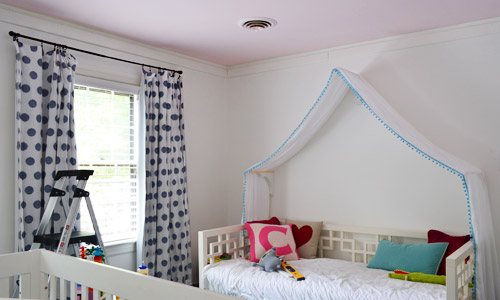
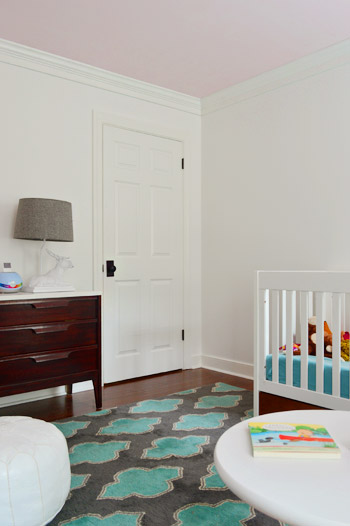
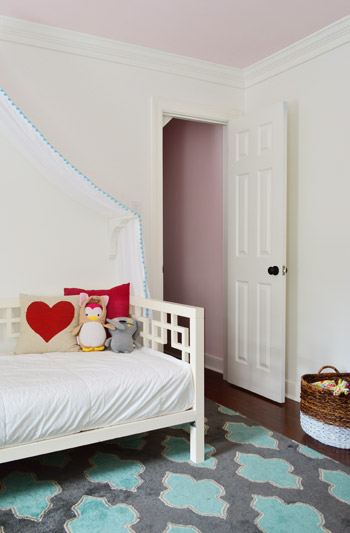
Here’s a detail of the finished job. We’re really happy with it! We thought we might not love it as much in a room with white walls (since it pops more easily when there’s color on the walls) but we actually really love the architecture it adds to the space. Sort of like how we find ourselves oohing and ahhing over those cool old buildings with white walls and thick crown that draws your eye up to the old tin ceilings… it’s not exactly like that in here (we wish!) but the pink ceiling is a fun focal point and the crown is like a big ol’ arrow pointing at it, which we really like.
It definitely makes the room look more polished – so even though it wasn’t the most fun or dramatically transformative project, it feels good to have it checked off my list. As for Clara’s reaction, she likes the “wood things we hung up there” but Sherry’s probably the most excited because she now has free rein in there. And things are HAPPENING on that canopy wall, let me just tell you.
Oh and in the money department, the total cost for the project was $76 worth of crown and $61 worth of baseboard for a total of $137. The boards came pre-primed and we used some of the Simply White semi-gloss paint that we stocked up on back when painting the rest of the trim upstairs, but adding $25 to that amount should cover a quart of paint plus caulk if you don’t have those on hand. Rather than paint after it was hung this time, I had the foresight to spray it way back in early September when I was set up to spray the planks for our sunroom ceiling. See, I told you this had been on my list for a while. Just don’t ask me how long I walked by that freshly sprayed trim sitting there mocking me in the garage.
Only bad news is that now I’m jonesing to put more beefed up crown around the rest of the rooms upstairs. Our bedroom was the only room to already have it, so that means I have two bedrooms, two bathrooms, and a loooooong hallway with weird angles to do. Oddly enough, I’m excited about it. But maybe that’s just my affection for nail guns and miter saws talking.

Sarah In Illinois says
We are going to tackle crown molding above our kitchen cabinets. However, I am scared to death of doing stained wood without the option of caulk to cover any miscalculations! Definitely need that jig!
YoungHouseLove says
Now that’s varsity! Would love to see photos. I bet it’ll be gorgeous!
xo
s
Kristen says
Wow, that looks gorgeous! John – when I have a house someday, you can come put up beefed up crowned molding in all the rooms since you enjoy doing it so much ;) haha. Also, something I’m curious about – since this blog is your business, do you get to write off any projects for your taxes? If so – that must be very helpful! :) I can’t imagine how quickly the costs of all these projects add up!
YoungHouseLove says
Nah, we don’t get to write off any of our projects. Since this is our primary residence it wouldn’t fly, and if we claimed it as a place of business we would owe the goverment a chunk of it if/when we sell. We do get to write off office supplies and hosting fees and stuff like that though!
xo
s
Dustin says
Any issues nailing the trim and crown to the exterior wall(s)? I would assume those walls are just plaster over brick and wouldn’t have much for the nails to bite into. I’ve been thinking about this issue for our own place, so i’m curious if that was an issue or not.
Thanks!
YoungHouseLove says
We have never had that issue, even in our first house (which was from the 50s and had all plaster walls). I think they’re thicker than you think so the nails hold just fine! And in this house the walls are drywall, and still hold nicely!
xo
s
Heather says
I love the one shot of the corner where you can really see the pink ceiling pop! I am going to have to file that idea away for a nursery someday!
Christy Niebaum says
Love it. Really makes the ceiling color pop more.
Shanna says
Loving the fancy crown!!! What is your take on installing crown in a room that has board and batten on the walls? We just installed B&B in our nursery (thanks for your tutorial btw!!) and were originally planning on crown, but now I’m not so sure. The B&B is chunky with clean lines and I wonder if crown would compete with that feel.
YoungHouseLove says
I bet it would be so pretty! We had B&B in our second house’s hallway with crown and we loved it!
xo
s
Mary Cole says
I love the crown!!! What great inspiration for us, and for everyone! Makes it look pretty darn easy as well. I love the pink ceiling, *people don’t hate me for this I LOVE this blog”, but the room seems so SO white, the bedding, the walls, the furniture.. It would look so cute with more color!
YoungHouseLove says
Oh yes, I’m with you! It’s blindingly white! The canopy wall is actually in the middle of getting a BIG SLAP of color! And the other walls need some art too. I have been so inspired by white-walled rooms with colorful art and fabrics and rugs, so that’s where we’re headed in here!
xo
s
Monica M. says
Hi John and Sherry,
Love the new crown molding in Clara’s room! I didn’t realize that her room had both her big girl bed and a crib. I think that’s the first time I’ve seen the crib in that room (unless I missed it before). Anyway, just curious if Clara still sleeps in the crib or if she sleeps in her big girl bed?? (Or both, or maybe one or the other for naps vs. sleep through the night)? If she’s in the big girl bed, when did you know when she was ready?
We are expecting baby #2 and are trying to figure out if we should bring in a big boy bed for our little guy who is 19 months now but will be nearly 2 years old when baby #2 is born.
YoungHouseLove says
She’s sort of half and half, so not fully transitioned but we’re confident she’ll do it by the time #2 is here, so that’s nice! We are just following her lead since the doc says if she’s a good sleeper you shouldn’t mess with that- haha!
xo
s
LC says
The pictures early on in this post don’t do it justice. As I was reading, I thought, “Man, that’s a lot of work for white-on-white that you’ll barely be able to see.” But the second to last picture really nails it — with that doorknob and wood flooring, it reminds me of one of those classy historic houses but with a modern color palette. The room just oozes architectural appeal. Consider me converted!
YoungHouseLove says
Aw thanks LC!
xo
s
LaineyR says
Hello, first time commenter from the UK here. I LOVE your blog. Your post goes up while I’m picking my children up from school and when we get home the cartoons go on and I sneak up to my study with a cup of tea and a scrummy treat to have while I read it and NO ONE is allowed to disturb me until I’ve finished! It’s my favourite time of the day for sure – so thank you so much! Anyway, talking of nail guns and crown pros – would you consider doing a post of DIY-related Christmas presents? My husband is currently stocking up his new workshop and some shiny new toys would be very well received I think but I don’t really know what to choose. What are your best/most useful buys that are maybe not the most obvious purchases? Just an idea!
YoungHouseLove says
Oh Lainey I love you. The use of scrummy treat made my entire day. Seriously. And as for DIY-related Christmas presents, that would be such a fun post! John has tools he loves like crazy, so we could do a roundup of those for ya I bet!
xo
s
Emily says
I second this idea! I would love some ideas for “must-have” tools for a beginner. Do you think a nail gun and a Kreg jig for Christmas would be too much of a hint to hubby about what I’d like him to do ;)
YoungHouseLove says
Haha, I love it! I ran the idea by John and he’s all for it!
xo
s
Lindsey says
Love the dimension that the crown has added to the room! It really makes the pink ceiling pop!
John says
As an architect we do this crown detail all the time. The other option is to use a smaller trim piece and hold it down 4 to 6 inches from the crown and paint the drywall white in between to appear as part of the crown.
YoungHouseLove says
Love the tip John!
xo
s
Marta says
I love the look, I am leery of trying crown molding in rooms where I know wall & ceilings aren’t square or level. I should probably bite the bullet. Thanks for the inspiration.
Amy @ Elephant Eats says
It’s hard to tell from the pic, but does the crown actually rest on top of the base molding vertically, or sit in front of it. Sorry, can’t think of a better way to explain that so i hope you understand what I mean! thanks :)
YoungHouseLove says
Such a good question! Sorry not to clarify that! It sits in front of it, so the crown is offset forward by resting on the baseboard. That makes it nice and chunky!
xo
s
Monica M. says
That’s a great point about not messing with the sleep (totally agree!). I think hubby just dreads buying another crib — lol!
YoungHouseLove says
Oh man, I hope it all works out! Kiddos can amaze you that way, so I bet it will all come together!
xo
s
Hillary says
While looking at one of the Pinterest links you pinned, I stumbled on this:
http://www.pinterest.com/pin/184858759678148341/
Love it and love you guys!
YoungHouseLove says
Ahhhhh! That’s so crazy to see. Makes my little heart leap in my chest. Haha!
xo
s
deb says
you guys are so inspiring. I like that idea, But…I may have to do the cheater crown moulding. I have curtain rods hung 3 ” from the top of our 9′ ceilings. that may be interesting when I finally go to do crown around the house.
First thing first, I have to get a miter saw. :0P I am going to look up the Kreg crown Pro and see how that works!
Deb
YoungHouseLove says
I think if your rods are 3″ away from the ceiling you could probably just install crown right over those holes to completely cover them and rehang a bit lower if you don’t want to mess with caulking them! Haha!
xo
s
Emily says
This is off topic and I don’t remember if you covered this when you installed the floors, but how do you like hardwood in Clara’s bedroom? I’ve always thought I’d want carpet in kids rooms so they have a soft place to play, but we found hardwood underneath the nasty carpet we have now. Now I’m torn… What’s your take on that?
YoungHouseLove says
We are hardcore fans of hardwood floors. They’re so easy to take care of with a dog and a kid, and by using areas rugs we can provide softness without worrying about something more permanent (we had light colored wall to wall carpeting in an apartment of ours and it always felt like we might stain it somehow – it was somehow more high stress than an area rug and an easy-wipe hardwood floor). We have heard from many people who love wall to wall carpeting in bedrooms though, so it’s definitely a personal preference thing.
xo
s
Linda says
Save your money next time and don’t buy baseboard… Buy 1/2 round instead. Place the half round where you want it on the wall, and crown above it, with a space between. Paint the wall in between to match the crown. Instant thick crown look at a fraction of the price. And you can ale that space as big as you want, although it should still look proportional to the crown you choose.
YoungHouseLove says
Thanks for the tip Linda! We’ve seen that on Pinterest but always wondered how it looked in real life (and if our our eyes would pick up on the indented just-painted part that isn’t sticking out like the rest of the more solid molding in our house). Since our ceilings aren’t extra high or anything, we worry tall folks like John would be close enough to it to see the quarter-round bumping out with the flat part above it – but we’ll have to see it in person somewhere (or try it out on one wall to see what we think)!
xo
s
Kelly says
Have you/will you put crown molding in your upstairs hallway? I’m staring at our blank canvas of a hallway that we are starting to redo, and can’t decide if I have ever seen it done in a hallway…or would that be too much if we do a board and batten or wainscoting wall?
YoungHouseLove says
Oh yeah, we have plans to do that area and can’t wait! We did board and batten and crown in our last house’s hallway and words can’t describe how much of an upgrade it was in a boring and windowless space!
xo
s
Dominique Paolini says
Putting crown molding up in my dining room has been on the to-do list for awhile. I’d also love to add some in the master, but we have a small weird angled portion of or ceiling (where the stairs are) and since I’ve never done it, I feel like the dining room should come first. With slanted (up to probably 18 ft) ceilings and weird nooks in our living room, I’d need an expert opinion on where to even put crown in the living room. Looks great!
Jamie says
I absolutely love her room, a little girls dream come true! Where did you get her bed and darling blue polka a dot curtains?
YoungHouseLove says
Thanks Jamie! Those were from Ikea a while back but maybe try Ikea?
xo
s
Rachael says
Hi! We are thinking of installing crown and I was wondering if you could give a few more details on your installation. Did you nail the upper part of the crown to studs in the ceiling or could you just nail it into the drywall? Did you guys use any adhesive on the back/edges of the crown? Thanks!
YoungHouseLove says
We nailed into the ceiling and into the baseboard/drywall (both places secures it better for the long haul). We didn’t use any wood glue between the baseboard and crown, but that never hurts when you’re nail-gunning so it would be a great added-insurance step. We didn’t use that in our second house or first house and the crown stayed put though.
xo
s
Jane says
WOW! Love the chunkier version more. Dont think I can look at the skinner verisons anymore.
Sherry -I have an organizing question about clothes and laundry. How do you handle your clothes that you have worn during the day ? Do you promptly hang them back if you are gonna wear it again ? What about worn jeans ? Do you hang them/fold them ? I am struggling with this in our house. Granted , we have a horrible closet situation with just one hanging rod. I usually change in pajamas when I get home and lay my clothes on the bed to air out and then right before i hit the bed , i dump it somewhere instead of neatly putting it away! I want to know how others handle this. Also what about folded laundry ? Do you put them away in their respective places immediately or do you save a pile to iron ? I would love some suggestions!
YoungHouseLove says
I have one of those chairs in the bedroom that gets covered in clothes (the ones I’ll rewear, like pjs and jeans or shirts that didn’t get dirty since I wore them half the day or something). I wish I would just hang them back up or put them away since the chair quickly gets covered and it’s chaos. Anyone else have tips on this! I spend fifteen minutes sorting the pile each week or so and promise I’ll never let it build up again… but I’m terrible at sticking to it. Haha!
xo
s
Katie says
After reading the comment and your response I’m now realizing why my laundry always piles up so fast! I honestly never thought to rewear clothes or jeans. Even if a shirt is only worn for an hour it is then thrown in the dirty clothes. Running my washing machines ragid!
YoungHouseLove says
Oh yeah, I think that’s a NYC trait of ours. Living there you have to walk blocks carrying all of your laundry and detergent to wash them in public laundry facilities, so it gets old fast! I learned all about how unnecessary it was wash certain things (like pjs) after one wear (of course if I’m a sweatball or spill something on myself during wear #1, they hit the bin – but your bed is such a clean place so it’s not like you’re doing yardwork in there!).
xo
s
Shannon [Our Home Notebook] says
So polished and pretty! I really love how the pink ceiling looks now with the crown moulding. It really makes it pop.
Jamie says
Wait, if I remember right you added a black out panel to them? Where is her daybed from?
YoungHouseLove says
Yes, we added a blackout panel behind them (just clipped up with the same ring hooks). The daybed is from West Elm about 6 years ago (it was a wedding present from John’s God Mother).
xo
s
Jessica says
Such an adorable room for an adorable girl! I do think her door needs a bold color…perhaps consult Clara for her opinion?
YoungHouseLove says
You’ll be excited about her canopy wall update I think… she picked something really fun!
xo
s
Christy says
Love it! My brother-in-law added wide/doubled crown molding to my formal rooms and master bedroom last year. If I had known how much I’d love it and how amazing it would look, I would have gotten him to do the *entire* house while he was at it. I still wander through those rooms admiring his work and how adding thicker crown totally changed those spaces. Unfortunately, he and my sister are no longer together, so I guess I have to learn how to do the rest myself!
Kaesey says
Excellent! These are the types of projects that make a room seem much more finished – even if they can be a little tedious to get around to. =)
Julianne says
Looks so nice, guys….I love the beefed up crown. We had it in our last place & now that I have your tutorial, I’ll know how to get the same look in our next place, thanks! :0)
Brittany M says
Just out of curiosity….but do you guys ever spill paint or drip it all over yourself? Every time you post a painting project I’m always amazed because it doesn’t look like it’s all over the place….unlike me. When I paint it looks like Jackson Pollock rose from the dead and came to my house.
<3 Brittany
YoungHouseLove says
I think we’ve ddefinitely gotten better about that over the years but occasionally I do get a drip. And there are some curses. But it usually just falls on the hardwood flooring (that’s the perimeter of almost every room in our house) so it actually wipes up easily since the floors have a sealer on top so it doesn’t sink into the wood and stain or anything. Mostly I get them on my face. Haha!
xo
s
kristen says
what is your ceiling hight? …. I’m debating crown mouldings to our brand new house that is being built but with only 8 foot ceilings I am wondering if they are too low? …. kicking myself bigtime for not upgrading to 9 foot!! Boo!!
YoungHouseLove says
Hope she drops in with that info!
xo
s
bethany says
The crown looks great! Random question though, have you guys considered painting the daybed frame? In that first picture of Clara, i kept thinking how pretty it would be to have a pop of navy (or pink or silver) amongst the white sheets. Just a thought
YoungHouseLove says
Never even thought about that! Love the idea though, so we’ll have to see how we feel once that wall is done and we take some pics (photos usually help me “see” things better than in real life).
xo
s
Shala says
Love the beefy crown. We dropped our crown down about 4 inches when we installed it and put rope lights in it on a dimmer. Then we painted the space above white. The makes the room seem much taller and the soft glow is awesome.
YoungHouseLove says
SOUNDS GORGEOUS! I’d love to see photos!
xo
s
Monique says
I have enjoyed reading about your house updates. We have to add crown moulding and wondered how tough is it to remove old caulking from the moulding.
I like the caulk look but the thought of having to remove old caulking years down the road, if needed, is stopping me from caulking the crown moulding. Any thoughts on the removal process?
Thanks!
YoungHouseLove says
It usually can just be yanked off (pop the molding off the wall with a mini-crowbar and caulk doesn’t usually stand a chance). You can also score it with a box cutter to cut it so it breaks out more easily.
xo
s
Monique says
Thanks for the info!
Marie says
I love a chunky molding. I’m going to have to try that at my house.
Diana says
I LOVE the chunky crown but, like you say in the post, it doesn’t pop super strong with the white walls. I’m curious to how the space will look once you add some more art on the walls!
Kristen O. says
That looks FANTASTIC! I love it!
Katie says
I LOVE THAT!!!!!!!
What are your thoughts on adding crown molding on a vaulted ceiling? And how do you deal with molding + popcorn ceilings?!
YoungHouseLove says
There have been some discussions in the comments and it sounds like it looks great with vaulted ceilings and with popcorn ceilings, so I’d go for it! It just sort of polishes the edges so it’s nice architecture, I think.
xo
s
Jana says
My nail gun makes me say lots of weird things like – “let’s replace the rotted floorboards on the front porch” or “let’s build an privacy fence from scratch”. But I LOVE my nail gun so I listen. Maybe one of these days I can break the hold it has one me. :) Thankfully my miter saw has a dull blade with a weird arbor size that I can’t find so its ability to talk me into things has been suppressed. Phew!
YoungHouseLove says
Haha!
xo
s
Boonie says
Did you consider mounting picture molding just underneath the crown molding? I have fallen in love with it as it allows one to hang pictures without putting holes in the walls. Using a brass hangar (available at the big box stores or online) on the molding, I just use fishing line (appropriate weight) and hang the pictures. If I want to change my pictures or rearrange my room I don’t put additional hole in the walls. I found the picture molding at a local lumber yard/hardware store which caters to contractors. My local big box store doesn’t carry it.
YoungHouseLove says
Didn’t even think of that. Sounds really nice though! Although after lots of gallery walls and spackle we’re not really fearful of nailing into walls at all.
xo
s
shannon says
Looks great! Its all the little details that make each room stand out from builder grade. Looking at your foyer reminded me of something I wanted to mention. I have the same type of foyer as you guys and by simply moving the railing to the other side of the stairs, I can now add wood detail/interest to the main wall going up the stairs. This will project # 582!!lol
YoungHouseLove says
Sounds pretty! Send pics!
xo
s
Page says
First time commenter here, although I’ve been following for quite a while and have finally begun some major projects like painting my kitchen cabinets!
As part of my kitchen makeover, I’m installing bead board to the sides of the cabinets and around the island. I’m using liquid nails to do so and am wondering if I also need to nail them in. (I think you’ve convinced me to invest in a nail gun since my next project includes crown molding and built-ins.) My question: can I paint the bead board first, and then put it up with the liquid nails (and real nails if needed). If I do paint it first, will I have to go back and fill in the nail holes and do another coat?
Thanks for your help!
YoungHouseLove says
Sure, I would paint it first, and use liquid nails and real nails together for the best hold. The n fill the nail holes and just touch up those areas that you filled with paint for a seamless look!
xo
s
Deborah says
Great job on the crown molding! We just finished doing crown molding in our dining room (which has textured ceiling but I could not talk my hubby into removing the texture so…) The Kreg Crown Pro works great in taking the guesswork out of which cut to make (inside, outside, right, left) I was a little disappointed with the amount of space still left where 2 pieces of crown met in the inside corners. The space did fill in nicely with caulk & once painted you would never know. Did you run into this problem where 2 pieces did not make a good joint in the inside corner? We also put 2 rows of 1x2x8’furring strips (one on top of the other) at the top of the wall where the wall meets the ceiling. This gave us something to nail the top of the crown to. (furring strips were $1 for 8’board)The bottom of the crown got nailed into the studs. Our general contractor got us 16′ lengths of crown molding at a great price. This eliminated us having to do any scarf joints.
I was wondering on your next crown molding adventure if you can post a picture of your inside corners (before caulking)
Keep up the great work!
YoungHouseLove says
I’m getting better as I go, so sometimes it’s just checking the back of the Crown Pro to make sure nothing slipped and I’m probably just getting more precise with measurements and cuts. I’ll have to take a photo of an inside corner before caulking for you. Sometimes they’re nearly perfect and other times I need caulk but they look great once there’s a line of that in there, so it might be luck of the draw sometimes too.
-John
Kendra says
This comment is totally unrelated to your awesome crown update, but since I read your blog daily I feel like I know you guys and can ask a question, haha. What is that shape that Sherry likes that was the shape of the mirror hanging in your 2nd homes master bath? I know it has a certain name and can’t seem to think of it nor know what the search for in your archives. It’s also kind of the shape of the design on the rug living in Clara’s room now.
YoungHouseLove says
Quatrefoil! I’m a die-hard fan of circle and quatrefoil mirrors!
xo
s
Maggie says
Looks SO great! That small touch absolutely finishes off the room. Especially love the extra beefy look, wouldn’t have though to do that!
Question — our entire condo (right in the middle of Boston, built in 1920) has absolutely beautiful crown molding except for our bedroom where one of the 11 (yes, eleven — Boston condos make use of every square inch!) walls is curved.
Do you guys have any experience or advice for adding crown molding to a curved wall? Every night I lay in bed staring at it and it’s driving me crazy. Thank you!
YoungHouseLove says
I’ve never tried that but dorkily enough, it sounds fun to me. You might need to use some of that bendy vinyl molding (I believe it looks just like wood when it’s placed and painted). Maybe try googling around? Anyone else ever done crown on a curved wall?
-John
Kathryn says
Looks great! I love the beefier look.
Stacey says
I bet if you really took a much closer look you would see that the “trick” was being used, not an extra piece of wood beneath because you can see that the bottom part below the crown is just a thin piece of molding, and the inside indents inward. I bet if you dislodged the thin molding a bit you would see that it is not an extra piece of baseboard but just the thin piece of molding tricking your eye…I could tell this immediately by the picture…
YoungHouseLove says
Thanks Stacey! We know that small molding trick, but in our house it’s definitely baseboard up there (we have measured it, knocked on it, painted it white up close, etc). I’m not sure if the pic is confusing, but the baseboard piece is the same depth all the way up (it doesn’t indent and it’s not one of those painted-walls-to-look-like-molding-over-a-small-strip-of-molding solutions). Although I’ve seen those on Pinterest and they look awesome!
xo,
s
Daisy says
Do you think a painting a textured ceiling would look okay too? (The pokey, peaked texture not the swirl.) I worry that it may bring to much focus to a design element may be considered outdated…
YoungHouseLove says
Has anyone done that? I’m honestly not sure how it would look because I agree it might draw attention to it. Some are more deeply textured than others too, so what might work on one might look a little intense on another more prickly versions. Maybe try google or Pinterest to check out painted textured ceilings to see how they look?
xo
s