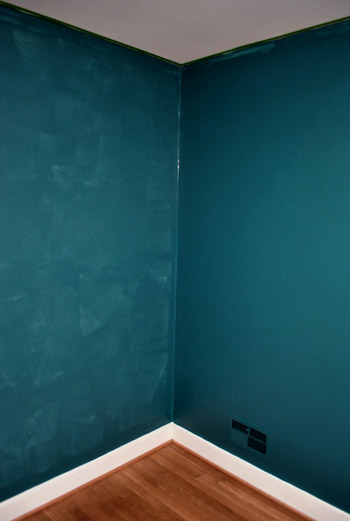
We finished painting the guest room. And boy is it bold. Seriously, it’s like no room we’ve ever painted before. And we luuurve it. With a capital urv. This is probably the most accurate pic (well I guess it’s as accurate as your monitor) of the dark teal that we went with:

The color was of course inspired by none other than Sue the Napkin. It’s kind of similar to Dragonfly (the color that we painted the backs of the built-ins in the future dining room) but when we held up a ton of swatches in the guest room we preferred this color (Dragonfly was darker and greener).
It’s called Plumage by Martha Stewart, but of course we got it color matched to Olympic Premium paint since it’s No-VOC (even the colorants they add are now VOC free). We went with an eggshell finish (so it’s a bit more wipeable and durable than flat but not too shiny since it’s such a deep tone, which can show lots of flaws and imperfections when it’s glossy). Lowe’s actually had a bit of trouble getting a good match, so if your paint pro can’t get it close enough – our lady finally got it within .03% accuracy – Olympic’s Azalea Leaf is an extremely similar alternative. Of course you can also just go with Martha’s Plumage and not color match it to any other base to avoid matching worries completely.
But back to the whole room painting process. Let’s just say that as soon as we started rolling it on there were some oh em gee moments. And a fair amount of melodramatic nail biting.

But after we got to the second coat, the coverage was great and it was looking deep and rich and bold and fun. See how much more coverage coat two gave us below (the wall on the right has two coats while the wall on the left just has one). Pardon the semi-odd coloring in this shot and the one above, they were taken at night so the rest are more accurate thanks to daylight.
After we completed that second coat we were sold. Seriously. We got all hyper and slap happy. There’s just something about pairing in your face color with crisp white trim that makes you giddy. And amazingly enough, we got ‘er done with just one gallon of paint (with some to spare actually) since it only called for two coats – probably thanks to the tinted primer we used beforehand.
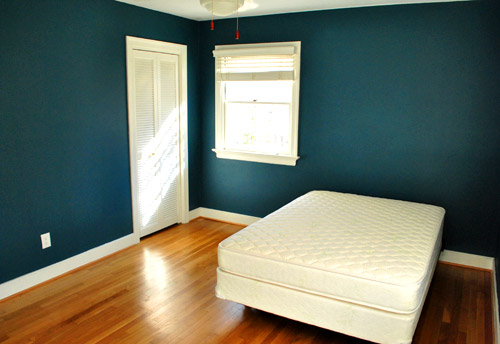
The first thing we did this morning was run into the guest room to admire it in the daylight. How can a $22 paint job make such a difference? It’s amazing. We were about to snap some after pics for you guys when the doorbell rang. It was our new guest bed arriving 30 minutes early. So it ended up in the pics since we didn’t have a moment to take any without it (more details on our mattress buying adventures later). Anyway, here’s the view of the room from the adjoined guest bathroom:
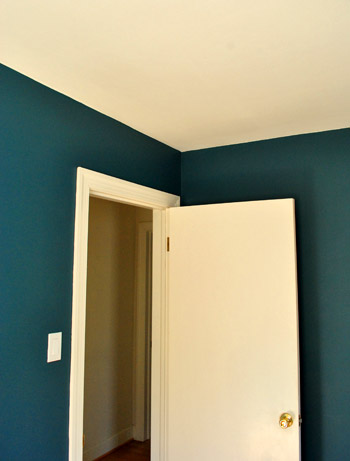
And here’s a shot of it from the hall:
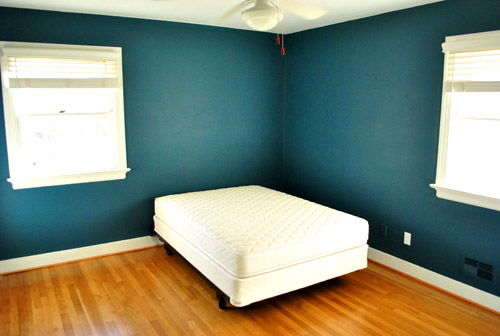
The off centered windows are definitely going to make the floor plan interesting, but we’ll share how we land on our final layout when we, uh, land on a final layout. We’re just going to play around with things until we figure out what we like best.
Oh and you’ll notice that we painted over some of the wall warts (as they so lovingly call them) like the vents and an old Bell Atlantic phone jack to the left of the white outlet plate above. They were already painted over by the previous owners so we repainted them to match the new wall color. We did keep all of the unpainted outlets unpainted though.
Speaking of painting over things, after a surprising number of requests I finally remembered to make a cutting in video, so you can enjoy the riveting play by play below and see how I use my favorite brush to get a nice clean line next to baseboards and trim:
As for down the road projects, we’d love to add crown molding and possibly paint the ceiling a lighter tone than the wall (or at least freshen it up with crisper white paint along with the trim). But that’s definitely not something we have time for with my mom & stepdad rolling into town this Thursday.
So there you have our dark teal guest room. Now we just have to hang the headboard, dress the bed, get a shower curtain and bath mat, change out the toilet seat (it’s old and rusty), hang curtains (if we have time), and figure out the side table & lamp sitch (might not get to that either). Should be an interesting few days…

Hallie Hal says
(Not that you asked, but) I vote for putting the bed in the corner!!
Two cents. No, I don’t need any change. :D
George O'Neill @Beach real estate says
This is an excellent choice in colour. White and blue create a striking yet calming combination. The dark matte finish makes the room seem smaller and cozier. Great paintwork around the trim too!
Amy says
That color is truly gorgeous. I can’t wait to see how the room turns out! You guys are better than TV. (And trust me, I know my way around a remote.)
MichelleS says
Love it! I knew you could do bold :)
Erin says
Love the paint color!! A small layout suggestion: I would either move the bed to the other window wall or possibly angle it out from the corner. I know you have a wall mounted head board, but it shouldn’t be too hard for a couple of DIY’ers like yourselves to figure out how to attach it to the bed frame.
Just my suggestions :) Can’t wait to see it evolve.
Lorna says
When you’re not so pressed for time you might want to try the bed diagonally in the corner. That would make the window placement appear more symmetrical, and create an interesting triangular nook behind the headboard.
Thank you for the much-anticipated cutting-in video – perfect room to video in too, with the super contrast.
Looking forward to seeing it all “dressed up”…
YoungHouseLove says
Wow- it’s amazing how popular the diagonal bed placement is! We’ll definitely be trying a ton of different configurations and will share our favorite when we settle on something soon!
xo,
s
Meg says
In the Philly area this beautiful color is known as EAGLES GREEN (pantone 316?) and it’s mandatory in at least one room per household. p.s. Please mention this to all of your guests (especially Giants, Jets, Redskins or Cowboys fans)!!!
Chelsea Strong says
Oh! This is the color we tried for in our living room. However, the man picked it out based on the swatch name we saw in Ikea, and after it was rolled on, it always looked royal blue, rather than deep teal.
Leigh Ann says
LOVE THIS COLOR!!!! Thanks for posting the cutting in video, I’m about to repaint my master and definitely plan to buy your brush and make my own attempt to not tape. The video of your technique really helped!
Alison says
I love the color! It’s very similar to the color we used in our basement. I had a question for you though – any advice for painting wall vents? I have tried painting mine, but then the knob to open and close the vent was stuck in one position. I had this happen with both regular paint and a brush and spray paint. Help!
YoungHouseLove says
We don’t open and close our vents (they stay open) so I just painted them in that position (two thin and even coats like I applied around the trim when cutting in). Thin is key so things don’t get all gunky and messy looking. Hope it helps!
xo,
s
Natalie says
Yay! That is EXACTLY the color I guessed you’d be painting the room…and it’s also the color I’d HOPED you’d be painting it! The coverage is AMAZING ~ I just love the rich, saturated color and like you guys said, it looks fantastic against the crisp, white trim. Can’t wait to see it decked out with accessories!
Well done! :)
Jamie B says
Ooh, I like the idea of yellow in there, yes.
And since it makes the white pop so much, I noticed how much I like your window sills. Just a little bit of architectural interest, very classy looking.
Michelle says
Your cutting in skills are impressive! You should start a class. :P
Kayla says
Can I move in? It’s beautiful!
Renee says
I’m THRILLED to see that you went with this color! We recently moved into an old house, and our move was taking place right when I noticed your post about the new color scheme for your new house. (Perhaps in October?) I instantly stole your color idea, painted it in our new living room, and now we couldn’t be happier!
The color is soothing, funky and extremely versatile all at once! After loving the white curtains I put up, I realized that white is very important on these walls. In fact, I made a recent HomeGoods purchase (that you can see here: http://bettycrockettrocknroll.blogspot.com/search/label/Decor). In addition to a lot of white accents, some deep reds also really pop with the teal behind them.
Good luck with decorating this room! I know you’ll do something great!
-Renee
Renee says
http://bettycrockettrocknroll.blogspot.com/search/label/Decor
Sorry for messing up the link, I just got too excited about teal walls!
YoungHouseLove says
GORGEOUS! Now I’m craving a HomeGoods trip…
xo,
s
Amanda says
I LOVE that mirror. I’ve been looking for one just like that for my bedroom. Hope my Home Goods has one just like it!
Brittney George says
I can’t wait to see the final layout. My house has offcentered windows in EVERY ROOM. We put our bed in the corner, but that got old after a while. We’ve thought of putting a curtain across one of the walls to give the bed some girth. We are so lost on what to do! Looking forward to your ideas!
LOVE the color! Bold is beautiful!
Erin says
I thought for sure you would have used the deep plum color! I love this, though! Makes me wish I had a room to paint! :)
Jessi says
This is a great color choice!! I cannot get enough of bold colors.
(I added this post to my favorites so I can look back at it once we’re able to paint our bedroom.) Thanks for sharing!
Kelly says
YES!! I knew it, knew it would be teal! Okay, I’m soooo doing this in my living room.
Laura S. says
That is such a soothing color, who knew a very deep shade would be so gorgeous?
I’d turn the bed kater corner into the corner between the two windows. This will free up space for two nightstands and maybe a tall lamp over the bed in the small triangle left behind the headboard.
Kate says
I love this color!! I want to paint our front door (and a room, if I can get away with it) this color, and now I know where to start!
QS says
Love the color! I’m a sucker for deep and bright colors with crisp white trim.
Quick question – Could you tell us the dimensions of the room? I can never tell how big something is by just looking and I get discouraged on many websites when I know the rooms are gigantic because I figure I could never do what they do and have it look as nice. Thanks!
YoungHouseLove says
The room is around 13′ by 11′ – so definitely not huge at all!
xo,
s
Leslie says
LOVE! Thinking it would look pretty awesome in my laundry room! Mind if I borrow??
YoungHouseLove says
Borrow away! And post after pics on our facebook page if you have a moment! We love the eye candy…
xo,
s
rachael says
Awwwww Girl! You cut in WAY differently than I do, which is so funny! I’m not a huge DIY-er, but we do love to do our own painting and I luuuuuuuv cutting in! The teacher in me has a “straight, crisp line fetish” I suppose. Anyway, I just assumed everyone cut in the way I do, but apparently NOT! Amazing. Thanks for the video.
And I love that color! I agree that bold colors and white trim are amazing, and you picked a lovely color for a guest room. Love your blog! Thanks for all the good ideas!
LuLu says
I’m not a dark colour kinda gal but I’m really looking forward to see what you do with the space. I also LOVE your enthusiasm.
LuLu
Marie says
I will get this out of the way first, that color is amazing! Second of all you are the only other people I have ever heard use the word LURV! I am actually giddy over it, my best friend and I used that word ALL the time in high school. Funny to hear it again here. Anyways congrats on the bold color step.
Monica says
Whoa, it looks amazing!
Marla says
Great color! Wondering if you’ve ever used a cutting-in tool. It’s rectangular-shaped and about the size of a large index card, with a sponge-like backing, and little wheels, made by Sure-line I think. I think we got ours at Homedepot or Lowe’s. Anyway, you can cut in like nobody’s business in about half the time. Works great b/t ceiling and wall – just zip it along. It takes a little getting used to and has a couple limitations like corners and such, but that’s when a paint brush comes in.
YoungHouseLove says
Nope, never tried it because I’m so in love with my short handled brush. Can’t cheat on him!
xo,
s
Yezenia says
I LOVE the teal! I had wanted to paint my bedroom that color last year but went with a dark charcoal on your recommendation. I love my room (I accessorized with teal pillows) but I am still tempted by that dark teal!
Erin L says
I just noticed that someone linked to a DIY ikea side table project made from the cheap RAST dresser. Their linked dresser was cute, but I saw a similar project today and it brings in a bit more uniqueness! I immediately thought of your guest room!
http://marcusdesigninc.blogspot.com/2011/02/my-ikea-diy-dorothy-draper-style.html
YoungHouseLove says
So much fun! Love it!
xo,
s
Bobbi says
Love the new color! So great when you are able to step outside of your color comfort zone and hit it right the first time!! Also…thanks for posting the updated trim cutting video!! It’s time for me to get off the couch and get that trim finished!!
Bobbi
Wanjiku says
Wooot!!! YHL am totally loving the risk!!! The combo of the white trim and dark walls is a sure winner…cant wait to see the room all done up.
Sheena says
Amazing! I love dark wood floors and I totally thought painting the walls darker (than you guys typically do) would make the floors look more blonde/lighter. Idk if it’s just the lighting, but the floors look so much darker.. Love it! :)
Camille @ the vintique object says
Outstanding. Just outstanding.
Jennifer says
So the cutting-in video is perfectly timed as I need to finish our bathroom. Question for you (such an amateur one as well) – do you cut in and do the edges first, or last. I of course tried the paint tape trick, then when I pulled it off it was very obviously I hadn’t done it very well… So now I have to go back and touch up. I have a very steady hand, so I’m thinking I should have done the edges first, then the main paint. I started small (the bathroom) to test out my skills before moving on to just about every room in our house.
Also, my 3-year-old son watched the video with me and his reactions where “Wow, so cool”. Then my 5-year-old heard the word “paint” and freaked out that she didn’t get to see it – so we had to watch it a second time.
YoungHouseLove says
Haha, so funny about your kids loving the video. They sound like they’re DIYers at heart. Haha. As for your question, typically it’s best to cut in first and then roll, that way the roller (John) can get as close to the trim as possible (rolling a bit over your cutting in border) so it looks more seamless. And definitely check out the exact cutting in brush I love (I linked to that original post from this post) since it makes everything about 100 times easier. Good luck!
xo,
s
Sammy says
I LOVE IT!! Teal is my favorite color and you chose the lovelyest shade of teal! :) It will look great with crown molding and everything… I’m really excited about this room!
Meghan, UK says
That is one beautiful room even without furnishings – nice one on the fab. colour choice! We chose a lot of colours like that in our place and love, love, love them 1 year on. The difference across daylight (and night) hours is amazing with such deep colours :)
Jan says
So you tape just your ceiling?
YoungHouseLove says
Yup, since I can’t get eye level with that (balancing on a step ladder and being 5’2″, I’m nowhere near the height I need to be to get a nice clean line) John slaps some Frog Tape up there (we like it much better than blue painter’s tape) and it makes ceiling cutting in pretty simple (it’s a lot quicker than taping off all the trim, doors, baseboards, etc). The key is to pull the tape the second you apply your last coat. If it dries sometimes you get a less clean line.
xo,
s
Julie says
Love it! Our kitchen is painted a similar shade – wish I could take credit for it, but it was painted like this when we moved in. :) We absolutely love it!
I can’t wait to see what your accent colors will be in the room as we still haven’t decided upon window coverings and we’ve been here a few years. :P
We’re looking into making our own Roman shades or roller blinds. Have you ever tackled this? I’ve seen some tutorials online, but haven’t tried making them….yet. Can’t wait!
YoungHouseLove says
Nope, haven’t tackled that yet, but we’d love to DIY some roman shades for the office so hopefully we’ll get to that down the line!
xo,
s
Monique says
Love the color and thanks for the tutorial. If you paint close to the trim, do you use another tool to remove the excess paint from the trim?
YoungHouseLove says
Sometimes I’ll have a wet paper towel on hand for any drips. Hope it helps!
xo,
s
Sofie says
I’m loving that colour!
tracie says
love the color!
Tricia says
It looks gorgeous – great job! :)
Jacque says
I am always amazed at how much LARGER a room looks with a deeper hue splashed on the walls…so contrary to what so many of us are taught. Gorgeous!!
Heather says
Love the color! Today’s blog entry over at theinspiredroom.net is framed vintages maps. Even some from a calendar. Thought I’d share so you can check it out.
YoungHouseLove says
Love those! Thanks for sharing the link!
xo,
s
Joe D says
This color is fantastic. +1 on the paint job as well. I’d love to use a color like this for an office or small library someday.
Great job as always. The new place is coming together nicely.
Snickrsnack Katie says
I figured that you would paint it dark blue, so I wasn’t TOO far off with the teal. I LOVE IT!
Felicity @ Our Little Beehive says
The contrast with the trim looks great! I struggled with the “do I paint over this too?” quandary this weekend. In the end, we took off as many of the things that were painted over (five phone jacks in one room, what!?) and just painted over the rest.
Your windows aren’t off centered for a caddy corner bed placement! Is that what it’s called when you put the head of the bed in the corner with the foot sticking out into the room? I loved moving my furniture around as a kid and that was one of my favorite arrangements.
Carrie says
I so want to paint a room in my house that color. I thought about doing my bedroom but it is right off the living room and the wall the door is on is red… Plus I don’t know that I would ever wake up with a dark color in my bedroom. Mmmmm but I love this! Good job!
Jenelle Williams Wass says
Random question: It looks like you changed the little knobbies on the end of the cords for the ceiling fan and they are now red. Did you? I never thought about that before, but I love how in the picture the red on the cords pop against the walls. I have a lot of teal/turquoise in my house and use red in small doses throughout. So that really caught my eye. But I have no idea if that is an easy thing to change without changing the whole fan. Thoughts? Thanks! Love the wall color!
YoungHouseLove says
Oh yeah you could paint or switch those out really easily (they sell them at places like Home Depot and they clip on like a ball and chain keychain does) but we actually didn’t change them- so the blue of the walls must just be creating more contrast and bringing out the red undertones in the original wood pulls!
xo,
s