Let’s talk about grout, because with our penny rounds finally all installed, grout was next on the agenda. It has a way of taking things from in-progress to looks-completely-finished-oh-thank-goodness. Observe:

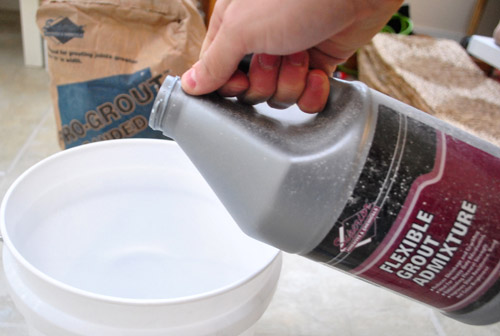
So here’s how we got there. First I have a little “materials shot” for ya:
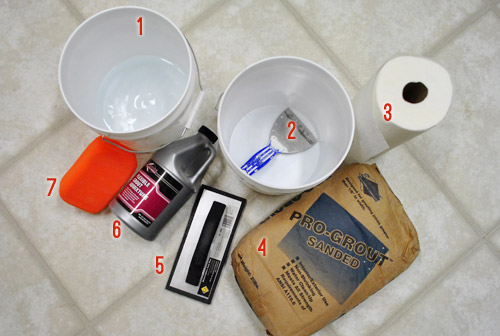
- Bucket of clean water
- Putty knife & another bucket to mix grout in
- Paper towels because, well, grout is messy
- Sanded grout (from The Tile Shop, $19 with discount) – ours is the Mobe Pearl color
- Rubber float (from Home Depot, $2)
- Flexible Grout Admixture (from The Tile Shop, $17 with discount) – this reduces grout shrinking and cracking
- Sponge. Woot!
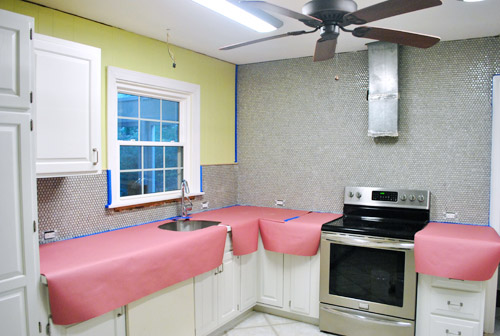
Oh and we used leftover rosin paper from Home Depot to prep the room, since it was again helpful in keeping the mess off of our counters.
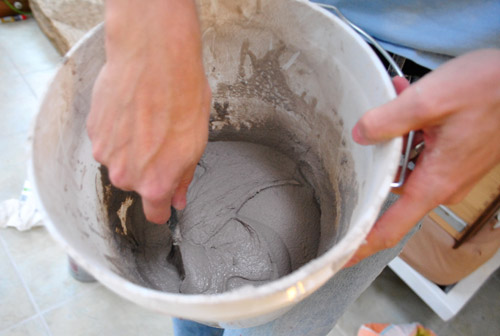
Grout, like thinset, is another mixture that you only want to make in small batches – since it’ll dry out after about 20-30 minutes. So according to the instructions, I started by pouring a bit of admixture into my bucket and then adding the grout powder second.
Just like with my thinset, I used my putty knife to mix everything together until I got a that toothpaste-y consistency that I found easiest to work with.
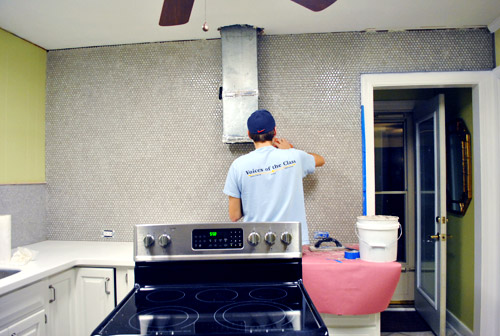
I had forgotten how much I enjoy grouting. That may be an overstatement, but after the focus it took to actually install the tile it was fun to do something that took very little thinking. It was basically just using the float to smoosh the grout onto the tile and, more importantly, into the cracks. Sherry helped too. She was less into it than I was. Ha.
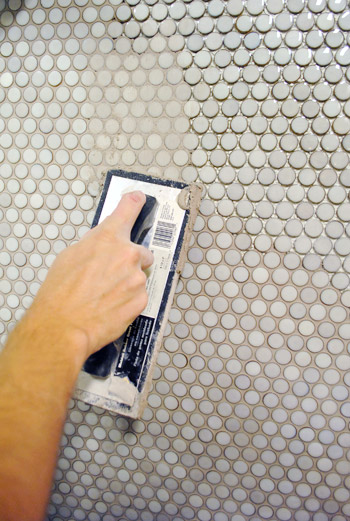
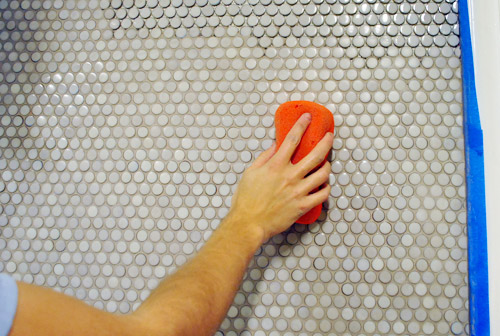
Once we made sure we didn’t miss any spaces, we held the float at an angle and scraped off some of the excess from the front of the tiles. Then it was time for some sponge-and-water action. This not only cleans grout off the front of the tiles, but also kinda smooths the grout between the tiles. It’s kinda weirdly amazing to me how simple but helpful this step is.
If you want to see these steps in action, we managed to film this little one-take video of it. Clara’s need for a cream-cheese refill cut it a smidge short, but you get the point:
Admittedly the task is a bit tedious – and more than bit taxing on your wrist – but we managed to get it all done in one afternoon.
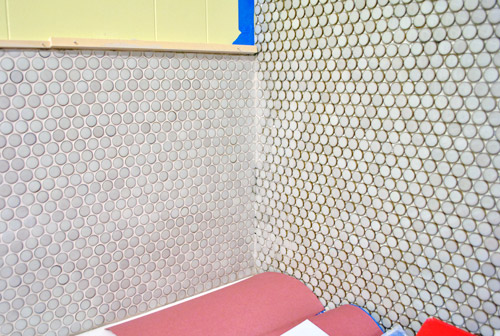
The difference between an ungrouted and grouted tile job still amazes us. Just when we thought we couldn’t love our penny rounds more. You can see the difference below – the left side has dried grout in it, the right side is ungrouted. You can also see how much lighter the grout gets once it dries. Of course there’s still a haze on the grouted tiles on the left, so they don’t look as gleamy as they do once you buff that off with a cloth after it has fully dried.
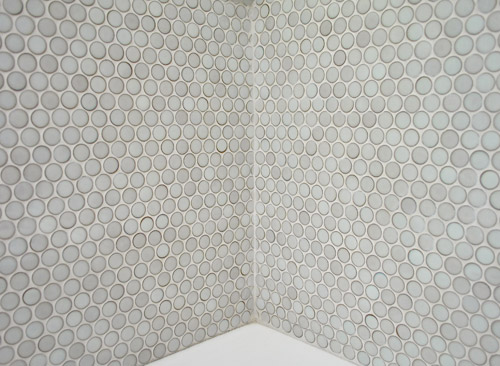
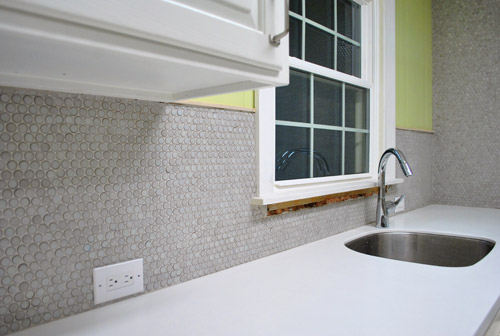
Oh, and since people had asked before – here’s a picture of the corner seam after it was filled with caulk that matches our grout. We also caulked the seam where the tile meets the counter (that’s still drying in this pic, so it looks darker along that bottom edge). This was taken before we buffed the tile with a cloth though, so it’s kinda chalky. But you get the idea.
Here’s the whole room completely done, though it’s kinda hard to make sense of it at this picture size – since it sort of just looks like a gray wall. Haha. But in person it’s approximately 50 times bigger than this photo on your monitor. And those gleaming penny rounds look pretty darn lip-smacking. Yes, I just used that adjective. The penny tile does that to me.
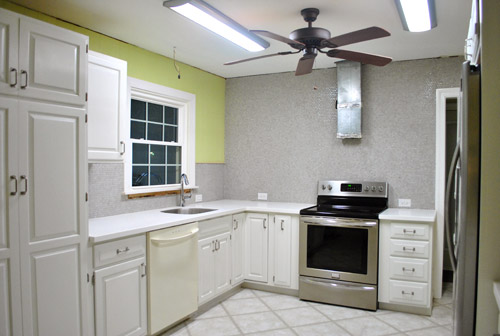
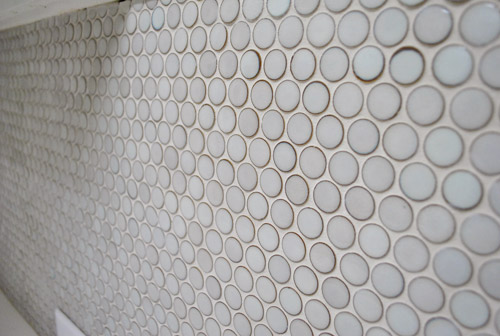
So here are some close ups so you can get a better idea of what it looks like in real life. Thankfully even when you enter the room from the frame hallway on the far side of the kitchen you can easily make out each individual penny tile. Which is nice because it would have been a colossal bummer to spend 14 hours tiling the room only to have it look like gray paint from afar. Even from the front door it clearly looks like little round penny tile on the part under the microwave that you can see from there. Whew.
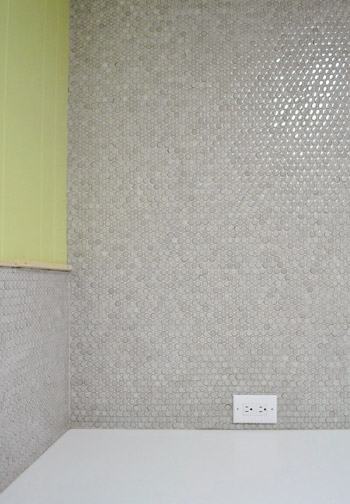
This shot is probably best at depicting all the varying tones in the tile. It’s awesomely random. Some tiles are a bit darker and some have a dark ring (or semi-ring) around them – we think it looks really charming and adds to the dimension. And you can see the polished shine on the top right corner of this shot (they look hazy in this pic for some reason, but up at the corner you can see that they gleam in real life). It’s actually a really “marble-ish” look without having to dish out the money for marble.
Here’s another close up to show how some tiles have darker rings and varied coloring. And you can really see how the grout cleans things up and adds some nice tone-on-tone action where dark holes and mesh once were:
We were a little nervous about the grouting step because we had heard that it can accentuate any seams or inconsistencies in the way that you laid the sheets. But our experience was the opposite: it actually seemed to disguise those little mistakes. It’s probably because our tile / grout color combo is low contrast, but if it was dark it could highlight those flaws instead of bridging the gap and making things look more finished and even. So this isn’t to say that grout solves a bad tile job when it’s low contrast (unfortunately nothing solves a bad tile job) but if there are tiny inconsistencies, similarly toned grout might be your best friend. And thanks to using a good sealer, it shouldn’t be a bear to keep clean (we used something awesome on our first house’s tiled shower and didn’t have to scrub it ever again – even while hosting Open Houses a year later it looked as good as it did the day we grouted).
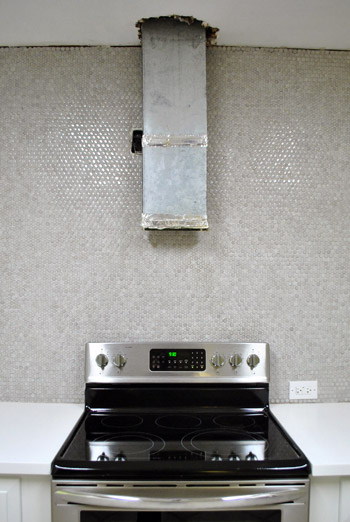
Here’s a better shot that shows the shine- although it’s only on that portion of tile on either side of the range hood. I blame our terrible kitchen lighting, but it’s next on our to-do list! Yes, we have an appointment with our electrician and everything.
Speaking of other still-to-be-completed projects, we also still have to add a range hood and some open shelves. We think our tile will be a pretty darn sexy backdrop for our dishware and such (knowing Sherry, there will be a whole lot of “and such” up there with our dishes – the girl has plans).
Even though grout is done, our job with the tile isn’t 100% complete. We still have to seal it. And before that we have to do a bit more clean up (aka: more buffing to remove small traces of haze in some areas). It’s pretty common for grout jobs and The Tile Shop actually sells haze remover, but we’ve found that just good ol’ fashioned elbow grease (and a dry dishtowel) can also do the trick. Buff, buff, buff. So we may try that first. That is, once our wrists recover.
You know we’ll be back to share all the goods as we go (applying our sealer, planning/replacing the lighting, range hood happenings, open shelves, new cork floors, etc). In the meantime, have you guys ever grouted? Did you kind of like it (me) or kind of hate it (Sherry). The good news is that we both admitted that it was totally worth the hassle when we were done, so that’s unanimous. Glad to have it checked off.
Psst- Take a wild guess who is the most excited indoor train rider in our family. Might not be who you think. More on that here.

Becky says
Love it
Tyra says
looks amazing!!! can’t wait for the new dishwasher to be in…that bisque one has GOT to go!!
YoungHouseLove says
Amen! Haha.
xo,
s
TheChangingHouse says
Holy amazing!
It really does look like marble!
That is super impressive.
Beth says
It’s gorgeous!! Nice work :) Can’t wait to see the finished room!
Lynn @ SafeBeauty says
Oo-eee does that read serene or what? I bet it looks so sparkly in real life like that girls teeth in the Orbit gum commercials. I knew it would turn out nice, but not that nice! (That didn’t come out right, er, um, you know what I mean?) Maybe I just couldn’t actually visualize it completely. Yeah that’s right, that’s what I mean. Anyhow it looks wonderful. This room will turn out awesome.
My best, Lynn
*try some accupressure to relieve some of that wrist fatigue.
Rebecca of Beck's Chic Life says
Looks great! And that song is now stuck in my head… thank you.
Danielle says
Love, love, love, love it!! I fell in love with penny tile when Sara Richardson used it in one of her shows. I wanted to use it in my kitchen but found a “to good to pass” deal on a morrocan (?spelling) lantern tile. Now every time I see penny tile I am in love – and a bit jealous. Looks totally, completely awesome. Can’t wait to see the finished kitchen!!
Danielle
Deborah says
The first tile job my hubby & I did was our sunroom floor using 16″ square tiles and colored grout with admixture. The grout came out great. The second & third tile jobs we did were bathroom floors using 12″ tile with colored grout(using the admixture). Unfortunately the grout ended up being uneven in color. Some said it was from too much water when wiping the haze. (although our sponge was very dry)We hope to redo the tile but hope to avoid the same mistake. Has anyone else had problems with spotchy grout?
YoungHouseLove says
Oh man, that stinks. Anyone have advice or ideas for Deborah?
xo,
s
Christie DeSlva says
I had this problem on my first tile job. It just wasn’t mixed well enough. :/
Jennifer says
On some previous tile posts, you mentioned using grout release (maybe grout sealer as grout release?). Did you use it this time with the penny tile? If not, why not? Thanks for all the tips!!!
YoungHouseLove says
Good memory! We used it on our bathroom reno at our first house but didn’t seem to need it this time. The Tile Shop people thought it would be overkill for this job (they were right, some regular old buffing did the trick).
xo,
s
Kristin McAuliffe says
Just wondering if you still love the combination of the buttery walls and the grey tiles…my eyes keep looking for it to have less contrast…no criticism from me just interested in your design viewpoint:)
YoungHouseLove says
In person they’re so pretty! A sofa avocado color. But we hear they can read crazy on other folks’ monitors. So we can’t wait to get better lighting and hopefully that’ll show the same pretty soft green walls we see (avocado + gray + white = so sweet). We also think when we hang the floating shelves with a few colorful accessories it’ll tie in the walls better. It’s odd to see big boxes of gray and green (or yellow, depending on your computer – hahah).
xo,
s
Lindsay says
Looks aaahhhhhhmazing dahhhhhlings!!
Lynette says
You are way tooooo young for a Tears for Fears reference, but I sooooo appreciated it! Best song ever!
Jen F says
So…we did our bathroom tile and our theme song was also based on the Tears for Fears tune….but ours went a little like this: “Grout, Grout, Stuff it up your snout…”
YoungHouseLove says
Bwahahaa.
xo,
s
Kate @ Stripes and Polka Dots says
The penny tile is looking AWESOME! I love it! You guys are doing a great job!
Tiff says
I am going to shout and let it all out! You picked a great tile. Maybe not the easiest but for ba-bing, you made it happen. Way not to give up when things started cracking in wrong places.
karla says
I love it. and please don’t change the wall color. it’s so fun! :)
YoungHouseLove says
Haha, no worries! The grellow is staying!
xo,
s
Aparna says
That looks so good! I read your previous post (tiling coomplete without the grout) and my one thought was, how would they get the dust ourt from in between the penny tiles! I didnt know then that the grout would cover the spaces..
shawndra says
Your truth about your imperfections make you even more perfect:)Happy 2012 to you and yours. Pleasure reading you blog.
Kate says
Oh so pretty! Good work team YHL!
Maureen says
Super impressive- looks great!!
Congrats : )
Laurendy says
you guys did a wonderful job on the tile work (bonus points for the Tears For Fears reference)
Sarah B says
I was the same way with penny tile, John! The install was terribly tedious (I would dare say I hated it) but the grouting didn’t bother me at all.
Marian says
I absolutely LOVE tiling and grouting! Especially grouting. It’s kinda like frosting the wall, except it makes everything look cooler. I find that as soon as I finish a tiling job, I start looking around for something else to tile. It’s kinda weird. That’s when I leave the house and get some fresh air. But great work guys. And I am so happy you are so delighted with it! There is nothing better than being thrilled with a project you put your heart and soul into. It’s gorgeous!
amber p says
It looks awesome! I cannot wait to see the shelves and the hood and the styling, of course!! I have so enjoyed watching the process.
Melissa says
LOVE! LOVE! LOVE!
Turned out awesome!
Cecelia says
Grouted penny rounds has the look of capiz shells.
Really light and beautiful!
Christine says
This has nothing to do with your gorgeous tiles or great grout job.
What did you do to make the photos now appear on my comp at work? Whatever you did… thank you!!!!!!! It made my Thursday morning a little brighter!!
YoungHouseLove says
Haha- so glad they’re back! Nothing has changed on our end with pics for the past year or so, so I’d guess your office’s virus blocker or image blocker might have just decided they’re not spam and let them through! Wahoo.
xo,
s
Erin aka TheSavvySeeker says
Looks fabulous! Excited to see it with the open shelving. Great job you guys! Have you ever tiled a floor before?
YoungHouseLove says
We have in our first house’s bathroom! I think you can find that info here: https://www.younghouselove.com/2010/01/tackling-the-bathroom-chapter-four/
xo,
s
Lauren says
The tile looks AWESOME! The grout really does make a huge difference!
Stacy says
I have to say, I was unsure about the penny tile but after seeing this post I LOVE it! I never should have doubted that it would be anything less than fabulous- I always love what you do! :)
Brittany says
Sherri
Question, how did yall decide where to stop the tile? I would not have thought to extend it over the door, but it looks good.
Thanks
Brittany
YoungHouseLove says
We decided to just do that whole wall and call it an accent wall since stopping it over the door might have made the range hood that we’ll be installing look off-centered (it’s centered on the wall, so it helps to have that tile continue). Hope it helps!
xo,
s
Leanne says
I love this so much! I am fully committing to using this pennytile on my backsplash. We are still in the planning stages of renovating our kitchen and adding a bathroom…. but i think i’m obsessed with this tile!
Ashley @ sunnysideshlee.com says
I just sang the Tears for Fears in my head while I was reading your first sentence! AWE.SOME. :)
kelly g says
WHAAAAT?!? I was out of town for a few days and came home to see this AMAZING tile wall! That looks SO awesome! You guys did a fantastic job!
Rhoda@ Southern Hospitality says
Wow, y’all!! I just love this pennytile backplash you have done. It looks so fantastic. I am getting all sorts of ideas for when I get my little fixer upper house this year. Can’t wait to start DIYing and jumping back in the game. You 2 are so inspiring!
Melissa says
The penny tile is really beautiful and just cool! Great job! And I love that you turned your outlets on their side….and down low… I really thought I was the only person who understood how smart that is! It drives me bonkers to go into an expensive “designed” kitchen with outlets 12 inches above the counter top with cords hanging from them!!! Kudos!
YoungHouseLove says
Aw thanks Melissa! They were actually already like that! We just kept them that way- but we totally appreciate it for the less-noticeable reason you mentioned!
xo,
s
Bea says
hey,
You may have seen it already, but just in case, have you seen that (real) pennies backsplash?
http://cotedetexas.blogspot.com/2012/01/holiday-weekend-giveaway.html
I expected to like it less that I think I do!!!
But still find yours really gorgeous!
Have a good w.e.!
YoungHouseLove says
So cool! Love the copper color!
xo,
s
Megan E. says
I just finished a tiling project myself and I’m looking to seal it. I know you sealed your bathroom at your old house (and I’m sure there is a forthcoming post about sealing your brand new penny tile– BEAUTIFUL!), but would you be willing to share what kind/brand of sealer you chose?
YoungHouseLove says
We’ll share a big post about that when we get there for sure!
xo,
s
Robyn says
This “penny tile” project made me immediately think of your kitchen. http://www.epbot.com/2010/09/money-money-money.html
YoungHouseLove says
Oh my gosh- amazing!!
xo,
s
Todd says
hey guys,
I know this is an old post to comment on, but could you let me know what type of caulk you used between the counter and backsplash and in the corner? Was it specifically for that purpose, like a stone caulk, or just regular caulk colored gray? Trying to figure what I should use between my granite and the tile backsplash I’ll be installing. Thanks P’s!
YoungHouseLove says
We got it from The Tile Shop since it’s made for the job and perfectly matches the grout (they sell them to match). Hope it helps!
xo,
s
Colleenzo says
Hello! I hope I’m not too late to this party to get my question answered… I just installed penny tile in my shower surround, and I’m wondering about sealing it. How did you seal all the grout without dulling the actual tiles? I thought you were supposed to only put the sealer on the grout itself, but that seems so overwhelming with such small tiles!!
YoungHouseLove says
We just followed the sealer instructions from The Tile Shop that said to wipe it off the surface of the tiles so ours aren’t dull, they’re nice and shiny!
xo,
s
Jenn says
Hello, sorry if i missed this info somewhere, but is the penny tile that you show on this page the “penny round moss”? i love the color of what you have installed, however, the color and description on the tile site looks different than yours. Just wondering if it’s the lighting or different tile? thanks so much.
YoungHouseLove says
Yes, it’s the moss color. No idea why they call it that. It’s 100% gray with no green undertones at all. Hope it helps!
xo,
s
Kristen says
After looking through your blog, I think you used the “Moss” color from the Tile Shop – is that correct?? It doesn’t look at all green to me though. Do you see any green undertones in it? I’m thinking this color would be good in our kitchen (white cabinets and counters) but our walls are a gray/beige color.
Kristen says
Ahh I see you just answered this question. Got it. Sorry!!
YoungHouseLove says
No worries!
xo,
s
Christie DeSlva says
I actually just ordered your same backsplash tile. After a length search (and a $6 sq ft budget) this was the most modern white/gray option I could find, so…I’m a copy cat. ;)
QUESTION – Now that you’ve lived with the grout color for a while, are you 100% pleased with it? Would you go a shade lighter or brighter or keep it exactly the same?
YoungHouseLove says
Yes, so happy with it! Just had a photo crew over to shoot something for a secret magazine and they were all petting it and loved it too. Made me beam. I’m a proud tile momma! Haha.
xo
s
Brigid says
Have you guys every experienced “holey” grout after it dries?
My backsplash looked amazing last night, and this morning there are tiny pin holes in several of the grout lines. I’m using pre-mixed, so I know I didn’t mess up the proportions.
Also, I should mention one wall is completely fine looking (no holes). Perhaps I was overzealous with the sponge and water dripped in? Can I just grout over it do you think?
YoungHouseLove says
I haven’t had that experience, but I’m thinking you might be on to something with your theory about the sponge. Somehow the grout probably got too wet and thinned out enough in some spots that when it dried it shrunk up and exposed some holes. My other thought is that maybe you just didn’t apply enough grout (or push the grout deep enough into the crack) in those spots so, again, the drying process revealed some gaps. Sorry to hear it didn’t go smoothly!
-John
Sarah E. says
Now that we’re finally in some big kitchen projects…. how do you “finish” the edges where the tile is done and there’s wall? Do you grout that edge? Caulk it? We have a few edges that I don’t really know what you do it? Thanks!
YoungHouseLove says
We used a small piece of wood as a “header” so it was like a trim piece (we painted it the same color as the grout) and we just grouted up to that. Hope it helps! I think you can see it (unpainted) in this post behind the flowers: https://www.younghouselove.com/2012/02/budget-blooms-tiptoeing-through-the-tulips/
xo
s
Julie says
I really want to do a wall of penny tile in my bathroom. Bone colored with a sort of metallic..ish ring around the bone. My bathroom guy suggested that all of that grout would be hard to clean..since there is a lot of it and it would be light colored to set off the outline around the bone tile. He also said grout these days is more stain resistant. So, my question to you is..how do you find it in the Kitchen behind the stove. Does it get dirty? Is it easy to clean?
Thanks!!
YoungHouseLove says
Oh yes, grout is better at resisting stains, and we sealed ours – which is HUGE! Definitely do that! We haven’t had to scrub ours once. And when we did subway tile in our first house’s shower (with white grout) we sealed that and didn’t scrub it at all for over a year before we sold- it looked mint!
xo
s
Laurie says
Any tips for wrapping penny tile around an outside corner? One that bends out toward you, rather than in…
YoungHouseLove says
Hmm, maybe just cut it along the crack and wrap it? So it sort of meets itself and once you grout it looks as seamless as possible? Anyone else have tips?
xo
s
Penny Smith says
OK-so I found the grout post… but the grout The Tile Shop “suggested” was unsanded… but it’s OK to use sanded? Good grief! I think picking my wedding dress was easier than picking grout!
YoungHouseLove says
Our understanding is that there are two main factors in choosing sanded vs. unsanded: the type of material you’re grouting (since some tile finishes like marble can get scratched by the grittier sanded grout) and the amount of a gap you are grouting. Sanded grout sticks together better so it’s preferred where you have large gaps. Since the penny tiles had a large grout space between the circles, we needed sanded. Since your hex tiles may be fine with unsanded – so I think it’s probably good to use their recommendation.
-John