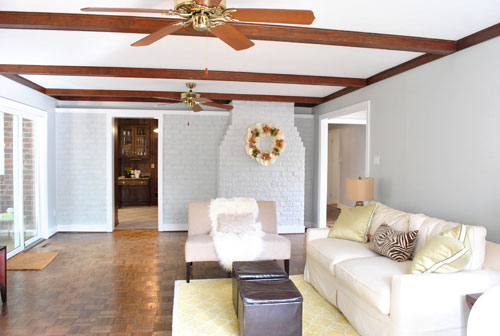
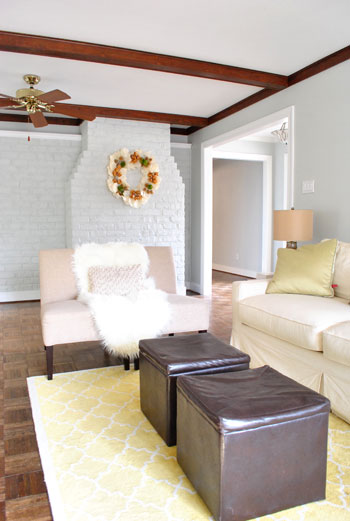
Glad that’s out of the way. Painting the trim was as long and tedious of a process as we expected. Maybe more-so actually, but it’s done! Wahoooo! And it feels pretty darn good. Seriously, there was more than one happy dance (one on Friday night when we finished, and another one in the morning when we saw the room in the light). What is it about certain annoying home improvement jobs that make you want to ugly-cry while doing them but happy-cry when you’re done? Talk about roller-coaster emotions. In the end, we never regret them, and we’re happy we got ‘er done. We’re just not ready to “do them all over again” the next day or anything. Haha. Anyway, it’s looking pretty good. Here’s the view in the living room now (ignore the beams, we’ll get to that later):
As far as the process went, experts recommend using oil-based primer to block potential bleed-through when it comes to painting wood trim (followed by latex paint). We threw caution into the wind and went straight to white semi-gloss latex no-VOC paint (Olympic Premium from Lowe’s). I had gotten some gray wall paint on the trim a few days back when we tackled that project, and it seemed to cover well without any signs of bleed through. So I went for it. Could have been a terrible plan. Could have resulted in having to go back and repaint all the trim with primer if I did see some bleed-through. And possibly pulling 60-80% of my hair out as a result. But it didn’t! Oh happy day.
So we saved the nastiness of working with oil-based primer and all the VOCs that come with it. Call it a baby-and-eco-friendly risk that happened to pay off. If it hadn’t we would have sought out the lowest VOC stainblocking primer that we could find, but it was pretty sweet that it didn’t come to that. That’s about where the words “pretty sweet” stop with regards to this project. We vowed to keep it real with you guys, so although we’re eternal optimists who generally love nearly every project that we tackle (even the ones that don’t work), we promised to tell you if something sucked. And painting the trim totally did.
It wasn’t that it was very hard (I used this brush, which I swear by for “staying in the lines” and going a lot faster that I used to move with a traditional long-handed brush). It was just that it took for.ever. I started at around 10am on Friday and went it alone until about 3pm (while Clara took her morning nap and then John watched her and tended the blog), then around 3, out of sheer desperation, I asked John to help while Clara was taking her afternoon nap (he traditionally rebuffs detail work since he’s the “big picture” guy who rolls while I cut in, so he claims he has less control when it comes to fine motor skills with a brush). At that point I was on coat #2 though, so I just asked him to go down the middle of the trim and baseboards with the second coat while I followed him and added a second coat to the top and bottom of the baseboards and trim (which requires a bit more control since that’s where the brush can meet the floor or the wall).
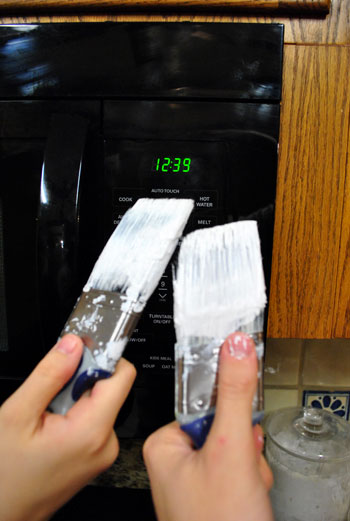
By coat number three it was around 7pm (thanks to a lot of blog, Clara, and food breaks among other things) and that’s when we realized that it wasn’t going to be a three-coat process like we thought. It was going to take four full coats to cover that dark dark trim. Boo to the hoo. There may have been a temper tantrum (not by Clara) but no actual tears were shed (which I consider to be a semi-mature response to such devastating news). But we pressed on. And it was actually past midnight when we finally finished (and snapped this victory shot of our paintbrushes “toasting” in front of the microwave clock). Klassy, right?
If we had used oil-based primer it definitely would have only been a 1-2 coat process (after the coat of primer was applied, which would add up to 2-3 total applications) so it may have taken us until 5 to 7pm instead of 12:30 in the morning. But those 1-2 extra coats were worth it to us in exchange for a completely zero VOC result. Even if it meant dragging a little bit the next day. So for those who are looking for the expert recommendation for tackling this project, use oil-based primer applied with a brush followed by 1-2 coats of latex gloss or semi-gloss paint also applied with a brush (and tape things off if you like to work that way). But if you wanna know how we did it, I used my trusty short handled brush and we applied 4 coats of semi-gloss latex paint (without taping off, since over time I’ve gotten nice and steady without tape). We actually painted all of the wood trim in our first house (including the stuff in the bathroom and kitchen) using this method (no sanding or primer) and we luckily didn’t have any chipping or bleed-through issues after 4+ years there. Fingers crossed for the same luck here!
As for the paint choice, we used the off-the-shelf white stuff that comes without any tint from Olympic Premium called “Base 2” (since “Base 1” is also known as “Ultra White,” and we wanted something crisp and white but not crazy white with a glowing blue tint to it). We love the color, and plan to use it for the rest of the trim in the house. When we finally work up the energy to tackle a project like that again in a few years. Har har.
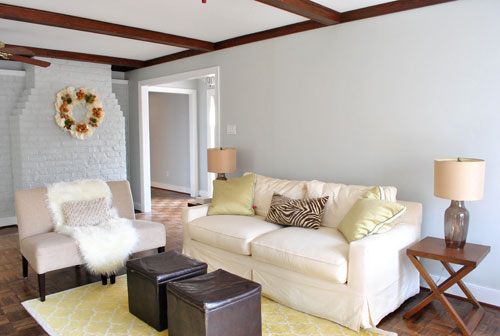
Oh and the beams. We promised more details about those. We left them au naturale to be 100% sure that we don’t prefer them that way (we don’t). But now that the trim is all painted, we’ve decided that we definitely want to stain or paint them a deeper gray color for some richness and dimension. And of course those fans have to go. So for a vague idea of what that might look like, picture this…
… looking something like this:
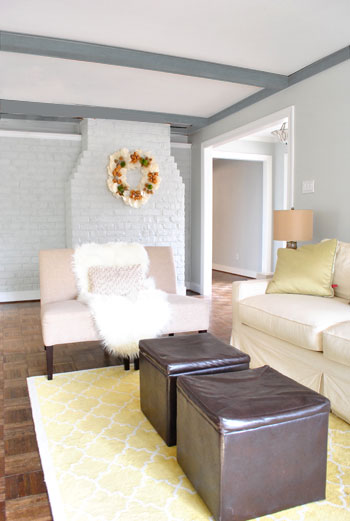
They definitely would have looked gorgeous in white just like the trim, but we want to take a risk and do something a little unexpected. We love that it’ll hopefully be just the right amount of drama without looking too heavy (we have standard 8-foot tall ceilings so we didn’t want them to feel like they’re closing in on you). But we think it’ll have a nice not-too-top-heavy look in the end, especially since we’ll be bringing in a large charcoal sectional to ground the room and add balance. Then we can start layering in some bold colors in the curtains, art, rug, accessories, etc. Should be interesting.
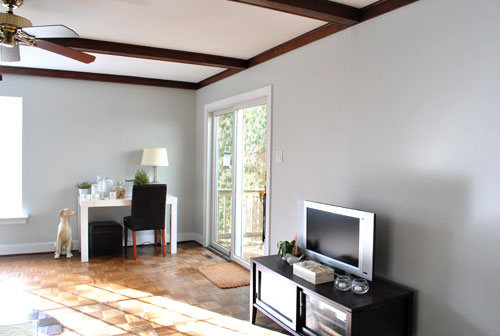
And why not end with a nice little flash-back to what the space looked like a little over a month ago when we moved in?
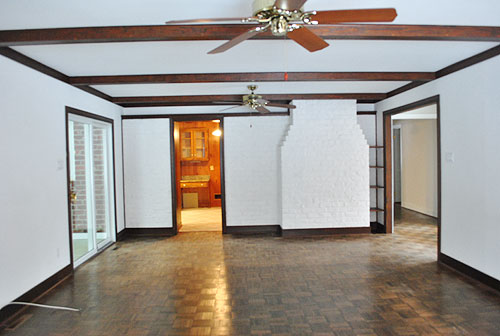
Oh the memories. Change is good.

Kari says
I painted the trim (and the paneling) in our sunroom, so I feel your pain (oh, the hours that took). We didn’t use any oil-based primer, but I was told to wipe down the paneling and the trim with paint thinner before painting. It worked, and nothing has bled through two and a half years later.
Brenda says
Major sympathy! I painted all the dark wood trim in my house by myself over a period of about a year (and also went with the semi-gloss white Olympic). I had to do SIX COATS in some areas.
Sarah says
I didn’t read all 480 other posts, so I don’t know if someone already said this. But you guys have really similar hands, as evidenced in the picture of your brushed in front of the microwave. It was striking enough to warrant a comment.
YoungHouseLove says
I thought the same thing when I saw that pic! Well what I really thought is “wow, may hand almost looks graceful next to John’s.” See my husband has long thin fingers and I have short stubby ones that look like little sausages by comparison. In short: that pic is a fluke. It was just a lucky angle or something. Haha.
xo,
s
Whitney says
Since there are 500 posts ahead of mine, forgive me if I repeat what others have said. We have neighbors who used almost identical paint colors (wall and your planned color for the beams) and they painted the ceiling the darker color. It looks FABULOUS – especially with white trim. Have you thought about doing to entire ceiling and going ahead with painting the beams white to contrast? Who am I kidding? I am sure you have thought of many things! Anyway – I could see that working very well in such a great space with a lot of natural light like yours. Good luck with whatever choice you make – I am sure it will be beautiful. But if not, I also know that you will make some pretty darn good lemonade out of those lemons!
Evita says
As someone who loves colored trim I have to say that I love the mock-up of the beams and cannot wait to see how they look when finished!
jenna@frombostonwithlove says
Too funny – I just linked back to this post while lamenting on the tedious nature of painting the trim. Just need to work up the energy!
Will for sure try your magic brush!!
Erica says
Personally, I’m trying to get rid of the white trim in my house and refinish the wood trim I already have, but I can see why you would want the white in your place. It already looks much better. That dark trim was so harsh before! And I LOVE the grey beams! I can’t wait to see them when they are finished!
Margaret says
I have a GRACO paint sprayer that I use for lots of household projects, and I imagine it can be used for trim too. I just did a comparison on spray paint vs. the paint sprayer and I’m pretty much in love! I feel like this is something that maybe you guys might look into in the future?
http://www.sugarandspackle.com
xo,
Margaret
YoungHouseLove says
We always imagine that it’s a pain to clean a paint sprayer out (for some reason it just seems simple to use a brush, wrap it in plastic wrap if you have to pause, get ‘er done, and rinse it off with water really fast. We’ll have to give it a try though!
xo,
s
Brooke says
Looks great! Just curious, are there any guidelines for whether or not to paint the shoe molding (quarter round) that meets both the floor and baseboards? I’ve always seen the shoe painted out along with the rest of the trim, but I noticed in both of your houses it is stained to match the floor. Maybe it’s a regional thing?
YoungHouseLove says
It’s totally a either-way sort of thing, but since our hallway had quarter round that matched the floor we opted to keep things consistent in the adjoined living room so it flowed nicely.
xo,
s
jenny says
i CANNOT believe you guys painted all the wood work! such a shame! oh and don’t get me started on the painting over chimney brick…
YoungHouseLove says
Uh oh, that’s on the agenda too. You might want to cover your eyes. Different strokes for different folks!
xo,
s
Megan says
It looks wonderful, crisp and clean. I have a terrible paint adhesion problem with the trim in my home. I think previous owners have done things quick and improperly and now I need to fix it. I know I should sand and probably use an oil-based primer. Have you found one that is no-VOC? I researched a little and found that KILZ claims to be low-VOC. Have you tried the KILZ ever?
YoungHouseLove says
If you truly have a paint adhesion problem, latex-based (no-VOC) primer probably won’t do the trick, so you might have to use oil-based primer (but finding the lowest VOC brand would help- along with running fans and opening windows). Good luck!
xo,
s
Dimara says
Random question about painting, I’m going to paint the tiny kitchen in my railroad, Brooklyn apt, and the stove is right next to a wall. Over the years, grease splater has absorbed into the wall. Do I need to use a special primer to ensure the stains don’t seep through to the new paint? I plan on using semi-gloss for the new coat and am working up a scheme to create a side splash to prevent further splatter.
YoungHouseLove says
Yup, you’ll need to scrub down the wall with soap and water, wait for that to dry fully, and then use an oil-based stain blocking primer. Then regular latex paint (in semi-gloss) should work!
xo,
s
Steph says
Hi guys,
GREAT job on the trim! Question for you guys. When you paint trim white in a house, do you paint the doors white, too? We just bought our first house and are getting ready to tackle the trim, but the previous owners installed brand new six panel wood doors, and we are unsure about painting them. What has been your experience???
Thanks!
Steph
YoungHouseLove says
Yup, semi-gloss white paint on all the doors and trim. At least that’s how we did it in our last house and loved it!
xo,
s
Par says
Hey – great job on the painting!
Crisp white is my preference for the beams. Maybe just the wood around the corner could do with grey and the rest white (not the entire beam section)
Take a look at this as well –
http://www.desiretoinspire.net/blog/2011/2/2/jean-louis-deniot.html
YoungHouseLove says
Thanks for the link! Lovely. We’re definitely still leaning towards staining or painting the beams gray for a bit of added drama and architecture (and in the interest of taking a risk and stepping outside of our all-white comfort zone) but we’ll have to see where we end up!
xo,
s
cori says
HI! I love you guys! I look forward to your blogs everyday and LOVE when there are more than one! :)
I am feening (is that a word?) to refinish our hardwood floors so I have been looking for videos and I came across a video that looked like your floors in this room. Are your floors hardwood? Well, here is the video of a man refinishing floors with that pattern.. be patient with the video.. It feels like a time warp. let me know what you think.
http://www.youtube.com/watch?v=Z9B5qWjihnA
Love what your doing with this room and I def say go for Gray beams I love! (but i am obsessed with gray these days!)
PS… I’m the one that helped (not really, but kinda) you find your house. ;)
Cori
YoungHouseLove says
So funny! We’d definitely love to refinish our floors someday down the line!
xo,
s
Anna @ The Owl & The Phoenix says
Oh my gosh you guys. I was just reading this post to see if you sanded and/or primed the trim and I am SO RELIEVED to hear that you didn’t do either and haven’t had any issues. I have been putting off painting the trim in my house for months because I’ve been dreading sanding/priming it all. Hooray! I’m off to get my paint shaken now (and a short-handled trim brush!). Thanks once again for the advise =)
YoungHouseLove says
Good luck! It definitely was a risk so we’re crossing our fingers for ya!
xo,
s
Erin says
I just stumbled across your blog in the midst of preparing to redecorate my 1923 Arts and Crafts home in MN. I am in awe! You guys are amazing.
I really, really want to paint my walls/trim the way you have it but I’m very scared about resale value after painting the original woodwork in my home white/gray. What are your thoughts on that?
I am late to the game on this post but, again, wow. Great work on everything! (I know I am going to copy your hallway framing idea. I’m psyched about it).
YoungHouseLove says
Great question! We have heard from multiple real estate agents that painted trim is becoming more in demand these days (some people just prefer that clean and fresh look). And in general, anything that makes a room look larger or lighter can help get a quicker sale (since large and bright are two of the most common “wants” on househunting lists). Of course there are still purists who prefer unpainted trim, but we sold our last house within two weeks (by owner) after painting all of the wood trim white, so we’re confident that there’s a market for that look, at least in our neighborhood! Maybe try calling a realtor or two (or chatting them up about it at an open house) just to see what they think? Good luck!
xo,
s
Kim says
Hey guys! I’m wondering how well the trim paint has held up over the last four to five months. Do you notice any scraping or chipping at all? I started painting the trim in our dining room with the same kind of paint (Olympic semi-gloss white, off of the shelf) during the late fall/early winter but noticed that, in some areas, it would easily scrape off. I let it go for a while so that it could fully cure, and things seemed OK. Then, just the other day, I noticed peeling after I had something just resting against the trim. We were careful to prep the trim before painting. I am wondering if it’s the quality of the paint or something else? I would LOVE to stick with Olympic for its VOC-free qualities.
YoungHouseLove says
Ours still looks good! Could it be that your trim was varnished a lot? If it’s too glossy it can have adhesion problems (in those cases sanding and then using oil-based primer can be amazing- and if you want to avoid VOCs, just sanding and repainting hopefully will work). Hope it helps!
xo,
s
Steph says
Working on painting the trim in our kitchen. I went out and bought the miracle brush you suggested, and I do love it, but I think I don’t have the steady hand skillZ you have, Sherry. I like the way the trim looks, but it doesn’t look as perfect to me as I would like it to. My mom says I’m crazy, and in pictures of the trim I painted, it looks great. My trim is a little different than yours (it looks like it has less of a ledge at the top), but how did you get so great at making the lines so clean? Granted, this is my first attempt at painting trim, so maybe experience will help. I was just wondering if you have any other tips (besides the brush and taking the time to do a good job). I feel like none of my options (taping off the wall, etc.) give me that perfect crisp line i’m looking for… and I don’t want to take the trim off to paint it.
YoungHouseLove says
It sounds like you did an awesome job, but maybe the video in this post will help?
https://www.younghouselove.com/2011/02/holy-buckets/
It shows me at work (it might just be a practice thing, but hopefully my tips will come in handy):
Good luck!
xo,
s
Leanne says
I just found your blogsite last weekend and I am obsessed. Your style and enthusiasm in contagious! I adore the living room paint job, the wall color is sheer gray perfection. Unfortunately, my husband and I were going for a chic gray living room as well but we ended up with a shade that is far too dark and makes the space feel too industrial (I pouted for days at the end result, not proud to admit that). I apologize if I missed it in a previous post, but can you tell me what brand/color was used on the walls?
Keep doin’ what you do, Petersik’s! Love it!
YoungHouseLove says
It’s Moonishine by Benjamin Moore (color matched to Olympic No-VOC paint). Hope it helps!
xo,
s
amy c says
Love your stuff! I do have a question about trim. Are most homes in your area filled with white trim? Besides the colored beams, have you ever considered dark trim elsewhere? Or should it be a whole house/continuity thing? Between dark and white, is one better? I can’t find a post specifically on trim advice though since, at least in your new home, the white trim was already there so why focus on that. :) Thanks for the great stuff.
YoungHouseLove says
Our first house had almost all oak trim. We are more white-trim people (you now we like things glossy and clean- haha) so we went for it. But we’ve seen gorgeous rooms with oak trim so just do what you love. Most folks like to have trim the same color throughout a house but I’ve seen homes with oak in some rooms and white in some rooms and it really can work too! We have those dark beams in our living room and nowhere else, but I think just things like the big dark sectional under them balancing it out really helps it make sense!
xo,
s
amy c says
Thanks $herdog!
-amy c
Amy E says
Your white trim looks great and I have been thinking about doing it in our house for awhile now. However, almost all of our house is carpeted, so do you have any good ideas on how to paint the trim without getting it on the carpet? Thanks so much for your help! You guys are great!
YoungHouseLove says
Maybe tape down a dropcloth? Or use a piece of cardboard against it?
xo,
s
slateberry51 says
The reason it took so many coats with the Base 2 is that, as you go from a base for lighter colors to bases for deeper colors, there is less pigment in the base, leaving more “slots” in the base for pigment to be added. So, compared to Base 1, base 2, without any colorant added, is by definition more transparent. you might want to reconsider your trim paint choice. There must be a way to get base 1 tinted to look like base 2. Then you will get the color you want, and much better coverage.
YoungHouseLove says
Great tip! Thanks so much!
xo,
s
Mandy says
LOVE LOVE your house! The grey beams are amazing. When painting the trim, how long did you wait between each coat?
Thanks! Mandy
YoungHouseLove says
I usually just wait the time it takes to get back to where I started, which is usually around 30 minutes to an hour, so then I can put on the next coat!
xo,
s
Mandy says
Thanks, Sherry! We’re painting our trim right now. So thankful you guys put all of your tips online for us!
Kait says
We just moved into our first house and we are planning on painting the trim (currently a golden color wood that matches our hardwoods). I noticed that you did not paint the quarter round, is there a reason you choose not to?
Our trim is much shorter than yours (only about 2in above the quarter round) so it may look stubby if the quarter round isn’t painted too but I’d like to avoid painting quarter round if possible :)
Kaitlyn
YoungHouseLove says
In our house other rooms already have painted trim and not painted quarter round. It was like that in our first house too, so we think it’s just an either/or thing so we chose to keep it consistent. It also minimizes dings and black marks on quarter round when it gets dinged and kicked!
xo,
s
Kait says
awesome, thanks! I love your blog, so many great ideas!
Christina says
Hey guys…so I know this post is so last year…but I hafta ask if you all usually paint the walls before the trim? I have just always heard to do it the other way, but if you guys have found it easier to switch it up, well, I just might try it, too!! Thanks guys!
YoungHouseLove says
I think you can do it either way but painting trim is probably easier if you don’t have the steadiest hand since you can paint over whatever you get on the walls when you do the walls! Hope it helps!
xo,
s
Anna says
Hi! I love how you did the beams! Were the beams already finished before you started? If they had a seal or wax coat on them that you painted over. I have very light bare (pine maybe?) wood trim I’d like to try your dry-brush technique with but I want the wood a little darker before I do (by adding a tinted finish of some sort). Or have you ever used this technique on unfinished wood trim?
YoungHouseLove says
They were a red stain (not sealed but stained) before I dry brushed them. Never used this technique before, but I just sort of learned as I went, so I’m sure you can figure out what you like as you go. Hope it helps!
xo,
s
Joan says
I’m trying to decide if I want to paint the wood trim in our family room & kitchen. I’d love to create a picture of the rooms with a different color trim like you did above with the gray beams. How did you do that? It would be so helpful for me in my decision-making! Thanks!
YoungHouseLove says
I used Photoshop, but it’s not free so maybe try a free site like gimp.com? Maybe that’ll help? Good luck!
xo,
s
Lynette says
I am thinking about painting the trim in my entire house, some room walls need to be painted also. Which would you suggest painting first? The walls or the trim?
YoungHouseLove says
Typically they say trim and then walls, we have done it both ways and they both work, but trim first might be a smidge faster. Hope it helps!
xo,
s
Isobelle says
Wow! We just bought a house and have to paint ALL the ceilings, walls and trim….Wish us luck!
YoungHouseLove says
Good luck!! It’s so fun when you’re just moving in, even though it’s exhausting!
xo,
s
kelly says
So, my husband and I are currently in the dark-trim-vs-white-trim dilemma. My husband likes the dark wood (looks like your before trim pics that don’t have the flash right on it). I don’t hate it, but whenever I see before and after pics of dark-to-white trim, I’m always relieved at the end white trim result! But I also LOVE your dark painted beams at the top; definitely adds drama. So, how did you decide these things?? And, since you obviously love white trim yourself, do you have any suggestions for someone who’s trying to make the dark trim work in terms of complimentary wall color?
YoungHouseLove says
Here’s what I would do, if I wasn’t 100% sure I wanted to paint trim or beams (which is a long hard-to-reverse job) I definitely wouldn’t pick up a brush! It’s best to wait to be completely sure, so in the meantime you might just want to keep inching along in the room with other things (adding curtains, art, accent pillows, etc) and see how it feels. If something still feels off the entire time and the trim is nagging at you, it might become clear that you really would prefer it white, but if the room comes together with each update and you love it as-is, you won’t make any decision you regret. It’s all just trial and error with us, and doing things slowly over time seems to cut down on doing things that we regret in hindsight. Hope it helps!
xo
s
laura~eye candy event details says
OK so soooooo glad I found this post! I have been debating for like 4 years on painting all of the awful nasty dark wood trim in my house to white but have been too scared to do it because of ONE thing which I must ask! What do you do about the windows & doors? I get you paint the door frames as well but what about all the bazillion doors & the windows??? Any help/ advice would be much appreciated because after reading this post I am soooooo ready to head to Lowe’s for the white paint! waaaahoooo – thanks in advance! You guys ROCK!!! xoxo
YoungHouseLove says
Sometimes the window trim and doors are already painted (here many of them were) but if not, we paint those too! Did that in our first house and it took forever, but it was worth it!
xo
s