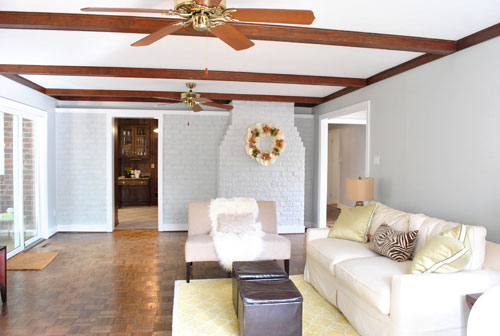
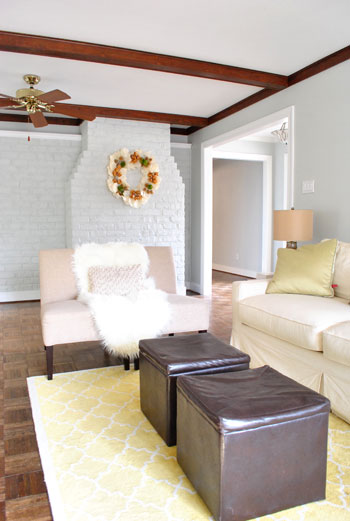
Glad that’s out of the way. Painting the trim was as long and tedious of a process as we expected. Maybe more-so actually, but it’s done! Wahoooo! And it feels pretty darn good. Seriously, there was more than one happy dance (one on Friday night when we finished, and another one in the morning when we saw the room in the light). What is it about certain annoying home improvement jobs that make you want to ugly-cry while doing them but happy-cry when you’re done? Talk about roller-coaster emotions. In the end, we never regret them, and we’re happy we got ‘er done. We’re just not ready to “do them all over again” the next day or anything. Haha. Anyway, it’s looking pretty good. Here’s the view in the living room now (ignore the beams, we’ll get to that later):
As far as the process went, experts recommend using oil-based primer to block potential bleed-through when it comes to painting wood trim (followed by latex paint). We threw caution into the wind and went straight to white semi-gloss latex no-VOC paint (Olympic Premium from Lowe’s). I had gotten some gray wall paint on the trim a few days back when we tackled that project, and it seemed to cover well without any signs of bleed through. So I went for it. Could have been a terrible plan. Could have resulted in having to go back and repaint all the trim with primer if I did see some bleed-through. And possibly pulling 60-80% of my hair out as a result. But it didn’t! Oh happy day.
So we saved the nastiness of working with oil-based primer and all the VOCs that come with it. Call it a baby-and-eco-friendly risk that happened to pay off. If it hadn’t we would have sought out the lowest VOC stainblocking primer that we could find, but it was pretty sweet that it didn’t come to that. That’s about where the words “pretty sweet” stop with regards to this project. We vowed to keep it real with you guys, so although we’re eternal optimists who generally love nearly every project that we tackle (even the ones that don’t work), we promised to tell you if something sucked. And painting the trim totally did.
It wasn’t that it was very hard (I used this brush, which I swear by for “staying in the lines” and going a lot faster that I used to move with a traditional long-handed brush). It was just that it took for.ever. I started at around 10am on Friday and went it alone until about 3pm (while Clara took her morning nap and then John watched her and tended the blog), then around 3, out of sheer desperation, I asked John to help while Clara was taking her afternoon nap (he traditionally rebuffs detail work since he’s the “big picture” guy who rolls while I cut in, so he claims he has less control when it comes to fine motor skills with a brush). At that point I was on coat #2 though, so I just asked him to go down the middle of the trim and baseboards with the second coat while I followed him and added a second coat to the top and bottom of the baseboards and trim (which requires a bit more control since that’s where the brush can meet the floor or the wall).
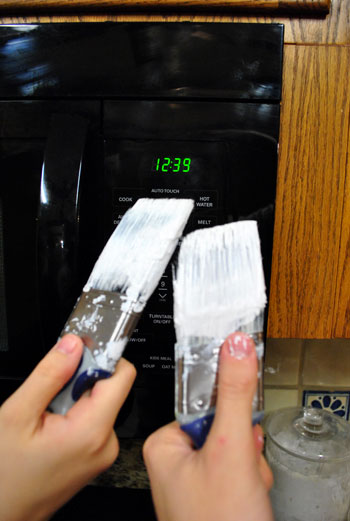
By coat number three it was around 7pm (thanks to a lot of blog, Clara, and food breaks among other things) and that’s when we realized that it wasn’t going to be a three-coat process like we thought. It was going to take four full coats to cover that dark dark trim. Boo to the hoo. There may have been a temper tantrum (not by Clara) but no actual tears were shed (which I consider to be a semi-mature response to such devastating news). But we pressed on. And it was actually past midnight when we finally finished (and snapped this victory shot of our paintbrushes “toasting” in front of the microwave clock). Klassy, right?
If we had used oil-based primer it definitely would have only been a 1-2 coat process (after the coat of primer was applied, which would add up to 2-3 total applications) so it may have taken us until 5 to 7pm instead of 12:30 in the morning. But those 1-2 extra coats were worth it to us in exchange for a completely zero VOC result. Even if it meant dragging a little bit the next day. So for those who are looking for the expert recommendation for tackling this project, use oil-based primer applied with a brush followed by 1-2 coats of latex gloss or semi-gloss paint also applied with a brush (and tape things off if you like to work that way). But if you wanna know how we did it, I used my trusty short handled brush and we applied 4 coats of semi-gloss latex paint (without taping off, since over time I’ve gotten nice and steady without tape). We actually painted all of the wood trim in our first house (including the stuff in the bathroom and kitchen) using this method (no sanding or primer) and we luckily didn’t have any chipping or bleed-through issues after 4+ years there. Fingers crossed for the same luck here!
As for the paint choice, we used the off-the-shelf white stuff that comes without any tint from Olympic Premium called “Base 2” (since “Base 1” is also known as “Ultra White,” and we wanted something crisp and white but not crazy white with a glowing blue tint to it). We love the color, and plan to use it for the rest of the trim in the house. When we finally work up the energy to tackle a project like that again in a few years. Har har.
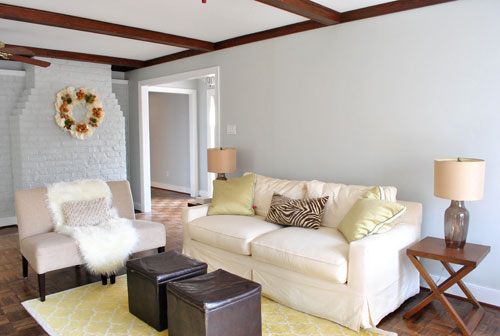
Oh and the beams. We promised more details about those. We left them au naturale to be 100% sure that we don’t prefer them that way (we don’t). But now that the trim is all painted, we’ve decided that we definitely want to stain or paint them a deeper gray color for some richness and dimension. And of course those fans have to go. So for a vague idea of what that might look like, picture this…
… looking something like this:
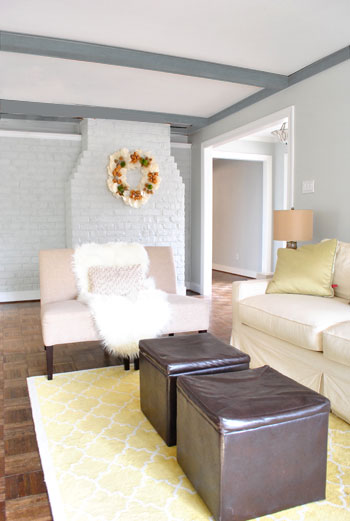
They definitely would have looked gorgeous in white just like the trim, but we want to take a risk and do something a little unexpected. We love that it’ll hopefully be just the right amount of drama without looking too heavy (we have standard 8-foot tall ceilings so we didn’t want them to feel like they’re closing in on you). But we think it’ll have a nice not-too-top-heavy look in the end, especially since we’ll be bringing in a large charcoal sectional to ground the room and add balance. Then we can start layering in some bold colors in the curtains, art, rug, accessories, etc. Should be interesting.
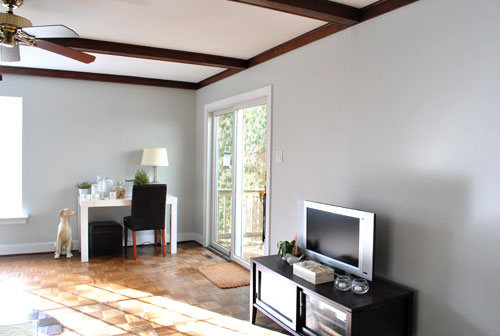
And why not end with a nice little flash-back to what the space looked like a little over a month ago when we moved in?
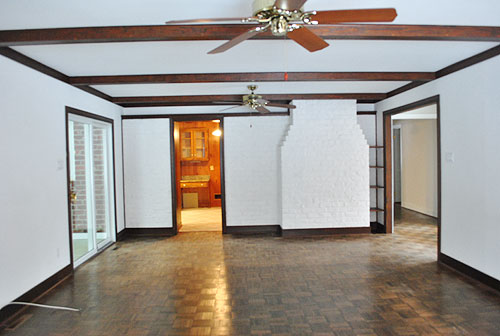
Oh the memories. Change is good.

Cara says
I’m curious why you are anti-ceiling fan? Is it just a matter of personal taste? No doubt you’d cringe at our 4 ceiling fans – one in each bedroom and another in the living room! Atlanta summers and owning two dogs with breathing-in-the-heat issues make them a necessity. I’m not offended, just curious.
YoungHouseLove says
Hey Cara,
We’re actually not anti-fan at all! We kept the one in our first house’s den and the one in our sunroom and plan to keep the one in our sunroom here (and have also brought in table fans in our bedroom and Clara’s for some much needed ventilation). The heavy and old ceiling fans in the living room just have to go because their placement is so strange! And we figure adding more light (we just have one small one over the game table in the back) is preferred- and not in such random spots (we might add a pendant light over the seating area). Fans definitely do it for us in a lot of ways if they’re in the right spot!
xo,
s
Allison K says
So funny that I was doing the exact same thing at the exact same time! I did use the primer(and it does bother me that it has VOCs). It has taken me 2 coats on top of that. After the first coat, it didn’t look much better than just a coat of primer. It’s also taken me a lot longer than you. I can’t paint all day and all night, due to other obligations, so I’ve worked about 3-6 hrs a day for the past 3 days and still no where near done. What do you do to keep yourself entertained(and from going crazy)? Do you listen to music or anything? I usually have the radio on, but since this is our living room, I’ve been having movie marathons. That may or may not have slowed my progress down a little:-P
YoungHouseLove says
Hey Allison,
We definitely listen to music (usually Pandora, so it’s random and less expected than CDs that we hear all the time). It helps the time go by a bit faster I guess!
xo,
s
Jess says
I bought a 1925 duplex complete with all paneling (Which had already been painted by the previous owners), and trim in 2 colors: dark tan and natural wood. Seriously – a room with yellow walls and tan trim, one with army green walls and natural wood trim…ugh. Painting that trim white, or off white in some cases, was the quickest and easiest way to freshen up those rooms!
I LOVE your gray ceiling beams!! AWESOME!
TheCarolinaHousewife says
Fantastic work on the trim–I love how it makes the wall color pop. I may be the only person who doesn’t want you to paint the beams. They’re simply gorgeous as is and make a beautiful contrast to the white and grey in the room.
karen says
The transformation continues to be remarkable! I think the gray ceiling trim and beams will be the icing on the cake. I always look forward to my daily dose of your progress, and only wish I were half as energetic and focused as you two!
Here is a random question about your photoshopping….I believe you have a Mac. Do you use Elements? I want to get into Photoshop, and also have a Mac, but was told that Pixelmator was a good program for the Mac and not quite as complicated as Photoshop. It is obvious that you are an expert with that program!
As always, thanks for sharing your expertise.
YoungHouseLove says
Hey Karen,
We use Photoshop (since we both learned the program in college and used it on the job in advertising) so we don’t know much about Pixelmator. So sorry!
xo,
s
heyruthie says
thanks for the encouragement, sherry!! we’ll see when things warm up outside. maybe that will galvanize me!
also, a part of me thinks the beams would look really cool if they vaguely “mirrored” whatever you do to the floors (espresso stain, etc.) but you’ve probably already fugired all that in!
Lilly says
Yeah that’s what I thought I should do, hold off to see ur outcome. lol. That’s where I want mines on the nightstands. The side tables that I had to give up were brand new I bought them when she was newborn (last year) because they were beautiful for the livingroom/playroom now, but I ended up giving them away for her safety when she started to play around them or with them.Thanks alot u guys always apreciate ur advice.
stacy says
LOVE it!! Your hard work definitely paid off…again! Are you noticing any blue undertones at all with the Moonshine…we’re strongly considering it in.
Jen_nifer says
What happened to the “View All” link for comments? I like to try and see if my point or question has been covered before, but can’t be bothered to check multiple comment pages.
I’ve checked this one, and don’t think it was mentioned. The biggest problem I’ve had with painting wood without a primer is bleeding through knots. If your trim didn’t have many knots you should be fine, however I’ve had bleeding show up a year or two later when I’ve painted trim with knots without priming.
YoungHouseLove says
Hey Jen_nifer,
In order to have threaded comments (which allow us to answer people right under their question, which seems to be what we and others prefer) we couldn’t get the “view all” link to work without crashing our site. But we’ll continue trying to get that back in there! As for bleed coming through later, we used the same no primer/latex paint method to paint the wood trim in our first house and after 4+ years we didn’t have any issues with cracking, peeling, or bleeding- so we’re crossing our fingers for the same luck here!
xo,
s
LittleMissEclectic says
I was going to ask about the beams. I was thinking you should go for a darker gray too! Love it.
Sarah T says
absolutely LOVE the grey ceiling beams. Such a great idea!
Nesting Newbies says
It looks so good guys! Keep up the good work!
Krissy says
Wow, this looks great! The white really makes your grey wall colour pop (and look grey). So definitely your pain staking efforts paid off! Now go enjoy it! :)
Erin says
Do you have a close up shot of the wreath you have hanging over the fireplace? I have been thinking about putting a year round colorful one above mine but have been having trouble finding one that doesn’t feel holiday.
YoungHouseLove says
Hey Erin,
Here’s a post with a closer shot: https://www.younghouselove.com/2009/03/pretty-presents-a-plenty/
Hope it helps!
xo,
s
Jenn says
I feel you pain! In our old house we painted all the trim. We got to what we called “the vortex” of the house which was a little hallway space with 7 doorways! Fortunately the previous owners had painted the trim so we just had to 1-2 coat it, but we had claw hands afterwards. It was so much easier when we put new baseboards and trim the upstairs and could just put them on saw horses and paint. The room looks great! Where are you getting the grey sectional from? We saw an awesome one at Macy’s when we went and bought our sectional.
YoungHouseLove says
Hey Jenn,
We def. owe you guys a post on our sectional hunt! Stay tuned…
xo,
s
sarah says
Trim looks great! I would love to see the beams stained a darker color and match the floor. I think it would bring warmth into the room. I think it looks a little cold with grey painted beams.
Andrea B says
Lookin’ good!
I wanted my living room to be those colors, but we have yellow paint all over the main areas of our home leftover from previous tenants in our rental, so that just wouldn’t have worked.
Seriously, though. Good job. You deserve a breather!
Erica @ Erica's Inspirations says
It looks so fresh and crisp! It is amazing how white trim really modernizes the space and makes the gray walls pop!
Jen says
First of all, love the new threaded comment system! It keeps me from having to scroll up to find the question you’re referring to in your answers!
Second, for us, the negative emotion task is hanging art. Every time hubby and I try to do that together, we almost have to get a divorce! But when it’s done, we stand there with our arms around each other admiring our good work. =)
YoungHouseLove says
Hey Jen,
Hahaha, love it.
xo,
s
misa says
i’ve been sloooowly repainting the doors and trim and it.is.the.worst.
Shannon says
Oh Gosh…this post hits close to home lol. I TRULY feel your pain when it comes to painting trim. The house that my fiance and I bought came with very unattractive stained honey-oak colored trim. Not only is the trim stained but so are the doors and the windows and the kithen cabints…honey oak everywhere!! So we have taken on the momentous task of painting ALL of the trim in the entire house along with the windows and the doors. It has caused more than a few arguments in our household..who knew wood trim could cause such a roller coaster of emotions?? The only upside is that the trim/doors/windows are in great shape and are a very good quality, so prepping isn’t too bad.
We have had the best luck with the exact advice you gave of 1 coat oil-based primer and then 2 coats latex. We are no where near finished, but boy does it look nice when we finish up another room with that crisp white trim :)
Your post once again confirms why I wanted to paint all of our stained trim in the first place – because the outcome is always fabulous!
Cara says
Sherry,
Thanks for your response. I feel better now that I know I’m not committing some terrible faux pas! :) I love your blog. Keeps me sane during the day!
Cara
Sara says
I literally just said “oooh” out loud (at work – oops!) at your picture of the dark grey beams. Fantastic choice – unexpected, but so seamless with the rest of the room.
Julie says
LOVE the gray, ya’ll! It looks so pretty with the yellows and browns! Congrats on all of the progress you’re making . . . must feel good.
MiChiMa says
Congratulations on getting that huge tedious task done. It looks fantastic :)
Our new home came complimentary with a thick, shiny, hideous-yellow lacquer coating on all of the wood trim. I swear the previous owners shined the trim with a stick of butter. So far, I’ve sanded the trim prior to priming and painting but it’s so tedious; just the thought of it gives me hives. I still have some major areas to tackle.. Do you think it’s ABSOLUTELY necessary to sand or is there an easier way to get things rolling?
YoungHouseLove says
Hey MiChiMa,
Oil-based primer might work without sanding- or some sort of deglosser or stripping agent. Just see what they recommend at the hardware store.
xo,
s
J'Anns Boutique says
Beams looks great! love the color…
http://jannsboutique.blogspot.com/
Tammy says
I’ve been painting our trim white since last Wednesday – and that’s just the living room and hallway! I wish I’d been able to find your little brush, but the Sherwin Williams here doesn’t carry them, so I’m using another short-angled brush. I didn’t prime either, and it’s taking a good 3 coats of Valspar. Glad to know it’s not just me.
Steph at Modern Parents Messy Kids says
Great work on the trim – glad to hear I’m not the only one that likes to paint to the beat of my own drum and not always do thing the “expert recommended” way.
Love the direction you’re going with the beams and the rug in that room is fab.
Lindsey R. says
It looks wonderful!! I did want to share my experience with bleed through. I painted my sons furniture white (it was originally dark wood) and it took about 4 years but then the knots started to bleed through. Hopefully that won’t happen to you, but my paint guy said bleed through is a down-the-road problem, not an immediate one.
Love the gray beams as well!
YoungHouseLove says
Hey Lindsey,
We actually painted all of the wood trim in our last house using this method (no sanding or primer) and we luckily didn’t have any chipping or bleed-through issues after 4+ years there. Fingers crossed for the same luck here!
xo,
s
jenny says
man, I feel your pain on the trim painting thing!! glad you got it done though, at least now its over with :) speaking of painting trim, what’s your opinion on painting only half the trim in the entire house? our house originally had all wood trim everywhere, and so far we’ve covered about half of it in white, but the kitchen and back hall is still the original wood. I rather like the kitchen having wood, but I’m worried about it seeming rather disconnected from the rest of the house!
YoungHouseLove says
Hey Jenny,
We’ve seen homes with wood and white trim throughout and they look lovely! So it can definitely work!
xo,
s
Stephanie says
AMAZING! Looks so good! LOVE the daring decision to paint the beams! You two our doing such a fantastic job of slowly (yet not so slowly b/c I would have procrastinated with that trim painting)making your home really reflect who you are as a family.
I start every morning reading your blog and it makes me look forward to one day owning a home so I can make it look like MY home, just like you guys! Thanks for so much inspiration!
Sarah says
This looks wonderful! So bright , airy and fresh! I love it! I’ve been reading your blog for sometime, all your projects are so inspiring and I really appreciate the way your personalities come through each post! Keep it up! P.S Clara and Burger are too cute!!!!!
dionna says
Hi,
I’m about to start a huge living room painting project – over wood paneling. I loved your past post on that subject and read this current post with much interest. I’m completely lost as to whether there is a no-VOC or low-VOC option for priming the wood paneling prior to painting. I have a little one with another on the way, so priming with an oil based primer just isn’t in the cards for me at this point! Any suggestions?
Thanks for all your tips!
YoungHouseLove says
Hey Dionna,
There are definitely low-VOC primers that should still be great! Just visit your home improvement store and tell them what you’ll be doing and they should be able to show you some great alternatives!
xo,
s
Laura C in Indy says
Sherry,
I use the same paint brush for trim but still find myself hitting places (the floor or wall) that I shouldn’t. Do you ever have any mistakes that you have to wipe up or have you gotten that good over time?
Thanks for your blog…we get great ideas from you all the time!
Laura
YoungHouseLove says
Hey Laura,
I definitely think it’s an experience-over-time thing. I’ve probably put in about 100 hours of trim painting, so I’m a lot better at “staying in the lines” than I was at first. Practice makes perfect- well almost perfect.
xo,
s
Kellie says
I LOVE this post! I just did the same project here: http://sixtieshome.blogspot.com/2011/01/ahhh-freshness.html
And it also took me 4 coats with no primer. Notice the door I painted is surrounded by wood paneling and dark brick! ahh! (but I’m planning on whitewashing the brick! :)
Since I didn’t get any help on that door I refused to do it all in one day. It actually took me 3-4 different times to finish it. But I’m relieved to know you guys used 4 coats too and it wasn’t just me. Props to YHL for completing that!! It makes a HUGE difference. And since I know I won’t be getting any help in the rest of my house, I’m going to opt for the primer route next time.
I know you don’t use primer, but just want to check.. when using oil-based primer, won’t we have to use a different paintbrush? It was my understanding you’d have to throw it away after using oil-based paint. What brush would you recommend disposing every time you paint with primer?
YoungHouseLove says
Hey Kellie,
No don’t throw away brushes! Just use mineral spirits (swirl them around in a cup full of it and then rinse). We would still let that brush dry and use a second high quality brush if you have one, but there’s no need to toss it or anything!
xo,
s
Meg Smith says
Love the white trim! You both deserve a cookie! That is what I tell my hubs when he does something awesome!
Stephanie says
Quick question: Did you sell your glass coffee table from the other house?
YoungHouseLove says
Hey Stephanie,
Nope, that’s sitting in our almost entirely empty future dining room. We love it so much that we hate to see it go. But with a nearly mobile kiddo we’re not sure where it’ll end up. Maybe in the attic for a while…
xo,
s
Angie says
This post couldn’t come at a better time for me. Last night I started painting our 100% builder’s flat white house and found that perhaps I was overconfident in my abilities. How do you cut in by the ceiling? Is there a certain brush that helps or is it just skill (or lack thereof)? Also, what are your thoughts on using color on the ceiling? I failed miserably on my paint color selection for the one room I’ve tackled so far, and the thought of screwing up the ceiling as well is too much to bear.
YoungHouseLove says
Hey Angie,
We actually have a post about “cutting in like a pro” on our Projects page (see that tab up by the header?) in the Painting category. I use a short handled brush, but others like to tape things off (we prefer Frog Tape over the blue painters tape stuff. Good luck!
xo,
s
Tovah says
I too like the beams in their natural state (so I think that makes two of your commenters:) but I know whatever you do will make the room look great. That is amazing that you got all that trim done! I only am working on a tiny room in my house and it is taking forever. Bleh.
marissa says
Glad to hear someone else keeping it real about painting trim. :) I generally love house projects, but painting trim sucks! It took me forever to finish all the trim in our house – partly due to the process and partly due to procrastination to start each room, ha ha!
Chels says
I think Zinniser (sp?) makes a VOC-free primer that goes over just about everything. You guys should really try that. I’ve used their regular primer (yeah, VOC and all), and loved its coverage on all kinds of weird surfaces.
jeanne says
Thank Goodness. It’s lookin’ like Home Sweet YHL Home.
Take a nap today!
xo J
http://beeskneesbungalow.blogspot.com/
Stephanie says
Yes, I love it too, but good call on the saftey angle!
Jaclyn says
I was wondering if you knew that there is Zero-VOC primer?
http://www.builderonline.com/products/kilz-clean-start-zero-voc-primer.aspx
http://www.amazon.com/Rust-Oleum-249020-Bulls-Primer/dp/B002C01EVU
They sell both of these at Wal-Mart! : )
xo,
Jaclyn
coolhomecreations.blogspot.com
YoungHouseLove says
Thanks Jaclyn! We haven’t given them a try, but it’s good to know they exist!
xo,
s
Erin says
Ooh, I love the gray ceiling beams. I would have just painted them white, without even thinking of other options. Great idea!
Jessica Dixon says
I just seen noticed about the quarter round not being painted..and I seen your response why…it still looks great. I do have a question, in the instance one replaced carpeting with hardwoods, is that a way to not have to tear out all the trim? To add quarter rounds? My hubby and I bought a house last year and at some point we will be doing about 80% of our 1700 sq ft top level of a bi-level (we have a total of 3400 sq ft but not going that route in the lower level) in hardwoods…and he is worried that all of our trim will have to be removed, repositioned and cause us to do wall work and repaint all of our walls that we just painted shortly after moving in..Thank you.
YoungHouseLove says
Hey Jessica,
Yes! Quarter round bridges the gap so things look finished! It’s a great solution and then you can work with what you have (without removing it)!
xo,
s
Bianca @ Walnut Avenue says
Good Job, guys. I am sooo with you! After having painted my blood red trim in the hallway I knew it would take 4 coats in the living/dining room so I went about doing 2 coats of primer then 2 coats of paint to save $$. I was so contorted from doing the ceiling trim my chiropractor held an intervention forcing me to stop at coat 3!! Still waiting on the last coat but there is already a huge difference. You room looks way bigger and brighter – congrats!
Bianca
Rachel says
I have a question about using no-VOC paint. If you’re painting over paint/primer that did have VOCs from a previous owner, does your no-VOC stuff seal off the chemicals so they don’t offgas any more? Or do they stop offgassing after, I don’t know, 30 years or something?
YoungHouseLove says
Hey Rachel,
We have heard that paint can off-gas for up to 1-3 years (so it shouldn’t still be going after 30 or anything) but our understanding is that if you paint over something, as soon as that has cured it is essentially “sealed.” So if you paint over some VOC paint with no-VOC stuff, it shouldn’t off-gas anymore once it has dried (assuming it’s sufficiently covered). We’re definitely not experts though, so maybe check around to see what paint pros say? Good luck!
xo,
s
Kristen @ {K Leigh Ford} says
BEAUTIFUL contrast between the walls and the trim! The wall color stands out so much more than before! Love!
You guys are already doing such great things with your new home! I love following!
Renee says
I quickly scanned your responses to questions and didn’t see any mention of the smells of the no VOC paints… are they truly odorless? With two little guys in the house and cracks from a foundation repair, I’ve been gun-shy to try to get the house re-painted because of potential fumes…
PS… LOVE the new look!!
YoungHouseLove says
Hey Renee,
Our experience has been that there is a super super subtle scent (wouldn’t even call it an odor) but as soon as the paint dries (a few hours after it has been applied) that is 100% gone. The next morning there’s no new paint smell or anything, that’s for sure! Hope it helps.
xo,
s
Renee says
THANKS! Maybe I’ll tackle the bathroom tomorrow while the hubby’s at work! *insert sinister laugh here*