Remember when I admitted that I was glad this was over? I’m even more glad that the following project has come to an end. Let’s just say standing on a stepladder leaning back and up to paint three sides of five beams plus crown molding and quarter round around a mammoth 25 x 15′ room isn’t exactly a picnic according to this girl. I’d point to myself with my thumbs as I said that but I’m too sore. That’s right, my thumbs are sore. Along with my neck, back, chin (yes, chin) and various other body parts (calves, glutes, even my obliques for some odd reason). So to those of you who guessed that beam painting might burn more calories than rolling (see this post) I can assure you that it’s moderately to severely more uncomfortable, so I’m betting there were some calories that were burned (along with some muscles that were pulled and a few chins that were strained- all of which were mine).
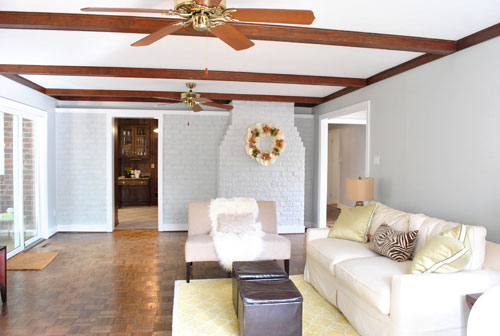
But it’s worth it. Oh so worth it! The beams went from a reddish tone that we tried to love, but just couldn’t (to us they just looked like they stuck out like a sore thumb)…
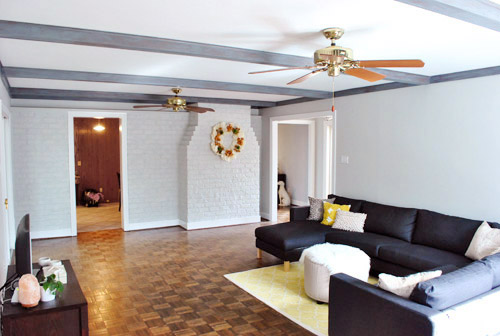
… to a warm rustic gray tone with enough of the brown wood color still peeking through.
We definitely still have to deal with the ceiling and those fans among a few other things, so this is just the beginning of the top 5% of the room’s transformation. We have no idea what color we’ll paint the ceiling but we’ll share all the details when we reach a final decision. Promise.
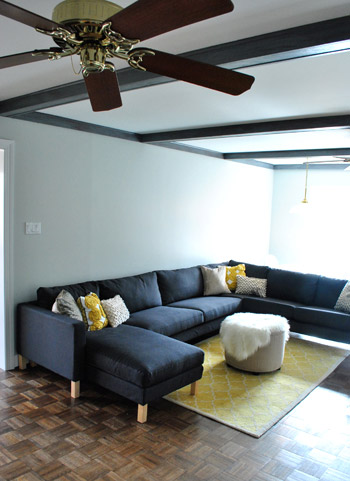
And the soft gray color washed over the beams seems to be a really good start when it comes to making the living room feel more like us. We think it’s kinda charming and dramatic without feeling nearly as heavy as the old dark reddy-brown beams felt. See how the thin wash of paint sort of diffused those sharp red undertones?
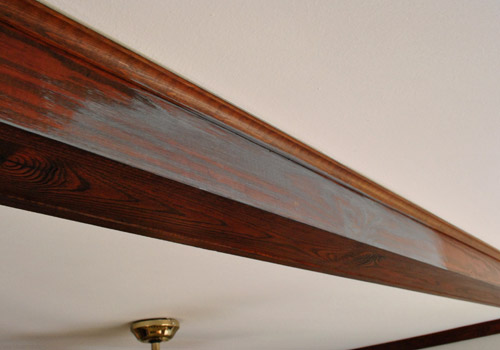
Here’s another detail shot of the beams more thoroughly painted so you can appreciate the dimension and the wood grain that shows through:
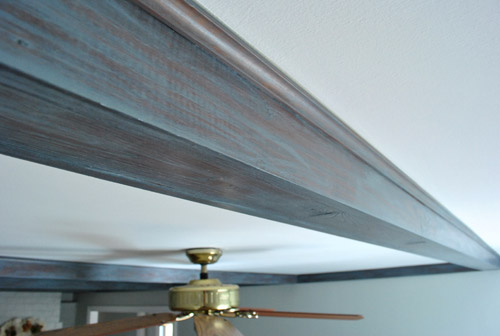
Ah, victory. It doesn’t feel any less good, even when you’re slowly shuffling around like an achey old grandma. I know some people love the look of untouched wood beams but they just weren’t right for us. And as the light changes the freshly gray-ified beams go from soft and rustic to deeper and more dramatic. Which is definitely fun since the room seems to get a bit swankier and more moody as the sun sets. See how the beams look deeper later in the day? We love it.
And for those who aren’t quite convinced, just remember that the room is about 8% done. We have a too-small rug and media center, huge honking fans on either side of the room (centered over nothing) that will be coming down, giant naked windows and sliders crying out for some curtains, nothing on the walls at all, etc. Heck, just adding in a bright 8 x 10 rug (instead of our current 5 x 8 one) and hanging some bold floor length curtains panels high and wide on those windows and glass doors will make this space feel 500 times more finished (and help the beams fit right in with the other textures and saturated colors that we’ll be adding in).
Can’t forget art either. Right now the walls are bare, but along with a bold rug and some punchy curtain panels we really want to add in some large scale brightly colored art which will also keep the room from feeling like a cold gray box and balance out the boldness of the beams with a bit more going on (so they’re not the only thing you see, they’re layered and lovely among a room full of color, contrast, shapes, fabrics, etc). Of course you’ll have to bear with us since this isn’t HGTV, so we definitely can’t snap our fingers and finish the room in 30 minutes. Instead you’ll get to watch it slowly evolve one project at a time along with the rest of our house – in real-time, on a real budget. And we think the beams will fit right in with our vision for the space as we slowly add in more color, art, fabrics, etc.
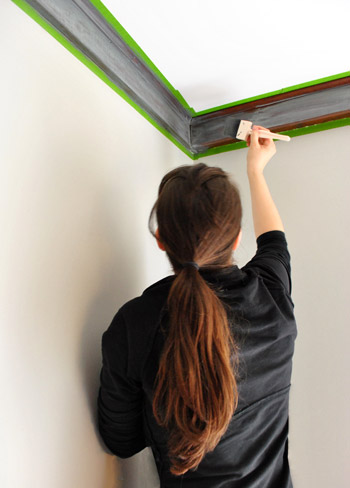
But anyway, on to how I did it. Yes, that’s the word I. John gets no credit for helping. Well except for Clara-sitting (and blog-sitting) while it all went down. Which was supremely helpful, but let’s just say that his neck and back didn’t revolt for three consecutive days like mine did. But again- it was so (so so so so) worth it. I walk into the room and smile now (we even catch Clara gazing up and grinning at our “new” beams). I might have even been smiling as I painted – although I think that face could probably best be described as a grimace. Hence this back-only progress shot.
Yes that picture alone spurred me to get a haircut the very next day (the first one I got since Clara was born 9 months ago). Insanity. Just a $14 trim at Haircuttery though. Nothing too crazy.
But on with the beam painting project. I’d actually use the term “painting” very loosely when it comes to this process. What I did to the beams could best be described as a combination between whitewashing graywashing, sponging, and drybrushing. But let’s start at the beginning. First we taped a few different swatch cards up on the beams and picked the three gray tones we liked best (which ended up being the last three swatches on the middle card from Benjamin Moore: Shaker Gray 1594, Rocky Coast 1595, and Nightfall 1596).
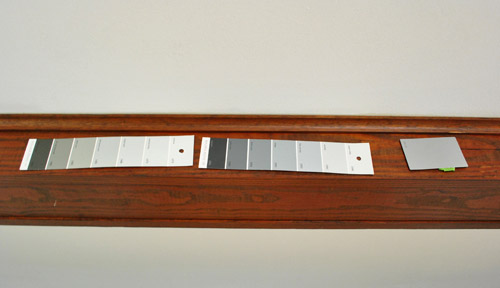
Then we went to Lowe’s and had them color match those three colors (they had them in the computer so they didn’t even have to scan our swatch card) to three small test pots of satin Olympic Premium No-VOC paint. We returned home with those three test pots and did a series of applications on the beams to see what we liked best. We picked an out of the way back edge of a beam that you can only really see when you’re standing in the corner (where the desk currently is) in the back corner of the room – just in case anything we didn’t like stuck around. But luckily everything we did was easily wiped down after each test was conducted. Especially the first attempt. We tried watering down a drop of paint on a ceramic plate and applying it with a foam brush.

That was a disaster. Ok, disaster is probably a bit too dramatic, but it was so watery it ran right off the beam I was test painting and onto the floor. It was gross and drippy and just not working. Then I tried using a dry foam brush to lightly brush on some paint directly from the tester. No watering down (or brush wetting) at all. As soon as I feathered it out, it started to look pretty cool. So we picked the test pot color that we liked best with the dry brush method (which happened to be the lightest of the grays that we brought home- Shaker Gray 1594 by Benjamin Moore) and used a wet rag to wipe down the other two test applications on the beam. Amazingly the unchosen paint applications came right off since they were so freshly applied and we left the winning one up there as a starting point. Here’s what it looked like at that stage in the game:
Next John helped me tape off the area around the beams and crown (since the 2″ foam brush wasn’t nearly as easy to control as my usual short handled brush). Then it was as easy as as simple as as mindnumbingly repetitive as using the 2″ foam brush to softly dry brush the medium gray paint all over the bottom and sides of each beam, piece of trim, and piece of quarter round for an imperfect but soft and charming weathered gray wood effect. We went with only one coat (which was very thinly applied, I’d stretch the paint as long as possible, dragging the foam brush so it would spread it out for a nice thin and translucent effect). In fact, although the project took me three days to fully complete (parts of Friday, Saturday, and Sunday – mostly because I couldn’t stay up on the stepladder for more than a few hours at a time since my neck got so cramped and my extended arm got so shaky) it probably only took about 6 hours total.
So sorry to sound so complainey- it was just an honest to goodness hard a$$ job. And you know we vowed to keep it real, so it just wouldn’t make sense to say things like “it was as easy as pie” when it wasn’t particularly difficult with regard to skill level, but a bit tough when it came to things like strength and endurance. Especially when you’re height-challenged like my 5’2″ self. Hah.
Oh and here’s a good demonstration of how much I stretched that paint. The entire project didn’t even exhaust the small amount of paint that we originally picked up to use just as a tester. This is a pic of our Shaker Gray test paint pot when we were completely done painting the beams with it. And there’s still about 10% left on the bottom! Who knew the paint used for this project would cost us just $2.80? Amazing.
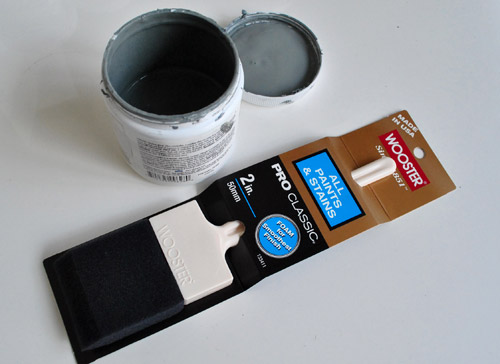
Oh and see the foam brush in the photo above? That’s an extra one I grabbed just in case my first one got beat up (I’m pleased to report that it made it through) so I stuck the extra guy in the picture above for anyone wondering exactly what foam brush I used (it’s from Lowe’s btw).
Anyway, back to the paint job. We love how the paint grabs the knots in the wood so it looks stained instead of painted for a subtle diffused look:
It’s almost as if we turned down the red and upped the weathered gray tones for a soft aged effect that fits right in thanks to the deep charcoal sectional on the ground (which definitely does its part to balance out the dark beams). And again, once we bring in a larger rug and media cabinet, remove the fans, add some art, hang lots of textured and bold curtains, etc – this room should really start to come together and warm up (since it’s pretty much a gray sandwich right now).
In the end, we both love that we took a risk and went waaaaay outside of our paint-it-white comfort zone and did something that looks weathered and stately and polished yet surprisingly soft. We definitely think it’s a risk that’ll pay off as the room starts to come together over the next few months. And we think it’ll look even more finished once we figure out what color we’ll add to the ceiling (a soft metallic champagne color? a light blue or green or yellow tone? wallpaper? more details on that as soon as we’re 100% sure about our direction).
And now we’ll end this beam-altering diatribe with a fun little journey back in time to this shot of the room as it looked when we moved in less than two months ago:
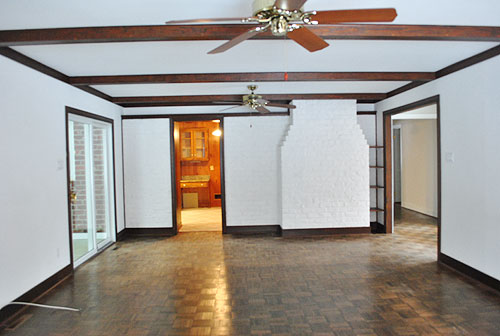
So crazy. You’ve come a long way baby living room. Can’t wait to start in on a few more projects…

Tania says
Great job! I think the space looks more modern with the grey beams! I know you have been thinking about more moody tones like the gorgeous shade of dark teal of the built-in backdrops but the pops of yellow are making me wonder what the space would look like with a yellow ceiling, although U have never seen anything like that in real life. I also love plum with grey, but that seems like it would be a bit too dark. I’ve got last night’s Glee episode on my DVR, it will be hard to watch and not think, “Sue, the napkin”.
Tania says
Sorry, that should have been “I’ve never seen”, not “U have never seen”. Too much multitasking here, between blog-reading and IM’ing my officemate.
anna says
I love everything you do but the gray beams look kind of weird especially half-way painted. They just make the ceiling look really heavy. I would probably do white or leave them wood but this is just my personal opinion. I love everything else in your house.
Ashley says
I hate painting over my head!!
I’ve been painting my bathroom & its taken a week to motivate myself to paint the ceiling; doing 2nd coat night, ugh!
I’d paint the ceiling the same color as the walls & done the trim in a high gloss white!
Good luck!
Lindsay@Tell'er All About It says
Such a great idea!! I need to re-read the process, but it looks amazing! Such a difference!!! GREAT JOB!
Btw, I really love that yellow rug/pillows with the gray. It really does POP! Great job – time for a nap!
xoxo,
Lindsay
Tell’er All about It
Maggie@Cheneyhome says
LOVE the look of the wood grain showing through. Makes me want to do something similar somewhere in my house…
mimi says
I saw a cool ceiling fan and thought of your airy living room right away. Have you seen this? chiasso Artemnis Fan: http://www.chiasso.com/store/Zoom.aspx?ItemId=50622
it’s so airy and not heavy looking like the tradition propellers.
YoungHouseLove says
Wow- that’s definitely not your average ceiling fan!
xo,
s
KathyG says
It’s gorgeous! Wow.
… and lol at ‘directed at my mother who constantly wants to know when I’m going to do this or that…” Your sense of humor is awesome!
Jeanette says
Looks nice, and now I’m inspired! I am wondering what you would think of using that technique on cabinets. I have plain ol’ oak cabinets and I don’t love them. I would just paint them, but with the grain of the wood I think it would look strange. This uses the wood grain to your advantage. Maybe with a couple of coats of poly on top?
YoungHouseLove says
Yeah I would ask at the home improvement center what you could do to seal them. And if they’re too glossy the dry brushing technique we used might not work. Hopefully they’ll have some suggestions!
xo,
s
emily says
You keep referring the grey as super warm. I wish I could see it in person, because the grey on grey on white seems super cool to me.
I can’t wait to see how you warm it up with yellow (or some other color) accents. I think once you get some other colors in the room, the beams will provide a nice presence.
YoungHouseLove says
It’s totally a gray sandwich in there – not gonna lie! The gray tone we picked for the walls and beams are definitely some of the warmest ones we found, but gray is still undeniably a cool color (the warm adjective comes out thanks to the wood that shows through, which feels warmer and more casual and rustic). We definitely can’t wait to bring in fabric and art to add color and a lot more warmth and approachability!
xo,
s
Robin says
I think it looks great! Can’t wait for some more bright colors and fancy extras!
Do you guys have any plans for the outside of your house? Spring is coming!
YoungHouseLove says
Yes! We can’t wait for it to warm up. Lots to do out there from privacy tree plantings to building out the columns on our porch so they’re square instead of round. Too much to mention, but if you search “listy mclisterson” on our sidebar it should turn up a post all about what we’re dying to do both inside and outside!
xo,
s
Lena says
I just looked yesterday at this cool diy carpet and realized that you have a similar pattern on your rug. Since big patternd rugs can be expensive and you like diy I thought to give you the link- maybe you can find a cheap uni-colored rug and diy? http://www.ikeahackers.net/2010/04/from-sweden-to-morocco.html
Of course you also could do other patterns like chevron…
YoungHouseLove says
WOW THAT IS GORGEOUS! Love it so much. Thanks for sharing the link!
xo,
s
sophie says
if you’re looking for some punchy colourful large scale wall art, you can make your own ‘jackson pollock’-esque splatter paint on an oversize canvas. I did one with a group of people and it looks fabulous on one of our walls. And it was fun to do, so it’s got lots of good memories attached to it, too.
Melody says
Wow! It looks so much better! Great job!
Jenn says
The beams look AMAZING!!! I secretly wish I had them in my place so I could do this also! Never would’ve guessed to thin out the paint and let the wood still show through but it looks so awesome! Kind of like a another take on the faux bois look. LOVE it!!
Melissa says
Love, Love, Love It.
hillary says
We have exposed beams in our LR with a gray wash too! I really like it as an alternative to a wood tone. The ceiling above the beams is pine planks and they are also washed gray,and the whole thing gray is a bit much, so we’ll probably paint them white eventually. I hadn’t thought of leaving the beams gray too but after seeing your room I am thinking maybe just the pine planks should go white and the gray beams should stay. Nice work! It’s inspiring to see Sherry tackle this project on her own. I often put off ceiling work until my husband can do it, but really he has to stand on a ladder too so it’s not like his extra six or seven inches are much of an advantage. Maybe I should paint it myself!
Holly says
I want that yellow rug sooo bad! Do you remember where you got it?? I am on a yellow kick right now!
YoungHouseLove says
It’s the Moorish Tile Rug from Pottery Barn but they no longer sell it so maybe try ebay? Good luck!
xo,
s
Mary @ Porch Ceiling says
Sherry, I have to hand it to you for your persistence. Wouldn’t it be cool if there were some easy kind of scaffolding where you could lie down to do work like that? Your arms might get tired and you might get some paint spots on your face, but you wouldn’t be so stiff and sore afterwards.
I love how your room is looking and also your plans for the rest. Those beams rock.
YoungHouseLove says
Ah yes, what I wouldn’t have done to be able to recline and paint! Haha.
xo,
s
Adrianne says
I LOVE your idea of putting a wash on the beams. They look a-mazing! They give the room a definite moody, textured feel and add a dose of character without being too “hey look at me!” Job well done. Sherry, I think you deserve to treat yourself to a nice massage after your crazy contortionist painting of those ceilings!
Danielle says
Love it! We have the same look on our beams and it’s original to our 1967 modern home. They were stained driftwood gray. The Douglas fir grain can be seen through the stain. It looks so crisp with wood floors and white trim like ours, and yours :)
YoungHouseLove says
THAT’S AMAZING! Wow, who knew an original 60’s house is rocking the same look. Love it!
xo,
s
Melissa says
Hey Sherry and John- I’ve never commented before but I’m a dedicated reader. Felt the need to comment on your amazing living room, as gray and yellow were my wedding colors this summer ;) I look forward to a new post every day! Thanks for writing!!
YoungHouseLove says
Aw thanks Melissa. Happy wedding planning to you! Gray and yellow sound like the perfect summer colors. Feel free to post pics on our facebook page! We’d love to see how it all turns out!
xo,
s
Meredith says
http://www.etsy.com/shop/tomkatstudio?section_id=7802679
My sister is a design assistant for The TomKat Studio and she just put some gray and yellow wedding printables on Etsy. Just thought I would share!!
lonely wife project says
Love how the wood grain comes through! Great job.
Laura says
Hhmm… I’m curious to see the whole room once everything is completed. I’ll save my answer until then. I think I would have painted them cream or white instead.
Katy says
Hi, my question doesn’t have to do with the ceiling, but i really love the sectional and i am thinking of buying one for our living room, can you please tell me the dimensions?
YoungHouseLove says
You can check out ikea.com for the specifics. It’s the Karlstad sofa (we bought the corner sofa plus the add-on chaise lounge separately and combined them). It’s something like 140″ by 98″ or so. Hope it helps!
xo,
s
kellie says
It looks great! So much better! I have painted beams myself and I know they are no fun. Although the room I painted wasn’t as big but I had to do 4 coats of white paint to cover the dark wood :) But, as you said, it’s so worth it!
Michele Daggar says
First things first: gray beams = gorgeous (or as my nieces would say “gorg”)
Secondly, I think I may have spent too much time on my ipad reading your archives over the weekend. I had the CRAZIEST dream that I stopped by your house. You guys showed me around, and then said “you have to see the new backyard.” We went out back and there was a giant mountain with a waterfall right in your backyard. It looked like something that would be in Hawaii.
If that’s not crazy enough for you, then John brought Clara and Burger out and they were the same size!!!! Clara looked like a Burger puppy with a baby head!
I think I ate too much junk food while surfing/Super Bowl watching!! Sorry I had such a creepy dream about your beautiful family. Get some rest Mama Sherry, you deserve it. Hopefully you’ll have sweet dreams!
YoungHouseLove says
Hahahahahah I love it. The backyard sounds almost as crazy as a dog-version of Clara. Hysterical.
xo,
s
Kristina says
It looks so much better! I have to agree…the beams stuck out like many sore thumbs! I’m new to your blog (I heard you won the Homie and was curious as to what your site was like) and just looked at all the pictures of your wedding, etc. Everything you do is so beautiful and creative and practical! I also love that you live in Richmond…I’ve never been, but I’m dying to visit.
YoungHouseLove says
Aw so glad you found us! And you should definitely come visit Richmond. We love it here!
xo,
s
Kerri says
Ok, I have to ask, what is the deal with the random wreath on the fireplace? Is there a story behind it? It just doesn’t seem to fit your aesthetic at all, so I figured there must be a story involved! :)
YoungHouseLove says
That’s still hanging from Christmas on a nail that was there when we moved in. At this point I think it’s funny so it stays around for entertainment value, but of course when we get something better suited for the space (I’d love a cool round mirror) it’ll get the boot!
xo,
s
Tori says
Ha! I saw your hair and thought, “Dang – prenatals did that hair good!”
Paula/adhocmom says
Not to be all off topic, but seriously, why don’t people tell you that it’s nearly impossible to get your hair cut after you have a baby? I kind of wish someone had told me that. It’s soooo hard. Don’t even talk to me about color. Please take comfort in the fact that my eyebrows ARE tended to however. I haven’t totally lost my mind.
YoungHouseLove says
Haha it’s true! I couldn’t believe how long it had been. Or how long my hair had gotten in the meantime! But I did keep the brows plucked… most of the time. You do what you can. Ha.
xo,
s
Katrina says
I’m right there with you – it’s been 10 months since I last cut my hair. I think there needs to be some sort of public service announcement for new moms. The eyebrow maintenance is attainable, thankfully!
Wendy G says
I LOVE the newly painted beams! It really makes such a huge difference in the room! I am so impressed and can’t wait to see how the rest of the room (and whole house) comes together!
Sherry, I think you definitely deserve a nice massage after all that work. :)
Dessie says
Speaking of that “too small rug,” I need something exactly like it. Where did you get that one?
YoungHouseLove says
It’s Pottery Barn’s Moorish Tile Rug but they no longer sell it. Maybe try ebay? Good luck!
xo,
s
crissy says
Ooooooh! I likes it!
Becky@OrganizingMadeFun says
I feel your pain, Sherry! Check mine out:
http://organizingmadefun.blogspot.com/2010/11/family-room-peek.html
I had the dark beams also….and painted TWO coats of primer (including the ceiling) and TWO coats of white. It could probably use another coat, but I stopped there and left it and only I know it and hubby. It’s SO much better white! Great job!
Becky B.
http://www.organizingmadefun.blogspot.com
Organizing Made Fun
kristen says
kudos on the hard work! i can say that i’m not sold on the grey beams, but how boring would it be if we all like the exact same things in life & decor? i like the overall feel of the room so far though & i think it’s great you guys aren’t just coming in and doing what you’re most comfortable with.
katie says
not that i like you to be in pain, but i enjoy hearing that someone else dislikes jobs like this as much as me. misery loves company? i’m totally feeling you sherry. but nice work!
annabelvita says
Psst, youngsters, check out this post on sprucing up a Karlstad. I know you want to work with what you have on the legs and probably prefer clean lines to the tufted look, but thought you’d like to see what’s possible to de-ikea your sofa…
http://www.apartmenttherapy.com/ny/before-after/before-after-adding-mid-c-style-to-an-ikea-karlstad-sofa-138736
YoungHouseLove says
It’s such an amazing makeover! Almost can’t believe that’s our Karl!
xo,
s
Ariel says
Very creative! and very restoration hardware, if I might add. I think the real before and after will be when those fans are gone though. :P
As a renter, I dealt with my previous ceiling fan by pulling the fan blades off, cutting the side of a paper globe shade from ikea, wrapping it around the hardware without tearing it, and sealing back up again. t’was quite a task but well-worth it. The blades were hunter green so I was motivated. :/
Autumn says
If your interested in art, Cost Plus World Market is having a Wall Art sale starting at 20% off, and going up to 50% off. I snagged my wall art for my office there, and if you sign up for their rewards program before you go in, you can save an additional 10%. I got a 120.00 canvas painting for 60 bucks! Just a tip :)
Danette from Oz says
Just slinking in to say “I shall never doubt you guys again”, I wasn’t sure about those beams, but the treatment you have used is really great. I was thinking it would be a solid colour. Loving it!
stephanie says
I’m with Jennifer and RebeccaNYC, I like that you tried to go outside the box with this, but I think white is the way to go…or even a solid, light grey.
Either way, I’m sure the room will come together great…just my 2 cents!
Angela says
Maybe you should try your paint technique on your ceiling fans! I actually love ceiling fans and have them in all my rooms except the living and dining rooms!
Stephanie Phillips says
Just got around to reading all the comments and wanted to tell you that we love ya! I’m so inspired by all that you did in your last house, but I am truly LOVING the step-by-step of this house as your plans seems to more closely mirror my own. I also eat up your quirky sense of humor, so thanks for brightening my work days!
Aimee W. says
Beautiful beams!
As I was reading through my blog list for the evening, I came across this post -> http://windhula.blogspot.com/2011/02/look-for-less-in-surprising-place.html by Michelle and if you scroll to the end, she shows a beautiful ceramic owl that’s on sale for 70% at Kohl’s! I don’t know if any of the Kohl’s in Richmond have it, but I thought of ya’ll when I saw it!
YoungHouseLove says
Very cute! Thanks for the tip!
xo,
s
ellis says
Can we discuss how Pottery Barn has GOT to come out with a Moorish Tile Rug 2.0???? You get SO many questions about it- seriously, that rug would sell out in a day from YHL readers alone!
YoungHouseLove says
I know, right?! We’d totally buy it in 8 x 10 if they did!!!
xo,
s
Sara says
Wow! I never would have thought to use gray paint, but it looks like you guys took those beams out of a salvage yard where they had weathered to a natural gray, like a nice set of weathered wood patio furniture. Awesome! Good job Sherry!
Debbe says
I don’t really care for the painted beams, but I have confidence that when all the rest of the room is put together, it’ll look great. Go YHL’ers!
Danielle says
Great job on the beams! I hate to ask a question, since I know how busy you are, but I was wondering your thoughts on wood in general….seems like you don’t like dark wood? I could be totally off! We just had a staircase to our basement playroom built and i am wondering whether to paint it white or stain a nice dark color. The basement is Roxbury caramel by benjamin Moore, a orangey color, and we have turquoise blue accents. My husband thinks I’m crazy to spend so much time thinking about this, but you both are decorating gods to me and would really value your opinion. Thanks so much!
YoungHouseLove says
We love dark wood! Around 80% of our furniture is rich deep wood as are the floors going to be someday when we get them all refinished! We just generally feel like wood on the walls or ceiling can close things in or look dark and dreary (think paneling, dark beams on standard height ceilings, etc). Hope that explains it! As for your bookcases, they would probably look lovely either way so just go with what you love! We stained Clara’s dresser a gorgeous wood tone and love the effect!
xo,
s
KrisCross says
http://theluxhome.com/search/Interior%20Decoration%20with%20Ceiling%20and%20wall%20Ornaments%20Ideas%20by%20Beerd%20Van%20Stokkum
Take a look at this for a solution to the ceilings…