Particle board subfloors aren’t always great under hardwoods – especially when you buy nail-in flooring like we did. Some folks install right over it without any issues while other folks have big problems down the line. Because it’s so unpredictable, hardwood manufacturers void the warranty if you install them that way – which was definitely not a risk we were willing to take. According to our initial research, we were left with three not-so-hot options.
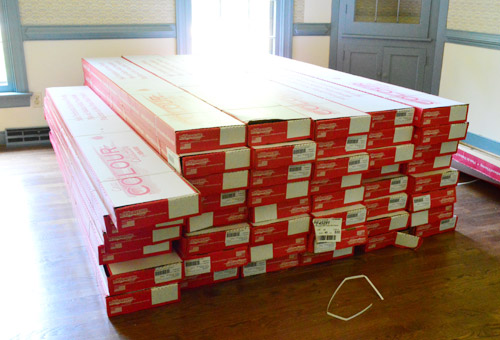
- Return the meant-to-be-nailed flooring and buy a meant-to-be-floated floor instead. But after falling hard for the one we picked and our adventure getting it home, we weren’t eager to take it back. Especially since none of the floating options were as close of a match to our existing wood stairs and hardwoods downstairs.
- Remove the particle board subfloor to (hopefully) reveal plywood underneath. This would’ve been time-intensive (the particle board was laid under all of the door jambs and everything) and it would’ve lowered the level of the floor (making door heights and transitions into the bathrooms weird). It would also cause us to lose the sound deadening effect that this particle board was installed to create in the first place. And we definitely didn’t want a loud and echo-ey floor upstairs.
- Install plywood right over the particle board. This was most the promising option, except that it too would’ve been time intensive, would’ve raised the floors (requiring us to cut down all of the doors and live with a noticeably high top step of the stairs). It would also carry an extra material cost.
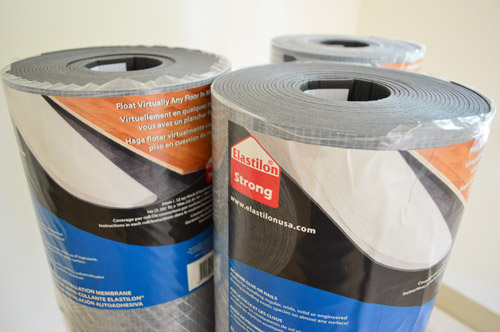
- It has a lifetime warranty, and is guaranteed to last as long as the hardwoods
- It’s elastic, so it stretches along with your boards during seasonal changes in temperature (this helps to prevent cracking, gapping, or warping)
- We only needed an exacto knife to install it, which saved us the expense of buying or repeatedly renting a nailer (although we were a little sad not to get to try one)
- It’s non-toxic, has no-VOCs, and no odor – which is great considering it’s an adhesive product
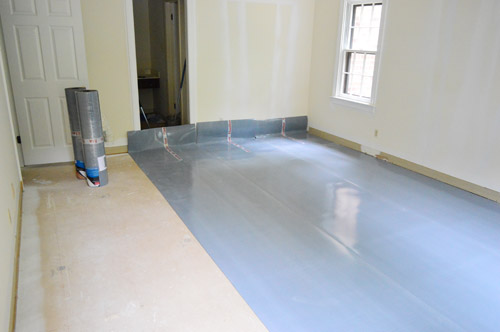
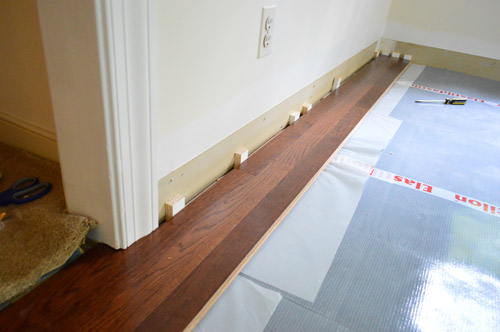
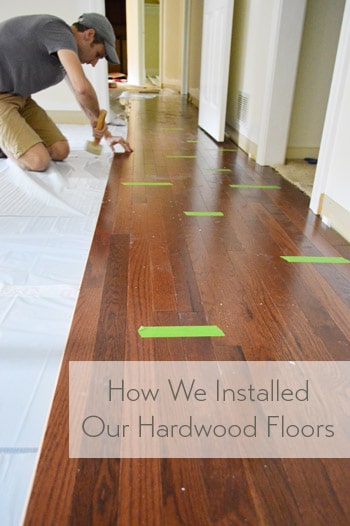
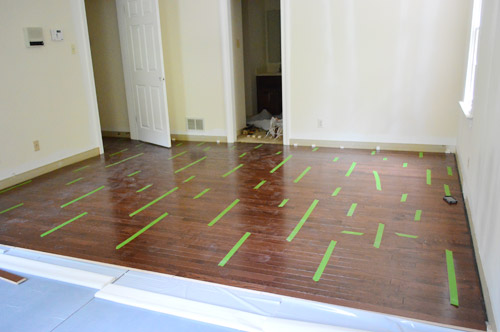
Laying the first row is a tricky step, since it sets the tone for how straight your entire floor will be. And you can’t always trust your drywall to be straight. So we started building our floor using some of the longest, straightest boards we could find to help overcome any curves in the wall. Oh, and those are scrap wood spacers against the wall that help leave an expansion gap around the edge (for when changes in temperature may make the floor expand).
Another thing that helped us feel more confident about our first row being straight was laying it across as long of a wall as possible. For us, this meant taking our first row all the way out into the hallway. Which also meant rough-setting a lot of boards before anything was actually ever stuck down – just to make sure they didn’t look wonky.
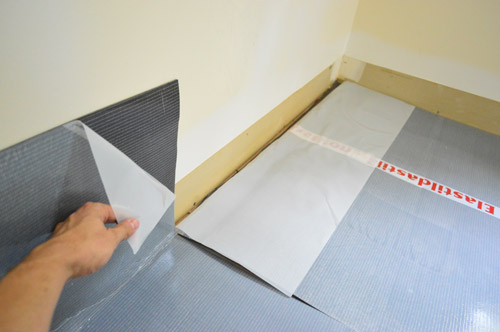
Once we felt good about our first few rows being straight, it was time to permanently secure them in place. Here’s where that extra flap of plastic comes in handy. You pull on it slowly so that it exposes the sticky Elastilon beneath the floor boards, so the bottom of the boards can be joined to the underlayment, permanently holding them in place.
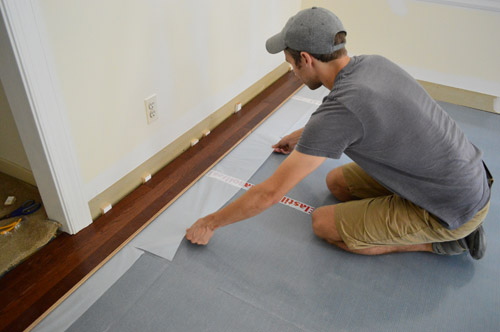
Once those boards touch the Elastilon, boy are they stuck. It takes a good yank (and sometimes even a pry) to get them loose. So that makes us feel good about the long term hold of this stuff!
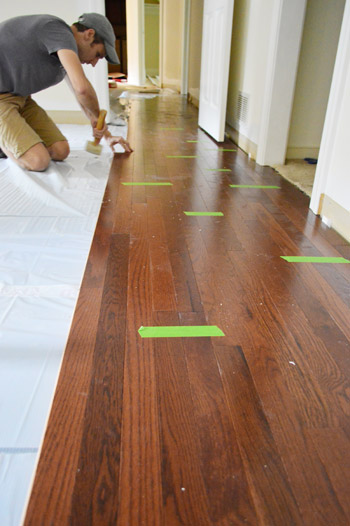
From there, it was pretty much the same process – lay a couple rows, bang them in tightly, peel back the plastic so they’re secured, and move on. Laying the boards was just like any floor – the boards have a tongue and groove that slide together, and we used a rubber mallet to tap them snugly into place.
We also used a bit of wood glue on the groove at the end of each plank as suggested, just to further secure everything.
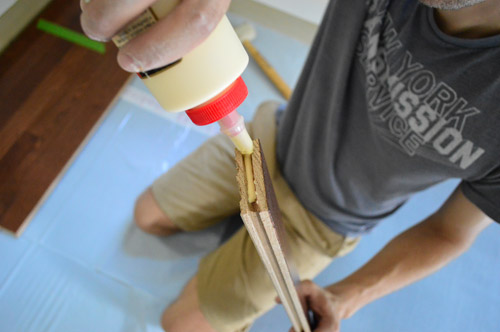
Oh and we periodically taped the boards together, which was also recommended – just to discourage slipping or shifting during the install. If there are two of you working on this project, one person might grab boards, run a bead of glue along the end grove (seen above), and hand them to the other person who’s clicking them in and hammering them into place. The person on glue duty can also pull the Elastilon every few rows and toss down some tape as you go. That’s the grove that Sherry and I got into (and every few hours we switched jobs to keep from getting too sore/tired).
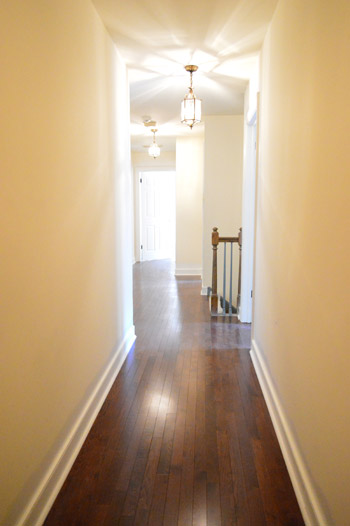
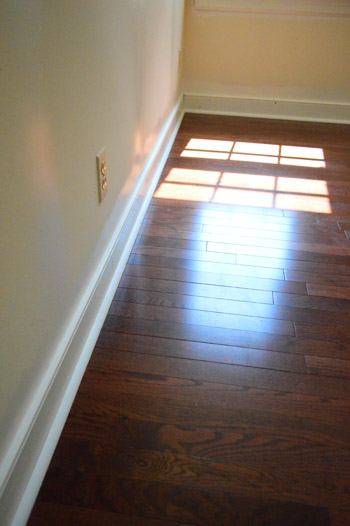
The result? A super tight gap-less floor that will still flex with fluctuations in temperature without cracking or warping – and it should outlast us. Huzzah!
Except… as simple as the process was, it still was not a quick process. I think our bedroom took us 10 hours to tackle together (across two days) while my parents watched Clara. Granted it was the largest room and it was our first one, but boy did it not inspire much confidence in how quickly this could get done.
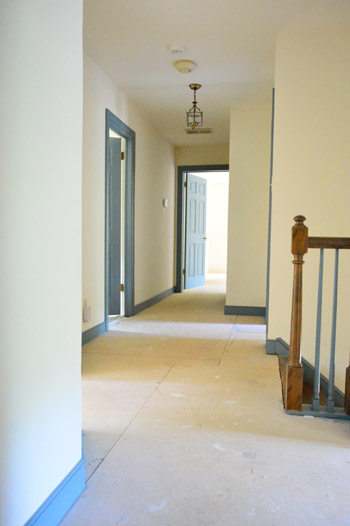
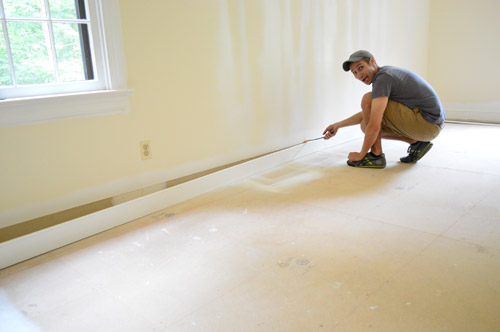
As is the DIY way, there are always little curve balls. For example, we originally had hoped to not have to remove our baseboards. But when we looked at things more closely, losing 3/4″ of the baseboard behind the floor made them look dorky-short. And we learned that neither quarter round alone (nor baseboards alone) would cover the expansion gap that our hardwoods required in order to keep the warranty in tact. So we pried all of our baseboards up and resigned ourselves to later having to reinstall them with quarter round. Le sigh. At least they’re already painted so we’ll just have a few small touch ups to take care of.
The good news is that we made lots of progress over the long weekend and yesterday evening we finally finished. We even got around to adding the baseboards back and placing the quarter round in most of the rooms already. The floors are looking awesome and feeling super solid.

So much better than the carpet.
More Flooring Projects
If you would like to read about other flooring projects we’ve done, please check out the posts below: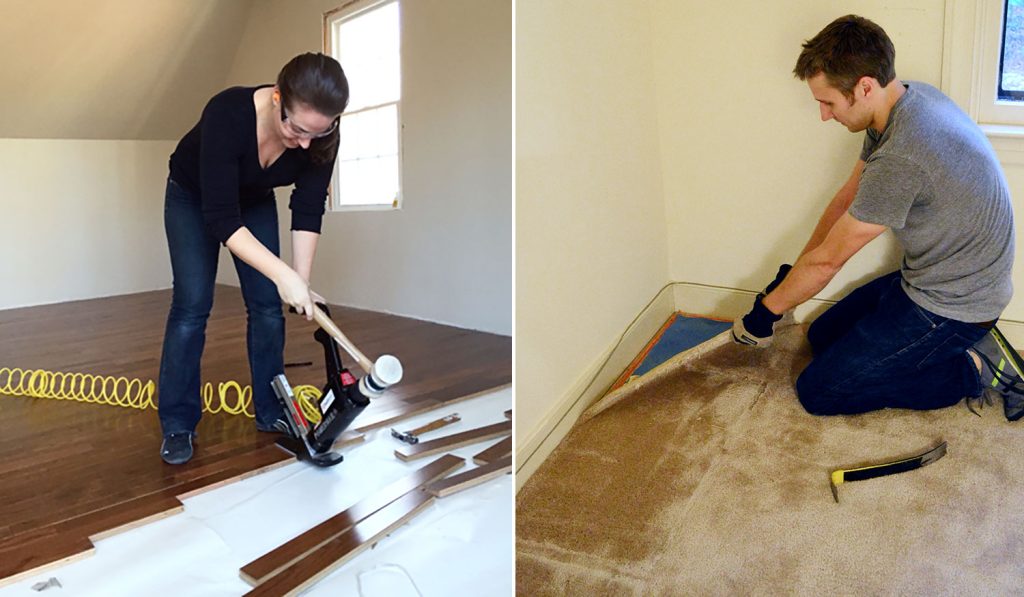

Janel says
You just rocked my socks off. Those are some sexy, SEXY floors!!!
Roxanne Coleman says
I know you probably feel you do not need them, you are young, and strong, but someday…you need to be wearing knee pads when your working on your knees. You need to protect them for your future. Please invest in a pair, you can get them at a sporting goods store, and wear them for any work you do kneeling.
God bless.
YoungHouseLove says
We had them and used them sometimes but other times they actually gave us pain! Haha! Maybe we just need a better set, but the ones we had weren’t staying on so they pinched and sagged and were often more uncomfortable than just kneeling on a pad, which we definitely did a lot as we went. We used one of those stadium seating pads, which helped a lot!
xo
s
Pam the Goatherd says
Get some of those new gel-filled knee pads. They are incredibly amazing and feel oh-so-good! You’ll never want to kneel down anywhere without them, once you’ve tried them.
YoungHouseLove says
Those sound awesome! Ours were like kneeling on two little Ninja Turtle shells. So… not as comfy.
xo
s
Karma says
How are you dealing with the edge of the top stair? Just trying to think though how you made that work…
YoungHouseLove says
We’re getting lots of detail questions like that, so John wants to write a post full of photos and details about how we dealt with those tricky parts. Soon I hope!
xo
s
KC says
It’s amazing what the new floors and painting over that blue trim will do! There’s a huge difference already! Can’t wait to see what you guys continue to do to the house.
Tanya says
Uh oh…my dear Significant other and his flooring installment buddy are in trouble… We have approximately the same square footage upstairs and you guys are done. And we are not. LOL! Can’t wait to see the post on how long it took from start to finish. I’ve been sending them your flooring updates (BTW, the cartoons were hysterical, more of those please) It all looks great (and gives me hope). Good luck moving this weekend!
Megan@JustForMeAndYou2 says
This turned out so, so awesome! It’s beautiful. Seriously, I bet it is going to be so nice to move into a house with new floors. It always grosses me out to imagine what has happened on floors when I first move into a new place (we are renters). Love this! Can’t wait to see what is next!
Steph Nelson says
SOOOoooooooo Nice!!
How was your math skills, meaning how much wood did you have left over?
YoungHouseLove says
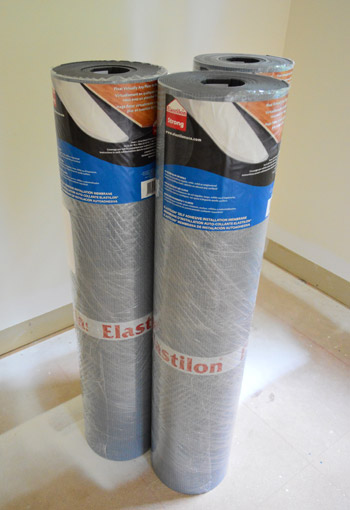
We only had about one full box and a few scraps (which we’re keeping just in case we get damage or something someday and need to patch something). And we had a whole extra roll of Elastilon that we got to return! #madeourday
xo
s
Vanessa says
Love,love,love the new floor!!! Well done Petersiks! Million times better than the carpet before. You could use the old carpet to protect the beautiful new floor during your move ;-), would be a shame to get it scratched after all that hard work (happened to us during our last move)
Alyssa says
Those floors are GORGOUS!!! Nice work guys!
Hilary says
The floors look amazing! My dad and I laid laminate flooring in my parents old house years ago, and I remember it being a huge task. (We did the entire house!)
Suzanne says
Amazing! As I scrolled down I said out loud, “what an amazing transformation!”
Kudos!!! I love it!
Lesley says
I want to touch them, and maybe even lie on them…fully clothed, I promise!
Now I wish we had prioritized our living room floor replacement above the fence replacement we are in the throes of this week. I’m sure it will be satisfying to finish too, but not as easy to lie on.
YoungHouseLove says
Haha, thanks for keeping your clothes on Lesley. I had the same inclination… maybe in a bathing suit though… frisky.
xo
s
Sharla says
WOW! the floors are gorg.
I’m thinking the light fixtures would look great with a coat of ORB.
YoungHouseLove says
Me too!
xo
s
karen says
i’m happy to see you painted the quarter rounds white!! looks slick!
Megan says
LOVE IT! I’ve only lived in one house, and for a very short time, that had a long hallway so this just looks wonderful. It is soooo much better than the carpet that was bumpy. The trim looks bigger and so much better in white with those dark wood floors. I can’t wait to see what other colors will be going on, plus all the other decorations and changes you will do. It makes me want to go refinish my hard wood floors (not happening for awhile though… although it’d be nice, our to do list is a mile long at that’s at the end!).
timothy says
looks so great!!! that stuff seems to do you good!! cant wait to see further renovations!!
Corrie @ Little House On The Update says
That is so amazing! it makes me want to take a nap just thinking about it!
Janet says
This post has single-handedly helped me finally decide what to do in our house. We have an engineered, bamboo, floating floor that we installed in our office (which was formerly a detached garage). It’s pretty, but a) it scratches easily and b) it was more expensive (!) than your beautiful hardwood. It’s time to replace the hardwood floors in our pre-WWII house, and I was dragging my feet on going the floating floor route again. But the sales people here really discourage hardwood because we’re near the coast (San Diego), and they seem to think the floating floor can better handle all the moisture. I now think that’s a bunch of hooey, and the hardwood just seems more era-appropriate to the house anyway. We’d just refinish what is here, but the previous owners really abused them, so I think they’re beyond hope. So, thank you so much! I’ve been deliberating forever!!
YoungHouseLove says
So glad. Good luck Janet!
xo
s
Diana says
I’m so impressed with the beautiful floors and the incredible amount of work you just undertook!!
Good luck with the move… looking forward to all the new adventures in your new home!!
Abby @ Just a Girl and Her Blog says
It looks so GREAT! Kudos to you guys for being willing to tackle such a huge job like this! And yay for helpful grandparents, too. :) It is so fun to watch you guys transform this space so quickly. {or so it seems to us who get the instant before/after gratification!} Thanks for sharing your adventure.
~Abby =)
Frances says
Hi Guys,
Beautiful job on the floor. John, did you do anything special to remove the baseboards? I’m dying to redo my floors, but I’m afraid of ruining my nice molding and making a mess of the walls. I noticed that yours came off without any problems. Thanks!
YoungHouseLove says
We ran a utility knife along the top first to cut any paint that might cling/peel, then we popped a flathead screwdriver very carefully behind them and used a crowbar after we got back there to pop them off. Seemed to minimize any scraping/wear on the front of them since we were prying from behind them!
xo
s
Jana H. says
It seriously does look infinity times better. The floors even make the light fixtures look fresher/newer. :-D
MissYana says
Awsome! It takes a lot of courage (and organization) to tackle this and you made it! I am impressed. It looks really good. Love reading your blog! I am touring Asia for some months but I still read your blog wherever I am even if I rarely make any comments! (Right now, am in Bangkok ;-).
YoungHouseLove says
Aw thanks MissYana!
xo
s
Laura & the Shell says
Amaza-balls!! Seriously, night and day, guys. Great job!!
Gabby says
Wow you guys, that looks amazing! I can’t wait until the day I’m back in a house with hardwood floors…until then, I’ll live vicariously through your blog.
Lilly says
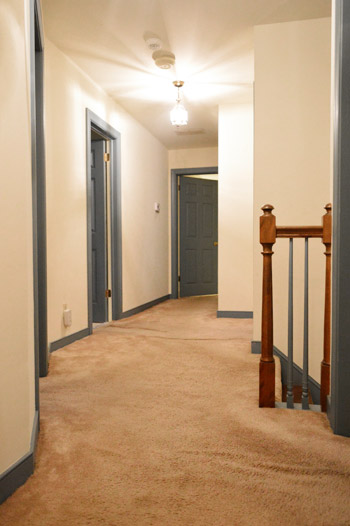
Floors look great! And I immediately noticed the fluidity of the planks from room straight into hallway–what a beautiful detail.
My very random takeaway from this post–thank you for the info that sub-floor particle board acts to absorb/dampen sound. Our 133-year old rowhouse (all wood floors with area rugs) is very loud and echo-y. For example, when someone is cleaning upstairs, to the person downstairs it *sounds like* the spiking of objects into the floor. It never occurred to me that sub-floor materials could dampen sound. :)
Hanna says
It looks amazing! In the pictures it looks darker than I expected, is that just the lighting or are the pictures true to life? Either way, they look great!
I’ve been contemplating hte wider-board floors for our house, but now, looking at yours, I think I may look at the thinner board options as well. Lovely!
YoungHouseLove says
It really changes depending on the lighting situation (day/night/etc) but I’d call it a medium wood tone (not too yellow, not too red, not too light, and not too dark). Right in the middle :)
xo
s
Gabbi @ Retro Ranch Reno says
Oh my goodness, you guys!! I can’t believe you finished already! What a project that was, huh? I never even heard of your underlayment before, but it sounds super cool! The floors look amazing, and even more phenomenal when you show what the carpet was like before haha! So excited for your move!! :)
Liz says
Wow, that hallway floor looks great….. I bet you two can’t wait till all that wood is put down. It’s very exhausting, good luck and rest lots you two. ;)
Liz says
I just scrolled up and noticed you two are finished…. Isn’t it a great feeling? ;)
YoungHouseLove says
The best!
xo
s
Caitlin @ Desert Domicile says
WOW! What a difference! We had hardwood floors installed in our condo and that installation fee is killer! I think it took me an entire year to pay it off :(
Susan (Between Naps on the Porch) says
Beautiful! Great job getting it all done in time. Here’s to lots of nights of restful sleep in your new home!
Liz says
It looks beautiful! I was a little bummed that you didn’t use a nailer, as I would have loved to get the scoop on that, but that sticky mat is pretty cool! Good job as usual!
Whitney says
Wow! The last two pics (before and after of the hallway) are insane! It looks like a completely different house! I’m drooling over your floor!
Melissa says
Those look delicious. Is it odd to say flooring looks delicious? I want to just lay on it, roll around and pet it. You guys are freaking amazing. I can’t believe you’re doing this just days before your move! That’s crazy pants!
Sandra says
Holey carp what a difference! I think you guys could put that house back on the market with just the carpet change and consider it a flip – and make a profit!
Elle says
Wow, those last two pictures look like different houses!
One thing I’ve always wondered, laying the first board would be easy but what about the last one? Or did removing the baseboards make it easy to set into place and the edges will be covered later with the quarter-round so it just *looks* flush wall to wall?
Elle says
Never mind, I just saw you respond to someone else that there’s another post coming about detail work.
heyruthie says
Those two changes–the painted trim and the new floor ALONE, have turned the corner on the hallway! If you never did another thing (OK, OK, except ORB the light fixture) you’d be good to go. I know you guys have many more plans than that, but honestly, it’s already completely transformed. I love it.
Jennifer from Fat and Appy Modern Art for Children says
I have to say that before I saw your post today (fantastic explanation by the way), I had this romantic vision of Jonathan installing our floors while I kept the three kids out of the house. Now I am imagining a babysitter (or two) and me right down there with him, helping out. Poof! There goes my sweet tea and strolling around while he works.
YoungHouseLove says
Haha, get in there and have at it!
xo
s
karine says
Love it !! good luck for the move ! hope the weather is good !! at least you should not have snow this time
Pam the Goatherd says
The painted trim and the new floors have made such a HUGE difference! You guys rock!
Jan says
Wow!!!! Looks beautiful. I can imagine how tired and worn out you two must be. I love the color of the wood. And can’t wait to see your stuff in the new house.
You two did an amazing job.
jenni patillo says
It looks AMAAAAAAZING!!! I am so in love with the color you went with. Aaahh, this gives me lots of hope that one day we will have the guts to buy an old fixer upper! If these floors are just the beginning, I can only imagine how beautiful your home will be when you are finished. Are we ever really finished though? ;)
Shelley @ Calypso in the Country says
I love the new floors – and the color of them. We just installed hickory floors in my office. I heard hickory is hard so it stands up to dog scratches pretty well. I am happy to hear that you have had no problem with oak. I think I will use that instead of hickory when we do more rooms – much better price!
What width boards did you buy? I apologize if you already answered that but I scanned through and didn’t see anyone asking that. Thanks! – Shelley
YoungHouseLove says
We wanted them to match the width that was already downstairs, so we went with the skinny original looking ones (2 3/4″ I think).
xo
s
Jill Stigs says
Holy moly…what a difference. It looks fantastic!
Glad you went with white quarter round this time. It always looked a bit “off” to me in your previous houses that they were wood colored.
Wishing you guys a swift and successful move this weekend.
At least there is no chance of snow! :)
MaryKD says
FANTASTIC!!
Aimee says
This is the kind of post that I love from YHL– informative, precise, learned something new and you used pictures in a productive way. I’m sure if you check my comment history (I just learned that you guys do that regularly), it might look like I only enter sweet giveaways or offer constructive criticism– ha!– but I don’t find it that useful to just add to the chorus of “awesome!” each post. Anyway, I did want to take the time to say “awesome!” not just for the craziness that is installing all that flooring but also to commend you for the accessible, professional post about that installation… Like I said, I think you shine in these types of posts so I wanted to encourage you both to keep up the good work!
renee says
I “tole” you it was hard work! Looks great, guys! Good job, and it will last a lifetime. Looks snazzy!
YoungHouseLove says
Haha!
xo
s
Joseph says
As far as I’m concerned wood flooring is the only way to go… buuuut I’ve never had to lay it before so I don’t what I would think when actually faced with such a task. Bravo to you guys. The end result looks pro!
s says
On a completely random note, just saw your design tips on the Oprah.com newsletter….congratulations!
YoungHouseLove says
Ahh! How crazy is that?!
xo
s