Particle board subfloors aren’t always great under hardwoods – especially when you buy nail-in flooring like we did. Some folks install right over it without any issues while other folks have big problems down the line. Because it’s so unpredictable, hardwood manufacturers void the warranty if you install them that way – which was definitely not a risk we were willing to take. According to our initial research, we were left with three not-so-hot options.
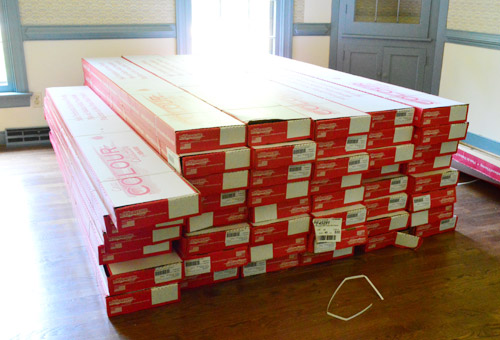
- Return the meant-to-be-nailed flooring and buy a meant-to-be-floated floor instead. But after falling hard for the one we picked and our adventure getting it home, we weren’t eager to take it back. Especially since none of the floating options were as close of a match to our existing wood stairs and hardwoods downstairs.
- Remove the particle board subfloor to (hopefully) reveal plywood underneath. This would’ve been time-intensive (the particle board was laid under all of the door jambs and everything) and it would’ve lowered the level of the floor (making door heights and transitions into the bathrooms weird). It would also cause us to lose the sound deadening effect that this particle board was installed to create in the first place. And we definitely didn’t want a loud and echo-ey floor upstairs.
- Install plywood right over the particle board. This was most the promising option, except that it too would’ve been time intensive, would’ve raised the floors (requiring us to cut down all of the doors and live with a noticeably high top step of the stairs). It would also carry an extra material cost.
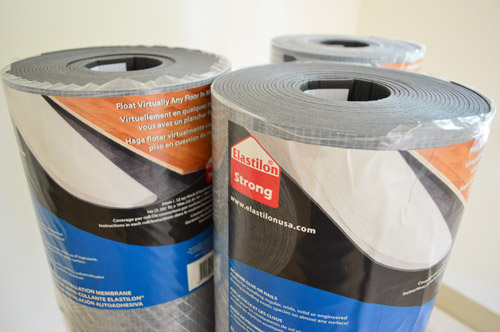
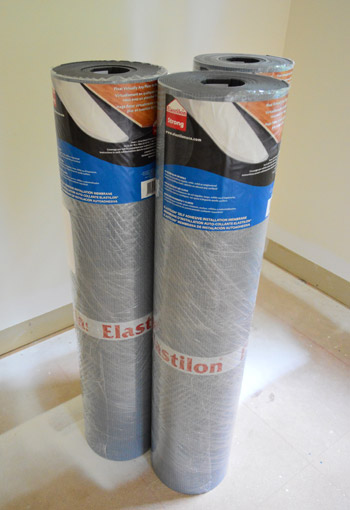
- It has a lifetime warranty, and is guaranteed to last as long as the hardwoods
- It’s elastic, so it stretches along with your boards during seasonal changes in temperature (this helps to prevent cracking, gapping, or warping)
- We only needed an exacto knife to install it, which saved us the expense of buying or repeatedly renting a nailer (although we were a little sad not to get to try one)
- It’s non-toxic, has no-VOCs, and no odor – which is great considering it’s an adhesive product
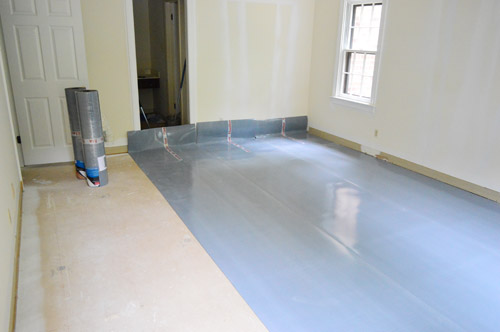
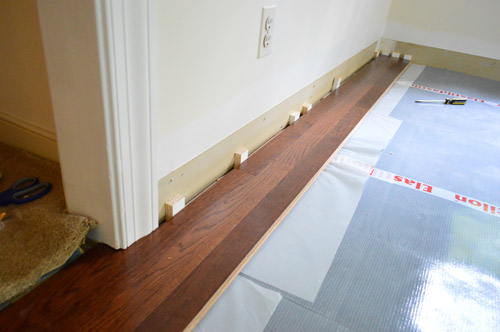
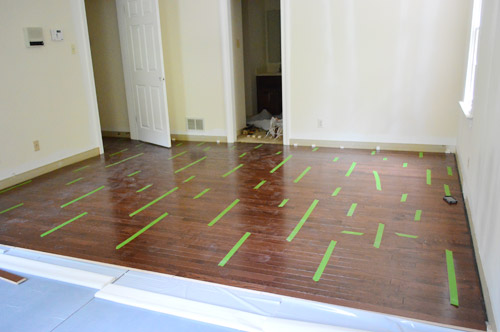
Laying the first row is a tricky step, since it sets the tone for how straight your entire floor will be. And you can’t always trust your drywall to be straight. So we started building our floor using some of the longest, straightest boards we could find to help overcome any curves in the wall. Oh, and those are scrap wood spacers against the wall that help leave an expansion gap around the edge (for when changes in temperature may make the floor expand).
Another thing that helped us feel more confident about our first row being straight was laying it across as long of a wall as possible. For us, this meant taking our first row all the way out into the hallway. Which also meant rough-setting a lot of boards before anything was actually ever stuck down – just to make sure they didn’t look wonky.
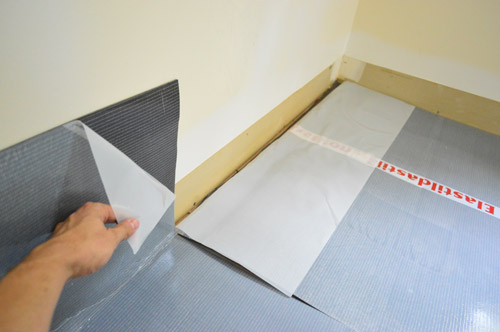
Once we felt good about our first few rows being straight, it was time to permanently secure them in place. Here’s where that extra flap of plastic comes in handy. You pull on it slowly so that it exposes the sticky Elastilon beneath the floor boards, so the bottom of the boards can be joined to the underlayment, permanently holding them in place.
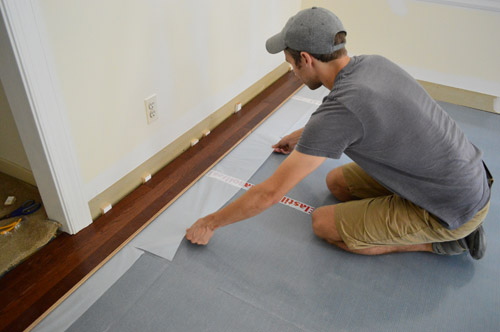
Once those boards touch the Elastilon, boy are they stuck. It takes a good yank (and sometimes even a pry) to get them loose. So that makes us feel good about the long term hold of this stuff!
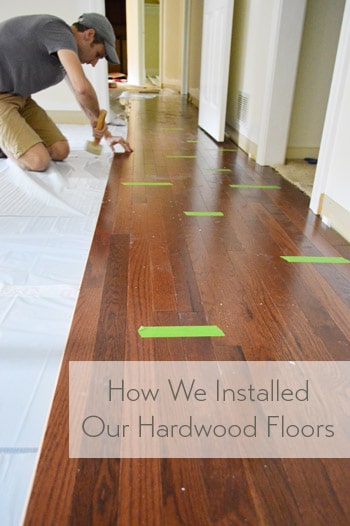
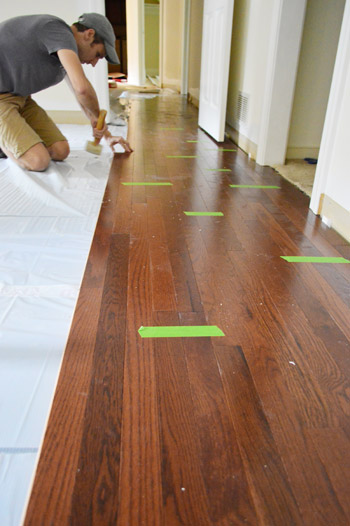
From there, it was pretty much the same process – lay a couple rows, bang them in tightly, peel back the plastic so they’re secured, and move on. Laying the boards was just like any floor – the boards have a tongue and groove that slide together, and we used a rubber mallet to tap them snugly into place.
We also used a bit of wood glue on the groove at the end of each plank as suggested, just to further secure everything.
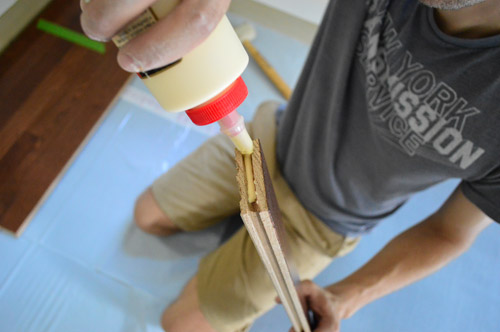
Oh and we periodically taped the boards together, which was also recommended – just to discourage slipping or shifting during the install. If there are two of you working on this project, one person might grab boards, run a bead of glue along the end grove (seen above), and hand them to the other person who’s clicking them in and hammering them into place. The person on glue duty can also pull the Elastilon every few rows and toss down some tape as you go. That’s the grove that Sherry and I got into (and every few hours we switched jobs to keep from getting too sore/tired).
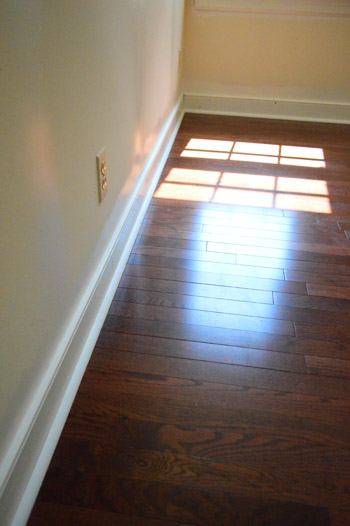
The result? A super tight gap-less floor that will still flex with fluctuations in temperature without cracking or warping – and it should outlast us. Huzzah!
Except… as simple as the process was, it still was not a quick process. I think our bedroom took us 10 hours to tackle together (across two days) while my parents watched Clara. Granted it was the largest room and it was our first one, but boy did it not inspire much confidence in how quickly this could get done.
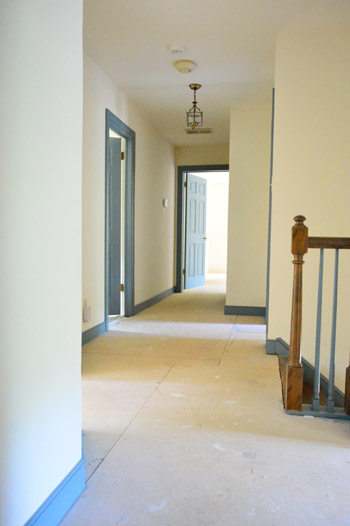
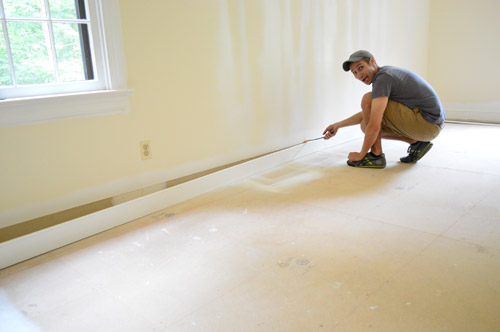
As is the DIY way, there are always little curve balls. For example, we originally had hoped to not have to remove our baseboards. But when we looked at things more closely, losing 3/4″ of the baseboard behind the floor made them look dorky-short. And we learned that neither quarter round alone (nor baseboards alone) would cover the expansion gap that our hardwoods required in order to keep the warranty in tact. So we pried all of our baseboards up and resigned ourselves to later having to reinstall them with quarter round. Le sigh. At least they’re already painted so we’ll just have a few small touch ups to take care of.
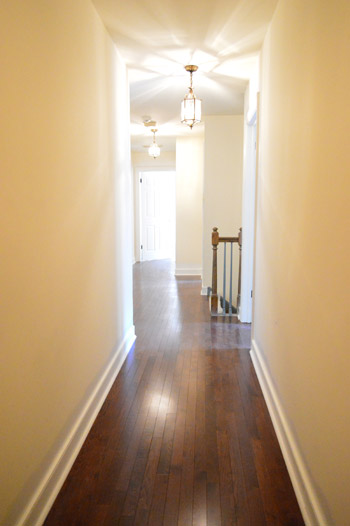
The good news is that we made lots of progress over the long weekend and yesterday evening we finally finished. We even got around to adding the baseboards back and placing the quarter round in most of the rooms already. The floors are looking awesome and feeling super solid.

So much better than the carpet.
More Flooring Projects
If you would like to read about other flooring projects we’ve done, please check out the posts below: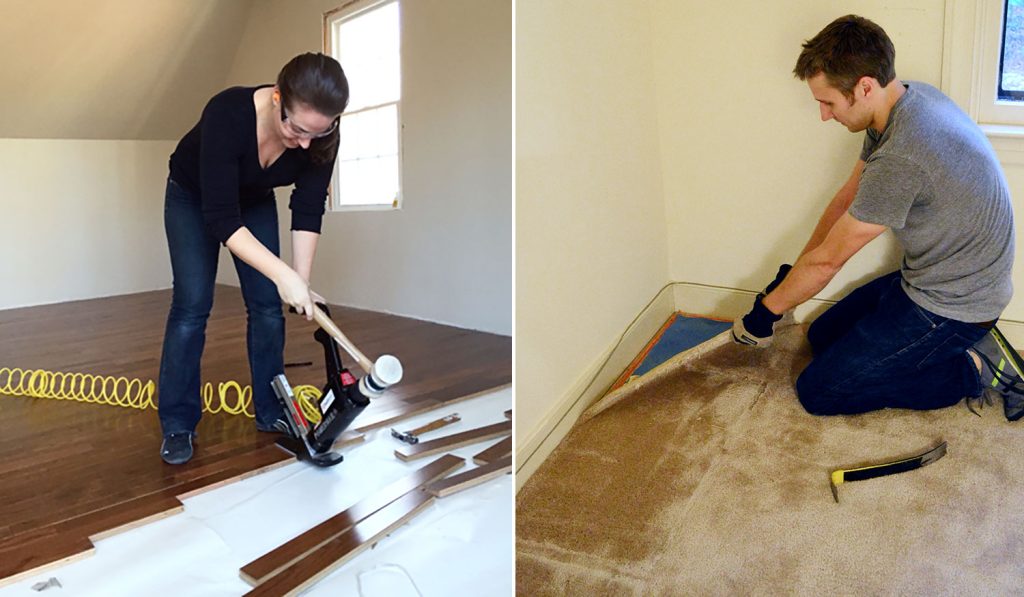

Constance says
It’s all been said above, but HOLY COW! Beyond well done. You two sure juggle a lot and do it well.
Did I miss the part where you said you were or were not putting a protective clear coat over them? Is that not needed with the wood you chose?
YoungHouseLove says
It’s prefnished, so it comes all stained and sealed (saves time and you can walk on them/use them right away).
xo
s
Lynn @ Our Useful Hands says
They look really nice guys! I never know with hardwoods though. When we were deciding to go with hardwood or wood laminate we heard from a ton of people who were like “No way! Don’t even think of hardwood because it’s a delicate beast and you can never let anything drop on it or it can leave a dent in the flooring.” We went to a friends house who has beeeeeautiful hardwood all throughout her house and watching her run to each kid and pretty much diving/lunging to catch ANYTHING that was headed for the floor is what sealed the deal for us and had us running for the laminate. I love what we got and I love what you got. I’m so confused as to the hardwood multiple personality though. Is it easy or hard to care for? I may never know…lol
My best, Lynn
YoungHouseLove says
I think good stuff like oak that’s solid and from a good source is awesome. It came with our first house in half of those rooms (over 50 years old, and looked awesome) so that sold us on it and made it an easy choice to add more in that house, and then when our current house had more and we had a good experience with that (also over 50 years old) we were double sold. I think some hardwoods are softer though (ex: pine dings up faster than oak, and bamboo is even harder than oak). I would check the hardness and take samples home and literally stomp on them and drop things on them to see how it does :)
xo
s
Maureen says
Looks fantastic!
Can you tell what kind of quarter round you bought? We are going to be installing it throughout our house, and was wondering if you got the pre-primed or what. And is it difficult to work with? Sorry if these are stupid questions.
YoungHouseLove says
Not stupid at all. We got the stock, pre-primed wood quarter round from Lowe’s. We definitely wanted something primed and I personally like working with wood over PVC.
-John
Maureen says
Thanks, John!
Tina says
Wow, the floors are gorgeous!! What a difference the new floor + painting the trim makes already, such a transformation! I’m happy for you guys that you finally have your dream home and I can’t wait to see what you all do with it. You guys did an amazing job on the floors!
Christina Jungwirth says
Your floors look great! We are currently having some Lumber Liquidator’s 12 mm Imperial Teak laminate installed. Our installer (not a LL installer) said this is the best laminate he’s worked with and I LOVE it! It’s beautiful and just what I was hoping for. Thanks for recommending Lumber Liquidators.
Laughing Abi says
Stunned. I am simply stunned. Can’t believe you guys got all that done and lived to blog about it. Congratulations on everything and thanks for continuing to inspire us all. Muah!
Kaija Kantola says
Looks soooo goood! What a bear to tackle as your first project! But it must be feel great to have it done before the move and not to have to re-move all the furniture.
Couple of questions:
– Can the underlayment withstand refinishing the floors?
– Does it provide moisture protection if you lay it directly over concrete?
My ex does hardwood flooring and believe me, nailing it down is b a c k b r e a k i n g work. Literally. I bet you also saved some time, because as someone who does not nail down floors on a daily basis could probably not do more than a half a day at a time.
YoungHouseLove says
We asked the same question about refinishing and were told it withstands it just fine and even makes the adhesion stronger since it will basically force the two surfaces together more strongly. And it does provide moisture protection, though I believe in certain applications (like over concrete on lower levels) it may still be recommended to do an additional moisture barrier. I’d check with an expert first.
-John
Laurielulu says
Hi, I’m new here and I can’t stop thinking about all that I have read so far. Your boundless energy and dedication to goals and deadlines is incredible. You never watch TV do you? I Loved, loved, loved yesterdays post, caught me up on two years…right? Hahaha.
The floors are really classic and lovely!
YoungHouseLove says
We haven’t clocked much TV time in the last couple of weeks, but we’re definitely TV junkies. And we let a reference to a favorite show creep into a post every now and again…
-John
Ashley@AttemptsAtDomestication says
The floors are gorgeous! Can’t wait for you guys to move your furniture in and start making it your own!
Lynn @ Our Useful Hands says
Oh and normally I don’t like quarter round, but I love how estate-ly it looks up there! It really pulls it all together.
That’s it!
MB, L
Maya says
You are going to have AMAZING before and after pics in this house!! Looks so much “higher-end” already!
Koliti says
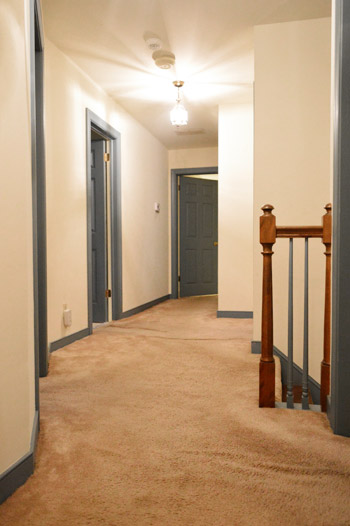
The second to last pic showing the finished floor down the entire hallway and into the Master Bedroom with the base boards and the quarter round – that’s the WOWZA money shot!
Before you had saggy baggy “Shar Pei” carpet…
Now transformed into sleek majestic oak! Beautiful.
It’s always good to have a Plan B –
Does the Elastilon underlayment boast any sound-proofing qualities?
YoungHouseLove says
Yes, it’s awesome with that! It’s rated highly in sound dampening, so on top of the sound dampening particle board under it, the upstairs areas of the house that we tackled are really quiet now that we Elastiloned the heck outta them. It’s great for a second floor I think!
xo
s
janice says
oh. my. word. you guys are killing me – I’m amazed at how quickly you are working through these projects. the house already looks so different! And ok, I am sure that 10 hours laying flooring doesn’t seem quick – but for someone who can’t find time to sweep the dust elephants out of the corners….well, whew, I’m either blown away inspired or crushed to the core. lol
Angel says
Do you guys ever think about flipping houses? You guys are so good at redoing a house… Giving old homes a fabulous facelift…And quickly it feels.
YoungHouseLove says
I worry we’d be terrible at that! I think we like to live somewhere for a while before doing things like kitchen and bathroom renos (to see how we really use the house, come up with ideas to make it more functional for us, etc) so I think the time pressure of a flip within a certain amount of months might suck the fun out of it for us. Never say never though!
xo
s
Shelise says
They are SO pretty!!
Jerri says
Stunning! You two are a fabulous team!
kate says
Looks fabulous – what a transformation! It looks like you have a bunch of old fixtures to switch out. Are you bringing your lovely fixtures from your current home to the new one?
YoungHouseLove says
They’re staying with the current house (we hate to strip it all down and add boob lights before we leave) but making/buying lights is one of our favorite things, so we can’t wait to find things that fit the new house :)
xo
s
Sapphira says
Holy moly! Just with the carpet-to-hardwood and blue-to-white paint switches, it already looks like a whole new house! It’s like the girl in the movies who takes off her giant glasses and puts on a coat of mascara, and BOOM beautiful! Love it! Can’t wait to see what else you guys do! Good luck with moving!
YoungHouseLove says
It’s like She’s All That in here….
xo
s
Angela says
I know you answered something similar but not exact question…If you were to lay hardwood again and the could use any option would you choose to use this sticky underlayment or nail it down? Looks great! You guys ROCK!
YoungHouseLove says
I think we’d nail it down just to try it the other way if we had plywood, we just couldn’t in this case because of the particle board.
xo
s
caitlin says
Not to be too nerdy, but I’d live to see/know how you navigated around the angled walls and the door trim in the hallway.
YoungHouseLove says
Oh yes, there have been a bunch of requests for that and we took a lot of photos so we’ll share a follow up post with those details about all the tricky little parts (transitions, the top of the stairs, the angled walls, the last plank in each room, etc).
xo
s
Cortney says
Oh, if I lived closer to you guys…I love laying flooring! I’ve done my whole house myself, with hubby cutting the boards at the end of each row for me. Now, if only I felt as excited about tile…my kitchen and the two bathrooms are the only rooms in the house I haven’t done the floors in.
Looks great! Isn’t it a great feeling when you lay that last board down and you think, ‘Yeah, I did that!’ And that underlayment is super cool…is it quiet to walk on? I have a few transitions in my floor where you can hear a little movement–that underlayment looks like it would keep that from happening.
Cortney says
Oh, and I want to come over and paint those two spindles on your banister! lol Are you going to paint, or replace and stain? I can’t see the blue sticking around for very long…
YoungHouseLove says
I think the blue might go glossy white and the bannister might go dark dark dark, like the beams in the kitchen makeover we shared yesterday. LOVE those!
xo
s
YoungHouseLove says
Yes, it’s rated highly for sound dampening, and in combination with the sound-dampening particle board subfloor under them the second floor is really quiet. And you’re right, laying that last board is the closest thing to a natural high. We just kept saying “dude, we did it.”
xo
s
Cortney says
Ooooohhhhhhh…those stairs would be gorgeous painted like that. I’m really looking forward to seeing how that staircase ends up…I have second-story envy! My husband says, ‘Never’, but I say, ‘One day…’ :-)
Amy says
Wow, wow, WOW! Looks awesome. I am not sure my husband and I woudl have had the patience for that…you guys make a great team.
Whitney Dupuis says
Wow! It already looks like a brand new house. Beautiful flooring. It’s amazing what a difference those “small” changes (paint and flooring) make!
Kristen Allen says
It looks awesome :) even better than the LL picture, makes us consider the same…and saving 4k on install has to feel good!
Ceci Bean says
Amazing! It looks like a totally different house already! I’m curious what you’re going to do with the stair railing and banister now!
YoungHouseLove says
I’m actually debating a really dark stair railing (almost ebony, like the beams from the kitchen makeover we shared yesterday) with white spindles, but we’re not sure where we’ll end up!
xo
s
Jennie says
We did our stair railings in “Ebony” by Minwax … I love the result! It looks awesome against the white spindles!
YoungHouseLove says
Ooh pretty!
xo
s
Jenn C says
Great job Sherry and John! It looks fantastic! I have a question about the Elastilon. We want to install hardwoods on our main floor (we live in a two story). We have concrete slab with no subfloor (boo!). Do you think the Elastilon would be a good option for us to install hardwoods since we can’t nail our woods in? I almost gave up the idea of hardwoods on our main floor until I read your post this morning.
YoungHouseLove says
Yes! From what we understand it was made for that! Hope it helps.
xo
s
Jenn C says
Thanks for the reply yhl! I feel motivated now!
Cori says
Oh man, I am exhausted just reading this post. You guys deserve a weekend of relaxation and pampering after all of that! But I guess that will have to wait… Those floors look so amazing, though, you guys should be super proud of all the hard work you did. I’ll be thinking of you moving this weekend, and I hope you don’t pass out from heatstroke (I don’t know how hot it’s supposed to be in VA, but it should be in the 90’s up here in PA)! Good luck, and GREAT JOB!!!!! <3
Rainbow Miller says
So glad that you guys found a solution that worked out! It looks fantastic. Hard work definitely paid off.
TriciaS says
That looks like an interesting way to stick down floors. I watched an episode of Ask This Old House and they used a similar product to put up a tile backsplash in a kitchen remodel. I do have to say I am surprised you guys chose to use this product. You always used low VOC paints in the house and a petroleum-based product with an adhesive is likely to off gas a lot. How does this product rate on the “healthy house” scale?
YoungHouseLove says
Check out the bullets about it in the post! We were thrilled that no only is it warrantied for life, it’s also non-toxic, has no-VOCs, and no odor – which is great considering it’s an adhesive product!
xo
s
Ali B. says
Wow, guys! That looks AMAZING! Great work. I can only imagine how tired you must be right now. Seriously, are you sure you don’t want to take a little bit of a blogging break for a couple days while you get all packed up? I think we would all totally understand. I promise to visit twice a day and click ads in the meantime!
YoungHouseLove says
Haha! No worries Ali! We feel like we have so much to tell you guys since everything is happening so fast that we hope to drop in with a lot of updates next week while we get settled in. Here’s hoping!
xo
s
Lady ID says
Great job – it looks good. I love hardwood floors.
Megan @ Monroe Makeshift says
It’s amazing how much better it look already! Way to go!
Melissa says
Nice work! My husband and I have gotten quite good at installing wood flooring after facing the same “old carpet upstairs” conundrum when we moved in 3 years ago. We used Schon Quick Click and it was pretty easy once you get the hang of it!
kalibrooke says
Seriously, whenever I look at posts like these, I imagine the old owners seeing them and being like, “DANG, WHY DID WE SELL THIS HOUSE?!” Beautiful!
Samm Spangler says
They look beautiful!! I feel your pain though (or at least my husband does). He installed floater hardwoods throughout an old rent house his parents were selling and he STILL has nightmares about it!! It was definitely worth it though… the floors are stunning! Great job!
gemma@thesweetestdigs says
You guys! It looks SO good!! What a classic choice – you will never ever regret it.
Happy moving!!
Janet Ralston says
WOWZA. You guys are impressive! It looks gorgeous.
Rene @thedomesticlady says
Laying our hardwood floors is definitely the hardest DIY job my husband and I have tackled. Great job:)
Lakitia A. says
They look incredible!!!! It’s so crazy how the walls look a different color after you painted the doors/trim and installed new flooring. Good luck with the move!!!
Bonnie @ the pin junkie says
The wood floor looks so much better than the old carpet. It looks like you’ve already painted over the blue trim and blue doors too. It’s looking good!
Tabbitha @ Turnip Tootsie says
What a beautiful transformation! It always amazes me how much flooring can change the look of a home!
<3
Tabbitha
Carra says
AMAZE!!! As others have said, what a transformation it makes already! The white baseboards with the new floors makes a world of difference. I am so excited to see this new house get put together :)
Donna says
You guys haven’t even moved in yet, and it already looks like a different house! Can’t wait to see it evolve. LOVE the hardwoods!
Karen C. says
Looks amazing! Your hard work definitely paid off!
Does the Elastilon underlayment affect your warranty for the hardwood floors in any way?
YoungHouseLove says
Nope, they’re both warrantied to the gills and meant to work together!
xo
s
Candy from Candied Fabrics says
Hip hip HOORAY, this looks fabulous! The elastilon stuff is totally new to me, and although I’m sure it was a steep learning curve, I’ll bet in the end it was the same or faster than doing the nail in route, which is what we’ve always done. And, trust me, you are less sore, because swinging that mallet, even with a compressor-type nailer, gets OLD REAL FAST! Huge congrats for getting that gross carpet replaced before the move and good luck packing!
Kim says
Wow! You guys have done a great job so far! It looks like a brand new house upstairs. It went from dated to modern just like that(snap!)!
Angela says
Holy crap what a difference! I bet if you had the time you would just sit there and stare at those floors for hours!
I have to imagine you guys aren’t getting any sleep between laying hardwood floors, packing up your house, parenting and blogging.
RebeccaM says
Those floors look AMAZING!! Between the new floors and the clean, white trim, it looks like an entirely different house! You’ve really done an excellent job lightening everything up, and making even the hall seem brighter, more open, and definitely more modern! (Boo blue trim!!)
I’m sure between parenting/packing/moving/renovating/working you’re super stressed and exhausted, but you guys are so awesome! Keep up the great work!
Julianne says
Great work, guys! Super inspirational…I hope the move goes well. :O)
Kay says
There’s no better way to say it: Those floors are like woah.