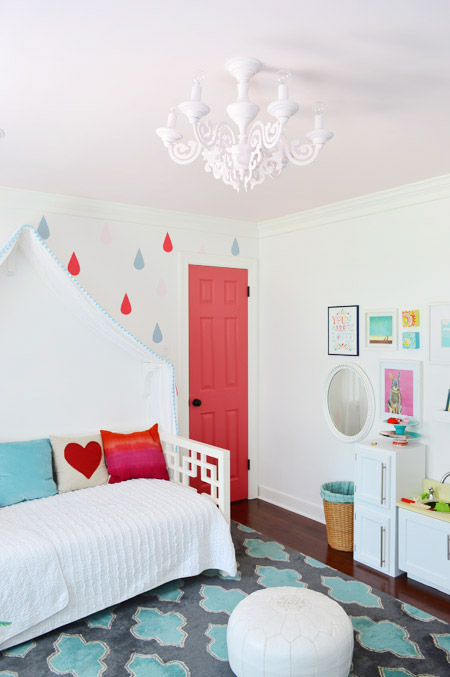
Continuing the recent trend in our house – Clara is the latest family member to get a ceiling fixture in her room. And methinks Sia might break out in song about it (“from the chan-de-li-eeeer!”).
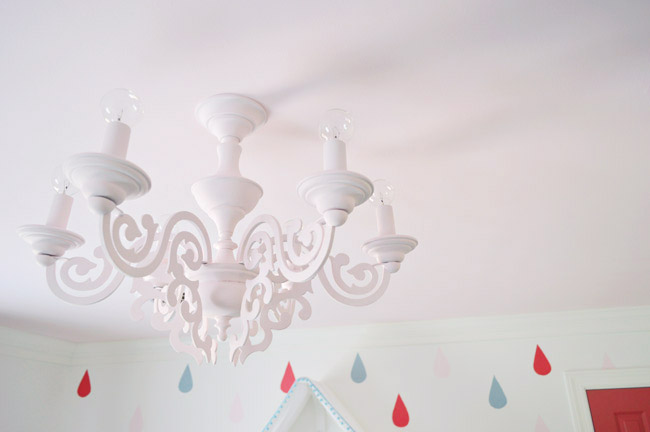
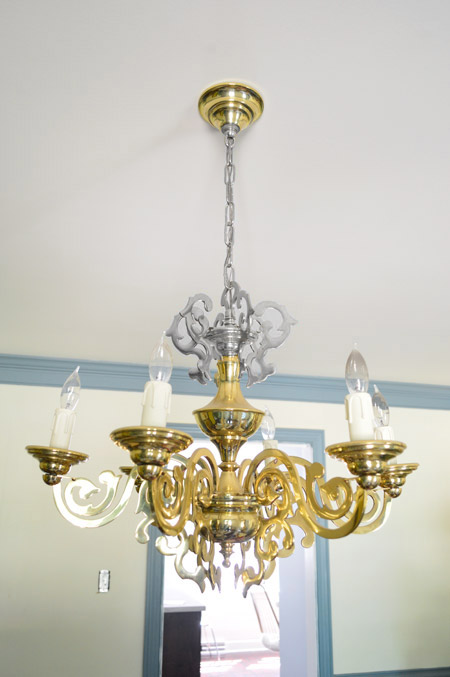
If it looks familiar, it’s because you’ve seen it before in our dining room. Well, a previous incarnation of it at least. We’ve always been intrigued by this chandelier, which was here when we moved in. The finish wasn’t totally our style, but the swirls and flat arms (it almost looks like an intricate paper chandelier) always made us think it could be a good candidate for Clara’s room.
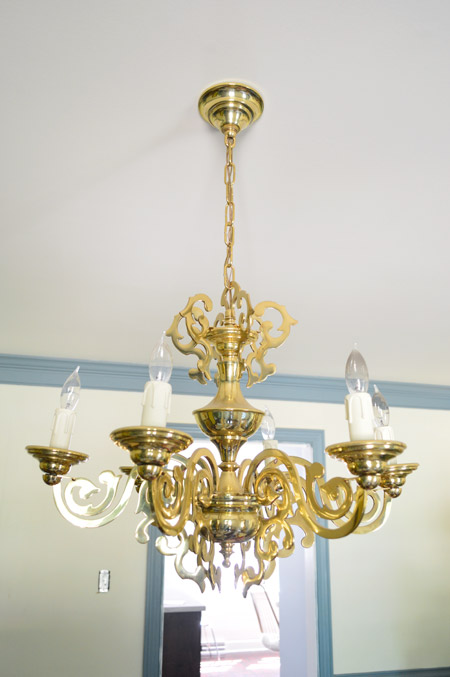
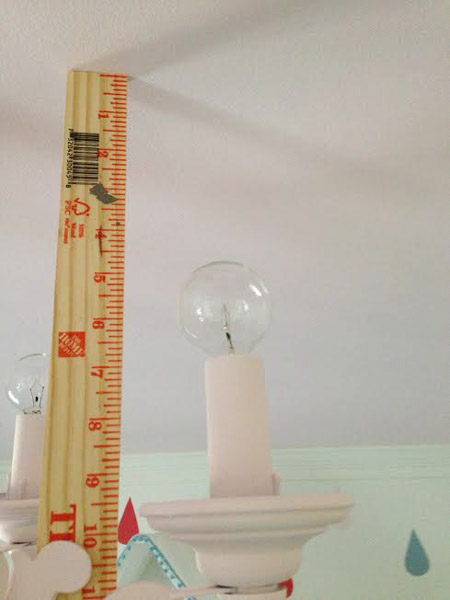
The main problem was that it was too big. Even without any chain, it would’ve hung about 26″ down from her eight foot ceiling, putting it perilously close to her six foot father’s eyeballs. But since Home Depot has yet to carry shrink rays, I decided to take it down and see if I could shorten it myself.
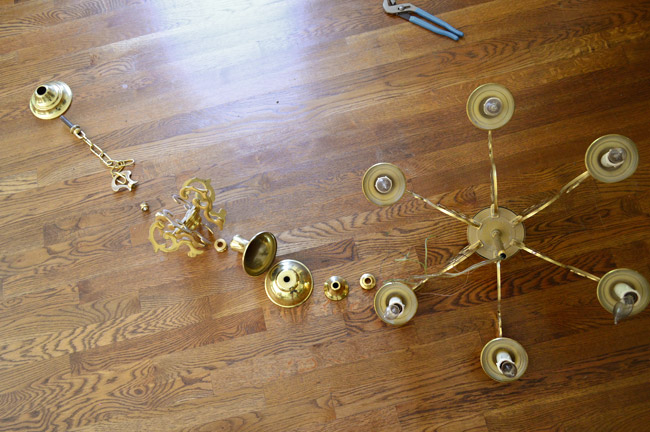
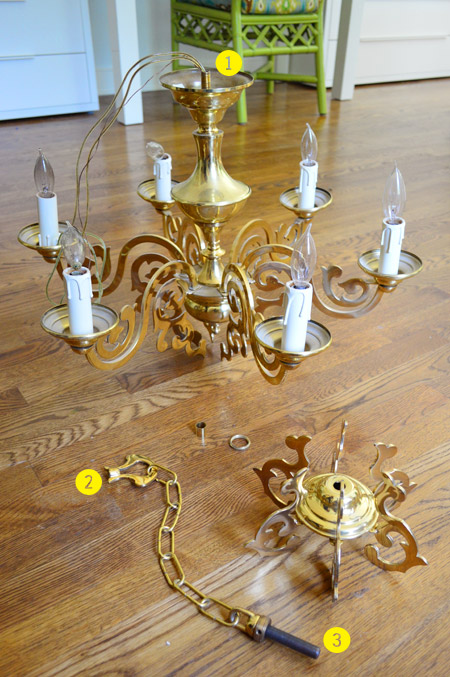
Just by loosening one screw at the top I was able to disassemble all of the nesting parts that create the ornate shape of the chandelier (I laid them out in the line above so I could remember their order). What it left was this long center post so I could begin spooling things back onto it.
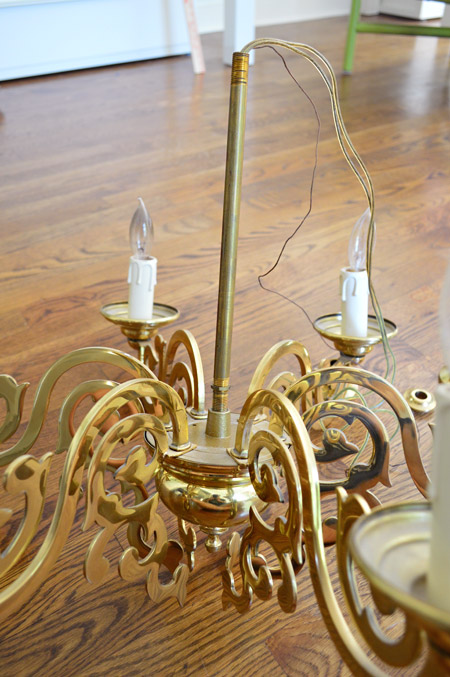
My goal was to reassemble most, but not all, of the pieces into something that still looked like a chandelier, but was several inches shorter than the original shape. That center post, however, was problematic since without buying a shorter one, I wasn’t going to be able shave much of the height off. I contemplated hacksawing it shorter, but then I realized I needed the threaded area right at the top of the rod to screw it back together in the end (hack-sawing it shorter would have removed that threaded area).

That’s when it struck me. Rather than use that threading (#1 in the pic below) to reattach it to the loop on top (#2) so that it could attach to the canopy piece that screwed into the crossbar (#3) to that loop, I could just screw that threading (again #1) directly into the crossbar itself (thereby shaving off the height of the large loop). That saved me quite a few inches because I could cut out most of the original hanging mechanism, but I knew that it would still be nice and secure. You never want to hang something this heavy by the wires, so threading the metal bar into the crossbar in the ceiling would safely and securely bear the weight.
You can see which pieces I left out in the picture above, but for easier reference, here’s the original photo of it in the dining room below with the removed pieces grayed out:
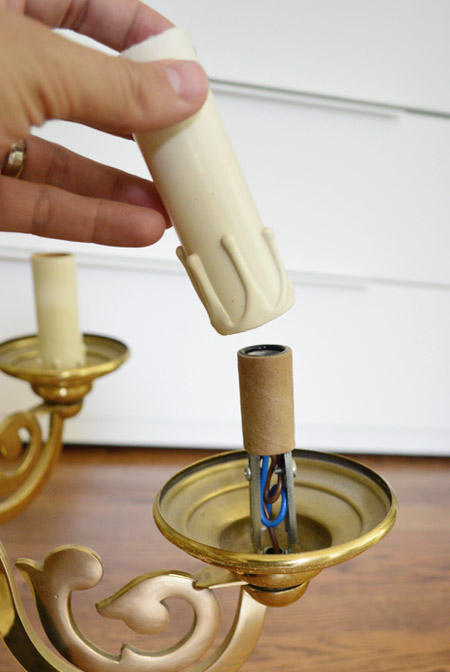
Oh, and we were going to buy new candle sleeves (the faux dripping wax wasn’t really doing it for us) but Sherry realized we could just flip them over and the drips wouldn’t be visible from below anymore (see the one in the background that has already been flipped).
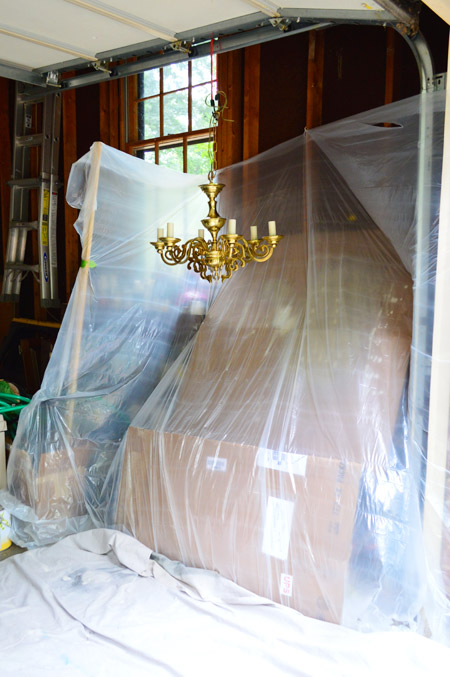
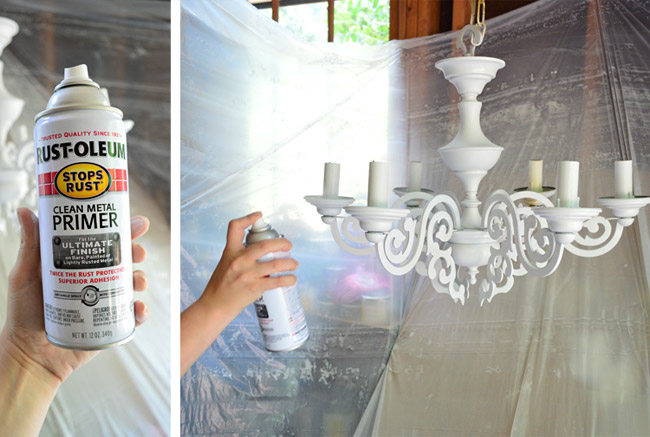
Next up came painting. I set up this little station in our garage using a plastic dropcloth, plus a bungee cord (and the original chain) for it to hang by.
First Sherry taped off the top of each bulb connected in each candle sleeve (don’t want to gum those up with paint) and then she applied a coat of Clean Metal Primer, which is our usual go-to base coat when painting metal.
Although we both thought it looked pretty great in white after that round of primer, we were most into the idea of making it the exact same light pink color that’s on the ceiling (Pink Cadillac). Something about a pink ceiling that sort of melts into a chandelier in the same color felt very Alice-In-Wonderland to us, and of course when we asked Clara what color she wanted her light to be, she screamed “PINK!” without hesitation.
But to get it exactly the same color, we couldn’t buy spray paint off the shelf – and we knew our paint sprayer would leave something this intricate pretty drippy and gummed up (we’ve had luck using it on flat things like trim and doors, but even the curves in molding and the recessed areas in doors aren’t always covered that well) so we decided to give something we had seen at Home Depot a try. It’s a “Preval Sprayer” that we bought for less than $5, which promised to turn any paint (plus water to thin it) into spray paint.
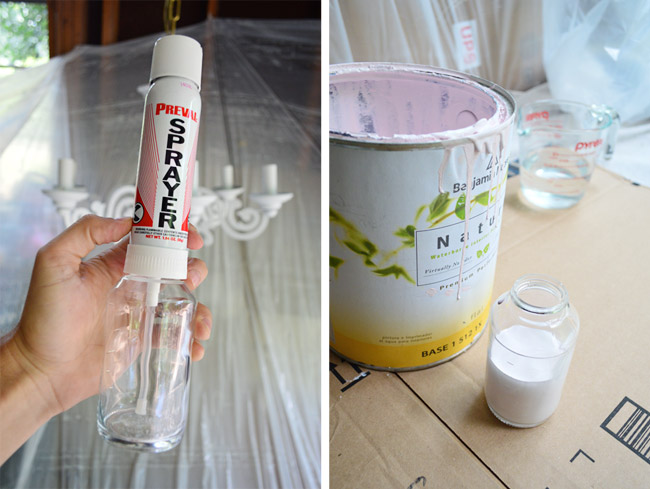
Well, we had a difficult time with it. There isn’t much direction given about how thin the paint needs to be. It took LOTS of trial and error (and mess) to get it thin enough to finally spray at all and once it did, well, it was super runny and we ended up needing to add more paint to thicken it back up again. I wish I could tell you the final formula that worked, but we lost track along the way. I think it was somewhere in the neighborhood of 1 part water to 2 parts paint.
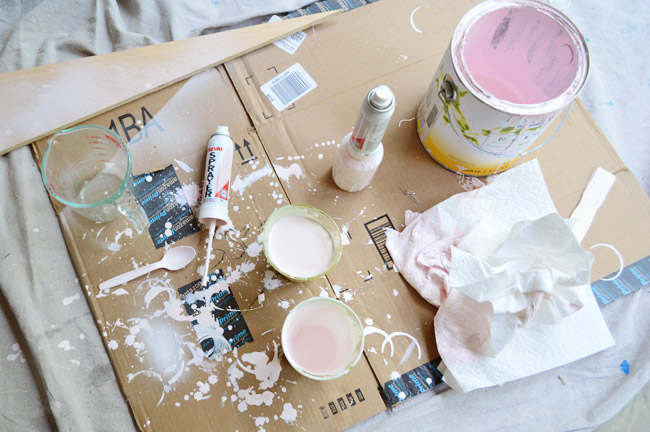
Spraying was still spotty and it would cut out or spurt sometimes, which required unclogging it somewhat frequently (putting your finger over the hole and pressing the spray button). So I’m pretty sure we never landed on the perfect paint consistency, but eventually Sherry got the job done. Once we got it spraying it was a lot lighter and more mist-like (like true spray paint) than our large Graco paint sprayer that we use for cabinets and doors, which seems to apply a lot more paint than a spray can, so it can get really drippy if you go over the same area twice or from a different angle.

The next morning we hung it up, but I didn’t get any photos of that process because it took both of us to get it in place (Sherry supported it while I did the wiring) and it wasn’t until we were both on the ladder that I realized the battery in my camera remote was dead.
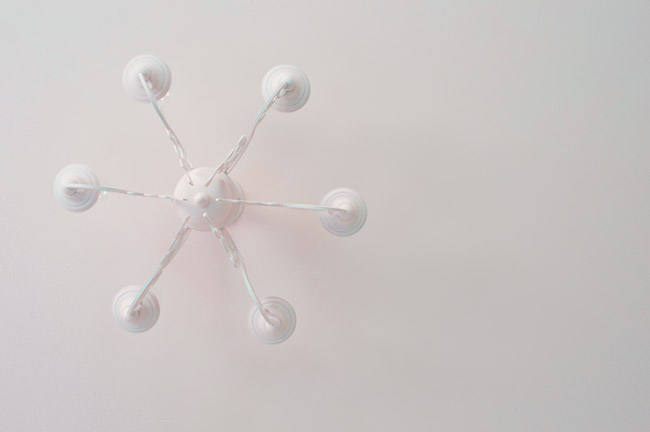
But the gist is that I attached the crossbar to the ceiling fixture (which had a center hole with threading in it, like this one) and we were able to spin the whole fixture so that the long center post (#1 from that picture way above, if you recall) screwed directly into it. We had intentionally left just about a half-inch of it sticking out above the canopy so that it could catch that ceiling crossbar, screw until it was nice and secure, and hold the canopy snug to the ceiling.

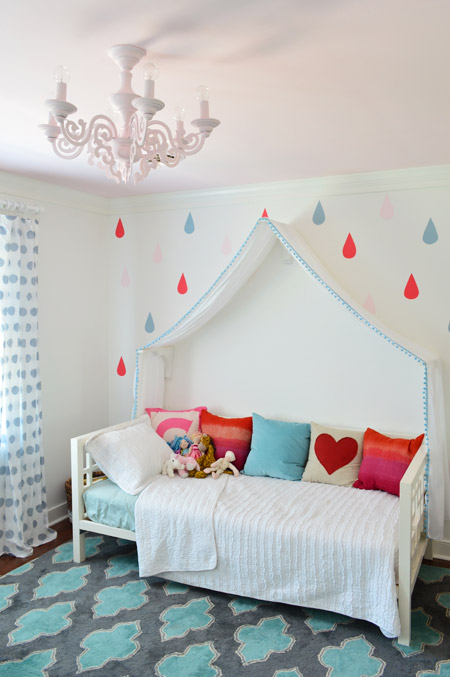
It’s hard to tell how much drop we have from the ceiling, but those bulbs are a good five inches from it, so they’re not right on it. It’s important to give bulbs breathing room on all sides (these have more than most chandeliers with shades on them).
We worried that the watered down paint would look lighter than the ceiling color, but if it is we haven’t noticed. In fact, it came out so nicely that we’re almost ready to forget the struggles we had with the sprayer which (beside the new round 25 watt light bulbs) was our only cost for the project (we spent $5 for the original sprayer and $4 for one extra air can).
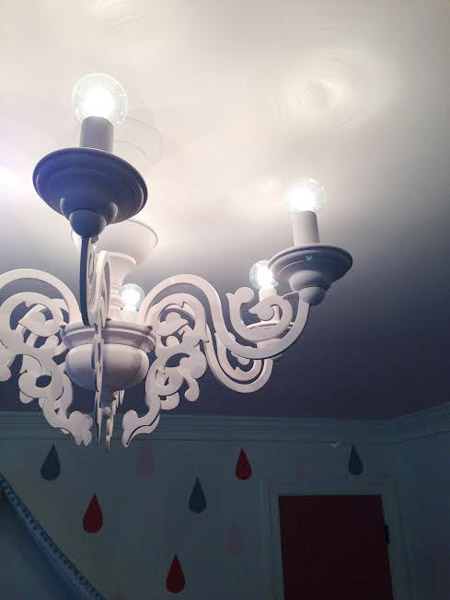
It’s nice to have a nice bright light to illuminate her room with the flip of a switch. And of course it’s always fun to take an old light that didn’t work for us in the dining room and reimagine it for Clara’s space. Here are those six 25 watt bulbs in action along with her fairy lights.
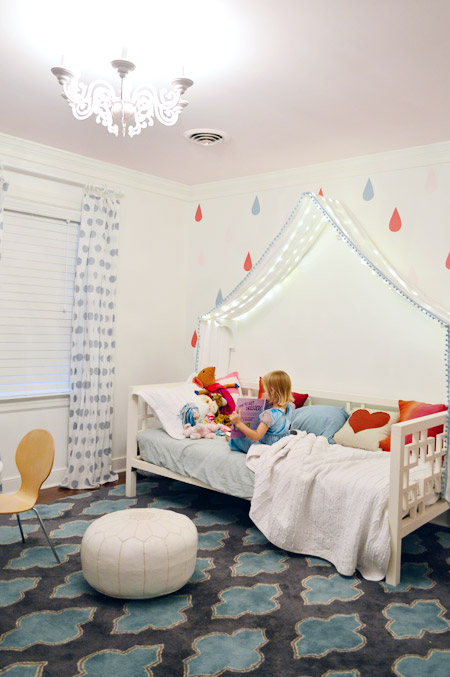
And a more ambient night shot thanks to the ol’ iPhone:
Since Teddy is too small to comment on his new light, it’s nice to know that Clara loves hers. Our favorite quote so far has been: “It’s all swirly like it’s from Belle’s castle!”
Of course this does leave us light-less in the dining room at the moment, but that’s kind of the least of our concerns in that room (I’m talking to you, blue trim). If anything we’re probably most focused on finding a light for the guest room, which is the only one upstairs that’s still ceiling fixture-less. And we’re expecting a guest next week…
Psst- Wanna know where we got something in our house? Just click on this button:


Joanna @ TheNestbook says
The light turned out great! Just curious–would you ever use the sprayer again? I feel like the concept is really good and I could think of many uses for it, but just wondering if it’s worth it?
YoungHouseLove says
I think we would! It gave us better results than we think our big Graco one would have had on such an intricately shaped object, so I think if we went into it knowing there would be that formula-perfecting time before we could spray anything built into the project, hopefully it wouldn’t annoy us as much. It was a surprise how long we had to fool with it, but the results were nice in the end.
xo
s
Ethne @ Wom Mom Blog says
This is so cute you guys. I keep thinking of the old owners (or their kids anyway) of this house and how much they would love that you repurpose these things. Can’t wait for the next thing!
Liz says
It looks awesome! I actually bought a chandelier on Craigslist for our family room which was wired and switched for a light fixture but didn’t have one and spray painted it ORB (because it was dark green with light green speckles to start). I got the idea from all of your spray painting adventures or I never would’ve had the courage – and it turned out great! We’re really happy with it (and the dimmer switch we installed), though I think we need to lower it some… it’s in the last pic here:
http://functionaladult.blogspot.com/2014/06/expensive-house-2.html
Anyway, thanks for showing how possible it is to re-use old stuff with a little DIY magic. :-)
YoungHouseLove says
That looks great!
xo
s
Julianne says
Nice job! Isn’t great when you can repurpose stuff?! We did this with an old crystal and brass chandelier at our last house. Repainted it, cleaned up the crystals and bam….great sparkly piece for the master bedroom. Best part is that Clara LOVES her princess chandy. BONUS! :O)
Erin says
It’s the sheer creativity that kills me. LOVE IT!
(And I was thinking of Belle’s castle the whole durn time I was reading this. Ha!)
Fabulous!
Sarah says
Why did you choose to paint it the same color as the ceiling? Why not a brighter pink? Just wondering!!
YoungHouseLove says
Something about a pink ceiling that sort of melts into a chandelier in the same color felt very Alice-In-Wonderland to us. Bright pink could have been fun too, we just liked the “magic” of it melting into the ceiling color I think.
xo
s
Sarah says
Agreed with Lil — I’m amazed that Clara, just being a kid, is so good at keeping things neat (even if you did have a quick tidying session). I would imagine that you guys must keep some house rules about putting stuff away when you’re done playing, but all kids like to try and push the limits sometimes.
How do you keep a house looking so photo ready with two kids?? Hats off to you all!
YoungHouseLove says
Oh gosh, it’s so not! Usually if we know we need floor space for two ladders that will kickstart a cleaning session, but you should see our dining room and our storage room. Full of stuff! And the back porch has a nice big pile of toys by the water table. We have been trying to institute a clean-up-the-toys rule before bed, which we might remind Clara about five nights a week and completely forget/ignore the other two ;)
xo
s
Tamara says
It is amazing how modern the shape of those swirls look when painted a less shiny, solid color. I think maybe the fact that the swirls are flat goes a long way too. I don’t know if I would have seen that potential!
Jennifer K. says
Sherry; that self-contained sprayer is AWFUL. I tried it too and I guess you had more patience with it than I did because I gave up and ran the diluted latex through the my Critter sprayer; which did a great job.
Didn’t you guys get a Critter? If so-next time try that when you’re spraying latex from a can. About a tenth of the time and a tenth less cussing :)
YoungHouseLove says
I was going to ask John to add a note to this post to ask about how people liked their Critter but I forgot! I wondered if that would be perfect for this project since it’s still a jar but a much nicer sprayer! Thanks for the tip!
xo
s
Julia @ It's Always Ruetten says
The preval is a joke. I tried to use it twice. The first time it didn’t work at all and the company sent me a few replacements. After months of waiting it finally arrived. When I used it, it exploded and now I have red paint on my porch… of my rental yay! But glad to see you {finally} got it to work.
YoungHouseLove says
OH MY GOSH, what a nightmare!!
xo
s
Amy says
That video was…interesting! Hadn’t seen that before. Thanks! And, the pink chandelier is adorable. Such a lucky little girl!
Nawel says
I have a spray painting question for you both, or anyone who can help. I’ve spray painted a few items (an ornate mirror frame made of resin and two wood picture frames) and in all instances, I’ve used Rustoleum products, including their primers, colors and sealers for the appropriate materials used. I follow the directions exactly as they are given. I generally put two layers of primer on to make sure everything gets coated evenly, allowing enough time to dry between coats, then wait a day before putting two coats of color on, waiting another day before putting the semi-gloss or gloss coat on. EVERYTIME I get to the semi-gloss/gloss coating, a few spots will crackle and I can’t figure out what I’m doing wrong. Each time, I’ve had to sand down (or throw away) the frame and start over….only to have the same thing happen.
Any suggestions on what I’m doing wrong?! Thanks!
YoungHouseLove says
Hmmm, what could that be?! I’ve never heard of things crackling other than if you paint latex paint over oil paint, but I don’t think that would be an issue here since most spray primer (and some spray paints) are oil based anyway. Has anyone else had this issue? Any ideas what it could be? Is there something going on at your house that could explain it? Like you’re doing it outside and a bug or a leaf is getting into it and making a flaw that looks like a crackle? I can’t figure it out…
xo
s
Stephanie says
Nawel,
More than likely the surface is not clean enough to start with. If there is any dust or residue on the original surface, the colored spray paint will pull the primer while it dries, causing a crackly-looking finish.
YoungHouseLove says
Great tip, Stephanie! Maybe try some liquid deglosser to make sure it’s super clean!
xo
s
erin says
that is pretty awesome. It almost looks like a paper chandelier!
DKL says
For future reference, many hardware and/or plumbing stores will shorten pipes and rethread them for you for a couple of dollars.
YoungHouseLove says
Great tip! Thanks DKL!
xo
s
Grace says
That is so adorable! Even with baby brains and sleepless nights, you guys still come up with the cutest ideas. (Bravo:)
river1 says
love how it turned out. i also would have Goodwilled that long ago.
for future reference there are companies that will custom fill aerosol cans with your color of paint. here is a company from a quick google that i have no experience with, http://www.myperfectcolor.com/Custom-Color-Spray-Paint/33865.htm
later jim
YoungHouseLove says
Thanks Jim, that’s awesome!
xo
s
Cathy says
My Benjaman Moore Store will do this for you–make any color you have into spray paint. I’m guessing they all can.
Annie says
It’s very pretty and perfect for Clara’s room. I think you did a great job of repurposing…But I think it would look much better hanging just a bit. It just looks odd clamped to the ceiling. And I also would have loved it either white or the color of the closet door so it popped more!
Margaret says
Wow, Clara must feel like a millionaire! Like the King of France, or somethin! I think she also needs a porcelain fountain. Imagine walking in your house and seein’ dis one. Or dat one. Or dis one….
Sorry, couldn’t resist!
YoungHouseLove says
Bahahaha!
xo
s
Diana says
LOVE this!!! I wouldn’t have even thought about painting it pink. Sorry you guys had so much trouble with it, but it looks great! We’ve been talking LOTS about lights on my blog, and I even posted an update on it today!
http://www.thewonderfullymade.blogspot.com
Sandra says
I totally agree with Stardancer. Goldie brass fixtures fail to inspire me, but you two nailed! I love, love, love the light now.
I have a question about the wiring. If you threaded the rod into the ceiling mount by turning the whole light, will you have to cut wires if you were to swap out the light in the future?
YoungHouseLove says
We’ll just have to unthread it (spin the chandelier in the other direction) to release it from the ceiling mount and then we can detach the wires the same way we attached them when we hung it – no cutting necessary :)
xo
s
Pat S says
I love it. Chandeliers are so cool and you did an amazing job.
Ortisse says
I LOVE IT!
Jan says
I love the finished look… Have you ever thought of installing a dimmer switch for the new overhead lights? We recently put them on all our overheads and its so nice being able to have the full light shining, or really low for a nice glow.
YoungHouseLove says
Love that! I have both Clara and Teddy’s room on the dimmer-switch list :)
xo
s
Jennifer says
We just did something similar for our bathroom. We took 2 brass/gold chandeiers from Restore and spray painted them black with the same kind of paint you used. They go with each other, but aren’t perfectly matched which I love. Amazing what spray painting an ugly chandelier will do.
YoungHouseLove says
I love that they’re mismatched but you sprayed them the same color to tie them together! Smart!
xo
s
Emily says
If I had to guess, I bet your house guest next week is Katie B. & men! Fingers crossed.
YoungHouseLove says
Oh man, that would be fun but it’s my mom. Haha!
xo
s
Patricia says
I love this! It’s great when you guys show the different ways an existing light fixture can be changed to reflect someone’s own style.
Fran says
Sheese, get that big, dark, heavy rug out of her room. Perfect for an adult, not so much a ‘fairy lights’ room.
Paula says
This project turned out amazing. Clara is a lucky girl. I keep thinking about what kind of project you can do with the swirly part you took out. It’s screaming for an upcyle.
YoungHouseLove says
Someone else said that too! I wonder what we can do with it… I keep thinking it would be a cool base to something – like topped with a round tray and painted to match, it could be a raised platter-type thing. Or if we strung shells on it we could make a wind chime/mobile?
xo
s
Alyssa says
So cool that you guys were able to reuse the chandelier! Quick question… where did you find the heart pillow for Clara’s bed? Thanks!!
YoungHouseLove says
Thanks Alyssa! That was Joss & Main a few years back.
xo
s
Amanda says
I’m sure this will get me blasted in the comments, but I’m a designer and I don’t think this looks great. While I agree that the shape of the fixture is somewhat whimsical for a kids room and it looks better painted, the overall shape hung that close to the ceiling doesn’t look right. If it had a drum shade around the upper portion, with the decorative bottom parts exposed that would help to disguise the old-retrofitted-chandelier look of it. I think would help balance the fixture out and look more deliberate, like a proper semi-flush mount fixture. Sometimes going a step further can really elevate an inexpensive fixture like this one.
YoungHouseLove says
Thanks Amanda! That’s a fun idea!
xo
s
oriah says
I like the idea of reusing this old chandelier. I like the flattened shape of it. I just don’t like the execution. It looks too close to the ceiling and will likely discolor (burn) the ceiling.
I also think that painting it with a flat latex probably wasn’t the best choice. When it gets dusty and cleaned a few times, the flat paint will very likely start to discolor where dust and dirt get worked into it. And generally speaking, i’m not a fan of the “exposed bulb” trend for overhead lighting. The light’s just too harsh.
Janet V. says
I have to chime in here with dissent, but this looks terrible! The light bulbs look like they almost touch the ceiling – the chandelier is way too close to the ceiling to look right. And the stark, bare bulbs throw off too much harsh light. Sorry, this one’s a DIY fail.
Danielle says
I have to agree!
Linda says
What a great idea! I’ve got a brass chandelier hanging out in the attic waiting for some inspiration to do something with it. We replaced it with a beautiful crystal chandelier in our dining room. Another great YHL project.
Marlena says
What a magical room!
Susan H says
That chandelier is hung way too high, so what if John had to duck, it would look better and it is HER room.
YoungHouseLove says
Thanks for the height feedback, guys! We can lower it a few inches without it being in John-head-smashing range (the hall ones upstairs and the one in the foyer hang lower without any issues) so maybe we’ll play with that and see if we can get more dangle going on. We definitely could have gotten over-zealous while shortening it :)
xo
s
Shunta says
Is Clara reading a story to her dolls?!! Oh my goodness she is just so cute you guys!!!
YoungHouseLove says
Haha, yes! She has a growing number of stuffed animals that she sleeps with and she likes to tuck them all in the read to them.
xo
s
Angela says
I love what you guys did there. Repurposed something completely dated and turned it into awesome! Just love your DIY skills.
Jill says
LOVE. I poured over craigslist for a couple months for something like this that I could paint for daughters room and finally gave up and bougt something. wish I would have had your eye. This looks amazing!
olivia says
That chandelier looks great! Clara must be so happy with how her bedromm turned out.
Becky Horst says
I totally thought it was a paper chandelier! Would have never guessed it was from the dining room, it looks awesome. Last week I had to double take I thought the stick light was made from q-tips! I thought at first maybe it was a new Pinterest challenge! Haha! They all look great.
Olivia says
Wow. Even when I see them side-by-side, it’s hard for me to believe it’s the same chandelier. Great idea!
Here’s a typo for ya: “Although we both thought it looked pretty great in white after that round of primer, we were most _into_ by the idea of making it the exact same light pink color that’s on the ceiling…”
YoungHouseLove says
Thanks Olivia! All fixed.
xo
s
Nichole K says
Just for the record, I don’t think it looks too close to the ceiling. I love brass chandy makeovers – wish I somewhere to put one! Maybe our hall light needs to mysteriously vanish ;)
Heather says
I like the idea but not the final result. I think a brighter pink would have looked great and chandeliers are not meant to touch the ceiling – this should be hung a bit lower. I’ve used the Preval sprayer twice with no issues – it works great if you read the instructions to thin the paint correctly!
Brit says
Very cute. Definitely agree the shape lends to the paper/cardboard lights that are so popular.
Also glad to know I’m not the only one who did the whole screw the light fixture into the crossbar thing. We had a light fixture by the front door I put in, and to clear the light with the door, we had to remove all the top portion along with the chain. You’re not alone.
I think I have to agree that it does look rather close to the ceiling. I’ve seen a lot of chandeliers that close leave burn marks on the ceiling (even though I know you said it has enough clearance between the ceiling and bulbs). I would consider the idea of lowering it a little if possible, or putting a drum shade over it, which someone mentioned. But I know you’ll live with it and see what works for y’all.
But still very cute & clever!
Brit says
But now that I’m looking at it more.. the chandelier being all the same color as the ceiling, it all kind of blends in and doesn’t feel so crazy being that close to the ceiling.
Agh, can’t make up my mind. But seriously stellar job. Y’all have more creative juice than I!
Kaye Whorley says
Love it! Did you notice if Virginia Metalcrafters made the original fixture? It looks like the things they made, they are no longer in business. They used to be in Waynesboro and made all sorts of things including many things for Colonial Williamsburg.
YoungHouseLove says
So cool! Didn’t see any markings on it. I wonder if it’s theirs?
xo
s
Amanda says
I’m so jealous of all the gorgeous light fixtures you’ve been adding to all the rooms! I wish I could pull that off. Too bad each room needs a ceiling fan. The joys of living in Texas, especially in the summer. Whoo-wee it’s hot! :)
SherryB says
Wow! This look so on-trend. Good on ya, Petersiks!
Milky says
Love it! Not a fan of chandies but this looks perfect. I love that it’s the ceiling color so it’s not overwhelming. I also love how it’s fixed close to the ceiling – much more modern than swinging low :) The bulbs do look close to the ceiling so I was worried you’d get six grey burn circles but if they’re 5 inches away you should be good.
And DO NOT get rid of Clara’s rug! It’s my favorite thing about her room! I love a fun kids room that’s not too babyish
Amanda K says
Love it! I would have Goodwilled that sucker long ago.
I hope your guests next week are the Bowers! We are overdue for some Clara and Will photos :)
YoungHouseLove says
That would be fun! It’s just my mom. Haha!
xo
s
Lux says
I would have never guessed that modern fillegre die-cut chandelier was ever that brass monstrosity. Good job guys!
Tall Tee says
Whole-lee-cow. That seriously looks like something you pay $300 at Wayfair. It doesn’t even look like the same fixture.
I have spray painted a ka-ton of lights and fans, and aside from one beat-down fan that no one could believe was the same item, none of them had this shocking of a transformation. Great job.