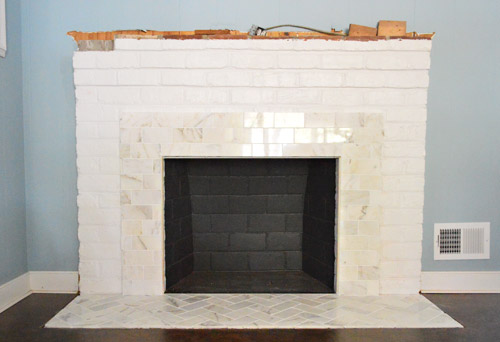
Ready for more progress on the fireplace? Good, ’cause there’s been lots. Last you saw, we had tiled the hearth and part of the surround with marble subway tile.
That was the easy step. Well, at least the more straightforward step. Because our next assignment – building out the rest of the frame – involved the addition of a lot more materials.
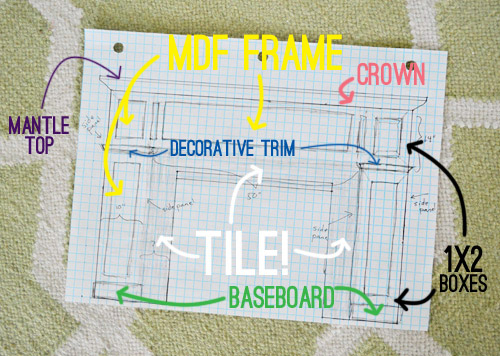
Let’s start with the MDF frame. We decided to work with MDF for the first time since it’s lighter, cheaper, and smoother than wood would be (plus it’s now sold without formaldehyde and it’s FSC certified). A 4ft x 8ft panel cost nearly $35, but the good news is that we only needed one sheet to get all of our pieces.
The first two parts of our frame were the two sides which sat on the floor and extended all the way to the mantel.
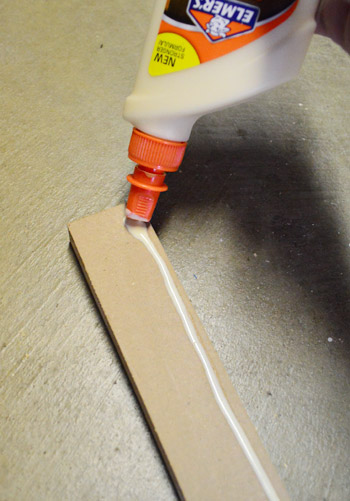
I built them by cutting the two pieces of MDF to size and then attaching them at a right angle using the ol’ Kreg Jig and some wood glue (just to be safe).
My bottle of wood glue and I actually become good friends during this project. I started to favor my nail gun over Kreg Jig-ing many of the pieces because it’s much much faster (one shot with the gun versus drilling a pilot hole and then screwing pieces together). But since nails don’t hold as tight as screws in the long run, wood glue is nice extra insurance.
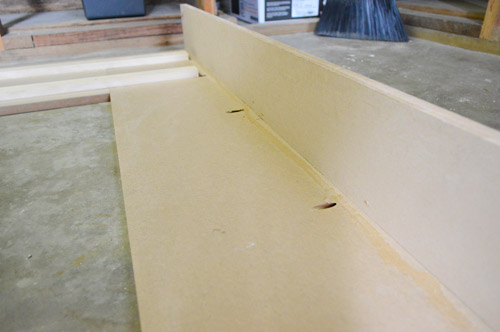
To connect the two side pieces, I cut a middle span (using my table saw) and then attached the three pieces together with a couple pieces of scrap 1 x 2″ whitewood.
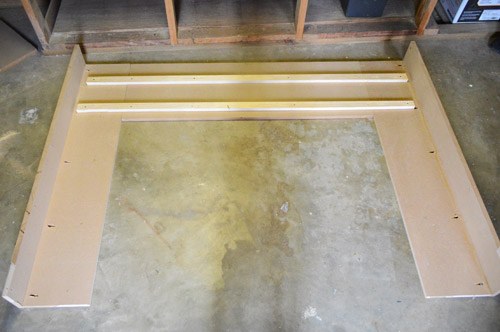
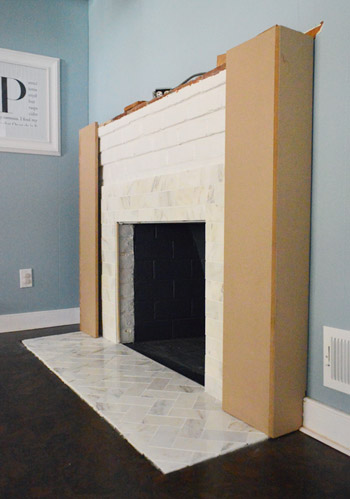
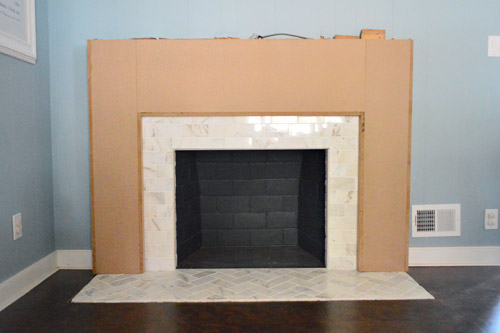
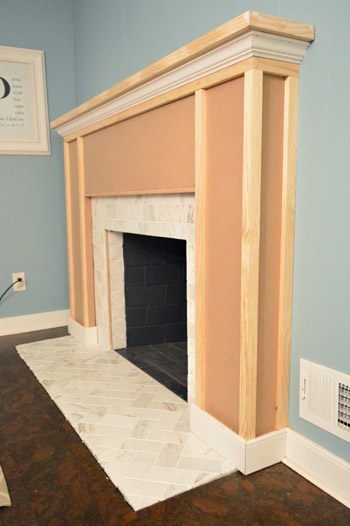
I realize the picture above is a bit confusing, so here’s a photo of the frame in place so you can understand how it’s coming together.
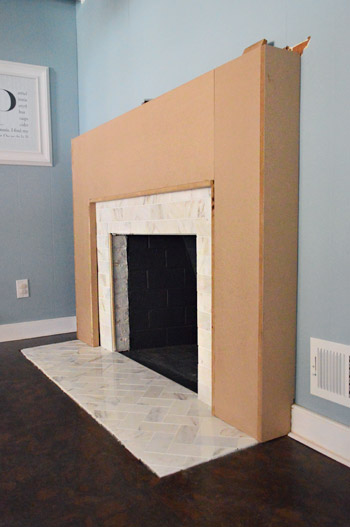
As you can see from the view from above, the MDF frame fits snugly right around the original brick fireplace (which turned out to be pretty gross-looking under the old mantel that we tore off – surprise!).
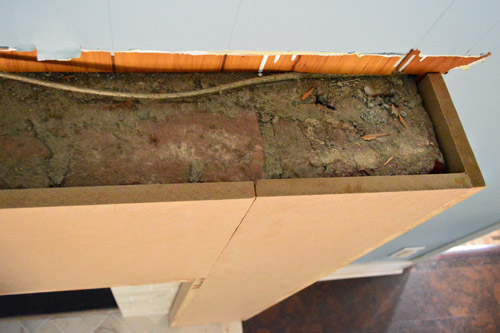
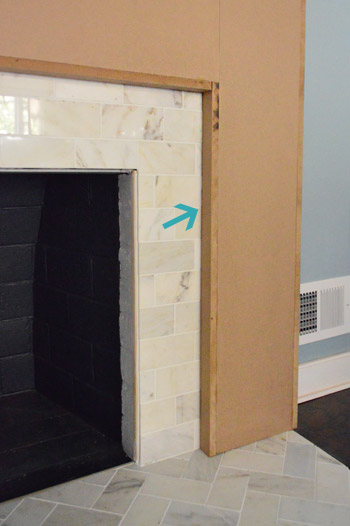
Oh and we had to add some thin pieces of MDF right where it sat against the tile because there was a small gap (see arrow below). That’s because the brick fireplace flared out right under the mantel and got thinner towards the floor (from the side it was actually pretty top-heavy). So even though the MDF sat right against the brick at the top, it floated a couple of inches away from the brick (and tile) at the bottom. It’s nice that from the side it’ll be nice and balanced now.
Here’s the MDF frame from the front. Hopefully this whole thing is starting to make more sense to you all.
It was actually pretty steady already, but we weren’t about to rely on good balance to keep it in place. So a few masonry screws through the top and along the sides (as well as a line of construction adhesive where the MDF met the brick at the top) made sure this thing wasn’t going anywhere.

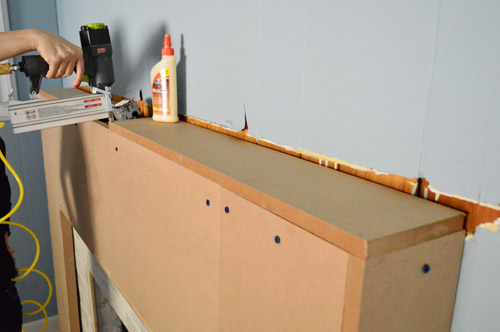
Next up was adding the mantel. The old mantel piece was too small to put back in place and my original plan to secure the new mantel directly to the brick (like the old one had been) failed upon realizing that the brick wasn’t level (it sloped away from the wall slightly). So after some trial and error, we cut some more MDF (still from the same sheet) and added a flat top to the frame with some glue and nails. Look at wifey go.
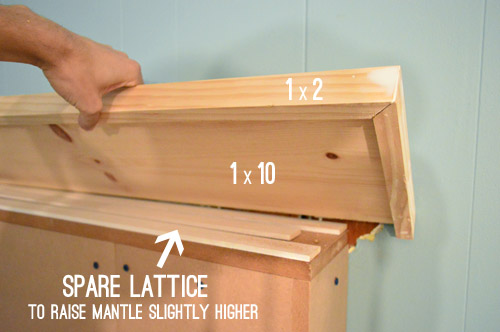
Then we constructed a new mantel top by taking a 1 x 10″ and framing it out on three sides with 1 x 2″ pine strips (so that no raw wood edges were exposed). It’s kind of the same technique we used for our floating shelves in the kitchen. Oh, and we added a few strips of lattice leftover from the board & batten project to raise the mantel a smidge so that it matched the old height (and thus covered all of the unpainted paneling behind it). When finished, this mantel will be exactly the same height as the old one, which is nice because we liked that about the last one (mostly we just wanted to fix the smashed tile hearth, and the side proportions since it got skinny and sloped into the wall from the side).
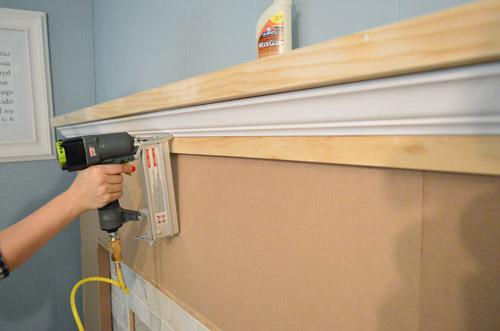
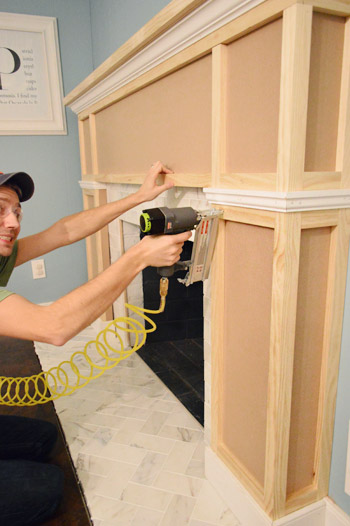
Once we nailed the mantel in place, we wanted to add some crown molding beneath it to give it more presence. But we couldn’t put the crown right against the MDF because we wanted it to sit flush with the rest of the decorative boxes (made from 1 x 2’s) that we’d be adding later. So we had to attached a piece of wood to bump the crown molding out to the right spot:
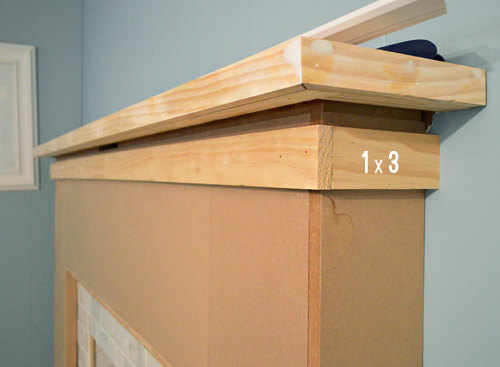
We chose 1 x 3″ boards so that we could use 1 inch of it as a base for the crown to rest against, while the remaining inches could act as the top piece of some of our 1 x 2″ boxes. Look it’s wifey with the nail gun again. Sorry, I’m still getting used to how good she looks while shooting nails into things. Update: Here’s an affiliate link to the nail gun that we bought, for anyone interested in grabbing one for themselves.
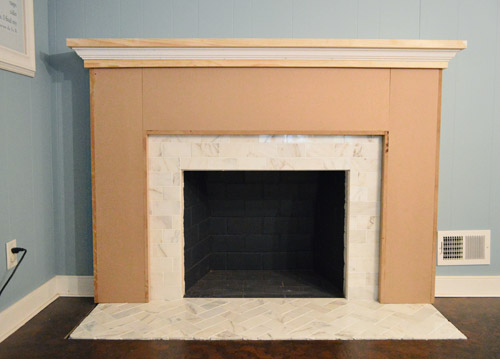
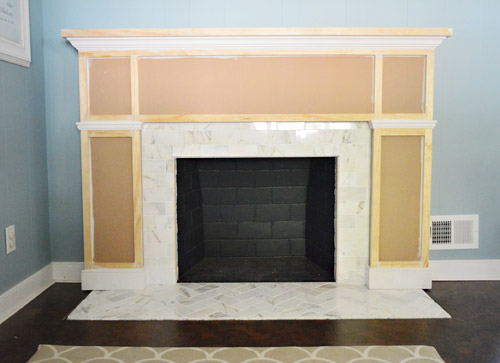
So here we are with the mantel added. It’s starting to look a bit more finished, eh? But we thought this flat-fronted look was a bit too modern for the rest of our kitchen (our cabinets on the other side of the room have more of a traditional shape), so adding baseboard and some framing/details to the wood surround was next on the agenda.
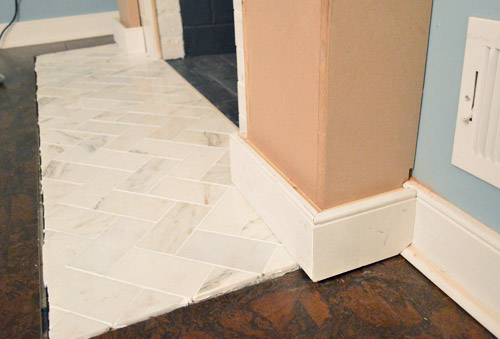
When it came to the baseboard, we had to add some scrap 1 x 2″ boards behind it so that the baseboard didn’t sit flush to the MDF (again, I promise this will make more sense once you see the finished piece).
From there we could start adding the 1 x 2″ boxes that we thought would give the piece a nice, simple detail. So first we added a few vertical strips of 1 x 2s.
And then we added some of the horizontal pieces between them. Are you starting to see the boxes?

We also added another piece of decorative trim right where the vertical “posts” of the fireplace frame seemed to support the middle “span” that stretched across the whole fireplace. It helped to break up the boxes a bit more so we didn’t have these long, skinny boxes on either side. Oh yeah, and this is what it looks like when you’re not aware that your wife is cropping you out of the photo. Smile!
The whole trim process actually went pretty quickly, so we even had time to start caulking some of the seams before the bean woke up from her nap and asked us what we were building now (true story).
Of course, we still have to prime and paint. And we’ve gotta finish trimming out the bottom – especially where the tile meets the cork floor, and add some quarter round where the baseboard meets the floor. So it’ll look a lot more polished when we tie up those loose ends.

Even though it’s not sporting a fresh coat of paint yet, we’re crazy about how this fireplace makeover is shaping up. Because, as a reminder, here’s where we started:

Give us another day or two (Wednesday maybe?) to get all of those finishing touches wrapped up and we’ll hopefully be back with the fully finished product, a complete budget breakdown, and a junkload of photos.

Kj says
Are you sure this is built to code? I think you are not supposed to have any combustible materials within 12-18 inches of a fireplace opening.
YoungHouseLove says
It definitely varies by area, but in our locality the rule is that there needs to be tile at least 6″ out from the firebox (ours extends 7″). It’s also a non-working fireplace, but we’re following code anyway :)
xo
s
Taylor says
Hi! Love this! We are renovating our kitchen inspired by yours…some q’s for you. We are also doing glacier white corian-any advice for how to get the best price? Same thing for new appliances, we are getting a refrigerator and stove. Wondering about getting a credit card for a discount, project discount, any other info to help get the counter top/appliances for the best deal. Thanks so much!! Taylor
YoungHouseLove says
We just priced it out at a few places and went with the lowest one (Home Depot and Lowe’s will price match, etc – so that helps).
xo
s
Abby @ Just a Girl and Her Blog says
It’s looking so awesome! I would never guess that your “before” shot is hidden under there somewhere! Can’t wait to see the final reveal!!
~Abby =)
Meg says
So off-topic, but please can we have the tour hotel post soon? So impatiently excited to see the hotels you were at :)
YoungHouseLove says
So sorry Meg! It’s on the list for sure! We have over 2,000 photos to go through (and a bunch of new projects to share that we’re tackling now that we’re home) so we hope we’ll get to that soon :)
xo
s
Amanda says
I adore how this is turning out – so incredibly gorgeous! Can’t wait to see the finished product!
danielle says
amazing! that looks incredible!
Leanne says
looks great! Are you going to keep the hearth as is or widen it to line up with the new mantle?
YoungHouseLove says
It’ll get trimmed out so it’s all seamless, but the mantel was wider than the hearth before and we didn’t mind so we’ll stick with that design. Once it’s all finished out on Wed we think it’ll look great :)
xo
s
Samantha says
wow! that’s incredible!!! can not wait to see the finished, painted end result! :-)
Laura L. says
All I can say is you guys are AMAZING!!!
mp says
If you never painted the new surround, it would still look 1000 times better than the original.
Jan @ Potassium Humate says
Well done! the fireplace is looking fantastic now.
Connie says
I’m always amazed at how much you guys can do. It’s so great looking already. You must spend a ton of time planning and prepping for the assembly to go so smoothly (and everything fit together so well… sometimes my efforts are less than exact)
Asheville Painting says
The fireplace was awesome. I love it.
Liz says
I really like the shape of the new fireplace, but have to admit it makes me sad to cover that brick. It had so much character and fit in much more with your house. If your house was new, the fireplace would be perfect, but being a native Richmonder, I’d pay for any exposed brick anywhere. I loved the white brick fireplace and living in the Fan for so many years (and loving old brick), I’d love to have it now. To me it seems way too formal (the tile) for a space attached to the kitchen. Just my two cents.
YoungHouseLove says
We like the exposed brick too, but I think having a full wall of it on the other side of the wall that extends into two rooms (living room and sunroom) we could spare to lose a little. :)
-John
Janet R says
Has HGTV approached you two yet about your own YoungHouseLove show? Seriously, I can see you doing spots on The Today Show, Good Morning America, etc. You two are amazing. And I am lusting after this fireplace redo.
YoungHouseLove says
Aw thanks Janet! We have actually been approached by a bunch of networks/production companies but we just say “thanks, but no thanks!” We’re happy to hide behind the comfort of our laptops. Haha!
xo
s
Nichole says
I can’t wait to see when it is done. It is already looking incredible!!!
anne says
oh, haha, the last picture you posted wasn’t the finished product! I was thinking, “hmmm… that’s the first time they’ve posted something I didn’t really like” (with the shiny new tile and the white brick) I loved the look of the white brick, so I’m excited to see how it turns out!
Angel says
Ok seriously… You guys are so awesome. true DIY peeps. I pay monnnnnnies for people to come and build out fireplaces etc… we remodeled our home out in california but I didn’t do any of it myself but I wish i could!!!! I was prego at the time. You guys… bravo 10,000 points for you. I cannot wait to see how fabulous it looks when you guys are all done. Sending you lots of love all the way out here in Beijing (we live in Beijing now) Keep up the good work!
YoungHouseLove says
Aw thanks so much Angel!
xo
s
Hampshire Furniture says
It is so inspirational that you guys can build a fireplace! I’m afraid to say that my imagination often lacks when it comes to things like that. If I need something, I never think ‘maybe I can make it’. Now I definitely will :)
Deb says
Gosh John, is there anything you can’t do?
Matt says
Looks great! Just a tip from a fellow woodworker here- when you’re gluing up wood like this the glue will actually end up being stronger than the wood itself… So really no need to use screws- your brad nailer will do just fine b/c all you need to be doing is securing the joint tightly while the glue dries.
YoungHouseLove says
Love that tip Matt!
xo
s
Denise Armbruster says
I love this, great job!
Candy from Candied Fabrics says
Oh my GOSH, this is looking fabulous!!! And you’ve inspired me, and provided my hubby, with enough info to paint the brick fireplace in my kitchen/family room – not retile, because I’ve got enough moolah, and the hubby’s go-ahead to order cabinets and redo the kitchen…squeal!!!!
Mary C says
The fireplace looks so lovely and crisp now. The tile is so amazing and you did such a professional installation. However…I seem to recall this is a non-working fireplace. Is that still the case?
YoungHouseLove says
Yes, it’s non-working but we’d love to add a gas insert someday!
xo
s
Miyu says
So I love this project and I’ve been studying it while I should be doing work.
One question about your mantle. I know you attached 1×2’s to reface the 1×10. The picture where you show the lattices to raise it slightly, I see that the 1×2 overhangs the 1×10, but the next picture where you show the 1×3 install, it looks like the 1×10 has something at the bottom that makes it flush against the 1×2. Did you nail in more wood to make it flush?
YoungHouseLove says
Oh yes, after I nailed in the mantle I realized that it might be helpful to give more room for the crown to rest against under the mantle, so I nailed in a few scrap pieces of 1×2 underneath just to be safe.
-John
Marin says
I love this!
I hate our current fireplace. It’s “stone” instead of brick, but that goes all the way from floor to ceiling. Trying to decide if we should try to tear that all out and fix the wall, or just cover it like you did.
Janet Spanagel says
Will you create a summer fireplace cover? Will you show us how it is done? – materials and steps to complete the project. It should cover just the fireplace opening and not be like a screen.
YoungHouseLove says
I’m not sure we’ll be tackling that, but if we do we’ll be sure to blog all about it :)
xo
s
Hayley says
I was flipping through old posts and the elusive bear just came straight out of the fireplace – no joke, the placement could not have been any better! Dang bear, I hope you catch him :)
YoungHouseLove says
Oh man. He is elusive, but at least he’s clever!
-John
Rob S says
Awesome job! It looks amazing. Out of curiosity how wide are the two side panels of the mantle and how tall is the top panel? I am getting ready to build a mantle for our basement fireplace and really like this style but want to make sure my attempt does not look disproportionate. Thanks!
YoungHouseLove says
I’d totally measure for you if we still lived there but I’m afraid we’ve moved! Maybe scrolling back through these comments will reveal if we’ve shared those dimensions with others?
xo
s
Rob S says
Sure enough… I found it in the comments. It looks like you used 1 x 10’s. I totally missed that the first time. Thanks for the tip! I’m truly blown away by how that mantle turned out. Whoever moved in after you is lucky to have such a great looking room. I’m sure that you’ve moved on to other amazing projects though. Thanks for a great post!
YoungHouseLove says
So glad! All the best with everything Rob!
xo
s
Charli @ EH Smith Brick Suppliers says
Looks great guys! The marble tile looks really sleek, can’t wait to finished fireplace!
Idania says
you guys did an awesome job , thank you for sharing, I like to ask you what is the color of the paint of your wall ? love it , minty-blue is just nice please let me know I’m planning to paint my living this is a great color. :)
YoungHouseLove says
They’re Colorado Gray by Ben Moore (it’s definitely a blue color and not a gray, though!)
xo
s
Sema says
Beautiful job with the fireplace! It’s a really nice upgrade!
You explanation of how you did it is even better. So much detail in your blog! It is very much appreciated. Thanks for taking the “time”! I learned a whole bunch.
Tycie says
I want to see pictures of the finished product, painted and decorated!! :)