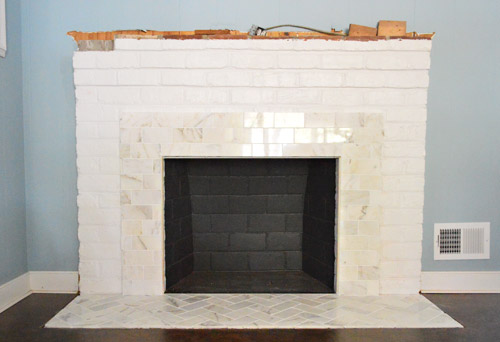
Ready for more progress on the fireplace? Good, ’cause there’s been lots. Last you saw, we had tiled the hearth and part of the surround with marble subway tile.
That was the easy step. Well, at least the more straightforward step. Because our next assignment – building out the rest of the frame – involved the addition of a lot more materials.
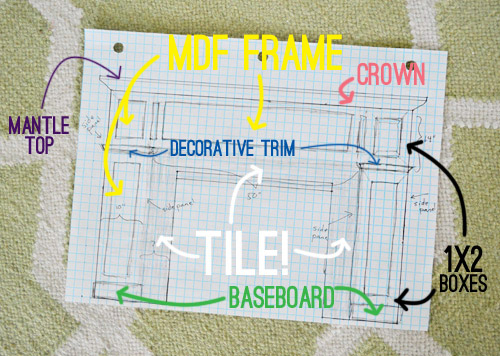
Let’s start with the MDF frame. We decided to work with MDF for the first time since it’s lighter, cheaper, and smoother than wood would be (plus it’s now sold without formaldehyde and it’s FSC certified). A 4ft x 8ft panel cost nearly $35, but the good news is that we only needed one sheet to get all of our pieces.
The first two parts of our frame were the two sides which sat on the floor and extended all the way to the mantel.
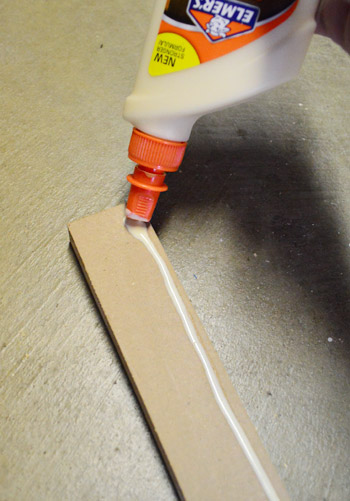
I built them by cutting the two pieces of MDF to size and then attaching them at a right angle using the ol’ Kreg Jig and some wood glue (just to be safe).
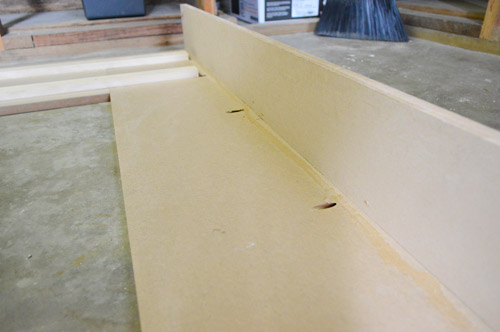
My bottle of wood glue and I actually become good friends during this project. I started to favor my nail gun over Kreg Jig-ing many of the pieces because it’s much much faster (one shot with the gun versus drilling a pilot hole and then screwing pieces together). But since nails don’t hold as tight as screws in the long run, wood glue is nice extra insurance.
To connect the two side pieces, I cut a middle span (using my table saw) and then attached the three pieces together with a couple pieces of scrap 1 x 2″ whitewood.
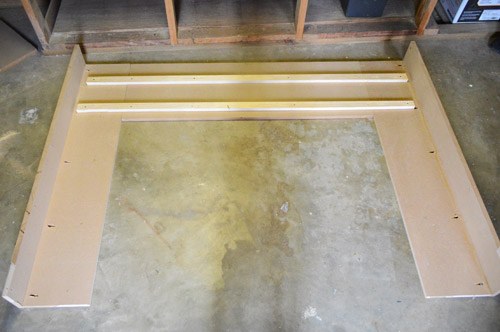
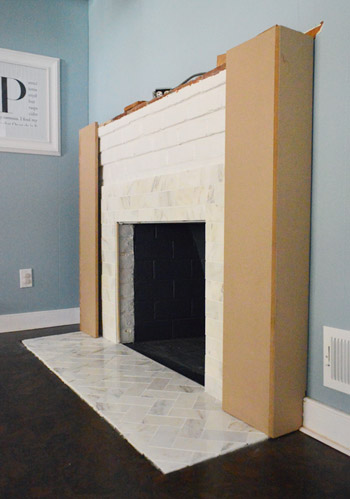
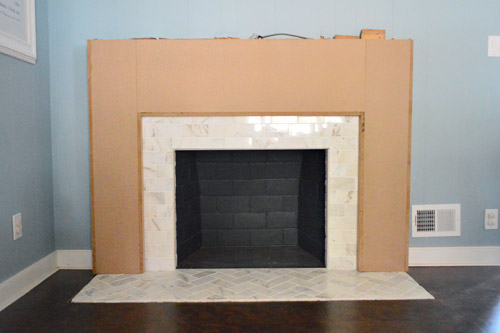
I realize the picture above is a bit confusing, so here’s a photo of the frame in place so you can understand how it’s coming together.
As you can see from the view from above, the MDF frame fits snugly right around the original brick fireplace (which turned out to be pretty gross-looking under the old mantel that we tore off – surprise!).
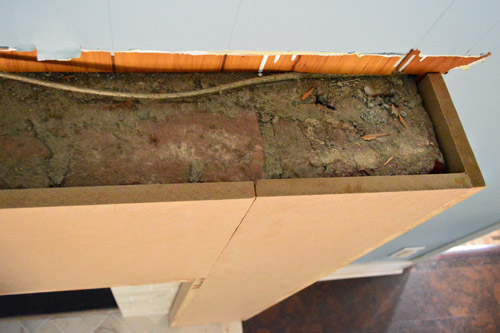
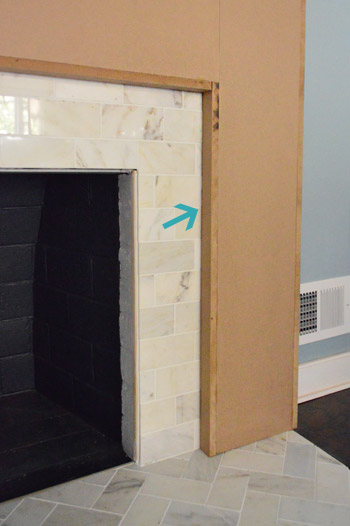
Oh and we had to add some thin pieces of MDF right where it sat against the tile because there was a small gap (see arrow below). That’s because the brick fireplace flared out right under the mantel and got thinner towards the floor (from the side it was actually pretty top-heavy). So even though the MDF sat right against the brick at the top, it floated a couple of inches away from the brick (and tile) at the bottom. It’s nice that from the side it’ll be nice and balanced now.
Here’s the MDF frame from the front. Hopefully this whole thing is starting to make more sense to you all.
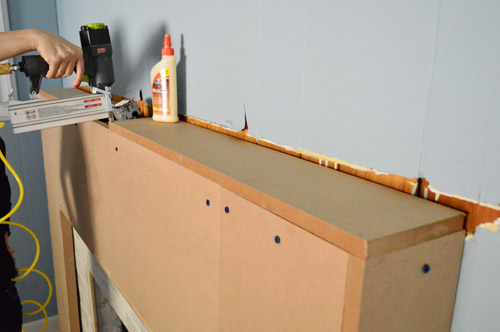
It was actually pretty steady already, but we weren’t about to rely on good balance to keep it in place. So a few masonry screws through the top and along the sides (as well as a line of construction adhesive where the MDF met the brick at the top) made sure this thing wasn’t going anywhere.

Next up was adding the mantel. The old mantel piece was too small to put back in place and my original plan to secure the new mantel directly to the brick (like the old one had been) failed upon realizing that the brick wasn’t level (it sloped away from the wall slightly). So after some trial and error, we cut some more MDF (still from the same sheet) and added a flat top to the frame with some glue and nails. Look at wifey go.
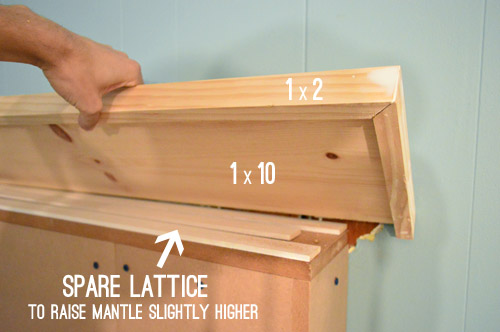
Then we constructed a new mantel top by taking a 1 x 10″ and framing it out on three sides with 1 x 2″ pine strips (so that no raw wood edges were exposed). It’s kind of the same technique we used for our floating shelves in the kitchen. Oh, and we added a few strips of lattice leftover from the board & batten project to raise the mantel a smidge so that it matched the old height (and thus covered all of the unpainted paneling behind it). When finished, this mantel will be exactly the same height as the old one, which is nice because we liked that about the last one (mostly we just wanted to fix the smashed tile hearth, and the side proportions since it got skinny and sloped into the wall from the side).
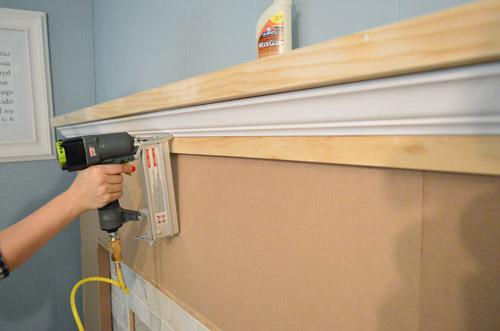
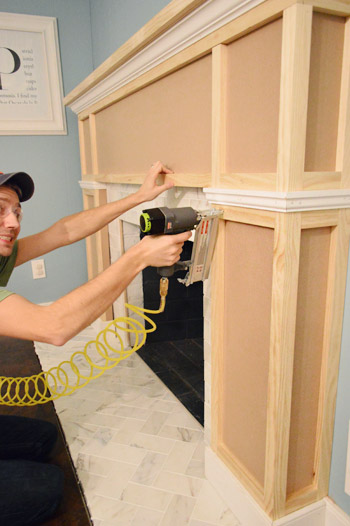
Once we nailed the mantel in place, we wanted to add some crown molding beneath it to give it more presence. But we couldn’t put the crown right against the MDF because we wanted it to sit flush with the rest of the decorative boxes (made from 1 x 2’s) that we’d be adding later. So we had to attached a piece of wood to bump the crown molding out to the right spot:
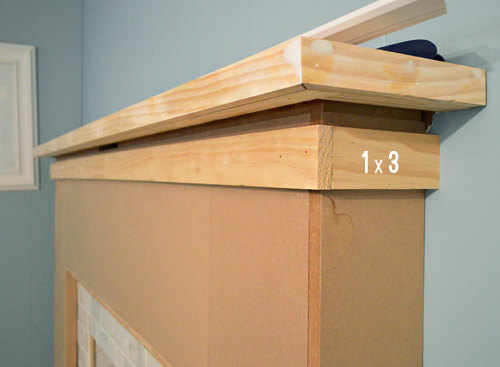
We chose 1 x 3″ boards so that we could use 1 inch of it as a base for the crown to rest against, while the remaining inches could act as the top piece of some of our 1 x 2″ boxes. Look it’s wifey with the nail gun again. Sorry, I’m still getting used to how good she looks while shooting nails into things. Update: Here’s an affiliate link to the nail gun that we bought, for anyone interested in grabbing one for themselves.
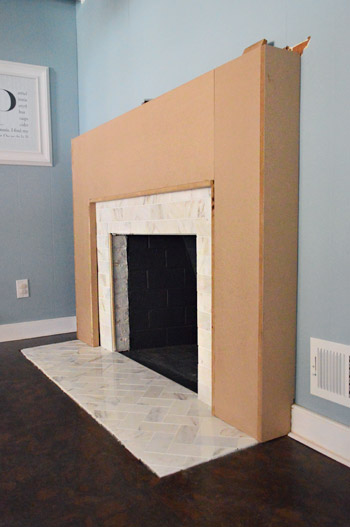
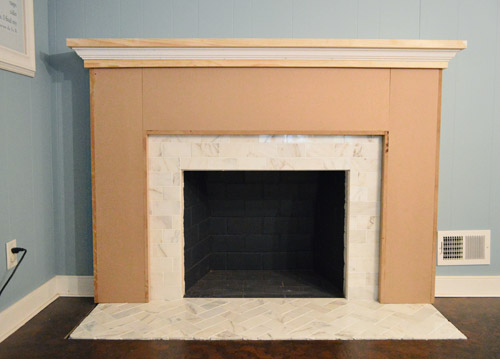
So here we are with the mantel added. It’s starting to look a bit more finished, eh? But we thought this flat-fronted look was a bit too modern for the rest of our kitchen (our cabinets on the other side of the room have more of a traditional shape), so adding baseboard and some framing/details to the wood surround was next on the agenda.
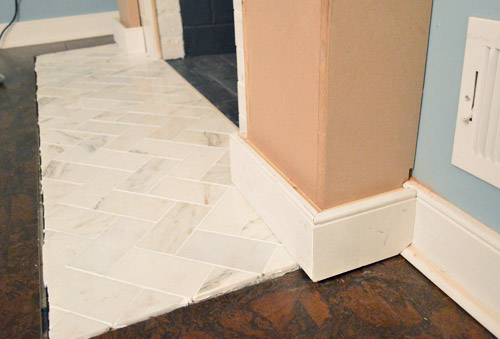
When it came to the baseboard, we had to add some scrap 1 x 2″ boards behind it so that the baseboard didn’t sit flush to the MDF (again, I promise this will make more sense once you see the finished piece).
From there we could start adding the 1 x 2″ boxes that we thought would give the piece a nice, simple detail. So first we added a few vertical strips of 1 x 2s.
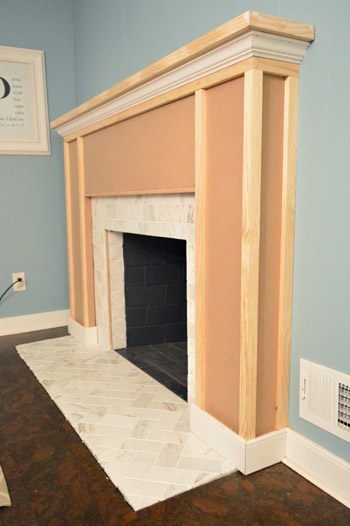
And then we added some of the horizontal pieces between them. Are you starting to see the boxes?

We also added another piece of decorative trim right where the vertical “posts” of the fireplace frame seemed to support the middle “span” that stretched across the whole fireplace. It helped to break up the boxes a bit more so we didn’t have these long, skinny boxes on either side. Oh yeah, and this is what it looks like when you’re not aware that your wife is cropping you out of the photo. Smile!
The whole trim process actually went pretty quickly, so we even had time to start caulking some of the seams before the bean woke up from her nap and asked us what we were building now (true story).
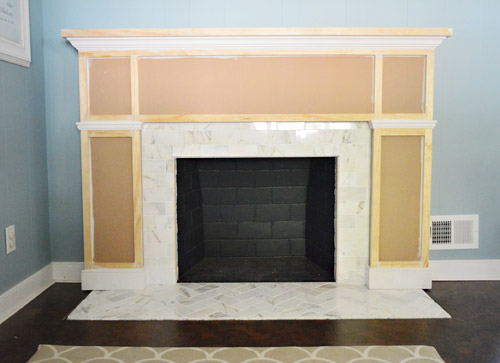
Of course, we still have to prime and paint. And we’ve gotta finish trimming out the bottom – especially where the tile meets the cork floor, and add some quarter round where the baseboard meets the floor. So it’ll look a lot more polished when we tie up those loose ends.

Even though it’s not sporting a fresh coat of paint yet, we’re crazy about how this fireplace makeover is shaping up. Because, as a reminder, here’s where we started:

Give us another day or two (Wednesday maybe?) to get all of those finishing touches wrapped up and we’ll hopefully be back with the fully finished product, a complete budget breakdown, and a junkload of photos.

Tammy says
DROP.DEAD.GORGEOUS!!! I have a similar fireplace (in a painted paneled room, no less!) that is screaming for this makeover.
Is your fireplace a working fireplace?
YoungHouseLove says
It’s a non-working fireplace currently, but we’d love to add a gas insert someday.
xo
s
Lara says
Mantle ? Mantel
But it looks awesome and I love you guys! Small pet peeve! I promise I am not a know-it-all jerk.
YoungHouseLove says
Haha, oh yeah how did I miss that ten billion times?!
xo
s
Liz K says
Looks like a completely different room and fireplace! Great job, guys!
Krystle @ Color Transformed Family says
I think it looks great and I am also really excited that you can get formaldehyde free particle board now.
Daniela says
Hey Sherry, I’m assuming you did a bunch of googling etc at fireplaces before you started this project. Did you come across any unsymmetrical fireplaces, or a good resource/site for fireplaces in general? I am helping a friend with his fireplace, and he only has about six inches of wall on one side, and 18 on the other. Which is making the design process a challenge! I haven’t found too much on my own. If you can’t help, no worries!
YoungHouseLove says
Ooh that’s a challenge! I haven’t seen anything like that. Anyone have links for Daniela?
xo
s
Nichole K says
Would adding storage for wood on one side work? Or slim but tall shelves? Or make it look intentional with two different finishes? Here are some google images with keywords “asymmetrical fireplace”… Good luck!
http://tinyurl.com/ahcdpjn
http://tinyurl.com/ag565zr
http://tinyurl.com/awumn8q
http://tinyurl.com/a2lwvl2
YoungHouseLove says
Those are really cool! Ours actually isn’t a wood burning fireplace (it’s inoperable, but we’d love to add a gas insert someday) so a place for wood wouldn’t be as functional for us :)
xo
s
Daniela says
Thanks Nicole K! I really like that last one.
Bethany Skorich says
Wow! It looks amazing! Do you ever wish you could bring the previous home owners back to the house and show them all you’ve done to it??? Everything looks so great!
YoungHouseLove says
They’re actually close friends with our neighbors, so sometime when they’re back in town and the house is actually clean, we’ll have to have them over :)
xo
s
Kate says
Speaking of previous owners, your old house is on the market!!
YoungHouseLove says
NO WAY!!!!! We’re dying to see it! Off to see if there’s going to be an open house! We knew the buyers would only be there a few years (it was some work thing, so it was a 2-year relocation) so it’ll be fun to get to peek inside if we can :)
xo
s
vel says
This is looking really great guys, can’t wait for the final reveal. Looks so classy already!
Julie M. says
Ooh, I wish you could have repeated the herringbone pattern up the face of the fireplace as well. Love that tile!
YoungHouseLove says
We looked at it both ways, but it was too busy for just 7″ of space on the face of the fireplace (too many zigs without zags, it looked chaotic and unbalanced since there wasn’t enough area to establish the pattern like we had with the hearth). Hard to explain, but we looked at it both ways and preferred keeping it just on the hearth. Hope it helps!
xo
s
Jeanne says
I used to say ‘now why are they changing that, it looks great as it is’ but each and every time, it looks 100 times better when you’re through with it. That’s vision.
Same as several others, I really liked the brick, but this build out has me really loving it. You’re going to end up with something modernishly stately looking I think. :)
Now the question is, where are you cutting the wood so as not to wake up the Bean with the loud saw? I’m guessing the car port…?
YoungHouseLove says
Bingo! We pull the car out into the driveway and use the carport like a work area :)
xo
s
Elizabeth @ Real Inspired says
Wow! I am super duper impressed(although I shouldn’t be because y’all are awesome like that)! When you started talking about the fireplace, I thought to myself that it looked just fine but now that it is coming together, it is truly gorgeous. I can’t wait to see how it turns out. It motivates me to go out and figure out how to work me some power tools!
YoungHouseLove says
Aw thanks Elizabeth!
xo
s
Kelsey @aslolife says
Wow, this is such a transformation! I love the marble herringbone too, so classic but fun too–can’t wait to see the finished look!
Hannah says
Very impressive! It looks clean and modern. However, I noticed that the new fireplace surround is wider than the tile on the floor. When you were tiling did you consider expanding the footprint of the floor tile to match the new width of the fireplace? Or does the overlap of fireplace onto the cork floors not bother you in person? (I know that sometimes things that trigger my OCD-ness in a photo might look totally OK in person.)
YoungHouseLove says
The old one was like that too, so we didn’t mind that about it and just went with it. Once we add the trim pieces it’ll all make sense again- Wednesday I hope!
xo
s
Melissa @ ReThreads Cville says
Nice work! It’s so inspirational to see what you can do with a tired looking fireplace!
A little off-topic but I’m curious since you talked about using masonry bits: I assume you use a hammer drill when drilling into the brick? Or maybe you don’t need it? I’ve got cement walls at my store and haven’t coughed up the money to get a hammer drill, so I end up hiring someone every time I want to put a screw in the wall – no fun!
Thanks for another great post!
YoungHouseLove says
We actually don’t need a hammer drill, we just use a regular drill with a masonry bit and with a little force it works!
xo
s
Nicole says
Wow, this looks amazing! On our “must have” list for our next house is a fireplace, for sure.
Can’t wait to see the final product!
Rita says
I think you “need” this to add to your fresh, new mantle.
It has two of your most favorite things, rolled into one – bees and ceramic animals!
http://www.anthropologie.com/anthro/product/home-office/E25682014.jsp
Rita says
or this one. Or, heck, BOTH! :)
http://www.anthropologie.com/anthro/product/home-office/F25682014.jsp
YoungHouseLove says
It’s a Burger!
xo
s
YoungHouseLove says
Haha, I love it!
xo
s
valerie broaddus says
I saw at Barnes & Noble here in Richmond (the VCC location actually) that yall will be there in May. I CANNOT WAIT! I missed the signings in Richmond and can’t wait to make it out to meet yall!!
Happy Monday! -Val
YoungHouseLove says
Woot woot!! Come on down, let’s party!
xo
s
Ruben says
you do good work John. ;) again…
keep it up!
Brooke says
A fireplace makeover is big on my list to get done by Christmas 2013. I’ll definitely be showing this to my husband so he can see what an incredible difference this can be. I can’t wait to see it done!
katie says
Looks awesome! I have been wanting to do something like that to our den fireplace but I’m trying to figure out how to translate it to our monster-fireplace – it’s 9 feet wide, the mantel is made of stepped layers of bricks, and the brick is also over the mantel all the way to the ceiling. Sounds insane, right? It totally is!
YoungHouseLove says
Haha, you can do it! Good luck with everything Katie!
xo
s
Kahley says
Absolutely love it!!
tabbitha @ Turnip Tootsie says
Your fire place is looking AMAZING! I can wait to see the final product:-)
<3
Tabbitha
Amanda says
This is looking lovely you two! Can’t wait to see it all painted (though I’m picturing it already and it looks fab-u-lous!)
Alison says
Maybe I’m clueless, but I had no idea what MDF was. Google quickly solved that problem, but maybe spelling it out off the bat and then using the acronym might help us clueless folks?
YoungHouseLove says
Good idea Alison! We’ll try to remember that the next time we mention it :)
xo
s
Leslie says
Hi,
Can I ask why you chose to keep and paint the wood paneling versus tear down and drywall? I have some paneling in my house and have been debating this.
Thanks!
YoungHouseLove says
We just primed and painted it in our first house and actually thought it was cozy (it’s like beadboard to us, it adds subtle texture and the vertical lines make the ceiling feel taller once it’s painted) so we were happy to leave it :)
xo
s
Nicky says
Nice work on the fireplace! Random question – how much have you guys paid for the garden stools you have and where have you purchased them? I saw some at Home Sense (Canadian Home Goods) recently that seemed kind of expensive ($60), but I have no idea how much they usually go for..
YoungHouseLove says
HomeGoods is where I get mine! I wait until they’re marked down to $29 (sometimes I’ll get a fun colored one for $39 but that’s my max). Hope it helps!
xo
s
Nicky says
$29! Wow.. The $60 ones were snatched up right away! I was contemplating picking one up, but when I went back a few days later, they were already gone!
YoungHouseLove says
I wonder if since you’re in Canada the pricing is a little different? Also I would check out places like craigslist and even thrift stores or garden centers (do you guys have Garden Ridge?) in case any come up there. Hope it helps!
xo
s
Heather W. says
Hi Nicky! I love garden stools too and have had a lot of luck finding mine at Marshall’s and TJ Maxx they always sell them for $39 compared to $100 if you look online. I am not sure if you have those stores in Canada or not. They always start selling them around the first of March till like May or so. Good Luck!
Kimberly says
Love how it’s coming along! I didn’t think the painted brick looked so bad but this looks reeeeally good!
Nicky says
I have another question to bug you with, if that’s ok.. I’m facing decorating paralysis – my living room is a complete blank slate and I don’t know what direction to move in as far as accent colors go! Dark wood floors, beigy-gray walls, and a cream leather sofa – all so neutral… I’m drawn to similar colors that you guys are… How do I select colors/patterns/etc for area rug, throw pillows, curtains that bring color and brightness, but don’t overwhelm?
Plus, how does one go about selecting throw pillows for a couch? I have quite a large one with a chaise on one side. Should I select a bunch of different ones? Some bolder, some more neutral? Should there be at least 2 identical ones of each (seems pillows are often seen in pairs on sofas)? Gahhh.
YoungHouseLove says
For pillows my favorite method is just to grab a bunch and bring them home and have a fashion show on the couch with them. You can mix and match and see what you love and return what you don’t want. Then use those pillows as a jumping off point for the rest of the room (draw a color out of the pillows for the rug, get some art with those tones, add some pops of color in the accessories, etc). Good luck Nicky!
xo
s
Juliet says
My husband loves him a good detail & photo-laden John P. post. Now I just skim through the pictures because he can’t help himself from re-capping the post for me. I still read everything else, though!
Lauren says
It looks amazing! I’m having tile envy right now . . . I just love that tile:)
Kristin says
This is really beautiful, but I’m writing about another fun little aspect of this post…
I love the new “Comments” disclaimer! (At least, I think it’s new…. When did you change it? If you say more than a week ago, I’ll cringe.) Hee hee, “teen angst-y.”
YoungHouseLove says
Aw thanks Kristin! It’s about a week old. I figure since I publish every comment anyway there’s no sense in acting like we delete ’em. Haha!
xo
s
Lindsey says
How cool to take something from your own design on paper to seeing it coming to fruition. Maybe it’s sort of like your vision for the wall knock out. I’m really excited to see the final before & afters!
Jamie S. says
The fireplace looks fantastic! Do you guys ever consider contacting the old owners to give them a tour? It would be very “Moving Up” and I’m sure they’d be quite impressed!
YoungHouseLove says
We’d love to do that someday!
xo
s
agustina says
I love it! makes me want a fireplace again…
Amber says
This looks fantastic! It’s going to be such a larger part of the room visually. Can’t wait to see the end result!
Melissa says
Wow, this is going to be amazing! How do you get your inspiration for projects like this? Did you know from the beginning that you would update the fireplace or did some recent picture inspire you?
YoungHouseLove says
It’s usually a combination of things like seeing something cool in a restaurant or model home or on a blog or in a magazine – or even at a friend’s house. We shared the inspiration for this specific project in our first post about planning it, so in this case Layla & Kevin at The Lettered Cottage inspired us a lot with two fireplace projects they tackled and then I tore a page out of a magazine (Canadian House & Home) with the idea for the addition of tile instead of brick :)
xo
s
Charlotte @ Ciburbanity says
Sorry if this was asked earlier in the comments…
1. Do you use a table saw to cut your MDF down or have the guys at HD do that for you? (We only have a hand and jig saw so not straight cuts…)
2. How do you get these enormous sheets of plywood/ MDF home? I get so nervous tying them to the roof because they catch the wind like a sail!
Thanks!
xo
Charlotte
YoungHouseLove says
I used a table saw to cut ours, but they cut it at Home Depot too (they cut it into sections I could fit in the car). I fit it all in the Altima, thanks to them cutting it down for us, so it wasn’t too bad. Hope it helps!
-John
jill says
I am duly impressed. Watching this come together is fabulous.
Rita says
Hi guys!
Quick question. What would you recommend for a higher hearth? My fireplace has a hearth that is tall enough to be used as seating.
Thanks,
Rita
YoungHouseLove says
Hmm, I would check out pinterest or google images and see what comes up and what you like – hopefully you can find some inspiration and model your makeover after that!
xo
s
David says
I’m a little confused about what’s going on with the edge of the marble tile where it meets the brick, around the fireplace opening. It’s hard to tell from the pics, but the edges look raw and undone. What’s going on there?
YoungHouseLove says
Oh yes, we’ll share details of that. We’re using a cap piece to finish it off so you don’t see the side of the cement board or the tile. More on that soon!
xo
s
Amy B says
It looks fantastic! Great work.
Barbara says
I’m at the point now where I feel there is not one thing you two couldn’t do. I cannot believe how lucky you two are. Unbelievably talented.
YoungHouseLove says
Aw thanks so much guys. You’re so sweet! You guys inspire us to keep going :)
xo
s
Melinda says
I was also thinking that the fireplace looked awesome before, but you’ve convinced me by now that the redo was a super idea!! Looks great!
myamogabi says
OMG! I just have to say– you guys are amazing!
Mary | lemongroveblog says
Wow! What a transformation. Way to work with what you got! Looks awesome.
Pat C says
Wow – that’s amazing! It’s like board and batten for the fireplace (along with a new backing though).
Great job!
Yvonne King says
Genius! I had no idea from the initial sketch this is where this project was going. It looks fantastic!
ashliegh says
This is a great blog ! keep up the great work , its looking great! Also, the step by step on how to do it is a good idea.
Olivia says
Love it!! Looks like a lot of work but I’m sure the final product will be stunning
thanks for sharing :)
http://withlov32012.blogspot.ca/
Ashli - The Sweat Revolution says
This looks awesome! You have inspired me – I think I’m going to attempt something similar on my builder grade fireplace and mantle!
TC says
Hi – will it be ‘fire-safe’ ie: can you light as real fire in it, or is it just for show? I didn’t thin k you could have MDF that close to flames because of the heat causing noxious gases in the mdf (from the glue that bonds the particles together) to release and catch fire? even if yours is just for show might be worth pointing out potential safety concerns to your fans? or maybe I’m totally wrong and its fair game as a material ;)
YoungHouseLove says
It’s a non-working fireplace, but we built this so it’s to code for our area (in our area as long as the wood, even MDF, has at least 6″ of brick or tile in the surround of the firebox (ours is 7″) it’s fire safe. We’d love to add a gas insert to ours someday :)
xo
s