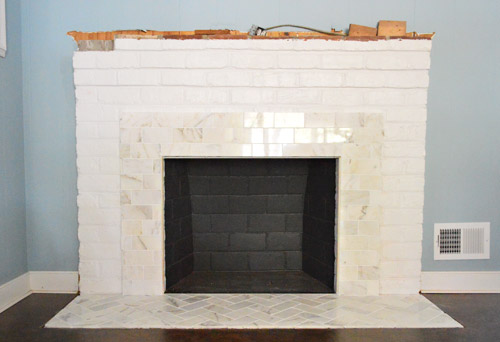
Ready for more progress on the fireplace? Good, ’cause there’s been lots. Last you saw, we had tiled the hearth and part of the surround with marble subway tile.
That was the easy step. Well, at least the more straightforward step. Because our next assignment – building out the rest of the frame – involved the addition of a lot more materials.
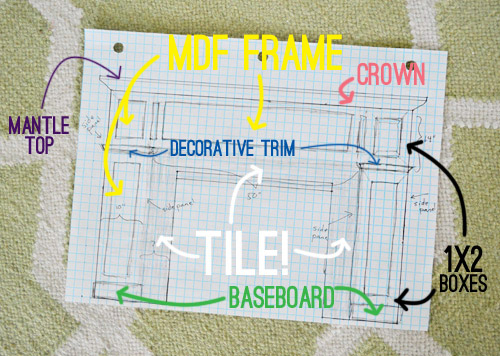
Let’s start with the MDF frame. We decided to work with MDF for the first time since it’s lighter, cheaper, and smoother than wood would be (plus it’s now sold without formaldehyde and it’s FSC certified). A 4ft x 8ft panel cost nearly $35, but the good news is that we only needed one sheet to get all of our pieces.
The first two parts of our frame were the two sides which sat on the floor and extended all the way to the mantel.
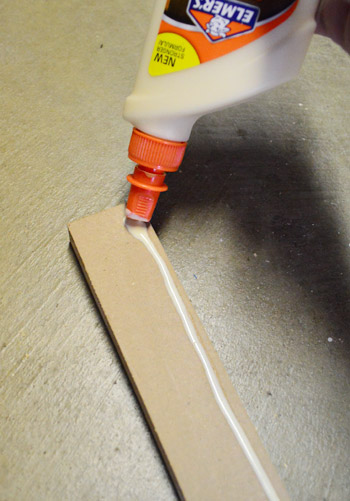
I built them by cutting the two pieces of MDF to size and then attaching them at a right angle using the ol’ Kreg Jig and some wood glue (just to be safe).
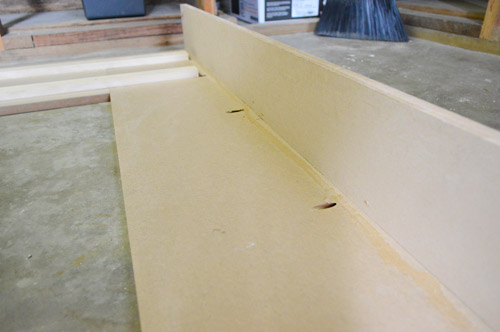
My bottle of wood glue and I actually become good friends during this project. I started to favor my nail gun over Kreg Jig-ing many of the pieces because it’s much much faster (one shot with the gun versus drilling a pilot hole and then screwing pieces together). But since nails don’t hold as tight as screws in the long run, wood glue is nice extra insurance.
To connect the two side pieces, I cut a middle span (using my table saw) and then attached the three pieces together with a couple pieces of scrap 1 x 2″ whitewood.
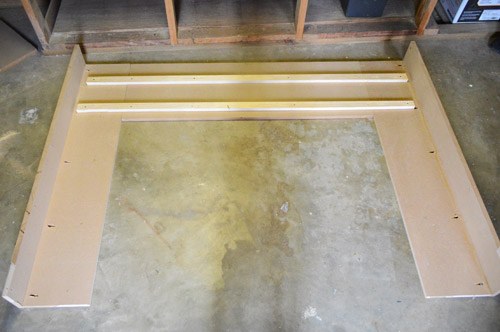
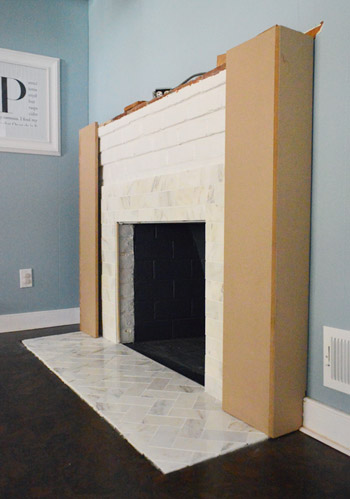
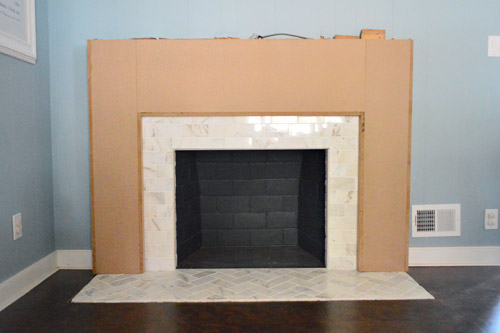
I realize the picture above is a bit confusing, so here’s a photo of the frame in place so you can understand how it’s coming together.
As you can see from the view from above, the MDF frame fits snugly right around the original brick fireplace (which turned out to be pretty gross-looking under the old mantel that we tore off – surprise!).
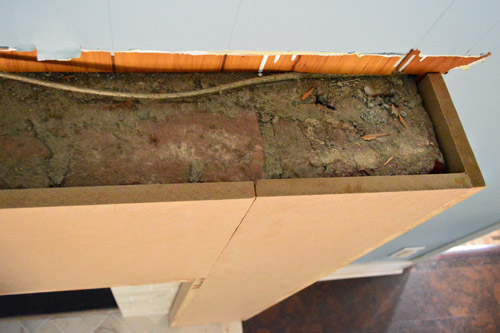
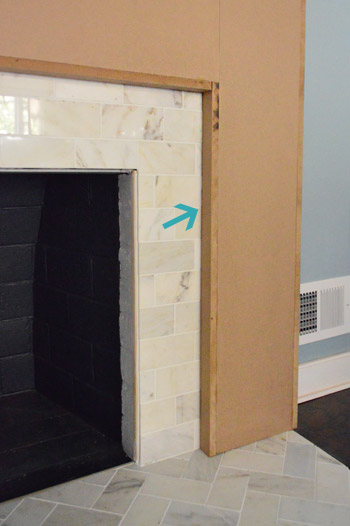
Oh and we had to add some thin pieces of MDF right where it sat against the tile because there was a small gap (see arrow below). That’s because the brick fireplace flared out right under the mantel and got thinner towards the floor (from the side it was actually pretty top-heavy). So even though the MDF sat right against the brick at the top, it floated a couple of inches away from the brick (and tile) at the bottom. It’s nice that from the side it’ll be nice and balanced now.
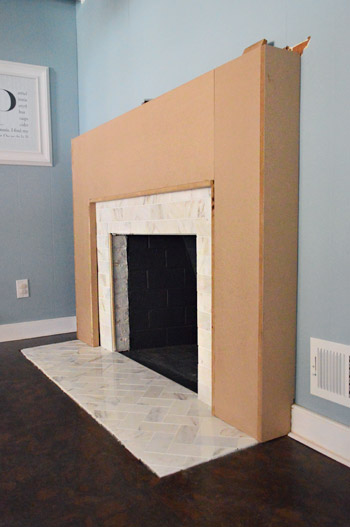
Here’s the MDF frame from the front. Hopefully this whole thing is starting to make more sense to you all.
It was actually pretty steady already, but we weren’t about to rely on good balance to keep it in place. So a few masonry screws through the top and along the sides (as well as a line of construction adhesive where the MDF met the brick at the top) made sure this thing wasn’t going anywhere.

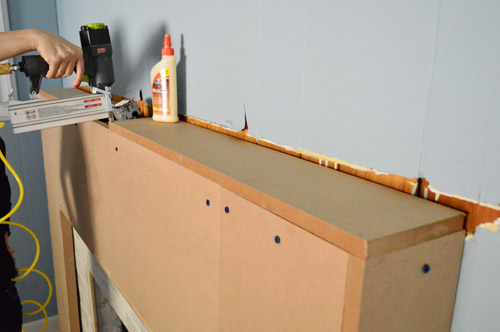
Next up was adding the mantel. The old mantel piece was too small to put back in place and my original plan to secure the new mantel directly to the brick (like the old one had been) failed upon realizing that the brick wasn’t level (it sloped away from the wall slightly). So after some trial and error, we cut some more MDF (still from the same sheet) and added a flat top to the frame with some glue and nails. Look at wifey go.
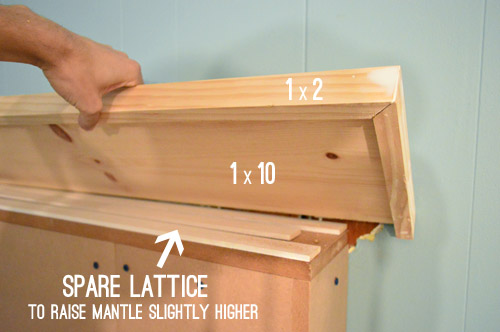
Then we constructed a new mantel top by taking a 1 x 10″ and framing it out on three sides with 1 x 2″ pine strips (so that no raw wood edges were exposed). It’s kind of the same technique we used for our floating shelves in the kitchen. Oh, and we added a few strips of lattice leftover from the board & batten project to raise the mantel a smidge so that it matched the old height (and thus covered all of the unpainted paneling behind it). When finished, this mantel will be exactly the same height as the old one, which is nice because we liked that about the last one (mostly we just wanted to fix the smashed tile hearth, and the side proportions since it got skinny and sloped into the wall from the side).
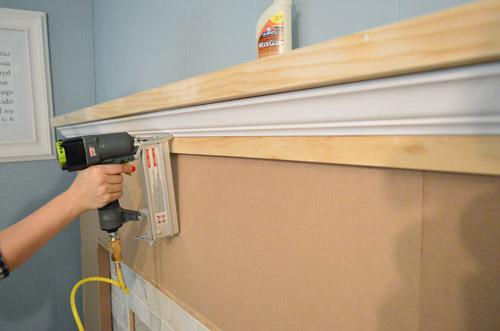
Once we nailed the mantel in place, we wanted to add some crown molding beneath it to give it more presence. But we couldn’t put the crown right against the MDF because we wanted it to sit flush with the rest of the decorative boxes (made from 1 x 2’s) that we’d be adding later. So we had to attached a piece of wood to bump the crown molding out to the right spot:
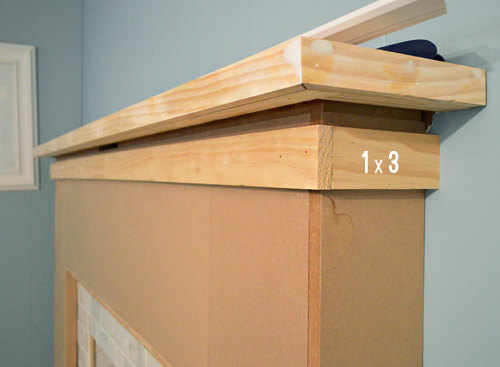
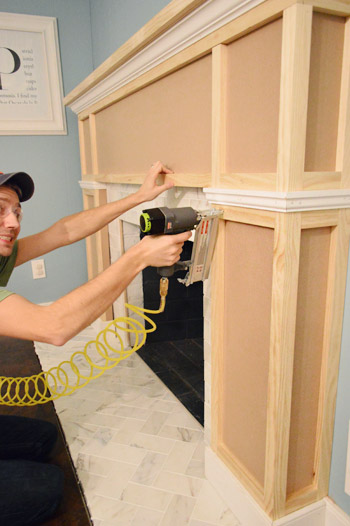
We chose 1 x 3″ boards so that we could use 1 inch of it as a base for the crown to rest against, while the remaining inches could act as the top piece of some of our 1 x 2″ boxes. Look it’s wifey with the nail gun again. Sorry, I’m still getting used to how good she looks while shooting nails into things. Update: Here’s an affiliate link to the nail gun that we bought, for anyone interested in grabbing one for themselves.
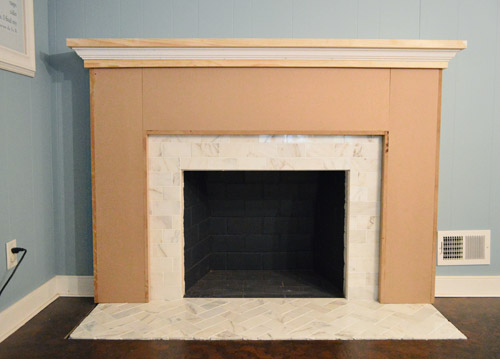
So here we are with the mantel added. It’s starting to look a bit more finished, eh? But we thought this flat-fronted look was a bit too modern for the rest of our kitchen (our cabinets on the other side of the room have more of a traditional shape), so adding baseboard and some framing/details to the wood surround was next on the agenda.
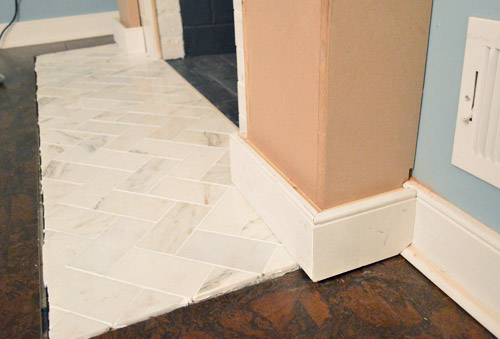
When it came to the baseboard, we had to add some scrap 1 x 2″ boards behind it so that the baseboard didn’t sit flush to the MDF (again, I promise this will make more sense once you see the finished piece).
From there we could start adding the 1 x 2″ boxes that we thought would give the piece a nice, simple detail. So first we added a few vertical strips of 1 x 2s.
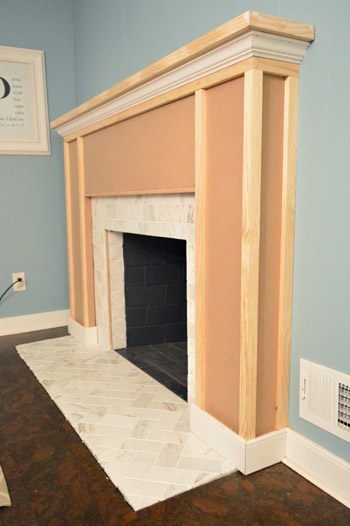
And then we added some of the horizontal pieces between them. Are you starting to see the boxes?

We also added another piece of decorative trim right where the vertical “posts” of the fireplace frame seemed to support the middle “span” that stretched across the whole fireplace. It helped to break up the boxes a bit more so we didn’t have these long, skinny boxes on either side. Oh yeah, and this is what it looks like when you’re not aware that your wife is cropping you out of the photo. Smile!
The whole trim process actually went pretty quickly, so we even had time to start caulking some of the seams before the bean woke up from her nap and asked us what we were building now (true story).
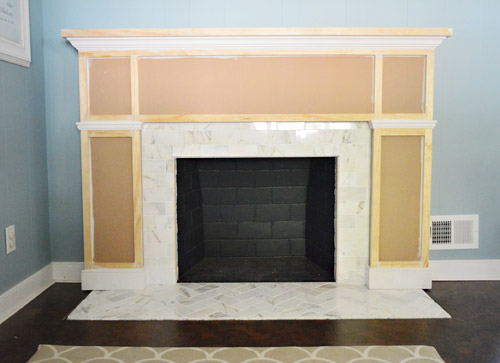
Of course, we still have to prime and paint. And we’ve gotta finish trimming out the bottom – especially where the tile meets the cork floor, and add some quarter round where the baseboard meets the floor. So it’ll look a lot more polished when we tie up those loose ends.

Even though it’s not sporting a fresh coat of paint yet, we’re crazy about how this fireplace makeover is shaping up. Because, as a reminder, here’s where we started:

Give us another day or two (Wednesday maybe?) to get all of those finishing touches wrapped up and we’ll hopefully be back with the fully finished product, a complete budget breakdown, and a junkload of photos.

Kara says
Ahhhh-mayh-zheeng!
The before-and-after pic you put in at the end of the post is what really drove home just how awesome it looks.
Sorta off the point – but when you mentioned nails and wood glue were doing it for you, I immediately thought that you guys should try to team up with Home Depot at some point in the future (unless this will change your whole advertising approach or whatever) – and come up with some projects for their Kids Klub projects. It’s all nails and wood glue projects. But they are starting to recycle a lot of their ideas now (Bird feeder, planter, bank, race car, picture frame. Bird feeder, planter, bank, race car, picture frame.)
YoungHouseLove says
Ooh that’s a fun idea! I can’t wait until Clara’s a little older and we can do those Kids Klub things with her!
xo
s
Tracy says
SO. FREAKING. BEAUTIFUL. I love it.
Christina @ Homemade Ocean says
Dang….you all are just too crafty!
I am loving the new color too :)
Desiree says
Gah, you guys make it look so easy! “Just put some 1×2’s here, nail it there, and bam! New mantle!” If only my projects went that smoothly… *wistful sigh as I stare at your dreamy mantle*
YoungHouseLove says
Haha, don’t you worry Desiree, it took us years to get to this point (we’re still completely giddy about owning a nail gun, haha!) so the best advice is just to go slow and steady and break every project into small do-able steps and just try to do them one at a time. Makes it easier to “digest” when it’s not one big project and it’s more like lots of little bite-sized steps :)
xo
s
jessica s says
Omg! So pretty! I wanna do this to my floor to ceiling brick fireplace! I think this would be a great compromise since my husband doesnt want to paint our brick for resale issues. Keep up the awesome ideas :)
Anika says
Wow, it’s really coming along (seemingly so quickly too!). That tile is beautiful! It will be interesting to see where it ends up and what color you paint the surrounding wood to help the tile really pop. More gray perhaps to match the penny tiles on the other side of the room? Can’t wait to see the end result! (Also, super amazing that Clara sleeps through you guys building something with a nail gun – crazy!)
jennt says
it’s hard to believe the mantle is the same height as before–it looks so much more substantial. and old too. like good old. traditional. and lovely. nice job!!! :)
Steph says
Wow, it looks great! I normally love brick anywhere but this is going to look really amazing when it’s all put together!
My boyfriend closed on house on Friday and today is our moving day, and of corse it’s snowing! It made me think of your moving day! Luckily it’s our first place so we don’t have too much to move. Maybe snow is good luck on moving day or something :)
YoungHouseLove says
Aw, I think it is! So exciting Steph! Hope it’s an awesome day/house/move.
xo
s
Karen Little says
I’m loving the changes with this! It will add so much “presence” and warmth to your pretty kitchen. Wish we had one in ours. So great that y’all saw all the potential in your ranch home. Love to see all that you do. (And loved all the comments on the awesome post for this last Friday—I can see that one being in your next book since it so clearly touched people.)
YoungHouseLove says
That was such a great love-fest on Friday. You guys are awesome. I’m so thankful for you.
xo
s
Rachel says
This is turning out amazing! I am so impressed that you were able to design and figure that out by yourselves.
Patti McHugh says
Wow! You guys did an amazing job with this. Your website is a constant source of inspiration. One day I’ll have my own home… until then, I’ll follow along with your DIY adventure.
Dawn says
Really looking great you guys! What a long way your whole kitchen has come. I think my favorite thing is seeing all the before and afters you post. I love how you go back to the very first ‘before’ pics from when you first moved in so we can see how things have changed. Love it! :)
Amanda says
I’m so in love I want to marry it! Haha! This really makes me want a house with a fireplace. Great job guys!
YoungHouseLove says
Haha, thanks Amanda!
xo
s
nick says
“When in doubt, nail gun it out.”
YoungHouseLove says
Amen!
xo
s
Jennifer says
I love what you did! I’m excited to see the fresh coat of paint to finish it off, it’s going to look so clean and really make the wow factor in that room!
Heather V. says
“It’s starting to look a bit more finished, eh?” This Canadian loved that line :-)
YoungHouseLove says
Hahah! John’s my faux Canadian prince.
xo
s
Emma says
Wow! That frame is amazing. You’re deadly with that nail gun John. I just used some Home Depot pencil molding tile in my bathroom and I think it would be a great border for the floor tile you have in front of the fire place. It’s made of the same Grecian white marble and come sin 12 in. pieces. http://www.homedepot.com/p/MS-International-3-4-In-x-12-In-Greecian-White-Marble-Pencil-Molding-Wall-Tile-1-Ln-Ft-per-piece-THDW1-MP-GRE/100664352#.UVBoNxeG1ic
YoungHouseLove says
So pretty!
xo
s
Gabbi @ Retro Ranch Reno says
Ahhhh, what an improvement!!! It’s so dreamy…
Kate says
Wow is about the only word that works here. I can’t believe how much of a difference you’ve been able to make on your own.
Meagan says
As always I am impressed with the finesse you demonstrate when tackling these new-to-you projects! I just can’t get over the fact that you guys do all this stuff without experiencing a learning curve…just BLAMO amazing finished project done! I’m curious as to whether you have suggestions for how to make projects go so well the first time so that your house isn’t full of not-quite-perfect changes/fixes? Is it attributable to the thorough research and planning that takes place before projects? Taking the projects slowly? Two heads are better than one? You’re super-human? :-) Thanks for the inspiration!
YoungHouseLove says
Oh we definitely have a learning curve! We love sharing the good, the bad, and the ugly! Remember when we failed our deck inspection this summer?! Talk about a setback! We have also had tons of “this didn’t work so we tried this” moments – including in this post when John explained that it took us two tries for the mantel since we built one mantel top piece to attach directly to the brick but then we learned that the brick wasn’t level so we needed a Plan B! I think we definitely have just learned to break projects down into smaller bite-sized tasks and remember that just going slow and steady can keep us sane – well, most of the time! Haha!
xo
s
Anu says
It looks really good, but would the tiles still work if you plan to make it a working fireplace later on? Also have you thought about staining the MDF (if MDF is stain-able)rather than paint it? Won’t the white paint and the tile kind of blend into each other?
YoungHouseLove says
Oh yes, the tiles in the surround are to code (many fireplaces have tile surrounds and fronts, especially in marble since that was a traditional choice even decades ago). We did think about staining but we think that since the cabinets are white, it will balance things out not to have a giant heavy brown object on one side of the kitchen. But we’ve seen tons of white fireplaces mantels with white marble and we think it’s a gorgeous combo :)
xo
s
Laughing Abi says
Thank you so much for sharing this process. We’ve lived with a hideous fireplace in our home for 7 years because we don’t know what to do with it. Your explanation makes it so much less intimidating. Drawing up some plans now. Can’t wait to see the finished product!
Jennifer says
Thanks! You took some of my inspiration pics as well and now I don’t have to put them all together! I can hopefully just use yours (althought ours goes to the ceiling)! Looks fantastic!
Lou says
I think you kids are AMAZING! Really, you are totally inspiring and I enjoy reading your blog so much. Please come to England and decorate my house…pretty please!
YoungHouseLove says
Aw thanks Lou! We’d love to end up over there someday!
xo
s
Marissa C says
Wow! I was a little skeptical of this project because I thought the white brick looked pretty nice. But this looks really impressive. I like it!
Sarah M. Dorsey says
Seriously looks amazing, even without paint yet!! What a transformation!
John @ Our Home from Scratch says
Whoa that was quick! Looks worlds better already. Gotta love MDF.
Elizabeth says
Wow, it looks awesome so far!
Lauren says
I’m SOOOO impressed!!! It’s looking fantastic so far!!
Renee - Hansen Family Chaos says
John – this is really impressive! It looks beautiful and will look so nice painted. I thought you might want to know that the Kreg Tool company, the tool that you keep referencing, is based out of Iowa, not far from where I live, and they generously give back to their community. Kudos to them! :)
YoungHouseLove says
So cool! I’m definitely a big fan!
-John
Michelle Kersey says
Looks amazing guys!!!!! ????????
Michelle Kersey says
Ha…. Those weren’t supposed to be ???? I have no question that the fireplace looks da bomb!
YoungHouseLove says
Haha, those random question marks! They pop up for me too sometimes. Ha!
xo
s
Brenda says
I really like the box detailing! And it looks so much more balanced from the side. I hadn’t realized how top-heavy it was before.
Kimberly says
It’s looking great!
Is it weird that when I read you gave the mantel a “flat top” I immediately had an 80’s flashback? Flat tops FTW! :P
YoungHouseLove says
Hahah!
xo
s
kris says
I loved the brick…sad. :(
YoungHouseLove says
No worries, we still have an entire rustic old painted brick wall in the living room and our sunroom – not to mention that the exterior of our house is brick too (that part’s unpainted). So in short: we still have lots o’ brick :)
xo
s
Kristen @ LoveK Blog says
The fireplace looks great! I can’t imagine how beautiful it will look once it’s painted! One question for you, since you’re doing all this work on the kitchen side of the fireplace will that change your plans to attempt making it a two-sided fireplace?
YoungHouseLove says
We can still go in from the back (the living room side) if those plans come to fruition down the line (they involve an architect and a mason since it’s a load bearing wall, so we’ll need to save up for that :)
xo
s
Alissa says
Looking good! Can’t wait to see it painted.
Random, silly, off-topic inquiry – probably brought on by helping friends move this weekend which always gives you a more in-depth look into their homes. I can’t recall ever seeing a trashcan in your house photos. Obviously they’re there somewhere, so you must do a good job hiding them or making them blend in so they don’t scream, “Here I am! Put gross and/or smelly stuff here!” Any tips/tricks?
YoungHouseLove says
Oh yes, we have them in the bathroom (just little acrylic ones from Target tucked next to the bowl) and we have a freestanding one in the kitchen next to the fridge. I think you can see it here: https://www.younghouselove.com/2012/01/a-strange-self-imposed-challenge/
xo
s
Camille says
With the baseboard added it sticks out over the edge of the tile work on the bottom, do you think you’ll add something to make it even or do you like it as is? I was just curious! Looks great so far! :)
YoungHouseLove says
Oh yes, we mentioned we still need quarter-round (shoe molding) down there around the baseboards (and the same cork trim around the tile that we used to have) to make it all more seamless. Can’t wait to get ‘er done!
xo
s
Julianne says
You guys are insanely good! We’re in the midst of trying to beautify our main living space with a gaudy fireplace & puny mantel, so this is helpful to see. How do you keep it all together with making choices? Jealous…it’s very easy for us to get overwhelmed with the choices, trying to make it look nice, but not spend more than we’ll get back out of this sale. I wish you guys made house calls to the Great White North!! ;P
YoungHouseLove says
We just try to take our time and make one call at a time, so if we’re unsure about a project we’ll put it on hold and tackle something we’re more sure of. Hope it helps!
xo
s
Melissa @ Loving Here says
Love this! We have brick fire places, not my favorite, but now I have hope of seeing this in my house someday! Woo hoo! (Now to just convince Hubs…)
Brittany says
So excited to see the finished product! It looks awesome so far!
Roxanne M says
I am in love with your fireplace. I want it to marry me.
Can’t wait to see it painted! LOVE LOVE the architectural details. Great job as usual!!
YoungHouseLove says
Haha, thanks Roxanne!
xo
s
Lydia says
You guys are AMAZING. I am so inspired right now. My only little crown molding project I want to do is this one: http://fabuloushomeblog.com/2013/01/05/separate-your-wall-colors-this-is-such-a-good-idea-i-dont-like-two-colors-coming-together-on-a-corner-and-this-is-the-fix-for-that-this-would-also-be-a-great-fix-for-the-beat-up-corners-in-the-ho/ so my kitchen & hallway can be two different colors. I’m so gonna do it now. Thank you!
YoungHouseLove says
Looks really cool!
xo
s
Jessca says
It looks pretty good so far. One question though, did you guys expect the mantel to be wider than the hearth?
YoungHouseLove says
Oh yes, it was before, so we knew building out over it would be the same result (we don’t mind the proportion of it other than the fact that it was thin on the side and sloped in like it was top-heavy, so this should solve that).
xo
s
Faith Kewfi says
Does this mean that you have decided against making the fireplace double sided? Or is this just a stop-gap measure until you decide to breakthrough to the living room? Looks great!
YoungHouseLove says
Yes, we still would love to do that down the line, but since it’s a load bearing wall it would mean we need an architect and a mason, so it would be pricey (gotta save up the funds).
xo
s
Jenny@EvolutionofStyle says
This is looking FANTASTIC! My fireplace makeover has been in a stalled state because it’s a funky, corner fireplace and the angles are giving us angular fits! Yours is going to look spectacular when it’s all finished! Thanks for sharing the play-by-play!
Lynn @ Our Useful Hands says
It looks so nice already and it’s not even done. You guys take the word “cohesive” and really know how to flesh it out in your home. My previously broken “eye” has now been restored. My trust never waivered but I was wearing that question mark suit the “THE GOVERNMENTS GIVING AWAY GRANTS!!!!” guy sports. :o) Cant wait for you guys to slap some paint on that bad boy.
My best, Lynn
Katy says
I love a painted brick fireplace, so at first I was like, “aw, bye pretty painted brick”.. but then you started putting the tile on.. and then you built it out.. and now it’s just amazing and can’t wait to see it finished!!
stefanie says
I love it SOOO much! Our fireplace/mantel leaves much to be desired, so I am drooling with this post. Maybe I will convince my hubs to copy your plan and upgrade ours!
Jen says
I LOVE this project and will totally be using it for inspiration for my currently-hideous fireplace soon! Thanks!
Jamie B says
I must say, I had my doubts about the fireplace build. I kinda love the charm of white-painted brick. It made that little area of your kitchen so cozy. BUT, you’re doing a really nice job with that! It’s going to look so lovely when it’s done!
**sigh** I wish I had a fireplace.