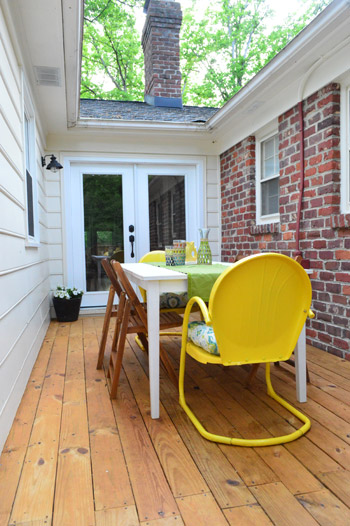
With our power washing done we could finally stain and seal our deck, which we completed and re-furnished on Tuesday (literally hours before our first showing!).
But let’s rewind to where we left off yesterday. We mentioned that after finishing it in late August we were told to give the pressure treated wood 2-3 months to dry out before sealing any of the moisture from the treatment in (apparently sealing or staining PT wood too soon can lead to terrible results). So by the time staining was advised, it was too cold out to apply the stain. But even after spring rolled around and we power washed, it still wasn’t quite ready.
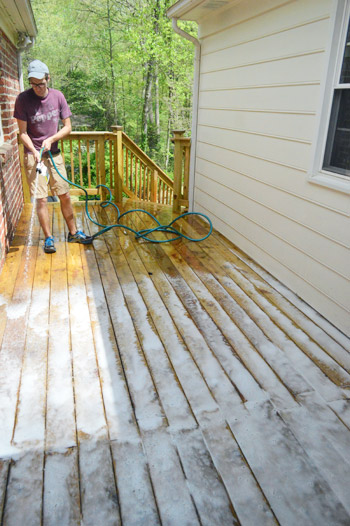
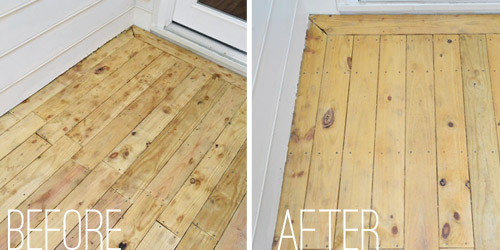
What was standing in our way? Some lingering grime that the pressure washer didn’t remove in this corner. Sherry didn’t think it was that noticeable, but I was determined to get things cleaner before staining (I feared that we’d seal them in and potentially darken those spots even more if we didn’t get them off first). Yes, you can call me Nerdy McWorrypants.
Since we hadn’t used a cleaner during the pressure washing process, I decided to try one after the fact. Lots of deck staining tutorials (like this one and this one) recommend applying some sort of cleaner first, so I didn’t want to skip that step. We grabbed this $7 “Deck Wash” because we liked that it could just be sprayed by attaching it to a garden hose.
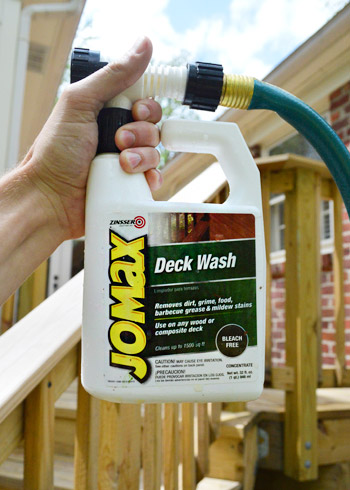
I followed the instructions, which was basically spray it, let it sit for about 5 minutes and then rinse it off. Could cleaning a deck really be that simple?
Apparently not. I didn’t even bother taking an “after” photo because it looked exactly like the before.
After two attempts (pressure washer, then cleaner) I was about to admit defeat. But I decided to give cleaning one more try, this time in the form of an $8 Olympic brand cleaner. I had bypassed it originally because it required buying this $11 sprayer.

Well, this cleaner most definitely made a difference. The same spray process commenced, I let it sit for a few minutes, and then rinsed it off, but this time it seemed to essentially bleach the whole deck clean. I was a smidge panicked with the result at first (although I had read that a bleach mixture is a commonly recommended deck cleaner) but in the end it was the exact blank slate that we needed to apply a nice even coat of stain. So to anyone wondering if the $8 product with the $11 sprayer can be that much better than the $7 one that works with a hose… in our experience the first one did nothing and the second one worked overtime.
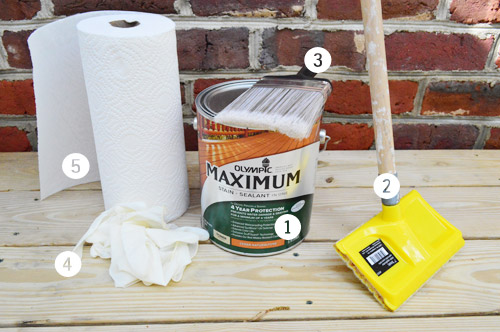
Next up was applying the stain/sealer, which Sherry and I were both eagerly anticipating (literally the minute Clara was tucked in for her nap we sprinted out to get started in the hopes that we could finish everything before she woke up). Here were our supplies:
- Olympic Maximum Toner in Cedar Naturaltone color (it’s a stain/sealant all in one, and was $37 from Lowe’s)
- Deck Stain Applicator ($7 from Lowe’s)
- Large brush ($6 from Lowe’s)
- Rubber gloves (already owned) – and yes, I now realize they kinda look like a certain other rubber item…
- Paper towels (rags would also work)
As for choosing the type of stain + sealer to go with, we heard a lot of great things about it from a friend of ours who recently used it (and a few readers mentioned the same one as well). We chose a toner over a semi-transparent finish because the color would be subtler and more of the wood would show through. We’d grown so used to the “natural” look of the wood that we didn’t want to go too dark (especially with the dark brick wall on one side) and our only other hope was that it wouldn’t look too red-orange either. Of course if you look at the photo below, straight out of the can it was pretty darn orange, but thankfully it dried to look a lot more subtle.
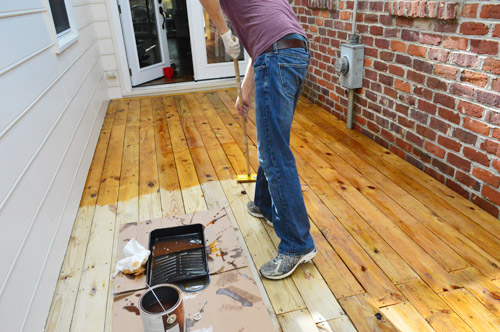
Before taking the train to Staining Town, we had read up on several options for applying it – spraying, rolling, brushing, etc. – and we opted to use a sponge-y “deck stain applicator” because we had seen my dad use one before at my Granny’s house. Both in watching my dad, and in our case, it was pretty easy to use and seemed to make things go really quickly. The only catch is that you need to “backbrush” afterwards, which keeps the stain from pooling in any place and also apparently helps work the stain into the wood. So as usual, I did the rolling-ish step (in this case, it was the sponge applicator) and Sherry was the brush girl (she followed quickly behind me, brushing over everything I stained to work the stain into the cracks and keep it from pooling anywhere).
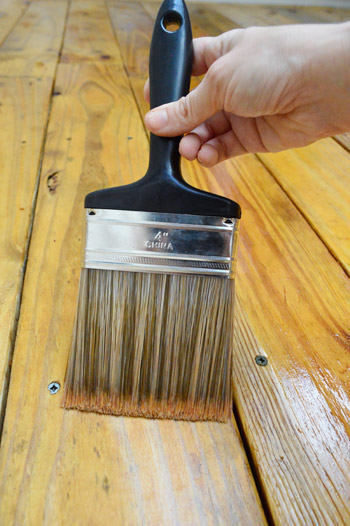
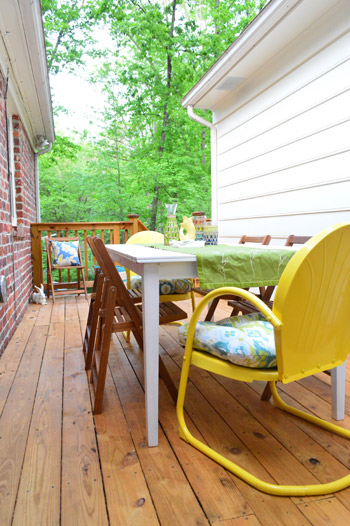
The top portion of the deck probably took us 15-20 minutes (this stain + sealer only calls for one coat). So that part was waaaay faster than we expected. It was the stairs and railings that ground us to a halt. That part had to be done with the brush making sure that we got all sides of each post while watching out for drips and puddles. So it took us more time and focus than we expected. Maybe two hours in total for that part? We kind of lost track, but Clara woke up before we were finished so I went in to watch her and Sherry “The Paintbrush” Petersik stayed back and got ‘er done.
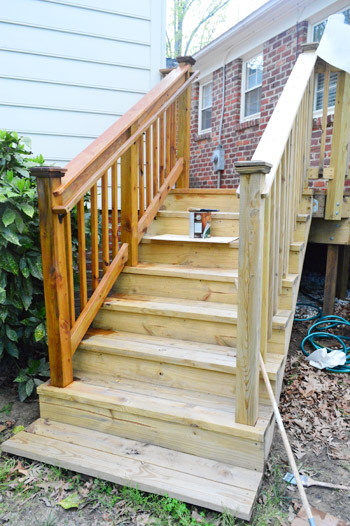
When the stain was still wet we worried that the color was redder than we had wanted, but when it dried it did exactly what we wanted – it just “toned” the wood, so it still looks similar to the other exterior wood around the house (like the fence around the patio, etc). Oh and you might notice that Sherry took a moment to paint the utility box to blend a little more with the brick, just like she did at our first house. It only took a test pot of paint (around $2.50), so although it’s hardly invisible, it’s a lot less “Look at me!” in person. And I think you can tell in the photos when you compare it to the picture a few photos up.
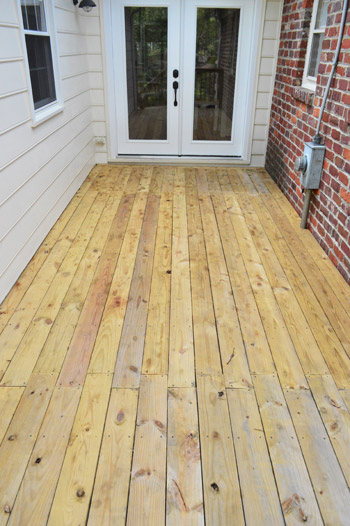
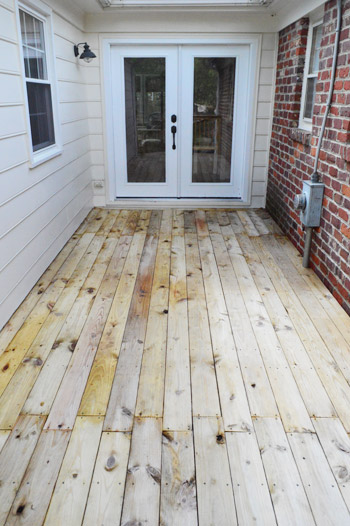
Best of all, I was totally redeemed from my failed-ish attempts at cleaning. Here’s that corner that was especially dirty looking.
It’s not flawless, but it’s much improved over where we were post-pressure washing.
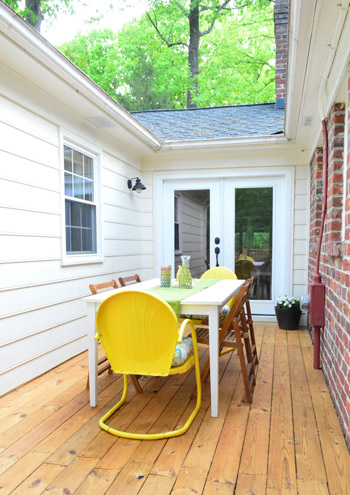
So now, eight long months after construction on the deck wrapped up (and 10 since it started!) it’s officially stained and sealed. And I’m still just as proud of her. Thankfully we got to enjoy the deck all through late fall and early spring (even before she was cleaned and stained) but it’s nice to know that she’s 100% complete and future acorns and leaves can’t do as much damage if they decide to hang out too long.
We also finally calculated the long awaited deck budget breakdown for you guys (we wanted to get her stained/sealed before breaking down the benjamins) so here it is:
Permit – $114
First lumber & hardware order – $1007
First auger rental – $60
Second lumber & hardware order – $251
Second auger rental – $60
Flashing – $40
Misc hardware & supplies – $95
Powerwash – $80
Cleaner & Stain – $76
Total: $1783
I definitely think if you didn’t have to build such a large staircase (ours has 8 steps with long railings on either side) you could save a good chunk of money. And if you don’t fail your first inspection and have to rent the auger again, you’d save 60 more bucks. Oh and you can save seven more if you buy the good cleaner the first time. Ha!
I think this project was one of my biggest (it’s right up there with our first house’s bathroom gut-job) and it certainly saved us money to DIY it (it probably would have been around 6-8K to get this hired out) but most of all it gave me confidence. Dude, I built a deck. And the permit guy said it would hold a bunch of elephants. I’m a proud poppa.
That odd little alley of ours has definitely come a long way. Here’s a picture we took during our first walk through back in 2010.
Anyone else staining a deck? Did the stain look crazy bright right after it went on? Have you tried one of those deck stain applicators on a stick? I really think in combination with the brush it was a fast yet thorough method.

Jamie says
How long do you need to wait after power washing before you apply the deck stain?
YoungHouseLove says
It ended up raining between that so we just read the instructions on the can (they vary but I think ours was 48 hours of them being dry?).
xo,
s
Kristin M says
Love the new stain! Looks gorgeous!
Also- funny story: Your family was in a dream I had last night. (First time that’s ever happened!) Probably due to the fact that I’m in the process of chipping away at your archives at the moment. (Don’t worry, I plan for this to take me like, a year. I’m not trying to read them all at once.. but since I started reading your blog about a year ago, I was always curious about how you had announced your pregnancy and your first move!) Anyway, I fell asleep reading through some of those last night, and then I had a dream that I had a house problem and all 3 of you (minus Burger) happened to come knocking on my door selling Girl Scout popcorn, so I invited you in for advice on my house problem! Ha! We plopped Clara down with my dog (which is weird because I don’t own a dog!) and she was happy as a clam, while we 3 adults went and saved the DIY day! :)
Also also- unrelated, but I think you’ll love this… Somebody adding monsters to landscape paintings found in thrift stores. http://twistedsifter.com/2012/04/adding-monsters-to-thrift-store-paintings/ SO funny.
YoungHouseLove says
Hahaha I love the dream and those thrift store monsters!
xo,
s
Megan says
That turned out great! With such a huge project to tackle it must feel awesome to finally have it done. The hubs and I need to seal the fence we put up last year but we’re waiting for it to warm up first. We also need to convince our neighbors on either side (who share the fence with us) to turn off their sprinklers for two days so the sealant can dry properly. Hoping a plate of homemade cookies will help convince them!
Sue says
Nerdy McWorrypants – haha I love it! The deck looks even more amazing than it did in August. Job well done, as always!
Brenda says
Wow, crazy how much fancier and swankypants it looks with a little stain! You have every right to be super proud.
erin says
great job on the deck!! I hope the new future owners enjoy it as much as you guys do/did!
Kim says
I second Oxi-Clean. We had to switch to it to get the years of grime off our deck, worked well. I used the leftover for the laundry.
Stephanie @ Legally Blinde says
The deck looks AWESOME! I’m so glad to hear that you guys were able to enjoy it in the fall and have been using it this spring, too – after all of that hard work you definitely deserve to bask in your accomplishments :) And wow, I’m so impressed with the before and after cleaning shots, too – it was definitely worth it to persist (I don’t think I would have had that much motivation after trying two things previously) because the difference is amazing. Congratulations! And I’m sure this will be a huge selling point for prospective buyers. It’s probably not worth it at this point, but I was hoping to see the deck with some strings of globe lights :) Great work Petersiks!
duffymrs @duffydigs.wordpress.com says
The deck really has come together so well. I remember when I was reading the posts during the process of it being built and thinking, “He’s really doing it!”
I saw a response you made up near the top and I was curious about it: You said some potential buyers are coming through your house with Buyer’s Agents. I’m so curious about this, because from what I’ve learned about the house shopping process, the Buyer never pays any commission and typically the seller pays the Listing/Selling Agents’ commission and the Listing Agent typically splits his commission with the Buyer’s Agent, since they brought the buyer to the house.
In your case, since you’re selling on your own, I really want to know who covers the Buyer’s Agent’s commission. In NY, the Buyer isn’t supposed to pay ANY commission, from what I can tell.
YoungHouseLove says
Oh yes we cover 3%, so instead of doing the typical 6% for two agents we are our own agents to save 50% :)
xo,
s
Kathy says
I didn’t even know you were supposed to wait with PT wood before staining it until you had blogged about it. And I’m kicking myself for not researching it more thoroughly now that half our deck is stained & all the disgusting stuff is sealed in. We tried to powerwash it mast summer, but most of the stain is still there (if anyone else has any helpful tips)
YoungHouseLove says
Anyone have tips for Kathy?
xo,
s
Lesley says
They sell deglossing products for folks who don’t want to wait out the natural deglossing of PT wood… maybe try that?
YoungHouseLove says
That’s smart!
xo
s
Henna | HENNA BLOSSOM BLOG says
Nice job, John! This is one of my favorite projects that you guys have done. The space was just odd and awkward and you made it into this gorgeous, useable space! I love it. The new owners are definitely going to thank you for this project. :)
Jessica says
I was anxiously waiting for this post, as we just stained our deck this week after building it last summer with PT wood and waiting for it to be ready. We used the same Olympic deck cleaner and Olympic toner in a different color, but our results weren’t nearly as good as yours! The cleaner made our wood “fuzzy”. I don’t know how else to describe it, but after reading I guess the bleach can eat away some of the wood. We also had some trouble with the stain not mixing evenly and it applied an uneven tone on the deck and is shiny in spots. Sad to say, I’m a bit disappointed in our results. Glad yours turned out so well, though!
YoungHouseLove says
Oh no! Did you power wash before? Or maybe it was the stain color? That stinks though!
xo,
s
Cindy says
Is it just me or does reading the word deck in the post and all of the comments, start to sound a little weird after a while? I love your deck, how do you wash your deck, just use the blower on the deck, elephants on the deck! :) I am sorry for my dirty-ish mind. It’s just that word….deck deck deck!! :)
YoungHouseLove says
Haha it’s like that “I just shipped my pants” commercial…
xo,
s
jody says
Im confused though – are you suppose to wait 2-3 months after power washing to stain?? We have our deck that needs this done to it & we thought we could do power washing & then stain within the same weekend – sounds like that’s not a good idea? Thanks for info!!
YoungHouseLove says
No you just can’t stain new pressure treated wood, so we waited over the fall/winter and then power washed and stained it this spring :)
xo,
s
Maureen says
OK, now you can move :)
Thanks for the tips.
taylor says
Nerdy McWorrypants…Ha!
The deck looks great!
Jessica says
Wow! That looks incredible! Especially with the “waaaaay” before photo – before you even built the deck! Great work.
Just curious – do you share your before and after photos in any way with potential buyers to show how much work you’ve put into the house?
YoungHouseLove says
We don’t really share b&a pics but with the listing flier we put out a few magazines so people can see the photos in there (some have before pics).
xo,
s
Krissy says
I helped my friend stain half her railing last weekend. It took us 4.5 hours, together, to get that far. Their deck is monstrous, has railings on 3 sides and 2 long sets of stairs. We’re hoping to bang out the second half and the floor this weekend (and hoping we’re nowhere near as sore the second time around).
It’s funny how differently stain takes to different wood. I love the cedar naturaltone on your deck, but on Nathan’s grandparents’ house (which is sided in rough-cut hemlock) it looks VERY orange.
JoannaBanana says
I love when you have product advice and do all the fails for me! It looks amazing. Do you know how much it would’ve cost a contractor to do the same job in your area?
YoungHouseLove says
We think having someone build a deck this size with this many stairs/railings between two house structures would probably have been around 6-8K to have it hired out. Of course estimates vary by location, deck size, deck location, etc :)
xo
s
Amanda says
The deck looks great! But in a totally unrelated point your book is being used as a prop on Anthropologie’s website for the beluga bookends! Just had to post, didn’t know if you knew. :)
YoungHouseLove says
Isn’t that crazy?! Makes me want those bookends. Haha!
xo
s
Jen says
For anyone else who needs to do some staining – I did the same method (apply stain then backbrush), but used slightly different tools. I used a regular 9″ paint roller cover with an extender pole so i could use it while standing. The 9″ cover was exactly the width of 2 of my deck boards, so I just did one long row of 2 boards at a time.
Then I used a wide deck staining brush from Sherwin Williams (but I think I’ve also seen them at Ace Hardware) that has a handle that twists off so you can use an extender pole. THIS was a life saver so I wasn’t crawling around the whole time. I basically did my backbrushing like I was using a broom. Well worth the extra money for the brush with removable handle!
The deck looks great, Sherry and John. I know it can be tough to find the right stain color that isn’t too orange or too red.
YoungHouseLove says
Great tip Jen!
xo
s
Erin says
I know you guys tackle a lot of stuff and get a lot of well-deserved comments about what a great job you do. But seriously, please take a moment and really soak in how cool this is. Building a deck from scratch is serious DIY and you guys should be so proud of how you’ve upgraded that space. My husband is dying to build our own patio/firepit area and I’ve squashed his manhood by implying we should hire someone else so it’s not a trainwreck. Maybe I should let him go nuts doing this just so he can stand back and roar with pride afterward- lol.
YoungHouseLove says
Aw you’re so sweet Erin! I seriously looked at John for months after the deck was finished, just while we were eating dinner or sitting on the couch and I scream: “Dude, you built a deck!!!” – haha. It was such an awesome project. I’m a proud wifey. And I’m so glad John pressed on past that failed inspection to show that weird alleyway who was boss. Ha!
xo
s
Rebecca says
Woah! Love the finished deck!
Debbie C says
The deck looks fabulous. I’m a little sad that you have to leave it behind, I mean…you BUILT a deck and staircase! Seriously mad skills. You’ll definitely have to do some (non-creepy) drive-bys just to stare at it sometimes.
Jane says
Our deck was just power washed and stained , thankfully the association does it since we are in a townhome.
I have a question for you guys. When you are looking for homes what do you really look for ? In terms of the layout , what do you look for? How do you look beyond all that fixing needed and come to a conclusion that ‘this is it’ ? or have you already done a post about it?
YoungHouseLove says
Here’s a post for you about that :) https://www.younghouselove.com/2012/11/what-we-look-for-look-past-while-house-hunting/
xo
s
Claudia Boress says
Y’all are just awesome! I am so excited for your upcoming move. Perhaps you will create book 2 in the new house! I enjoy how simple you lay out the process of your projects. Although I don’t have a deck I find myself reading through the process anyways. You never know…one day I might have a deck that needs staining. Thanks for the tutorial :) Love you guys!
YoungHouseLove says
Thanks Claudia! You’re so sweet!
xo
s
Laura C says
Looks great! You guys have really put on some nice finishing touches in the last few weeks – your house should show really well.
Ally says
You guys amaze me. :)
I get tired just looking at the pictures of all the work you do at your home. I know it’s your day job … and your night job … and your hobby … but wow! I’m impressed every time I click on over to YHL. And now you’re going to start all over at a new place. You two are a special kind of crazy! :)
YoungHouseLove says
Hahaha, I think that’s the perfect description of us. I feel like I want that on my tombstone: $herdog Petersik, a special kind of crazy.
xo
s
Heidi P. says
hahaha!!
Kirsten says
Hahahaha – oh priceless! Completely laughing out loud!
N Shirley says
Just occurred to me you need a shot of the front of your “house to be” on your house tour page. I for one would lovingly gaze at it- also a floor plan… just saying…BTW the deck looks great!
YoungHouseLove says
Haha! It’s on the to-do list!
xo
s
Melissa @ ReThreads Charlottesville says
So great to learn from your power washing/staining adventures! I started researching/dealing with this last summer but decided against the cleaners because of how toxic they could be to our gardens and compost bins, which are right next to our deck. I know you tend to buy low VOC paints and things for indoor use. Curious if the chemicals aren’t as much of a concern for you since it’s outside? I wish there were lower VOC options for deck cleaners and stains!
YoungHouseLove says
I know what you mean! There are so many great eco options for inside but the outdoor stuff still seems to be oil-based for the most part. We actually read up on a few water-based or lower-VOC options but the reviews weren’t as good, so we thought the risk of having something that wore off or peeled right away and then having to do it a second time would mean even more materials/VOCs/time spent on the project. It’s so hard though! I really wish things like spray paint and exterior stains/sealers would get more attention in the eco option department. Soon I hope!
xo
s
Krystle @ Color Transformed Family says
I think the deck turned out fabulous but the one thing that caught my attention is how well you have the deck staged for showings. It’s important for potential home buyers to see all the unique spaces that they can utilize with your house and what better way to show off your deck than to have the table set and ready to entertain!
Diane says
We inherited a small balcony “deck” that consists of metal grates that were covered with many wood planks to beautify the area. I’d love to clean and stain the wood. It has gotten a bit green in some spots. Is it a must to power-wash beforehand? We don’t have access to water out there, and I’d love to skip the step to save a few bucks. But would the cleaner step alone do enough to make sure the wood is ready for the stain? Thanks in advance :)
YoungHouseLove says
I think you can definitely clean wood in other ways so maybe try using a wire brush and a cleaning solution (maybe Oxyclean since we hear people saying it’s awesome on their deck)? Hope it helps!
xo
s
Megan says
I just did a little porch rehab of my own. And by rehab I mean, I tore up the nasty old carpet and replaced it with a 5×7 outdoor rug that I found for $12.99. It’s so much better with just concrete and a removable rug! There was nasty 50-year-old dirt under that old carpet! I posted some pictures on my blog: http://rentalrevival.com/home/2013/5/2/13-porch-rehab
Nothing better than relaxing on a porch that you fixed up yourself!
YoungHouseLove says
That’s awesome Megan! And I love the name of your blog!
xo
s
Megan says
Thanks so much! Before I came on my computer and found your reply, I was just talking to my friend on the phone about bloggers and how much better it is when they are “real” and the bloggers are relatable and down-to-earth. Your blog came up, obvs :) So thanks for proving me right!
YoungHouseLove says
Aw, thanks Megan!
xo
s
Kathleen says
Back when I had a house (instead of my current condo) I stained my deck 3 time. First with a transparent stain but it had a green tinge which was weird. The next year I for some unknown reason used a redwood color stain and it was also awful looking especially as you could kinda see the green tinge thru the now deep reddish color. Then the 3rd year I used an opaque brown stain. It almost perfectly matched my newly painted exterior trim and finally the deck looked good. All 3 times I used a brush on my hands and knees staining the deck. It was pretty back breaking with sore and bruised knee work. I was worried that it would flake off and require sanding prior to touch up staining jobs in years to come. But somehow it absorbed into the wood and just faced with time. No sanding bare spots necessary to keep it looking good. Just a restaining after a couple years to freshen it up.
YoungHouseLove says
That’s awesome! Well all that knee-bruising work, not so much, but the results of the third stain sound so pretty!
xo
s
Justynn Y says
Hah, too funny. I’m washing and staining my deck this weekend too. It was never stained after built and when I bought the place was in need of some attention. Finally getting around to give it some. Had to pressure wash it big time (lots of moldy areas). Then used a bleach deck cleaner from Behr and I’m amazing with the results. Staining to commence tomorrow!
YoungHouseLove says
Good luck Justynn!
xo
s
Amanda says
The deck looks beautiful! And I was looking at your pictures and realized that we will never get to see you guys redo your floors. I’ve been waiting for that since you guys bought the house. *tear* Oh well, it’s a bittersweet feeling that will pass once I see all the exciting changes to your new home. :)
YoungHouseLove says
That’s my biggest regret! I wish we didn’t have to close and move all in one day so we could have had time to do them first! It’s such a bear to get them done once rooms are furnished (you think we would have learned that lesson when we did just that in our first house, haha!).
xo
s
Stephanie says
Wait…I’m confused…why did you have to wait so long to stain and seal? I have an existing deck…can’t I just clean and stain/seal it?
YoungHouseLove says
Yes, if it’s not freshly pressure treated like our lumber was when we built the deck, you can stain and seal whenever you’d like (just read the directions on the can to be sure it’s the right temperature for that product and to see how long the deck should be dry after the last rain).
xo
s
ces says
I love how it turned out to be. Good job… as always! ;)
Brandi says
This post gave me the jump start I needed to get my own deck in order. Your deck really turned out great. You guys should be so proud!!
Heidi P. says
YAY!!! I’ve been waiting for this post!! And I was worried it wouldn’t come with the new house and all. Phew! I’m just a week or so away from staining my new deck boards too! Thank you!!
Kierstin says
It looks sparkling new and delightful. It’s unfortunate that you won’t be enjoying it this summer, but mentally you’ve probably already moved on to the new house, which has many wonderful opportunities to offer, I’m sure.
So have you sold your house yet? Is the market as crazy there as it is in Portland? After a dip for the past few years, it’s back up to where it was 5 years ago and beyond. Good houses are selling in days, sometimes before they even have an official showing, and selling for over asking price with 10+ bids! It’s insane if you ask me.
YoungHouseLove says
Wow! Richmond real estate seems to be up, but not the way you describe Portland! That’s amazing!
xo
s
Amanda says
That looks great! We’re about to seal our deck, so I’ve been waiting (im)patiently for you to do yours. Question, though I’m not sure if you can help…our deck is on the second level of the back of the house, so all the undercarriage is exposed. Does that get sealed too? And the beams? It’s such a high deck, with these super fat beams, I joke that it looks like an AT-AT. :)
YoungHouseLove says
Ooh that’s a good question and I have no idea. I think you want to seal surfaces where moisture and junk can collect, so maybe underneath they don’t “rest” enough to collect or hurt it thanks to gravity? Or maybe since it’s so exposed you could seal it too. I definitely don’t think it could hurt, so you could just do it to be safe. Anyone have info for Amanda?
xo
s
Linda says
At my condo association, initially the undersides of the wooden balconies were not stained and sealed when the tops were. Penny wise, pound foolish. Three years into the cycle, we made the decision to pressure wash and seal the bottoms. Some of the undersides weren’t too bad, but it did depend on exposure. Many of the balconies really really needed underside cleaning badly, and the sealing really made a difference in the appeal from all angles.
katalina says
I like the way you are still sharing the LOVE to your old house…..I knew something way up when you went from fireplace redo to pergola and bathroom update but then I have been reading since the beginning ….
totally unrelated question—how do you locate a smell in your house — for instance sewer gas or water pipe broken or something died in the attic or mold? I know you would crawl up there in the attic– even though I have seen bats so I am wary of doing that one myself! who do you call to check for sewer gas? I have run vinegar in the dishwasher and disposal etc. check under all the sinks.
also any cure to get rid of ANTS?????
YoungHouseLove says
Hmm, here’s what worked for us when it came to ants: https://www.younghouselove.com/2009/05/ants-in-my-pans/ and as for the smell, that’s a toughie! Maybe if you’re worried about crawling up in the attic you can bribe a brave friend or relative with free dinner? As for sewer gas, we’ve never dealt with that. Anyone have tips for Katalina?
xo
s
Amy @ Croquet & Cocktails says
We just heard from our contractor in WV that we will need to replace THREE decks (and siding and insulation and whatever else is in a wall…) because the last guy to do work on it didn’t seal the wall correctly. We’ve got a ton of rot and, sadly, these decks aren’t DIY decks. There is plenty of other stuff to occupy our time. (Check out our new project if you get a sec.)
http://croquetncocktails.blogspot.com/2013/02/finally-our-top-secret-secret-is-secret.html
We will be staining them ourselves, so this post is uber helpful.
YoungHouseLove says
Aw man, that sucks! I wonder if there wasn’t flashing to protect the wall. Hope it’s a fast and easy process (at least as much as it can be) to get those three decks back to their glory.
xo
s
Amy says
The flashing was installed improperly and the rest, as they say, is history. Wet, expensive history. Thanks for checking it out. Hopefully soon we’ll have something glorious to show you!
YoungHouseLove says
Oh no, so sorry Amy! All the best of luck!
xo
s
Sara V says
Hannah has your yellow chairs in Dexter season 7 epi 6!!!!! (Catching up on it right now and just spotted them) haha
YoungHouseLove says
AHHH! No way! How did we miss that?!
xo
s
Teresa W says
We recently had a 6×18 ft side porch built off of our kitchen(it is my hideaway spot) and also a small deck and patio area off our new addition we had built for my father-in-law. We will be staining and sealing it in June and I had already planned to see if you had done yours and I had just missed it. I love knowing which brand to try, and especially knowing to be diligent about keeping stuff off the deck that may stain it. Hopefully, the rain around here will stop before June!
One thing about having my father-in-law here is we moved his workshop to our house and we now have some cool tools. I am so excited! I can’t wait to organize it and find out what we can build. He even has one of the large planers!
In the upstate area of SC, it is a sellers market. Houses are staying on the market about 2-3 weeks. I think yours will sell quickly in your area.
Sassafras says
I love all your posts but special thanks for the last couple of posts as the new house we bought has a front stoop and back deck that are made of pressure treated but unstained wood. Right after the upcoming vacation I’m all over it now that you’ve shown me how to do it right! Great job and I love the wood tone you achieved.
YoungHouseLove says
Thanks Sassafras!
xo
s
Paul says
Looks great, what a difference it makes. Let us know how your showing are going!
katalina says
thanks I found your ant post.
but locating a smell that needs a detective is harder– plumbing leak?
thanks
YoungHouseLove says
Anyone have ideas for Katalina? Its hard to say without being there and checking it out. Maybe call a house inspector to see if for an hourly rate they can look into it?
xo
s
Katie @ Spirals & Spatulas says
Looks great! The new owners are so lucky to get the house with that update already done and looking beautiful!