As exciting as it was to remove the sliding glass doors from our sunroom, it left a very unexciting task (by comparison) next on our list.
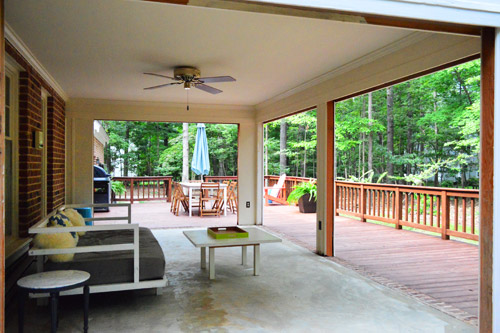
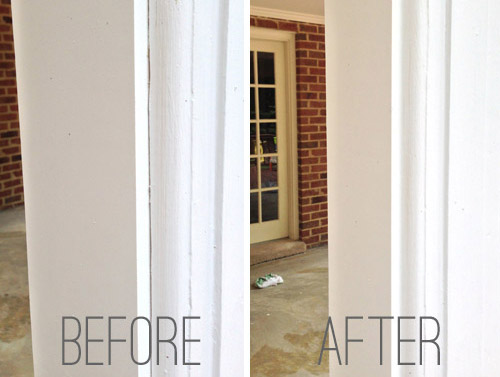
Removing all of the metal door frames left lots of exposed raw wood along the edges of each opening. Not only did it look unpolished, but it was recipe for rot (that recipe being rain water + raw wood = rot). So we jumped on this to-do right away.
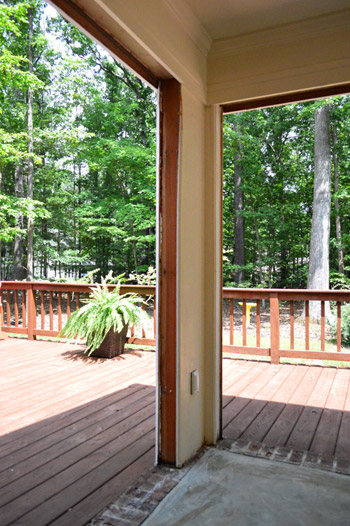
When we got our house painted, this room had a lot of rot repair on the outside so we’re hyper-vigilant to the issue right now. So instead of filling those areas with wood, I splurged on PVC (i.e. plastic) since it holds up better to moisture. It was about $5 more per piece, but I figured it was worth knowing that it would last for decades without any rot. I did save about $25 by buying the pre-primed wood for the tops of the door openings (since they won’t likely come in direct contact with standing water).

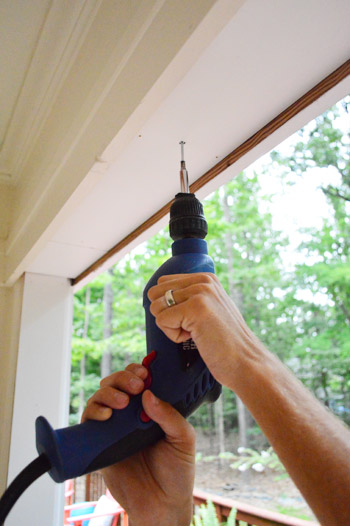
Each of my boards measured 1″ x 6″ x 8′, which was just a smidge too wide for the gaps that I was filling. So in addition to cutting them a bit shorter, I had to rip a little off the sides using my table saw. Once I set my guide to the right measurement it made for pretty easy work.
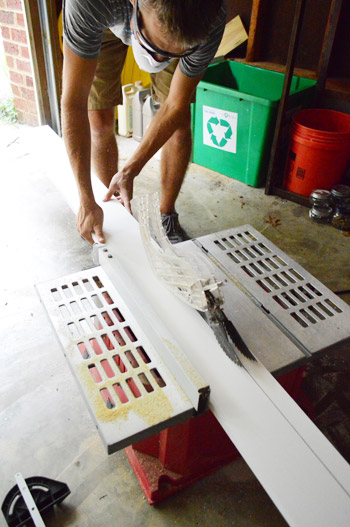
Once everything was cut, I put some construction adhesive on the back of my board and the nail gunned it into place. It had been a while since I had a date with my nail gun, so it felt good to be back in the saddle. I made super handsome faces like this.
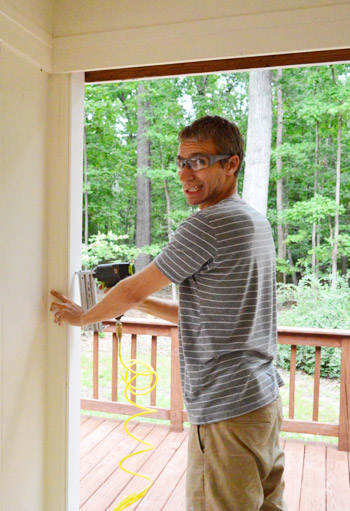
For the ceiling boards I also reinforced the hold with a few screws. I just didn’t totally trust adhesive + nails to keep it from falling on our heads at some point.
Installing the boards took me a couple of hours, only to be followed by an equally fun few hours of caulking. #YOLO
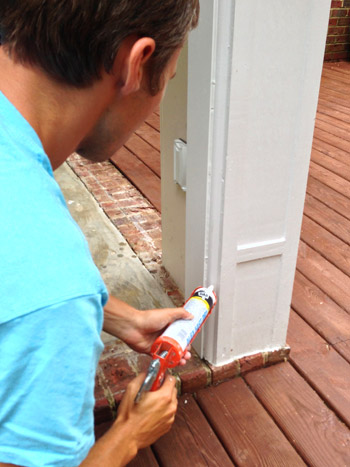
Our main mission was to caulk the gaps around the new boards (just say no to moisture creeping in there!) but we took the opportunity to fill any other cracks or gaps that we saw around the room. In addition to its rot-prevention benefits, this step also made the new frames look more finished.
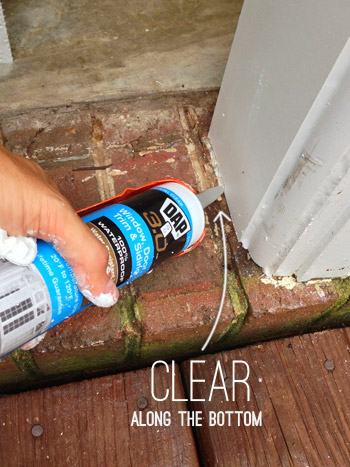
When it came to caulking the bottoms, I learned from a similar experience on our last home’s porch makeover that I should use clear (not white) silicone caulk here. When caulking against brick it’s nearly impossible to get a straight looking line because the caulk gets smushed into the ragged surface of the brick. So clear caulk allows us to still seal things tightly, while the straight edge of the board still acts as the visual edge. Obviously it looks lumpy here since I didn’t smooth it with my finger yet, but once you do that it’s pretty clean looking.
I know, I know, riveting stuff. But at least it made the room look a little less unfinished.

And as you can see, someone is enjoying the new open space quite thoroughly.
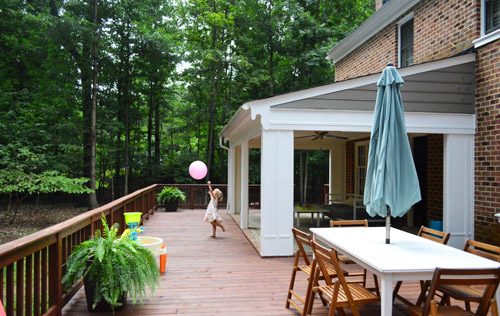
We still need to paint the inside of the room (right now it’s cream, while the outside is white) but before we broke out our paintbrushes, we couldn’t keep ourselves from breaking into the ceiling…
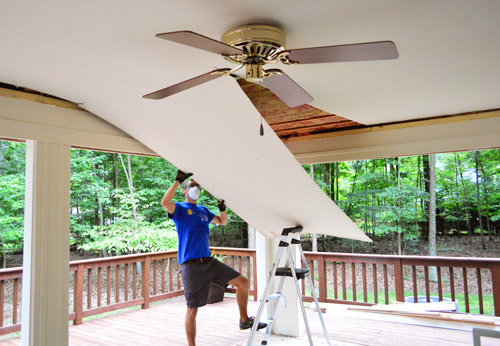
More on that once we finish poking around in there. Here’s hoping we can actually loft this baby!

Steph says
That cliffhanger is cruel, you guys! I love this project. It just looks so cool and relaxing and is such an awesome thing to do.
Also, I’m kind of obsessed with the brick border around the patio. I have no good reason, I just love it. (Is that weird?)
jamie says
How wide are your openings at the front? We’re building a covered patio and I’m wondering how open it will feel with our posts on that side.
YoungHouseLove says
All of the openings in the sunroom are the same width. There were four sets of extra wide doors that we removed, which were around 10 feet wide.
xo
s
Dana says
Looking good! Do you plan to do a haint blue on the ceiling?!
YoungHouseLove says
We’d love that!
xo
s
Gretchen says
I mean, seriously – this is about the greatest thing you’ve done. That’s saying a lot considering the amazing kitchen re-do and the built in double desk (which I loved). This outdoor space is incredible and cannot wait to see it progress. It rocks!!!!!
Katherine says
Very nice! I like the cobble trim around the concrete patio edge as well. The concrete would look great stenciled with patio paint a’la a rug design.
Mel G says
#YOLO made me laugh out loud! It’s getting crazy up in thurrr! Looks awesome guys. We’re about to close on our new (old) house and can’t wait to do all the things I’ve learned from y’all the past few years!
Keep being stellar. :)
Bailey says
Oh my god, what a cliffhanger with that last picture. I can’t even imagine where you two get your energy from! Adrenaline rush from the nail gun??
xox
Bailey
http://akabailey.blogspot.com
Laurie says
Everytime I see how much better something looks when it’s caulked I’m impressed. I hope the caulk the heck out of my exterior this fall.
Excellent tip on the clear caulk and brick. I never would have thought of that.
Also, pulling down the ceiling like that is SO BRAVE!
maddy says
it looks so good! i thought the sun room was kind of an awkward room, i love where its going!
will you guys be able to loft the ceiling yourself? i kind of assumed that had to be one for the pros but what do i know haha!xo
YoungHouseLove says
Oh yes, we’re definitely going to be consulting with the pros when it comes to removing beams/lofting things to be sure the structure stays secure. We can just do things like removing the ceiling (which isn’t structural, just decorative) to see what we’re dealing with up there first, but we already have a call in to an expert to discuss what we find!
xo
s
Kara says
That is so awesome! I can not wait to see how you tackle the ceiling, we have a drop ceiling in our sunroom and it is killing me not to go play around with it, maybe I will once I see how you guys accomplish your task!
Kara says
This is looking awesome! Can not wait to see how you tackle the ceiling! It might cause me to look into dealing with my drop ceiling!!!
kate says
I might be being dumb here (I’m in England so we don’t have rooms like this) but what happens in the winter?
Is your climate like California where furniture etc can stay out all year as it’s not cold and wet. If not where are you going to store everything and how will you use the space in the middle of winter?
YoungHouseLove says
It’s like a deck (except a bit less exposed) so we’ll use outdoor-safe furnishings. Richmond is pretty mild for the most part, so there are thankfully lots of things that can stand up to the winter months under a covered porch.
xo
s
Pam C says
I’m glad you didn’t read my mind. I was completely against opening up the room. You were right (of course!). Have you considered just staining the concrete instead of tiling over it? I love the look of stained concrete…
YoungHouseLove says
There’s glue all over it so it would have to be a solid stain (a painted look) and we worry that’s too slick. We’ve all slipped on the concrete when it’s wet, so we prefer the idea of something with a little more grip.
xo
s
Pam C says
Now that I’ve taken the time to read this thread, I see why you want tile over the concrete. Good idea, really.
YoungHouseLove says
Thanks Pam!
xo
s
Sabrina says
John, that last pic should have a blurb of you saying “I am all that is man” haha
YoungHouseLove says
Haha!
xo
s
Julie @ Living on the Ledge says
I can’t believe you are tackling LOFTING this ceiling. I know it will work, because everything you guys do turns out great. I can’t wait to see it!!!
Shell says
Is is just me or is John the king of Cliffhanger posts?
YoungHouseLove says
He totally is! He loves shows that end with “to be continued” the most. Meanwhile I’m all “nooo! what will happen?” and he’s like “well now I can formulate a few theories and see if I’m right” – ha!
xo
s
Alex says
Did you two finish watching the Following?? I know from Instagram that you at least started it…that show had THE BEST cliffhangers each episode, and the season finale still makes me think WAIT OH MY GOD WHAT?? WHAT??? when I think about it! I think John’s brain would probably like that aspect… :)
YoungHouseLove says
Yes. We were at the edge of our seats the entire time.
xo
s
Alex says
!!!!!!!!!!! I am shivering just THINKING about that again! Ay yi yi!! :)
Mia B says
Looking good! Question about using the table saw – have you ever had a piece of wood kick back at you? We were installing replacement floor planks in a house to fix termite-damaged boards, and ripping them to fit, and a piece came flying back like a bullet and thunked DH in the chest. Knocked the wind out of him and left a big bruise – plus freaked us out! It’s been five years and we’ve found a way around using the table saw ever since. Any ideas?
YoungHouseLove says
So scary! That hasn’t happened to us, but we have heard of it. Anyone have tips for this? John never cuts without his safety glasses just in case something flies up, but they won’t keep a bruise from happening somewhere else.
xo
s
Alex says
I still remember being in 8th grade shop class and it was the day the teacher was going to teach us about the table saw and as he was demonstrating the wood kicked back. So, so scary! It was a while before I went near it.
Anyway, two really important things I’ve learned are: never stand directly behind the saw blade, stand a bit over to the side, just in case it kicks back, maybe you won’t get the brunt of it. And never back wood out of a cut and then push it through again. Seriously, never ever. Ever.
YoungHouseLove says
Great tips!
xo
s
Jessica C says
I LOVE the change! I’ve read somewhere that in the tropics they paint outdoor ceilings a very light blue to help keep the bugs away. I wonder if it works? ha!
YoungHouseLove says
They do that in the south too!
xo
s
Kate says
Thought this when i saw the photo of Clara enjoying the veranda and had to share. Your deck would be great for roller skating. Such a big open space and doorways to spin around, but smooth compared to a gravel street. I would have loved it as a kid.
Mia says
Think twice about that idea. I was roller skating at about 8 yrs old on our concrete porch, when I fell and significantly chipped my front tooth. (Lived with it until I was in my teens–couldn’t afford to fix it).
Katie says
The picture with John making a funny face looks like he is MacGyver. The no mullet MacGyver of course.
YoungHouseLove says
Oh man, now I want to photoshop a mullet in there…
xo
s
Hilary says
It looks like it’s coming along great! My son saw the pictures of Clara playing and started saying he wanted to play with her :)
YoungHouseLove says
That’s so sweet!
xo
s
Teresa @ wherelovemeetslife says
Can’t wait to see what happens with that ceiling!!! You guys must be having a blast right now with all the new possibilities! Are you like a kid in a candy store where anything you tackle looks to be fun?!
YoungHouseLove says
I think I’m bouncing between so excited about a bunch of projects and so tired of painting blue trim and removing wallpaper (how are there still rooms of it left?!). Haha!
xo
s
Ashley@AttemptsAtDomestication says
I hope you can loft it! That space is going to look so awesome! I can’t wait until it’s done! ;)
MB says
This makeover is so exciting! I wish I could do this to my sunroom but I have a feeling my ideas will stay just that. I live vicariously through you guys.
Emily says
Have you considered putting in bifold doors like these – http://www.google.co.uk/imgres?start=145&um=1&client=safari&sa=N&rls=en&biw=1280&bih=612&hl=en&tbm=isch&tbnid=7cnK__uUY4e-JM:&imgrefurl=http://www.thepanoramicdoorcompany.co.uk/&docid=Idalib5LKMcT0M&imgurl=http://www.thepanoramicdoorcompany.co.uk/sites/default/files/images/temp/bifolding-doors.png&w=500&h=375&ei=3DwWUuqYAqqd0AWw0IDYBA&zoom=1&ved=1t:3588,r:52,s:100,i:160&iact=rc&page=9&tbnh=194&tbnw=259&ndsp=17&tx=149&ty=145
They push back to barely anything. It seems like it would give you the open space you want but more flexibility to use the area when it’s cooler/rainy. Plus if you add a strip heater you can add to your square footage!
YoungHouseLove says
Oh yeah, those babies are awesome! I think for now we prefer the completely open look, especially since we’re planning to finish the storage room over the garage (so we’ll gain more square footage up there than we’ll lose in the sunroom). The previous sunrooms we’ve had with heat and glass doors have always been rooms that we use for three seasons (even if we mean to hang out there in the winter we just never do) so I think we’re cool with this being a three-season room too.
xo
s
Carla says
Cliff hanger in deed! But how exciting. It’s going to be beautiful.
I’m a big fan of painting porch ceilings sky blue. It’s a thumb’s up to tradition but also very refreshing and fun.
I can’t wait to see what happens next. This is my most favorite DIY you’ve done to date.
Lauren H says
Hey, John- no legs or table for the table saw? I have been eyeing this modular workbench with pivot out saw cart. http://www.familyhandyman.com/workshop/workbench/modular-workbench/view-all
Looks like you could use one ;)
Ha, ha! Just saw I’m not the only one to comment on this!
YoungHouseLove says
That! I need that.
-John
Shannon [Our Home Notebook] says
Must feel nice to get it all protected from the weather. So many possibilities now! So glad you are enjoying it already.
Danie O'Shaughnessy says
I love the last picture! Cliffhanger! Can’t wait to see what happens next!
Shannon says
I’m excited to see this “room” get finished! I love that you went a different direction with this sunroom. I wish we were able to finally add our deck, which I plan on covering and furnishing like an extension of the house. Someday!
Jenny D says
We have a similar porch – we painted the ceiling a pale blue. It’s a “southern thing”. Google it :)
YoungHouseLove says
Love that! Some of our neighbors have one too!
xo
s
Jenny D says
Also, there is a company that makes light blue beadboard for ceilings just like yours.
YoungHouseLove says
That’s awesome!
xo
s
Corrie @ Little House On The Update says
I think it was such a great choice to open it up! And what about acid staining that concrete? I am dying to see somebody try this!
YoungHouseLove says
Our concrete has glue stains all over it, so we can’t do anything other than something solid (stain or paint) and it’s so slick (we have all slipped on it when our feet are wet) that we think tiling it with something gritty and less slippery will work better for the long haul.
xo
s
Teresa says
We used the same plastic planks to frame some windows on the outside of our house. Did you caulk the nail holes from securing the peices? And if so, how the heck do you get them to blend in seamlessly with the PVC?
YoungHouseLove says
The key to us is the right caulk (we love Dap paintable windor/door caulk in white) and to do it a second time in those holes that shrink up, so it’s really flush.
xo
s
Anne says
What an interesting project. Totally fun to watch this proceed. Great tip on the clear caulk by the floor. Heck, I didn’t even realize people caulked baseboards and stuff until I had some professional work done and thought: gosh, that looks way better! Also, I love the teaser for the ceiling and the picture of Clara playing. What a sweet life! :)
Ang D says
Love love love the new veranda! And can’t wait to see what you do with the ceiling! What a perfect transitional outdoor space!
Diane says
I hate DIY cliff hangers. The suspense is killing me.
Hope the next episode is tomorrow – same Bat time, same Bat channel.
YoungHouseLove says
Haha! We’re hoping to know something by tomorrow, but the latest will be Monday. (we’re still taking stuff down today, and we need to take pics and write it up :)
xo
s
Rosemarie says
I’ve been reading your blog for a year now and I just squealed in delight when I saw you were buying a new house. You’d think I was the one buying a house. I’m excited to be a part of this journey of making this house your dream home. You are an inspiration! I have recently tackled two DIY and I had your blog up the entire time. Your step by step tips are invaluable!
Thanks! And the veranda looks amazing!
YoungHouseLove says
Thanks so much Rosemarie!
xo
s
Effie says
Wow! This looks crazy good! Can’t wait to see how you furnish it!
Kim says
Oh man, you are leaving us hanging with ceiling! The torture!!
I’m trying to get my husband to read your blog. We are (fingers crossed) moving into a new home next weekend and there are loads of projects to do. He is imagining hiring help, but I think we can do a lot more of it ourselves than he is imagining… all thanks to reading your blog :) Plus, he wants to dive into the BIG projects right away and I need a little bit of time to ponder over the spaces, get inspired from Pinterest, Houzz, etc, and mutually agree on a style before we start tearing things apart. My mindset is, let’s spend the first month painting walls/cabinets/woodwork instead of ripping out walls. It’s cheaper and less of a commitment in a home we are barely used to yet.
mamaw says
Wow! The room looks great! Y’all have such great vision.
MidloMel says
Of all the houses and all the projects, this is the one I’m most excited about. It already looks amazing!
Amy says
This is such an exciting project! I can not wait to see more! Might be your best yet! Eek!
Maddie says
YAY! I’m so glad you guys took this leap with this space – it makes such a huge, glorious (Sherry was right) different! Also, excellence use of #YOLO :)
Jessie @ Cape 27 says
Yea.. this space is going to be pimp. Just saying :) Can not wait to see how it turns out. I can TOTALLY envision everything. You guys should probably just go ahead and move outside now.
YoungHouseLove says
Ha!
xo
s
Sally says
Are mosquitos not as much of an issue in your area as they are in metro DC? We loved our deck, but rarely used it from June-October because of the mosquitos. On the other hand, we LOVE our screened-in porch!
YoungHouseLove says
With a fan running they won’t mess with the air current – at least that was our experience in old sunrooms when we left the doors wide open with the fan on. So far that’s working here too (I think they really dislike air that moves that fast).
xo
s
Katie G says
Best use of YOLO ever. Perfectly reflects how young people saying that makes me feel old. And I’m only 28!
Meghan says
WoW! I am loving how it is shaping up!
Susanne says
Why don’t you put that table saw up on a table or horses?
YoungHouseLove says
I have big plans to build a table/workshop in the garage. For now we don’t even have to sawhorses out to use, but I’d love to dig those out in the meantime.
-John
sarah m. dorsey says
Perfect use of this space!! This looks SO good!!