Dude, stencils are no joke. But I did it! I bit the bullet and ordered the stencil that John and I have been pining after for the past month (mentioned here a few weeks back). We loved the idea of adding some subtle tone on tone detailing above the chair rail in our office (we didn’t want anything with too much contrast since it’ll compete with the dark teal built-ins and the fun curtains in the nearby dining room). So we settled on a softer gray tone with a tiny pop of color (leftover grellow paint from the adjoining kitchen). At 54 honking dollars it was hardly a drop in the bucket, but let me tell you, this stencil is hardcore. First of all, it’s made of super durable plastic, so I don’t have to worry that it will rip or crease while I’m taping it, untaping it, and bending it manhandling it to get into the corner crevices (I’m pretty sure I would have trashed a thinner stencil after one wall, just because it’s kind of a more rigorous application process than I expected). And let’s just talk about how big it is. It’s over two feet tall and almost two feet wide, so it helps to make things go faster since you don’t have to reposition it every three seconds like you would with something smaller.
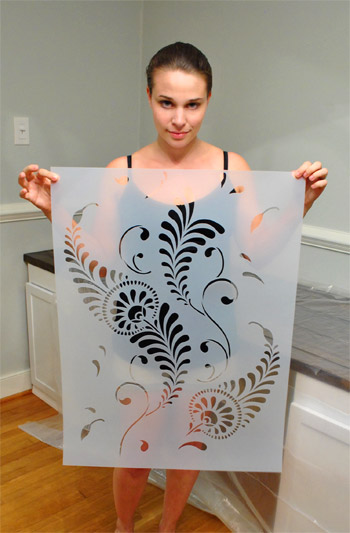
And yes, this is quite an evil face I’m making. No idea why. I remember saying something like “make sure I don’t look naked” when John snapped this, but had no idea I was giving off such an I’m-the-female-Hannibal-Lecter vibe.
Another way that I’m rationalizing my purchase is that we only spent $6.30 on cabinets for the built-ins and $27 to build a 13 foot counter, so maybe it’s time we splurged in the office. Haha. I also figure any type of wallpaper (even the cheap stuff at Lowe’s and Home Depot) would be way more than $54 for the entire room above the chair rail, so there ya go.
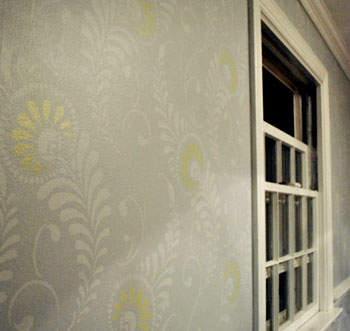
I’ve actually never done a giant repeating stencil like this on a wall (we did stencil the floor of our first house’s sunroom) so here’s where I’ll get to the keeping it real part: stenciling is haaard. I’m not gonna lie, my arms were cramping after about an hour and it took four and a half solid hours (from 8pm to twelve thirty in the morning) just to almost finish one wall (out of the four that I want to do). But in the spirit of sharing things real-time as we go, I couldn’t wait to share the in-progress madness. Here’s a close up:
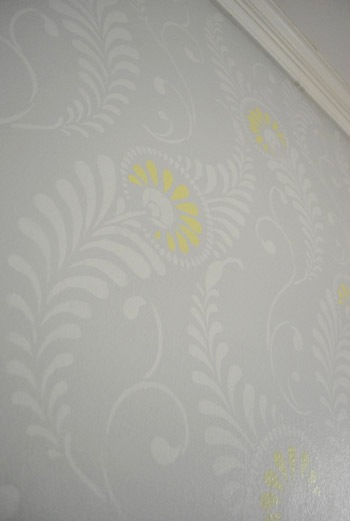
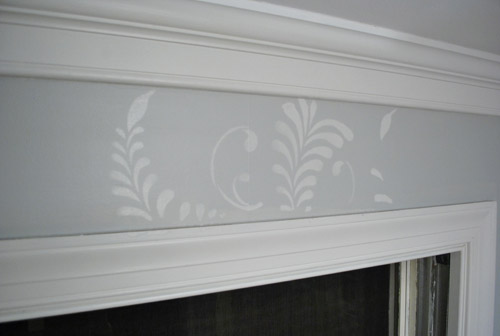
And here’s one side of the wall that I almost completed (I still have to do those last 6″ above the chair rail). Oh but ignore the weird dark and light vertical shadows on the wall (couldn’t wait for the lighting to be better – too impatient and excited to share, haha).
As for my method, here’s a little breakdown of what seemed to work for me:
1. I prepped the room by clearing it and tossing a drop cloth over the desk so we wouldn’t get paint splatters on it.
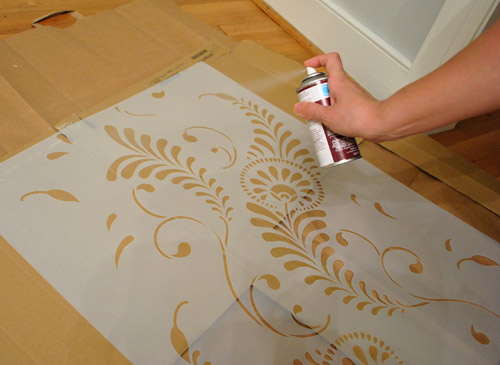
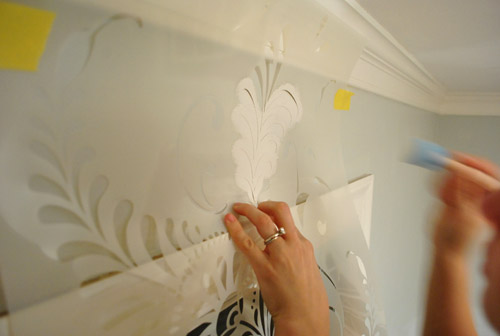
2. I used Martha Stewart Craft Stencil Adhesive Spray from Michael’s (purchased with a 40% coupon of course) to spray the back of the stencil before taping it up on the wall with painters tape. This helped the middle parts of the stencil stay close to the wall and not bend out for a nice crisp line. I probably repositioned the stencil two or three times before re-spraying it (when I noticed it holding less firmly to the wall I just took it down and sprayed it and taped it back up for the next application). Oh and you’ll want to use a large piece of cardboard or drop cloth to spray the back of your stencil so you don’t get stick stuff all over the floor).

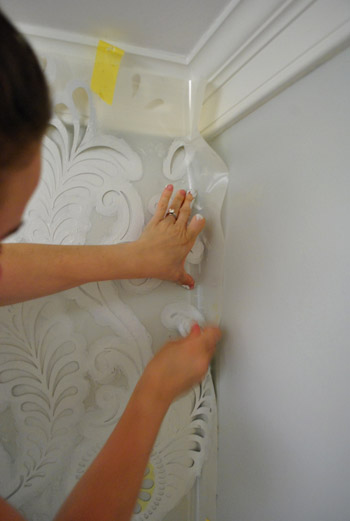
3. As for where to start, John held the stencil up in the top middle of the wall so we could center the pattern and work out from there in all directions.
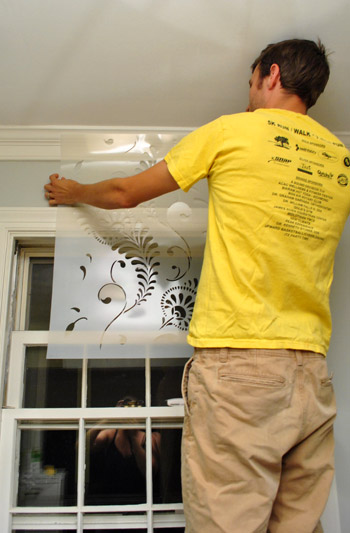
4. I also used delicate surface frog tape for holding the stencil up at the top, bottom, and sides (we already had it on hand and I didn’t want to tear off fresh paint as I moved it around the room so it seemed to do the trick).
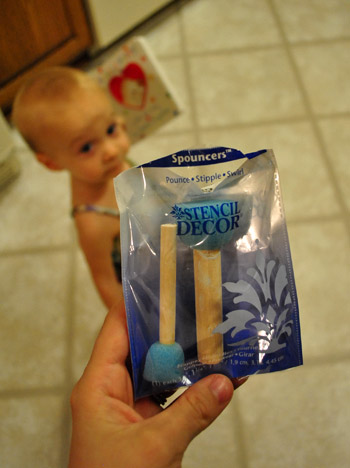
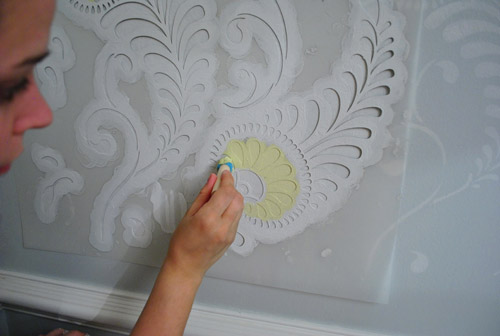
5. I used small foam craft brushes (also from Michael’s). They were basically dowels with flat foam tips.
6. As for how I loaded my little foam brushes, I just dipped them in the paint (more details on the paint colors later) and dabbed the brush around the lip of the plate to remove excess before tapping it against the wall to apply the stencil.
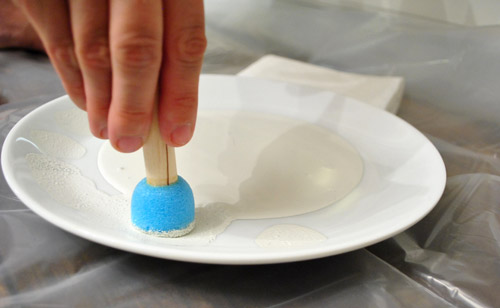
7. I always tapped the wall at a right angle with a not-to-gloppy foam brush for a nice clean edge (so the paint wouldn’t slip or drip behind the stencil and smear around).
8. If I feared that a little bit of paint somehow got behind the stencil, before repositioning it on the wall for the next application I would lay it on my drop cloth on the floor (face down) and wipe the back with a dry folded paper towel to remove the excess paint. Then I would respray my stencil adhesive and stick it back on the wall for the next application.
9. The way that the stencil is applied means that there are repeats. So you position it right over the last 3″ that you previously stenciled and work your way across the wall that way. I didn’t wait for the paint to dry before moving the stencil (that would have probably taken five million hours), so I just took my time applying the paint so nothing got behind the stencil and then matched up the stencil carefully for the repeat and continued on. Since there was no wet paint on the back of the stencil, it was fine to be pressed against the 3″ of wall that was already done, and it didn’t look any different than the non-overlapped part. I wonder if the application of paint was so thin that it was drying really quickly so it didn’t make a difference…
10. The corners were the hardest part. To get the stencil to lay flat against the wall in the corner so you can cram your brush into the small little stencil openings was sort of impossible to get perfect. But I did learn that this stencil is extreeeeemely forgiving (probably because it’s a more organic pattern than a regularly spaced geometric one, which would probably make any inconsistencies a lot more obvious). So when I didn’t quite get deep into all the corners, once it dried it was somehow not obvious at all (a stenciling miracle?). Of course I’m not exactly a corner expert because I’ve only attempted one of them, so as I go around the rest of the room maybe I’ll have more tips.
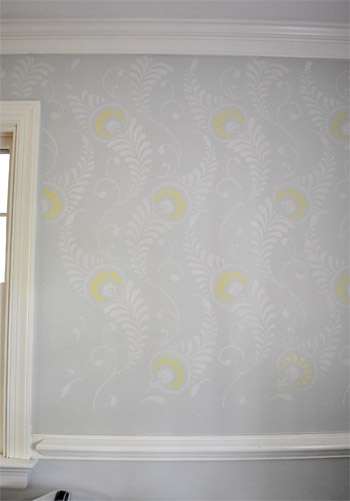
After about three hours I was here on the first wall:
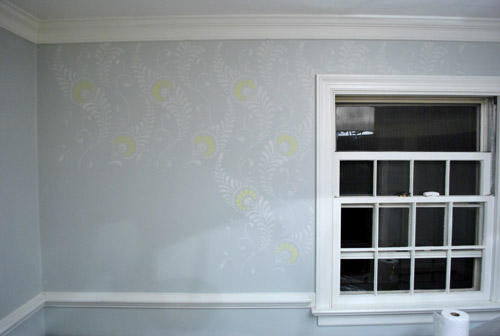
And after 4.5 hours I had one wall almost all done (sorry for the terrible picture, I was sort of losing it at this point).
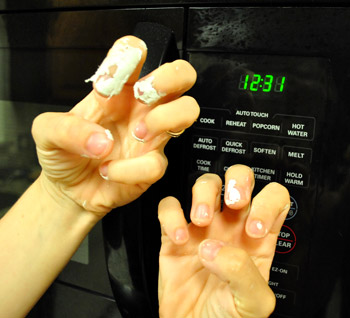
So although I wasn’t completely done with that wall, I decided that 12:31 am meant it was time to put the foam brush down and throw in the towel for the night. And do some finger stretching (I seriously had cramped up hand-claws).
Oh and as for the colors, here you go:
- Walls: Moonshine by Benjamin Moore (color matched to Olympic No-VOC paint in a satin finish)
- Main stencil color: I just asked the paint guys to give me a half-tint of the wall color (also color matched to Olympic no-VOC paint in a satin finish). This means they just add half as much tint to the white base as the original formula calls for, so you end up with a half-as-intense tone-on-tone effect.
- Grellow stencil flower accent color: Leftover wall paint from the kitchen, which is Sesame by Benjamin Moore (color matched to Olympic no-VOC paint in semi-gloss). You actually can’t tell the difference in finish unless the light hits it just right from the side and the grellow sort of looks iridescent, which is actually awesome. Yay for happy accidents.
I also made a video to hopefully help demonstrate the foam brush prepping and actual stenciling part of the process (including a quick demo on corner stenciling):
So that’s where I am with the stencil. One wall-above-the-chair-rail almost done, three more to go. I’m planning to tackle another 4+ hours tonight and hopefully can fit in one more session this week (my goal is to be done by Thursday or Friday, soreness permitting). It’s definitely one of those projects that you just need to force yourself to complete as fast as possible – because as soon as you start all you want is to get to the point where you can let out a huge sigh and say “so glad that’s over!”
But so far I have to admit that it’s totally worth the trouble. We’re loving the effect (it’s sort of like subtle modern wallpaper, not too in your face but not too tame and unnoticeable either). It’s sort of the perfect amount of “ooh, look at that” without being too competey and chaotic with the adjoined dining room. And John and I both have said the following sentence about ten times so far: “the pop of color totally makes the entire thing.” So might I recommend a splash of grellow (or any color you love actually) to take something that’s gray on gray to the next (still-kinda-subtle) level?
Ok, now I have to hear from you guys. Have you ever stenciled something, be it an accent wall, piece of furniture, or entire room? Do you have any secrets you’d like to share? How long did it take? Is four and a half hours for the top half of one 13 foot wall (with a big ol’ window in the middle) about right? I might just be moving at a turtle-like pace. Haha. Just too nervous about getting paint all down the back of my stencil if I go any faster. Anyway, hopefully I’ll be back with finished pictures (and maybe a bulging right bicept from dabbing away) by Thursday or Friday. Until then, picture me standing on a chair at 11pm wearing my inside out painting clothes and listening to shows on Hulu (I tried radio, but somehow hearing Community and Parks & Rec play in the background kept my spirits up a little more).
Psst- I’m over on BabyCenter chatting about my favorite kids clothing store and how I save money when it comes to shopping for Clara’s clothes & shoes. Did I mention that I snagged 47 cent shoes on my latest mission? Excited doesn’t even begin to describe it. Check it out here.

Emily says
This is GORGEOUS. Love love love the pop of grellow. My arms are hurting just looking at these pictures- can’t wait to see the finished project!!
Samm Spangler says
ok LOVE LOVE LOVE the stencil!!
I stenciled my boring blank 9 ft long bathroom wall thinking MAYBE it would take an hour or two… … … 2 days and a total of 8 hours later, i was near tears dabbing my final stencil in the bottom corner screaming “WHY DO YOU HATE ME?!” at the wall… TOTALLY worth it though because I love it and I get compliments on it all the time.
Keep at it!!! It’s going to look fantastic! I love your idea of incorporating two colors… just awesome!
YoungHouseLove says
Haha- “why do you hate me?” – totally a valid question after all that work!
xo,
s
Loren says
This looks great! I said the same thing when I saw the photos. ‘Man that pop of color really ‘makes it’
Jen S says
This is awesome! I love all your pictures and your wall turned out beautiful!
Christa says
Sooo beautiful! I have been reading your blog for a few months now and just love it! My husband has something against actual wallpaper so I have done several stencils in our home as well. I often add a bit of Behr Preium Plus with style – Pearlescent to my stencil paint – catches the light beautifully for tone-on-tone stenciling. I also find that a polystyrene paint roller with just a little paint on it works well and makes the job go quite a bit faster.
Can’t wait to see the finished post!
Laura Johnson says
Yep totally worth the extra effort! Looks wonderful!
Bridget says
OMG this looks AMAZING!!!!
Ann Marie says
Oooh! I love how subtle that looks. I can’t wait to see the finished room. Yellow is my most favorite color!
Alison says
Looks great guys!! Question though, do you have any plans for the area just above the chair rail? It looks like there’s a gap between the bottom of the stencil and the chair rail, but the stencil goes to the ceiling at the top. Are you going to leave it as is or fill in the bottom later?
YoungHouseLove says
Oh yes, that’s just the not done part. Still have to overlap the stencil and do that part.
xo,
s
Rachel Tatem says
Looks great! Looks like a lot of work but it looks great!
Kathy says
Nice demo. I like the stencil effect.
Have you tried wearing some gloves while painting? That way you can keep your hands protected from icky sticky paint. Just a thought. =)
YoungHouseLove says
Oh yeah, that would definitely work! I keep thin latex gloves around, just didn’t think to pop them on. But at least no-VOC latex paint is easy enough to rinse off.
xo,
s
Melissa @ thefauxmartha says
Loving the splash of yellow. I need some of this in my life!
Tina says
Your stencil work looks amazing. Totally put thsi one in my somday when I have a house folder.
Allyn says
So many things!
First, LOVE the stencil. We’re going to one day do a stencil on a wall in our office. The hubs has traced out two sections… three months ago.
Yellow and grey were our wedding colors and the main color scheme of our house, with a good bit of blue thrown in too.
Your painting claw hands remind me of the Friends episode when Phoebe gives Monica and Chandler a Mrs. Pacman and Chandler plays so much that he gets claws.
Ah, Friends…
YoungHouseLove says
Haha, I was totally channeling Joey’s claws in that pic. Love Friends.
xo,
s
Alis in Wnderlnd says
I think it looks great! I have my eye on a different pattern that I want to do on the CEILING of my new dining room, but I am still waiting for a few other pieces of furniture to make sure it would work together. I also want to do a tone on tone with a slight shimmer. SUBTLE is my goal.
Any reason you chose not to roll on the paint and then dab the yellow where you needed it?
I’m also curious if the the front of the stencil got gummy from the stencil adhesive after a few times of spraying since you have to lay it back down on the cardboard to spray. Maybe it’s just as easy to position that again and again?
YoungHouseLove says
I was just trying to follow the tips I saw on the stencil site (they recommended a stiff brush like a foam or densely packed bristle one) – so I feared that rolling wouldn’t be tapping the wall at a right angle, so paint could drip behind it. Probably just being a worry wart. As for laying the front of the stencil in the spray adhesive, it was sticky from the paint all over it, so I didn’t really notice much of a difference. Hope it helps!
xo,
s
Lauren @ chezerbey says
Oh wow! I’m not usually a stencil girl, but this looks great…I love the colors and the William Morris vibe!
Barbara says
While I absolutely love what you’ve done, I could never devote that kind of time to a wall. I just do not have the attention span any more. Back in the 90’s when sponge painting was all the rage, I could whip out those walls in an afternoon…but stenciling was then, and still is, WAY too much work for me.
You have my utmost admiration!
Gretchen @ Honey, I Shrunk the Gretchen! says
That looks un-freaking-believable.
Kate says
I love it! It looks amazing! I think this would look really pretty in an entryway leading upstairs too. My grandmother was a stenciling queen but I haven’t done it in years. I recently inherited some black metal trays that she stenciled way back in the day and they still look chic.
Stefani@Try to Enjoy says
Looks AWESOME. Can’t wait to see the finished product.
I also felt a great deal of anxiety rising inside of my chest while watching your video… sort of like a panic attack coming over me… because that looks SO TEDIOUS and SO EXHAUSTING.
Good for you! I don’t think I could handle doing that myself. Thinking about doing the corners just really makes me stressed.
jodi says
it looks amazing!!!
Katherine says
Wow, Sherry, you’ve outdone yourself! This is looking fabulous! You’ve totally inspired me to do something similar – tone on tone in my bedroom redecoration. I have a big blank wall that I’m afraid can’t take artwork because of foot traffic and proximity to my bed. I’m thinking big chevron stripes!
Gaidig says
I lurve it! It’s definitely making me think of doing something similar. I’m really curious to see what it looks like from the dining room, contrasted with the book cases.
YoungHouseLove says
We definitely owe you guys that shot! Hopefully in a few days I’ll have it done and load everything back into the room and clear it all off the dining room table and snap some pics looking in!
xo,
s
Heidi says
I love love it! I know you just explained how hard it is but I can’t wait to figure out where to do it in our house (maybe a small, cornerless room… hmm) Brilliant choices on the colors. Thanks for the inspiration.
Melissa @ HOUSEography says
I stenciled my half bathroom ceiling and I am still scarred by the experience although I love the results! The room was tiny and I did not do enough research in advance. I still need to wash my stencil and I would definitely do the spray adhesive next time I use it. I had a neck cramp for DAYS!
http://houseography.blogspot.com/2011/08/powder-room-bling-part-2.html
YoungHouseLove says
Oh yeah I love that project of yours though!
xo,
s
Lindsey @ arkadian belle woods says
Amazing – seriously amazing! I love love love love love the color too! Besides the fact that the stenciling job is incredible…..the Clara pic = melts my heart. She’s so curiously cute! I’ve been wanting to stencil a wall for a while now but I think the mental road block of intensity and time has me second guessing it sooo for now I’ll stick with checking out the luscious eye candy on your wall!
<3
tracy says
I love this!!!! It is turning out so beautiful. And gray and grellow, I’m in love. I am so inspired to stencil something now. I saw some ballard-inspired quatrefoil curtains on pinterest, and now I’m dying to do that because I’ve been coveting those curtains for a long time.
Laura says
1) AMAZING. I didn’t think I’d like it, but it so playful and modern. Love it!
2) You are a brave woman, painting with your rings on! :)
YoungHouseLove says
Those never come off! I’m probably a huge fool for that, but John and I are perma-ring wearers. We shower/swim/sleep in them. Just can’t take ’em off! Haha. I got too swollen at the end of my pregnancy to wear them and seriously cried! And I don’t think John has taken his off once in four years. Isn’t that crazy?
xo,
s
Laura says
Wow! I never take mine off either (except also at the end of pregnancy). I always find my husband wearing his ring on his pinky, which I think is incredibly odd, haha.
YoungHouseLove says
Haha- that’s so cute!
xo,
s
Kim says
WOW!!!!!!!!!!!! SO SO pretty. Amazing!!!!
(Also, I LOVE Old Navy for my little man)
Jany Claire says
Wow! I love, love, love that stencil and love the accent yellow you chose. Great job!
Gavin S. says
Ahhhhhhhhhh! It looks amazing! Or should I say amazeballs? You’re the king of the world!!!
Liz says
Oh my gosh, that looks amazing!!! I love the pop of yellow. I can’t wait to see it all finished. Now I want to stencil something.
debbie c says
This is gorgeous! I love the grellow accents, yep, they totally take the already beautiful look to another level! So worth the effort! Hope your fingers are doing better.
jodanders says
This looks AWESOME!!!! I cant wait to try it on my entry half wall:)
Lindsey says
Looks great!!
candace @ thecandace.com says
Sherry, the stencil LOOKS AWESOME!
Gina says
This looks awesome!!! Fantastic work!! You are genius!
Just love the whole look. This room will just be so beautiful….. thanks for all the eye candy you guys present.
Katherine says
Wait, why do you wear your paint clothes inside out again? I know you have some reason for it….
AWESOME. JOB. love it.
YoungHouseLove says
Haha, they’re actually my pjs, so keeping them inside out keeps the paint off the front- so I can still wear them to sleep in without looking as sloppy. Haha. The paint is hidden.
xo,
s
Relevant Notes says
That is so beautiful! Totally admire your patience, Sherry!
Polly says
That looks so amazing! I am totally inspired to use stenciling somewhere in my house now!
Steph @ Birdhouse says
That looks so amazing! I love that you used two colors for a subtle but striking effect. Can’t wait to see the entire wall!
Katherine Victoria says
I can’t get over how great the stenciling looks! Definitely one of my favorite DIY projects you’ve done so far. Can’t wait to see the whole room finished (and Clara’s reaction to the pretty walls!)
Gracie says
Ooh that is so pretty! I love the pop of yellow too!
Christina W. says
Love, love, love it! It looks fabulous! I wish I was brave enough to tackle stenciling. I love how it looks, but I’m afraid my OCD would drive me insane trying to make it look perfect!
Liz says
Great stencil work! On a clothing note…you should see if they have a “just between friends” sale in your area. You can look at jbfsale.com. I am in no way affiliated with them, except that I get some great buys for my daughter at our local sale. You can also consign your stuff with them too to offset the cost. Last year I made about $250 consigning! They have two sales a year, fall and spring.
YoungHouseLove says
Wow. Thanks for the tip!
xo,
s
Amanda M says
Absolutely Gorgeous ! I am in love, love ,love with your wall !!
Teri says
Did you do it purposely to have no grellow over the windows? It just seems like there is a big break in your pop color once you hit the window.
YoungHouseLove says
That’s just not the part of the stencil that we add grellow to. We kept the flower part consistent for the grellow pop, so it’s spaced out equally throughout the wall. When I share more far away pics it’ll hopefully make more sense.
xo,
s
Go Haus Go says
Consider my mind officially blown. Wow, this is great. I know it’s a huge and tiring project but we’re rootin’ for ya. So excited to see the end result.
Elaine says
I love it!!!
I’ve done a few stencils in my time and corners are definitely the worst! I’ve done a few layered stencils, with several sheets and you have to let layer 1 dry before moving on to layer 2.
I haven’t done any in a while but I might be getting the itch….
Julie says
Holy CR@P!!! Our dining room is grey with chair rail and needs some “oomph”. I’m going to try to sweet talk the hubs into letting me do it! We also want to paint our half bath DARK. It would be fun to do a really subtle stencil. (or even just do a varnish gloss over the stencil areas instead of another color)