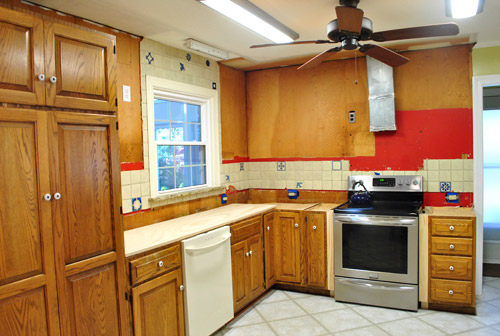
In case all of that turkey and stuffing made you forget, allow me to remind you that our kitchen was looking something this after the upper cabinets came down:
Since the clock was ticking on our new counters (in around 2 weeks we should no longer be sink-less and counter-less), we had to get the walls prepped for the new backsplash. Not that the backsplash would be going up before the counters (we’ll get a snugger fit if we install it afterwards, plus we don’t want it getting damaged during the whole counter install), but because wall prep = demo (aka: a mess) we didn’t want to worry about scratching our new counters if they were in during that step. So it was time to say adieu to the old “random blue things” backsplash:
We have a weird soft spot for this old backsplash. It’s kinda quirky, and feels very handmade. But it also feels all wrong for our idea of a dream kitchen – and the penny tile that we found had us at hello. We keep saying that the existing backsplash seems more suited to an adobe style home in the Southwest, but since we’re softies, we have an idea to keep a few of the accent tiles around for old time’s sake (more on that in a bit).
When it came to the whole removal process, it went ok. Some of it even came down in 3 or 4 (or 6!) tile chunks at a time. And all it took was a quick pry of the screwdriver.
But then again, most of it came out one-by-one… or in chipped pieces and broken chunks. Still, I can’t complain. It was maybe a 45 minute job from beginning to end? I did about 80% of it (Sherry loves demo too, but she was on Clara duty after she woke up from a wish-it-was-longer nap).
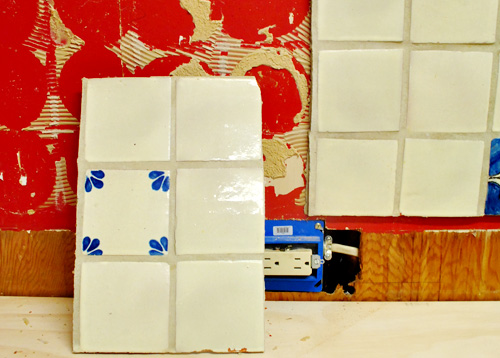
We wanted to save a bunch of the blue tiles for nostalgia’s sake, and actually came up with the idea of adding little felt feet to make them into coasters (could be fun to tell people about their past whenever we break them out), but these three were the only ones that survived in one piece:
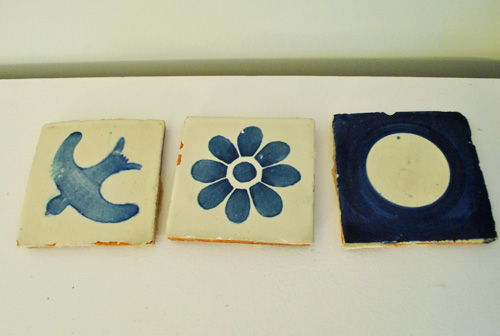
Kinda sad, but three coasters are better than none – so we’re thankful for these lucky three survivors. Still a little bummed that we couldn’t donate more whole tiles to the ReStore or give a few of the fun blue ones to friends of ours who requested ’em though. They were just so brittle (they were made from red clay) so they shattered and collapsed really easily. Our three survivors were kind of miraculous.
Oh, but to make sure that we never forget the other random blue tiles that graced our now-gone backsplash, we threw together this little tribute video. You may want to have a box of tissues handy…
Sorry. That was just us being weird. Sort of like this bow-chicka-bow-wow console video from a while back. Can’t help ourselves.
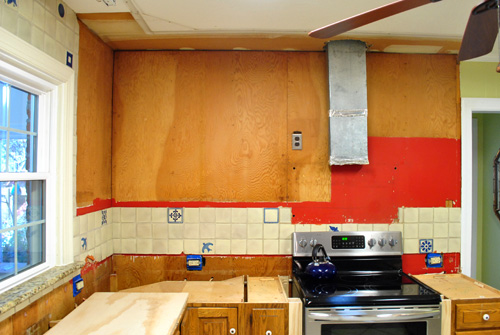
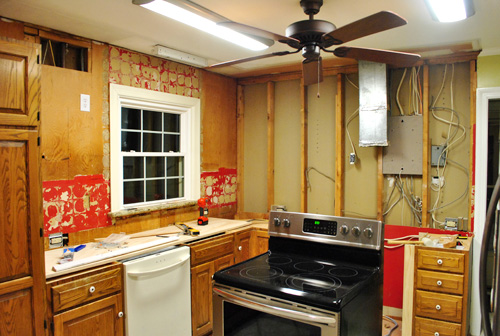
But back to the serious stuff: the rest of the kitchen demo. As you saw in the video, here’s what the room looked like sans tile. Pretty ugly and not exactly ready for the new backsplash.
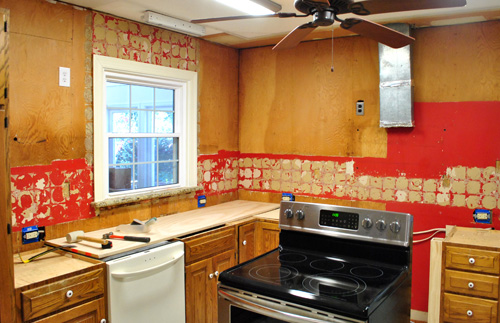
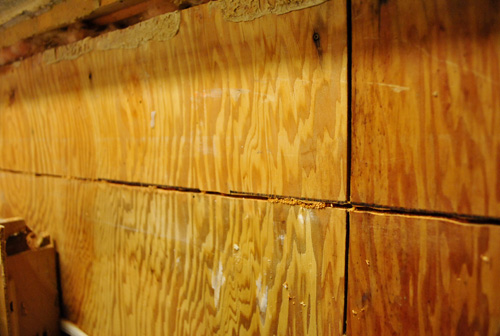
Between the plentiful bumpy leftover glue and the fact that plywood isn’t an ideal surface for holding tile in the first place (especially the weight of penny tile all the way to the ceiling along the stove wall) we resigned ourselves to the fact that we should probably demo it out and replace it with something more suitable. Sigh.
So we called The Tile Shop (they’ve pretty much been our go-to resource for tiling ever since we asked them a million questions while we gutted and retiled our bathroom a few years back) and they confirmed that we really ought to install cement board. We had a mild panic attack when we realized that the counter guys templated against the 1/4″ thick plywood walls (so if our cement board was any thicker or sat too low on the wall, our counters might not fit correctly). Thank goodness they actually sell 1/4″ cement board, so we can seamlessly sub out plywood for cement board without affecting the counters.
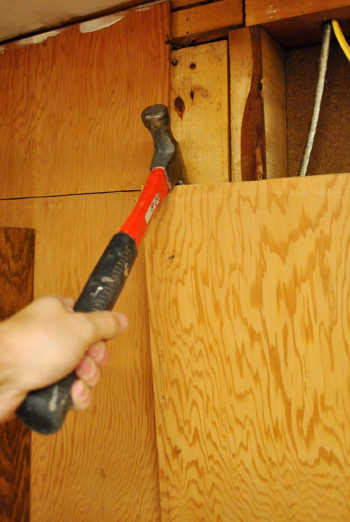
But I still had the challenge of cutting the plywood along a straight seam right above the lower cabinets, so it could be pried off the wall and replaced with cement board. I don’t really own a great tool for this, but I figured my Dremel Trio was my best shot since I could control the depth at which it cut (since I wanted to cut through the full depth of the 1/4″ plywood, but not the studs behind it) – which I’m demonstrating in the photo below:
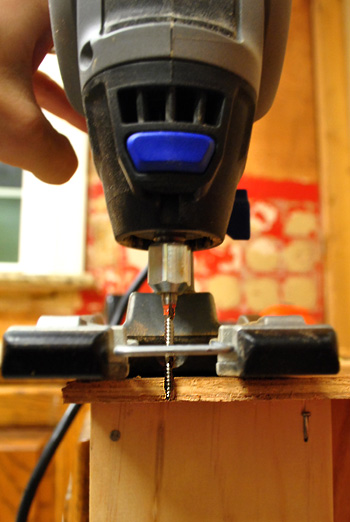
Though had I seen the commercial that I saw the very next night for this thing I probably would’ve bought it as an early Christmas present to myself. Oh well, you know we like to use what we have.
My main struggle with the Dremel Trio is that it’s not very steady when cutting. Since it cuts using a spinning motion, it constantly wants to spin off in different directions. So I fashioned a makeshift guide by loosely nailing a piece of scrap wood into the wall. This way I could press the Dremel against it as I pushed it along the wall, keeping my cut perfectly straight:
Well, straight enough. Oh and I turned off the power to the kitchen (and used an extension cord from another room to power my Dremel) even though I was only cutting the depth of the plywood – just in case there was a wire in my path. Luckily all wires were a lot deeper into the wall, so I didn’t come close to anything with my shallow cuts.
It took me a bit longer than I’d like to admit to make all of my cuts (maybe 90 minutes?) because of having to move (and double-check) my guide placement. But once I had sliced the plywood, it was easy to pry it off of the wall from there.
See? Look how fast I’m moving now. Oh wait, these photos aren’t time stamped…
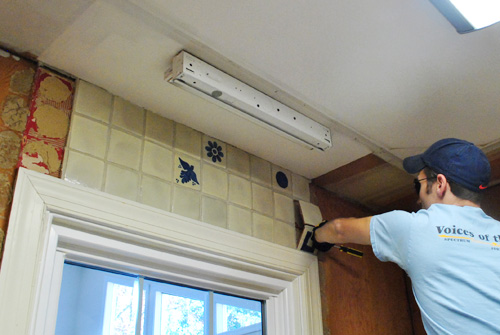
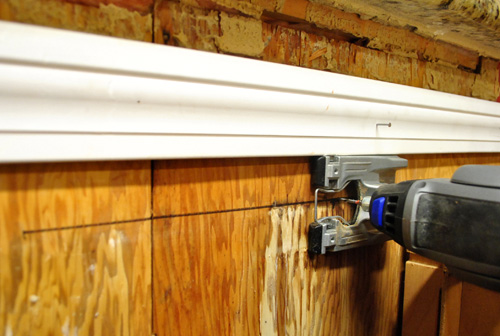
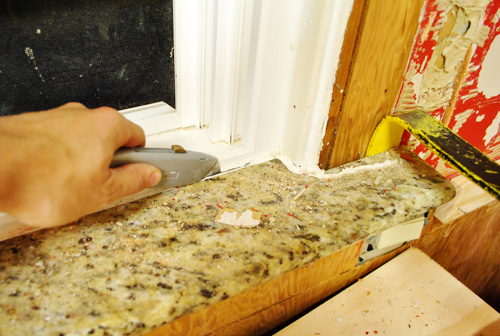
I did hit one other speed bump when I realized that I needed to remove the trim from around the window (it was nailed in on top of the plywood).
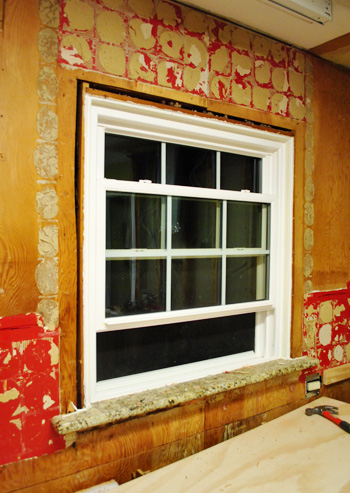
This also meant removing the last remaining piece of granite in our kitchen: the window sill. But like its granite-y brethren before it, we just had to slice its caulk seal and pry it away. Easy peasy. We’ll replace it with a regular old white wood sill like we had right above the sink in our first kitchen (white Corian would have been nice, but we’re too cheap for that, and semi-gloss paint on a wood sill holds up nicely in our experience).
Voila. So long granite. Sayonara plywood.
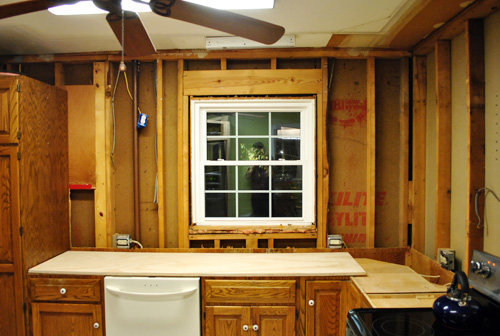
So there we have it: all of the demo’s officially done. And our kitchen is officially looking more disastrous than ever:
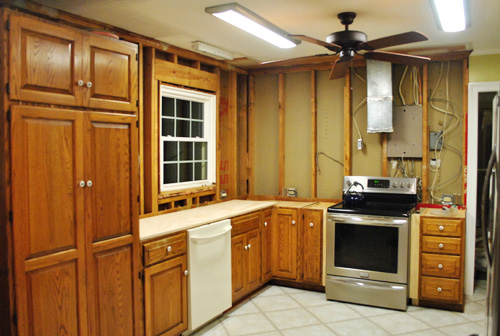
Not that where we started before demo was much to look at anyway:
Next up is the fun part. Okay, not really. Next up is hanging the new cement board walls along with some leftover paneling from the wall-opening project on either side of the window (since that wall won’t be tiled all the way to the ceiling and we want it to match the rest of the painted paneling in the room). And I’m going to be real here: this is not a process that I think we’ll particularly enjoy (at least we didn’t when my dad helped us do it in our old bathroom). But it must be done. And it also must be blogged about, so stay tuned for all the details as we go. In the meantime, I’d love to hear what you guys did around the house this weekend. Any tile stuff or demo going on? Does anyone have a fun demo story for us?

J says
No tiling here (I’m pretty sure our apartment complex wouldn’t be too happy with that) but we did spend a good part of yesterday reupholstering chairs! Three down and three to go- it’s amazing what $6 chairs and a bit of fabric can do!
Congrats on the progress- I can’t wait to see the finished product!
Suzanne @TheWineabe says
Seriously so funny! How do you come up with the ideas for those videos?!?!?! I will have images of the birds on the collision course in my head all day. Thanks for the morning laugh. ;)
YoungHouseLove says
Haha, John is usually the mastermind. I figure since it cracks me up it’ll hopefully make you guys laugh too.
xo,
s
Jen @ The Decor Scene says
I think the kitchen looks better with the walls down…there was a lot going on. It’s going to really start to look different once the walls go up. You guys are getting close…the list is getting shorter! ;)
We actually did our outside Christmas lights this weekend. It was 62 in NY, so it was the perfect weekend for the outside lights. Now we just have to finish up on the inside of the house. :)
We had loads of fun when we demo’d our Family Room. Dry wall everywhere, but it was worth it in the end for nicer walls and insulation behind them. ;)
http://thedecorscene.blogspot.com/2011/03/our-family-room-tour-part-iii-doorways.html
http://thedecorscene.blogspot.com/2011/03/our-family-room-tour-part-4-demo.html
YoungHouseLove says
Looks like so much fun! And lights sound fun too! Lots went up in our neighborhood too!
xo,
s
Laura says
I can’t wait to see those cabinets painted.
Marika says
Spent the weekend painting the fireplace – following your tutorial. Love having a white fireplace! Except now it prompts more projects to be done…
YoungHouseLove says
Aw, congrats!
xo,
s
Patti says
So, will you just leave the plywood wall (assuming it goes to the floor) behind the lower cabinets…and only add the cement board from countertop height to the ceiling? I’ve been hung up on this issue in my home (on my range wall also). We are already down to the studs and I’ve been debating whether or not to re-drywall behind the cabinets too or just do drywall from the counter height to the ceiling. Indecision is paralyzing!
YoungHouseLove says
Yup, since we’re keeping the cabinets it’s easiest to leave the plywood behind them and just replace the exposed stuff that will be tiled or paneled. Hope it helps!
xo,
s
Amy Knisely says
We finally finished phase two of our major wall transformation. We had a 14×8 wall that had floor to ceiling mirrors glued to them. Shortly after we bought the house we took the mirrors down and unfortunately the paint underneath the mirrors was peeling pretty bad.
For the last two months (when we’ve had time) we’ve chipped away at the paint so we could eventually replaster and repaint the wall. After a long, hard fought, battle I held my paint scraper high and declared victory on Saturday.
Tonight… working on replastering. This should be… fun.
YoungHouseLove says
You can do it!
xo,
s
maribel says
My favorite seen in the console video was when John slowly pushed away the items to reveal the hidden compartment…too funny.
YoungHouseLove says
Haha, mine too.
xo,
s
Amanda Nowak says
Haha, I love how everyone is so stuck on the fact that your walls aren’t insulated. :) I’m loving the progress, and glad that people can save momentos without being pack rats. :) You guys are the best!
Kayla says
Yesterday I finally took down a wall of random shelves and photos, and put up a newspaper template for a coming gallery wall of photos! It’s been on my to-do list forever, but I was excited to have the black Friday ads to use!!! And when husband came home, he said he liked the idea!!! I was afraid the newspaper would be too busy for him to see my vision! Success!!!
Kathy says
What about using the leftover broken tiles for a mosaic project later on? Or, someone who does mosaic pieces would probably take it off your hands on freecycle.com. :)
YoungHouseLove says
That’s a great idea!
xo,
s
Heidi says
Totally random comment here… (I warned you! :)) I just watched your “goodwill hunting” video with KB on youtube & was wondering why the prices were so weird? Like $1.51 for that wooden pedestal bowl, or $14.92 for a pair of something… Is is just me, or is that weird?
YoungHouseLove says
Haha, yes! Weird! The one near us is usually 99 cents at the end.
xo,
s
Debbie says
I saved a tile from our old harvest gold bathroom. I wanted to show folks how ugly it had been. It’s too ugly to frame.
YoungHouseLove says
Haha, love it.
xo,
s
Ericka says
Looks like you guys are making awesome progress! My hubby and I started painting our boys’ room over the long holiday weekend. It was raining and we noticed a large water spot below the window sill in the corner. My hubby decided the best thing to do was to remove the window to fully assess the damage. We took out the screws and the window still felt like it was in there pretty good. My hubby headed outside and shut the front door behind him and THE WINDOW FELL OUT. The glass didn’t break but the frame was bent. We now have a board and plastic where our boys’ window used to be. We will be installing our own windows (had to order them from a local company). We’re planning on replacing one of OUR bedroom windows as well which is on the same side of the house as our sons’ window since we think they were installed incorrectly and it’s only a matter of time before that one leaks too (those two windows are the most exposed to the elements because of no overhang). What started out as a simple weekend project turned into a nightmare:( Good news is that the water damage was minimal. This will be our first time installing windows, but my husband is handy and we feel pretty confident we can do it correctly (with a little help from books and internet tutorials:)
YoungHouseLove says
Aw man, so sorry to hear about the whole snafu, but I know you guys can do it! And you’ll love your new properly installed windows.
xo,
s
Stacey says
I was watching the “console” video and my four year old son came up behind me. His words…”Mom I want a living room like that!!!!” Me too, me too:)
YoungHouseLove says
Haha, too funny!
xo,
s
Meghan Martin says
We installed ‘soft close’ cabinet hardware on our existing cabinetry over the weekend. Just like the soft-close drawers, only for cabinets! $3/door and seriously life changing. With 3 little ones, the quieter you can keep your house during naptime the better! You should definitely consider it for your kitchen!
YoungHouseLove says
Thanks so much for the suggestion! Sounds amazing!
xo,
s
emma says
Unrelated but are you guys doing any cyber monday purchasing? Or did you do any black friday shopping?!
YoungHouseLove says
We spent a huge chunk of the long weekend with family, so we didn’t really make many purchases at all!
xo,
s
Priscilla says
http://www.tierrayfuego.com/ceramic-handcrafted-mexican-tile.html
The old tiles are called Talavera tiles, so if someone wants to get some, that is a website to get them. I like them, but also can’t really use them in our kitchen. Coasters is a great idea. There are lots of pretty tiles.
YoungHouseLove says
Love it, thanks for the info!
xo,
s
Jasmine says
That video was hilarious! Gotta keep up that sense of humour throughout a kitchen reno, or you’ll end up in a ball in the corner rocking and humming to yourself…! ;o)
KK says
That video is hysterical. Loved it!
Dana says
love to see your kitchen progress!! quick question… can you tell me the approx height of the top shelf in your dining room “built in” (the one over the opening to your office)?? We are building a “built in” inspired by yours.. I’ll be sure to send pics when we are done!
YoungHouseLove says
It’s about seven feet up (we have eight foot ceilings). Hope it helps! Would love to see pics!
xo,
s
Raina@ Mamacita Spins The Globe says
I thoroughly enjoyed those videos. Too funny!
We didn’t do any demo work here over the weekend, but we did get the trim work done in our ridiculously slow moving living room renovation…. it just might be ready for Christmas after all.
Diana @ Boy + Girl says
I think it looks better now without all of the red showing! You’re on your way. So excited to see the final product.
– Diana
Shannon Burke says
This weekend started with a plan to paint my bathroom white to start, then go back with a pattern of stripes (that I could mark with tape). However, then my Dad said he’d come over and help me fix a crack in my front door with wood glue and some clamps. Then he helped me understand how to use a drywall anchor to hang a newly framed canvas. While he was there I ended up re-caulking a few places in the baseboards and then finally painted my bathroom in semi-gloss white. Only to figure out that the green paint I have leftover from the kitchen is actually eggshell not semi-gloss. So now I have a shiny new white bathroom and am thinking that maybe I really want to get a stencil instead to do a wallpaper effect on one wall. Hmmm…decisions decisions.
Meghan says
Actually, we did start a small demo project this weekend. I’m such a fan of YHL that I jokingly refer to us as “Dunn House Love” (our last name) although we are no where near the DIY-ers that you are. We took down some chair rail in our bathroom that was at an awkward height on some random walls, but not all walls & we are replacing the old medicine cabinet mirror, light fixture and faucet. Definitely a work in progress, but maybe I’ll submit the final pics for Reader Redesign (depending on what it looks like.) This is our first real project.
YoungHouseLove says
Haha, I love Dunn House Love, and would love to see the pics! Good luck!
xo,
s
Colleen says
I’m glad I didn’t have to do any demo this weekend. Instead, I actually got to finish a project that has progressed very slowly over the past few months:
http://newlittleoldhouse.tumblr.com/post/13462100338/the-porch-is-done
I’m so glad to have it done–nothing feels better than that! I still need to figure out furnishing, but that’s the fun part. I hope you get to the fun part of your kitchen project soon. It sounds like the next task (cement board) might be the worst of it!
YoungHouseLove says
Nice! You’ve come a long way!
xo,
s
Elise says
Not exactly demoing, but I thought you might like to know that , thanks to you, my boyfriend and I ORBed the legs on his Charcoal Karl sectional and chair this weekend. They look fantastic and it makes a surprising difference. Thanks for the (super direct)inspiration YHL!
YoungHouseLove says
Aw so glad! Congrats! Tell your Karl that our Karl says hi.
xo,
s
Veronica says
Random question: Could you maybe do a post on what to get a husband for christmas? We recently bought our first house and my husband has been loving some of the smaller projects we have done (replacing a garbage disposal, trouble shooting a dishwasher, hanging a mailbox, etc) But we have some bigger projects coming in the new year including a few design plans on the list from Ana White, and complete bathroom demo and renovation. I was thinking of getting him the Kreg Jig, but was wondering if you had any other “GO TO TOOLS” that would be helpful for a variety of projects, or just some that would be nice to keep handy that can do a variety of things. I know this is wordy, but I NEED HELP :)
YoungHouseLove says
It’s already on our to-do list! A few others have asked for the same thing, so we’re hoping to tackle it in the next few weeks!
xo,
s
Veronica says
Awesome. Thanks!!!!!!
Kim says
The video is hilarious. For some reason I can better visualize what your kitchen is going to look like with the tile and plywood down and it all rearranged. It’s going to look awesome!
jenn aka the picky girl says
I spent the weekend rehanging my cabinets after painting all 36 (!) in the evenings last week. It was such a massive job, and I didn’t even tackle the backsplash or floors. i did demo a ridiculous low cabinet I had in there with no purpose. It was like a window seat but much too small and low. I plan on building a box and making it into a better window seat. My house is 106 years old, so replacing the huge windows would mean fixing outside siding and all that, so I’m working with the existing oddities of my space. Am planning a big reveal on my blog Friday and am SO excited!
YoungHouseLove says
Wow, sounds like you’ve been busy!!
xo,
s
Jen says
Hahaha – the video was perfect! It made my day. :)
Keep rockin’ that kitchen re-do.
~Jen
YoungHouseLove says
Aw thanks Jen!
xo,
s
Kathryn says
You “tile video” twice made me hysterically laugh to the point where I had tears in my eyes! How do you guys think of all these things?
YoungHouseLove says
Haha, it’s usually all John. This one started with him standing in the kitchen like Vana White and pointing to each tile and I died laughing and then convinced him it would make a good video.
xo,
s
Mel says
I just wanted to say I’m SO EXCITED to see this completed! My well loved kitchen is also old and, well, sort of crusty, and I can’t wait to get rid of my fruit wallpaper, faux brick laminate flooring (that is faded from 20 years of sun) and chipped laminate countertops! This blog gets me really excited to be able to do most of the work ourselves, which is huge!
Jessica says
It’s coming along nicely! Well, as nicely as a demolished kitchen can! :) Thanks to your console video, I have just spent the past 30-45 minutes watching your youtube videos! lol Clara and Burger are so cute!!
God bless!
MelissaG says
Love the vid….too funny.
Heidi P. says
Bare bones!! So exciting!! And I think it’s looking better!
LARY says
You guys are too funny and work so fast! I’m excited to see more! :) Hope you had a great holiday weekend!
Emily says
Love the backsplash! ‘Course, my kitchen is blue and white. ;)
Jess says
This is SO random, but I have a question! Where do you keep your infant things you’re not using? car seat, walking toys, etc.! i don’t want them to get dusty in the garage, and can’t think of a good place for them!
YoungHouseLove says
We got a lot of hand-me-down items from other relatives who are having more kiddos (or have had them since we used them!) so many of them got returned, which was awesome! We do have our infant car seat and a few other items (boppee, small travel swing, playmat, etc) in large bins or bags in the attic. Hope it helps!
xo,
s
Barb says
have you guys thought about removing the old breaker box in the laundry room while the wall is open?
YoungHouseLove says
Hmm, never thought about that. Off to chat with John about pros and cons!
xo,
s
Lizzy says
no demo for us this weekend but we put up our xmas tree and i made some a few ornaments (shown here: http://anexcellentadventure.blogspot.com/2011/11/no-christmas-tree.html)
i’m unreasonably excited to see your tiled wall! we are planning on tearing down our cabinets after the holidays and replacing with a fully tiled wall with open shelves. your reno posts are helping me to mentally prepare and organize! thanks!
YoungHouseLove says
Such a pretty tree and a cutie boy!
xo,
s
mp says
Coming right along!
My weekend project was stuffing steel wool & aluminum foil in the margins around my bedroom floor, as I noticed last week that the field mice had returned. (They vanished in January when my bedroom reno commenced and an amazing number of holes were plugged with Great Stuff, but they found their way back in.) I’ve layered steel wool over aluminum foil and then squirted in “pest-proof” Great Stuff, plus I hope the friend who helped me start the reno will return the week after Christmas to finish it. (I’m not holding my breath on that one — he hasn’t been back since December 30, although he tells me every couple of weeks that he’ll be here soon.)
YoungHouseLove says
Aw man, crossing my fingers that you have a nice good seal going on!
xo,
s
Jadie says
Woohoo! Things continue to get more and more exciting! Can’t wait to see the next step!
Joy says
Your video made me laugh out loud. I dont know, I guess I get your humor :)
Melissa M says
Wanted to say I also really enjoyed the tribute video!
Jenna @ Homeslice says
I’m looking around your site trying to find an email, but figured it might just be best to leave you a comment! I just came across a super cute little store that sells… wait for it… white ceramic animals!!! They’re actually Bone China, to be technical, and while some are a little $$ there are some really affordable ones too. I couldn’t help but tell Sherry about it. It’s called Have You Met Miss Jones? if you want to see my post and some of my favorite little critters, you can here
http://heyhomeslice.blogspot.com/2011/11/keeping-up-with-joneses.html
I hope you check out their site, I’m sure you’ll love it!
PS- great demo-ing by the way- you guys rock!
YoungHouseLove says
Oh my gosh- I’m enamored! Thanks so much for sharing!
xo,
s
Nikki says
I’ve been following your kitchen remodel. I have sort of lost track of how long you’ve been at it. It would be fun if you had some sort of timeclock on your site. Like a kitchen timer:)
YoungHouseLove says
Ooh, that would be fun! We could keep track of how many days and how many posts and maybe even the budget!
xo,
s
Colleen P. says
Ya know…I really don’t think that it does look more disastrous. It doesn’t have all the different color, texture and tile screaming for attention any more. It looks like a project finally ready to get going.
Karena says
I honestly think the ‘after’ looks better than before. However, we are constantly living in a remodeling zone, so you learn to appreciate the look of progress.
We (and by that I mean my husband) had our own fun with cement board. We are in the process of redoing our fireplace. The cement board was adhered to the brick with glue and screws. Then, the tedious process of ‘laying’ carrera marble subway tiles was started. In order for it to look the best, he has been working top to bottom on the sides of the fireplace. This means making sure that each row is level and somewhat somewhat dry before moving on to the next row. I believe that he is not-so-silently cursing my design choice.
I played the supportive roll by keeping our 14-month-old son out of the mastic. :)
Evia says
Hey John – Christmas idea for Sherry. Didn’t see a better way to let you know. So Sherry, quit reading now!!
Saw on Zulily today a silver wire bee cuff (bracelet). $17.99, original price $44. It would “bee” perfect!!
Evia
YoungHouseLove says
Thanks Evia!
-John